
VME 9309 TS - Car radio AUDIOVOX - Free user manual and instructions
Find the device manual for free VME 9309 TS AUDIOVOX in PDF.


| Product Type | Car Stereo with CD/MP3/WMA playback |
| Brand | Audiovox |
| Model | VME 9309 TS |
| Dimensions (W x H x D) | 7 x 2 x 6 inches (178 x 50 x 152 mm) |
| Weight | 2.2 lbs (1 kg) |
| Power Supply | 12V DC (negative ground) |
| Maximum Power Output | 4 x 50 Watts |
| RMS Power Output | 4 x 22 Watts |
| Supported Media | CD, CD-R, CD-RW, MP3, WMA |
| Radio Bands | AM/FM with RDS |
| Preset Stations | 30 (18 FM, 12 AM) |
| Display Type | LCD with variable color illumination |
| Audio Features | Built-in EQ (preset and customizable), bass/treble control, subwoofer output |
| Connectivity | Front USB, AUX input, rear RCA outputs |
| Remote Control | Included (wired or IR) |
| Steering Wheel Control Compatible | Yes (requires adapter) |
| Maintenance | Clean faceplate with soft dry cloth; avoid liquids |
| Safety | Fuse protection (10A); detachable faceplate for theft deterrence |
| Spare Parts & Repairability | Fuse, wiring harness, remote control available; professional installation recommended |
| General Information | Designed for single-DIN dashboard installation; includes mounting sleeve, trim ring |
Frequently Asked Questions - VME 9309 TS AUDIOVOX
User questions about VME 9309 TS AUDIOVOX
0 question about this device. Answer the ones you know or ask your own.
Ask a new question about this device
Download the instructions for your Car radio in PDF format for free! Find your manual VME 9309 TS - AUDIOVOX and take your electronic device back in hand. On this page are published all the documents necessary for the use of your device. VME 9309 TS by AUDIOVOX.
USER MANUAL VME 9309 TS AUDIOVOX
natural_image
Line drawing of two electronic devices labeled 'PREPARE RADIO' (no text on device body)FERNBEDIENUNG
natural_image
Two mechanical components with circular holes and curved ends, no text or symbols visibleCINEMA
* CVBS - Composite Video Baseband Signal
General Sub Menu Features
| Setting | Options | Function |
| Clock Mode | 12Hr | Clock displays 12 hour time using AM and PM. |
| 24Hr | Clock displays 24 hour time up to 23:59. | |
| Clock | (HH:MM) | Clock appears in the top right corner of the screen and on the LCD screen during certain operations. NOTE: The AM/PM indication will change as you continue to adjust the hour past 12. |
| Tuner Region | USA | • AM Frequency Spacing - 10kHz• AM Frequency Band - 530kHz~1720kHz• FM Frequency Spacing - 200kHz• FM Frequency Band - 87.5MHz~107.9MHz |
| S.Amer1 | • AM Frequency Spacing - 10kHz• AM Frequency Band - 530kHz~1720kHz• FM Frequency Spacing - 100kHz• FM Frequency Band - 87.5MHz~108.0MHz | |
| Arabia | • AM Frequency Spacing - 9kHz• AM Frequency Band - 531kHz~1620kHz• FM Frequency Spacing - 100kHz• FM Frequency Band - 87.5MHz~108.0MHz | |
| China | • AM Frequency Spacing - 9kHz• AM Frequency Band - 522kHz~1620kHz• FM Frequency Spacing - 100kHz• FM Frequency Band - 87.5MHz~108.0MHz | |
| S. Amer2 | • AM Frequency Spacing - 5kHz• AM Frequency Band - 520kHz~1600kHz• FM Frequency Spacing - 100kHz• FM Frequency Band - 87.5MHz~108.0MHz | |
| Europe | • AM Frequency Spacing - 9kHz• AM Frequency Band - 522kHz~1620kHz• FM Frequency Spacing - 50kHz• FM Frequency Band - 87.5MHz~108.0MHz |
| Setting | Options | Function |
| Korea | AM Frequency Spacing - 9kHzAM Frequency Band - 531kHz~1602kHzFM Frequency Spacing - 200kHzFM Frequency Band - 88.1MHz~107.9MHz | |
| Beep | On | When turned on, an audible beep tone confirms each function selection. |
| Off | No beep sounds. |
| Obstruction Self Protection OPEN | Button Pressed Power Reconnected | |
| Monitor loading out horizontally Unit | Unit stops at obstruction point Monitor fully extended horizontally | Monitor is automatically loaded into unit |
| Monitor loading in horizontally Unit | stops at obstruction point Monitor fully extended horizontally | Monitor is automatically loaded into unit |
| Monitor loading out horizontally | Unit stops at obstruction point Monitor swivels back to the unit | Monitor swivels back to the unit |
| Monitor loading in horizontally | Unit stops at obstruction point Monitor swivels back to the unit | Monitor swivels back to the unit |
Remote Control Direct Entry
Table 5: Disc Properties
| Symbol | 12cm Disc Properties | Max Play Time |
 | Single side single layer (DVD-5)Single side double layer (DVD-9)Double side single layer (DVD-10)Double side double layer (DVD-18) | (MPEG 2Method)133 minutes242 minutes266 minutes484 minutes |
 | Single side single layer (VCD) | (MPEG 1Method)74 minutes |
 | Single side single layer | 74 minutes |
Table 6: Disc Symbols
| Symbol | Meaning |
 | Number of voice languages recorded. The number inside the icon indicates the number of languages on the disc (maximum of 8). |
 | Number of subtitle languages available on the disc (maximum of 32). |
 | Number of angles provided (maximum of 9). |
 LB LB | Aspect ratios available. "LB" stands for Letter Box and "PS" stands for Pan/Scan. In the example on the left, the 16:9 video can be converted to Letter Box video. |
 | Indicates the region code where the disc can be played.• Region 1: USA, Canada, East Pacific Ocean Islands• Region 2: Japan, Western Europe, Northern Europe, Egypt, South Africa, Middle East• Region 3: Taiwan, Hong Kong, South Korea, Thailand, Indonesia, South-East Asia• Region 4: Australia, New Zealand, Middle and South America, South Pacific Ocean Islands/Oceania• Region 5: Russia, Mongolia, India, Middle Asia, Eastern Europe, North Korea, North Africa, North-West Asia• Region 6: Mainland China• ALL: All regions |
DVD/CD AUDIO-BETRIEB
Thank you for choosing a Audiovox product. We hope you will find the instructions in this owner's manual clear and easy to follow. If you take a few minutes to look through it, you'll learn how to use all the features of your new Audiovox VME 9309TS Mobile Multimedia Receiver for maximum enjoyment.
Preparation 3
Optional Equipment 4
Warning 4
Installation 5
Wiring Diagram 7
Controls and Indicators 8
Remote Control 10
Using the TFT Monitor 13
Operating Instructions 15
Setup Menu 16
Tuner Operation 20
DVD/VCD Video Operation 23
DVD/CD Audio Operation 29
MP3/USB/WMA/Operation 31
Troubleshooting 32
Care and Maintenance 34
Specifications 35
Warranty Card
PREPARATION
Congratulations on your purchase of the Audiovox VME 9309TS Mobile Multimedia Receiver. It's a good idea to read all of the instructions before beginning the installation. We recommend having your Audiovox VME 9309TS installed by a reputable installation shop.
Features
DVD
- Aspect Ratio - Cinema, Normal and OFF (Standby)
- Fast Forward, Fast Reverse - 2X, 4X, 8x and 32X
- Slow Forward, Slow Reverse - 2X, 4X, 8x and 32X
- Play, Pause, Stop, Next Chapter and Previous Chapter
CD / MP3 / WMA
• CD-Text Compatible
• ID3 Tag Compatible
- Directory Search (MP3 / WMA Only)
- Direct Track Access via Remote control
- Burn Up To 1500 MP3 and WMA Files onto a DVD+R /RW
• Audible Forward / Reverse Track Search
• Random, Repeat and Intro
- Play, Pause, Stop, Next Track and Previous Track
AM-FM-RDS
• USA/Europe/Latin America/Asia Frequency Spacing
• 30 Station Presets (18 FM, 12 AM)
• Auto Stereo/Mono
- Local/Distance
• Auto Store/Preview Scan
• RDS (Radio Data System)
Chassis
• 1.0 DIN (Import / ISO-DIN Mountable)
- Motorized Flip-Out / Flip-Up LCD Screen
• 8 Character / Segment Type Secondary LCD Display
- 7" TFT Active Matrix LCD w/ Anti-Glare Coating
• 336,960 Sub Pixels (1440W X 234H)
- Pixel Pitch - 0.321W X 0.370H
- Screen Tilt
- Beep Tone Confirmation (On-OFF Option)
• Heat Management System - Forced Air Cooling to keep the chip sets operating at nominal temperatures
• USB 1.0 (500 mA max.)
General
• Navigation Ready (NAV101 or NAV102)
• 44-Key Infrared Remote Control
• One Composite Video Output for Additional Screens
• One Audio / Video Auxiliary Input for Game Console, Camcorder, Navigation, etc.
• Three-Band Tone control (Bass, Mid and Treble) w/ seven Preset EQ Curves
- Front, Rear and Subwoofer Line Output
- Subwoofer Phase Control - 0 \~ 180 degrees
- Programmable Volume Control
- Rear Camera Input (Normal and Mirror Image View)
- Touch Screen Calibration Mode
• 100-Ohm Preamp Line Output - All Audio Channels
• 2VRMS Line Output - All Channels
• Rotary Encoder Audio Control
Optional Equipment
• NAV101/NAV102
The VME 9309TS is "navigation ready." Before accessing any navigation features, you must purchase and install the NAV module. All installation and operating instructions will be included with the NAV navigation module. Once the NAV is connected and operating properly, the NAV source mode will become active. While the NAV is not installed, the NAV option appears gray, indicating the function is not available.
- Rear Camera
The VME 9309TS is "camera ready." Before accessing any camera features, you must purchase and install a rear video camera. Once the rear camera is connected and operating properly, the CAMERA source mode will become active. While the camera is not installed, the CAMERA option appears gray, indicating the function is not available.
Tools and Supplies
You will need these tools and supplies to install your VME 9309TS:
- Torx type, flat-head and Philips screwdrivers
- Wire cutters and strippers
- Tools to remove existing radio (screwdriver, socket wrench set or other tools)
- Electrical tape
- Crimping tool
• Volt meter/test light - Crimp connections
• 18 gauge wire for power connections
• 16 – 18 gauge speaker wire
Disconnecting the Battery
To prevent a short circuit, be sure to turn off the ignition and remove the negative (-) battery cable prior to installation.
NOTE:
If the VME 9309TS is to be installed in a car equipped with an on-board drive or navigation computer, do not disconnect the battery cable. If the cable is disconnected, the computer memory may be lost. Under these conditions, use extra caution during installation to avoid causing a short circuit.
WARNING! Only connect the unit to a12-volt power supply with proper grounding.
WARNING! Never install this unit where operation and viewing could interfere with safe driving conditions.
WARNING! To reduce the risk of a traffic accident (except when using for rear view video camera) never use the video display function while driving the vehicle. This is a violation of federal law.
WARNING! Never disassemble or adjust the unit.
WARNING! To prevent injury from shock or fire, never expose this unit to moisture or water.
WARNING! Never use irregular discs.
WARNING! To prevent damage to the mechanism inside this unit, avoid impact to the TFT monitor.
WARNING! Using an improper fuse may cause damage to the unit and result in a fire.
WARNING! The monitor employs an automatic motorized mechanism. To prevent damage to the core mechanism, please do not push, pull or swivel the monitor manually.
INSTALLATION
Pre-installation
- Press the metal levers on both sides to remove the halfsleeve from the radio.

natural_image
Line drawing of two electronic devices labeled 'PREPARE RADIO' (no text or symbols on the devices themselves)- Install the half-sleeve.
a. Install adapter if necessary (optional).
b. Install half-sleeve into adapter or dashboard (use only the supplied screws). Do not force the sleeve into the opening or cause it to bend or bow.
c. Locate the series of bend-tabs along the top, bottom and sides of the mounting sleeve. With the sleeve fully inserted into the dashboard opening, bend as many of the tabs outward as necessary so that the sleeve is firmly secured to the dashboard.
d. Install support strap to make the unit more stable.

CAUTION! Be careful not to damage the car wiring.
- Place the radio in front of the dashboard opening so the wiring can be brought through the mounting sleeve.
Wiring
Complete wiring as illustrated in the wiring diagram on page 8. Once the wiring is complete, reconnect the battery negative terminal. If there is no ACC available, connect the ACC lead to the power supply with a switch.
NOTE:
When replacing a fuse, be sure to use correct type and amperage to avoid damaging the radio. The VME 9309TS uses one 15 amp mini-ATM fuse, located in the black filter box in-line with the main wire harness.
Final Installation
After completing the wiring connections, turn the unit on to confirm operation (ignition switch must be on). If unit does not operate, recheck all wiring until problem is corrected. Once proper operation is achieved, turn off the ignition switch and proceed with final mounting of the chassis.
- Connect wiring adapter to existing wiring harness.
- Connect antenna lead.
- Carefully slide the radio into the half-sleeve, making sure it is right-side-up, until it is fully seated and the spring clips lock it into place.
NOTE:
For proper operation of the CD/DVD player, the chassis must be mounted within 20° of horizontal. Make sure the unit is mounted within this limitation.
- Attach one end of the perforated support strap (supplied) to the screw stud on the rear of the chassis using the hex nut provided. Fasten the other end of the perforated strap to a secure part of the dashboard either above or below the radio using the screw and hex nut provided. Bend the strap to position it as necessary.
CAUTION! The rear of the radio must be supported with he strap to prevent damage to the dashboard from the weight of the radio or improper operation due to vibration.
- Replace any items you removed from the dashboard.

Final ISO-DIN Installation
- Remove trim ring.
- Mount factory brackets on new radio using existing screws from old radio.
- Slide radio chassis into dash opening and secure.
- Reinstall dash panel.
FINAL ISO-DIN INSTALLATION

Wiring Diagram
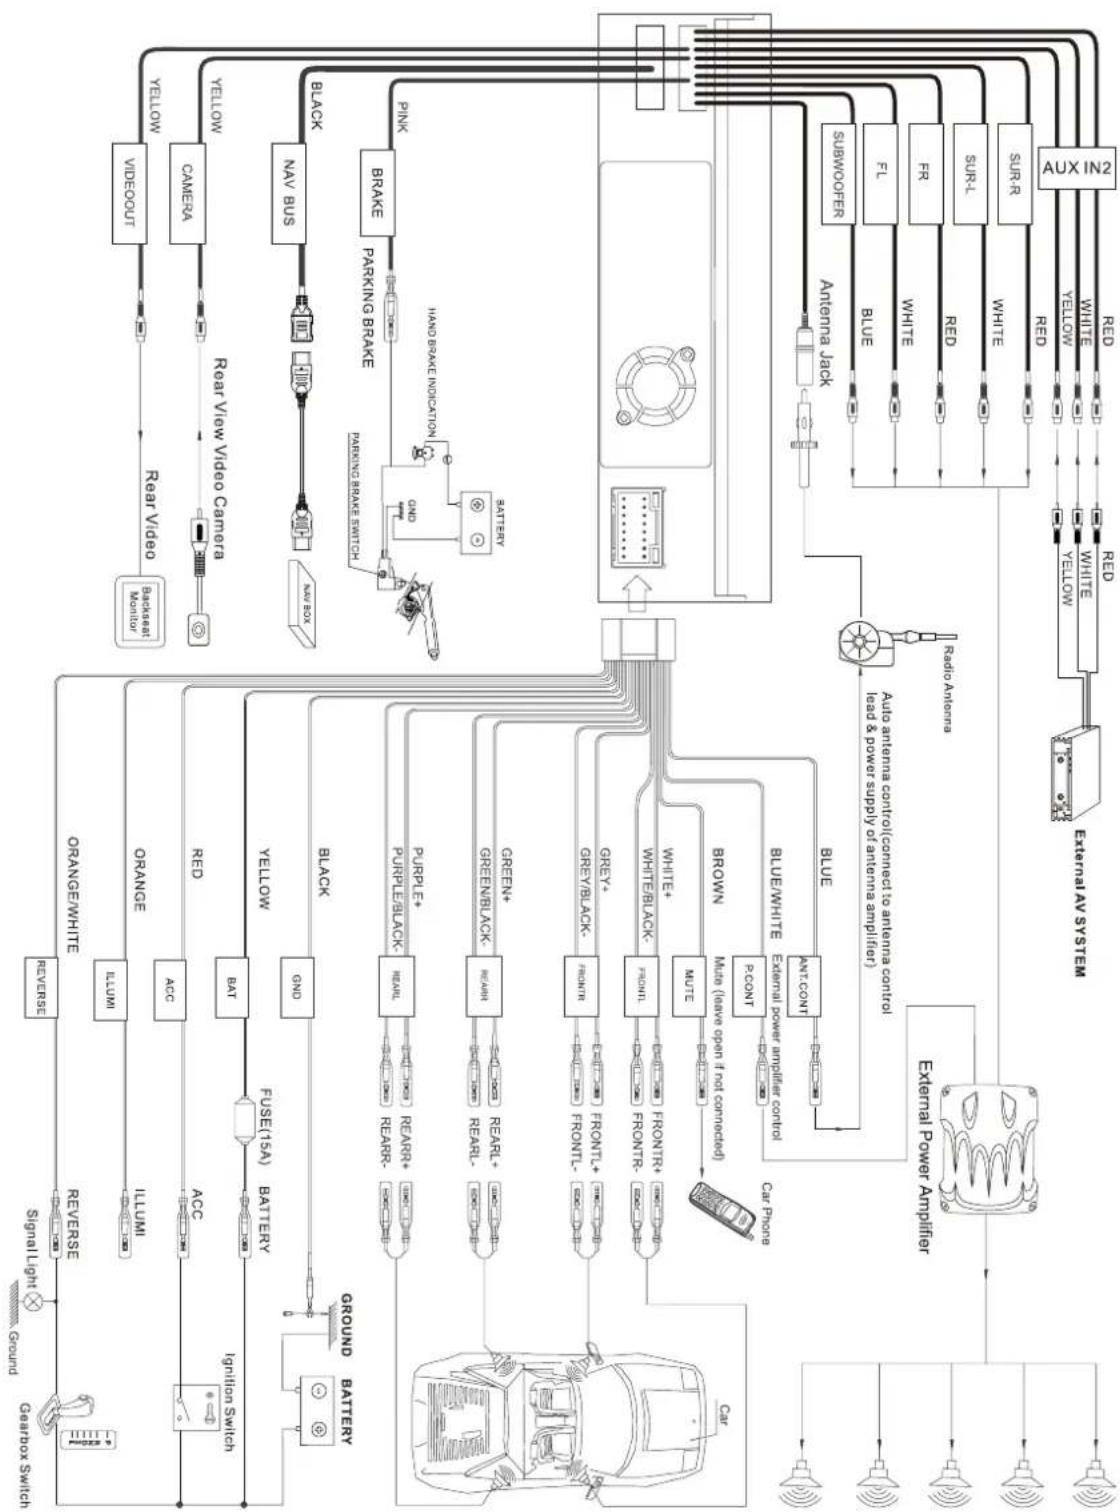
flowchart
graph TD
    A["Car"] --> B["Exterral Power Amplifier"]
    A --> C["Ground"]
    A --> D["Radio Andhraure"]
    A --> E["Yellow"]
    A --> F["White"]
    A --> G["Red"]
    A --> H["SunR"]
    A --> I["SURL"]
    A --> J["FNTR"]
    A --> K["FR"]
    A --> L["Blue"]
    A --> M["Autenna Jack"]
    A --> N["AUX IN2"]
    O["Car Floor"] --> P["Pump/BLACK"]
    O --> Q["Pump/BLACK+"]
    O --> R["Pump/BLACK-"]
    S["Car Battery"] --> T["BAT"]
    S --> U["BLACK"]
    S --> V["RED"]
    S --> W["AGC"]
    X["Exterral AV System"] --> Y["Radio Andhraure"]
    X --> Z["Yellow"]
    X --> AA["White"]
    X --> AB["Red"]
    AC["Auto antenna control (connected to antenna control lead a power supply of antenna amplifier)"] --> AD["BRDOWN"]
    AE["Car Floor"] --> AF["Pump/BLACK"]
    AE --> AG["Pump/BLACK-"]
    AE --> AH["Pump/BLACK-"]
    AI["CAR Battery"] --> AJ["BAT"]
    AI --> AK["BLACK"]
    AI --> AL["RED"]
    AM["Exterral Power Amplifier"] --> AN["Pump/BLACK"]
    AM --> AO["Pump/BLACK-"]
    AM --> AP["Pump/BLACK-"]
    AQ["CAR Battery"] --> AR["BAT"]
    AQ --> AS["BLACK"]
    AQ --> AT["Pump/BLACK"]
    AU["Exterral Power Amplifier"] --> AV["Pump/BLACK"]
    AU --> AW["Pump/BLACK-"]
    AU --> AX["Pump/BLACK-"]
    AY["External Air Condition"] --> AZ["Pump/BLACK"]
    BA["External Power Amplifier"] --> BB["Pump/BLACK"]
    BC["Auto antenna control (connected to antenna control lead a power supply of antenna amplifier)"] --> BD["Pump/BLACK"]
    BE["Auto antenna control (connected to antenna control lead a power supply of antenna amplifier)"] --> BF["Pump/BLACK"]
    BG["Auto antenna control (connected to antenna control lead a power supply of antenna amplifier)"] --> BH["Pump/BLACK"]
Subject to technical changes
CONTROLS AND INDICATORS
Button Operation
- OPEN/CLOSE
Press to activate the automatic mechanical system and move the TFT monitor into viewing position. Press again to close the TFT.
2. WIDE/NAV/DISP
When the monitor is retracted the station search function is started in the direction of lower frequencies by pressing button . If button is pressed briefly when the monitor is extended, the image switches between Full and Standby mode for the monitor. If button is pressed and held, the optionally available navigation module appears and the audio stream from the previously selected source keeps playing in the background. The touch screen operation for the navigation interface is inactive in this "MIX" mode. In order to be able to execute TS settings you will need to switch off the "MIX" mode by pressing and holding button again.
3. ▶ | / TILT
When the monitor is retracted the station search function is started in the direction of higher frequencies by pressing ▶.
Pressing the TILT button when the monitor is extended activates the angular adjustment function of the monitor, which can be adapted to requirements by using the volume controller.
4. BAND/PIC
When the monitor is retracted you can switch between FM 1/2/3 and AM1/2 by pressing the BAND button.
When the monitor is extended the brightness and contrast settings can be adjusted by pressing the PIC button.
5. AUDIO/LO/DX
Rotate to adjust the volume. Press and release to enter and/or confirm audio settings. Press and hold to activate the Local (LOC) setting.
6. SRC
Briefly pressing the SRC button switches on the device. The device is switched off by pressing and holding the SRC button. Briefly pressing the SRC button while the device is switched on and the monitor is retracted activates the source selection function, which appears on the small display. Press this button again repeatedly to alternate between the various sources. The source indicated on the display is selected after 3 seconds. Pressing the SRC button when the monitor is extended displays the source selection menu on the screen, where you are then able to make your selection via the touch screen function.
7. LCD Display
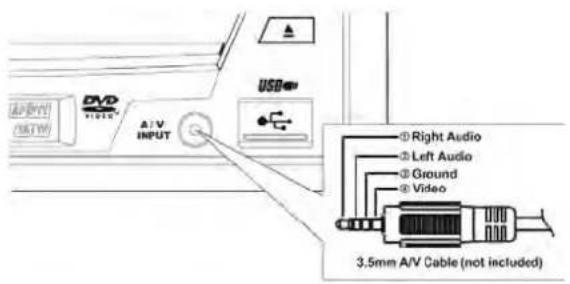
8. FRONT AV INPUT
The front audio/video input function can be selected via the source selection menu (AUX1).
You can connect portable media devices to this input. For details of the connector assignment please refer to page 9.
9. IR Remote Control Receiver
10. RESET
Press to reset system settings to factory default (except the password and parental lock setting).
11.()
Press once for disc insertion/ejection. Press and hold to reset core mechanism position.
12. TFT Display
13. USB connection
Front USB input including "slidable" cover. The USB input can accommodate standard USB media devices that do not exceed a maximum amperage of 500 mA. Audio and video formats can be played back via this input.
Connectable media include e.g. MP3 players, USB sticks and cameras (provided that these cameras save images in JPEG format).
14. DISP
In the CD/DVD mode the DISP (Display) button activates the upper status line which includes additional information relating to the disc, such as the track number and running time.
GB

Subject to technical changes
REMOTE CONTROL

NOTE: Your remote control may differ slightly from the one pictured here. The above diagram is for illustrative purposes only.
| Name: Ref. No. | ||||||
| DVD VCD TUNER CD/MP3 USB | ||||||
| MENU | 1 | Open Route Menu Disc | ||||
| TITLE | 2 | Open Title Menu Disc | ||||
| MUTE | 3 | Mute audio signal | Mute audio signal | Mute audio signal | Mute audio signal | Mute audio signal |
| POWER | 4 | Power the unit ON/ OFF | Power the unit ON/ OFF | Power the unit ON/ OFF | Power the unit ON/ OFF | Power the unit ON/ OFF |
| AUDIO | 5 | Change Audio language of disc playback | ||||
| REPT A-B | 6 | Repeat from time frame A to B | ||||
| REPT | 7 | Repeat of the current chapter | Repeat Single/ Folder/ Off | |||
| SRC | 8 | Select Source | Select Source | Select Source | Select Source | Select Source |
| SUBTITLE | 9 | Select subtitle language | ||||
| DISP | 10 | Show playback information/ Clear entry in direct access mode | ||||
| PRESET | 11 | Enlarge picture at DVD/DivX or Picture | ||||
| PRESET | 12 | Reduce picture at DVD/DivX or Picture | ||||
| ANGLE | 13 | |||||
| FFW | 14 | Fast forward | Update title list page up | |||
| VOL - | 15 | Decrease volumen | Decrease volumen | Decrease volumen | Decrease volumen | Decrease volumen |
| VOL + | 16 | Increase volumen | Increase volumen | Increase volumen | Increase volumen | Increase volumen |
| Track back | 17 | Track back | Select previous track for playback | |||
| Enter | 18 | Start/ Stop playback/ Enter | Start/ Pause playback | |||
| Track forward | 19 | Track forward | Select next track for playback | |||
| BAND | 20 | Stop playback | Stop playback | |||
| GOTO | 21 | Activate direct access mode | ||||
| Rewind | 22 | Fast rewind | Update title list page down | |||
| ZOOM | 23 | Zoom IN/ OUT | ||||
| PIC | 24 | Brightness and Contrast adjustment | Brightness and Contrast adjustment | Brightness and Contrast adjustment | Brightness and Contrast adjustment | Brightness and Contrast adjustment |
| OPEN/CLOSE | 25 | TFT Monitor IN/ OUT | TFT Monitor IN/ OUT | TFT Monitor IN/ OUT | TFT Monitor IN/ OUT | TFT Monitor IN/ OUT |
| TILT | 26 | Monitor angle decreasement | Monitor angle decreasement | Monitor angle decreasement | Monitor angle decreasement | Monitor angle decreasement |
| TILT | 27 | Monitor angle increasement | Monitor angle increasement | Monitor angle increasement | Monitor angle increasement | Monitor angle increasement |
| WIDE | 28 | Picture: CINEMA,NORMAL or Stand By | Picture: Cinema or Standby | |||
| 1,2,3,4,5,6,7, 8,9,0 (Number pad) | 29 | Jump directly to choosen chapter | Direct access to selected track | |||
| CLEAR | 30 | Delete entrys or leave to avoid errors | Delete entrys or leave to avoid errors | Delete entrys or leave to avoid errors | Delete entrys or leave to avoid errors | Delete entrys or leave to avoid errors |
| SETUP | 31 | Display SETUP menu | Display SETUP menu | Display SETUP menu | Display SETUP menu | Display SETUP menu |
| SEL | 32 | Open EQ menu | Open EQ menu | Open EQ menu | Open EQ menu | Open EQ menu |
| RDM | 33 | Playback all chapter in random order | Playback all tracks in random order | |||
| SCN | 34 | |||||
| EJECT | 35 | Eject disc | Eject disc | Eject disc | Eject disc | Eject disc |
Subject to technical changes
USING THE TFT MONITOR
Open/Close TFT Monitor
Open TFT Monitor
Press the OPEN button (1) on the front panel or press the (▲) button (25) on the remote control to activate the mechanism that moves the display panel into the viewing position.
Close TFT Monitor
Press the OPEN button (1) on the front panel or press the (▲) button (25) on the remote control to load the display panel back into the compartment.
TFT Monitor Auto Open
If "TFT Auto Open" is "on" when the unit is turned on, the monitor automatically moves to the viewing position.
If "TFT Auto Open" is "off" when the unit is turned on, press the OPEN button (1) or (2) button (25) on the remote control to move the monitor into the viewing position.
If "TFT Auto Open" is set to "Manual", the TFT will not close when the key is turned off.
Monitor Tilt Angle Adjustment
A known characteristic of LCD panels is the quality of the display in relationship to the viewing angle. The monitor angle can be adjusted for optimum viewing using one of the following methods:
Press the Tilt buttom to activate the Tilt function (a yellow symbol appear at the right top corner of the screen).
Step by Step Angle Adjustment
Press the ∧ or ∨ button on the remote control to adjust the tilt angle of the screen one step at a time.
Continuous Angle Adjustment
Press and hold the ∧ or ∨ button on the remote control to adjust the tilt angle in a continuous motion.
The angle adjustment can be adjusted by the right joystick up and down.
Aspect Ratio
Press the WIDE button (28) on the remote control or WIDE/NAV button (2) on the monitor to adjust the aspect ratio as follows:

natural_image
Two mechanical components with circular holes and curved arrows indicating motion (no text or symbols)FULL
The entire screen is extended horizontally to the aspect ratio of 16 to 9. The extension ratio is the same at any point.
NORMAL
The conventional display image has a 4 to 3 ratio of horizontal to vertical, leaving a blank area on the right and left sides of the display.
STANDBY
Screen becomes black. Touch screen to resume.
Parameter Adjustment Procedure
- Enter Picture Quality Setting Mode:
Press the PIC button (24) on the remote control or the BAND/PC button (4) on the monitor.
- Select Item to Set:
Press the AUDIO button (5) on the control panel to select "BRIGHT" or "CONTRAST".
- Set Parameters:
Press the +/- buttons (15, 16) on the remote or turn the rotary encoder (5) on the control panel.
- Exit Picture Quality Setting Mode:
Press the PIC button (24) on the remote control or the BAND/PIC button (4) on the monitor
Table 2: Video Output Modes
| Playing Source Video Output Modes | |
| AM/FM TUNER RGB Mode | |
| DISC RGB Mode | |
| AUX 1 + 2 CVBS Mode | |
| NAV RGB Mode | |
| CAMERA CVBS Mode |
* CVBS - Composite Video Baseband Signal
Parking Brake Inhibit
- When the "PRK SW" cable is connected to the brake switch, the display on the TFT monitor will display video only when the vehicle is applied.
- Parking brake function is overridden when the video source is set to CAMERA.
- When the parking brake inhibit is active, the front monitor displays "Parking Is On", preventing the driver from watching content while driving.
Rear video screens are not affected.
Mute
Press the MUTE button on the front panel (6) or remote control (3) to mute the volume from the unit. Press the MUTE button again to restore the volume. "MUTE" is displayed on the LCD. Adjusting the volume or using any of the audio setup features cancels the mute function. External peripheral devices can be connected to this unit via RCA output or MediaLink. Select "AUX" mode to access and control connected auxiliary devices.
Monitor Movement Mechanism
If an obstruction occurs in the monitor path, the following protective measurements can be executed to prevent damage to the mechanism or monitor:
After the protective procedure is executed, normal operation is resumed by pressing the OPEN button (1) or disconnecting and reconnecting the power.
| Obstruction Self Protection OPEN | Button Pressed Power Reconnected | |
| Monitor loading out horizontally Unit stops at obstruction point Monitor fully extended horizontally | Monitor is automatically loaded into unit | |
| Monitor loading in horizontally Unit stops at obstruction point Monitor fully extended horizontally | Monitor is automatically loaded into unit | |
| Monitor loading out horizontally Unit stops at obstruction point Monitor swivels back to the unit | Monitor swivels back to the unit | |
| Monitor loading in horizontally Unit stops at obstruction point Monitor swivels back to the unit | Monitor swivels back to the unit | |
Table 3: Monitor Protective Measures
OPERATING INSTRUCTIONS
Power On / Off
Press the ⏻/SRC button (6) on the unit (or the ⏻/ POWER button (4) on the remote control) to turn the unit on. The buttons on the front of the unit light up and the current mode status appears in the LCD (7). You can also turn on the unit by pressing the OPEN button (1) and opening the TFT screen.
Press and hold the ⏻ button to power off the unit. The monitor is drawn back into the main compartment.
Audible Beep Confirmation
An audible beep tone confirms each function selection. The Beep tone can be disabled through the Setup menu.
Playing Source Selection
Press the SRC button (6) on the front panel or the SRC button (8) on the remote to change between available playing sources in the following order: AM/FM/RDS, DISC, AUX1, AUX2 and CAMERA (Navigation can be selected if connected). The playing mode is displayed on the TFT and LCD screens.
Volume Adjustment
To increase or decrease the volume level, turn the rotary encoder (5) on the front panel or press the VOL+/VOL buttons (15, 16) on the remote control. When the volume level reaches "0" or "40", a beep sounds, indicating that the adjustment limit has been reached. The volume ranges from "0" to "40". The LCD or TFT screen displays the volume level for 3 seconds.
Audio Control Menu
The Audio Control feature allows you to easily adjust your audio system to meet the acoustical characteristics of your vehicle, which vary depending on the type of vehicle and its measurements. Proper setting of the Fader and Balance boosts the effects of the cabin equalizer. Press the AUDIO button (5) on the front panel once to display the audio menu. To adjust an audio feature:
| Function Adjustment option | ||
| EQ User | Adjustment of Bass/Mid/Treble separately available | |
| Rock | By push at the “EQ”-field you can choose between the pre adjusted EQ’s | |
| Hip Hop | ||
| Dance | ||
| Latin | ||
| Rave Urban Acoustic | ||
| FAD-BAL By push at the gridfield you can adjust the Fader/Balance accordingly. | ||
NOTE: The EQ mode will automatically change to "USER" when individual EQ bands are adjusted.
The Audio menu will automatically exit after a few seconds of inactivity. To exit quickly, touch the top left corner of the screen or press and hold the AUDIO button (5).
System Reset
To correct a system halt or other illegal operation, use the tip of a pen to press the reset button (10) located on the front bottom-right corner of the unit. After a system reset, the unit restores all factory default settings.

NOTE: If the unit is reset while a DVD is playing, the DVD resumes play once the reset is complete.
Line Mute
If the "MUTE" wire is connected, audio output mutes when a telephone call is received by the car phone or when verbal navigation is performed.
SETUP MENU
To access system settings, press the SETUP button (31) on the remote control or touch the button ✕ on the screen to enter the "SETUP" menu. The "GENERAL" sub-menu appears highlighted in blue.
| SETUP | ||||
| General | Language | Audio | BACK | |
| RDS | Clock Mode | 12Hr | ||
| Rating | Clock | 04:31 AM | ||
| Hardware | Tuner Region | USA | ||
| P.VOL | Beep | On | ||
| TS Cal | ||||
Accessing Menu Items
Touch the sub-menu name to select a sub-menu (Language, Audio, RDS, etc.).
The features available for adjustment under the highlighted sub-menu option will appear in the center of the screen.
Adjusting a Feature
- Use the touchscreen or press the ∧ or V buttons (14, 22) on the remote control to select the feature to be adjusted.
- Enter the option field for the feature you want to adjust by using the touchscreen or pressing the >/|| button (18) on the remote. A submenu appears in a second row with the selected option highlighted in blue.
- Select a new value by using the touchscreen or pressing the >> or << buttons (14, 22) on the remote control.
- Use the touchscreen or press the >/|| button (18) on the remote control to confirm setup.
General Sub Menu Features
| Setting | Options | Function |
| Clock Mode | 12Hr | Clock displays 12 hour time using AM and PM. |
| 24Hr | Clock displays 24 hour time up to 23:59. | |
| Clock | (HH:MM) | Clock appears in the top right corner of the screen and on the LCD screen during certain operations. NOTE: The AM/PM indication will change as you continue to adjust the hour past 12. |
| Tuner Region | USA | • AM Frequency Spacing - 10kHz• AM Frequency Band - 530kHz~1720kHz• FM Frequency Spacing - 200kHz• FM Frequency Band - 87.5MHz~107.9MHz |
| S.Amer1 | • AM Frequency Spacing - 10kHz• AM Frequency Band - 530kHz~1720kHz• FM Frequency Spacing - 100kHz• FM Frequency Band - 87.5MHz~108.0MHz | |
| Arabia | • AM Frequency Spacing - 9kHz• AM Frequency Band - 531kHz~1620kHz• FM Frequency Spacing - 100kHz• FM Frequency Band - 87.5MHz~108.0MHz | |
| China | • AM Frequency Spacing - 9kHz• AM Frequency Band - 522kHz~1620kHz• FM Frequency Spacing - 100kHz• FM Frequency Band - 87.5MHz~108.0MHz | |
| S. Amer2 | • AM Frequency Spacing - 5kHz• AM Frequency Band - 520kHz~1600kHz• FM Frequency Spacing - 100kHz• FM Frequency Band - 87.5MHz~108.0MHz | |
| Europe | • AM Frequency Spacing - 9kHz• AM Frequency Band - 522kHz~1620kHz• FM Frequency Spacing - 50kHz• FM Frequency Band - 87.5MHz~108.0MHz |
| Setting | Options | Function |
| Korea | AM Frequency Spacing - 9kHzAM Frequency Band - 531kHz~1602kHzFM Frequency Spacing - 200kHzFM Frequency Band - 88.1MHz~107.9MHz | |
| Beep | On | When turned on, an audible beep tone confirms each function selection. |
| Off | No beep sounds. |
Language Sub-menu Features
If a DVD supports more than 1 Subtitle or Audio language, all the languages are available for selection during playback. If the selected language is not supported by the DVD, then the default language is used.
| Setting | Options | Function |
| OSD | English | On Screen Display appears in english. |
| German | On Screen Display appears in german. | |
| Italian | On Screen Display appears in italian. | |
| DVD Audio | English | DVD Audio is heard in English when the option is available. |
| German | DVD Audio is heard in German when the option is available. | |
| Italian | DVD Audio is heard in Italian when the option is available. | |
| DVD Subtitle | English | DVD subtitles automatically appear in English when available. |
| German | DVD subtitles automatically appear in German when available. | |
| Italian | DVD subtitles automatically appear in Italian when available. | |
| Off | DVD subtitles do not appear automatically. | |
| Disc Menu | English | DVD menu (if applicable) is displayed in English. |
| German | DVD menu (if applicable) is displayed in German. | |
| Italian | DVD menu (if applicable) is displayed in Italian. |
Audio Sub-menu Features
| Setting | Options | Function |
| Subwoofer | Off | Turn the subwoofer on/off. |
| On |
| Setting | Options | Function |
| Sub.W Phase | 0 | Subwoofer output IN phase |
| 180 | Subwoofer output OUT OF phase | |
| NOTE: Depending on your installation, reversing the sub-woofer phase may increase Bass output. |
| Setting Options Function | ||
| RDS | On | Unit will display Radio Data System information when available. |
| Off | ||
| CT | On | Clock timesupported by RDS |
| Off | Manual Clocktime adjustment | |
| IAVOL Volumen increasement for traffic announcements. | ||
Rating Sub-menu Features
The DVD system has a built-in parental lock feature to prevent unauthorized persons from viewing restricted disc content. By default, the rating system is unlocked. Once setup, the parental lock is released only by entering the correct password. Once the password is entered, rating is available for setup.
The default password is 0000.
| Setting Options Function | ||
| Password Enter a | 4-digit password to activate the "Rating" feature. | |
| Rating 1. Kid Safe | Select the appropriate rating level for the intended audience.You may override higher ratings by using your password. | |
| 2. G | ||
| 3. PG | ||
| 4. PG-13 | ||
| 5. PG-R | ||
| 6. R | ||
| 7. NC-17 | ||
| 8. Adult | ||
| Load Factory Reset Select "Reset" to restore the | ||
To reset the password, access the "RATING" menu and enter the current password. Once the correct password is entered, you can access the "Password" field and enter a new one.
NOTE: Record the password and keep it in a safe place for future reference. The rating for each disc is marked on the disc, disc packing, or documentation. If the rating is not available on the disc, the parental lock feature is unavailable. Some discs restrict only portions of the disc and the appropriate content will play. For details, please refer to the disc description.
Hardware Sub-menu Features
If the rear-view video camera is connected, the unit is on, and the TFT monitor is retracted inside the unit, the TFT monitor automatically moves into the viewing position and Camera mode is selected upon shifting into REVERSE gear. When shifting into DRIVE gear, the TFT monitor is retracted back inside unit.
| Setting Options Function | ||
| Camera In | Normal | |
| Mirror | ||
| TFT Auto Open | On | The TFT panel automatically opens when the unit is turned on. |
| Off | You must press the OPEN button (1) to open the TFT panel. | |
| Manual | When the ignition is turned OFF, the TFT panel DOES NOT retract if it was previously out. | |
If the monitor is in display mode, the monitor automatically switches to CAMERA mode upon reverse driving. When the reverse driving stops, the monitor return to its original input mode.
P.VOL Sub-menu Features
| Setting Options Function | ||
| Source DISC | Choose a sourcefor which you would like to increase the relative volume (LEVEL).Use the +/- buttons to increase relative volume for specified source up to 6 decibels. | |
| RADIO | ||
| AUX 1 | ||
| AUX 2 | ||
| NAV | ||
| USB |
TS Cal (Screen Calibration)
To access the "Screen Calibration" function from the SETUP menu, select the "TS CAL" option.
After entering calibration mode, a crosshair appears in a corner quadrant of the screen. To begin calibration, press and hold the crosshair for one second until it moves to the next quadrant. Continue for each quadrant until the calibration is completed.
Exiting the System Setup Menu
To exit setup mode and resume normal playback, press the SETUP button (31) on the remote control or touch the BACK button on the screen.
TUNER OPERATION
Tuner TFT Display

- Current radio band indicator
- Radio frequency indicator
- Clock
- Stereo broadcasting indicator
- Strong Local signal broadcasting indicator
- Preset radio stations: Touch to recall preset stations
- RDS Information: PS (Program Service), PTY (Program Type), RT (Radio Text)
- Touch for quick access to Equalizer level settings
- Touch to access the direct entry screen
- Current preset station indicator
- |<<: Touch to seek backward
-
|: Touch to seek forward
- √ Touch to tune backward one step
- ✗ Touch to tune forward one step
- BAND: Touch to change between AM/FM bands
- AS: Touch to automatically store stations
- Touch to view the SOURCE MENU and select a new playback source
- MEM: View screen used to enter current channel into preset memory
- 1/2 or 2/2: Touch this page button to view a second page of on-screen buttons
- : ✗ Touch to view the SETUP menu
- PS (Preview Scan): Touch to scan all stations available, stopping for 5 seconds at each and continuing until a station is selected
- LOC: Touch to tune to strong local stations
- PTY: When PTY is pressed, the Program Type categories are listed, allowing listeners to find similar programing by genre. When a PTY category is selected from the touch screen menu, the radio will start scanning for the selected category.
- Indicates the PTY function is activated
- Indicates the RDS function is activated
- TA: (Traffic Announcement) indicator
- TP: (Traffice Program) indicator
- Broadcaster information stored at the preset
Switch to Radio Tuner source
- Touch the top left corner of the screen (the RADIO circle) to view the SOURCE MENU. Touch "Radio".
- Press the SRC button (6) on the front panel or remote control (8) to switch to the AM/FM or RADIO source.
Select FM/AM Band
Touch the BAND button (15) on the screen, or press the BAND button on the unit (4) or remote control (20) to change between the following bands: FM1, FM2, FM3, AM1, and AM2
NOTE: The BAND button on the unit only works when the TFT is closed.
Seek Tuning
To seek the next higher station:
- Touch the >>| button on screen.
- Press the >>| button (19) on remote control.
To seek the next lower station:
- Touch the |<<| button on screen.
- Press the |<< button (17) on the remote control.
Manual Tuning
To increase or decrease the tuning frequency one step:
- Touch the or buttons on screen.
- Press the >> or << buttons (14, 22) on the remote control.
Direct Tuning
To enter a radio station directly, touch the button.

Enter the desired radio station using the on-screen numberpad. Press the enter button (arrow) to tune to the selected station. To exit the screen without changing the station, touch Exit. To clear your entry and start over, touch Clear.
Using Preset Stations
Six numbered preset buttons store and recall stations for each band. All six stored stations (P1-P6) for the current band appear on the screen.
Storing a Station
- Select a band (if needed), then select a station.
- Touch the on-screen MEM button (18) to open the preset screen.
- Touch the preset number in which you would like to store the current station (or press EXIT to cancel and close the menu). The preset number and station appears highlighted.

Recalling and Storing broadcaster using the presets and the Automatic Storing (AS) Function:

Recalling a Station
- Select a band (if needed)
- Touch an on-screen button (P1-P6) to select the corresponding stored station.
Manual Storing of a Station
- Please manual tune to the desired broadcaster (Frequency)
- Push the MEM on-screen button and then select the desired preset (P1-P6)
- The broadcaster will be stored at the selected one
- Instead of the frequency the Program Service ID (i.e. BBC) will be stored
Automatic Storing (AS) of the strongest Stations
- Push the Automatic Storing (AS) on-screen button for 2 seconds
- The VME start scanning the available broadcasters (which take a while)
- Once scanning is finished the 6 strongest ones will be stored at P1-P6
- During Automatic Storing (AS) only the frequencies will be stored at P1-P6 to decrease the scanning/ storing time
- If you now manually select P1- P6, then the PS information will be finally stored for the selected preset (i.e. P2: BBC)
Radio Text message bar
- The Radio Text (RT) information is a part of the RDS signal which is supplied by the broadcaster. This information will be shown at the lower bar (i.e. ABCD)
- Not all broadcaster support this additional information or all the time
Preview Scan (PS)
To scan the AM or FM band for a preview of available stations in your particular area, touch the 1/2 button to access the second screen of menu options touch the PS button (21). Touch again to stop preview scan.
Local Radio Station Seeking (LOC)
When the Local function is on, only radio stations with a strong local radio signal are played. To activate the Local function in AM/FM tuner mode, touch the 1/2 button to access the second screen of menu options, and then touch the onscreen LOC button. Touch the LOC button again to turn Local off. When the Local function is active, the LOC indicator at the top of the screen is illuminated.
NOTE: When properly installed, DVD video cannot be displayed on the main TFT screen unless the parking brake is applied. If you attempt to play a DVD while the vehicle is moving, the TFT screen displays "PARKING" with a blue background. Rear video screens, if applicable, will operate normally.
Opening/Closing the TFT Video Screen
Opening the TFT Screen
To open the TFT video screen, press the OPEN button (1). The unit beeps and then opens.
Closing the TFT Screen
Press the OPEN button (1) again to close the TFT screen. If the screen is in the "IN" position, it moves out before closing.
Insert/Eject Disc
Upon inserting a DVD disc, DVD mode is entered and disc play begins.
NOTE: If Parental Lock (Rating) is activated and the disc inserted is not authorized, the 4-digit code must be entered and/or the disc must be authorized (see "General Sub-menu Features" on page 24).
You cannot insert a disc if there is already a disc in the unit or if the power is off.
NOTE: DVD-R and DVD-RW will not play unless the recording session is finalized and the DVD is closed.
Ejecting a Disc
Press the ▲ button (11) on the unit or remote control (35) to eject the disc. The unit automatically reverts to Tuner mode.
You may eject a disc with the unit powered off. The unit will remain off after the disc is ejected.
Reset the Loading Mechanism
If the disc loads abnormally or an abnormal core mechanism operation occurs, press and hold the ▲ button (11) on the unit or remote control (35) to reset the loading mechanism. Normal operation resumes.
Accessing DVD Mode
To switch to DVD mode when a disc is already inserted, press the SRC button (6) on the front panel or remote control (8) until "DISC" appears at the bottom of the screen.
Controlling Playback

To access the on-screen controls, touch the screen. Touch the 1/2 button to view a second page of controls.
Stopping Playback
Touch the stop button (■) on the screen or press the ■ / BAND button (20) on the remote control to stop DVD play.
Pausing Playback
Touch the pause button (||) on the screen (or press the >/|| button on the remote control) to suspend disc playback. Press the > button on the screen to resume disc playback.
Slow Motion Playback
Press the << button (22) on the remote control or the << button on the screen to play the current title in slow motion. Keep pressing and releasing the button to increase the rate from "2X" to "4X", "8X", and "20X". Press >/|| (18) on the remote control or touch the onscreen play button (>) to resume normal play.
Fast Forward Playback
Press the >> button (14) on the remote control or the >> button on the screen to fast forward. Keep pressing and releasing the button to increase the rate from "2X" to "4X", "8X", and "20X".
Press >/|| (18) on the remote control or touch the onscreen play button (>) to resume normal play.
Repeat Playback
Press the REPT button (7) on the remote control or the ➕ button on screen to alter repeat mode according to the following:
• DVD: Repeat Chapter, Repeat Title, Repeat Off
• VCD (PBC Off): Repeat Single, Repeat Off
NOTE: For VCD play, the repeat function is not available if PBC is on.
Sectional Repeat Function (A-B)
Use the A-B function to define a specific area of a disc to repeat.
- Press the RPT A-B button (6) on the remote control (or the A-B button on screen) to set the start point (A) of the repeated section.
- Press the RPT A-B button again once you reach the desired end point (B) of the repeated section. The selected portion of the DVD will now repeat continuously.
- Press the RPT A-B button again to cancel the A-B section setting and stop repeat play.
NOTE: When a VCD is playing with PBC turned "On", activating random playback automatically turns PBC off.
Random Playback
With a DVD, VCD, or CD playing, press the RDM button (33) on the remote control to activate random playback and play all chapters/tracks in random order. "On" appears on the screen. Press the >>| button (19) on the remote control to play the next random track. Press the RDM button again to turn random play off.
NOTE: When a VCD is playing with PBC turned "On", activating random playback automatically turns PBC off.
Accessing the DVD Menu
Press the MENU button (1) on the remote control to recall the main DVD menu.
Press the TITLE button (2) on the remote control or on screen to select a different title for playback.
Press the >/|| button (18) on the remote control to confirm your selection and begin playback. You can also select a title using the touch screen.
Moving Through Chapters
Press the >>| button (19) on the remote control or the >>| button on screen to advance to the next chapter on the DVD. Press the |<< button (17) on the remote control or the |<< button on screen to move to the previous chapter.
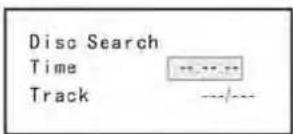
Goto Search
During DVD or VCD playback, perform the following steps to use the GOTO feature to access a specific location on a disc:
-
Press the GOTO button (21) on remote control to enter "GO TO" mode.
-
Press the >> or << buttons (14, 22) on the remote control to select a category (highlighted in blue).
- For DVD mode, you can choose Time or Title/ Chapter search.
- For VCD mode, press the GOTO button to choose between Track Search, Disc Search and Exit.
VCD Track Search

DVD Search
Time - Go to specific time in current title
Title/Chapter - Go to specific time in a chapter
Time - Go to specific time in the current track
Track - Go to specific track

VCD Disc Search
Time - Go to specific time on disc
Track - Go to specific track
Direct Chapter / Track Selection
Remote Control Direct Entry
During DVD, VCD and CD playback, you can use the numeric keypad on the remote control (29) to access a track directly.

- Enter a time into the field using the numeric keypad (29) on the remote control.
- Press the >/|| button (18) on the remote control to go to the specified location on the disc.
- Press the GOTO button again to exit.
Touch Screen Direct Entry
To select a chapter/track directly, touch the button 📁 on screen control to display the direct entry menu.

- Title (Titel): _/#
- Chapter (Kapitel): _/_###
- Time (Zeit): _:_:_:_
Enter the desired chapter/track using the on-screen number pad. Press the enter button (arrow) to tune to the selected station. To exit the screen without changing the station, touch Exit. To clear your entry and start over, touch Clear.
Viewing an Alternate Picture Angle (DVD Only)
Some DVDs contain scenes that have been shot simultaneously from different angles. For discs recorded with multiple angles, press the ANGLE button (13) on the remote control to toggle available angles of the on-screen image.
Zooming
Press the ZOOM button (23) on the remote control to enlarge and pan through the video image using the following options: "Q1", "Q2", "Q3", and "OFF".
Multi-Language Discs (DVD Only)
Changing Audio Language
If you are watching a disc recorded in multiple languages, press the AUDIO button (5) on the remote control to choose a language.
Changing Subtitle Language
If you are watching a disc recorded in multiple languages with subtitles, press the SUBTITLE button (9) on the remote control to choose the language in which you would like the subtitles to appear.
NOTE: During VCD playback, press the AUDIO button (5) on the remote control to choose between Left Channel, Right Channel, and Stereo.
PBC (Play Back Control - VCD Only)
For VCDs with play back functionality, play back control (PBC) provides additional controls for VCD playback.
Press the MENU button (1) on the remote control to toggle the PBC function "On"/"Off". Once PBC is on, playback starts from track one of the play list.
NOTE: When PBC is activated, fast forward, slow playback, and previous/next track are available. Repeat and direct track selection are not available.
When PBC is activated, selecting random, scan, or search playback automatically deactivates PBC.
Playback Information
During DVD and VCD playback, press the DISP button on the control panel (14) or remote control (10) to display playback information on the screen, including the media playing and current playback time.
DVD Playback Information
The following information is displayed at the top of the screen during DVD playback:
- Title: 05/08 – "05/08" indicates the fifth of 8 titles on the DVD is currently playing.
- C : 2/16 - "2 / 16" indicates that the second of 16 titles on the DVD is currently playing.
DVD T:5/8 C:2/16 00:41:28 2/6 Eng
00:41:28 - "00:41:28" indicates the playback time of the current title.
- 2 / 6 Eng – The language display information indicates the second language out of 6 (English) is currently being used.
VCD Playback Information
The following information is displayed at the top of the screen during VCD playback:
• VCD2.0 - Format of current disc.
- T: 6/18 – “6/18” indicates the sixth of 18 tracks on the VCD is currently playing.
VCD2.0 T: 6/18 00:02:18
00:02:18 – “00:02:18” indicates the playback time of the current track.
General Disc Information
Table 5: Disc Properties
| Symbol | 12cm Disc Properties | Max Play Time |
 | Single side single layer (DVD-5) | (MPEG 2 Method) |
| Single side double layer (DVD-9) | 133 minutes | |
 | Double side single layer (DVD-10) | 242 minutes |
| Double side double layer (DVD-18) | 286 minutes | |
| 484 minutes | ||
 | Single side single layer (VCD) | (MPEG 1 Method) |
| 74 minutes | ||
 | Single side single layer | 74 minutes |
Table 6: Disc Symbols
| Symbol | Meaning | |
 | Number of voice languages recorded. The number inside the icon indicates the number of languages on the disc (maximum of 8). | |
| [ZASD] | Number of subtitle languages available on the disc (maximum of 32). | |
 | Number of angles provided (maximum of 9). | |
 | LB | Aspect ratios available. "LB" stands for Letter Box and "PS" stands for Pan/Scan. In the example on the left, the 16:9 video can be converted to Letter Box video. |
 | Indicates the region code where the disc can be played.• Region 1: USA, Canada, East Pacific Ocean Islands• Region 2: Japan, Western Europe, Northern Europe, Egypt, South Africa, Middle East• Region 3: Taiwan, Hong Kong, South Korea, Thailand, Indonesia, South-East Asia• Region 4: Australia, New Zealand, Middle and South America, South Pacific Ocean Islands/Oceania• Region 5: Russia, Mongolia, India, Middle Asia, Eastern Europe, North Korea, North Africa, North-West Asia• Region 6: Mainland China• ALL: All regions | |
 | Regional Coding:Both the DVD-Player and discs are coded by region. These region codes must match in order for the disc to play. If the codes do not match, the disc won't play. This unit's code is 2. DVD's with other region codes cannot be played in this unit. | |
Instructions for TFT control and Insert/Eject are the same for DVD and CD operation. Please see the DVD/Disc Video Operation section for information about these topics. The VME 9309TS will play music or other audio files from the following disc media:
- CD-DA
- CD-R/RW
• DVD
- DVD+R/RW
- DVD-R/RW
Upon inserting a disc with the TFT screen open, the disc and track title (if available), along with the track number and playing time appear on the screen.
CD Player User Interface
The on-screen indicators and touch key areas for CD playback are outlined below.

- Current track and total number of tracks on disc
- Elapsed playing time
- Current time
- Track titles
- Disc title
- Touch to play/pause disc playback
- Touch to stop disc playback
-
|: Touch to move to next track
- |<<: Touch to move to previous track
-
: Touch to fast forward current track
- <<: Touch to rewind current track
- Touch to activate/deactivate Repeat play mode
- Touch to open sub page
- Touch to access the direct entry screen
- : Touch to view the SETUP menu
- Touch for quick access to Equalizer level settings
- Touch to view the SOURCE MENU and select a new playback source
- Touch and slide to show next track or page
- Clock time
Controlling Playback
Stopping Playback
Touch the ■ button on screen or press the ■/BAND button (20) on the remote control to stop disc play.
To resume playback, touch the ▶ button on screen or press the >/|| button on the remote control (18).
Pausing Playback
Touch the ▶ button on screen to suspend or resume disc playback.
Moving Through Tracks
Press the >>| button (19) on the remote control or on screen to advance to the next track on the disc. Press the |<< button (17) on the remote control or on screen to move to the previous track.
Repeat Playback
Touch the ➕ button on screen, press the RPT button on the remote control (7) to alter repeat mode according to the following:
• DVD: Repeat Chapter, Repeat Title, Repeat Off
• CD-DA: Repeat One, Repeat All, Repeat Off
- CD-R/RW: Repeat One, Repeat All, Repeat Off
• DVD-R/RW: Repeat One, Repeat All, Repeat Off
Track Scan Select (CD-DA discs only)
During disc play, press the SCN button on the remote control (34) to play the first 10 seconds of each track. When a desired track is reached, press the SCN button again to cancel the function and play the selected track.
Random Play Select
While disc play is stopped, press the RDM button on the remote control (33) to play the tracks on the disc in a random, shuffled order. Touch the RDM button again to cancel Random Play mode.
NOTE: CD-R and CD-RW will not play unless the recording session is finalized.
Fast Forward/Fast Rewind
Touch the button on screen >> to fast forward and the button << to fast rewind. Keep pressing and releasing the button to increase the rate from "2X" to "4X", "6X", "8X" and "20X"
Direct Track Entry
To select a track directly, touch the button on screen to display the direct entry menu.

Enter the desired track number using the on-screen number pad, and then press the Enter button. To exit the screen without making a selection, touch Exit. To clear your entry and start over, touch Clear.
MP3/USB/WMA-Operation
Instructions for TFT control and Insert/Eject are the same for DVD and MP3 operation. Please see the DVD/Disc Video Operation section for information about these topics.
MP3/WMA Media and File Requirements
This player allows you to play back MP3 and WMA files recorded onto CD-R/RWs, DVD+R/RWs, and DVD-R/RWs. For CD-RW discs, please make sure it is formatted using the full method and not the quick method to prevent illegal disc operation. Up to 1500 songs/files can be burned onto a disc for a MEGA DVD music mix. Do not exceed this number of songs/files or disc readability problems may occur.
MP3 Format Compatibility
The file naming formats listed below are compatible with this unit:
- ISO 9660 – file name: 12 characters, file extension: 3 characters
- ISO 9660 – file name: 31 characters, file extension: 3 characters
• Joliet - 64 characters
If the file or folder name does not conform to ISO 9660 file system standards, it may not be displayed or played back correctly. Use the following settings when compressing audio data for your MP3 disc:
• Transfer Bit Rate: 128kbps
• Sampling Frequency: 48kHz
When recording MP3 up to the maximum disc capacity, disable additional writing. For recording on an empty disc up to maximum disc capacity, use the "Disc at once" setting.
MP3 Playing Order
When selected for play, files and folders (Folder Search, File Search or Folder Select) are accessed in the order they were written by the CD writer. As a result, the order in which they are expected to be played may not match the order in which they are actually played. You may be able to set the order in which MP3/WMA files are to be played by writing them onto a medium such as a CD-R with their file names beginning with play sequence numbers such as "01" to "99". For example, a medium with the following folder/file hierarchy is subject to Folder Search, File Search or Folder Select, as shown below.

flowchart
graph TD
    A["Level 1"] --> B["2"]
    A --> C["3"]
    A --> D["4"]
    A --> E["5"]
    A --> F["6"]
    A --> G["7"]
    A --> H["8"]
    B --> I["Folder"]
    C --> J["File"]
    D --> K["Root"]
    E --> L["Folder"]
    F --> M["File"]
    G --> N["Folder"]
    H --> O["Folder"]
The VME 9309TS player will only recognize three folder levels and does not display folders containing only other folders. In the example above, the unit will display folders 3, 4, 6, and 8, but not 2 and 7 since they do not contain any tracks directly. Folder 5 is not recognized at all since it is at the fourth level.
MP3 User Interface
The on-screen indicators and touch key areas for MP3 playback are outlined below.

-
Current track and total number of tracks on root of disc
-
Elapsed playing time, track length
-
Current time
-
Track titles
-
ID3 information
-
II : Touch to play/pause disc playback
-
DIR-: to previous directory
-
|: Touch to move to next track
-
|<<: Touch to move to previous track
-
↑ / >>: Touch to navigate playlist
-
↓ /<<: Touch to navigate playlist
-
DIR -: Touch to view the previous folder
-
DIR +: Touch to view the next folder
-
Touch to access the direct entry screen
-
Touch to view the SETUP menu
-
Touch for quick access to Equalizer level settings
-
Touch to view the SOURCE MENU and select a new playback source
-
Folder name
-
1/2 or 2/2: ■ Touch to stop disc playback
-
DIR+: to next directory
Controlling Playback
Playing MP3/WMA Files
After inserting a MP3/WMA disc, files will play in the sequence of the "Root" directory.
NOTE: When burning MP3 / WMA files onto a DVD disc, use the 2X or 4X burning option, if available. This slower burning speed will help eliminate buffer errors and increase disc reading reliability. Also, use folders when burning large numbers of songs / files to a disc for easy music navigation. Select the "Disc at Once" option and close your disc.
Stopping Playback
Touch the ■ button on screen or press the ■ / BAND button (20) on the remote control to stop disc playback.
To resume playback, touch the ▶ button on screen or press the >/|| button (18) on the remote control.
Pausing Playback
Touch the ▶ button on screen or press the >/|| button (18) on the remote control to suspend or resume disc playback.
Moving Through Tracks
Press the >>| button (19) on the remote control or on screen or to advance to the next track on the disc. Press the |<< button (17) on the remote control or on screen to move to the previous track.
TROUBLESHOOTING
| Problem | Cause | Corrective |
Act
GENERAL
| Unit will not power on Radio Fuse blown Install new fuse with correct rating | ||
| Car battery fuse blown Install new fuse with correct rating | ||
| Illegal operation Press the RESET button located in the bottom right corner of the front panel | ||
| Remote control does not function Battery depleted Replace battery with new one | ||
| No/low audio output Improper audio output connection Check wiring and correct | ||
| Poor sound quality or distortion | Pirated disc is in use | Use original copy |
| Speaker power rating not compatible with unit | Connect proper speakers | |
| Speaker is shorted | Check speaker contact | |
| Tel-Mute malfunction | “MUTE” wire is grounded | Check that the “MUTE” connection is not grounded and that it’s properly insulated |
| Unit resets itself when engine is off | Incorrect connection between ACC and positive battery wire | Check wiring and correct |
TFT MONITOR
| Monitor does not open automatically | TFT Auto Open is turned off | Turn TFT Auto Open on |
| No image | Incorrect connection to parking brake wire | Check wiring and correct |
| PRK SW is activated, parking brake is not engaged | Stop vehicle in safe place and apply parking brake | |
| Flashing image or interference appears on screen | DVD is not compatible with current TV system settings | Change setup to accommodate disc |
| Improper video signal connections | Check wiring and correct | |
| Prolonged image or improper height/width ratio display | Improper aspect ratio setup | Use correct aspect ratio setting |
| Monitor stops at incorrect position | Moving path is blocked | Press OPEN key to restart monitor movement |
TUNER
| Weak station searching | Auto antenna is not fully extended | Connect the auto antenna control cable properly |
| Auto antenna not properly connected | Connect the auto antenna control cable properly | |
| LOCAL function is activated | Turn LOCAL function Disc does not play back | |
| Disc is warped or scratched | Use disc in good condition | |
| Disc is dirty or wet | Clean disc with soft cloth | |
| Laser pickup is dirty | Clean laser pickup with cleaning disc | |
| Incompatible disc is used | Use compatible disc | |
| Disc rating exceeds Parental Lock rating limit | Change Parental Lock settings to lower restriction | |
| Disc region code is not compatible with unit | Use disc with proper region code | |
| Disc is inserted upside down | Insert disc with label side up |
Image blurred, distorted, or dark Disc is illegally copied Use original disc
PCB cannot be used during VCD playback PCB is not available on the disc
No repeat or searching while playing VCD PCB is on Turn PCB off
MP3
Interruption occurred
during playback Disc is dirty or scratched Clean disc or replace
File is damaged/bad recording Recreate disc with good files
Incorrect playback message
displayed Message is longer than LCD can display
Message Displayed Cause Corrective Action
| Loading Disc is being read | ||
| No Disc Disc is dirty | Clean disc with soft cloth | |
| Disc is upside down | Insert disc with label side up | |
| Disc not present in loading compartment | Insert disc | |
| Bad Disc | Disc is dirty | Clean disc with soft cloth |
| Disc is upside down | Insert disc with label side up | |
| Unknown disc | Disc format is not compatible with this unit | |
| Region Error | DVD is not compatible with region code of unit | |
| Error | Illegal mechanism operation | Press EJECT key for 5 seconds to reset loading mechanism |
Care and Maintenance
- Use only a clean silicone cloth and neutral detergent to clean the front panel or monitor. A rough cloth and nonneutral detergent (such as alcohol) may result in scratching or discoloration.
- Do not get water or cleaning fluids on the unit.
- If the temperature inside the player gets too hot, a protective circuit automatically stops play of the disc. If this occurs, allow the unit to cool before operating the player again.
- Never insert anything other than a 5" (12 cm) compact disc into the player as the mechanism can be damaged by foreign objects.
- Do not attempt to use a 3" (8 cm) CD-Single disc in this unit, either with or without an adaptor, as damage to the player and/or disc may occur. Such damage is not covered by the Warranty on this product.
- The CD player may not operate properly in extreme hot or cold. If such conditions occur, allow the interior of the vehicle to reach a normal temperature before using player.
- When the vehicle warms up during cold weather or under damp conditions, condensation may appear on the LCD panel. Should this occur, the screen will not operate properly until the moisture has evaporated.
- We suggest you use a cleaning disc in this unit more frequently than in the unit in your home due to the environmental conditions of the vehicle.
SPECIFICATIONS
DVD/CD Player
Compatible Disc Media: DVD + R / RW (Single and Dual Layer) and CD-R / RW
Compatible Media Formats: CD-DA, MP3, WMA, VCD, SVCD, AVI, MPEG1 / 2, XviD, DivX and Kodak picture CD (JPEG).
Signal to Noise Ratio: >95dBA
Dynamic Range: >95dB
Frequency Response: 20Hz to 20 kHz, -3dB
Channel Separation: > 60dB @ 1 kHz
D/A Converter: High performance 24-bit / 192 kHz sample rate,
Multi-Bit Sigma-Delta Modulator
Video
Format: NTSC, PAL (auto-detection)
| Output: | 1Vp-p | (75-ohm) |
| Input: | 1Vp-p | (75-ohm) |
FM Tuner
Tuning Range: 87.5MHz - 107.9MHz
Mono Sensitivity (-30dB): 9dBf
Quieting Sensitivity (-50dB): 15dBf
Alternate Channel Selectivity: 70dB
Signal to Noise Ratio @ 1 kHz: 58dB
Image Rejection: 80dB
Stereo Separation @ 1 kHz: >30dB
Frequency Response: 30Hz - 15 kHz, -3dB
AM Tuner
Tuning Range: 530 kHz - 1720 kHz
Sensitivity (-20dB): 15uV
Signal to Noise Ratio @ 1 kHz: 50dB
Image Rejection: 60dB
Frequency Response: 50Hz - 2 kHz, -3dB
Monitor
Screen Size: 7.0" (Measured diagonally), 16:9 Widescreen
6.06" (154.1mm) W X 3.42" (87mm) H
Screen Type: TFT Liquid Crystal Display (LCD) active matrix
Response Time: 30mSec rise time, 50mSec fall time
Resolution:
• 336,960 sub pixels, 1440 (W) X 234 (H)
Viewing angle:
• 65 degrees left or right
- 40 degrees up
- 65 degrees down
General
Auxiliary Input impedance: 10k
Power Supply: 11 to 16VDC, negative ground
Power Antenna (Blue): 500 mA max, current limited protection
USB 1.0 500 mA max. current
VME 9309TS

AUDIOVOX®
natural_image
Line drawing of two electronic devices labeled 'PREPARE RADIO' (no text on device body)CONTROL REMOTO
| Name: Ref. No. | ||||||
| DVD | VCD TUNER CD/MP3 USB | |||||
| MENU | 1 | Open Route Menu Disc | ||||
| TITLE | 2 | Open Title Menu Disc | ||||
| MUTE | 3 | Mute audio signal | Mute audio signal | Mute audio signal | Mute audio signal | Mute audio signal |
| POWER | 4 | Power the unit ON/ OFF | Power the unit ON/ OFF | Power the unit ON/ OFF | Power the unit ON/ OFF | Power the unit ON/ OFF |
| AUDIO | 5 | Change Audio language of disc playback | ||||
| REPT A-B | 6 | Repeat from time frame A to B | ||||
| REPT | 7 | Repeat of the current chapter | Repeat Single/ Folder/ Off | |||
| SRC | 8 | Select Source | Select Source | Select Source | Select Source | Select Source |
| SUBTITLE | 9 | Select subtitle language | ||||
| DISP | 10 | Show playback information/ Clear entry in direct access mode | ||||
| PRESET | 11 | Enlarge picture at DVD/DivX or Picture | ||||
| PRESET | 12 | Reduce picture at DVD/DivX or Picture | ||||
| ANGLE | 13 | |||||
| FFW | 14 | Fast forward | Update title list page up | |||
| VOL - | 15 | Decrease volumen | Decrease volumen | Decrease volumen | Decrease volumen | Decrease volumen |
| VOL + | 16 | Increase volumen | Increase volumen | Increase volumen | Increase volumen | Increase volumen |
| Track back | 17 | Track back | Select previous track for playback | |||
| Enter | 18 | Start/ Stop playback/ Enter | Start/ Pause playback | |||
| Track forward | 19 | Track forward | Select next track for playback | |||
| BAND | 20 | Stop playback | Stop playback | |||
| GOTO | 21 | Activate direct access mode | ||||
| Rewind | 22 | Fast rewind | Update title list page down | |||
| ZOOM | 23 | Zoom IN/ OUT | ||||
| PIC | 24 | Brightness and Contrast adjustment | Brightness and Contrast adjustment | Brightness and Contrast adjustment | Brightness and Contrast adjustment | Brightness and Contrast adjustment |
| OPEN/CLOSE | 25 | TFT Monitor IN/ OUT | TFT Monitor IN/ OUT | TFT Monitor IN/ OUT | TFT Monitor IN/ OUT | TFT Monitor IN/ OUT |
| TILT | 26 | Monitor angle decreasement | Monitor angle decreasement | Monitor angle decreasement | Monitor angle decreasement | Monitor angle decreasement |
| TILT | 27 | Monitor angle increasement | Monitor angle increasement | Monitor angle increasement | Monitor angle increasement | Monitor angle increasement |
| WIDE | 28 | Picture: CINEMA,NORMAL or Stand By | Picture: Cinema or Standby | |||
| 1,2,3,4,5,6,7, 8,9,0 (Number pad) | 29 | Jump directly to chosen chapter | Direct access to selected track | |||
| CLEAR | 30 | Delete entrys or leave to avoid errors | Delete entrys or leave to avoid errors | Delete entrys or leave to avoid errors | Delete entrys or leave to avoid errors | Delete entrys or leave to avoid errors |
| SETUP | 31 | Display SETUP menu | Display SETUP menu | Display SETUP menu | Display SETUP menu | Display SETUP menu |
| SEL | 32 | Open EQ menu | Open EQ menu | Open EQ menu | Open EQ menu | Open EQ menu |
| RDM | 33 | Playback all chapter in random order | Playback all tracks in random order | |||
| SCN | 34 | |||||
| EJECT | 35 | Eject disc | Eject disc | Eject disc | Eject disc | Eject disc |
natural_image
Two mechanical components with circular holes and curved ends, no text or symbols visibleCINEMA
| Function Adjustment option | ||
| EQ User | Adjustment of Bass/Mid/Treble separately available | |
| Rock | By push at the “EQ”-field you can choose between the pre adjusted EQ’s | |
| Hip Hop | ||
| Dance | ||
| Latin | ||
| Rave Urban Acoustic | ||
| FAD-BAL By push at the gridfield you can adjust the Fader/Balance accordingly. | ||
Reinicio de sistema
General Sub Menu Features
| Setting | Options | Function |
| Clock Mode | 12Hr | Clock displays 12 hour time using AM and PM. |
| 24Hr | Clock displays 24 hour time up to 23:59. | |
| Clock | (HH:MM) | Clock appears in the top right corner of the screen and on the LCD screen during certain operations. NOTE: The AM/PM indication will change as you continue to adjust the hour past 12. |
| Tuner Region | USA | • AM Frequency Spacing - 10kHz• AM Frequency Band - 530kHz~1720kHz• FM Frequency Spacing - 200kHz• FM Frequency Band - 87.5MHz~107.9MHz |
| S.Amer1 | • AM Frequency Spacing - 10kHz• AM Frequency Band - 530kHz~1720kHz• FM Frequency Spacing - 100kHz• FM Frequency Band - 87.5MHz~108.0MHz | |
| Arabia | • AM Frequency Spacing - 9kHz• AM Frequency Band - 531kHz~1620kHz• FM Frequency Spacing - 100kHz• FM Frequency Band - 87.5MHz~108.0MHz | |
| China | • AM Frequency Spacing - 9kHz• AM Frequency Band - 522kHz~1620kHz• FM Frequency Spacing - 100kHz• FM Frequency Band - 87.5MHz~108.0MHz | |
| S. Amer2 | • AM Frequency Spacing - 5kHz• AM Frequency Band - 520kHz~1600kHz• FM Frequency Spacing - 100kHz• FM Frequency Band - 87.5MHz~108.0MHz | |
| Europe | • AM Frequency Spacing - 9kHz• AM Frequency Band - 522kHz~1620kHz• FM Frequency Spacing - 50kHz• FM Frequency Band - 87.5MHz~108.0MHz |
| Setting | Options | Function |
| Korea | AM Frequency Spacing - 9kHzAM Frequency Band - 531kHz~1602kHzFM Frequency Spacing - 200kHzFM Frequency Band - 88.1MHz~107.9MHz | |
| Beep | On | When turned on, an audible beep tone confirms each function selection. |
| Off | No beep sounds. |
| Setting | Options | Function |
| Subwoofer | Off | Turn the subwoofer on/off. |
| On |
| Setting | Options | Function |
| Sub.W Phase | 0 | Subwoofer output IN phase |
| 180 | Subwoofer output OUT OF phase | |
| NOTE: Depending on your installation, reversing the sub-woofer phase may increase Bass output. |
| Obstruction Self Protection OPEN | Button Pressed Power Reconnected | |
| Monitor loading out horizontally Unit | Unit stops at obstruction point Monitor fully extended horizontally | Monitor is automatically loaded into unit |
| Monitor loading in horizontally Unit | Stops at obstruction point Monitor fully extended horizontally | Monitor is automatically loaded into unit |
| Monitor loading out horizontally | Unit stops at obstruction point Monitor swivels back to the unit | Monitor swivels back to the unit |
| Monitor loading in horizontally | Unit stops at obstruction point Monitor swivels back to the unit | Monitor swivels back to the unit |
Acceder al modo DVD
Table 5: Disc Properties
| Symbol | 12cm Disc Properties | Max Play Time |
 | Single side single layer (DVD-5)Single side double layer (DVD-9)Double side single layer (DVD-10)Double side double layer (DVD-18) | (MPEG 2Method)133 minutes242 minutes266 minutes484 minutes |
 | Single side single layer (VCD) | (MPEG 1Method)74 minutes |
 | Single side single layer | 74 minutes |
Table 6: Disc Symbols
| Symbol | Meaning |
 | Number of voice languages recorded. The number inside the icon indicates the number of languages on the disc (maximum of 8). |
 | Number of subtitle languages available on the disc (maximum of 32). |
 | Number of angles provided (maximum of 9). |
 LB LB | Aspect ratios available. "LB" stands for Letter Box and "PS" stands for Pan/Scan. In the example on the left, the 16:9 video can be converted to Letter Box video. |
 | Indicates the region code where the disc can be played.• Region 1: USA, Canada, East Pacific Ocean Islands• Region 2: Japan, Western Europe, Northern Europe, Egypt, South Africa, Middle East• Region 3: Taiwan, Hong Kong, South Korea, Thailand, Indonesia, South-East Asia• Region 4: Australia, New Zealand, Middle and South America, South Pacific Ocean Islands/Oceania• Region 5: Russia, Mongolia, India, Middle Asia, Eastern Europe, North Korea, North Africa, North-West Asia• Region 6: Mainland China• ALL: All regions |
USO DE AUDIO DE DVD/CD
GB Congratulations! You have made a wise selection in becoming the owner of a AUDIOVOX Mobile Video equipment. Due to high quality AUDIOVOX products have earned an excellent reputation through the western world. And this high quality standard enables us to grant a 2-years warranty for AUDIOVOX Mobile Video products.
The equipments are checked and tested continuously during the entire production process. In case you have problems with your AUDIOVOX Mobile Video equipment, kindly observe the following:
-
The guarantee period commences with the purchase of the component and is applicable only to the original owner.
-
During the guarantee period we will rectify any defects due to faulty material or workmanship by replacing or repairing the defective part at our discretion. Further claims, and in particular those for price reduction, cancellation of sale, compensation for damages or subsequential damages, are excluded. The guarantee period is not altered by the fact that we have carried out guarantee work.
- Unauthorized tampering with the equipment will invalidate this guarantee.
- Consult your authorized dealer first, if guarantee service is needed. Should it prove necessary to return the component to the factory, please insure that • the component is packed in original factory packing in good condition • the quality control card has been filled out and enclosed with the component, • your enclose your receipt as proof of purchase.
- Excluded from the guarantee are: • Illuminates • Wear parts • Shipping damages, either readily apparent or concealed (claims for such damages must be lodged immediately with forwarding agent, the railway express office or post office). • Scratches in cases, metal components, front panels, etc. (You must notify your dealer directly of such defects within three days of purchase.) • Defects caused by incorrect installation or connection, by operation errors (see operating instructions), by overloading or by external force. • Equipments which have been repaired incorrectly or modified or where the case has been opened by persons other than us. • Consequential damages to other equipments. • Reimbursement of cools, without our prior consent, when repairing damages by third parties.
F
Toutes nos félicitations!
No warranty without receipt!

AUDIOVOX®


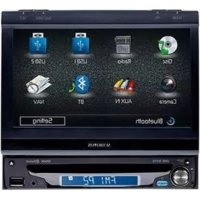
- FERNBEDIENUNG
- Remote Control Direct Entry
- DVD/CD AUDIO-BETRIEB
- Preparation 3
- Optional Equipment 4
- Warning 4
- Installation 5
- Wiring Diagram 7
- Controls and Indicators 8
- Remote Control 10
- Using the TFT Monitor 13
- Operating Instructions 15
- Setup Menu 16
- Tuner Operation 20
- DVD/VCD Video Operation 23
- DVD/CD Audio Operation 29
- MP3/USB/WMA/Operation 31
- Troubleshooting 32
- Care and Maintenance 34
- Specifications 35
- Warranty Card
- PREPARATION
- Features
- DVD
- CD / MP3 / WMA
- AM-FM-RDS
- Chassis
- General
- Optional Equipment
- Tools and Supplies
- Disconnecting the Battery
- NOTE:
- INSTALLATION
- Pre-installation
- Wiring
- Final Installation
- Final ISO-DIN Installation
- Wiring Diagram
- CONTROLS AND INDICATORS
- Button Operation
- WIDE/NAV/DISP
- ▶ | / TILT
- BAND/PIC
- AUDIO/LO/DX
- SRC
- LCD Display
- FRONT AV INPUT
- IR Remote Control Receiver
- RESET
- 11.()
- TFT Display
- USB connection
- DISP
- REMOTE CONTROL
- USING THE TFT MONITOR
- Open/Close TFT Monitor
- Monitor Tilt Angle Adjustment
- Aspect Ratio
- Parameter Adjustment Procedure
- Parking Brake Inhibit
- Mute
- Monitor Movement Mechanism
- OPERATING INSTRUCTIONS
- Power On / Off
- Audible Beep Confirmation
- Playing Source Selection
- Volume Adjustment
- Audio Control Menu
- System Reset
- Line Mute
- SETUP MENU
- Accessing Menu Items
- Adjusting a Feature
- General Sub Menu Features
- Language Sub-menu Features
- Rating Sub-menu Features
- Hardware Sub-menu Features
- P.VOL Sub-menu Features
- TS Cal (Screen Calibration)
- Exiting the System Setup Menu
- TUNER OPERATION
- Tuner TFT Display
- Switch to Radio Tuner source
- Select FM/AM Band
- Seek Tuning
- Manual Tuning
- Using Preset Stations
- Storing a Station
- Recalling a Station
- Manual Storing of a Station
- Automatic Storing (AS) of the strongest Stations
- Radio Text message bar
- Preview Scan (PS)
- Local Radio Station Seeking (LOC)
- Opening/Closing the TFT Video Screen
- Insert/Eject Disc
- Ejecting a Disc
- Reset the Loading Mechanism
- Accessing DVD Mode
- Controlling Playback
- Stopping Playback
- Pausing Playback
- Slow Motion Playback
- Fast Forward Playback
- Repeat Playback
- Sectional Repeat Function (A-B)
- Random Playback
- Accessing the DVD Menu
- Moving Through Chapters
- Goto Search
- VCD Track Search
- DVD Search
- VCD Disc Search
- Direct Chapter / Track Selection
- Touch Screen Direct Entry
- Viewing an Alternate Picture Angle (DVD Only)
- Zooming
- Multi-Language Discs (DVD Only)
- Changing Subtitle Language
- PBC (Play Back Control - VCD Only)
- Playback Information
- DVD Playback Information
- VCD Playback Information
- CD Player User Interface
- Moving Through Tracks
- Track Scan Select (CD-DA discs only)
- Random Play Select
- Fast Forward/Fast Rewind
- Direct Track Entry
- MP3/USB/WMA-Operation
- MP3/WMA Media and File Requirements
- MP3 Format Compatibility
- MP3 Playing Order
- MP3 User Interface
- MP3
- Care and Maintenance
- SPECIFICATIONS
- VME 9309TS
- AUDIOVOX®
- CONTROL REMOTO
- CINEMA
- Reinicio de sistema
- Acceder al modo DVD
- USO DE AUDIO DE DVD/CD
- F
Brand : AUDIOVOX
Model : VME 9309 TS
Category : Car radio