
D415 - Speaker SAMSON - Free user manual and instructions
Find the device manual for free D415 SAMSON in PDF.
| Product Type | Active 2-way speaker |
| Brand | Samson |
| Model | Auro D415 |
| Total Power | 400 W peak (320 W bass + 80 W treble) |
| Woofer | 15" woofer (38 cm), 76 mm voice coil |
| Tweeter | 34 mm titanium compression tweeter |
| Frequency Response | 55 Hz - 20 kHz (-3 dB) |
| Maximum SPL | 124 dB SPL at 1 m |
| Coverage Angle | 90° horizontal x 60° vertical |
| Inputs | XLR and balanced 1/4" jack (mic/line) |
| Output | Balanced XLR (daisy-chain) |
| Equalizer | 2-band Baxandall: bass ±15 dB at 80 Hz, treble ±15 dB at 12 kHz |
| Limiter | Dual optical |
| Active Crossover | Linkwitz-Riley 24 dB/oct, crossover at 2.1 kHz |
| Power Supply | 220-240 VAC, fuse T2.5 AL / 250 V |
| Power Consumption | 456 W max |
| Dimensions (W x D x H) | 450 x 342 x 698 mm |
| Weight | 22.2 kg |
| Enclosure Material | Heavy-duty polypropylene |
| Grille | High-strength steel |
| Mounting | 35 mm pole mount socket, 1 rigging point |
| Applications | Live sound, DJ, conferences, fixed installation |
Frequently Asked Questions - D415 SAMSON
User questions about D415 SAMSON
0 question about this device. Answer the ones you know or ask your own.
Ask a new question about this device
Download the instructions for your Speaker in PDF format for free! Find your manual D415 - SAMSON and take your electronic device back in hand. On this page are published all the documents necessary for the use of your device. D415 by SAMSON.
USER MANUAL D415 SAMSON
400 Watt 2-Way Powered Loudspeakers
Safety Instructions
TO PREVENT FIRE OR SHOCK HAZARD DO NOT USE THIS PLUG WITH AN EXTENSION CORD, RECEPTACLE OR OTHER OUTLET UNLESS THE BLADES CAN BE FULLY INSERTED TO PREVENT BLADE EXPOSURE. TO PREVENT FIRE OR SHOCK HAZARD. DO NOT EXPOSE THIS APPLIANCE TO RAIN OR MOISTURE. TO PREVENT ELECTRICAL SHOCK, MATCH WIDE BLADE PLUG TO WIDE SLOT AND FULLY INSERT.

CAUTION
RISK OF ELECTRIC SHOCK DO NOT OPEN


CAUTION: TO REDUCE THE RISK OF ELECTRIC SHOCK, DO NOT REMOVE COVER (OR BACK). NO USER-SERVICEABLE PARTS INSIDE. REFER SERVICING TO QUALIFIED SERVICE PERSONNEL.
This lightning flash with arrowhead symbol, within an equilateral triangle, is intended to alert the user to the presence of uninsulated "dangerous voltage" within the product's enclosure that may be of sufficient magnitude to constitute a risk of electric shock to persons.

The exclamation point within an equilateral triangle is intended to alert the user to the presence of important operating and maintenance (servicing) instructions in the literature accompanying the appliance.
WARNING
DO NOT EXPOSE THIS EQUIPMENT
TO RAIN OR MOISTURE
AVIS
RISQUE DE CHOC ELECTRONIQUE
NE PAS OUVRIR
CAUTION
FOR CONTINUED PROTECTION AGAINST RISK
OF FIRE, REPLACE ONLY WITH SAME TYPE FUSE
ATTENTION
UTILISER UN FUSIBLE DE
RECHANGE DE MÉME TYPE
Safety Instructions
-
Read these instructions.
-
Keep these instructions.
-
Heed all warnings.
-
Follow all instructions.
-
Do not use this apparatus near water.
-
Clean only with dry cloth.
-
Do not block any ventilation openings. Install in accordance with the manufacturer's instructions.
-
Do not install near any heat sources such as radiators, heat registers, stoves, or other apparatus (including amplifiers) that produce heat.
-
Do not defeat the safety purpose of the polarized or grounding type plug. A polarized plug has two blades with one wider than the other. A grounding type plug has two blades and a third grounding prong. The wide blade or the third prong are provided for your safety. If the provided plug does not fit into your outlet, consult an electrician for replacement of the obsolete outlet.
-
Protect the power cord from being walked on or pinched particularly at the plugs, convenience receptacles, and at the point where they exit from the apparatus.
-
Only use attachments/accessories specified by the manufacturer.
-
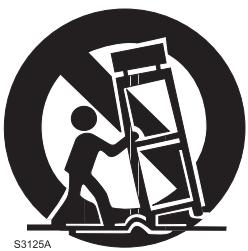
Use only with the cart, stand, tripod, bracket, or table specified by the manufacturer, or sold with the apparatus. When a cart is used, use caution when moving the cart/apparatus combination to avoid injury from tip-over.
-
Unplug the apparatus during lightening, sort or when unused for long periods of time.
-
Refer all servicing to qualified personnel. Service is required when the apparatus has been damaged in any way, such as power supply cord or plug is damaged, liquid has been spilled or objects have fallen into the apparatus has been exposed to rain or moisture, does not operate normally, or has been dropped.
-
This appliance shall not be exposed to dripping or splashing water and that no object filled with liquid such as vases shall be placed on the apparatus.
-
Caution-to prevent electrical shock, match wide blade plug wide slot fully insert.
-
Please keep a good ventilation environment around the entire unit.

If you want to dispose this product, do not mix it with general household waste. There is a separate collection system for used electronic products in accordance with legislation that requires proper treatment, recovery and recycling.
Private household in the 25 member states of the EU, in Switzerland and Norway may return their used electronic products free of charge to designated collection facilities or to a retailer (if you purchase a similar new one).
For Countries not mentioned above, please contact your local authorities for a correct method of disposal. By doing so you will ensure that your disposed product undergoes the necessary treatment, recovery and recycling and thus prevent potential negative effects on the environment and human health.
Auro D412/D415 Features 10
Quick Start. 11
Rear Panel Layout 12
Connecting a Microphone. 13
Connecting a Stereo Signal Source 14
Linking Two Speakers Per Side 15
Positioning the Auro D412/D415 16
Connections. 17
Specifications. 18
Dimensions 19
Thank you for purchasing the Samson Auro professional, powered loudspeaker. The Auro D412 and D415 are compact and powerful speaker cabinets featuring 400 watts of bi-amped onboard power. The Auro D412 and D415, respectively, feature 12'' and 15'' heavy-duty, long-excursion woofers, as well as 1.34'' titanium compression drivers on 1'' throat wide dispersion horns. The speaker cabinets provide both XLR and 1/4'' phone jacks that handle microphone or line level inputs. The XLR Line Output allows you to "daisy-chain" multiple Auro cabinets together to create larger sound reinforcement systems.
For added speaker protection, the Auro D412 and D415 feature dual optical limiters that keep your speaker sounding perfect at any level, and the integrated two-band equalizer allows you to sculpt the mix to your desired sound. Each cabinet's trapezoidal shape allows it to be configured for either front-of-house use, or for operation as a wedge-style monitor. In addition, the compact cabinets can easily be stacked, using the built-in bumpers or can be stand-mounted using the integral 1 3/8" polemount receptacles.
Each Auro PA system's durable enclosure is made of high-impact polypropylene with a scuff-resistant textured finish, and include a heavy-grade steel grill, offering excellent protection against wear and tear for truly portable audio. The Auro active monitors are ideal for live music, DJ, lecture, and installed sound applications, or anywhere serious power and superior sound quality are desired.
In these pages, you'll find a detailed itemization of the features of the Auro PA stracystem, as well as a description of its front and rear panels, step-by-step instructions for its setup and use, and full specifications. You'll also find a warranty card enclosed—please don't forget to fill it out and mail it in so that you can receive online technical support, and so that we can send you updated information about this and other Samson products in the future. Also, be sure to check out our website (www.samsontech.com) for complete information about our full product line.
With proper care and adequate air circulation, your Auro cabinet will operate trouble free for many years. We recommend you record your serial number in the space provided below for future reference.
Serial number:
Date of purchase:
Should your unit ever require servicing, a Return Authorization (RA) number must be obtained before shipping your unit to Samson. Without this number, the unit will not be accepted. Please call Samson at 1-800-3SAMSON (1-800-372-6766) for an RA number prior to shipping your unit. Please retain the original packing materials and, if possible, return the unit in the original carton and packing materials. If you purchased your Samson product outside the United States, please contact your local distributor for warranty and service information.
Here is a look at some the features of the Auro powered loudspeakers:
400 watt, two-way active loudspeakers for live sound applications
320W LF + 80W HF power amplifiers (peak)
- Ultra-wide, flat frequency response
- Custom-designed, heavy-duty, 12'' / 15'' long throw low frequency drivers provide enhanced bass response
1.34" titanium diaphragm compression driver with 1" throat for smooth high-end reproduction
- Balanced Mic/Line input with Volume control and Peak LED
- Two-band LF and HF shelving equalizer
XLR Line Output connectors to "daisy-chain" multiple Auro cabinets
Multi-band dynamics processing with audibly transparent limiting
- Internal 24 dB/octave time aligned electronic crossover
30- and 45- degree monitor angles for near and far field coverage
Standard 1 3/8-inch (35mm) speaker stand receptacle
- Versatile, portable design with integrated side handles
- Tuned, ported bass reflex design for extended low end
Rugged, lightweight polypropylene cabinet construction
The following steps will help you set up your Auro D412/D415 loudspeakers.
Setup
- Turn the Level control on the rear panel fully counterclockwise.
- Set the Bass and Treble EQ controls to the 12 o'clock position.
- Turn the Power switch OFF.
Connections
- Connect either a line-level signal from your mixer (or other source) or a microphone to the Input jack on the Auro D412/D415 rear panel.
- Connect the supplied power cable to the IEC socket on the back of the loudspeaker. Plug the power cable into an AC outlet.
- Note: Always make sure that the AC outlet is configured with the correct voltage as indicated on the rear panel of the Auro loudspeaker.
Operation
- Switch the Auro's Power switch to the ON position.
- Run an audio signal from your mixer, or talk into the microphone.
- Slowly raise the Auro's Level control until you have reached the desired level.
- If the volume from the speakers gets really loud, or you see the Peak indicator blinking frequently, turn down the Level control on the Auro D412/D415 a little until the Peak indicator does not light, or only lights occasionally with signal peaks.
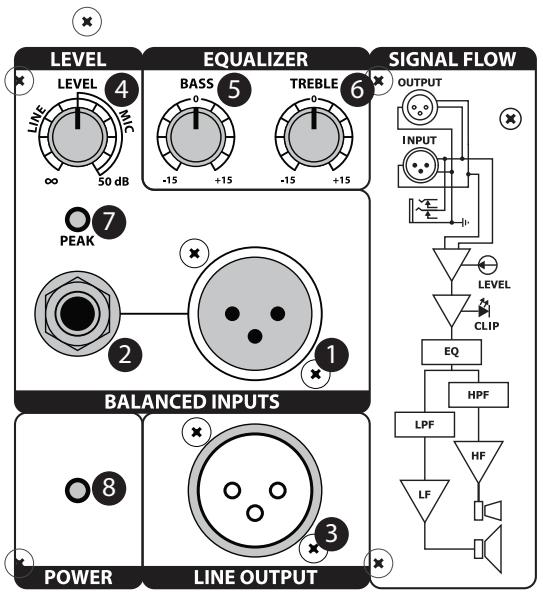
Rear Panel Layout
1. XLR Input Connector
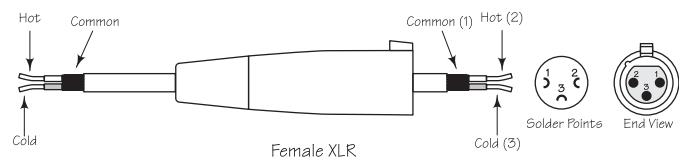
This female XLR connector accepts either a balanced microphone or line level signal.
2. 1/4'' Input Connector
Use this 1 / 4'' input for connecting balanced microphone or balanced and unbalanced line level inputs.
3. Line Output
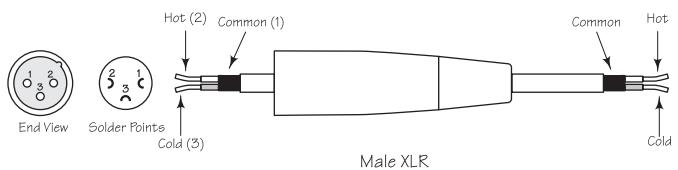
Male XLR connector used to link multiple Auro cabinets.
4. Level Control
This control adjusts the overall signal level at the input of the power amplifiers. For attenuating a line level signal, turn the control from fully counter-clockwise until 12 o'clock. For a mic level signal turn the Level control past 12 o'clock.
5. Bass EQ Control
This controls the low band of the loudspeaker equalizer, +/- 15 dB at 80 Hz.
6. Treble EQ Control
This controls the high band of the loudspeaker equalizer, + / - 15 dB at 12kHz .
7. Peak Indicator
This RED LED lights when the amp is near the clipping point. If the Peak indicator lights frequently, turn down the Level control on the Auro loudspeaker or turn down the signal at the source, until the indicator does not light anymore, or lights occasionally with signal peaks.
8. Power Indicator
This LED lights GREEN when amp is active.
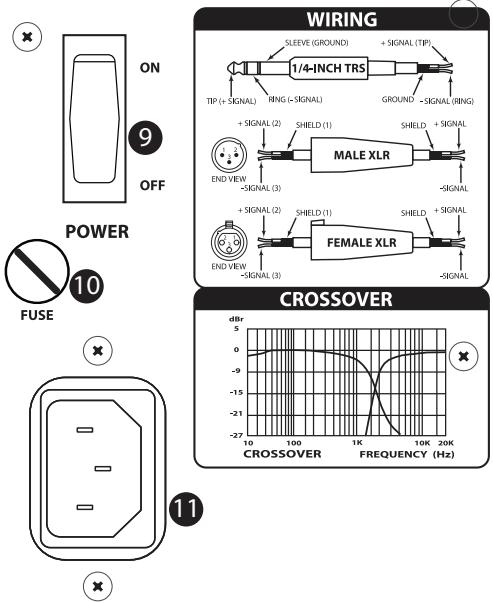
9. Power Switch
Switches on the Auro's main power.
10.Fuse Cover
The fuse is located behind the fuse cover. Always replace fuses with the same type of fuse.
11.AC Power Inlet
Connect the supplied standard IEC AC power cable here.

400 WATT POWERED SPEAKER CABINET
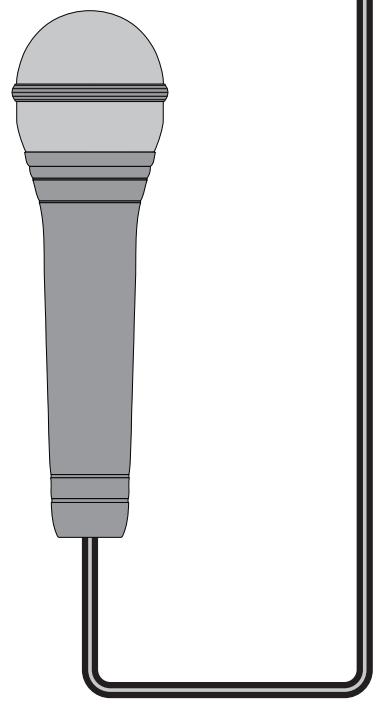
Using a Microphone
- Be sure that the Auro D412/D415 Power switch is set to the off position.
- Turn the LEVEL control fully counterclockwise to the off position.
- Connect the power cable to an AC socket.
Using a standard XLR cable, plug a microphone into the Auro's XLR INPUT. - Switch the Power switch to the ON position.
- While speaking or singing into the microphone, slowly raise the LEVEL control until you have reached the desired level.
- For larger sound reinforcement you can run several monitors using the Line Output to daisy-chain one Auro to another.
Connecting a Stereo Signal Source
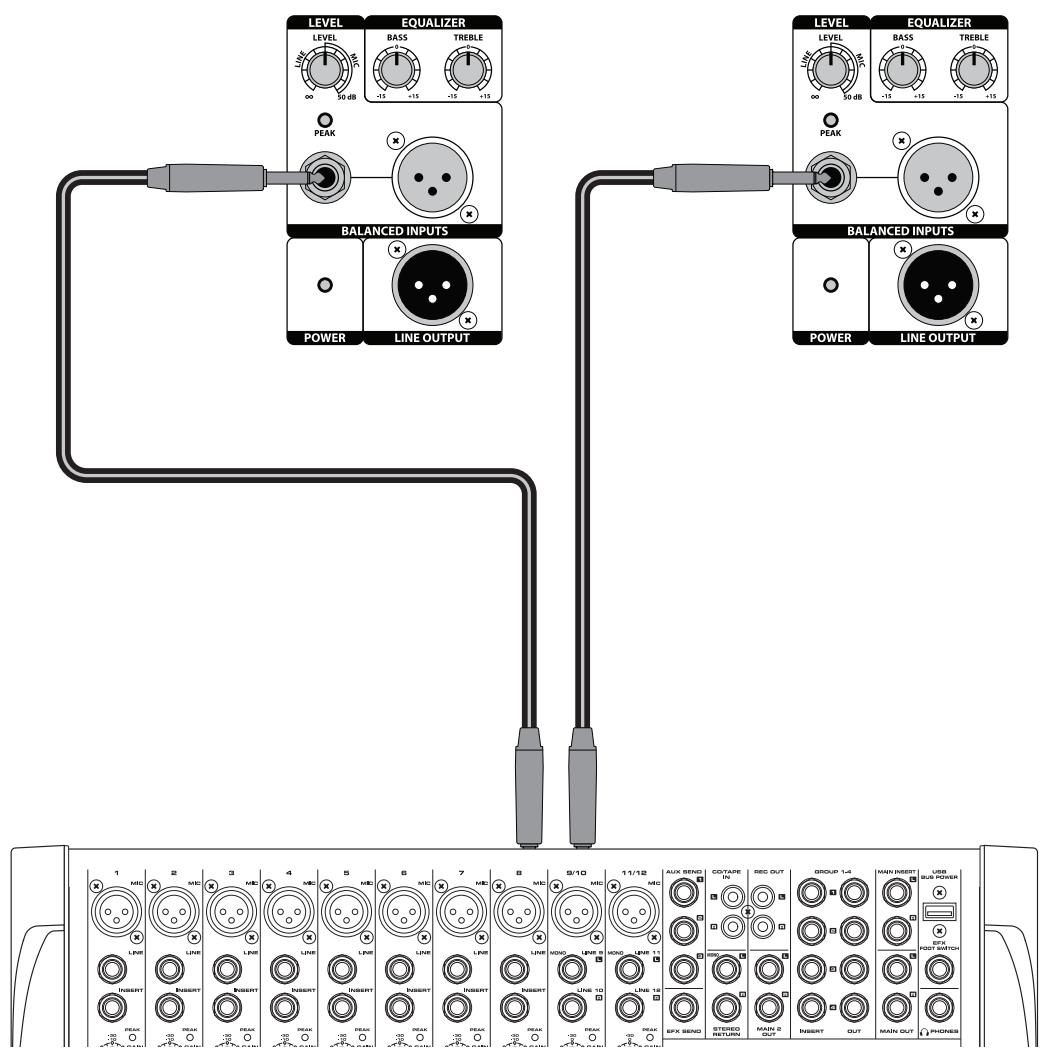
Using a Stereo Line Level Signal
- Be sure that the Auro D412/D415 Power switch is set to the off position.
- Turn the LEVEL control fully counterclockwise to the off position.
- Connect the power cable to an AC socket.
- Using standard XLR or 1 / 4'' cables, connect the line level signals from a mixer or keyboard into the Auro Inputs.
- Switch the Power switch to the ON position.
- Now, run an audio signal from your mixer (like music from a CD) while slowly raising the Auro's Level control until you have reached the desired level.
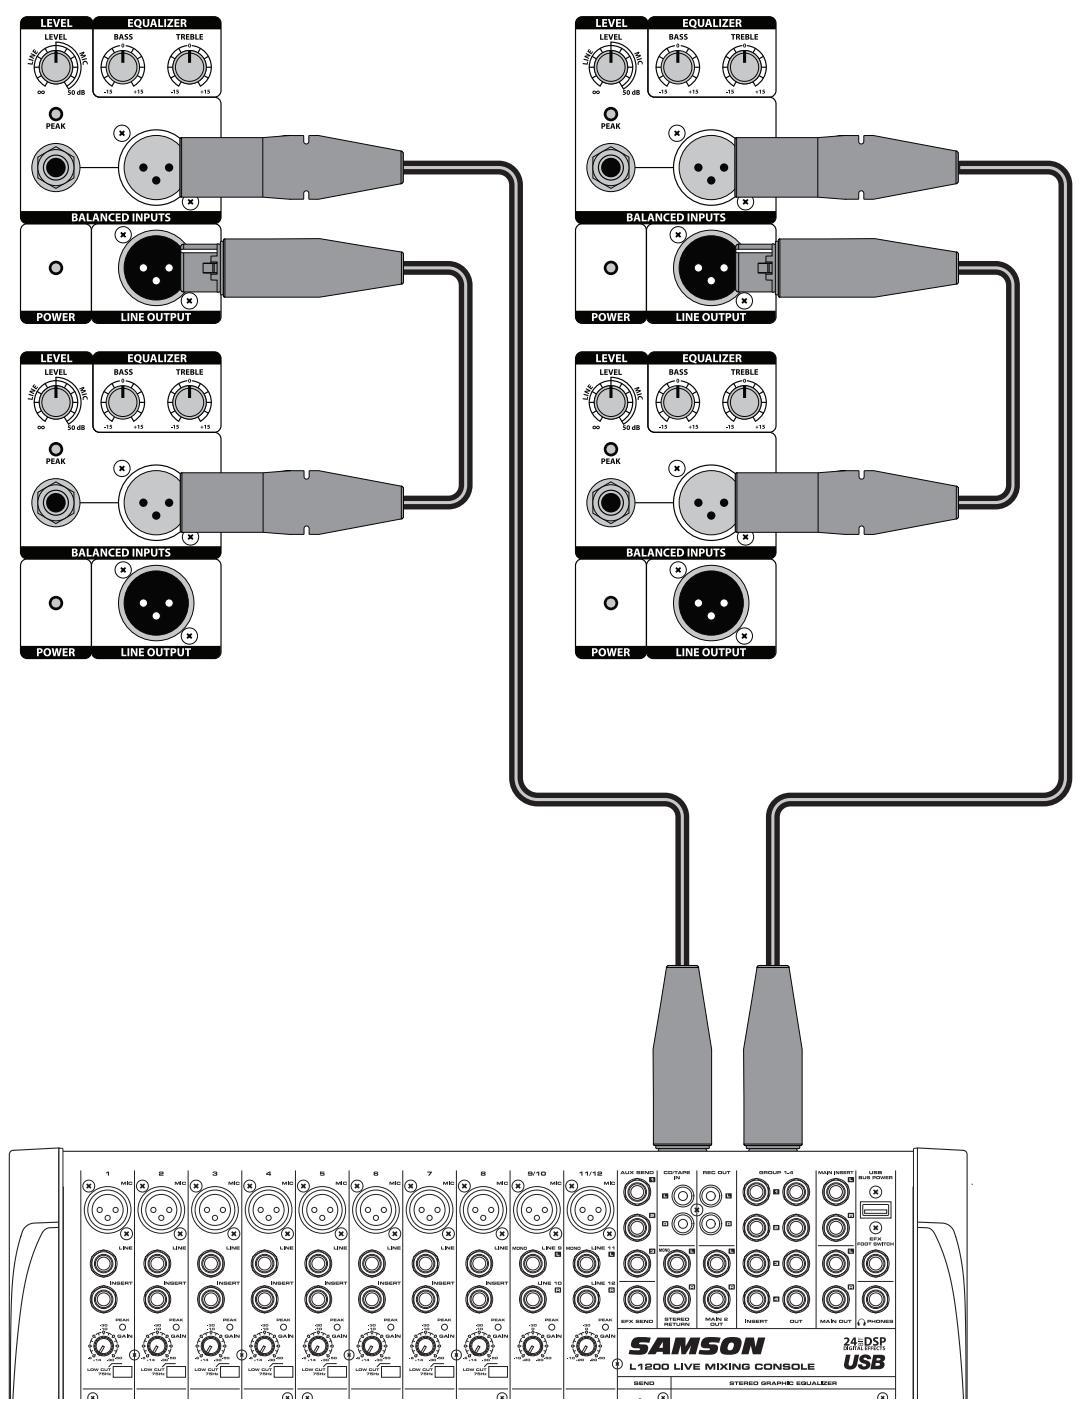
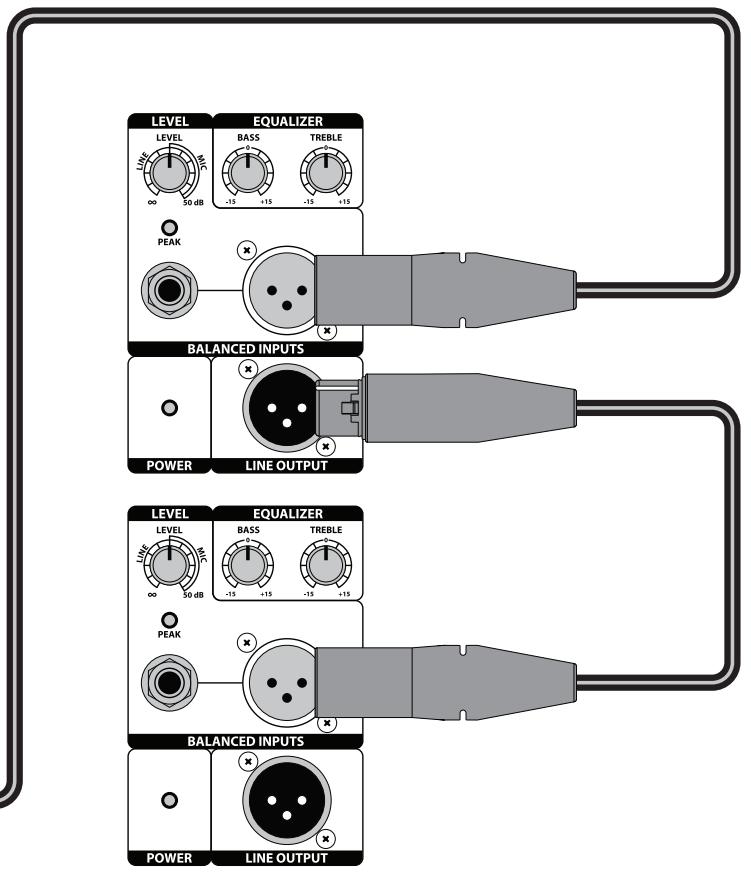
Linking two Auro cabinets per side:
- Turn the LEVEL control fully counterclockwise to the off position.
- Connect the left and right line-level outputs from a mixer to the inputs of two Auro loudspeakers.
- Feed the Line Outputs to another pair of Auro loudspeaker inputs.
- Now, run an audio signal from your mixer (like music from a CD) while slowly raising the Auro's Level control until you have reached the desired level.
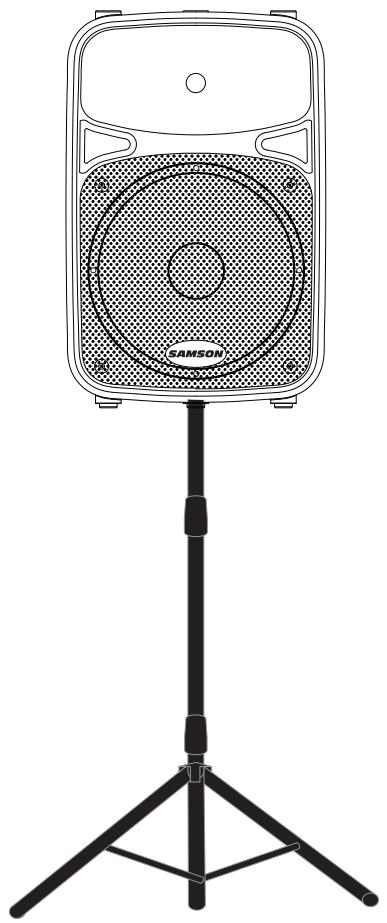
Positioning the Auro D412/D415
Speaker Placement
Whenever possible, it is a good idea to raise the speakers above the heads of the listening audience. The Auro enclosures feature standard 1 3/8'' pole mount receptacles with locking bolts, which are compatible with speaker stands from a variety of manufacturers. In a smaller setting like a school cafeteria, library, or a mall kiosk, you can also use the Auro loudspeaker in one of the tilt back monitor positions, which will improve the projection of the speakers and may eliminate the need for speaker stands.
Note: When using a speaker pole mount, be sure the pole is capable of supporting the weight of the Auro loudspeaker.
Note: Always have another person to assist when mounting the Auro speaker onto a speaker stand, or when adjusting the stand while the speaker is mounted on the stand.
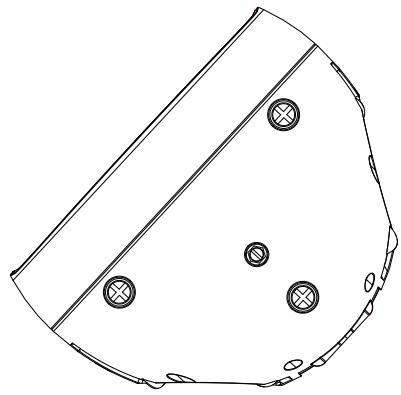
Using the Auro D412/D415 as a Floor Monitor
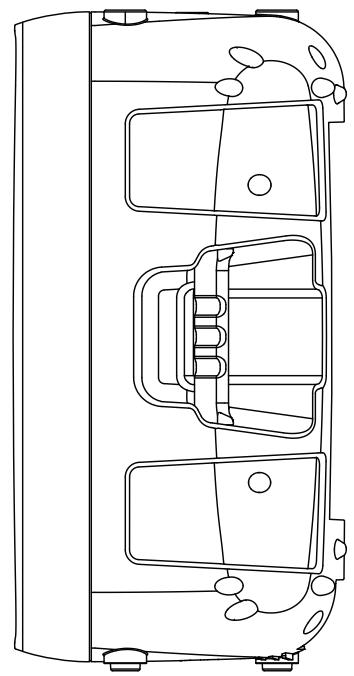
The Auro D412/D415 is an ideal solution for stage monitoring and thanks to its unique design, two wedge monitor positions are possible. When placed on its side, with the high frequency horn facing to the left of the enclosure, the Auro is tilted at a 30 degree angle, optimizing performance when used on a large stage. When placed on its side with the high frequency horn facing to the right of the enclosure, the Auro is tilted at a 45 degree angle optimizing performance when used on smaller stages.
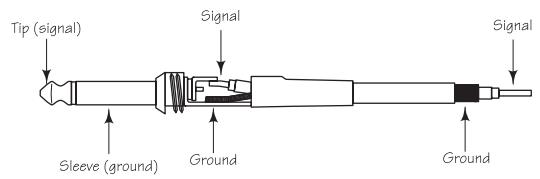
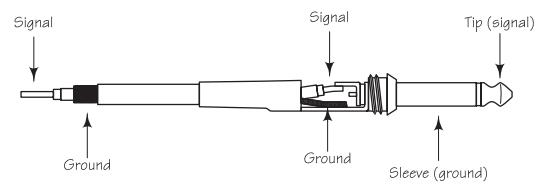
The Auro D412/D415 features balanced inputs and outputs, so connecting balanced and unbalanced signals is acceptable. Whenever possible, use balanced connections to other equipment to suppress interference.
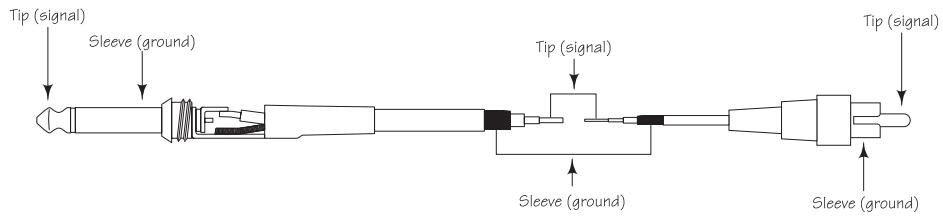
Unbalanced 1/4'' Connector
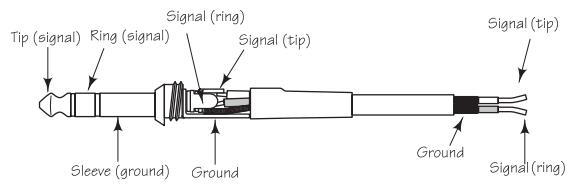
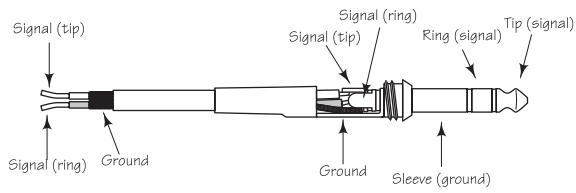
Balanced TRS 1/4" Connector
XLR to XLR Balanced
Unbalanced 1/4'' Connector to RCA
XLR to Balanced 1/4-Inch

Specifications
| D412 | D415 | ||
| Output Power | |||
| Low Frequency | RMS Power | 200 W @ 8 ohms | |
| Peak Power | 320 W @ 8 ohms | ||
| THD | < 1 % | ||
| High Frequency | RMS Power | 50 W @ 8 ohms | |
| Peak Power | 80 W @ 8 ohms | ||
| THD | < 1 % | ||
| Transducers | |||
| Low Frequency | 12" bass transducer, 2.5" voice coil | 15" bass transducer, 3" voice coil | |
| High Frequency | 1.34" (34 mm) titanium compression driver, edge-wound copper voice coil | ||
| Acoustic Performance | |||
| Frequency Response (-3 dB) | 58 Hz to 20 kHz | 55 Hz to 20 kHz | |
| Maximum Sound Pressure Level | 125 dB SPL @ 1 | 124 dB SPL @ 1 m | |
| Limiter | Optical | ||
| Horizontal Coverage Angle | 90° | ||
| Vertical Coverage Angle | 60° | ||
| Electronic Crossover | |||
| Crossover Type | 24 dB/oct Linkwitz-Riley | ||
| Crossover Frequency | 2.1 kHz | ||
| Input/Output | |||
| Inputs | Balanced XLR & 1/4" Mic/Line Connectors | ||
| Output | Balanced XLR Line Output | ||
| Equalization | |||
| High | ±15 dB @ 12 kHz, shelving | ||
| Low | ±15 dB @ 80 Hz, shelving | ||
| Power Supply | |||
| Power Consumption | 456 W max. | ||
| AC Connector | 3-pin IEC 250 VAC, 20 A male | ||
| Fuse | 100 - 115 VACT5AL / 250 V | ||
| 220 - 240 VACT2.5AL / 250 V | |||
| Dimensions and Weight | |||
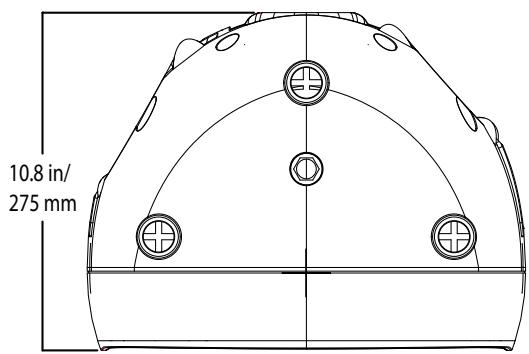
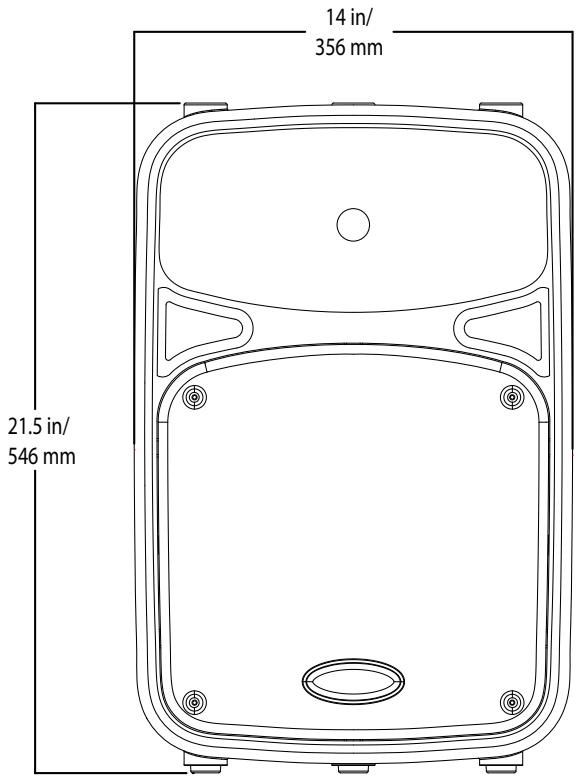
| Dimensions | in | 14" L x 10.8"W x 21.5"H | 17.75"L x 13.5"W x 27.5"H |
| mm | 356 mm L x 275 mm W x 546 mm H | 450 mm L x 342 mm W x 698 mm H | |
| Weight | lbs | 35.8 | 49 |
| kg | 16.25 | 22.25 | |
| Mounting | |||
| Mounting Method | Integral 1 3/8" Pole Mount Receptacle | ||
| Fly Point | 1 | ||
Specifications are subject to change without notice.
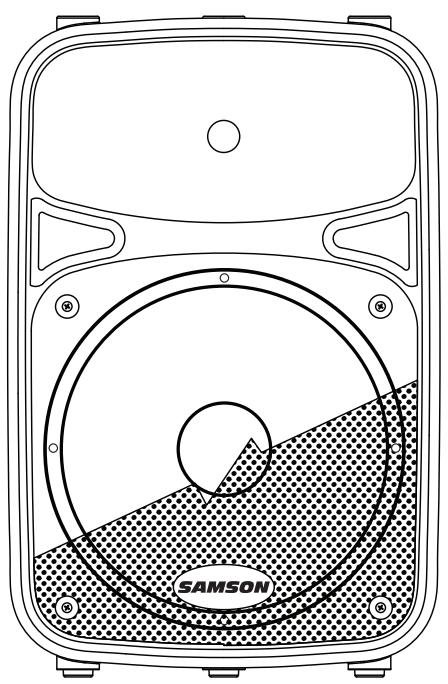
D412

D415
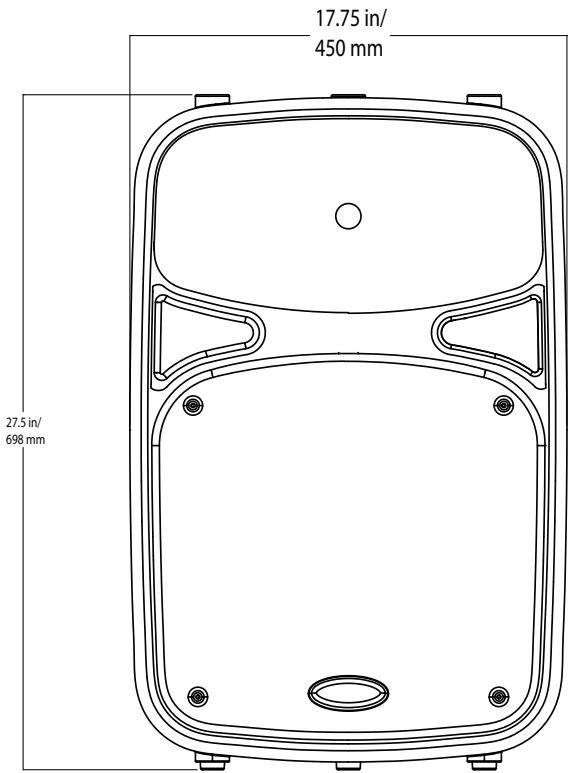
Table des matières
- Safety Instructions
- WARNING
- AVIS
- CAUTION
- ATTENTION
- Setup
- Connections
- Operation
- Rear Panel Layout
- XLR Input Connector
- 1/4'' Input Connector
- Line Output
- Level Control
- Bass EQ Control
- Treble EQ Control
- Peak Indicator
- Power Indicator
- Power Switch
- 10.Fuse Cover
- 11.AC Power Inlet
- Using a Microphone
- Connecting a Stereo Signal Source
- Positioning the Auro D412/D415
- Speaker Placement
- Using the Auro D412/D415 as a Floor Monitor
- Unbalanced 1/4'' Connector
- Balanced TRS 1/4" Connector
- XLR to XLR Balanced
- Unbalanced 1/4'' Connector to RCA
- XLR to Balanced 1/4-Inch
- Table des matières
Brand : SAMSON
Model : D415
Category : Speaker