BP 3560 - Blood pressure monitor KAZ - Free user manual and instructions
Find the device manual for free BP 3560 KAZ in PDF.
User questions about BP 3560 KAZ
0 question about this device. Answer the ones you know or ask your own.
Ask a new question about this device
Download the instructions for your Blood pressure monitor in PDF format for free! Find your manual BP 3560 - KAZ and take your electronic device back in hand. On this page are published all the documents necessary for the use of your device. BP 3560 by KAZ.
USER MANUAL BP 3560 KAZ
m = 311 ;

Braun Infolines
English 4
Francais 15
Espanol 26
Portugues 38
Italiano 49
Nederlands 60
GB
IRL
F
B
E
08007837010
1800509448
0810309780
0800 14 592
Espana:
901 11 61 84
Mexico:
018005085800
Argentina:
0800 44 44 55 3
Chile:
02 288 25 18
P
1
NL
HK
808200033
800-44 00 11
0800-4455388
852-25249377
(Audio Supplies Company Ltd.)
Internet:
www.braun.com
Manufactured by:
Braun GmbH
Frankfurter Str. 145
61476 Kronberg /
Germany

English
What you should know about blood pressure
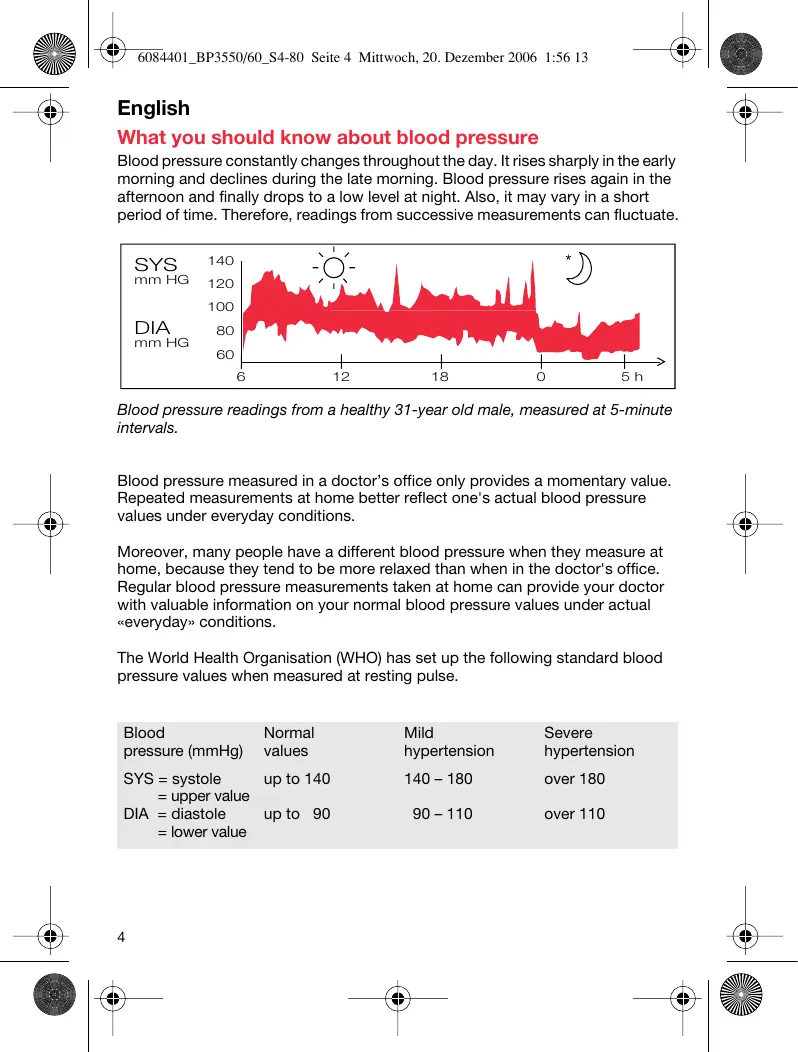
Blood pressure constantly changes throughout the day. It rises sharply in the early morning and declines during the late morning. Blood pressure rises again in the afternoon and finally drops to a low level at night. Also, it may vary in a short period of time. Therefore, readings from successive measurements can fluctuate.
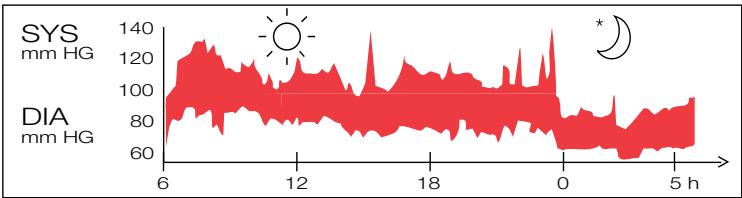
Blood pressure readings from a healthy 31-year old male, measured at 5-minute intervals.
Blood pressure measured in a doctor's office only provides a momentary value. Repeated measurements at home better reflect one's actual blood pressure values under everyday conditions.
Moreover, many people have a different blood pressure when they measure at home, because they tend to be more relaxed than when in the doctor's office. Regular blood pressure measurements taken at home can provide your doctor with valuable information on your normal blood pressure values under actual "everyday" conditions.
The World Health Organisation (WHO) has set up the following standard blood pressure values when measured at resting pulse.
| Blood pressure (mmHg) | Normal values | Mild hypertension | Severe hypertension |
| SYS = systole | up to 140 | 140 – 180 | over 180 |
| = upper value | |||
| DIA = diastole | up to 90 | 90 – 110 | over 110 |
| = lower value |
What you should know about this blood pressure monitor
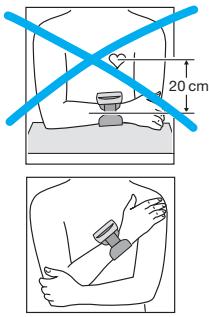
For accurate measurements, all wrist blood pressure monitors must be positioned at heart level. Example: If the monitor is positioned 20~cm below heart level as shown on the left (e.g. by putting the arm on a table), the reading you will obtain is approximately 15 mmHg too high.
Therefore, the Braun SensorControl has an active positioning system (A): it guides you to hold your measuring arm in the right position at heart level and gives you confirmation of correct handling after the measurement.
Additionally, your blood pressure monitor features an EasyClick cuff which automatically fastens correctly to your wrist to ensure an accurate fit for an accurate reading.

- To ensure accurate measuring results, carefully read the complete use instructions.
- This product is intended for household use only.
- Keep product and batteries away from children.
- People suffering from cardiac arrhythmia, vascular constriction, arteriosclerosis, diabetes or users of cardiac pacemakers should consult their doctor before measuring their blood pressure themselves, since deviations in blood pressure values may occur in such cases.
- Please consult your doctor in case of any doubt, especially if you are under medical treatment or receiving medication.
- The use of this blood pressure monitor is not intended as a substitute for consultation with your doctor.
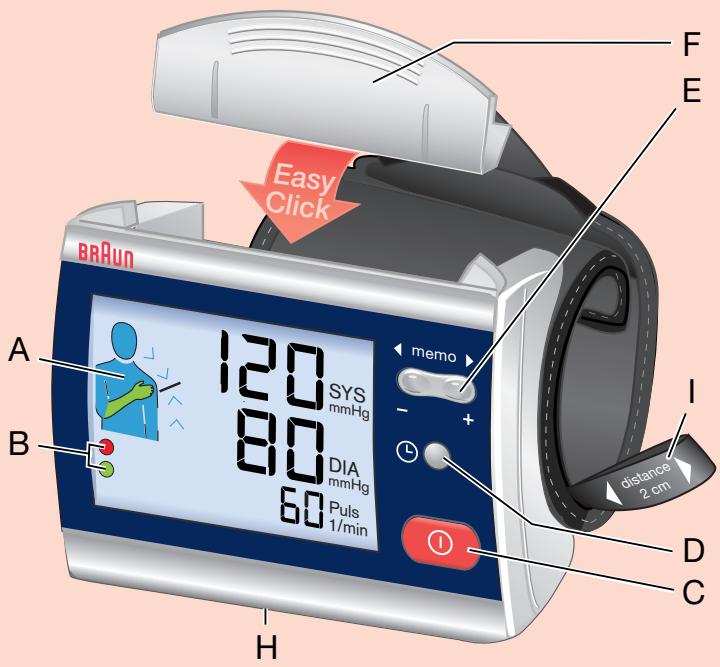
Product description
A Positioning system
B Confirmation system
C On/off button
D Select button
E Memory button («memo»)
F Cuff closure
G Release button
H Battery compartment
I Distance aid

区
Inserting batteries
- Use alkaline batteries, type LR 03 (AAA) (e.g. Duracell) as supplied with this product (or rechargeable batteries).
- Remove the battery compartment cover and insert two batteries with correct polarity (see symbol in the battery compartment (H)).
- New batteries (Duracell) will provide approximately 300 measurements.
- Only discard empty batteries. They should not be disposed of in the household waste, but at appropriate collection sites or at your dealer.
Key rules for accurate blood pressure measurements
Correct handling is key for obtaining accurate measuring results!
- Always take readings at the same time of day, ideally in the morning, under the same conditions.
- Do not measure within 30 minutes after smoking, coffee or tea consumption.
- Take off wristwatch and jewelry before fitting the appliance on the measuring arm.
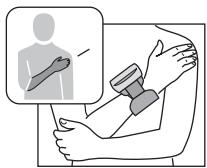
- Position the monitor 2cm below the palm line.
- While taking a measurement, sit down, relax, keep still, especially the hand and fingers of the measuring arm, do not move or speak.
- Hold the appliance at heart level during the measurement.
- Wait approximately 3 minutes before repeating a measurement.
Measuring
For a reliable blood pressure measurement, please follow the instructions below.
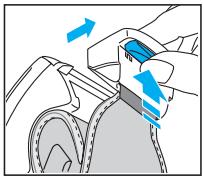
To open the cuff, press the release button (G) underneath the cuff closure.

- Place the monitor housing on the slim side of your bare forearm with the monitor facing up. The distance aid (I) helps you to keep the required 2 cm distance to your palm line.
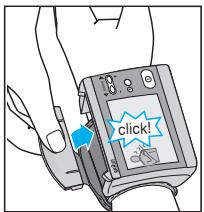
- To close the cuff, hold the appliance against your body. Then take hold of the cuff closure, pull out the cuff and insert the cuff closure in the monitor housing until it locks into place. The cuff will adjust automatically to length needed for your wrist. Once cuff is closed, do not move the appliance anymore. If you want to change the monitor position on your arm, open and close the cuff once again.
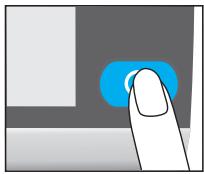
- Press the red on/off button (C).

- Put the hand with the appliance on the other upper arm as shown. Slowly move the hand upward along the upper arm. Watch the positioning system (A) and move your hand up or down according to the direction of the arrow shown.
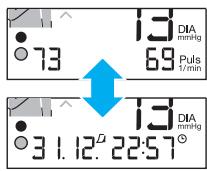
- The positioning system (A) shown on the left and a beep confirm that you have reached the right measuring position. The measurement will start automatically. When the measurement is complete, a beep will sound again, and the reading is displayed along with the feedback from the confirmation system (B):
Upper (systolic) value Lower (diastolic) value Pulse
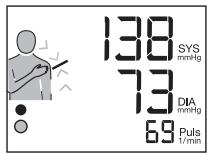
Confirmation system (B)
The green dot in the lower left corner of the display confirms that the measurement conditions have been okay. If not okay, a red dot is flashing and the positioning system (flashing arm) shows the reason for the measuring error:
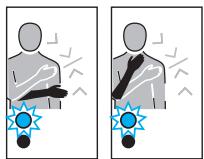
Measuring arm: too low . . . too high

Arm movement during measurement
Please note:
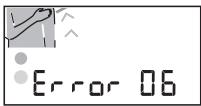
- In case of system errors or handling mistakes, the display will show an error code, instead of giving you inaccurate results (for details, please see section «What to do if...»).
- 15 seconds after switching on the appliance, the measuring process will start automatically, even if the appropriate measuring position has not been reached.
Turning off
Press the on/off button to turn the product off. Otherwise the product will turn off automatically after 2 minutes.
Memory mode
Your blood pressure monitor can store the readings of 100 measurements (BP 3550 model: 80 measurements). Storing is done automatically after each completed measurement. The memory is non-volatile. This means that you will not loose stored data when changing batteries. The memory cannot be cleared. Once the memory is full, the oldest values will be overwritten.
Recalling stored readings
To recall stored readings, first turn the product off, then press the memory button (E). A single push (or will recall the latest reading. The lower display line successively shows memory index and pulse on the one hand and date and time of the respective measurement on the other hand. The memory reading also includes the feedback from the confirmation system as described above.
Repeatedly pressing the memory button (E) will call up one by one all stored readings:
(−) towards older readings
(+) towards younger readings
Scrolling
Keep one side of the memory button pressed for scrolling through the memory.
Press the on/off button (C) to exit the memory mode.

Select mode
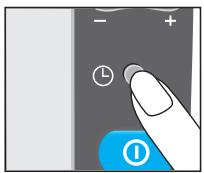
Setting date and time
First turn off the appliance. Push the select button (D) for longer than 3 seconds to enter the select mode. Wait for a confirmation beep. The day position of the displayed date starts flashing. Using the memory button (E), you can adjust the date. Press the select button again to make the month position flash, adjust it using the memory button. Press the select button again and proceed the same way to adjust the time (hour/minute).
After having changed date and time, press the on/off button (C) to confirm. The device will then turn off.
Deactivating the positioning system (A)
Should you wish to deactivate the positioning system (e.g. because you want to measure while lying down), proceed as follows:
Turn off the product. Push the select button (D) for longer than 3 seconds and wait for the confirmation beep.
The display shows the date and time settings. Then repeatedly press the select button until the positioning system symbol (4) will be displayed next to a flashing «ON».
Press one side of the memory button to change the setting from
"ON" (positioning system activated) to
OFF (positioning system deactivated).
To confirm the change of setting, press the on/off button (C).
Please note:
Unless you confirm a modified setting by pressing the on/off button, the appliance will turn off automatically after 2 minutes without adapting the modified setting.
Storage and cleaning
Clean the product with a soft, slightly damp cloth. Stains on the cuff can be carefully removed with damp cloth. Do not wash or dry clean the cuff. Do not store the product in a place exposed to direct sunlight or high humidity.
Calibration
This product has been calibrated at the time of manufacture. If used according to the use instructions, periodic re-calibration is not required. If at any time, you question the measuring accuracy, please contact a Braun Service Centre.
Manufacturing date is given by the LOT number on the back of the product. The first number after LOT represents the last digit of the year of manufacture.
The next three digits give the day of the year of manufacture.
An example: LOT 4116 xx xx - this product has been manufactured on the 116th day of the year 2004.
What to do if ...
| Problem | Reason | Solution |
| flashing) | Batteries are flat. Memory readings can be called up. Measurements are not possible. | Insert new batteries. |
| e.g. Error | Error codes 01-29: Device may not be correctly positioned on the wrist. | Refit device and repeat measurement as shown and described under «Measuring». |
| e.g. Error | Error codes 30 and higher: System error | Repeat measurement. If problem persists, have device checked at a Braun Service Centre. |
| Measurement or inflation does not start instantly. | Right measuring position was not reached. | Repeat measurement as shown and described under «Measuring» or deactivate the positioning system (A). |
| Readings from repeated measurements differ considerably. | Blood pressure is a fluctuating value. For healthy adults, deviations of about 10 to 20 mmHg are possible. | none |
| Cuff is not properly fitted. | Ensure that the appliance is fitted as follows: - on top of the slim side of the forearm - with the display on top - with the battery compartment facing the user's body - approx. 2 cm away from the thumb root | |
| Readings were not consistently taken at heart level. | For each measurement, proceed exactly as shown and described under «Measuring». | |
| Talking, coughing, laughing, moving etc. when measuring will influence the reading. | While measuring, relax, keep still, do not move, or speak. | |
| Prior to a measurement, the positioning system (A) on the display does not work. | Positioning system (A) is deactivated. | Refer to the chapter «Select mode» to activate the positioning system (A). |
Specifications
Model: BP 3560/BP 3550
Operation principle: Oscillometric method
Display: Liquid Crystal Display
Measuring range: 0 - 320mmHg (cuff pressure)
Blood pressure 30 mmHg (minimum diastolic value)
measurement: 250 mmHg (maximum systolic value)
Pulse rate: 30 - 150 / min
Laboratory accuracy: ± 3mmHg (cuff pressure) ± 5% of reading (pulse rate)
Inflation: Automatic, soft, adapted to blood pressure
Power supply: 2 batteries, type LR 03 (AAA) (e.g. Duracell)
Operating temperature: +10^ to +40^
Storage temperature: -20°C to +60°C
Humidity: Up to 85% r.h.
Cuff: Suitable for wrist circumference of 13.5 to 20 cm
If device is not used within specified temperature and humidity ranges the technical accuracy can not be ensured.

Type BF equipment
Subject to change without notice.
This appliance conforms to the following standards:
DIN EN 60601-1: 3/96 «Medical electrical equipment» -
Part 1: General requirements for safety
DIN EN 1060-1: 12/95, AMD 1 09/02 «Non-invasive sphygmomanometers» –
Part 1: General requirements
DIN EN 1060-3: 9/97 «Non-invasive sphygmomanometers» -
Part 3: Supplementary requirements for electro-mechanical blood pressure measuring systems

This product conforms to the provisions of the EC directive 93/42 / EEC (Medical Device Directive).
MEDICAL ELECTRICAL EQUIPMENT needs special precautions regarding EMC. For detailed description of EMC requirements please contact the Braun Infoline (see page 2).
Portable and mobile RF communications equipment can affect MEDICAL ELECTRICAL EQUIPMENT.

Please do not dispose of the product in the household waste at the end of its useful life. Disposal can take place at a Braun Service Centre or at appropriate collection points provided in your country.
Guarantee
We grant 2 years guarantee on the product commencing on the date of purchase. Within the guarantee period we will eliminate, free of charge, any defects in the appliance resulting from faults in materials or workmanship, either by repairing or replacing the complete appliance as we may choose.
This guarantee extends to every country where this appliance is supplied by Braun or its appointed distributor. This guarantee does not cover: damage due to improper use, normal wear or use as well as defects that have a negligible effect on the value or operation of the appliance. The guarantee becomes void if repairs are undertaken by unauthorised persons and if original Braun parts are not used.
To obtain service within the guarantee period, hand in or send the complete appliance with your sales receipt to an authorised Braun Customer Service Centre.
For UK only:
This guarantee in no way affects your rights under statutory law.
François
Procter & Gamble International Operations, SA
Atomo # 3 Parque Industrial Naucalpan,
Naucalpan Estado de Mexico C.P. 53370
SOLO PARA ARGENTINA
Part 1: General requirements
DIN EN 1060-3: 9/97 «Sfigmomanometri non invasivi» -
For a reliable blood pressure measurement, please follow the instructions below.

- Place the monitor housing on the slim side of your bare forearm with the monitor facing up. The distance aid helps you to keep the required 2 cm distance to your palm line.
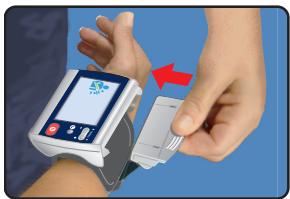
- To close the cuff, hold the appliance against your body. Then take hold of the cuff closure, pull out the cuff and insert the cuff closure in the monitor housing until it locks into place. Once cuff is closed, do not move the appliance anymore. If you want to change the monitor position on your arm, open and close the cuff once again.

- Press the red on/off button.
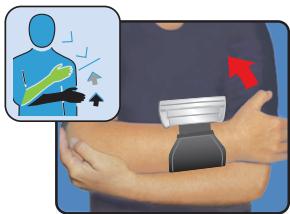
- Put the hand with the appliance on the other upper arm as shown. Slowly move the hand upward along the upper arm. Watch the positioning system and move your hand up or down according to the direction of the arrow shown.

- The positioning system shown on the left and a beep confirm that you have reached the right measuring position. The measurement will start automatically.