LIVE-FSH16T PLUS - Surveillance Camera AIRLIVE - Free user manual and instructions
Find the device manual for free LIVE-FSH16T PLUS AIRLIVE in PDF.
| Brand | AIRLIVE |
| Model | LIVE-FSH16T PLUS |
| Product type | Unmanaged network switch |
| Number of ports | 16 ports |
| Port type | RJ-45 (computer ports) |
| Port speed | 10/100 Mbps |
| Network functions | Auto-MDI/MDI-X, VLAN (via switch) |
| VLAN selector | Yes, on the back of the switch (ON/OFF) |
| Power supply | External (power adapter) |
| LED indicators | Power (green), Link/Act (green), FDX/Col (yellow), 100M (red), VLAN ON/OFF (yellow) |
| Recommended cable | UTP/STP Cat 3, 4 or 5 (10 Mbps); Cat 5 (100 Mbps) |
| Maximum cabling distance | 100 meters |
| Auto-MDI/MDI-X | Yes, allows use of straight or crossover cable |
| Operating temperature | 0°C to 40°C (estimate) |
| Operating humidity | 10% to 90% (estimate) |
Frequently Asked Questions - LIVE-FSH16T PLUS AIRLIVE
User questions about LIVE-FSH16T PLUS AIRLIVE
0 question about this device. Answer the ones you know or ask your own.
Ask a new question about this device
Download the instructions for your Surveillance Camera in PDF format for free! Find your manual LIVE-FSH16T PLUS - AIRLIVE and take your electronic device back in hand. On this page are published all the documents necessary for the use of your device. LIVE-FSH16T PLUS by AIRLIVE.
USER MANUAL LIVE-FSH16T PLUS AIRLIVE
Live Series Switches
Live-FSH5PS, Live-FSH8PS, Live-FSH5R, Live-FSH8SB, Live-FSH8R, Live-FSH16T+, Live-GSH5T, Live-GSH8T
Quick Setup Guide

English 1

Espanol 4

Deutsch 7

François 10

13
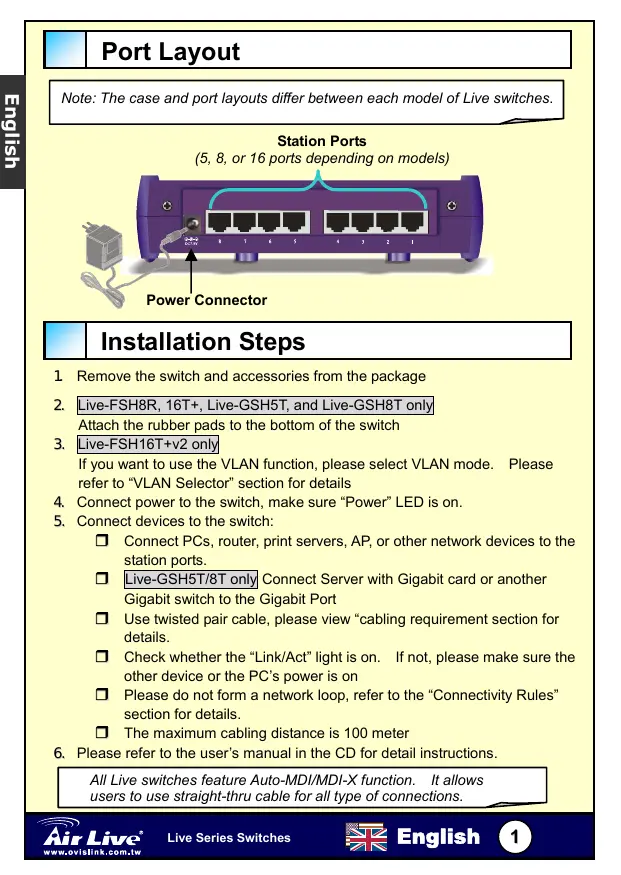
Port Layout
Note: The case and port layouts differ between each model of Live switches.
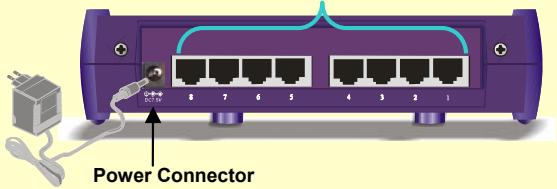
Station Ports
(5, 8, or 16 ports depending on models)
Installation Steps
- Remove the switch and accessories from the package
Live-FSH8R, 16T+, Live-GSH5T, and Live-GSH8T only Attach the rubber pads to the bottom of the switch
Live-FSH16T+v2 only If you want to use the VLAN function, please select VLAN mode. Please refer to "VLAN Selector" section for details - Connect power to the switch, make sure "Power" LED is on.
-
Connect devices to the switch:
-
Connect PCs, router, print servers, AP, or other network devices to the station ports.
Live-GSH5T/8T only Connect Server with Gigabit card or another Gigabit switch to the Gigabit Port
Use twisted pair cable, please view "cabling requirement section for details.
Check whether the "Link/Act" light is on. If not, please make sure the other device or the PC's power is on
Please do not form a network loop, refer to the "Connectivity Rules" section for details.
The maximum cabling distance is 100 meter -
Please refer to the user's manual in the CD for detail instructions.
All Live switches feature Auto-MDI/MDI-X function. It allows users to use straight-thru cable for all type of connections.
LED & Cabling Rules
| LED indicator | Color | Status | Meaning |
| All Models | |||
| Power | • Green | ON OFF | Power ON Power OFF |
| Link/Act | • Green | ON Blinking OFF | Connection is made Transmitting/Receiving No connection is made |
| FDX/Col | • Yellow | ON OFF Blinking | Full Duplex Half Duplex Collisions (in half duplex) |
| 100M | • RED | ON OFF | 100 Mbps Connection 10 Mbps Connection |
| Live-FSH16T+ | |||
| VLAN | • Yellow | ON | VLAN Mode On |
| VLAN | • Yellow | OFF | VLAN Mode OFF |
| Live-GSH5T/ Live-GSH8T | |||
| • 1000/ACT • 100/ACT • 10/ACT | • Green • Green • Green • Green | ON ON ON Blinking | FDX 1000Mbps Connection FXD 100Mbps Connection FXD 10Mbps Connection Transmitting/Receiving |
| Port Type | 10/100 Ports | Gigabit Port (Live GSH5T/8T) |
| Cable to use | 100Mbp :CAT5 UTP/STP 10Mbps: Cat 3, 4, 5 UTP/STP | 10/100/1000Mbps Cat 5 UTP/STP |
| To PC | Straight-through | Straight-through |
| To hub/switch | Straight-through | Straight-through |
| Maximum distance | 100m | 100m |
VLAN Selector (Live FSH16T+ only)
For normal operation, please make sure your VLAN switch is in "OFF" Position
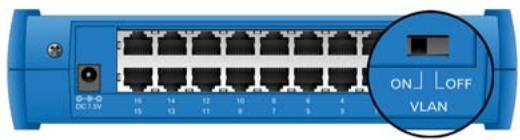
Live-FSH16T+ is equipped with VLAN selector switch in the back panel. When activated, each port will be in its own VLAN group with 2 sharing ports. Ports in different VLAN groups cannot see each other. However, everyone can see the sharing port. Please make sure your VLAN selector is in "OFF" position if you are not using the VLAN function.
ON: Every port in its own VLAN group sharing Port 8 and 16
OFF: VLAN function off, the switch operates in normal mode
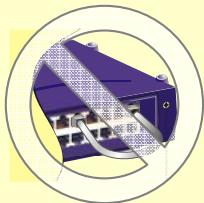
Connectivity Rules
Please avoid forming a network loop (see the diagram on the right) when connecting the cables. A network loop can cause the network to shutdown..
The maximum cable distance is 100 meter
Always check the LED lights for trouble shooting
Computers and network devices must be in the same IP subnet in order to see each other. For example, 198.168.0.1 can not see 192.192.1.1 for Class C subnet. You can find out the computer's IP address by typing "IPCONFIG" in WinNT/2000/XP's command line. For Win9x, run "WINIPCFG".
- Avoid operating device in 10Mbps full duplex mode if the device does not have auto-negotiation function.