
NXF600 - Sound Amplifier YORKVILLE - Free user manual and instructions
Find the device manual for free NXF600 YORKVILLE in PDF.


| Product type | Speaker suspension system |
| Brand | YORKVILLE |
| Model | NXF600 (NX series) |
| Compatibility | YORKVILLE NX speakers |
| U-bracket material | Steel |
| Vertical tilt angle | Up to 30° (with angle hardware) |
| Horizontal rotation angle | Up to 30° |
| Max number of speakers in array | 6 (with NXF600A adapter) |
| Circular array angle | 60° between speakers |
| Included components | U-bracket NXF600U, adapter plates (top/bottom), bolts and nuts |
| Available options | NXF600W (wall mount), NXF600A (circular array adapter) |
| Usage | Aerial suspension, wall mounting, circular array |
| Safety | Must be installed by a professional; consult a structural engineer |
| Installation instructions | See manual: plate assembly, bracket attachment, tightening |
| Maintenance | Periodically inspect hardware and cabinet |
| Repairability | Spare parts available: NXF600U, NXF600W, NXF600A |
| Weight (estimated) | Approximately 3-5 kg (depending on configuration) |
Frequently Asked Questions - NXF600 YORKVILLE
User questions about NXF600 YORKVILLE
0 question about this device. Answer the ones you know or ask your own.
Ask a new question about this device
Download the instructions for your Sound Amplifier in PDF format for free! Find your manual NXF600 - YORKVILLE and take your electronic device back in hand. On this page are published all the documents necessary for the use of your device. NXF600 by YORKVILLE.
USER MANUAL NXF600 YORKVILLE
Yorkville NX Flyware
All Yorkville NX speaker enclosures are equipped with flying hardware. To increase the options, several hardware kits have been developed to expand the NX enclosure's capabilities for overhead suspension applications. Flying the enclosures in different angles, attaching to walls and even setting up arrays are now possible to do easily and, most importantly, safely.
IMPORTANT!! The rigging of loudspeaker systems is an extremely serious matter. Overhead rigging requires extensive experience, including (but not limited to) calculating working load limits, hardware installation, and periodic safety inspections of all hardware and cabinetry. If you lack these qualifications, do not attempt the installation yourself, but instead use a professional structural rigger. Improper installation can result in bodily injury or death. Consult a structural engineer to calculate added loads for a building. Structural reinforcement may be necessary to insure a safe installation.

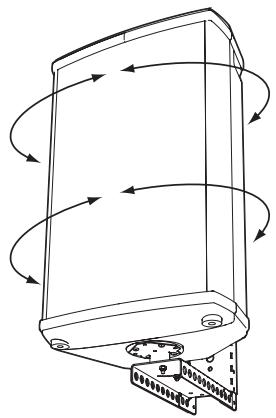
30-degrees horizontal rotation allows NX enclosures to be mounted along walls of venues.
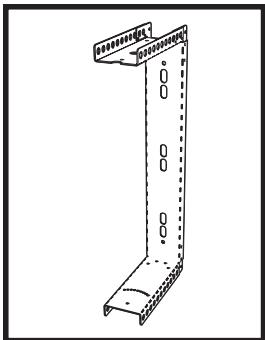
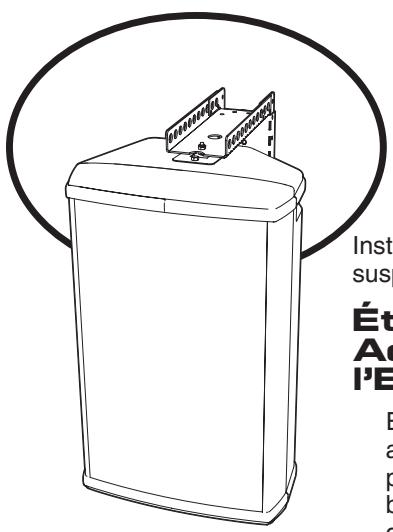
The NXF600U Bracket
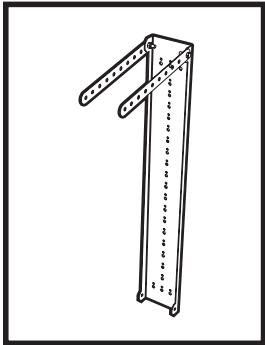
The optional NXF600W Wall Mounting Bracket
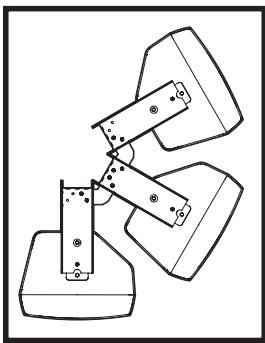
The NXF600U Bracket with the optional
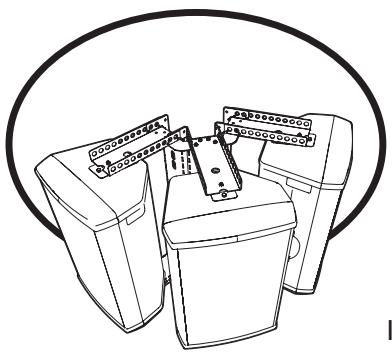
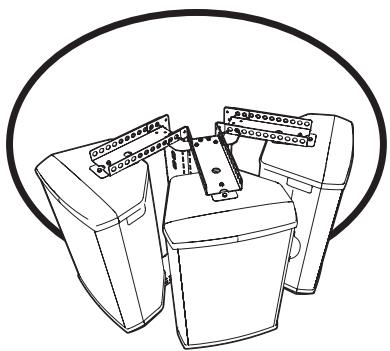
NXF600A Installed. Three enclosure array.
The NXF600U System
The NXF600U kit allows enclosures to be mounted in more ways than standard shackle and cables allow. By using the NXF600U bracket, the multiple fly-point options allow the rig to be flown at different angles. The bracket also helps secure the NX enclosure to the truss or roofing systems. The NXF600U is easily mounted strategically to the top and bottom of the enclosure. Additionally, the NX enclosure can be rotated up to 30-degrees across the horizontal plane (within the bracket housing).
NXF600W Wall Mounting (optional)
The optional NXF600W has been designed to add more capability and versatility for wall mounting applications. The NXF600U attaches to the NXF600W wall-mount bracket enabling vertical angles of up to 30-degrees.
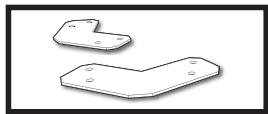
The NXF6000A Array Link Assembly Kit
NXF600A Flying Arrays (optional)
When using multiple enclosures, the optional NXF600A Array Adapter connects NXF600U brackets together to form perfect 60-degree
spacing. The NXF600A joins the NXF600U U-brackets together safely and securely which makes it fairly simple to install for flying two or three enclosures (up to six) in the circular arrays.
Note: the NXF600A Array Link Adapters cannot be used with the NXF600W Wall-Mount Kit.
NX Flyware System Components
NXF600U - Steel U-bracket and Enclosure Adapter Plates (upper and lower).
NXF600W - Wall-Mounting Bracket (for mounting the NXF600U bracket to wall or pillar).
NXF600A - Array Adapter (to properly array and space out multiple NXF600U Flying assemblies)
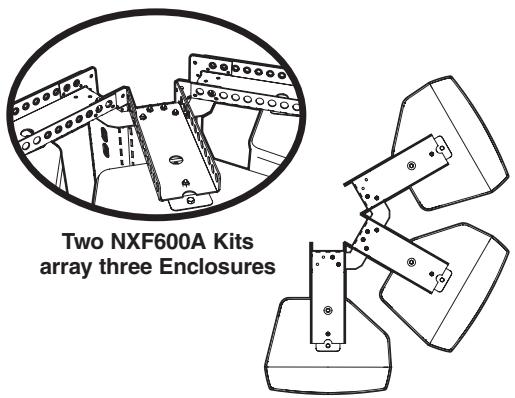
An ideal cluster array is easily assembled using three NXF600U U-brackets kits, and two NXF600A kits (shackles and cables not included).
Note: all necessary nuts and bolts are included with kits
INDEX
English
NXF600U U-Bracket ....2
NXF600W Wall-Bracket .3
NXF600A Array Adapter .4
Français
NXF600U Support en U en acier 6
REAL Gear. REAL People.
Canada
Voice: (905) 837-8481
Fax: (905) 837-8746
U.S.A.
Voice: (716) 297-2920
Fax: (716) 297-3689

Yorkville
www.yorkville.com
Yorkville Sound
550 Granite Court
Pickering, Ontario
L1W-3Y8 CANADA
Yorkville Sound Inc.
4625 Witmer Industrial Estate
Niagara Falls, New York 14305 USA
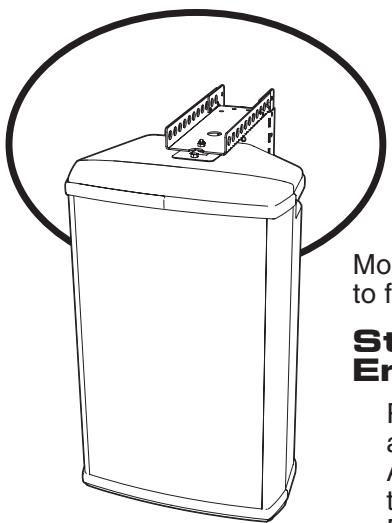
Attaching the NXF600U Bracket to NX Enclosures
Mount the NXF600U bracket onto the NX enclosure prior to flying or mounting.
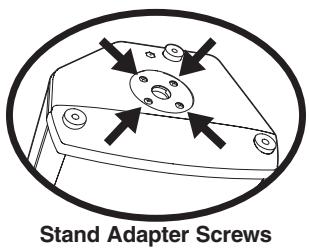
Step 1 - Installing the Bottom Enclosure Adapter Plate
Remove the enclosure's bottom four stand adapter bolts. Do not remove the Stand Adapter and be sure to save the bolts, they will be needed to mount the bottom Enclosure Adapter Plate. Position the bottom Enclosure Adapter Plate on the Stand adapter (as shown in diagram). Use the bolts, previously used to mount the Stand Adapter, and mount the bottom Enclosure Adapter Plate to the enclosure (on top of the Stand Adapter).
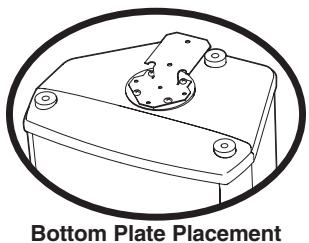
Step 2 - Installing the Top Enclosure Adapter Plate
On the top of the NX enclosure, remove the 2 hex bolts. Position the top Enclosure Adapter Plate as shown in diagram, and use two of the bolts provided with the kit to mount the plate on the enclosure.
Step 3 - Mounting the Enclosure to the Steel U-Bracket
With the NX enclosure on its side, mount the Steel U-Bracket as shown in the diagram. Align the holes on the bracket with the corresponding holes on the NX enclosure (the top uses a single bolt to mount the Steel U-Bracket and the bottom uses two). Do not tighten the bolts until the complete bracket is in place.
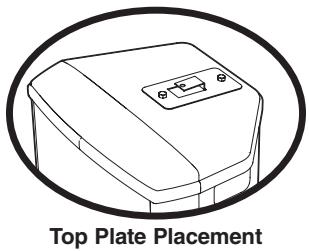
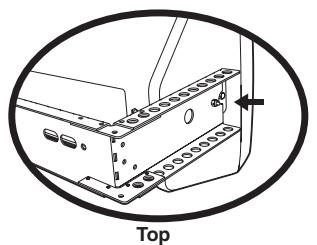
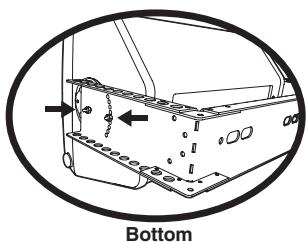
Step 4 - Assembly complete
Tighten all bolts mounting the bracket to the NX enclosure appropriately before flying.
REAL Gear.
REAL People.
Canada
Voice: (905) 837-8481
Fax: (905) 837-8746
U.S.A.
Voice: (716) 297-2920
Fax: (716) 297-3689

www.yorkville.com
Yorkville Sound
550 Granite Court
Pickering, Ontario
L1W-3Y8 CANADA
Yorkville Sound Inc.
4625 Witmer Industrial Estate
Niaqara Falls, New York
14305 USA
Using the NXF600W Wall-Mount Bracket
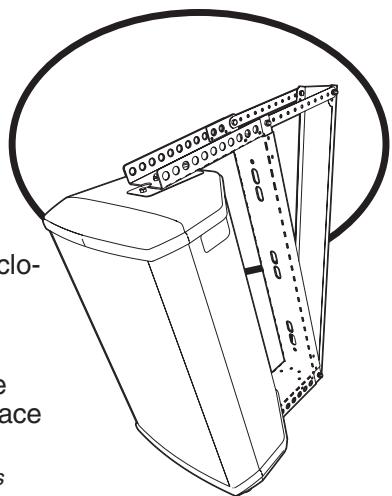
The NXF600U Bracket must be installed on the NX enclosure to use the NXF600W Wall-Mount Bracket.
Step 1 - Choose a Location
Locate the appropriate place where the NX enclosure will be mounted. Mounting should be to a secure surface such as wall joists or pillars that can handle the load. Do not attempt to install the enclosure to the wall alone and always follow safety rules. Do not mount onto a surface that's not secure!
Step 2 - Mount Wall-Mount Bracket
It's best to mount the NXF600W Wall-Mount bracket to the secure surface prior to attaching the NX enclosure (equipped with the NXF600U bracket). Once the NXF600W Wall-Mount bracket is secured – to a proper secure surface – proceed to mount the NX enclosure (equipped with the NXF600U bracket).
Step 3 - Angle Stand-Off Rails
If required, install the Angle Rails to the Wall-Mount Bracket using the bolts provided.
Step 4 - Mounting the NX Enclosure
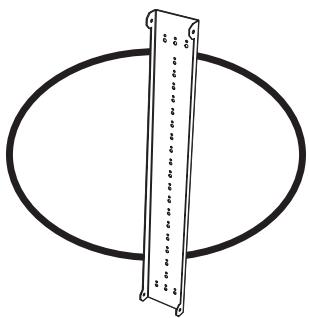
NXF600W Wall-Mount
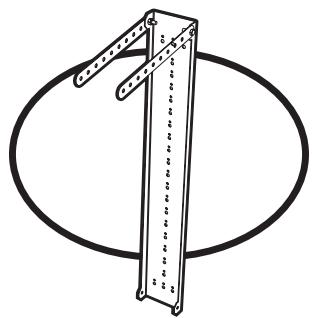
NXF600W with Angle Stand-Offs Attached
i. Place the NX Enclosure equipped with the NXF600U bracket into the Wall-Mount Assembly. Install the bottom two nuts and bolts first (see diagram). Do not fully tighten the bolts until the top bolts are in place and the cabinet has been properly positioned.
ii. Install the top 2 nuts and bolts of the NXF600U brackets to the NXF600W Wall-Mount brackets at the appropriate angle using the Angle Stand-Off Rails if needed. (see diagram)
(Installation to the NXF600W Wall-Mount bracket can be made without the angle stand-offs, if a downward angled position is not required.)
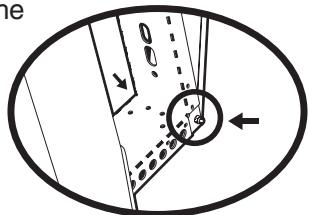
Mount the assembly to the bottom first for stability
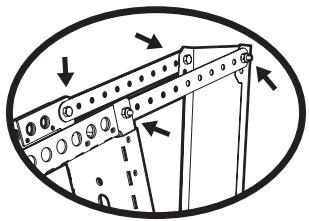
Using the Stand-Off Rails helps position the NX Enclosure at the perfect angle
REAL Gear.
REAL People.
Canada
Voice: (905) 837-8481
Fax: (905) 837-8746
U.S.A.
Voice: (716) 297-2920
Fax: (716) 297-3689

Yorkville
www.yorkville.com
Yorkville Sound
550 Granite Court
Pickering, Ontario
L1W-3Y8 CANADA
Yorkville Sound Inc.
4625 Witmer Industrial Estate
Niagara Falls, New York
14305 USA
Using the NXF600A Array Link Adapters
Note: The NXF600U Bracket must be installed on the NX enclosure to enable the use of the NXF600A Array Link Adapters.
In addition to flying, NX enclosures have been designed to be used in an array. To facilitate this the NXF600A Array Link Adapters were developed.. The NXF600A Array Adapters link the NXF600U Brackets together at proper 60-degree angles (for maximum dispersion).
Note: the NXF600A Array Link Adapters cannot be used with the NXF600W Wall-Mount Kit.
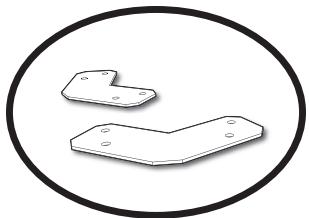
The NXF600A Array-Adapters

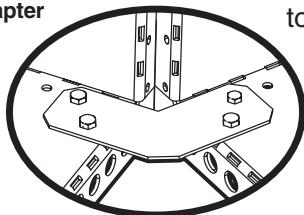
Top Adapter
Bottom Adapter
Step 1 - Linking Assemblies Together
Attach the NXF600A Array Link Adapters as shown in the diagram, between the NXF600U brackets that are to be arrayed. Use the nuts and bolts provided with each Array Link Adapter, tighten.
Step 2 - Adding More Assemblies
To link more than two assemblies together additional NXF600A Array Link Adapter kits are required. Repeat Step 1 for each enclosure added to the array,
REAL Gear.
REAL People.
Canada
Voice: (905) 837-8481
Fax: (905) 837-8746
U.S.A.
Voice: (716) 297-2920
Fax: (716) 297-3689

Yorkville
www.yorkville.com
Yorkville Sound
550 Granite Court
Pickering, Ontario
L1W-3Y8 CANADA
Yorkville Sound Inc.
4625 Witmer Industrial Estate
Niaqara Falls, New York
14305 USA
Yorkville NX Flyware
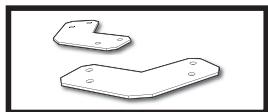
The NXF6000A Array
Link Assembly Kit
Montage Mural NXF600W (optionnel)
Voice: (716) 297-2920
Fax: (716) 297-3689

Yorkville
www.yorkville.com
Yorkville Sound
550 Granite Court
Pickering, Ontario
L1W-3Y8 CANADA
Yorkville Sound Inc.
4625 Witmer Industrial Estate
Niagara Falls, New York
14305 USA
Fixer la Quincaillerie NFX35U aux En- Ceintes NX
Voice: (716) 297-2920
Fax: (716) 297-3689

Yorkville
www.yorkville.com
Yorkville Sound
550 Granite Court
Pickering, Ontario
L1W-3Y8 CANADA
Yorkville Sound Inc.
4625 Witmer Industrial Estate
Niaqara Falls, New York
14305 USA
Voice: (716) 297-2920
Fax: (716) 297-3689
Niagara Falls, New York
14305 USA
REAL Gear. REAL People.
Canada
Voice: (905) 837-8481
Fax: (905) 837-8746
U.S.A.
Voice: (716) 297-2920
Fax: (716) 297-3689

www.yorkville.com
Yorkville Sound
550 Granite Court
Pickering, Ontario
L1W-3Y8 CANADA
Yorkville Sound Inc. 4625 Witmer Industrial Estate Niagara Falls, New York 14305 USA


- YORKVILLE NX FLYWARE
- THE NXF600U SYSTEM
- NXF600W WALL MOUNTING (OPTIONAL)
- NXF600A FLYING ARRAYS (OPTIONAL)
- NX FLYWARE SYSTEM COMPONENTS
- INDEX
- ENGLISH
- FRANÇAIS
- REAL GEAR. REAL PEOPLE
- WWW.YORKVILLE.COM
- YORKVILLE SOUND
- YORKVILLE SOUND INC
- ATTACHING THE NXF600U BRACKET TO NX ENCLOSURES
- STEP 1 - INSTALLING THE BOTTOM ENCLOSURE ADAPTER PLATE
- STEP 2 - INSTALLING THE TOP ENCLOSURE ADAPTER PLATE
- STEP 3 - MOUNTING THE ENCLOSURE TO THE STEEL U-BRACKET
- STEP 4 - ASSEMBLY COMPLETE
- USING THE NXF600W WALL-MOUNT BRACKET
- STEP 1 - CHOOSE A LOCATION
- STEP 2 - MOUNT WALL-MOUNT BRACKET
- STEP 3 - ANGLE STAND-OFF RAILS
- STEP 4 - MOUNTING THE NX ENCLOSURE
- USING THE NXF600A ARRAY LINK ADAPTERS
- STEP 1 - LINKING ASSEMBLIES TOGETHER
- STEP 2 - ADDING MORE ASSEMBLIES
- MONTAGE MURAL NXF600W (OPTIONNEL)
- FIXER LA QUINCAILLERIE NFX35U AUX EN- CEINTES NX
Brand : YORKVILLE
Model : NXF600
Category : Sound Amplifier