
UNIVERSAL LAPTOP DOCKING STATION - Laptop Docking Station TARGUS - Free user manual and instructions
Find the device manual for free UNIVERSAL LAPTOP DOCKING STATION TARGUS in PDF.



| Product Type | Universal Laptop Docking Station |
| Brand | Targus |
| Model | Universal Laptop Docking Station |
| Power Supply | AC power adapter included |
| Connectivity | 4 USB 2.0 ports (including 2 Always On high power 1A), 2 PS/2 ports, 1 IEEE 1284 parallel port, 1 RS232 serial port, 1 RJ-45 10/100 Ethernet port, 2 3.5mm audio ports (stereo output, microphone input), 1 S/PDIF digital audio output |
| USB Data Rate | Up to 480 Mbps |
| High Power USB Power | Up to 1000 mA (1A) on Always On ports |
| Always On Function | USB power maintained even when laptop is off, in sleep or unplugged |
| Thermal Dissipation | Natural convection via raised rubber feet |
| Comfort Platform | Raised position for better typing comfort and air circulation |
| Supported Operating Systems | Windows 2000 SP4, Windows XP SP3, Windows Vista SP1 |
| Minimum Configuration | PC with Intel Pentium or equivalent processor, CD-ROM drive, USB 2.0 port, AC power source |
| Anti-theft | Lock slot compatible with Targus DEFCON (lock not included) |
| Box Contents | Docking station, high-speed USB 2.0 cable, driver CD-ROM, power adapter, user manual |
| Maintenance | Clean with a soft, dry cloth. Do not use abrasive products. |
| Safety | Overvoltage protection on each USB port; do not force connectors |
| Repairability | Spare parts not specified; contact Targus customer service |
Frequently Asked Questions - UNIVERSAL LAPTOP DOCKING STATION TARGUS
User questions about UNIVERSAL LAPTOP DOCKING STATION TARGUS
0 question about this device. Answer the ones you know or ask your own.
Ask a new question about this device
Download the instructions for your Laptop Docking Station in PDF format for free! Find your manual UNIVERSAL LAPTOP DOCKING STATION - TARGUS and take your electronic device back in hand. On this page are published all the documents necessary for the use of your device. UNIVERSAL LAPTOP DOCKING STATION by TARGUS.
USER MANUAL UNIVERSAL LAPTOP DOCKING STATION TARGUS
Universal Laptop Docking Station

Targus
USERGUIDE
TABLE OF CONTENTS
GB - English
Targus Universal Laptop Docking Station 3
DE - Deutsch
Targus Universelle Laptop-Dockingstation 21
ES - Espanol
Targus Docking Station Universal Para Portátil 39
FR - Français
Targus Universal Laptop Docking Station 75
NL - Nederlands
Targus Universeel Docking Station Voor Laptops 93
PT - Português
Targus Universal Laptop Docking Station 111
TARGUS UNIVERSAL LAPTOP DOCKING STATION
Introduction
Congratulations on your purchase of the Targus Universal Laptop Docking Station. This portable expansion module allows you to connect through a single USB connection up to 4 USB devices, a network (Ethernet/LAN) connection, speakers and microphone, PS/2 mouse and keyboard, and a serial and parallel device. Also, the lock slot and universal lock support provided helps you secure your docking station to your desktop.
The docking station also features Targus Always On technology, Targus USB Power Port providing twice the USB specification for higher power requirement devices, and USB ports that are widely spaced to accommodate larger adapters. Targus Always On provides power to the USB ports even when the laptop is shut-down, disconnected from the docking station or in hibernate/stand-by mode. This allows USB devices that charge via the USB port to keep charging under any circumstance.
Features
Heat dissipation by natural convection:
Place the back edge of your laptop on the rubber pads of the Docking Station. Most laptops dissipate heat through the bottom and the more air that's allowed to flow under the bottom, the better chance that heat will dissipate by natural convection.
Comfort
The raised platform also provides a more comfortable position for the hands.
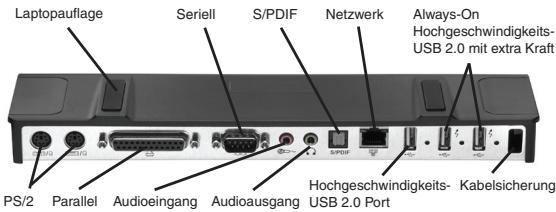
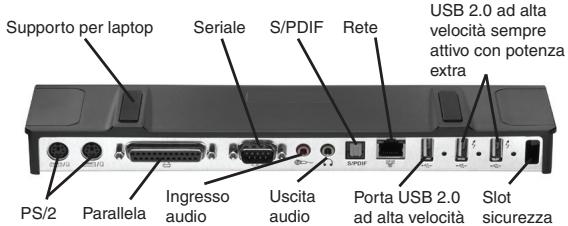
The docking station provides the following ports:
- Two PS/2 ports
- IEEE 1284 DB25 Connector parallel (USB emulated)
-
Two 3.5 mm Audio: (1) stereo out and (1) microphone in
RS232 serial (USB emulated)
One S/PDIF Digital Audio Output (not supported in Windows 2000)
RJ-45 Ethernet 10/100
Four USB 2.0 Ports: -
Two High-Speed USB 2.0 ports
- Two High-Speed USB 2.0 Always-On ports with extra power
Package Contents
In addition to this user guide, the package contains:
Targus Universal Laptop Docking Station
High-speed USB 2.0 upstream cable
- Driver software CD
- AC power adapter
System Requirements
Hardware
PC with an Intel Pentium processor or equivalent
- CD-ROM drive
- USB version 2.0 port
- AC power source (AC adapter required)

NOTE: WHEN CONNECTED TO A USB VERSION 1.1 PORT ON YOUR COMPUTER, THE DOCKING STATION'S PERFORMANCE LEVEL WILL BE LESS THAN OPTIMAL. FOR BEST RESULTS, CONNECT IT TO A USB VERSION 2.0 PORT.
Operating System
- Windows® 2000 Service Pack 4 or
- Windows® XP Service Pack 3 or
- Windows Vista® Service Pack 1
Installing the Device and Drivers
To use the Targus docking station, you must first install the driver onto your computer.

WARNING: YOU MUST INSTALL THE SOFTWARE BEFORE CONNECTING THE DOCKING STATION TO YOUR COMPUTER. OTHERWISE, THE DOCKING STATION WILL NOT WORK PROPERLY.
After installing your software, connect the docking station to your computer and Windows plug-and-play will install the hardware drivers for each port.
Installing the Docking Station Driver
Installing the docking station driver enables your operating system to recognize it and its ports once it's connected.
1 Turn on your computer.
2 Insert the driver software CD into your computer's CD-ROM drive.
If setup does not begin automatically, click Start, Run, and enter D:\ACP45_setup.exe (where D: is the path of your CD-ROM drive) and then click OK.
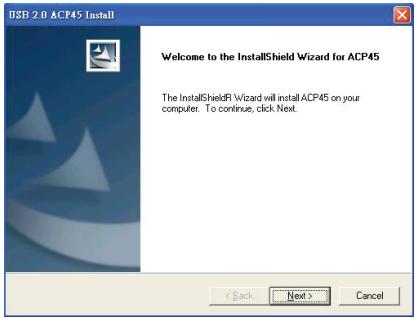
3 The Installation Wizard window of the docking station will pop up. Click Next to proceed.
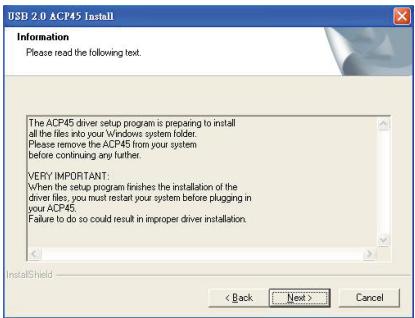
4 The Information window will pop up. Click Next to proceed. In order to install the driver files properly, you must restart your system before plugging in the docking station.
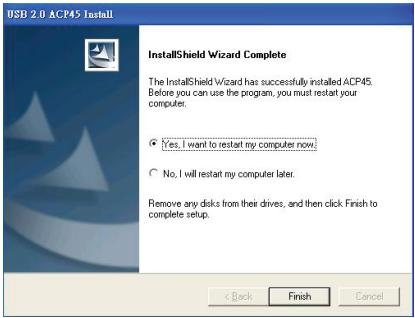
5 Choose Yes, I want to restart my computer now. Click Finish and restart your computer when prompted.
Connecting the Docking Station to Your Computer
After installing the docking station software, you are ready to connect the docking station to your computer. To do this:
1 Connect the supplied AC power adapter to the AC power jack on the docking station.
2 Connect one end of the USB cable to the docking station and the other end into an available USB 2.0 port on your computer.

WARNING: THE DOCKING STATION WILL NOT FUNCTION PROPERLY WITHOUT THE AC ADAPTER PLUGGED INTO AN AC OUTLET.
DO NOT CONNECT ANY DEVICES TO THE DOCKING STATION UNTIL THE INSTALLATION IS COMPLETED.
Installing the Default Device Drivers
Once you connect the docking station to your computer, the default drivers begin installing for each of the ports automatically.

NOTE: PLEASE ENSURE YOU HAVE THE LATEST SERVICE PACKS INSTALLED.
Some hardware devices may prompt you to install the drivers.
To install the drivers:
1 Select Install the software automatically (Recommended) and click Next.
The Found New Hardware Wizard program begins installing the hardware drivers.
The Completing the Found New Hardware Wizard screen appears.
2 Click Finish and repeat as needed for each device.
3 Restart your computer.
LED Status Indicator Lights
Once all device drivers are installed, the USB LED status indicator lights on the back of the docking station glow when you connect devices to the docking station.
- Green Tx light illuminates when connected to a network and the yellow Rx light flashes when data is transmitting to or from the network.

NOTE: THE DOCKING STATION SUPPORTS HOT SWAPPING OF THE NETWORK CABLE.
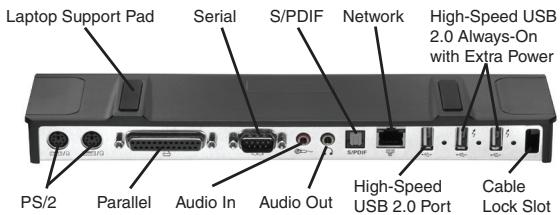
Docking station ports
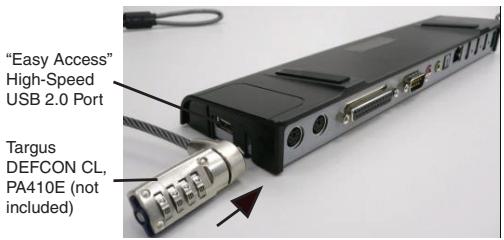
Docking station left-side view
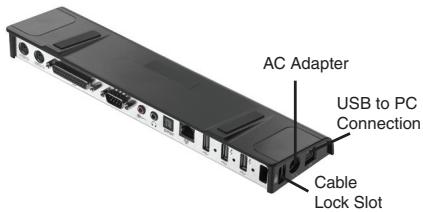
Docking station right-side view
Connecting New Devices
To avoid possible damage when connecting a new device, do not force the cable connector into the port on the docking station. If the cable connector does not attach smoothly, turn the connector over and try attaching it again.
Connecting a Serial Mouse / Keyboard
To connect a serial mouse or keyboard, attach the cable connector to the serial port on the docking station.
Connecting a PS/2 Mouse / Keyboard
To connect a PS/2 mouse or keyboard, attach the cable connector to the PS/2 port on the docking station.
Connecting and Configuring a Serial Modem
To connect a serial modem:
1 Attach the cable connector to the serial port on the docking station.
2 Install the modem software driver according to the instructions that come with the device.
3 When prompted to select the port, choose the Serial USB (COMx), where x is the COM port number assigned by your operating system.
Connecting a Parallel Printer
To connect a parallel printer:
1 Attach the cable connector to the parallel port on the docking station.
2 Go to Start button of your Window OS, and click on Printers and Faxes. Add your printer driver by following the instructions of the Add Printer Wizard.
Connecting a PDA
1 Attach the cable connector to the serial port on the docking station.
2 Verify that the COM port setting, in either your HotSync® or ActiveSync® software, matches the setting on the docking station.
To verify the COM port setting on the docking station, refer to "Verifying Devices are Installed".
To verify the COM port setting on your PDA, refer to the documentation that came with it.
Connecting to a Local Area Network
To connect an Ethernet cable with an RJ-45 connector, attach the cable connector to the Ethernet/network port on the docking station. Additional procedures to connect to an actual network depend on the type of network you are using. Contact your network administrator for detailed instructions.
Connecting a USB Device
To connect a USB device, plug it into a USB port on the docking station and follow the additional instructions provided with the device.
All four USB ports meet USB High-speed requirements by providing 480Mbps and 500mA of power. However, the two USB ports on the right side denoted by this symbol have two unique features - Always On and High Power. See "Targus Always On" and "Using USB Devices That Require More Power" for more details.
The other USB ports (one on the side and the other on the back next to the Ethernet port) are ports that provide the standard 500mA of power.
Connecting and Configuring an Audio Device
1 Plug your headphones or speakers into the green 3.5mm Audio Out port on the docking station.
2 To connect a microphone, plug it into the mono Audio In port.
3 To enable your headphones or speakers, you must first choose USB PnP Sound Device in the Properties Settings.
For Windows 2000, click Start, Settings, Control Panel, and then open the Sounds and Multimedia folder.
Select the Audio tab. Under Sound Playback, change Preferred Device to USB PnP Sound Device from the drop down list.
Click Apply, then click OK.
For Windows XP, go to the Control Panel and choose Sound and Audio. Select the Audio tab. Under Sound Playback, change Preferred Device to USB PnP Sound Device from the drop down list.
Click Apply, then click OK.
For Windows Vista, go to the Control Panel and choose Hardware and Sound. Select Sound. Under the Playback tab, select Digital Output of the USB PnP Sound Device.
Click Set Default.
4 Make sure the volume is not set to MUTE.

NOTE: AUDIO DEVICES WILL NOT WORK SIMULTANEOUSLY ON THE PORT STATION AND THE HOST COMPUTER.

CAUTION: ALL AUDIO OR MULTIMEDIA APPLICATIONS MUST BE TERMINATED BEFORE SWITCHING BETWEEN THE PORT STATION AUDIO OUTPUT AND THE HOST COMPUTER AUDIO OUTPUT.
Installing and Configuring a S/PDIF (Sony/ Philips Digital Interface) Device
1 In order to enable S/PDIF, you have to turn it on. This can be done by opening the USB 3D Sound Configuration applet located in your system tray (click on the USB icon to open up the Configuration Screen).

2 Click on the button next to the S/PDIF Output text to enable S/PDIF.
3 Set the Audio Output from the Tray.
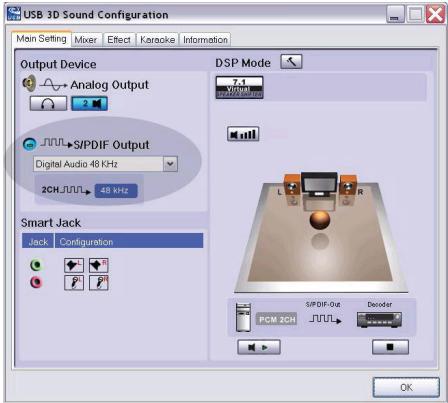
4 Plug your optical cable (not included) into the S/PDIF-Out port of docking station on one end, and the S/PDIF-In port of Digital Decoder or Speaker on the other end.
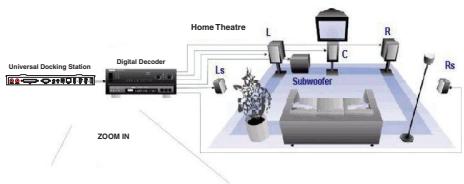
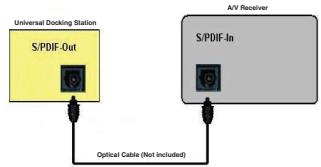
5 Connect your Digital Decoder or Speaker to the Home Theater System.
Global Suspend Mode
When your computer is in suspend mode, the docking station also enters suspend mode to avoid power consumption. When your computer wakes up, the docking station wakes up automatically.
Targus Always On
The two USB ports that provide up to 1 Amp of power will continue providing power even when the laptop is powered down or disconnected from the docking station. This allows you to charge any USB device you connect to these ports without powering your laptop.
Using USB Devices That Require More Power
Some devices, which use large amounts of power, such as printers and optical drives, should be plugged into the High Power USB Ports. These ports will provide up to 1000 mA of power - double the power of a standard USB ports.
Product Limitations
Some devices may halt temporarily when a high data transfer is occurring. For example, your mouse may respond slowly while a graphic print job is printing or while you are experiencing heavy network traffic.
We recommend the following guidelines:
- Do not transfer data to or from multiple high-speed devices, such as a digital camera or scanner, at the same time.
- If speed degradation does occur, close other programs that use a USB device to improve device performance.
Troubleshooting
Device Not Working
- Make sure that the device is fully inserted into the correct port on the docking station.
- Plug the device into a different port on the docking station. If it still doesn't work, test the device by connecting it directly to your computer.
- Verify that you ran the Setup or Install program for the device.
- Make sure that the device appears in Device Manager. For more information refer to "Verifying Devices are Installed".
- Disconnect all devices from the docking station and reconnect them, one at a time. Check that each device works before plugging in the next one.
Each USB port is equipped with over-current protection. Should a USB device draw more current than the USB port can supply, the port will shut down. To re-enable the port, unplug the device and go to Device Manager or to the message in the system tray and choose the Reset option. You can then plug the device back into the USB port. If a shut down reoccurs, check the power requirements of the device.
Verifying Devices are Installed
You can view the devices installed on the docking station from the Device Manager window in System Properties.
Right-click My Computer, Properties, then click the Hardware tab, and then the Device Manager button.
From the Device Manager window, expand the following:
Human Interface Devices - displays keyboards and pointing devices: mice, trackballs, and joysticks
- Keyboards — displays PS/2 keyboards
- Mice and Other Pointing Devices — displays PS/2 mouse
Network Adapters - displays ASIC AX88772A USB 2.0 fast Ethernet Adapter
- Ports (COM & LPT) — Prolific USB-to-Serial Comm Port (COM X)
Sound, Video and Game Controllers — displays USB PnP Sound Device
Universal Serial Bus controllers — displays the other devices installed for the docking station and generic hub
Verifying a Serial Modem Connection
When attaching a modem to the serial (RS232) port, verify that the port assigned to your modem is Serial USB (COMx), where x is the number of the COM port.
If the operating system does not detect automatically that your modem is assigned to Serial USB (COMx), run the Hardware Wizard again and choose Select from the list instead of Autodetect. Then, select use Prolific Device from Page as the COM port.
Error Message on Your PDA
If the error message "Connection Not Established" appears on your PDA, check that the COM port setting in either your HotSync or ActiveSync software matches the setting on the docking station. See "Verifying Devices are Installed" to verify the COM port setting on the docking station.
Some older versions of the Palm® Desktop software are not compatible with the USB to Serial conversion. Please contact your PDA vendor for software updates.
Palm and HotSync are registered trademarks of Palm, Inc. Microsoft, Windows, Windows Vista and ActiveSync are either registered trademarks or trademarks of Microsoft Corporation in the United States and/or other countries. All trademarks and registered trademarks are the properties of their respective owners. All rights reserved. Features and specifications are subject to change without notice. © 2008, Targus Group International, Inc. and Targus Group (UK) Ltd.
TARGUS UNIVERSELLE NOTEBOOK- DOCKINGSTATION
Einführung
The InstaShield Vizard has successfully installed ACP45. The system can use the program, you must restay your computer.

Yes, I want to restart my computer now.

No, I will restart my computer later.
Remove any disks from their drives, and then click Finish to complete setup.
<Back
Finish
Cancel
Ports and Dockingstation
Targus Universal Docking Station
Cavo USB 2.0 upstream High-speed
CD driver
Alimentatore CA
Collegare la Docking Station al computer
Portedella Docking Station
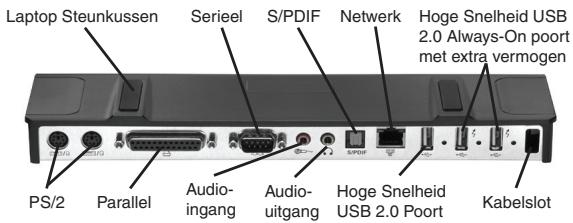
Poorten Docking Station
"Easy Access" Hoge Snelheid USB 2.0 Poort.
Targus
DEFCON CL,
PA410E (niet
meegeeverd)
Visit our website at www.targus.com
Features and specifications are subject to change without notice.
© 2008 Targus Group International, Inc. and Targus Group (UK) Ltd.
- Universal Laptop Docking Station
- Targus
- USERGUIDE
- TABLE OF CONTENTS
- GB - English
- DE - Deutsch
- ES - Espanol
- FR - Français
- NL - Nederlands
- PT - Português
- TARGUS UNIVERSAL LAPTOP DOCKING STATION
- Introduction
- Features
- Heat dissipation by natural convection:
- Comfort
- The docking station provides the following ports:
- Package Contents
- System Requirements
- Hardware
- Operating System
- Installing the Device and Drivers
- Installing the Docking Station Driver
- Connecting the Docking Station to Your Computer
- Installing the Default Device Drivers
- LED Status Indicator Lights
- Connecting New Devices
- Connecting a Serial Mouse / Keyboard
- Connecting a PS/2 Mouse / Keyboard
- Connecting and Configuring a Serial Modem
- Connecting a Parallel Printer
- Connecting a PDA
- Connecting to a Local Area Network
- Connecting a USB Device
- Connecting and Configuring an Audio Device
- Installing and Configuring a S/PDIF (Sony/ Philips Digital Interface) Device
- Global Suspend Mode
- Targus Always On
- Using USB Devices That Require More Power
- Product Limitations
- Troubleshooting
- Device Not Working
- Verifying Devices are Installed
- Verifying a Serial Modem Connection
- Error Message on Your PDA
- TARGUS UNIVERSELLE NOTEBOOK- DOCKINGSTATION
- Einführung
- Collegare la Docking Station al computer
Brand : TARGUS
Model : UNIVERSAL LAPTOP DOCKING STATION
Category : Laptop Docking Station