
AMW51EU - Wireless Mouse TARGUS - Free user manual and instructions
Find the device manual for free AMW51EU TARGUS in PDF.
| Product Type | Wireless Laser Mouse |
| Brand | TARGUS |
| Model | AMW51EU |
| Detection Technology | Laser |
| Connection Interface | USB (micro USB receiver included) |
| Power Supply | 2 AA batteries (included) |
| Compatible Operating Systems | Windows 2000, XP, Vista, 7; Mac OS X 10.4 or higher |
| Main Functions | Plug & Play, programmable scroll wheel |
| Battery Level Indicator | 3 LED (green): 3 = full, 2 = half, 1 = low |
| Energy Saving Mode | Yes, automatic |
| Box Contents | Mouse, micro USB receiver, 2 AA batteries, user manual |
| Laser Class | Class I (eye safety) |
| Safety Warning | Do not stare into laser beam |
| Maintenance and Cleaning | Clean with a soft, dry cloth |
| Manufacturer Website | www.targus.com |
| Removable Receiver | Stored inside mouse for portability |
Frequently Asked Questions - AMW51EU TARGUS
User questions about AMW51EU TARGUS
0 question about this device. Answer the ones you know or ask your own.
Ask a new question about this device
Download the instructions for your Wireless Mouse in PDF format for free! Find your manual AMW51EU - TARGUS and take your electronic device back in hand. On this page are published all the documents necessary for the use of your device. AMW51EU by TARGUS.
USER MANUAL AMW51EU TARGUS
©2009 Manufactured or imported by Targus Europe Ltd., Hounslow, Middlesex, TW4 5DZ, UK. All rights reserved. Targus is either a registered trademark or trademark of Targus Group International, Inc. in the United States and/or other countries. Features and specifications are subject to change without notice. All trademarks and registered trademarks are the property of their respective owners.

953


C
User Guide
Table of Contents
GB - English
Targus Wireless Comfort Laser Mouse 6
BG-BbIrpckn (e3nk)
Be3KnHa na3epHa Mmka Comfort Ha Targus 16
CZ - Ceştna
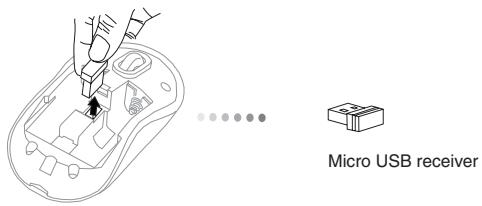
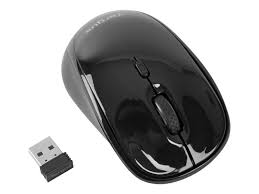
Thank you for your purchase of the Targus Wireless Comfort Laser Mouse. The accompanying micro USB receiver is small enough to leave plugged into your computer or simply store it inside the mouse when travelling. This is a plug and play device so no additional software is required. The advance scroll wheel feature program can be downloaded from the Targus website.
Contents
Targus Wireless Comfort Laser Mouse
- 2 x AA Batteries
- Micro USB Receiver
- User Guide
System Requirements
Hardware
USB port
Operating System
- Microsoft Windows® 2000
- Microsoft Windows® XP
- Microsoft Windows Vista®
- Microsoft Windows® 7
Mac OS X 10.4 or later
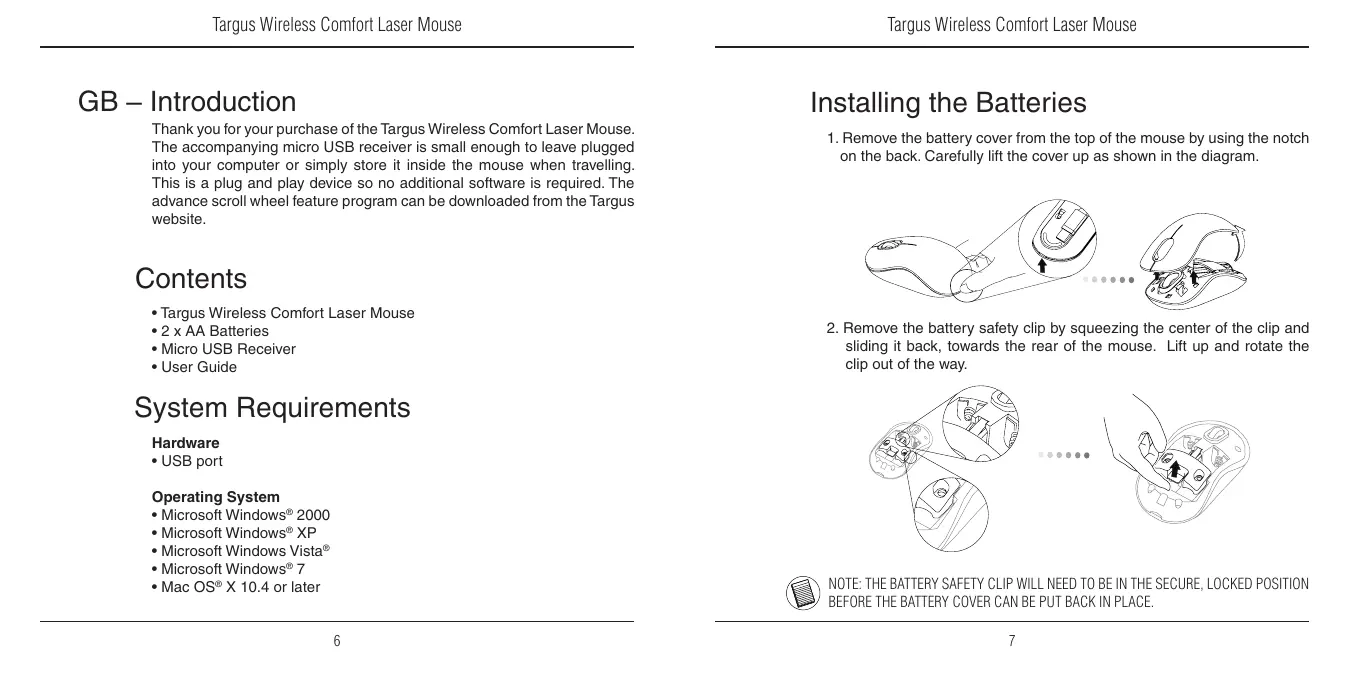
Installing the Batteries
- Remove the battery cover from the top of the mouse by using the notch on the back. Carefully lift the cover up as shown in the diagram.
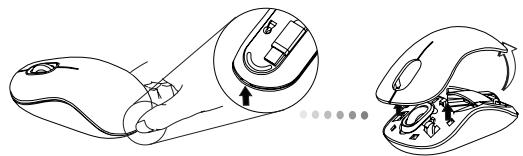
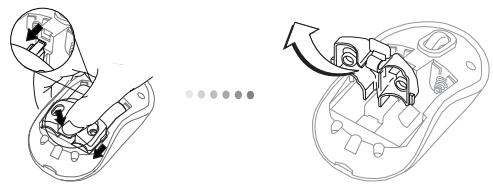
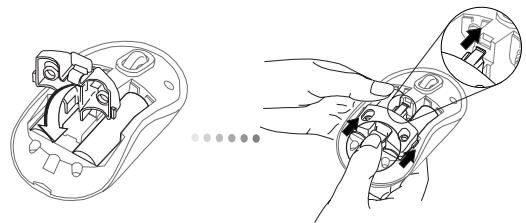
- Remove the battery safety clip by squeezing the center of the clip and sliding it back, towards the rear of the mouse. Lift up and rotate the clip out of the way.
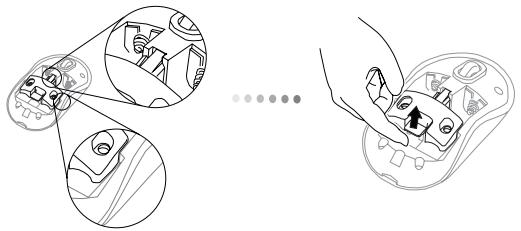

NOTE: THE BATTERY SAFETY CLIP WILL NEED TO BE IN THE SECURE, LOCKED POSITION BEFORE THE BATTERY COVER CAN BE PUT BACK IN PLACE.
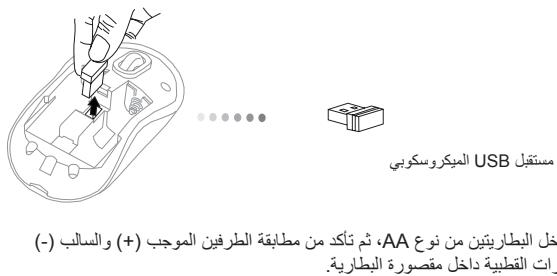
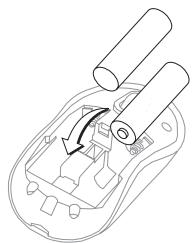
- Remove the micro USB receiver stored inside the center compartment.
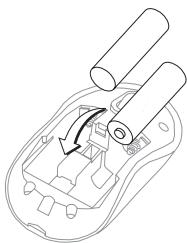
- Insert the two AA batteries, making sure that the positive (+) and negative (-) ends of each battery match the polarity indicators inside the battery compartment.
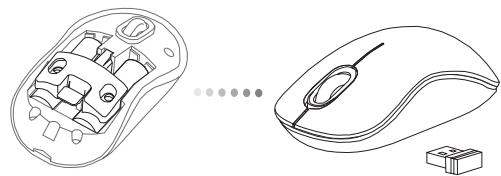
- Replace the battery safety clip by sliding it forward until it clicks into place and then replace the battery cover.

Establishing the Connection
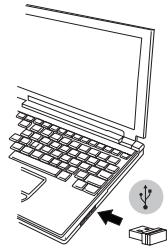
(A) Plug the USB receiver into an available USB port on your computer.
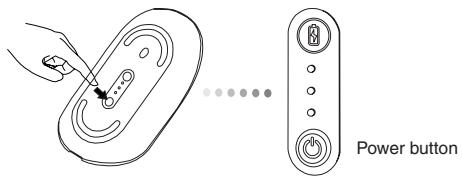
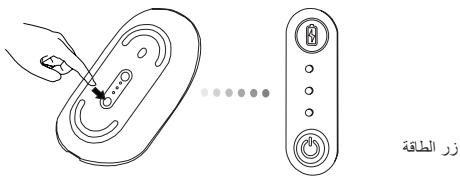
(B) Turn on the mouse pressing the power button, located on the bottom of the mouse, for 3 seconds and then release.
This mouse is a plug and play device. It will automatically operate when the USB receiver is connected to the computer.
Power On:
Press and hold the power button for 3 seconds and then release.
The battery life indicator will briefly light up showing the current power level of the batteries.
Power Off:
Press and hold the power button for 3 seconds and then release.
The battery life indicator will briefly light up and then fade out.
Battery Check:
After the mouse is turned on, quickly press and release the power button. The battery life indicator will light up showing the current power level of the batteries.
Power Saving mode:
After an extended period of time, if the mouse is not used, it will automatically enter power saving mode to conserve power and increase battery life. Click on any mouse button to resume the normal operation. The mouse may take a few seconds to reconnect with your computer.
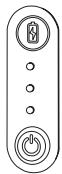
Battery Life Indicator
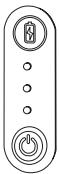
| 3 LEDs lit | Full power |
| 2 LEDs lit | Half power |
| 1 LED lit | Low power |

NOTE: WHEN THE FIRST LIGHT IS BLINKING, PLEASE REPLACE THE BATTERIES
Power Management
- To extend the life of your battery, turn off the mouse while travelling or when you're not using it.
Programming Your Mouse (Windows Only)
To access the advanced scroll wheel features you will need to download and install the software driver. This can be downloaded from the following location:
Visit www.targus.com to download and install the driver.
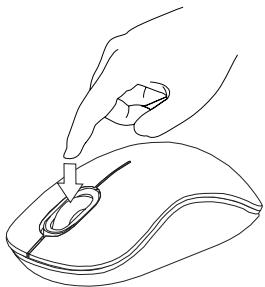
Once installation is complete, open the driver software and select the desired setting for the scroll-wheel button. Close the driver software application and you're ready to go. Activate your selected feature by pressing down on the scroll wheel.


CAUTION
LASER RADIATION. DO NOT STARE INTO THE BEAM OR VIEW DIRECTLY WITH OPTICAL INSTRUMENTS. CLASS I LASER PRODUCT.
NEVER POINT A LASER BEAM INTO A PERSON'S EYES OR VIEW A LASER BEAM DIRECTLY, AS PROLONGED EXPOSURE CAN BE HAZARDOUS TO THE EYES.
MOMENTARY EXPOSURE FROM A LASER POINTERSUCH AS AN INADVERTENT SWEEP OF THE LIGHTACROSS A PERSON'S EYES, MAY CAUSE TEMPORARYFLASH BLINDNESS SIMILAR TO THE EFFECT OF ACAMERA FLASH BULB. ALTHOUGH THIS CONDITIONIS TEMPORARY, IT CAN BECOME MORE DANGEROUSIF THE EXPOSED PERSON IS ENGAGED IN A VISONCRITICAL ACTIVITY SUCH AS DRIVING.
BG-BbVeDeneHne
Благорам 3а поукала на Ббхинота Лаэрпma Мшka Comfort ha Targus. Рпдруньамma MKpo USB рпсмнк e Достатуно Mннathорен, 3aдаю octabraye BKluoyen Кьм komIoTNbpa. Мшka'ta e yctpoiCTBO TO вда plug-n-play' И не с hyждано DTobЛнтelen coftypere. Пограмата с усьыршевстаны Функима на konelento за празьгтaine може за с итегл onу ebcaита на Targus.
CbDbPjKaHne
-Бezична na3epHa MIIka Comfort Ha Targus
- Batepnu 2 x AAA
- Minkpo USB npneMHNK
PbkoDCTBOHa nOtpeBnteIa
CnCTeMHN n3nCKBaHna
Xapnyebp
USB INTEppeic
OnepaunHna cnTeMa
Microsoft Windows® 2000
- Microsoft Windows® XP
- Microsoft Windows Vista®
- Microsoft Windows® 7
Mac OSX 10.4 nIIN no-HOBA
YnpabJIeHHe Ha MOUHOCTTa
3a da ydbjnxnte xmbota ha 6baTeepnnte, n3KJIIOyBaIte MmJkaTa, KOrato PbTyBaTe mN KOrATO He y N3NOJ3BaTe.
Повторно порогампане на мишkaТа (Само за Windows)
3a da IMate DoCTbI Do yCbBbPweHCTBaHInTe FyHKuHa Nn PnDnBnKBaHe Ha KOJIeNoTo Ⅲe TpIb6Ba Da 3apeNiTe INHCTaIInpate CoΦTyepeH dpaIbep.ToM MoKeJa Ce 3apeiOnOT CneIHHOTo MRCTO:
IoceteTe www.targus.com, 3a da 3apeiTe n HnctanipaTe dpaBepa
CneI KaTo INHCTanaJyTa e npNKIOUeHa, CTapTnpaTe coOpTyepa I36peTe JKeJAHnTe HAcTpoKn Ha npDvKBAHe. 3aTbOpTe npINOKeHMeTO n Cte roTOBn 3a paOta.
AknBpuaTe n36paHaTa ΦyHKuIy Upe3 HATnCKaHe Ha KOJIeNoTo 3a npEbPtaHe.

BHHMAHNE
JI3EPHA PAINAUJN. HE CE B3NPAIe TBbua NHE JI3EAAI TE INPEKTHO C ONTNUH NHCTPYMEHTN. JIA3EPEH IPOJyKT KJIAC I HNKOTA HE HACOUBAITE JIA3EPEH JbU B OUYTE HA DpyT, KAKTO N HE JI3EAAIte INPEKTHO B JIA3EPEH JbU, TbN KATO IPOJbJXNTJEHOTO N3JIaFAHE MOXE DA E BPEJHO 3A OUYTE. MOMEHTHOTO IN3JIaFAHE HA CBETJINHATA OT JIA3EPHA IOKA3AJKA, KATO HANPIMEP CJUYAHOTO INPEMINHABAE HA JbU A INPE3 OUYTE PNYNJOTPEBA, MOXE DA INPUHNH BPEMEHHO 3ACJIENRAHE, IIOOBHO HA EΦEKTA OT CBETKABULA HA FOTOAPAPAT. BbIPKEKN YE TOBA CbCTOJHNE E BPEMEHHO, TO MOXE DA E ONACHO, AKO JINLcETO N3LOXEHO HA JbUa INBbPIJBA DEHOCCT, 3A KOJTO POJYTA HA 3PEHNEO E KPNITUHA, KATO HANPIMEP YNPABJENHE HA ABTOMOBJI.
CZ - Úvod
YCTaHOBKa COeDInHeHnIa
LgKglllgyllllalgl 1 g, jaoaol kka aay aay aay aay aay aay aay


aJssall aegaaal llaabgsall sall USB 1000 all jpa .3

Jy 1 aai y i j 2 5
jL = jL
LUBUSUBUB

pa pa pa pa pa pa pa pa pa pa pa pa pa pa pa pa pa pa pa pa pa pa pa pa pa pa pa pa pa pa pa pa pa pa pa pa pa pa pa pa pa pa pa pa pa pa pa pa pa pa pa pa pa pa pa pa pa pa pa pa pa pa pa pa pa pa pa pa pa pa pa pa pa pa pa pa pa pa pa pa pa pa pa pa pa pa pa pa pa pa pa pa pa
uulll USB 1111111111111111111111111
aalal
- 3 3d jaii jia bai
aill llll llll aal 5 5 5 5 5 5 5 5 5 5 5 5 5 5 5 5
:
3 3 3 3 3 3 3 3 3 3 3 3 3 3 3 3 3 3 3 3 3 3 3 3 3 3 3 3 3 3 3 3 3 3 3 3 3 3
:
J 10000000000000000000000000000000000000000000000000000000
:ab
i 1 1 1 1 1 1 1 1 1 1 1 1 1 1 1 1 1 1 1 1 1 1 1 1 1 1 1 1 1 1 1 1 1 1 1 1
iJbll Joc
J 1 J 1 J 1 J 1 J 1 J 1 J 1 J 1 J 1 J 1 J 1 J 1 J 1 J 1 J 1 J 1 J 1 J 1 J 1 J 1 J 1 J 1 J 1 J 1 J 1 J 1 J 1 J 1 J 1 J 1 J 1 J 1 J 1 J 1 J

- Table of Contents
- Contents
- System Requirements
- Hardware
- Operating System
- Installing the Batteries
- Establishing the Connection
- Power On:
- Power Off:
- Battery Check:
- Power Saving mode:
- Battery Life Indicator
- Power Management
- Programming Your Mouse (Windows Only)
- CAUTION
- BG-BbVeDeneHne
- CbDbPjKaHne
- CnCTeMHN n3nCKBaHna
- Xapnyebp
- OnepaunHna cnTeMa
- YnpabJIeHHe Ha MOUHOCTTa
- Повторно порогампане на мишkaТа (Само за Windows)
- BHHMAHNE
- CZ - Úvod
- YCTaHOBKa COeDInHeHnIa
Brand : TARGUS
Model : AMW51EU
Category : Wireless Mouse