USER MANUAL TITANIUM GAGGIA
Congratulations on your choice!
As the proud owner of the machine, you can now experience the taste of a delicious cup of espresso or cappuccino in the comfort of your own home.
1 ESPRESSO
PROGRAMAZ. DOSE
When using electrical appliances, basic safety precautions should always be followed to reduce the risk of fire, electric shock, and/or injury to persons, including the following:
1 Read all instructions and information in this instruction book and any other literature included in this carton referring to this product before operating or using this appliance.
2 Do not touch hot surfaces. Use handles or knobs.
3 To protect against fire, electric shock and personal injury do not immerse cord, plugs or appliance in water or other liquid.
4 Close supervision is necessary when any appliance is used by or near children.
5 Unplug from outlet when not in use and before cleaning. Allow to cool before putting on or taking off parts, and before cleaning the appliance.
6 Do not operate any appliance with a damaged cord or plug or after the appliance malfunctions or has been damaged in any way. Return appliance to the nearest authorized service centre for examination, repair or adjustment.
7 The use of accessory attachments not recommended by the appliance manufacturer may result in fire, electric shock or personal injury.
8 Do not use outdoors.
9 Do not let cord hang over edge of table or counter, or touch hot surfaces.
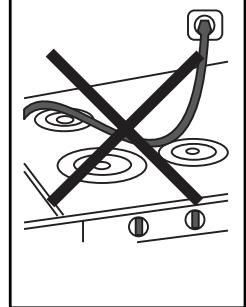
10 Do not place on or near a hot gas or electric burner, or in a heated oven.
11 Always turn appliance "OFF", then plug cord into the wall outlet. To disconnect, turn switch to "OFF", then remove plug from wall outlet.
12 Do not use appliance for other then intended household use.
13 Use extreme caution when using hot steam.
SAVE THESE INSTRUCTIONS
CAUTION
This appliance is for household use. Any servicing, other than cleaning and user maintenance, should be performed by an authorized service centre. Do not immerse base in water. To reduce the risk of fire or electric shock, do not disassemble the base. There are no user serviceable parts inside. Repair should be done by authorized service personnel only.
1 Check voltage to be sure that the voltage indicated on the nameplate agrees with your voltage.
2 Never use warm or hot water to fill the water tank. Use cold water only.
3 Keep your hands and the cord away from hot parts of the appliance during operation.
4 Never clean with scouring powders or hard implements. Simply use a soft cloth dampened with water.
5 To avoid your coffee maker scaling up, use purified or bottled water.
INSTRUCTIONS FOR THE POWER SUPPLY CORD
A A short power-supply cord is provided to reduce risks of getting tangled up or tripping over a longer cord.
B Longer extension cords are available and may be used if care is exercised in their use.
C If a long extension cord is used:
1 the marked electrical rating of the extension cord should be at least as great as the electrical rating of the appliance.
2 if the appliance is of the grounded type, the extension cord should be a grounding type
3 the cable does not hang from the table to avoid the risk of getting caught up in it.
1 GENERALITIES
This coffee maker is designed to make espresso coffee using both coffee beans and ground coffee; it is also equipped with a device for supplying steam and hot water.
This elegantly designed appliance has been designed for household use and is not suitable for continuous, professional-type use.

Caution: The manufacturer cannot be held liable for any damages/injury attributable to the following:
- Incorrect use and not in keeping with the indented use.
- Repairs not carried out by authorized service centres.
- Tampering with the supply cord.
- Tampering with any machine part.
- Use of not original spare parts and accessory attachments. In these cases, the guarantee is invalidated.
1.1 Reading this instruction book

The following symbols have been used to facilitate reading:
The caution triangle denotes all t for the safety of the user. Follow these sly to avoid serious injury!

This symbol denotes information that should be taken into account to get the most out of the appliance.
The figures referred to in the text can be found on the cover flap. Keep these pages open when reading the instructions.
1.2 Using this instruction book
Keep these instructions in a safe place and hand them over to any other person who uses this coffee maker.
For additional information or for
information on topics not covered or inadequately covered in this book, contact the authorized service centres.
2 TECHNICALPARTICULARS
Nominal Voltage
See nameplate found on the appliance.
See nameplate found on the appliance.
Material of Body
Metal
- Dimensions (I x h x d) (mm)
290 × 375 × 425
Weight (Kg)
10
1200
Control Panel
Front (Digital)
Water Tank
Removable
Power Supply
See nameplate found on the appliance.
Water Tank (I)
2.2
Coffee Container Capacity (g)
250 of coffee beans
15
2 - Stainless Steel - Aluminium
Boiler pressure safety valve Safety thermostat
The manufacturer reserves the right to change the make up of the machine in the light of any technological breakthrough.
The machine complies to the European Standard 89/336/EEC (legislative decree 476 04.12.92), referring to the elimination of broadcasting disturbance.
A

B
C
D
E
3 SAFETY STANDARDS

Never let live parts come into contact with water: short-circuit hazard! The superheated steam and hot water can cause scalding! Never direct the steam or the hot water jet towards body parts! Touch the steam /hot water nozzle carefully: scalding hazard!
Intended Use
- This coffee maker is intended for household use only.
- Do not make technical changes and use the appliance inappropriately: damage/injury hazard!
- The coffee maker must only be used by adults who are in full control of their mental and physical capacities.
Power Supply
- Connect the coffee maker to a suitable outlet only.
- The voltage must match the one specified on the nameplate of the appliance.
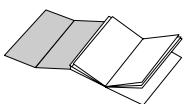
Power Supply Cord (Fig.A)
- Never use the coffee maker if it has a faulty cord.
- The defective cord must be replaced immediately.
- An authorized service centre must replace the defective cords and plugs immediately.
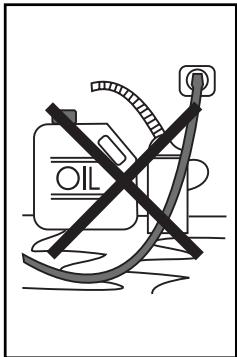
- Do not let the cord touch sharp edges, very hot objects and oily surfaces.
- Do not carry or pull the coffee maker by the cord.
- Do not pull the cable to remove the plug, and do not touch the plug with wet hands or feet.
- Avoid letting the cord dangle from tables or raised surfaces.
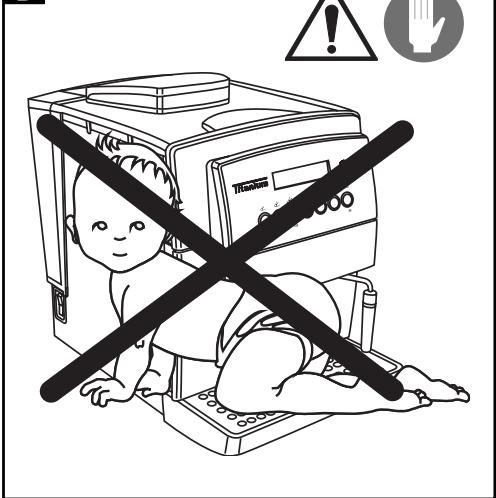
Preventing Injury (Fig.B)
- Ensure that the machine is out of the reach of children.
Children are not aware of the risks involved in electrical appliances.
- Do not leave packing material near children.
Scalding Hazard (Fig.C)
- Do not direct the flow of the superheated steam and/or hot water towards yourself and/or others: scalding hazard!
- Always use the correct handles or knobs.
- Do not insert objects through the openings in the appliance.
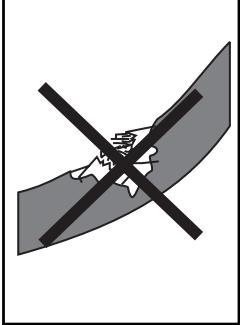
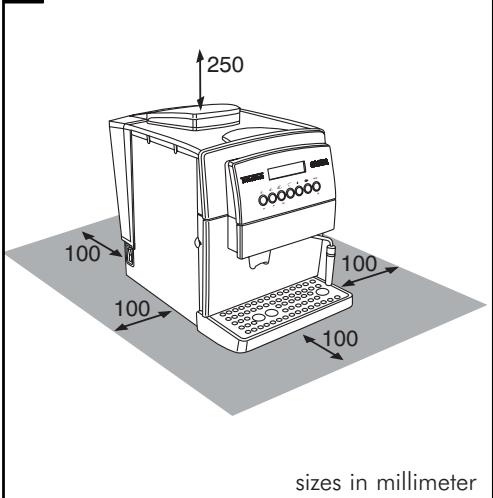
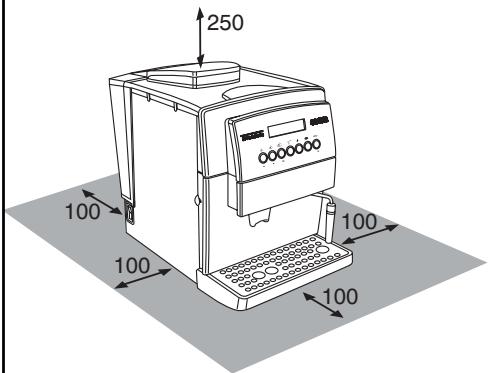
Space necessary to installation, usage, and maintenance. (Fig.D)
- Place the machine on a flat, even surface.
- The machine must be positioned in a safe place where it cannot be knocked over or cause injury.
- Choose a position that is well-lit, hygienic and where a wall socket is easily accessible.
- To prevent melting or damage to the casing, do not rest the machine on very hot surfaces or near open flames.
- Place the coffee maker 10cm away from walls and cooking tops.
- Do not keep the machine at a temperature below 0^ ; frost may damage the machine.
- The wall outlet must be reachable at all times.
- Do not use the coffee maker outdoors.
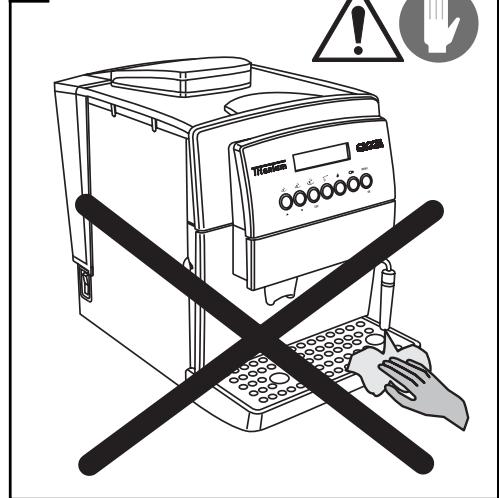
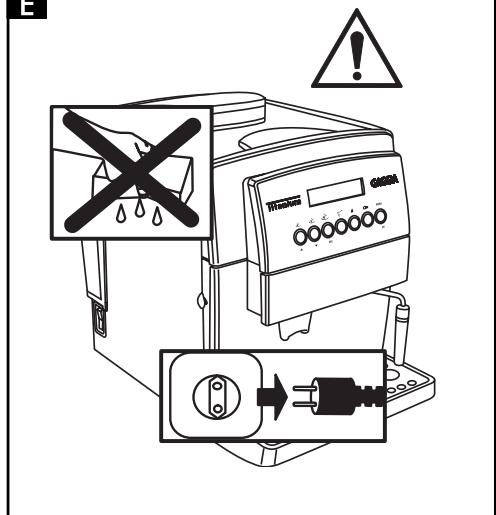
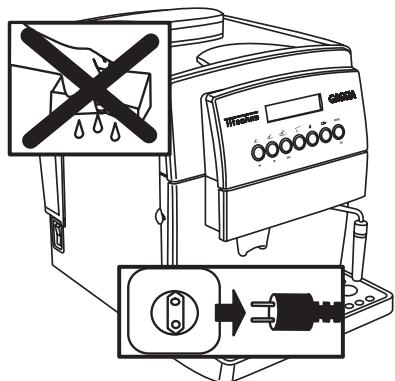
Cleaning (Fig.E)
Before cleaning the coffee maker, switch the ON/OFF switch (7) to "0"; then, remove the plug from the wall outlet.
- Wait for the machine to cool down.
- Never immerse the appliance in water! Avoid splashes.
- Never tamper with the machine inside parts.
Storing the Appliance
- When the appliance is not used regularly, switch OFF the appliance and remove the plug from the wall outlet.
- Store it in a dry place, away from children.
- Protect it from dust and dirt.
Repairing / Maintenance
- If the coffee maker falls and you see or suspect damages or malfunctions, immediately remove the plug from the wall. Never use faulty machines.
Repairs must be made by authorized service centres only.
- If authorized service centres do not carry out maintenance work and/or repairs, the manufacturer is not liable for any damages.
Fire Fighting
- In the event of a fire, use carbon dioxide extinguishers (CO_2) . Do not use water or powder extinguishers.
DESCRIPTION OF PARTS
See Fig.01
1 Coffee bean container
2 Coffee bean container cover (aroma preserver)
3 Grinding control knob
4 Dose control knob
5 Ground coffee doser cover
6 Cup Heater
7 ON-OFF switch
8 Water tank cover
9 Water tank
10 Coffee grounds drawer
11 Power cord
12 Drip tray + plate
13 Height adjustable coffee dispenser
14 Steam / hot water nozzle and pipe
15 Front cover
16 Steam knob
17 Coffee dispenser
18 Control panel
19 Key of coffee dispenser
20 Cleaning brush
21 Ground coffee measuring scoop
Control panel
22 Espresso coffee selector button / Page up in programming mode
23 Normal coffee selector button / Page down in programming mode
24 "Caffe lungo" selector button / ESC in the programming mode
25 Ground coffee selector button
26 Hot water selector button
27 Descaling selector button
28 Programming button / "OK" in the programming mode
29 LCD display
30 Full tray warning light
4 INSTALLING THE COFFEE MAKER
For your own safety and the safety of others, follow the "Safety Rules" (see chapter 3).
4.1 Packaging
The original packaging was designed and made to protect the appliance during shipment.
We recommend you keep it for future needs.
4.2 Preliminaries
- Remove the coffee maker from the packaging and position it in a suitable location that meets the requirements specified and described in the safety rules (chap.3).
- Open the machine door, take the drip tray (12) from the package, and fit the dregs box (10); then, fit the drip tray in the machine (Fig.21).
- Make sure that the drip tray and plate (Fig.01, pos. 12), the coffee grounds drawer (10) and the coffee dispenser (17) are fitted correctly and that the front cover (15) is closed.
- Keep the cleaning brush (20) and the coffee dispenser key (19) supplied with the appliance within easy reach.

If the display signals a fault when you switch on the machine, it means that one of the above-described components has not been properly positioned (Par.16).
4.3 Preparing the coffee maker for use
- Open the water tank cover (Fig.02) and remove the tank (Fig.03). Rinse and fill with fresh potable water (Fig.04); we recommend that you do not exceed the "MAX" level mark. Replace the water tank in its housing and reposition the cover on top.
Always fill the tank (9) with fresh still water. Hot water and other liquids can damage the tank and/or the appliance. Do not operate the appliance without water: make sure that there is enough water inside the tank.
- Lift the cover (Fig.05) and fill the container with coffee beans (Fig.06).

Use coffee beans only. Ground and instant coffee, as well as other items, will cause damage to the appliance.
- Set the cover back in place on the coffee container (1).
- Insert the plug into the outlet on the back of the coffee machine (Fig.07) after making sure that the on/off switch (7) is set on "0".
- Insert the plug on the other end of the cord into a suitable wall outlet.
- The machine on/off switch is set on "0" (OFF); to turn the machine
on just press the button (Fig.08); the machine will begin to heat up and the display will show:
RINSING
WARMING UP ...
When the machine reaches the right temperature, it will carry out a rinse cycle.
- To load the circuit, direct the steam pipe (Fig.01-pos.14) over the drip tray, place a cup or other suitable receptacle below the steam nozzle and press the button (26); the following messages will be displayed in turn:
RINSING
WARMING UP ...
HOT WATER
WARMING UP ...
- Turn the knob (Fig.09) anticlockwise and wait until water is discharged from the steam pipe in a steady stream; to stop the flow of water, turn the knob clockwise.

Note: After a long period of disuse, if the water tank has been completely emptied, you must reload the
circuit before starting up the machine. The circuit must also be loaded every time the display shows the following message:
VENTILRATE
- Press pushbutton 26 again.
- When the heating-up phase reaches completion, the display will show:
SELECT PRODUCT
READY FOR USE
- After the above steps are completed, the machine is ready for use.
- To dispense coffee, hot water or steam and ensure proper use of the machine, carefully follow the directions below.
5 THE COFFEE GRINDER (FIG.10)

Caution! Only turn the grinding control knob situated inside the coffee bean container (Fig.10) when the coffee
grinder is working. Do not place ground and/or instant coffee in the coffee bean container.
Do not introduce anything other than coffee beans into the container. The coffee grinder contains dangerous moving parts; keep fingers and/or other objects away. Before carrying out any operations in the coffee bean container, switch OFF the ON/OFF switch (7) and remove the plug from the wall outlet. Do not introduce coffee beans when the coffee grinder is working.
The quality and the taste of your coffee depend both on the blend used and the grind.
The appliance comes with a grind-adjusting knob (Fig.10). To use this feature, turn the graduated knob when the coffee grinder is working; the numbers displayed on the knob indicate the grind setting.
The manufacturer sets the knob to an average grinding coarseness in the factory: if the ground coffee is too fine, turn the knob toward higher settings; if the ground coffee is too coarse, turn the knob toward lower settings.
You will note the change only after dispensing three /four coffees.
Use coffee beans for espresso coffee makers. Avoid using extremely fine or coarse grind settings (e.g. 1 and 16); if you find this is necessary, try using different coffee blends.
Store the coffee in a cool and dry place, in an airtight container.
You should change the grind setting if the coffee does not flow out in an optimal manner, or more specifically:
The coffee flows out too fast = excessively coarse grind turn the knob to lower settings;
The coffee drips out slowly and/or not at all = excessively fine grind > turn the knob to higher settings.
6 ADJUSTING THE COFFEE DOSE (FIG.11)
You may select the quantity of coffee (dose) that you wish to grind. The manufacturer sets an average dose in the factory.
To change the ground coffee dose, simply turn the knob (Fig.11) situated inside the coffee container. Turn it anticlockwise to increase the dose and clockwise to decrease the dose.
You must adjust the dose before pressing the coffee dispenser button. This system allows you to obtain an optimal cup of coffee with all commercially available types of coffee.
7 THE COFFEE DISPENSER

Note: If the appliance does not dispense coffee, check the water level in the tank.
- Before dispensing coffee, check that the water tank and coffee container are full and that the display shows:
SELECT PRODUCT
READY FOR USE
- Place 1 or 2 coffee cups under the coffee dispenser spouts; you can adjust the height of the dispenser by moving it up or down manually (Fig.12) until it suits your cups.
7.1 Making coffee with coffee beans
- To dispense coffee press the coffee dispenser button (22, 23 or 24);
the display will indicate (for example)
1 SMALL COFFEE
Dispense 1 coffee, place a single cup beneath the coffee spouts and press the button (22, 23 or 24) only once; to dispense 2 coffees, place two cups beneath the coffee spouts and press the button (22, 23 or 24) twice; the display will show:
2 SMALL COFFEEES
In this operating mode, the appliance automatically grinds and doses the right quantity of coffee; making two coffees requires two grinding and dosing cycles, which are automatically managed by the machine.
- Then the dispensing cycle starts.
- After undergoing a pre-brewing cycle, coffee will start to come out of the spout (Fig.01, pos.13).
The coffee will stop flowing automatically when the preset level is reached (see section 7.3). You can interrupt the flow of coffee by pressing the button (Fig.01, pos.22 23 or 24).
7.2 Making coffee with ground coffee

In this operating mode, you must use the scoop provided (Fig.01, pos.21) to measure out the
ground coffee.

Only use ground coffee suitable for espresso coffee makers in the doser (5); placing coffee beans, instant
coffee and other materials inside the doser causes damage to the appliance.

Keep fingers away from the ground coffee doser since there are moving parts.
Use the scoop provided (21) to measure out the right quantity of ground coffee to place in the doser.
Use only one full measuring scoop at a time; to make two coffees, you must go through the entire process twice.
- Pressthe button (25) to select the function; the display will show
SELECT PRODUCT
PREGROUND COFFEE
- Lift the cover of the ground coffee doser (Fig.13).
- Fill the scoop with one measure of coffee; discard any excess ground coffee.
- Fill the doser with the ground coffee (Fig.14)
-
Close the cover of the ground coffee doser.
-
To dispense coffee, press the coffee dispenser button (22, 23 or 24); the display will show (for example)
1 SMALL COFFEE
PREGROUND COFFEE
- The dispensing cycle will start.
- After undergoing a pre-brewing cycle, coffee will start to come out of the spout (13).
The coffee will stop flowing automatically when the preset level is reached (see section 7.3). You can interrupt the flow of coffee by pressing the button (22 23 or 24).
- Subsequently the machine will automatically switch back to the normal operating mode (see section 7.1).
7.3 Adjusting the quantity of coffee per cup
The machine has been programmed to dispense 3 types of coffee: espresso coffee with button 22, normal coffee with button 23 and "caffe lungo" with button 24.
To adapt the programmed settings to the size of your cups, place a cup beneath the coffee spouts (13), press the dispenser button corresponding to the kind of coffee you want (22, 23 or 24) and keep it pressed down; the display will show (for example):
1 COFFEE
PROGR. QUANTITY
Wait for the cup to fill to the desired level and release the button.

Note: keep the button (23) or (24) pressed during the entire coffee dispensing process.
In this way, the appliance is programmed to dispense the quantity of coffee you selected.
8 DISPENSING HOT WATER

Caution: splashing may occur at the start - scalding hazard! The hot water nozzle and pipe can reach high
temperatures: avoid touching directly with your hands.
- Before attempting to dispense hot water, make sure that the display shows.
SELECT PRODUCT
READY FOR USE
When the machine is ready to dispense coffee, carry out the following steps.
- Press the button (26); the following messages will be
displayed in turn:
SELECT PRODUCT
READY FOR USE
HOT WATER
READY FOR USE
- Place a cup and/or receptacle beneath the hot water/steam pipe (Fig.15).
- Turn the knob anticlockwise as shown in Fig.15.
- Dispense the desired quantity of hot water; to stop the flow of hot water turn the knob clockwise.
- Press the button (26) again; the machine will switch back to the normal operating mode and the display will show:
SELECT PRODUCT
READY FOR USE
9 DISPENSING STEAM / PREPARING CAPPUC-CINO

Steam can be used to froth the milk for cappucinos and also to heat beverages.
Scalding hazard! Splashing may occur at the start - scalding hazard! The hot water nozzle and pipe can reach high temperatures: avoid touching it directly with your hands.
- When the machine is ready to dispense coffee, direct the steam pipe (14) above the drip tray, open the "hot water/steam" knob (16) for a few instants to discharge any residual water from the steam pipe; soon only steam will issue from the nozzle. The display will show:
STEAM
- Turn the knob (16) to OFF.
- Fill 1/3 of the receptacle you wish to use to make cappuccino with cold milk.

For best results when making cappuccinos, the milk and the cup used should be cold.
- Immerse the steam nozzle into the milk to be frothed and turn the knob (16); turn the container slowly with up-down movements to achieve uniform frothing (Fig.16).
After using the steam for the desired time, shut off the steam (16).
- The same method can be used to heat other beverages.
- Clean the steam nozzle with a damp cloth.

Note: Should you wish to use big cups, raise the side door and rotate the steam tube; by this way, the steam be further raised (Fig. 17). This is particularly useful
when you use the cappuccinatore.
10 OPTIONAL ACCESSORIES
10.1 Cappuccinatore

The cappuccinatore is a device that automatically froths in milk, making it extremely easy to prepare classic Italian-Italian cappuccino.
To install the cappuccinatore, proceed as follows:
- Make sure that no other devices are fitted on the steam tube; you must remove any devices that have been installed. I.E. the "Pannarello".
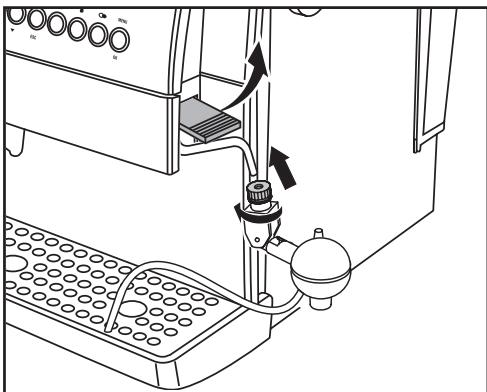
- Loosen the ring nut without slipping it off the cappuccinatore.
- Insert the cappuccinatore in the steam tube to a depth of about 4cm .
- Tighten the ring nut securely.

Note: if the ring nut is not securely tightened, the cappuccinatore may slip out during use.
Hot water with the cappuccinatore
To dispense hot water using the cappuccinatore, follow the directions provided in par.8; hot water will flow out of the lower part of the cappuccinatore.
While hot water is being dispensed, the silicone tube inside the cappuccinatore must be inserted into the grating of the drip tray. Make sure the silicone tube cannot slip out while the machine is in use.

Note: Insert the tube into the grating, so that to avoid any contact with dirty water or ground coffee residues;
the risk is that the drip tray contents may be sucked up.
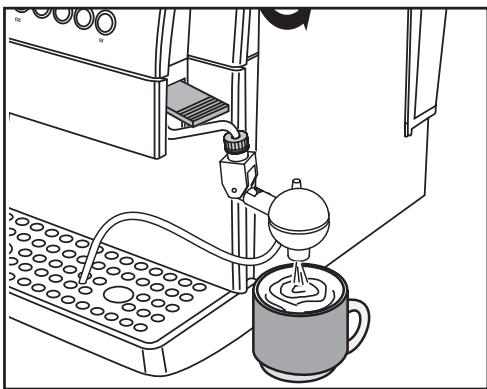
Steam/Cappuccino with the cappuccinatore
The steam may be used to froth milk for cappuccino and to heat up beverages.

Danger of scalding!
The steam may be preceded by brief sprays of hot water.
The dispensing tube can reach very high temperatures: avoiding touching it directly with your hands.
- Position the cappuccinatore over the drip tray, open the "hot water/steam" knob (16) for a few seconds to discharge residual water from the cappuccinatore; in a short time only steam will issue from the tube.
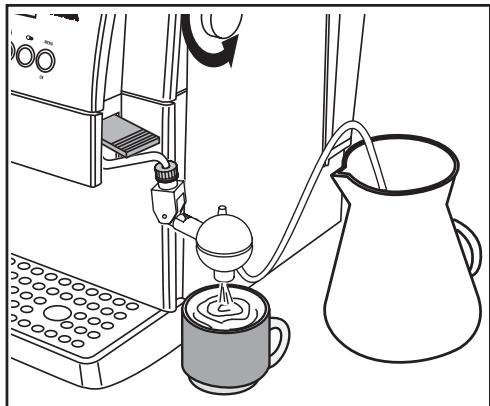
- Close the knob (16).
- Place the intake tube in a suitable receptacle or directly into a container of milk, placed next to the machine.
- Place a cup containing previously prepared coffee beneath the nozzle of the cappuccinatore.
- Open the knob (16); frothed milk will start issuing from the cappuccinatore.
- Move the pin on the cappuccinatore to regulate the thickness of the foam; by pushing it upward you will increase its volume.

When preparing cappuccino, use cold milk to ensure the best results.
- When you have finished using the cappuccinatore and steam, clean the cappuccinatore to remove residual milk.
- Place a container filled with fresh drinking water alongside the machine and place the tip of the intake tube inside the container.
- Proceed as if you were making cappuccino, allowing the dirty water to flow into a receptacle or directly into the drip tray.
Cleaning the cappuccinatore.
After using the cappuccinatore, you should clean it thoroughly to ensure maximum hygiene and functionality over time.
The cleaning steps are as follows:
- Loosen the ring nut of the cappuccinatore.
- Remove the cappuccinatore from the steam tube.
- Remove the casing of the cappuccinatore.
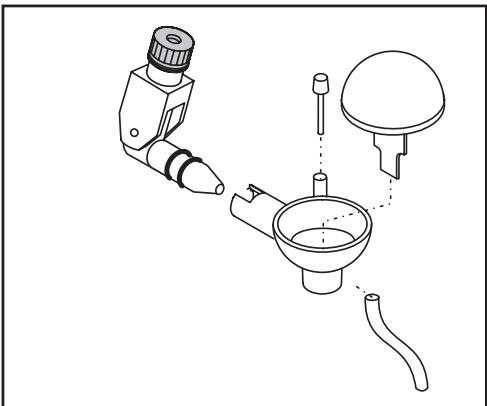
Take off the cover, pin and intake tube.
- Clean all the parts of the cappuccinatore thoroughly with running drinking water.
Reassemble the cappuccino maker.
- Insert the cappuccinatore back in the steam tube.
- Tighten the ring nut securely.

Note: if the ring nut is not securely tightened, the cappuccinatore may slip out during use.
11 CLEANING AND MAINTENANCE
General Cleaning
- Maintenance and cleaning should only be carried out when the appliance is cold and disconnected from the power supply.
- Do not immerse the appliance in water and do not wash the parts in
the dishwasher.
- Do not use abrasives or aggressive chemicals (solvents) for cleaning.
- Do not dry the machine and/or any of its parts using a microwave and/or conventional oven.
- We recommend that you clean the water tank and change the water daily.
-
Clean the ground coffee doser daily.
-
Use the brush provided to clean the doser (Fig.18).
-
To clean the appliance, use a soft cloth dampened with water (Fig.19).
- Clean the service area and the coffee dispenser.
- We recommend that you empty and clean the drip tray (12) and the coffee grounds drawer (10) daily; to carry out this operation you must open the front cover (Fig.20) and remove the drip tray (Fig.21); then you can empty and clean all the components.
-
You can remove the coffee dispenser in order to clean it (Fig.24):
-
lower the dispensing unit nozzles
- take the dispensing unit as shown in Fig. 24, and remove it from its housing
- wash the whole unit with warm water.
11.1 The coffee dispenser

The coffee dispenser (17) must be cleaned each time you fill the coffee bean container or at least once a
week.
- Switch off the appliance by pressing the ON/OFF switch (7) to the "0" position and remove the plug from the wall outlet.
- Open the service cover (15). Remove the drip tray (12) and the coffee grounds drawer.
- Remove the coffee dispenser, holding it by its handle and pressing the "PUSH" button (Fig.22)
- Make sure that the two steel filters are free from any coffee residues. The top filter can be removed by unscrewing the plastic pin anticlockwise using the key provided (Fig.23.).
- Wash the coffee dispenser only with hot water: do not use detergents. Then thoroughly wash and dry all its components.
- Refit the filter and carefully screw the plastic pin back on using the key provided.
- Clean the compartment inside the appliance.
- Holding it by its handle, insert the coffee dispenser into its housing until it snaps into place.
- Insert the coffee grounds drawer, the drip tray plate and the drip tray.
- Close the cover (15).
12 DESCALING
Scale forms during normal use of the appliance; a descending treatment
should be carried out every 3-4 months, either when you notice a reduced water flow or the following message is displayed:
DESCALING
READY FOR USE

If you wish to carry this out at home, you can use a
commercially available descaling product for coffee
makers that is non-toxic and/or not harmful.

Caution! Never use vinegar.
To descale the appliance proceed as follows:
- Mix the descending agent with water as directed on the package and fill the tank with the solution.
- Switch on the machine by pressing the on/off switch (7).
- Press the button (27) for at least 5 seconds to select the function; the following message will appear on the display:
DESCALING
OPEN KNOB
- Direct the steam pipe (14) over the drip tray.
- Place a receptacle of adequate capacity beneath the steam pipe and turn the hot water knob (16) anticlockwise.
The machine will start an automatic descending cycle including pauses preset by the manufacturer and automatically controlled by the machine. The display will show:
MACHINE IS DESCALING
- At the end of the cycle, the flow of descending solution will be stopped and the display will show:
DESCALING FINISHED
CLOSE KNOB
- Turn the hot water knob (16) clockwise to shut off flow. The display will show:
RINSE MACHINE
FILL WATERTANK
- Thoroughly rinse out the water tank and fill it with fresh drinking water.
RINGEMACHINE
PRESS KEY
- Place a receptacle of adequate capacity beneath the steam pipe and press the button (27).
RINSE MACHINE OPEN KNOB
10 Turn the steam knob (16) anticlockwise to empty out the contents of the water tank
MACHINE IS RINSING
11 When the machine rinse cycle is completed the display will show:
RINSING FINISHED CLOSE KNOB
12 Close the tap, reload the circuit and let the machine heat up

If you use a product other than the recommended one, you should follow the manufacturer's directions on the
12.1 Interrupting the descending cycle

If the descending cycle is interrupted by switching the machine OFF, it will automatically resume when the is switched back ON.
The descending cycle can be interrupted by turning the steam knob (16) clockwise and then pressing the button (27).
The display will show:
DESCAL. INTERRUPTED EMPTY WATERTANK

Warning! After interrupting the cycle you must empty the water tank of the descending solution and wash out with fresh drinking water; the machine circuit must be by carrying out a rinse cycle. The display will show:
RINSE MACHINE
PRESS KEY
Follow the directions for a normal rinse cycle provided in section 8 of the previous chapter.
13 FUNCTION PROGRAMMING

The user can change some machine operating parameters according to personal needs.
13.1 MENU/OK command
In order to program functions you must access the programming mode
by pressing "MENU/OK" (28) when the machine is in a standby status.
To select the desired function, press the "A" button to move up one line or the "√" button to move down on the display.
To exit the programming mode press "ESC"
13.2 Choosing individual functions
Select the desired function by pressing "A" or "V". Press "MENU/OK" to enable the desired function; you can browse the selectable settings using the "A" or "V" button; to store a setting press "MENU/OK".

Note: by pressing "ESC" you can exit the programming mode at any time without saving the changes made; without saving is possible only before you have pressed OK".
13.3 Description of programmable functions
ENERGY SAVING
If the appliance is used little, it may be switched to the ENERGY SAVING mode. This function allows electricity costs to be reduced. However, it is recommended to switch the appliance off completely using the on/off switch (7) if it is not to be used for a prolonged period. It will take the machine just a few minutes to heat up when you switch it back on.
- In the programming mode press "A" or "V" to select the function:
ENERGYSAVING
and enable it by pressing "MENU/OK"; the following message will appear:
ENERGYSAVING
in this mode the machine remains on but no components are active.
- To deactivate the "ENERGY SAVING" function, press "MENU/OK".
RINSING
Immediately after heating up, the appliance automatically eliminates the water left standing in the internal circuit to ensure that only fresh water will be used to make coffee.
The function is activated in the factory.
- To deactivate it, go to the programming mode and press "A" or
"V" to select the function:
RINSING
and enable it by pressing "MENU/OK". The following message will appear:
RINSING ON
Now press "A" or "V" to select
RINSING ON
RINSING OFF
and store the selection by pressing "MENU/OK".
We recommend selecting:
RINSING ON
LANGUAGE
This function allows you to change the language of the display. You can choose among Italian, German, Portuguese, Spanish, English, French and Dutch. The appliance is normally set on the language of the country it is to be sold in.
After accessing the programming mode, press "A" or "V" to select the function:
LANGUAGE
and then enable it by pressing"MENU/OK".
The display will show:
LANGUAGE ENGLISH
Press "^" or "√" to select the desired language and then press "MENU/OK" to memorise it.
WATER HARDNESS
The hardness of tap water may vary from region to region. For this reason, the appliance may be adjusted according to the degree of hardness of the water in the place it will be used in; hardness is measured on a scale of 1 to 4.
The appliance is already programmed for an average value (hardness 3). The appliance setting should be adjusted according to the actual hardness of the water, which can be measured using the test strip provided.
Briefly dip (1 second) the test strip provided in water and shake it gently. After one minute you can read the test results on the strip.
After accessing the programming mode press "A" or "V" to select the function:
WATER HARDNESS
and enable it by pressing "MENU/OK".
WATER HARDNESS
HARDN 3
- Check the test strip previously immersed in water to see how many squares have changed colour.
- Press "A" or "V" to select the correct water hardness (e.g. 2 squares = Hardness 2) and memorise it by pressing "MENU/OK".

Caution: descale the appliance when the max water hardness level is reached.
The display will show the message:
DESCALING
READY FOR USE
CUP HEATER PLATE
This function allows you to turn on the cup heater plate present in the machine cover.
CUP HEATER
- In programming mode, select the function using the "A" or "V" button, and confirm using the "MENU/OK" button.
- It will thus appear the indication to choose whether you wish to select
CUP HEATER ON
or
CUP HEATER OFF
using the "^" or "( button, and confirm your choice using the "MENU/OK" button.
TEMPERATURE
This function allows you to adjust the water temperature to obtain hotter or less hot coffee (Minimum, low, medium, high and maximum).
ENGLISH
After accessing the programming mode press "A" or "V" to select the function:
TEMPERATURE
then enable it by pressing "MENU/OK".
The display will show, for example:
TEMPERATURE
MEDIUM
- Press "A" or "V" to select the desired temperature and memorise it by pressing "MENU/OK".
PRE-BREWING
In the pre-brewing process the coffee is slightly moistened before actual brewing. This brings out the full aroma of the coffee, which thus acquires a delicious flavour.
- Press "A" or "V" to select the function:
PREBREWING
then enable it by pressing "MENU/OK".
The display will show:
PREBREWING ON
- by pressing "A" or "V" you can choose to deactivate the function
PREBREWING OFF
or extend the pre-brewing phase
PREBREWING LONG
to enhance the flavour of your coffee.
- Memorise the choice by pressing "MENU/OK".
PRE-GRINDING
With the pre-grinding process the appliance grinds twice: the first time for the type of coffee selected and the second time for the next coffee (not yet selected).

This function is useful only if you have to make several coffees at the same time (e.g. when
entertaining guests or during a party).
After accessing the programming mode, press "A" or "V" to select the function:
PREGRINDING
enable it by pressing "MENU/OK".
PREGRINDING
OFF
Press "^" or "√" to select the desired setting and memorise it by pressing "MENU/OK".
TOTAL COFFEEES
This function allows you to display how many coffees the appliance has made to date.
After accessing the programming mode, press "A" or "V" to select the function:
TOTAL COFFEEES
enable it by pressing "MENU/OK". The display will show, for example:
TOTAL COFFEEES
86
TIMER
This coffee maker features a new function that allows you to save energy in case of long periods of quiescence. This function, which is factory set, automatically switches the machine from the
SELECT PRODUCT
READY FOR USE
status to the
ENERGYSAVING
mode after 3 hours have elapsed since the previous use.
- The switch-off time can be set at 15-minute intervals, down to a minimum of 15 minutes. The function may not be disabled.
- In the programming mode press "A" or "V" to select the
TIMER
function and activate it by pressing "MENU/OK". The display will show:
STANDBY
AFTER: 3:00
- Press "^" or "√" to select the desired setting and press "MENU/OK" to store it.

Note: if ON/OFF times have been activated through the "CLOCK" function, this function will be ignored.
CLOCK
This function may be activated and deactivated by the user. It is used to:
display the current time when the machine is in the "ENERGY SAVING" or "FUNCTION SELECTION" mode;
- program the machine to switch on and off at a specific time.
In order for the programming function to work properly, you must set the clock to the current time.
- Press "A" or "V" to select the function:
CLOCK
enable it by pressing "MENU/OK".
- Press "A" or "V" to select the function:
CLOCK TIME
enable it by pressing "MENU/OK".
- Press "^" or "√" to set the current hour and memorise it by pressing "MENU/OK";
CLOCK TIME
1:18
Then press "A" or "V" to set the minutes and memorise the setting by pressing "MENU/OK".
The clock is set and the machine will go back to the previous menu.

Note: keeping the buttons pressed down will allow you to go through the numbers quickly.

Note: the clock setting is also maintained when the machine is off
Displaying the time
- press "A" or "V" to select the function
SHOW CLOCK TIME
and enable it by pressing "MENU/OK".
- press "A" or "V" to activate or deactivate the function
SHOW CLOCK TIME
ON
and memorise the setting by pressing "MENU/OK".

Note: the time may be displayed only at certain times; this function must be deactivated by the user
- If you want to deactivate the function press "A" or "√" to choose:
SHOW CLOCK TIME
OFF
and memorise by pressing "MENU/OK"
Programming the machine to switch on and off.
The machine can be switched on and off automatically without the user's intervention. You can program only one time for the machine to go on and one time for it to go off.

Note: this function is enabled only if the on/off switch (7) is positioned on "1" (on).
- press "A" or "V" to select the function:
ON/OFF TIME
and enable it by pressing "MENU/OK".
- Select the hour when you want the machine to go on by pressing "A" or "V" and memorise by pressing "MENU/OK".
ON/OFF TIME
ON 7:30
then press "A" or "V" to set the minutes and memorise the setting by pressing "MENU/OK".
- Select the hour when you want the machine to go off by pressing "A" or "V" and memorise by pressing "MENU/OK";
ON/OFF TIME OFF 9:30
then press "A" or "V" to set the minutes and memorise the setting by pressing "MENU/OK".

Warning: if the on/off time settings coincide, the machine will ignore both. After the times have been clock must be activated in order for the function to work.
Activating the automatic on/off function

Note: activating this function makes sense only if you have already set the on/off times.
- Press "A" or "V" to select the function:
CLOCK
enable it by pressing "MENU/OK".
The display will show:
CLOCK OFF
In this case pressing "MENU/OK" will deactivate the function. Choose to activate the function by pressing "A" or "√" and when
CLOCK ON
appears, memorise the setting by pressing "MENU/OK".
When you exit the programming mode, the machine will check the set parameters. If the current time falls within the set deactivation time, the display will indicate:
ENERGYSAVING

Note: during the set deactivation period, the machine can be restarted at any time by pressing "MENU/OK".
Later, to deactivate the machine again, go into the programming mode by pressing "MENU/OK" and exit immediately by pressing "ESC".
RINSING CYCLE
With this function, all the parts involved in the coffee dispensing process undergo a washing cycle with water.

During the wash cycle it is recommended that a person be on hand to supervise the operation.
- To start the wash cycle, press "A" or "V" to select the function:
RINSING CYCLE
to enable the function press "MENU/OK". Press "MENU/OK" again to start the wash cycle.
- When the wash cycle is completed, the following message will appear.
FILL WATERTANK
At this point fill the water tank. The machine will automatically switch to the normal operating mode and the following message will appear on the display:
SELECT PRODUCT
READY FOR USE
FACTORY SETTINGS
This function allows you to restore all the machine operating parameters originally set by the manufacturer.
After accessing the programming mode, press "A" or "V" to select the function:
FACTORY SETTINGS
then enable it by pressing "MENU/OK". The following indication will appear:
FACTORY SETTINGS NO
- Choose whether you want to restore the factory settings by pressing "A" or "V" and press "MENU/OK" to confirm your selection.

Caution: when you restore all the factory settings, you will lose any custom settings you have made on the
machine.
This instruction book contains the information you need in order to use and upkeep your appliance correctly.
- The information should be viewed as a guideline for using and upkeep your coffee maker in safety. The information is not exhaustive. For additional information or for information on topics not covered or inadequately covered in this instruction book, please contact an authorized service centre or the manufacturer directly.
- In addition, it should be noted that these instructions do not form part of a previous or existing agreement, legal contract or similar and that the information is not changed by any other document.
- All the manufacturer's obligations and liabilities are based on the contract of sale, which also specifies all the warranty terms and conditions.
- The warranty terms and conditions are neither limited nor extended on the basis of this instruction book.
- This instruction book contains information protected by copyright.
- This instruction book may not be photocopied or translated into other languages without the explicit written consent of the manufacturer.
15 SCRAPPING
- Make unusable any appliances no longer in use.
- Detach the plug from the wall outlet and cut the electric cord.
- Deliver scrapped appliances to a suitable waste disposal facility.
16 DISPLAY INDICATIONS
The display guides users and helps them to use the machine properly. Below is a description of alarm messages that disable the coffee dispenser and an explanation of what the user must do in order to use the machine properly.
ENERGYSAVING
Press "MENU/OK" (28).
DESCALING
- Descale the machine (see Chap.12)
FILL WATERTANK
- Fill the water tank (9) with fresh drinking water (Fig.03).
COFFEE BEANS EMPTY
- Fill the coffee bean container with coffee beans and restart the coffee dispensing cycle.
DREGDRAWER FULL
- Open the front cover (15), take out the coffee grounds drawer (10) and empty the grounds into a suitable container.

Important note: the coffee grounds drawer may be emptied only when the machine is on. The drawer must
be taken out for at least 5 seconds. If you empty out the drawer with the machine off, the coffee dispensing function will be disabled when you switch it back on.
BREWUNIT MISSING
- Fit the coffee dispenser unit (17) properly in place.
DREGDRAWER MISSING
- Fit the drip tray (12) and coffee grounds drawer (10) properly in place.
CLOSE DOOR
- Close the front cover (15).
GRINDER BLOCKED
BREWUNIT BLOCKED
- Contact an authorized service centre.
16 TROUBLESHOOTING
| Problem | Cause | Troubleshooting |
| The appliance does not switch ON | The appliance is not connected to the mains | Connect the appliance to the mains |
| The coffee is too cold | The cups are cold | Heat the cups |
| No hot water or steam | The hole of the steam nozzle is clogged | Clean the steam nozzle hole with a pin. |
| Coffee is dispensed slowly | Coffee is too fine | Change the coffee blend or adjust grinding as specified in Par. 5. Decrease the dose (Par. 6) |
| Dirty coffee dispenser | Clean the coffee dispenser (Par. 11) |
| The coffee has little "crema" (cream - froth layer) | The blend is not suitable or the coffee is not freshly ground or is ground too coarsely | Change the coffee blend or adjust grinding as described in Par. 5. Increase the dose (Par. 6) |
| The appliance takes too long to heat up or a limited volume of water comes out of the nozzle | The circuit of the appliance is clogged by scaling | Descale the appliance |
| The coffee dispenser is jammed | The coffee dispenser is not snapped into its housing | Switch ON the appliance. Close the service cover. The coffee dispenser automatically returns to its initial position |
| Coffee grounds drawer in place | Remove the coffee grounds drawer before removing the coffee dispenser |
| No coffee is dispensed | Dirty coffee dispenser | Clean the coffee dispenser |
| Large dose | Decrease the dose |
| Coffee is dispensed outside the dispenser | The coffee dispenser is not fitted correctly | Refit the coffee dispenser |
| The coffee dispenser is clogged | Clean the coffee dispenser and its spouts |
| Coffee comes out too quickly | Too little coffee inside the container | Fill the container with ground coffee (not instant coffee) |
| Coarse coffee blend | Change the type of blend |
| Small dose | Increase the dose |
NOTE
WICTIGE
VORSICHTSMASSNAHMEN
D
MaBe in Milimeter
E

1 CAFE PROGR. QUANTITE
10 ACCESSORIES EN OPTION
10.1 Cappuccinatore

12.1 Interruption descalcification

A工程技术 manager, who is responsible for the project.
A工程技术 manager who is responsible for the project.
A Technology Manager who is responsible for the project.
A Technical Manager who is responsible for the project.
ESPANOL
8 AFGIFTE VAN HET WARME WATER

10 OPTIONELE ACCESSOIRES
10.1 Cappuccino-inrichting met ringmoer

APPARAT SPOELEN WATERRESERV.VULLEN
APPARART SPOELEN TOETS DRUKKEN
APPARART SPOELEN DRAIKNOP OPENEN
APPARART SPOELEN TOETS DRUKKEN
WATERRESERV. VULLLEN
WATERRESERV. VILLLEN
1 EXPRESSO PROGR.DOSE
11 LIMPEZA E MANUTENCAO
Limpeza generica
TEMPO ON/OFF ACTIVADO 7:30