
KS 2402-40 - Chain saw ATIKA - Free user manual and instructions
Find the device manual for free KS 2402-40 ATIKA in PDF.
| Product type | Electric chainsaw |
| Brand | ATIKA |
| Model | KS 2402-40 |
| Motor power | 2400 W |
| Supply voltage | 230 V ~ / 50 Hz |
| Guide bar length | 400 mm |
| Chain speed | 14 m/s |
| Oil tank capacity | 200 ml |
| Chain type | Oregon 91PJ057X (pitch 3/8", gauge 1.3 mm) |
| Weight | 5.7 kg |
| Protection class | II (double insulation) |
| Sound pressure level LPA | 86.8 dB(A) |
| Guaranteed sound power level LWA | 105 dB(A) |
| Hand-arm vibration | < 4.89 m/s² |
| Drive sprocket | 7 teeth, pitch 3/8" |
| Lubrication system | Automatic |
| Chain brake | Yes, mechanical |
| Intended use | Domestic and garden (non-professional) |
| Included equipment | Chainsaw, guide bar, chain, chain guard, manual |
| Protection rating | IPX0 (not waterproof) |
Frequently Asked Questions - KS 2402-40 ATIKA
User questions about KS 2402-40 ATIKA
0 question about this device. Answer the ones you know or ask your own.
Ask a new question about this device
Download the instructions for your Chain saw in PDF format for free! Find your manual KS 2402-40 - ATIKA and take your electronic device back in hand. On this page are published all the documents necessary for the use of your device. KS 2402-40 by ATIKA.
USER MANUAL KS 2402-40 ATIKA
Original instructions – Safety instructions – Spare parts
Tronçonneuse
Extent of delivery 17
Declaration of conformity 17
Symbols on the chain saw 18
Symbols Operating instructions 18
Normal intended use 18
Residual risks 18
Security instructions 18
- Personal protective clothing 19
Before sawing 19 - Electrical safety 19
- Operating 20
While sawing 20 - Saw backstroke 20
- General notes 21
Assembly 21
Before the first commissioning 21
-Chain lubrication 21
- Charging the oil tank 21
Commissioning 22
- Mains connection 22
- Switching On/Off 22
- Chain brake 22
- Checking of chain brake 22
- Clamping of saw chain 22
Working with the chain saw 22
Maintenance and cleaning 24
- Maintenance 24
- Sharpening of saw chain 24
- Exchanging saw chain and sword 24
- Chain wheel 24
- Checking of the oil automatic 24
- Cleaning 24
Transport 25
Storage 25
Guarantee 25
Possible faults 25
Technical data 25
Discription of chain saw / Spare parts 26
Operating times
Before initiating the device please observe the provisions pertaining to corresponding laws (regional provisions) for the noise control.
Extent of delivery
After unpacking, check the contents of the box
That it is complete
Check for possible transport damage
Report any damage or missing items to your dealer, supplier or the manufacturer immediately. Complaints made at a later date will not be acknowledged.
1 chain saw
1 guide bar
1 saw chain
1 chain protection
1 operating instructions
EC Declaration of Conformity
according to EC directive:
98/37/EC until 28.12.2009
2006/42/EC from 29.12.2009
We,
ATIKA GmbH & Co. KG
Schinkelstraße 97
59227 Ahlen - Germany
herewith declare under our sole responsibility that the product chain saw type KS 2402/40
is conform with the above mentioned EC directives as well as with the provisions of the guidelines below:
2000/14/EG, 2004/108/EG and 2006/95/EG.
Conformity assessment procedure: 2000/14/EC - Appendix V.
Measured sound power level L_WA103,5 dB (A).
Guaranteed sound power level L_WA105dB (A).
Following harmonized standards have been applied:
EN 55014-1:2006, EN 55014-2:1997+A1
EN 61000-3-2:2006, EN 61000-3-3:1995+A1+A2
EN 60745-1:2006, EN 60745-2-13:2007
ZEK 01.1-08 / 06.08
Keeping of technical documents at:
ATIKA GmbH & Co. KG – technical department –
Schinkelstr. 97 – 59227 Ahlen – Germany
EC type examination carried out by: TUV Rheinland Certificate no.: BM 50140772 0001
Ahlen, 07.09.2009
A. Pollmeier, management
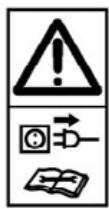
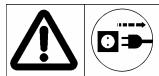
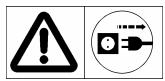
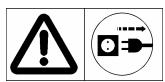
Symbols on the chain saw
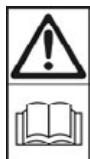
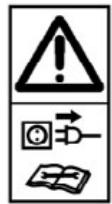
Carefully read operator's manual before handling the machine. Observe instructions and safety rules when operating.
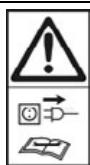
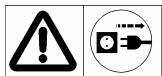
Shut off engine and remove power cord before performing cleaning, maintenance or repair work.
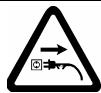
When connecting cable is damaged or cut through immediately pull out the power plug.

Wear hardhat, eye and ear protection.
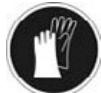
Wear protective gloves.
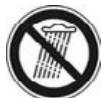
Do not expose to rain. Protect against humidity.

maximum cutting length 400mm
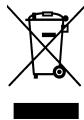
Electrical devices do not go into the domestic rubbish. Give devices, accessories and packaging to an ecofriendly recycling. According to the European
Directive 2002/96/EC on electrical and electronic scrap, electrical devices that are no longer serviceable must be separately collected and brought to a facility for an environmentally compatible recycling.
Symbols Operating instructions
| Threatened hazard or hazardous situation. Not observing this instruction can lead to injuries or cause damage to property. | |
| Important information on proper handling of the saw. Not observing this instruction can lead to faults in the chain saw. | |
| User information. This information helps you to use all the functions of the chain saw optimally. | |
| Assembly, operation and servicing the chain saw. Here you are explained exactly what to do. | |
| Important notes for environmentally compatible conduct. Failure to observe these instructions may lead to environmental damage. |
Normal intended use
The chain saw is suitable for
-
sawing of trunks, perches, wood trusses, boards etc. and can be used for transverse or longitudinal cuts.
-
Chopping down of trees.
-
Do not use the chain saw for sawing of building materials and synthetic materials.
The chain saw is only suitable for the private use in the house and hobby garden. - The chain saw is not suitable for forestry works (chopping and cutting off of perches in the forest). The necessary safety of the operator is not guaranteed by the cable joint.
- The intended usage also includes compliance with the operating, servicing and repair conditions prescribed by the manufacturer and following the safety instructions included in the instructions.
The relevant accident prevention regulations for the operation as well as the other generally acknowledged occupational medicine and safety rules must be complied with.
Residual risks
Even if used properly, residual risks can exist even if the relevant safety regulations are complied with due to the design determined by the intended purpose.
Residual risks can be minimised if the "Safety information" and the "Intended usage" as well as the whole of the operating instructions are observed.
Observing these instructions, and taking proper care, will reduce the risk of personal injury or damage to the equipment.
- Risk of backstrokes when touching the guide bar tip with a hard object.
■ Risk of injuries of fingers and hands by the tool (saw chain).
Injury by catapulted workpiece parts.
Electric shock.
■ Risk from electricity, by using non-standard electrical connections.
Touching live parts of opened electrical components.
Impairment of hearing when working on the machine for longer periods of time without ear protection.
Fire danger.
In addition, in spite of all the precautionary measures taken, non-obvious residual risks can still exist.
Safety instructions
Observe the following advices in order to protect yourself and other persons against possible injuries.
(i) Keep these security advices (operating instructions) always together with the chain saw.
The chain saw shall only be operated by persons with
i sufficient experience.
Give or lend the chain saw only to persons who are familiar with the chain saw and its operation. Give always the operating instruction to take with them.
Repair works on the device must be carried out by the manufacturer or by companies appointed by the manufacturer respectively.
Primary users
- Persons working for the first time with the chain saw must obtain a practical instruction to the use of the chain saw and the operator protection equipment by an experienced operating person. Primary users shall first of all practice cutting of round timber on a sawhorse or a rack.
■ Minors are not allowed to work with the chain saw. - Be observant. Attend to what you do. Start working with rationality. Do not use the device when you are tired or under the influence of drugs, alcohol or medicaments. One moment of carelessness when using the device can result in serious injuries.
Make yourself familiar with the equipment before using it, by reading and understanding the operating instructions. - Do not use the machine for unsuitable purposes (see "Normal intended use").
Personal protective equipment
-
Never work without suited protective equipment.
-
Do not wear loose-fitting clothes or jewellery, they could be caught by movable parts.
- wear a hair-net if your hair is long
- certificated hardhat in situations where injuries to the head must be expected (e.g. when chopping or releasing trees).
- Visor
-ear protection - Cut-proof trousers and gloves
- Anti-slipping cut-proof boots (safety shoes) with steelltoes
Safety instructions - before sawing
Carry out the following checks before the initiation and regularly during the sawing process. Observe the relevant sections in the operating instruction manual:
Is the chain saw assembled completely and properly?
Is the chain saw in good and safe condition?
- Only use a suited guide bar/saw chain combination as described under "Technical data". Incorrect combinations increase the risk of kickbacks.
Is the oil tank filled (chain lubrication)?
Check the oil level on a regular basis. Top up saw chain oil without delay to prevent the saw chain from running dry.
Is saw chain clamped correctly?
Observe the points in paragraph „Clamping saw chain".
Is saw chain sharpened correctly?
You only work well and safely with a sharpened saw chain.
Is chain brake released and works properly?
Observe the points in paragraph "Checking the chain brake".
Are the handles clean and dry - free of oil and resin?
Before starting your work make sure that:
- no other persons, children or animals stay within the woring area,
you can always step back without any barriers, - your standing area is free from foreign objects, brushwood and branches,
- you have always a secure standing position.
■ Is workplace free of risks to stumble? Keep your workplace in an orderly condition! Untidiness can result in accidents. Risk of stumbling.
Take into consideration environmental influences:
- Delay the work in case of disadvantageous weather (rain, snow, ice, wind) – increased risk of accidents!
- Do not work under insufficient light conditions (e.g. fog, rain, snow flurry or twilight). You can not see anymore details within the falling area – risk of accident.
- Do not use the chain saw near inflammable liquids or gases - Risk of fire.
The operator is responsible for accidents or risks which occur to other persons or their properties.
Electrical safety
1.5 mm² for cable lengths up to 25 m
2.5 mm² for cable lengths over 25 m
■ Design of the connection cable according to IEC 60 245 (H 07 RN-F) with a core cross-profile section of at least
- Long and thin connection lines result in a potential drop. The motor does not reach any longer its maximal power; the function of the device is reduced.
Plugs and coupler outlets on connection cables must be made of rubber, non-rigid PVC or other thermoplastic material of same mechanical stability or be covered with this material.
The connector of the connection cable must be splashproof.
- When running the connection line observe that it does not interfere, is not squeezed, bended and the plug connection does not get wet.
- Do not use the cable for purposes for which it is not meant. Protect the cable against heat, oil and sharp edges. Do not use the cable to pull the plug from the socket.
Wind off completely the cable when using a cable drum.
- Regularly check the extension cables and replace them if they are damaged.
- Do not use any defective connection cables.
- When working outdoors, only use extension cables especially approved and appropriately labelled for outdoor use.
- Do not set up any provisional electrical connections.
- Protect yourself against electric shocks. Avoid body contact with grounded parts (e.g. pipes, heating apparatus, cookers, fridges etc.)
- Do not hose down the device with water. (origin of danger electric current).
- Never bypass protective devices or deactivate them.
- Only hook up the machine by means of a fault-current circuit breaker (30 mA).
The electrical connection or repairs to electrical parts of the machine must be carried out by a certified electrician or one of our customer service points. Local regulations - especially regarding protective measures - must be observed.
Repairs to other parts of the machine must be carried out by the manufacturer or one of his customer service points.
Use only original spare. Accidents can arise for the user through the use of other spare parts. The manufacturer is not liable for any damage or injury resulting from such action.
Safety instructions - operation

Never saw with only one hand. Hold the chain saw always firmly with both hands, left hand on the front handhold (4) and right hand on the rear handhold (17).
Hold the chain saw slightly on the right of the own body.
- Avoid abnormal posture. Provide a safe standing position and keep at any time the balance.
- Never work
- with stretched arms
- on hardly accessible places
- above shoulder height
- standing on a ladder, a staging or a tree.
Activate the chain brake when moving to a tree.
Before leaving the chain saw (work break) bring it in a safe condition (cover the guide bar, apply the chain brake) and put it on a place where nobody is endangered. Secure the chain saw against unauthorized access.
Safety instructions - while sawing
- Never work alone. Keep acoustic and visual contact to other persons at all times to allow immediate first aid in emergency cases.
- Immediately stop the engine at imminent danger or in emergency cases.
Never leave the saw running unattended. - Immediately stop working when you feel unwell (e.g. headache, dizziness, nausea, etc.). Otherwise there is an increased risk of accidents.
- When switching on the chain saw must be supported and held safely. Chain and guide bar must stand free.
Start cutting only when the saw chain has reached the full number of revolutions. - Do not overload the machine! You work better and safer in the given performance range.
- Do not use the chain saw for lifting or moving of wood.
Make breaks when sawing so that the engine can cool down. - Do not place a hot chain saw in dry grass or onto inflammable objects.
- Never get in contact with the running saw with metallic fences or the ground.
- Make sure that the wood is free of foreign object (stones, nails etc).
Make sure that the wood can not turn when sawing. - Saw splintered wood with care. There is risk of injury by wood pieces carried away.
- Avoid saw backstroke by a correct guiding of the saw.
Note: Safety instructions - saw backstroke
Use the claw stopper (16) for fixing the chain saw on the wood. Use the claw stopper when sawing as lever.
- Do not use the chain saw for lifting or moving wood.
- Let the chain saw work by producing a light leverage pressure over the claw stopper. When sawing do not press with strength.
- When sawing thicker perches or trunks set back the claw stopper on a deeper point. For setting back release the claw stopper from the wood and place it again in a deeper position. Do not remove the saw here out of the cut.
- Be careful at the end of a sawing cut. As far as the saw leaves the wood the force of weight changes. There is risk of accident for legs and feet.
- Remove the chain saw only with running saw chain out of the cut.
If the saw chain gets jammed in the wood, stop it immediately. Use a wedge to free the guide bar.
Vibrations
If persons who have blood circulation problems are too often exposed to vibrations damages to the nervous system or to blood vessels may occur.
You can reduce vibrations
-
by thick and warm working gloves,
-
shorter working time (have longer breaks).
See a doctor if your fingers swell, you don't feel well or your fingers become numb.
Safety instructions - saw backstroke
What is saw backstroke? Saw backstroke is the sudden strike upwards or backwards of the running chain saw in direction of the operator. This happens when

- 11 the guide bar tip gets in contact with the sawing material (unintended) or other hard objects.
- the saw chain is jammed at the guide bar tip.
The chain saw reacts uncontrolled and causes frequently heavy injuries with the operator.
Carry out lateral cuts, diagonal cuts and longitudinal cuts with increased attention because here the claw stopper is not put on.
How to avoid saw backstroke?
Always hold the chain saw firmly with both hands.
- 13 For better control saw with the lower edge of the guide bar. Hold the chain saw as close as possible to the horizontal position when contacting wood.
11 Never saw with the guide bar tip.
Sawing with the upper guide bar edge may cause a saw backstroke if the saw gets jammed or hits a hard object in the wood.
- Start cutting only with running saw chain.
Only work with sharp and correctly sharpened saw chain.
Only work with correctly clamped saw chain.
Use claw stopper (16) as lever.
- Never work above height of shoulders.
- Never cut through several perches at the same time. When releasing make sure that no other perch is touched.
If possible use a sawhorse when cutting to length.
Stab cuts shall only be carried out by instructed personal.
General notes
-
Switch the machine off and remove the mains plug from the socket when
-
contact of chain saw with soil, stones, nails or other foreign substances
check immediately chain and sword - carrying out repair works
- maintenance and cleaning
- removal of faults
cut through connection cables - checking of connection cables whether they are swallowed or damaged
- transport
clamping again the chain
chain change -
leaving of machine (also for short-term interruption)
-
Maintain your chain saw with care:
-
Keep your tools sharp and clean in order to be able to work better and safer.
- Comply with the maintenance instructions and the advices for lubrication and for the tool change.
- Keep the handholds dry and free from resin, oil and grease.
Check the machine for possible damage:
- Before further use of the machine the protection devices or slightly damaged parts must be checked carefully for their proper and intended function.
- Check whether the movable parts function perfectly and do not stick or whether the parts are damaged. All parts must be correctly installed and fulfil all conditions to ensure perfect operation of the chain saw.
- Damaged guards and parts must be properly repaired or exchanged by a recognized, specialist workshop; insofar as nothing else is stated in the instructions for use.
Damaged or illegible security labels have to be replaced. - Do not allow any tool key to be plugged in! Before switching on, check always that all tools are removed.
- Store unused equipment in a dry, locked place out of the reach of children.
Do not carry out repair operations on the machine other than those described in section "Maintenance" but contact the manufacturer or authorized customer service centre.
Repairs to other parts of the machine must be carried out by the manufacturer or one of his customer service points.
Use only original spare parts, accessories and special accessory parts. Accidents can arise for the user through the use of other spare parts. The manufacturer is not liable for any damage or injury resulting from such action.
Assembly
Connect chain saw to power supply system only after having finished the complete assembly.
Risk of njury! Wear protective gloves when assembling.
Put the chain saw on an even face.
Remove the cover (10) by loosening the fastening screw (11).
2 Put on the guide bar.
Insert the saw chains into the circular guide slot of the guide bar.
Attend to the correct running direction of the chain links.
3 When assembling, pay attention that the chain links are lying correctly within the guide slot and on the chain wheel (13).
Saw chain can hardly be put around the chain wheel?
Turn the chain clamp (21) anti-clockwise until the saw chain can easily be put around the chain wheel. Turn the chain clamp (21) clockwise until the saw chain is firmly clamped.
Now, refasten the cover (10).
Clamp the saw chain as described in paragraph "Clamping of saw chain".
Before the first commissioning
Chain lubrication
The chain saw is not delivered filled with saw chain adhering oil.
Never operate the chain saw without lubrication. Any use without chain saw oil may result in damage of the chain saw and guide bar.
The durability and cutting power of the chain depends on the optimal lubrication. During operation the saw chain is automatically wetted with oil.
Charging the oil tank
Put the chain saw on a suitable base.
4 Unscrew the oil tank lock (9).
Fill the oil tank with bio-degradable chain saw adhering oil (app. 200 ml). The fill level can be seen on the inspection window (17). For easier filling use a funnel.
When filling observe that no dirt reaches the oil tank.
Screw on the oil tank lock again.
Never use recycled oil or used oil. The guarantee expires when using oil which is not allowed for chain saws.
Commissioning
Mains connection
- Compare the voltage given on the machine model plate e.g. 230 ~V with the mains voltage and connect the saw to the relevant and properly earthed plug.
Use a shockproof plug, mains voltage 230V with residual current circuit breaker (FI switch 30mA ).
Only use connection cables with sufficient diameters.
Switching On / Off
Do not use a device where
- the contactor can not be switched on and off.
the chain and motor brake does not work properly
Damaged switches must be repaired or replaced immediately by the customer service.
When switching on the chain saw must be supported and held safely. Chain and guide bar must stand free.
5 Release the chain brake. Push the front hand guard (3) towards the front handle (Pos. 1). The chain saw is ready for operation.
Switch on
8 Push and hold automatic trip switch (5). Then operate the On/Off switch (6). Release now automatic trip switch. The green LED is on.
The red LED comes on when the saw chain is jammed or overloading occurs.
Reduce the power or immediately cut off the chain saw.
- Remove the guide bar from the cut.
- Check the chain saw and the chain tension before restarting.
Switching off
8 Release On/Off switch (6).
Chain brake
The chain brake is a protective mechanism which in case of a stroke back chain saw is initiated via the front hand protection or after releasing the on/off switch. The saw chain stops immediately (< 0,1 sec.).
Checking of chain brake
Check the chain brake's proper function before each work start.
- Start the engine.
- Hold the chain saw with both hands and allow the engine to run.
6 Use the back of your hand to press against the front hand guard.
The chain saw must stop immediately.

It is not allowed to use this chain saw without properly working chain brake. Please contact the manufacturer or the customer service point.
Clamping of saw chain
- Before setting or checking the saw chain tension pull out power plug.
- In order to avoid injuries wear protective gloves.
Check the saw chain tension before
start of work
after the first steps
during sawing regularly all 10 minutes
Only with a correct clamped saw chain and a sufficient lubrication you can influence the durability.
(i) Please observe the following:
a new saw chain must be reclamped more often until it has elongated.
in case of heating of chain to operating temperature it expands and needs to be reclamped.
After finishing the sawing works release tension of saw chain as in case of cooling too high tensions would emerge in the saw chain.
if chain flackers or comes out of the guide clamp it again immediately.
Clamping of saw chain:
9 Loosen the fastening screw (11) 1 - 2 revolutions anticlockwise.
Turn the chain tension ring (12) stepwise clockwise until the correct chain tension is reached. The engaging effect prevents that the chain tension loosens.
The fastening screw (11) turns with it; possibly it must be released again during the clamping process.
The saw chain is correctly clamped when it can be lifted in the centre of the guide bar by appr. 3 - 4 ~mm .
Turn the chain tension ring (12) anti-clockwise when the saw chain is clamped to much.
Refasten the fastening screw with the hand.
Check wether the chain links are positioned correctly in the guide slot of the guide bar.
Working with the chain saw
Additional advices for sawing trunks
- Never put the trunk for sawing on the ground. Support the trunk in such manner that the cut does not close and the saw chain jams. Use a safe base (e.g. sawhorse). Avoid contact to ground with the guide bar tip or saw chain.
Adapt shorter trunks before sawing and clamp them firmly. - Avoid cutting of thin bosk and lumber. The chain saw is not suitable for those works.
-
Carry out longitudinal cuts with special care as the claw stopper is not used. Avoid saw backstroke by guiding the saw with a small angle.
-
When working at a slope take always the position above or on the side of the trunk or the lying sawing material respectively. Pay attention to rolling trunks.
Additional advices for sawing timber under tension/release
If perches, trees or wood under tension become free of tension by sawing extreme caution is demanded. The sawing material can react completely uncontrolled and result in heavy injuries or death.
Such works shall only be carried out by instructed specialists.
$$ \Rightarrow \boxed {1 7} / \Rightarrow \boxed {1 8} / \Rightarrow \boxed {1 9} / \Rightarrow \boxed {2 0} $$
For all works set always first of all on the pressure side 1
the releasing cut and then the dividing cut ② - otherwise the chain saw can jam or strike back.
Upper side of wood under tensile stress
1 Place one cut (one third of the diameter of the trunk) from the bottom up.
Then place a second cut on the same point from top which cuts through the trunk.
18 Underside of wood under tensile stress
1 Place one cut (one third of the diameter of the trunk) from top to bottom.
Then place a second cut on the same point from bottom which cuts through the trunk.
19 Strong trunks and strong tension
1 Place one cut (one third of the diameter of the trunk) from buttom up.
Then place a second cut with distance to the first cut from top which cuts through the trunk.
20 Cutting off of perches
For horizontal branches without being top heavy
The branch section falls down in a controlled manner without tipping over.
- Set the first cut from below, approx. one third of the branch diameter.
The second cut is made on the same level as the first cut or moved further toward the inside (negative breaking step).
3 Remove the remaining branch section.
Additional advices for chopping down trees
Such works shall only be carried out by instructed specialists.
Pay attention to the length of the guide bar. Only those trees are allowed to be cut which have a trunk diameter which is smaller than the length of the guide bar.
21 Safeguard the dangerous zone (D) before cutting.
Make sure that there are no persons or animals in the fall area. Danger to life!
21 Make sure that the working area around the trunk is free of risk to stumble and that you have an escape route (F) which is free of obstacles.
21 Before cutting the tree down decide on the felling direction (C). Before chopping the tree decide on the chopping direction. Consider in this case the balance point of the treetop, neighbour trees, slope direction, state of health of the tree and the wind direction. On this side the kerf is cut in.
- Remove interfering branches, scrub and obstacles from the working area at the trunk and make sure that you have a safe standing position.
Thoroughly clean the trunk foot - sand, stones and other foreign objects make the saw chain edgeless or may damage it.
- Consider the state of health of the tree - be careful with trunks with damages or deadwood (droughty, rotten or dead wood).
Chopping a tree:
Cut a kerf with the saw of approximately one third of the tree diameter into the trunk. First of all place the horizontal cut and then as secondly a cut from top in an angle of 45^ .
Shout the warning "Caution" or "Tree is falling" before starting the fell cut.
- Now saw on the opposite side of the trunk a horizontal chopping cut. This cut should be placed a bit higher (appr. 4 cm) than the horizontal cut of the kerf.
- By no means cut through the trunk. Appr. 1/10 of the trunk diameter must remain. If the tree starts falling ahead of time pull out the chain saw immediately out of the cut and step back or to the side.
- Push a key into the horizontal chopping cut in order to make the tree falling.
Pay attention, when tree starts falling, to perches or twigs falling down.
Maintenance and cleaning
Before each maintenance and cleaning work
- switch off device
- wait for stop of chain saw
- pull out main plug
Further maintenance and cleaning works than described in this chapter shall only be carried out by the manufacturer or companies named by the manufacturer.
For maintaining and cleaning, removed security devices must unconditionally be mounted properly and proved again.
Use only original parts. Other parts can result in unexpected damages and injuries.
Maintenance
In order to avoid possible injuries wear gloves.
To guarantee a long and reliable usage of the chain saws carry out the following maintenance works regularly.
Check the chain saw for obvious defects such as
- loose, hung out or damaged saw chain
- loose fastenings
- worn or damaged components
Check the chain saw after each application for
- wear, especially chain, guide bar and chain wheel.
- correctly assembled and faultless covers and protective devices.
Necessary repair works or maintenance works have to be carried out before the usage of the chain saw.
Sharpening of saw chain

You can only work safely and well with a sharp and clean saw chain. Damaged or incorrectly sharpened saw chains increase the risk of kickbacks.
The saw chain has to be sharpened if
only wood dust is thrown out instead of shavings
you have to press the chain saw through the wood during cutting

Inexperienced users: Have the saw chain sharpened by a specialist/service workshop.
You can also sharpen your saw chain yourself by using our electric sharpener KSG 220 (article-no.: 302360).
| Saw chain type | Oregon 91 PJ 057X |
| Depth gauge distance T | .025" (.64 mm) |
| Sharpening angle α | 30° |
| Breast angle β | 85° |
| Planing tooth length a | min. 3 mm |
Exchanging saw chain and guide bar
Saw chain and guide bar are exposed to great wearing demands. Immediately exchange saw chain and guide bar when the faultless function is not guaranteed.
Put the chain saw on an even face.
Remove the cover (10) by loosening the fastening screw (11).
3 Turn the chain clamper (21) anti-clockwise in order to release the saw chain a bit.
Take off the guide bar with saw chain.
Clean the guide slot thoroughly when only the saw chain is exchanged.
3 When assembling, pay attention that the chain links are lying correctly within the guide slot and on the chain wheel (13).
Turn the chain clamp (21) clockwise until the saw chain is clamped.
Now, refasten the cover (10).
Clamp the saw chain as described in paragraph „Clamping of saw chain".
Chain wheel
The demand of the chain wheel (13) is particularly great. Check regularly the teeth of the chain wheel for wear or damages.
A worn or damaged chain wheel reduces the durability of the saw chain and should therefore immediately be exchanged by the customer service.
Checking of the oil automatic
Check the function of the automatic chain lubrication by switching on the chain saw and holding it with the pike in direction of a carton or paper on the ground.
Do not get in contact with the ground with the chain. Keep a safe distance of 20~cm .
If an increasing oil track is caused when checking it the oil automatic works faultless.
If there is no oil track despite full oil tank
16 clean the oil flow canal (14) and the upper chain clamping boring (15).
If this is not successful please contact the customer service.
Cleaning
Clean the chain saw thoroughly after each application so that the faultless function is kept.
Clean the case with a soft brush or a dry cloth.
Water, solvents and polishing agents shall not be applied.
Pay attention to that the ventilation slots for the motor cooling are free (risk of overheating).
In case of harder pollution or resins put the chain for some hours in a container with chain cleaner. Afterwards wash up the chain with clear water.
Remove all adhering substances with a brush from the chain wheel (13) and the sword fastening.
Clean the oil flow canal (14) with a clean cloth.
Transport
Remove mains plug before each transport.
Transport the chain only with the chain protection put on.
When transporting the product within a car put it in the boot or on a separate loading area. Secure the chain saw against tipping over.
Storage
- Store unused equipment in a dry, locked place out of the reach of children.
To extend the service life of the saw and guarantee smooth operation, before storing for a longer period
thoroughly clean the chain saw
Remove the oil from the oil tank.
Hint:
Some chain oils tend to encrustations after a longer period. For this reason the oil system should be flushed before a longer storing with a chain saw cleaner. Fill the cleaner up to the middle (appr. 50 ml) into the oil tank. Close the tank. Switch on the chain saw without assembled guide bar and chain until the complete cleaner has left the oil opening of the chain saw.
Put the saw chain for a short time into an oil bath and enwrap it afterwards in an oil paper.
Guarantee
Please observe the enclosed terms of guarantee.
Possible faults
Before each maintenance and cleaning work
- switch off device
- wait for stop of chain saw
- pull out main plug
After each fault clearance, put into operation and recheck all security installations.
| Fault | Possible cause | Removal |
| Chain saw does not initiate after switching on | Chain brake no power Extension cable damaged Main plug, motor or switch defect | Release chain brake Check power supply, power outlet, fuse protection Check extension cable, exchange defect cable immediately Have motor or switch checked by an approved electrician or replaced by original spare parts. |
| Chain saw works with interruptions | external loose connection internal loose connection Circuit closer/breaker defect | Check power supply, power outlet, fuse protection Check extension cable, exchange defect cable immediately Please contact the after sales service. |
| Chain saw picks, vibrates or does not saw correctly | Chain edgeless Chain worn Chain tension Chain not assembled correctly (teeth face to wrong direction) | Chain must be regrinded or exchanged Exchange chain Check and adjust chain tension Assemble chain again |
| Chain saw does not work with full power | Extension cable too long or diameter too small Power outlet to far away from main connection | Use extension cable with sufficient diameter Use power outlet which is nearer within the working area |
| Saw chain gets hot | no oil in the tank oil flow canal blocked chain tension too high Chain edgeless | Refill oil Clean oil flow canal Adjust chain tension Chain must be regrinded or exchanged |
| no saw chain lubrication | no oil in the tank oil flow canal blocked | Refill oil Clean oil flow canal |
Technical data
| Typ | KS 2402/40 |
| Motor rating P1 | 2400 W |
| Mains voltage / Mains frequency | 230 V~ / 50 Hz |
| No-load speed n0 | 8463 min-1 |
| Chain wheel (number of teeth/pitch) | 7 x 3/8" (.9525) |
| Cutting length | 400 mm |
| Saw chain speed | 14 m/s |
| Oil tank volume max. | 200 ml |
| Protection class | II / ☑ |
| Sound power level LPA* | 86,8 dB (A) |
| measured sound power level LWA* | 103,5 dB (A) |
| guaranteed sound power level LWA* | 105 dB (A) |
| Uncertainty KPA / KWA | 3,0 dB (A) |
| Hand-Arm-Vibration | ahand = < 4,89 m/s2 |
| Uncertainty K | 1,5 m/s2 |
| Weight | ca. 5,7 kg |
| Saw chain type | 91 PJ |
| Pitch / drive link thickness | 3/8" / .050" (1,3 mm) |
* (according to regulation 2000/14/EC)
Description of device / spare parts
| Position | Order number | Denomination |
| 1 | 364626 | Guide bar |
| 2 | 362926 | Saw chain - 91PJ057X |
| 3 | 364627 | Chain brake release |
| 4 | 364628 | Front handhold |
| 5 | Trip switch | |
| 6 | Circuit closer/breaker | |
| 7 | Ventilation slots - motor | |
| 8 | Apparatus cable with plug | |
| 9 | 364621 | Oil tank lock |
| 10 | 364623 | Cover |
| 11 | Fastening screw |
| Position | Order number | Denomination |
| 12 | Chain tension ring | |
| 13 | 362923 | Chain wheel |
| 14 | Oil flow canal | |
| 15 | Upper chain clamping boring | |
| 16 | 364625 | Claw stopper |
| 17 | Rear handhold | |
| 18 | 362921 | Chain protection |
| 19 | 364633 | Safety label |
| 20 | Carbon brush set (without pict.) | |
| 21 | Chain clamp (without pic.) | |
| 400144 | Saw chain oil 1 l (without pic.) |
Table des matieres
Proceded evaluation of the conformity:
2000/14/CE - Annexe V
2000/14/EG, 2004/108/EG u 2006/95/EG.
IpoceDypa 3a OueHbAhe Ha CbOTBETCTBNETo:
2000/14/EG- npinloxenge V
n3MepeHo paBnIe Ha cnIaTa Ha 3Byka LwA 103,5 dB (A).
raPATnIpaNo paBnIe Ha cnIaTa Ha 3Byka LwA 105 dB (A).
PpIIOXeHc cIeIhTe xapMOHN3npaHn CTaNapTn:
EN 55014-1:2006, EN 55014-2:1997+A1
EN 61000-3-2:2006, EN 61000-3-3:1995+A1+A2
EN 60745-1:2006, EN 60745-2-13:2007
ZEK 01.1-08/06.08
TexHnueckata DOKyMeHTaunCe CbXpaHraBaB:
ATNKAΓm6X&Ko.KΓ-Texnuecko 6hopo-
山HKeIpace 97-59227 Aen -FepMaHn
Yka3aHna 3a6e30NaCHOCT
MOnIM Da B3eMeTe IOB BHImaHHe CJIeHNTe yKa3aHnIy, 3a da npedna3nte ce6e cn I pyrInTe OT Bb3MOxHn HapaHЯBaHnI.
CbXpaHraBaiTe Te3n yka3aHn 3a 6e3OpacHOCT (HapbUHK 3a ynoTpe6a) BnHarn 3aeDn C BepnxKaHaTa pe3aYka.
BepnKHaTa pe3aKa MoKe Da 6bJe o6cIyKBaHa eINHCTBeHO OT IInCa C DoCTaTbUHO rOJIaM OINT.
Давайе Или OTдавайе пон Наим Верпхна тpeзачka e enductbeho Ha Лиca, коно ca 3ano3natc BervxhaTape3aquKa n6opabeheto c Heя.Винагдавайе и указанноу 3a ynoTepe6a ca Heя.
Понравки(TpeMOHTITE)ТрЯбаДa 6bДaT 3ВьршвиОТСтпаHa ПponЗБоДиTeЯ ИИН Ha3OBaHOn OT HeRoФиРМN.
Pbpyn noptpeBnteI
O3N, KOIto 3a IIbPbN IIbT pa6OTn C BepnxHata pe3auKa, Tp8Ba Da IOnyuN IpaKTHuecko BbBexJaHe B yNoTpe6ata Ha BepnxHata pe3auKa n 3a O6OpyDbaHeTo 3a IInuHa Be3oJnacHOCT OT ONHTHO oCnYkBaIo IIne. Te3N, KOIto 3a IIbPbN IIbT N3NON3aT HnCTpyMeHa, 6n Tp8BaNo Da UnpaxHrT Han-HanpeD p3aHTo Ha KpbIgNa DbpBeCeHa Ha CTOnKa 3a P3aHe Ha DbPbA INn Ha NODCTabKa.
HenbIhOJIeTHn Iuca He MoKe da pa6oTc BepNXnra TpnoH.
Бьдete BHMaTeJIHn. BHMaBaIte KaKBO npaBnte. IodxoxJaTe pa3ymHo KbM pa6oTata. He n3noJ3BaIte ypeDa, ako cTe yMOpEnuIIn cTe POn dBNIAHeTo Ha HapKOTnU, aIKOXOIN MeDnKaMeHTn. MomeHTHO To HeBHMaHne pIn n3NoJ3BaHe Ha ypeDa MoKe da DoBeDe Do cepNo3Hn HapaHЯBaHn.
Ipeyn ynoTpe6a Ha ypea ce 3ano3HaTe c Hero C nomouTa Ha pkoBOcTBOTo 3a 06cnykBaHe.
He n3no13BaIte ypeDa 3a cen, 3a KOInTo Toi He e npedHa3NaueH (BnKTe "YnOtpe6a No npedHa3NaueHne").
Otkat Ha TpnoHa e Bhe3aHTo OTcKaaHaHe Ha pa6oTeuHaBepnKeH TpNoH Harope N Ha3aD KbM

To3n, KoTo pa60tn C Hero. ToI ce nOlyuaba, KOrato
11 BbpxbT Ha HnpaBnaBaaata ShaHa DOKocBa MaTePnAJa, KOITo Ce Hap3Ba (HeBOJ- Ho) IINI DpyrN TBbpDn PpeDMETN.
- TpnohT e 3akneWeH Ha Bbpxa Ha HnpaBnaaatauHa.
BepnKnT TpnoH pea npa HeKoHTpOnpaHO u YeCTO npuHbBa TeKKn HapaHbAHna Ha To3N, KOITo pa6OTn C Hero.

N3BbPbBaIte CtpaHnUHn Pra3aHn, HaKIOHeHn
HadIbXHN pa3pe3n C NOBNIeHO BHNMaHHe, TbKaTO TyK He Ce 13NoJ3Ba NaJIcOBNa ORpaHnHTeJ.
Kak mora da npedotbpaTg OTkata Ha TpnoHa?
14 ⅡрьжTe BepиЖнЯ TprnoH BnHaRn 3ДраВО C ДБe рьцe.
13 3a no-ido6po KOHTPOJnPaHe pexTe CdoHnPaBbHa HnpaBnBaUata ShnHa. Pn TOBa NOCTaBnTe BepxHHn Tpnoh BNHaT OJkoBa NOpEraTO, KOKOTO e Bb3MOXHO.
11 HnKora He pexeTe c Bbpxa Ha HnpaBnaaTa 1nHa.
12 PЯзанeto C rophnpa6 moKe Da npeDn3Bnka OTkata Ha TpnoHa, KOrato BepnKHNrT TpnoH Ce 3aKJIeun IINI KOrato nonaIHe Ha TBbpN ppeMGet DbpbBeCnHaTa.
3anoubaTe da pexeTe, cAmo kOrato pexeTa Ta Bepnra pa60tn.
Ja ce pa60n cmo c octpa n KopeKTHo HaToyeHa n OnbHaTa Bepira.
15 PanaObnaT OrganHnHTeJI (31) da 6bJe n3POnI3BaH KaTO JIOCT.
Hikora He pa6oTeHe NaBvCoUHnHa Ha pamHeTe.
-Да He ce Hapra3BaT HnKOra HnKlOko KJIoHa HabeIhBx.Пи pa3TObAPBaHe BnHmAbaTe Дa He DoKOBaTe dpyr KJIOH.
Pn yIbJxBaHe nO Bb3MOXHOCT n3IOJ3BaIte onopa 3a p3aHe.
Ipo6oHn pa3pe3n MOrat da ce npabT cAmO OT oByeH nepcoHaI.

06и уka3aHЯ 3a 6e3oNaCHOCT
MaunHata ce n3KJIIOUba n ⅢeNcIbT 3a eJIeKtpuYeckaTa
MpeJa Ce N3BaXJa OT KOHTaKToI np:
-ДоиранеHaВериЖнATERape3aчkaC noчBa, KaMbHn,ПирониИЛь BCЯКВnДугпЧждп TeJa.
Bednara ce npobepaB Bepura n Hoka
peMOHTHn pa6oTn
- TexHnuecka nOdprbXka N NOUcTbaHe
OTCTpaHЯBaHe Ha HEn3PpABHOCTN PpeKbCHaTN pOBODHNU
- npOBepKn Ha npCbeHNHTeHNHTe npOoHnU, daN Te ca nObJNaTn nn NOpeDeHn
- TpaHcNoPT
-ДОпьЛнHTeЛНО ONьВан Ha Берираза
- CmHa Ha BepnRaTa
HanyckaHe Ha MaunHaTa (CbIc TaKa I npKpaTKocpoUHO pekcbaHe)
IopdbpkaaTe Baawata BepnKa pe3aUka rpnKlnBO:
- PoiDJIbPkaIte NHCPTyMeHTne OCTpn N UcCTn, 3a da moXeTe Da pa6Tne No-dO6pe N no-6e3oNaCHO.
CneDbaiTe npedncaHnraTa 3a PndpBxKa n yka3aHnraTa 3a Cma3BaHeTo 3a CMHaTa Ha INCTpyMeHTa.
IopnbkaaTe dpbKkTe YnCTOn OT MaCNo mMa3HnHa.
■Поберявауpeдааэевentuyaлиповрди:
- Прази по-ha-tbша уnotpe6а на урета спета да 6ьдат поверени празиashiteусточьно OTHOSEHNE Ha TTXHOTO 6e3ynpechno DeiCTBne, Cbo6pa3Ho празиashueHneTo IM.
- PpOBepeTe 3a HAnuHeTo Ha NOBpeDeHn IIN HeN3npabHn Yactn.
-Пов体育场празаиnpсncocobнясдвадбьдатпоравенилзаменисореди3иckваняотOTOTOPINAPAcneuaININPAHcepBn3HaClyx6a,akoВркOBODCTBOTO3aПОЛ3BAHe He NOCOYEOdpyro.
-Поврededнiteин HeeTnBn JIeENKn C yka3aHna 3a 6e3onacnoct Tpr6Ba da ce cMeHrT.
MoHTax
BkIIOUeTe BepxHnTpnoH KbM eJeKtpueckaTa MpeXa, eDba cIeKaTO CTe ro CrIo6uINn I3quIIO.
OnachocT ot hapaHyaHe! Pn Crlno6yBaHTo Ha TpNoHa HocTe 3aHTn pKaBn.
1 OTepaheTe kanaKa (10), KaTo pa3BHeTe fNkCupaun BnHT (11).
2ПoctabeteHa npablaBaaatauHa.ПoctabeteBepnnteHaTPOHaB ObIKoJIHnHa npablaBaauKaHaHa KOH3OJaTa.
OObpHete BHMaHne Ha npabNHaTa Nocoka Ha XoDa Ha 3BeHaTa Ha Bepurata.
Bb3MOxHn Hen3npaBHOCTN
2000/14/EK, 2004/108/EK, 2006/95/EK.
2000/14/CE, 2004/108/CE, 2006/95/CE.
A. Pollmeier, management
2000/14/EG, 2004/108/EG i 2006/95/EG.
conform directivei 98/37 a UE
pānǎ in 28.12.2009: 98/37 CE
din 29.12.2009: 2006/42/CE
Prin prezenta, noi
ATIKA GmbH & Co. KG
Schinkelstraße 97
59227 Ahlen - Germany
declarçampepropriereaspundereca produsul
2000/14/UE, 2004/108/UE, 2006/95/UE.
Proces de evaluates a conformitàtii: 2000/14/UE - Anexa V
2000/14/ES, 2004/108/ES, 2006/95/ES.
Postopek za ugotavljanje skladnosti: 2000/14/ES - Dodatek V.
Izmerjen nivo zvočne jakost LwA 103,5 dB (A).
Garantirani nivo zvočne jakosti LwA 105 dB (A).
Uporabljeni so bili naslednjih harmonizirani standardi:
EN 55014-1:2006, EN 55014-2:1997+A1
EN 61000-3-2:2006, EN 61000-3-3:1995+A1+A2
EN 60745-1:2006, EN 60745-2-13:2007
ZEK 01.1-08/06.08