
AM 12 - Mixer DYNACORD - Free user manual and instructions
Find the device manual for free AM 12 DYNACORD in PDF.
User questions about AM 12 DYNACORD
0 question about this device. Answer the ones you know or ask your own.
Ask a new question about this device
Download the instructions for your Mixer in PDF format for free! Find your manual AM 12 - DYNACORD and take your electronic device back in hand. On this page are published all the documents necessary for the use of your device. AM 12 by DYNACORD.
USER MANUAL AM 12 DYNACORD
WARNING: TO REDUCE THE RISK OF FIRE OR ELECTRIC SHOCK, DO NOT EXPOSE THIS APPLIANCE TO RAIN OR MOISTURE.
AVS: RISQUÉ DE CHOC ELECTRIQUE. NE PAS OUVRIR.
WARNING: CONNECT ONLY TO MAINS SOCKET WITH PROTECTIVE EARTHING CONNECTION.
IMPORTANT SAFETY INSTRUCTIONS

CAUTION
RISK OF ELECTRIC SHOCK DO NOT OPEN

WARNING: TO REDUCE THE RISK OF FIRE OR ELECTRIC SHOCK, DO NOT EXPOSE THIS APPLIANCE TO RAIN OR MOISTURE.
AVIS: RISQUÉ DE CHOC ELECTRIQUE. NE PAS OUVRIR.
WARNING: CONNECT ONLY TO MAINS SOCKET WITH PROTECTIVE EARTHING CONNECTION.
The lightning flash with arrowhead symbol, within an equilateral triangle is intended to alert the user to the presence of uninsulated "dangerous voltage" within the product's enclosure that may be of sufficient magnitude to constitute a risk of electric shock to persons.

The exclamation point within an equilateral triangle is intended to alert the user to the presence of important operating and maintenance (servicing) instructions in the literature accompanying the appliance.
- Read these instructions.
- Keep these instructions.
- Heed all warnings.
- Follow all instructions.
- Do not use this apparatus near water.
- Clean only with a dry cloth.
- Do not cover any ventilation openings. Install in accordance with the manufacture's instructions.
- Do not install near heat sources such as radiators, heat registers, stoves, or other apparatus (including amplifiers) that produce heat.
- Do not defeat the safety purpose of the polarized or the grounding-type plug. A polarized plug has two blades with one wider than the other. A grounding type plug has two blades and a third grounding prong. The wide blade or the third prong are provided for your safety. If the provided plug does not fit into your outlet, consult an electrician for replacement of the obsolete outlet.
- Protect the power cord from being walked on or pinched particularly at plugs, convenience receptacles, and the point where they exit from the apparatus.
- Only use attachments/accessories specified by the manufacturer.
- Unplug this apparatus during lightning storms or when unused for a long period of time.
- Refer all servicing to qualified service personnel. Servicing is required when the apparatus has been damaged in any way, such as power-supply cord or plug is damaged, liquid has been spilled or objects have fallen into the apparatus, the apparatus has been exposed to rain or moisture, does not operate normally, or has been dropped.
- Do not expose this equipment to dripping or splashing and ensure that no objects filled with liquids, such as vases, are placed on the equipment.
- To completely disconnect this equipment from the AC Mains, disconnect the power plug from the AC receptacle.
- The mains plug of the power supply cord shall remain readily operable.

Management of WEEE (waste electrical and electronic equipment) (applicable in Member States of the European Union and other European countries with individual national policies on the management of WEEE) The symbol on the product or on its packaging indicates that this product may not be treated as regular household waste, but has to be disposed through returning it at a Telex dealer.
IMPORTANT SERVICE INSTRUCTIONS
CAUTION:
These servicing instructions are for use by qualified personnel only. To reduce the risk of electric shock, do not perform any servicing other than that contained in the Operating Instructions unless you are qualified to do so. Refer all servicing to qualified service personnel.
- Security regulations as stated in the EN 60065 (VDE 0860 / IEC 65) and the CSA E65 - 94 have to be obeyed when servicing the appliance.
- Use of a mains separator transformer is mandatory during maintenance while the appliance is opened, needs to be operated and is connected to the mains.
- Switch off the power before retrofitting any extensions, changing the mains voltage or the output voltage.
- The minimum distance between parts carrying mains voltage and any accessible metal piece (metal enclosure), respectively between the mains poles has to be 3mm and needs to be minded at all times. The minimum distance between parts carrying mains voltage and any switches or breakers that are not connected to the mains (secondary parts) has to be 6mm and needs to be minded at all times.
- Replacing special components that are marked in the circuit diagram using the security symbol (Note) is only permissible when using original parts.
- Altering the circuitry without prior consent or advice is not legitimate.
- Any work security regulations that are applicable at the location where the appliance is being serviced have to be strictly obeyed. This applies also to any regulations about the work place itself.
- All instructions concerning the handling of MOS - circuits have to be observed.
NOTE:

SAFETY COMPONENT ( MUST BE REPLACED BY ORIGINAL PART )
TABLE OF CONTENTS
| Description | 10 |
| Quick Start | 11 |
| Controls | 12 |
| Cabling | 15 |
| Setup Examples | 23 |
| Specifications | 24 |
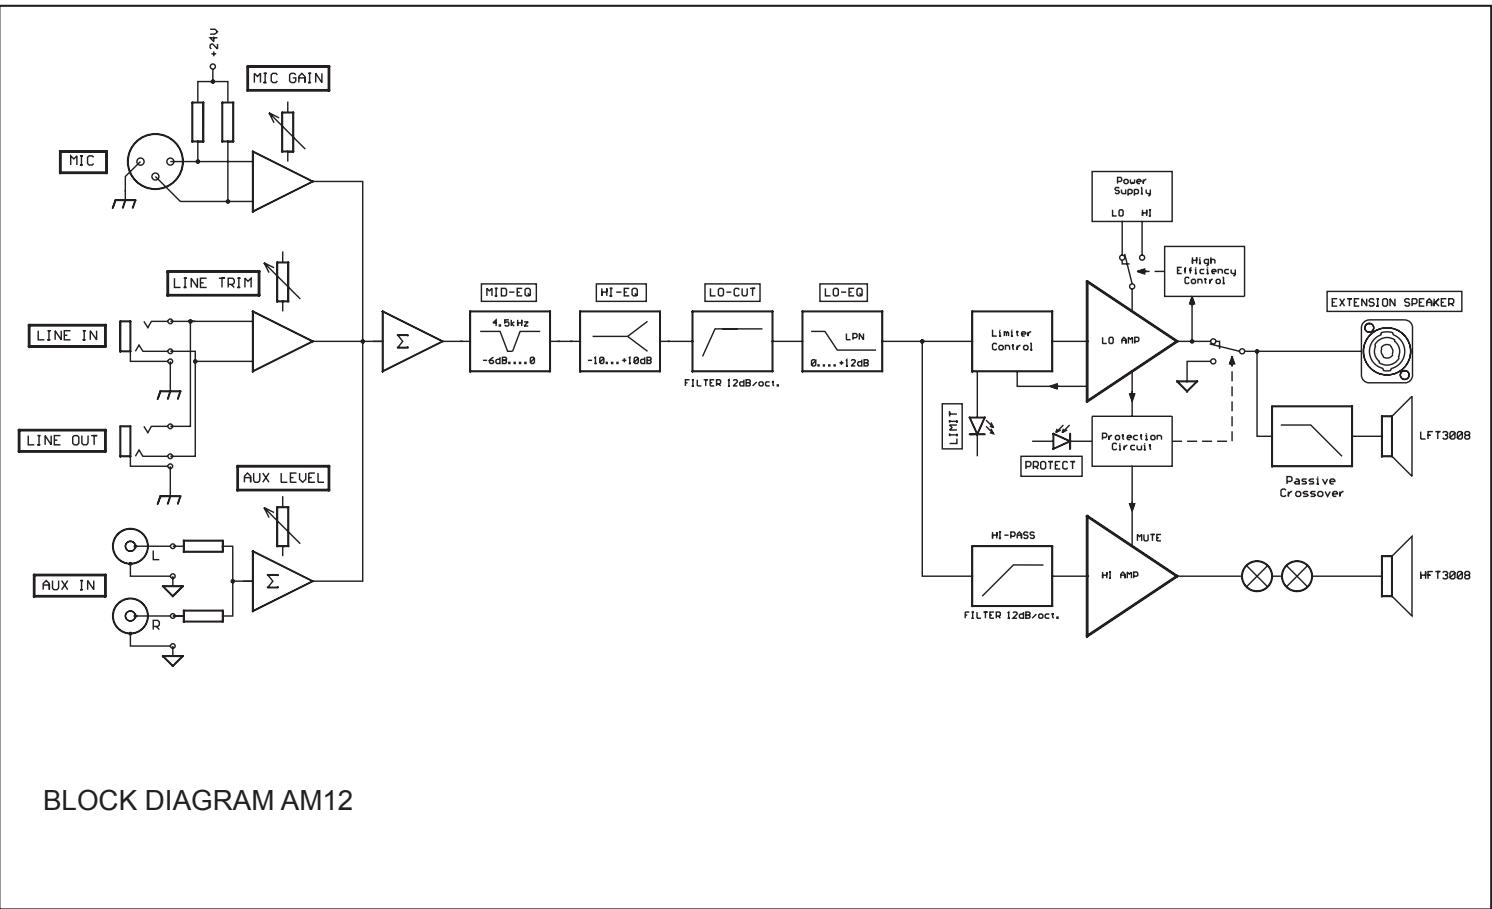
| Block Diagramm | 25 |
| Dimensions | 25 |
Congratulations! With buying the DYNACORD AM12 you got yourself an active monitor system that incorporates most advanced technology.
The AM12 is an active 2-way loudspeaker system that has been designed for use in stage-monitoring or general sound reinforcement applications. The multitude of connection and setting facilities (MIC, LINE, and AUX) allows using the AM12 in many creative ways. You can use the AM12 as on-stage monitor speaker, small PA system or even for sound reinforcement during presentations and similar events. Employing only quality speaker components and a sophisticated modern power amplifier design, the AM12 generates outstandingly high sound pressure level offering maximum sound performance. The integrated high-efficiency power amps provide 300W/4ohms for the Lo range channel and 60W/8ohms for the Hi range channel, supplying sufficient output power and reliable operation for all your sound reinforcement applications. The Extension Speaker Speakon-type connector allows connecting an additional passive monitor, like the M12 or an external subwoofer and using the integrated Acoustic Processing Section provides all the controls you need to adjust the AM12's sound to individual applications or acoustic conditions.
Unpacking and Warranty
Open the package and carefully take out the AM12. Remove the protection foil from the handle of the appliance. Next to this owner's manual the package also contains the mains cord, a cable pull-relief and the warranty card. Please check whether the warranty card has been filled out entirely. Only a warranty card with completely filled in information entitles you to make any warranty claims. The appliance comes with a full 36 months warranty that is valid from the date of original purchase. Please also keep the original invoice together with the warranty card.
Setup and Connections
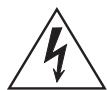
To ensure safe and reliable operation, always place the AM12 on an even surface standing on its rubber foot stands. Do not cover the heat sink on the rear of the appliance during operation. Otherwise, the AM12 will enter protect-mode because of thermal overload. This prevents the system from being damaged but the sound reproduction is suspended until the system regains operational state. The speaker output (EXTENSION SPEAKER) on the rear of the appliance is carried out via professional SPEAKON-type high-performance connectors, which provide absolutely secure and reliable connection of additional speakers. The pin-assignment of the female-type connectors is 1+(hot) and 1-(cold).
Before connecting the AM12 to the mains, please make sure that the value stated on the mains voltage label which is located next to the appliance's mains switch, complies to the voltage settings of your local power supply. Installing the supplied cable pull-relief prevents that the mains cord gets inadvertently pulled out of the mains socket.
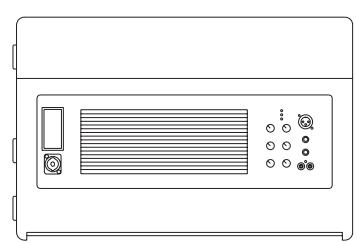
For installing the cable pull-relief, please remove the screw as shown in the diagram. Slide the cable pull-relief over the mains cord and use the screw to fix it to the AM12 panel.
Please set all Acoustic Processing controls to their center position, before switching the AM12's power on.

Caution: Before switching the AM12's power on, make sure to set the level controls to their counterclockwise margin. Otherwise, this could result in extremely high acoustic output, especially when the connected audio source is already playing. It is particularly dangerous when a microphone is connected, because of the possibility of acoustic feedback.
The input section of the AM12 allows the connection and mixing of three individual audio signal sources (MIC, LINE, and AUX).
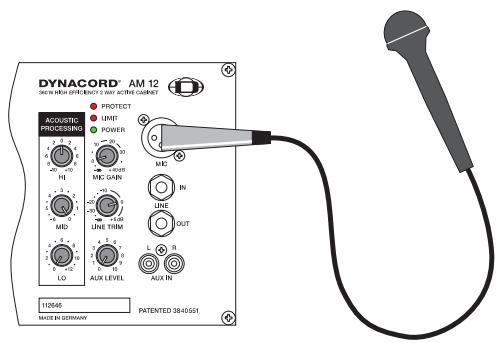
MIC
- Before connecting a microphone, turn the MIC GAIN control all the way down (counterclockwise).
- Connect a microphone via XLR-type cable to the MIC input of the AM12.
- Switch the microphone on and while speaking into the mic slowly increase the MIC GAIN setting until the wanted volume is achieved.
Caution: Too high level setting can result in acoustic feedback. Therefore be careful when turning the MIC GAIN control.
Under some circumstances it is possible to increase the feedback threshold by lowering the mid range level using the MIDs control.
- Using the HI, MID, and LO controls lets you match the sound according to acoustical conditions. Again, be sure to keep the feedback threshold in mind. Whenever you notice feedback noise after making a certain change, decrease the setting of the control that you have just used by a little bit.
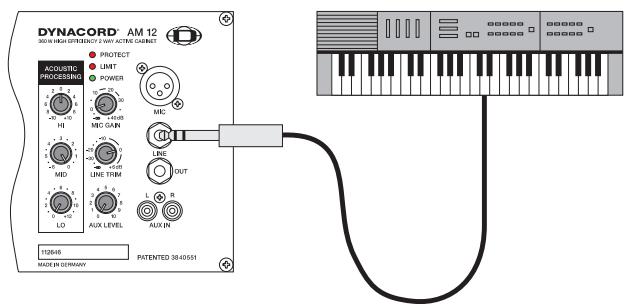
LINE IN
- Before connecting an audio signal source, always turn the LINE TRIM control all the way down (counterclockwise).
- Connect an audio signal source (e.g. mixer, keyboard, etc.) to the AM12's LINE IN connector using a 0.25-inch phone plug.
- First, switch on the audio source and then slowly increase the setting of the LINE TRIM control until the desired volume is achieved.
- Using the HI, MID, and LO controls lets you match the sound to your liking.
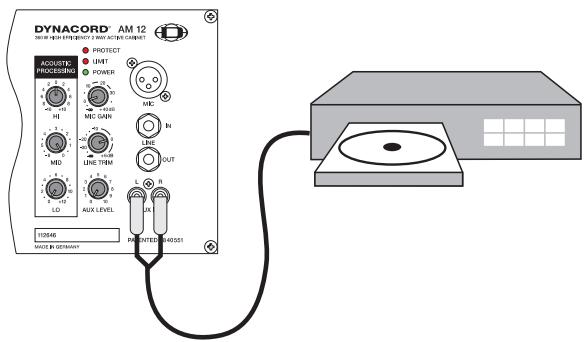
AUX IN
- Before connecting an audio signal source, always turn the AUX LEVEL TRIM control all the way down (counterclockwise).
- Connect an audio signal source (e.g. CD/MD-Player or Tape Deck) to the AM12's AUX IN using a RCA connector-type cable.
- Switch on the audio source and then slowly increase the setting of the AUX TRIM control until the desired volume is achieved.
- Using the HI, MID, and LO controls lets you match the sound to your liking.

MIC
is an electronically balanced XLR-type input for connecting low-impedance microphones. Basically, you are able to connect any type of microphone to this input as long as you mind the correct pin-assignment. It is also possible to connect condenser microphones, which automatically gets the needed phantom power (+24V) from the AM12. Please also refer to your microphone's owner's manual for additional information.
Caution: Before connecting or unplugging a microphone, make sure to turn the GAIN control all the way down (counterclockwise). This helps to protect the audience and you from displeasing knock noise.
The MIC-input is not necessarily meant for the connection of mixers, keyboard instruments or other electronic sound generating sources. For better results, please use the den LIN-input instead.
MIC GAIN
This control is used to set the volume of the connected microphone within an adjustment range of - to +40dB .
Caution:
Extremely high volume setting may result in unpleasant feedback noise!
LINE IN
is an electronically balanced input for connecting high-impedance audio signal sources like mixers, electronic music instruments like keyboards, guitars and bass guitars with built-in active electronics. It is possible to connect balanced as well as unbalanced gear at the LINE-input using monaural or stereo phone plug cables. Balanced connection via stereo phone plug cables is preferable whenever the source unit has a balanced output stage. Following this advice will provide you with the advantage of less interference that is introduced from external hum of HF-induction.
Caution: Before connecting or unplugging devices, make sure to turn the LINE TRIM control all the way down (counterclockwise). This helps to protect the audience and you from unpleasing knock noise.
LINE OUT
The LINE OUT socket provides the carried through audio signal from the LINE IN connector. It can be used to feed additional external equipment (e.g. an additional AM12) with the identical input signal.
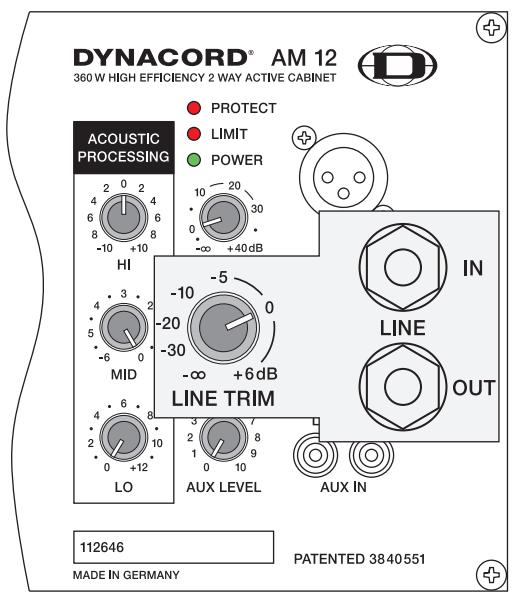
LINE TRIM
This control serves for setting the input level of the signal source that is connected to LINE IN within an adjustment range of - to +6dB .

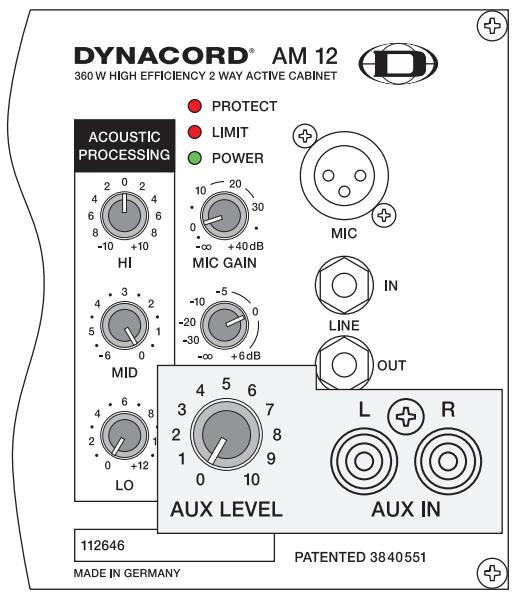
AUX IN
These RCA-type connectors allow the connection of stereo signal sources (e.g. CD/MD-Player, Tape Deck,...). The stereo input signals are internally summed for monaural output.
Caution: Before connecting or unplugging an appliance, make sure to turn the AUX LEVEL control all the way down (counterclockwise). This helps to protect the audience and you from unpleasing knock noise.
AUX LEVEL
This control is used to adjust the input level of the signal source that is connected to AUX IN.
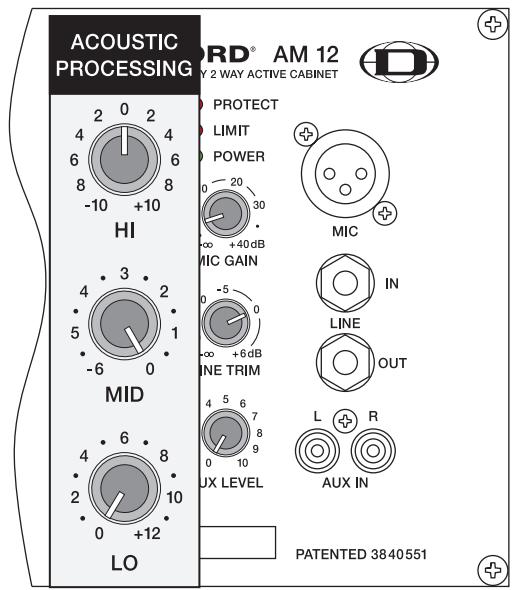
ACOUSTIC PROCESSING
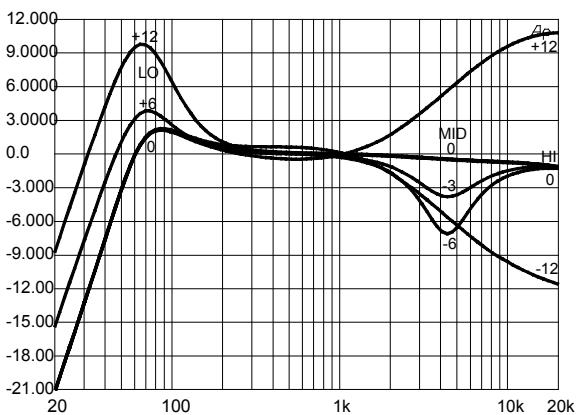
The ACOUSTIC PROCESSING section is not what you would call the 'usual' sound control section, like the ones found on a mixer for instance. What's more, the ACOUSTIC PROCESSING section provides the possibility to very efficiently match the desired sound of the AM12 to existing acoustic conditions. Using the controls lets you alter the AM12's frequency response up to the margins as shown in the below diagram. When altering the sound, it is always good advice to start with all controls set to their neutral positions - all controls centered - and to adjust their setting by cautiously turning the controls.
HI control
The HI control allows amplifying or attenuating the high-frequency range of the signal by ± 10dB
MID control
Turned all the way to the right (clockwise), the MID control is set to its neutral position, i.e. the signal's mid-frequency range is unaltered. Set the control to its counterclockwise margin for 6dB attenuation. Therefore the MID control provides a way to efficiently prevent acoustic feedback noise. The MID control's cutoff frequency is at 4 kHz. Experience has shown that with most set-ups in this frequency range feedback noise tends to occur.
LO control
The LO control incorporates the DYNACORD's patented LoPass notch filter. Using the LO control lets you increase the audio signal's low frequency range level. The signal is unaltered when the LO control is set to its neutral position, i.e. turned all the way down (counterclockwise). Setting the control to its clockwise margin causes a level increase of 12dB.
STATUS INDICATORS
These indicators provide information about the integrated power amplifier's actual status.
When the AM12 is powered-on, the POWER will light. In case the LED does not light after switching the power on please make sure that the mains cord is plugged in correctly. When the POWER LED still does not light although the mains connection is correct, please contact your dealer.
When the LIMIT LED lights, this is an indication that the power amplifier is operated at its limit. Short-term blinking is not critical, since the integrated limiter circuit controls occurring distortion within the power amplifier. When the LED is constantly lit, this can result in sound degradation and you should reduce the output level.
The PROTECT LED will light when one of the power amplifier's comprehensive protection circuits like the temperature overload protection, HF-protection, DC-protection, and the Back-EMF-protection is activated. In Protect Mode, the loudspeaker outputs are muted via the speaker relays and the audio signal's input level is automatically attenuated to protect the power amps from being damaged. When the AM12 enters Protect Mode, first check the EXTENSION SPEAKER output for existing short-circuits. If necessary unplug the SPEAKON-type loudspeaker cable from the appliance. Maybe you have connected more than one speaker cabinet to the output. When switching the power of the AM12 on, the PROTECT LED will light for approximately 2 seconds. This is normal, indicating that the entire protection circuitry is operational.
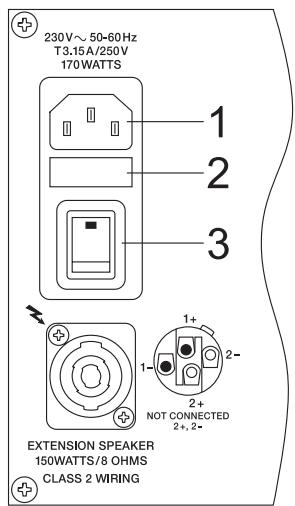
POWER
- Mains connection via rubber connector
- Mains fuse socket
- Mains-switch for Power-On/Off
EXTENSION SPEAKER
Full-range loudspeaker output for the connection of passive cabinets like the DYNACORD M12 or C15SUB. The output is carried out as a professional standard SPEAKON high-performance connection. This mechanical and electrical secure connection complies with all safety standards allowing the use of high-quality speaker cables with diameters of up to 4 × 2.5mm . The Extension SPEAKER output provides the possibility for connecting a single cabinet with an impedance of 8 ohms. Connecting several cabinets does not necessarily cause damage to the integrated power amplifier but it might activate the internal protection circuitry.
WARNING:
The speaker output terminals are marked with a symbol “ ”, which signifies that these terminals present a shock hazard to the user.
Make connections to these terminals as described in the owner's manual.
Plugs, jacks, and high-quality loudspeaker cables are available from DYNACORD's accessory assortment.
CABLING
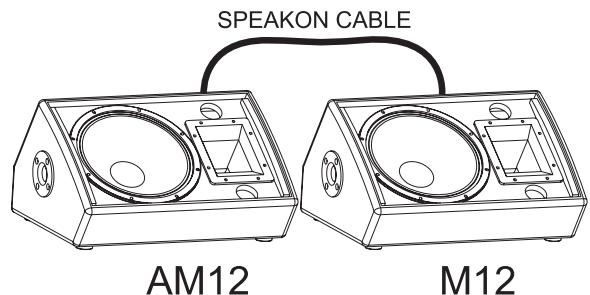
Loudspeaker cable - Experience has shown that cable with rubber jacket, a diameter of 2.5mm^2 per conductor, and SPEAKON-type plugs and jacks represent the optimal speaker connection solution. Connect the SPEAKON-type connectors on the rear panel of the AM12 according to the example in the diagram. DYNACORD loudspeaker cables that have SPEAKON-type connectors as well as any other types of cable are available from your dealer.
LF-cord
For connecting audio signal sources to the AM12, we recommend using cable with balanced XLR-type or stereo phone plug connectors. Using balanced cable reduces the risk of sound degradation resulting from interference. However, make sure to mind the pin-assignment as shown below. Original DYNACORD cable from our accessory program will always comply with this pin-assignment.
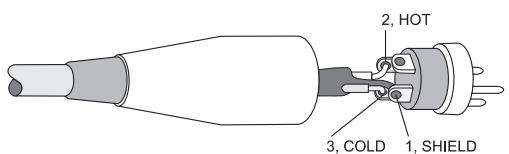
XLR MALE
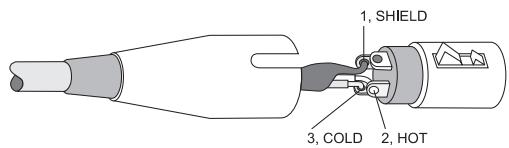
XLR FEMALE


balanced connection of microphones

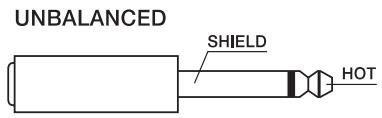
unbalanced

external equipment with XLR-type in/output jacks

balanced

unbalanced
external equipment with XLR-type in/output jacks
balanced
INSTRUCTIONS DE SÉCURITÉ IMPORTANTES

CAUTION
RISK OF ELECTRIC SHOCK
DO NOT OPEN

WARNING: TO REDUCE THE RISK OF FIRE OR ELECTRIC SHOCK, DO NOT EXPOSE THIS APPLIANCE TO RAIN OR MOISTURE.
AVIS: RISQUÉ DE CHOC ELECTRIQUE. NE PAS OUVRIR.
WARNING: CONNECT ONLY TO MAINS SOCKET WITH PROTECTIVE EARTHING CONNECTION.
Monitoring with AM12 and M12 on Extension Output
Technical Specifications: AM12
Amplifiers at rated conditions, 4 ohms loads on fullrange- and 8 ohms loads on hf-amplifier, acoustic control in 0-position, unless otherwise specified.
| Fullrange Amplifier | High Frequency Amplifier | |
| Minimum Load Impedance | ||
| External Speaker | 8 ohms | - |
| Maximum Midband Output Power | ||
| THD=1% | 300W (1kHz) | 50W (10kHz) |
| Rated Output Power | ||
| THD<0.2% | 250W (100Hz - 20kHz) | 40W (3kHz - 20kHz) |
| Max. Output Power | ||
| Dynamic-Headroom, IHF-A | 450W | 60W |
| Maximum RMS Voltage Swing | ||
| THD=1% | 46.8V (1kHz) | 23.3V (10kHz) |
| THD at rated output power, MBW=80kHz | < 0.1% (1kHz) | < 0.1% (10kHz) |
| IMD-SMPTE | ||
| 60 Hz, 7 kHz | < 0.2% | - |
| DIM30 | ||
| 3.15 kHz, 15 kHz | < 0.1% | - |
| Frequency Response | ||
| -1dB, ref. 1 kHz | 30Hz - 30kHz | 12.5kHz - 57kHz |
| Power Bandwith | ||
| THD=1%, half power | 14Hz - 20kHz | 2kHz - 68kHz |
| Slew Rate | 24V/μs | 17V/μs |
| Signal to Noise Ratio | ||
| A-weighted | 104 dB | 105dB |
| Power Consumption | ||
| at 1/8 maximum output power @ 4ohms | 170W | |
| Input Sensitivity | ||
| at rated output power @ 1 kHz | MIC: -34dBULINE: 0 dBUAUX: -3dBU | |
| Input Impedance | ||
| 20Hz ... 20 kHz, balanced | MIC: 1.3kohmSLINE: >10kohmSAUX: 8kohms (unbalanced) | |
| Phantom Power | 24V dc | |
| Power Requirements | 230V, 50Hz | |
| Protection | Audio limiters, High temperature, DC, HF, Back-EMF, Peak current limiters, Inrush current limiters, Turn-on delay, speaker protection | |
| Cooling | convection cooled | |
| Safety Class | I | |
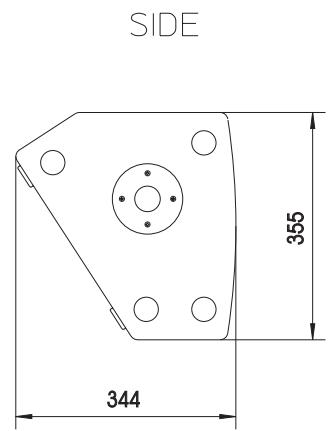
| Dimensions (W x H x D), mm | 530.5 x 355 x 344 | |
| Weight | 21kg | |
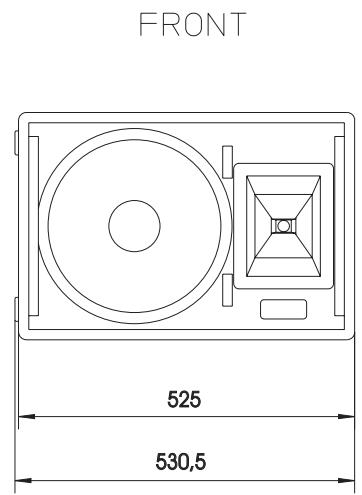
Abmessungen / Dimensions (in mm)
TOP
Bosch Communications Systems
Americas-Headquarter Americas
Telex Communications, Inc.
12000 Portland Ave South,
Burnsville, MN 55337, USA
USA-Ph: 1-800-392-3497
Fax: 1-800-955-6831
Canada-Ph: 1-866-505-5551
Fax: 1-866-336-8467
Latin America-Ph: 1-952-887-5532
Fax: 1-952-736-4212
Europe, Africa & Middle-East
Headquarter EAME
EVIAudioG
Hirschberger Ring 45, D-94315
Straubing, Ger
Asia & Pacific Rim-Headquarter Asia
Singapore: Telex Communications (SEA) Pte Ltd
38C Jalan Pemimpin
Singapore 577180
Tel: (65) 6319 0621
Fax: (65) 6319 0620
Japan: EVI Audio Japan Ltd
5-3-8 Funabashi, Setagaya-Ku
Tokyo, Japan 156-0055
Phone: +81 3-5316-5020,
Fax: +81 3-5316-5031
Hong Kong: Telex EVI Audio (HK) Ltd.
Unit 5,1/F, Topsail Plaza
11 On Shum Street
Shek Mun, Shatin HK
Phone: +852 2351-3628,
Fax: +852 2351-3329
Bosch Communications Systems
Telex EVI Audio (Shanghai)Co., Ltd.
Room 3105-3109, No.1 Building, No.218, Tian Mu West Road.
Shanghai, China
Postal Code: 200070
Tel: 86 21-63172155
Fax:8621-63173023