400 - Gps CARTREK - Free user manual and instructions
Find the device manual for free 400 CARTREK in PDF.
User questions about 400 CARTREK
0 question about this device. Answer the ones you know or ask your own.
Ask a new question about this device
Download the instructions for your Gps in PDF format for free! Find your manual 400 - CARTREK and take your electronic device back in hand. On this page are published all the documents necessary for the use of your device. 400 by CARTREK.
USER MANUAL 400 CARTREK
Getting started: Page 7
- Installing and removing the SD memory card 8
- Flexible mounting arm using the in-vehicle bracket 8
- Powering/Charging the CarTrek400 GPS 9
- Recharging 9
- Turning the GPS unit On and Off 10
- System reset 10
User manual:
- First time use of your navigation solution - Quick start guide 11
2.What you see on the screen 12 - The main screen 12
- The main screen in detail 13
- Giving in a destination 13
- Home 14
- Favorite 14
- History (recent destination) 14
- Point of interest 15
- Navigating (by giving in a specific address) 16
- Drive safely! 18
- Blocking routes 18
- Ignoring the route 18
- The options of your device 18
- Change the language of the application 19
- Change the time zone of your device 19
- Change the route settings of your navigation solution 19
- Change the screen settings of your device 20
- Change the system options of your device 20
- Change the audio volume of your device 21
- Contact & support details 21
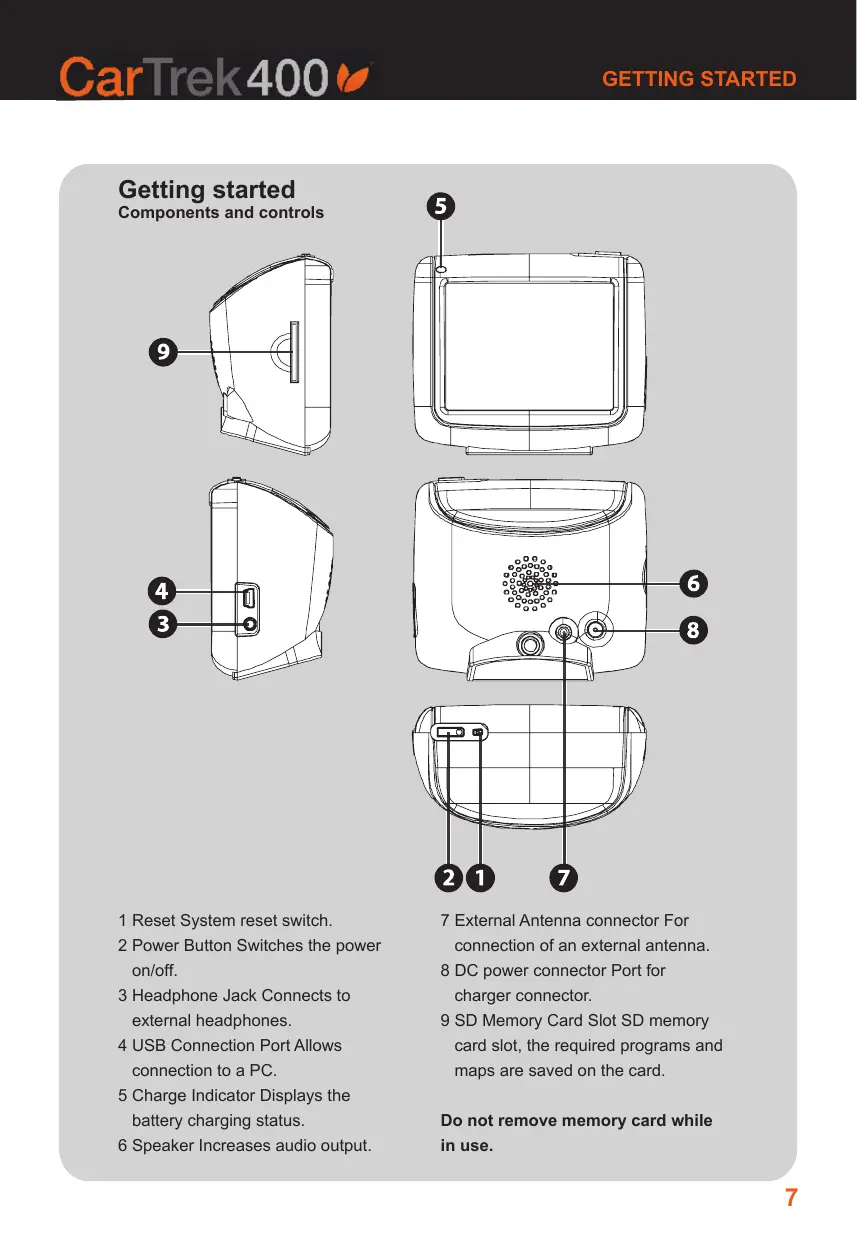
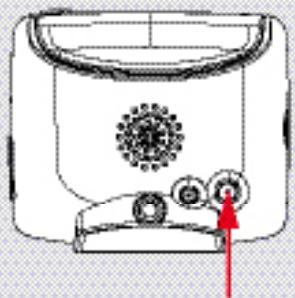
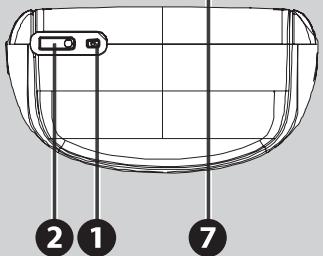
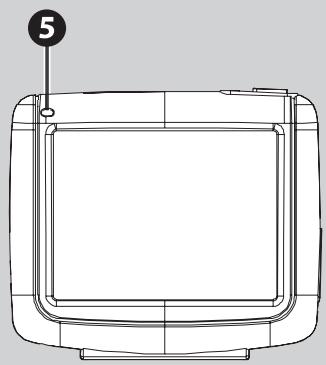
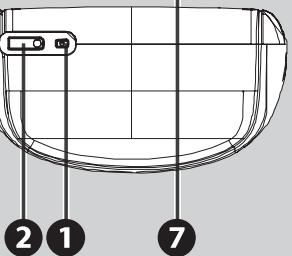
Components and controls


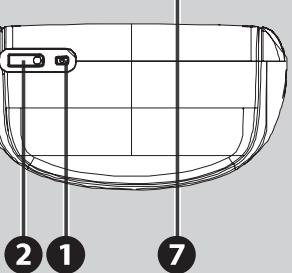
1 Reset System reset switch.
2 Power Button Switches the power on/off.
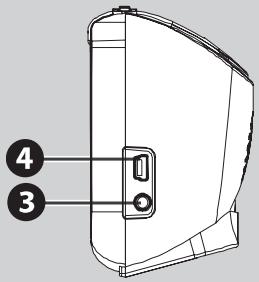
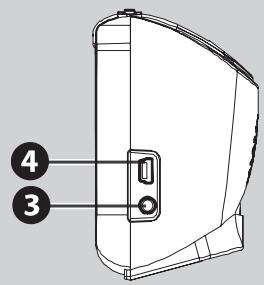
3 Headphone Jack Connects to external headphones.
4 USB Connection Port Allows connection to a PC.
5 Charge Indicator Displays the battery charging status.
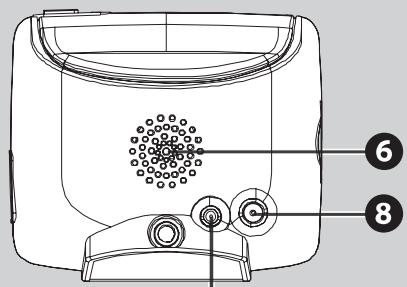
6 Speaker Increases audio output.
7 External Antenna connector For connection of an external antenna.
8 DC power connector Port for charger connector.
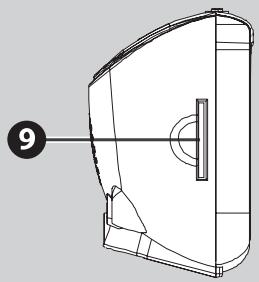
9 SD Memory Card Slot SD memory card slot, the required programs and maps are saved on the card.
Do not remove memory card while in use.
1. Installing and removing the SD memory card
The SD memory card contains the map data required by the GPS. Slot the card into the memory card slot located on the right hand side of the unit make sure the contacts on the card point towards the front of the GPS unit. To remove the SD memory card press lightly on the top edge until it ejects. Remove the card taking care not to touch the contacts. Memory cards are very fragile take care not to force the card or touch the contacts.
The included memory card contains the digital map files that are required for the GPS navigational data.do not delete.
- When removing the memory card, please make sure the card is not reading data, or it will cause a system crash.
- Please do not set the SD memory card as write protect, or the system cannot be successfully executed.
- When operating, accidental removal of the memory card will result in an error message, please reinsert the memory card and reset the unit.
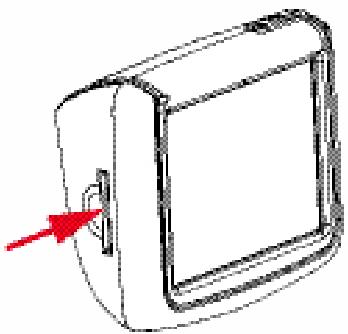
2. Flexible mounting arm (using the in-vehicle bracket)
The included in-vehicle bracket set can be suctioned securely on the front windscreen, this device will effectively secure the CarTrek400 GPS unit to the vehicles windscreen. Follow the procedures below to secure the bracket.
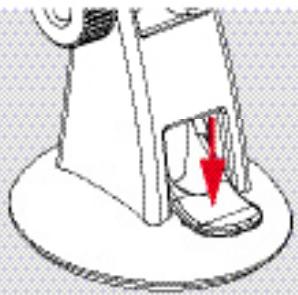
- Place the CarTrek400 satellite navigation system onto the mounting bracket aligning the slots on the underside of the CarTrek400 unit with the lugs on the mounting bracket. (figure A)
- Slide the unit back until you hear a click. The CarTrek400 satellite navigation unit is now locked into place. (figure A)

A
- Ensure the windscreen of the vehicle is dust and grease free. Place the mounting bracket onto the windscreen in a suitable position, push the plastic lever forward to secure the mounting bracket to the windscreen. (figure B+C)
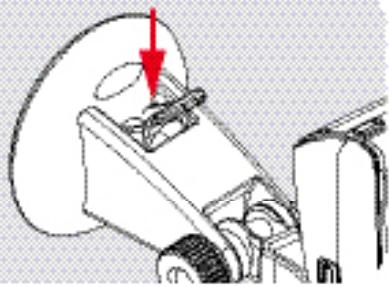
B
C
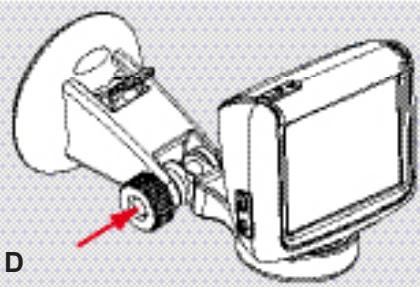
4. The angle of the mounting bracket can be adjusted by slackening the adjuster knob on the mounting bracket. Once you have adjusted the bracket re-tighten the adjuster knob. (figure D)
NOTE: Some vehicles may have a heat reflective windscreen that can prevent GPS signals reaching the satellite navigation system.
If your vehicle is fitted with a heat reflective windscreen you may need to use an external antenna.
- When using the in-vehicle bracket,do not install in a location that will block the view of the driver.
- Recommended installation requirements: The bracket base should be secure close to the area above the dashboard to prevent excessive shock.
3. Powering/Charging the CarTrek400 GPS
To power the GPS unit from a vehicles auxiliary socket plug one end of the 12V power cable into the d.c(socket on the rear of the satellite navigation unit and the other end into the vehicle auxiliary socket. If using the GPS unit in the car we recommend you use the 12V car accessory adaptor in order to maintain the battery level.
4. Recharging
Plug one end of the 12v power cable into the d.c. socket on the rear of the satellite navigation unit and the other end into the vehicle auxiliary socket. When charging the battery for the first time charge the battery for 5 hours, subsequent charges will be shorter.
If using the additional home charger (available in our webshop) plug one end of the charger cable into the d.c(socket on the rear of the satellite navigation unit and the other end into your home power outlet. To maximise the life of the battery the first charge must fully charge the battery.Subsequent charges will be shorter.
When charging starts, the charging indicator light will illuminate, please wait for the charging to complete (this might take several hours). After charging is completed the indicator light will turn off.
5. Turning the GPS unit On and Off
Press and hold down the On/Off button, release when the start up logo appears. When the unit has started the SETTING, NAVIGATION, GPS RECEIVER screen will be displayed.
To switch the satellite navigation system Off press in the On/Off button until the screen goes blank.

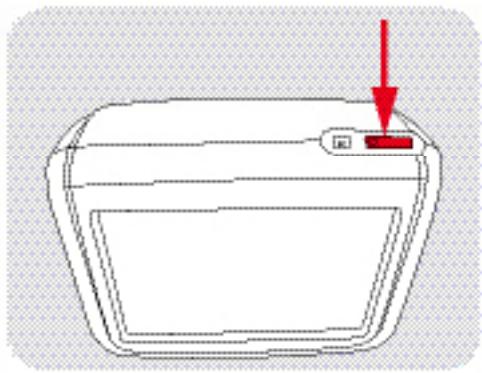
6. System reset
Only under extreme circumstances will it be required to reboot the system. Reset your system if the following situations occur:
- Heavy lag experienced with screen refresh or operations, resulting in an inoperable system.
- Cannot turn off the system with power button.
- No response with selection on the screen.
Use the tip of a pen or similar object to press in the reset switch on top of the unit. It may be necessary to remove then re-insert the SD memory card. Be aware that stored data may be lost by resetting the system.
Cartrek 400 User manual
We would like to thank you for the purchase of your Cartrek 400 navigation solution. This booklet contains important information on the correct use of your Cartrek 400. Please read this information carefully before using your navigation solution.
Important: GPS signals can only be received in your car or outdoors. Inside buildings or covered places, you will not be able to receive GPS signals. Cars with shielded windows will have limited GPS reception. An optional external GPS antenna can be a solution.
1. First time use of your navigation solution - Quick start guide
- Before using your device, the device should be powered by means of the home charger. If you plug in the plug of the home charger in the power socket on the bottom of your device, it will start charging. This is indicated by a red light on the device. As soon as the device is fully charged, the light will switch off. It will then be ready for use!
- While using the device in your car, you can charge the device by means of a car charger that came with your device. Normally, the device has stand alone battery power of approximately 3 hours, depending on how you use it.
-
Make sure your device is powered and the SD memory card is inserted into the SD slot of your GPS. Make also sure that the SD card is not locked (check the slider at the left side of your SD card. This slide should be positioned towards the copper contacts of the SD card).
-
Carefully read this software manual and the hardware manual of the Cartrek 400.
- Navigation solutions are based on digital maps. These digital maps are created with great care. However, actual situations such as one-way streets, street names and traffic signs change on a regular basis. Also, cities expand rapidly and new streets and addresses are created constantly. Navigation systems can not take into account all these changes immediately. The maps that you see on your screen do not reflect real time satellite information. What you see is a map reflecting the situation as it was at the time of the release. Therefore, please always follow the local traffic rules.
- Please note that the CartTrek400 has a touch screen. You can single click on the icons on the screen with your finger or with a stylus, whatever you find easier. Until you take the stylus or finger off the icon/screen, icons are not selected. All Icons and other buttons of the device should be clicked on only once to select the feature. By double clicking, the device might select the wrong feature.
- Select the language you want to use. You will only have to do this the first time you switch on your device. In some cases you will not be asked to select a language. In that case, the device either only has one language, or you can only change the language of your application in the options menu of your Cartrek 400 solution. The language selection defines the language of the voice instructions and the language of the instructions that you see on the screen. You can always change the language of your application in the options menu of your Cartrek 400 solution.
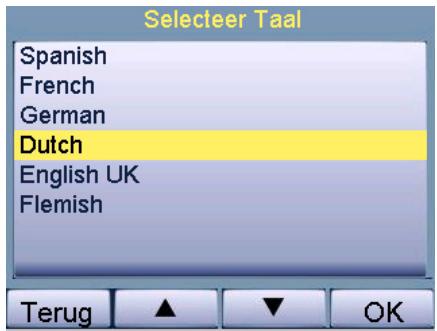
Once you have selected a language, your Cartrek 400 navigation solution will start automatically.
2. What you see on the screen
When your Cartrek 400 is ready for navigation, you will see the navigation menu. You will also always see this menu if you click on the middle of the main screen while navigating or on the "menu" button on the right hand side of the device itself. This menu (also called "Quick pick menu") provides access to all features of the device

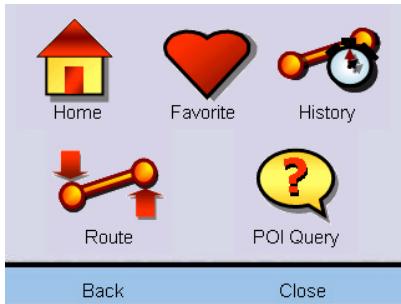
You can select a feature by clicking on the relevant icon. The four main features are further explained in this user guide. The "routing" icon gives access to several options (see image above, right), that are explained in section 5 and further.
The "options" icon in the quick pick menu also gives access to several preference options, that are explained in section 14.
3. The main screen
The main screen is used to navigate you to your destination. This is the traditional "map view" (see image). If the device has GPS reception, your position is indicated by a little blue arrow in the middle of the screen. The purple/red path indicates the calculated route to your destination. If you have not yet given in a destination and you go to the main screen (and the device has GPS reception), the little arrow will just indicate your position; there is no purple/red path and you will not get (audio) instructions.
Please note that the little blue arrow indicating your position, might sometimes point in the wrong direction (not the direction the front end of the car is in). This might happen if you are not driving. The device needs movement in order to see in what direction you are travelling.
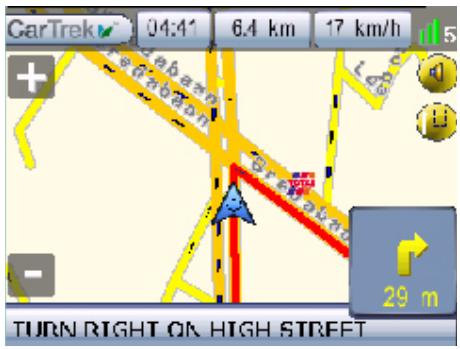
4. The main screen in detail
- The big red arrow on the bottom left of your screen with the grey/light blue background (the info area) indicates your next driving instruction. Under the red arrow is a distance indicator that indicates when to follow this next driving instruction.
- The screen furthermore shows the estimated time to your destination. It also indicates the total driving distance to your destination. In addition, you will see a speedo meter. You will see this information at the top of your screen.
- In the bottom of the screen, in the grey transparent area, you can read the next driving instruction. Just above that is your current position. In the bottom of your screen, in the black area, you will alternatively see your current position and your chosen destination.
To increase or decrease the scale of the map, click the "+" button on the device (zoom in) or the "−" button (zoom out). - If you switch off the sound (see section 20) by clicking on the button with the audio
speaker on the right of the screen, you will see a "sound off" indicator (a little red cross). You will not hear any voice instructions when you see this indicator.
- If you ignore an instruction, the devive will recalculate your route. An indicator in the top end of the screen indicates that the device is recalculating the route. This indicator always shows when the device is calculating its iniary route, or when it is recalculating (a green loading indicator).
- To go to the Quick pick menu, you can always click in the middle of the map. To go back to the map, you can click on "back".
- If you click on the grey area at the bottom of the screen, you will hear the last spoken instruction, if still available.
5. Giving in a destination
- In the Quick pick menu, click on 'Routing' to enter your destination and start the navigation. You will then have five options which represent possibilities to create routes.
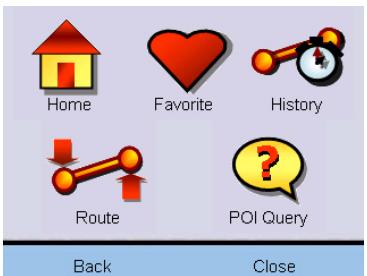
- Each possibility is represented by an icon. These icons and their respective functions will be explained further below:
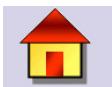
Click on this icon to plan a route to your home destination. If you didn't save your home address, you will be asked to enter your home address. You can choose between your current position or you can enter a full address (see section 6 below).

Select a favourite destination to navigate to. You can add new favourites by entering an address and save the address as a favourite in the address confirmation window (see section 7 below).

Select a destination from the routes that you have recently driven (see section 8 below).

Select a POI (Place of Interest) to navigate to. See section 9 below for more explanation.

Once you have created a route, you can delete the route by clicking on this icon (see section 10 below).
6. Home
- You can give in your home address so that you can select your home address without having to select country, city, street and house number first. Of course you can also use a different frequent travel location in your home memory, such as your parking place or office location. You can change your home location using the "change" button in your home location menu.
7. Favorite
- Locations you frequently travel to such as your office address, family or friends can be given in and selected in the favorite menu. If you click on the "favorite" button you will be presented with a browser listing of all your favorite locations in alphabetical order.
- You can turn locations into favorites using the "favorite" option after you have selected a route. Before you click on the "navigate" button, you are given the chance to select the address as a favorite destination (see section 10).
- You can easily rename or delete favorites in the favorites menu.
8. History (recent destination)
- Of each and every route that you plan, the destination is automatically added to the list of recent destinations in the "history" menu. If you click on the "history" button, you will be presented with a browser listing the most recent destinations.
9. Point of interest
- Points of interest are normally referred to as "POI". POI's are destinations, of which you do not need the exact address to have your device navigate you to their location (gas stations, hospitals, airports etc). The device offers numerous categories of POI's.
(a) "At address"
- You can either chose a POI (e.g. a restaurant) that you know, and have your device navigate you to this location. The POI will then be your final destination of the route that you are planning. In this case you will have to chose "At Adress" in the POI menu. You can ten fill in the address and click on "navigate".
(b "At Current Pos"
- You can also chose to have the device find a POI in a certain category for you at your current position. This option can be usefull if you are in need of a POI (e.g. a gas station) and you want the device to navigate you to the nearest gas station. In this case you can choose "At current Pos" in your POI menu. The device will then show you a list of all gas stations that are located near your current position. You can select the maximum distance you want gas stations to appear in the browse list. You can have the gas stations in the list listed on distance from your position, or in alphabetical order.
(c) "At Destination"
- You can also chose to have the device find a POI in a certain category for you at your selected destination. This option can be usefull if you are in need of a POI (e.g. a restaurant) somewhere near your destination. In this case tou can chose "At Destination" in your POI menu. The device will then show you a list of all restaurants that are located near your destination (and that are adopted in the POI list of your device). Again, you can select the maximum distance you want restaurants to appear in the browse list. You can have the restaurants in the list listed on distance from your position, or in alphabetical order.
(d) "Along Route"
- You can also chose to have the device find a POI in a certain category for you along the route to your selected destination. This option can be usefull if you are in need of a POI (e.g. a hotel) somewhere along the route to your destination. In this case you can chose "Along route" in your POI menu. The device will then show you a list of all hotels that are located near your route (and that are adopted in the POI list of your device). Again, you can select the maximum distance from your route that you want hotels to appear in the browse list. You can have the hotels in the list listed on distance from your position along the route, or in alphabetical order.
At Current Pos
At Destination
Along route
At Address
Back
- In all situations, you first need to pick a POI category. The POI menu first presents you with the five categories that people tend to use often (such as gas stations), or that are important to be able to select quickly. You can click the category that you prefer.

Petrol

Parking

Restaurant

Hotel

Search Item

More
Back
-
There is also a sixth category: "more". If you do not prefer one of the five most used POI's, you can click on "more". You can then select a POI category from the complete list. The menu will then provide a list of POI's in the category you have selected, in order of proximity, or alphabetical order, depending on your choice and settings.
-
The POI browser only shows the nearest POI's, or the POI's that are in the range that you have selected.
- Please be advised that the POI list does not give you real time information. New hotels, restaurants etc may not (yet) be in the list.
10. Navigating (by giving in a specific address)
- If you want to give in a specific address to navigate to, you will first have to select the country that you want to navigate to. Selecting the country: Select the country you want to plan a route to (e.g. France). Click on 'Next'.
Selecteer Land
NORWAY MAJOR
PORTUGAL MAJOR
SPAIN MAJOR
SWITZERLAND MAJOR
UK MAJOR
Terug


-
Selecting a city/village or a postal code area: Type the first letters of the city name on the keyboard (see below). You will notice that only these characters will remain visible that can be entered in combination with the characters that you already entered. A few letters usually suffice to select the city that you are looking for.
-
When you see the name of the city in the top of your screen, click "next". You will then be presented with a list of cities that have similar names to the city you have selected. This gives you the chance to change city name if you were initially mistaken in confirming your choice. You can browse into the list by clicking on the up/down buttons at the lower part of the screen.
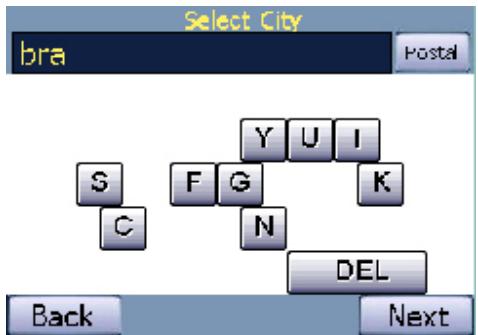
- The menu also knows the postal code zones for most countries (see the blue button in the right top end of the screen). This means that in those countries, you can click on the "postal" icon and enter the (first part of) a postal code instead of entering the name of the city.

- Once you have entered the city name or postal code, click on 'Next'. Specifying the street: Once you have selected a city, you will be asked for a street name. Once again, a few letters usually suffice. Note that the device is not capable of finding streets on the basis of misspelled or incomplete names. In addition, if you are e.g. looking for a street with a complex name, you might have to try and find the address by typing
different combinations of the words of which the address consists. For example, the address "Laan der Vier Heemskinderen" in Geldrop, the Netherlands: you will find this street under "Der vier heemskinderen, Laan". Similarly, the "Koningin Astrid Boulevard" in Noordwijk Aan Zee, the Netherlands is found under "Astrid Boulevard, Koningin".
- Streets that cannot be entered by a car can just as well be selected. The device will navigate you to the nearest location that you can reach by car. You will then be warned that your destination is closed to where you are.
- If you don't enter a street name and click on 'next', you will be routed to the city centre of the selected city.
- Specifying the house number: Next, you will be asked to enter the house number. This is optional. You don't need to enter a house number.
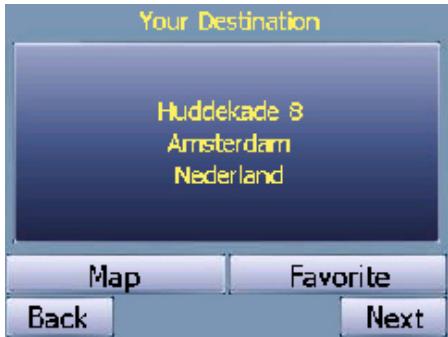
Click on the 'Next' button to start the navigation. If you want to store the address as a favourite destination, click on 'Favorite'. You can also see the location of destination on the map by clicking on 'Map'.
- Follow the audio instructions and follow the purple coloured line on your GPS screen.
11. Drive safely!
- Regardless whether you have given in a specific address, or whether you navigate to a POI, a recent destination or your home address, you must always enter your route before you start driving. Always drive safely!
12. Blocking routes
- To block routes, go to the Quickpick menu and click on this button:

- You will see a small map of the environment around your car. To block or avoid a route, click on the street on the map and click on avoid to avoid the street during your current trip. You can also block roads. A blocked road will remain blocked till you unblock the road again. You can also block roads for 5 or 15 kilometers. This is useful if you want to block highways or if you want to avoid traffic jams or areas where road work is in progress.
- In the block list, you see all the roads that you have blocked. You can unblock roads here. If you unblock roads (by selecting and deleting the blocked roads from the list), you need to go to the Quick pick menu, and click on the "exit" icon. You will then be asked if you are sure that you want to exit the application. If you click on "yes", the blocked roads are permanently deleted from the blocked roads list.
13. Ignoring the route
- Your navigation device is very flexible. If you take a different route than the device suggests (whether by mistake or on purpose), the device will adjust to the new situation and will re-calculate route to your destination. This might take a while.
14. The options of your device
On the Quickpick menu, click on this options button:

- Below, the buttons you see in the next menu -and the various options these buttons have are further explained.

- Change the language of the application (reboot needed).

- Change the time zone of your device and summertime.

- Change the route settings of your navigation solution (details to follow below).

- Change the screen settings of your device (details to follow below).

- Change the system options of your device (details to follow below).

- Change/test the audio volume of your device.
15. Change the language of the application.
- You can only change the language of your device integrally. This means that if you change the language, both the written texts in your screen and the audio commands will be in the newly selected language.
- If you change the language of the application, you will need to restart your GPS. The device will ask you if you want to proceed. If you then click on "OK", the device will restart automatically. Click on "OK" to proceed, or on "Cancel" to go back to the previous screen and keep the original (or previously selected) language.
- Once you have selected a language, the device will keep this language, until you select an other language.
16. Change the time zone of your device.
- The settings under icon (2), in combination with the GPS time, define the clock of your device. Simply click on the time zone you are in and the device will adopt to the new time zone. You can also indicate whether or not it is summer time (for those time zones where this is applicable).
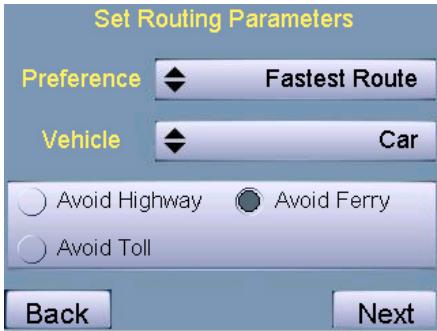
17. Change the route settings of your navigation solution.
- In the route setting menu (button 3), you can change the route options. You can select the route type (Fastest route, Shortest route or Touristic route). If you click on "Fastest route" the device will direct you to a highway as quick as possible, provided that there is a highway towards your destination. The fastest route is the route that takes you to your destination in the shortest period of time, taken into account higher maximum speeds and the avoiding of city traffic. The Fastest route is normally regarded as the standard setting.
- You can also click on "Shortest route". The device will then navigate you to your destination over a minimal distance. This means that you might be guided over lower categories of roads.
- If you click on "Touristic route" the device will navigate you along scenic roads if these are in the area. The device selects scenic routes from the mapdata.
- In this menu you can also select the following additional route options: avoid ferry connections, highways or Toll roads.
18. Change the screen settings of your device.
- In the screen settings menu (button 4), you can change the settings of the screen.
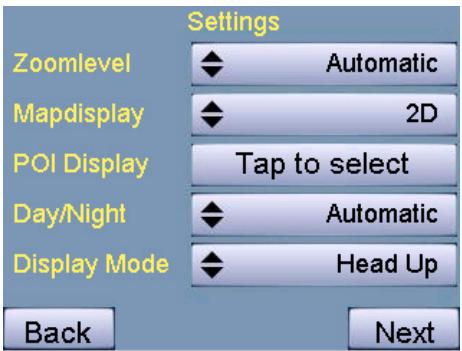
- You can choose that the Zoom level of the maps is zoomed in automatically or manually. If you want to zoom in on the map manually, you can use the "zoom (+)" or "pane (-)" button on the screen.
- The Map display can be shown in 2D (two dimensional) or 3D (three dimensional).
- By means of the POl Display option, you can select which POIs are displayed on the screen by means of an icon. You can browse through the list and click on a POI category to make a POI visible or invisible.
- The Day/night option, will change the colors of the screen to bright colors (during day) or darker colors (during night). If you put this setting to "automatically", the colors will change automatically when the sun sets or rises.
-
The display mode defines if you see an arrow or a map display during navigation.
-
All the above mentioned screen settings will be effective after you have clicked on the "next" button on the right bottom side of the settings menu screen.
19. Change the system options of your device.
- In the system options menu (further explained below), you can change the basic settings of your device. You can change the settings of your distances and speed. You can also change the keyboard settings. If you click on GPS settings, you see detailed information of the GPS signals.
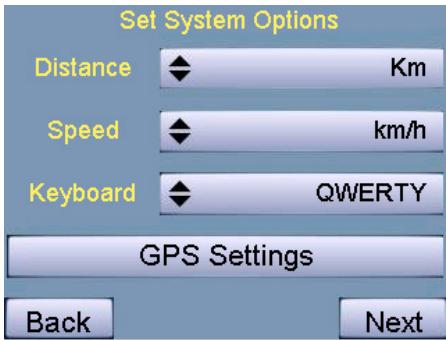
- With the Distance button, you can change the system settings of the travelled distance/distance to travel. You can choose between Kilometers, Yards, Meters, Feet, Miles and nautical distance settings.
-
With the Speed button, you can change the system settings of the travelling speed. You can choose between Kilometers per hour, Meters per second, Feet per second, Miles per hour and nautical distance settings (knots).
-
The "Keyboard" button allows you to change the keyboard settings. You can choose between the azimuth setting, the qwerty setting or an ABCD mode.
- If you switch off the device the above mentioned settings will be kept.
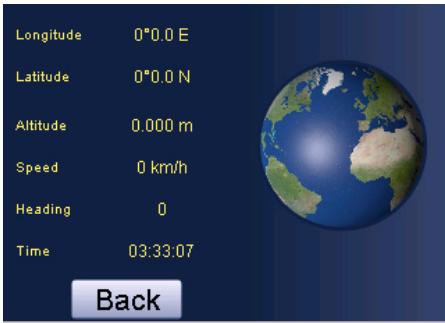
- If you click on "GPS settings", you will see the detailed information of the GPS signals, satellite reception information etc. On this GPS status screen is shown: The longitude, latitude and altitude are displayed. Also, the driving speed is shown and the time according to the GPS signal (which might not be the local time). You will also see a picture of the Earth showing the positions of the satellites.
20. Change the audio volume of your device
- With button (6) you can set the audio volume of the device.
- With the testing button you can test the audio volume that you have selected.
21. Contact & support details
If you have any questions about the navigation solution, or if you wish to contact us and provide us with backfeed information, you can reach us at:
Our website:
www cartrek.info
Registration of your product:
www cartrek.info/register.aspx
Additional accessories:
www-cartrek.info > Webshop
Support questions:
www cartrek.info/support.aspx
On-line documentation:
www cartrek.info > Support > Manuals
End user license agreement
Grant of Software License. This Alturion License Agreement ('License') permits Licensee to use one (1) copy of the software package ('Software Package') enclosed with the License for its own internal purposes only. The Software Package includes software ('Software'), if applicable, and their respective documentation. This non-exclusive License, without the right to sublicense, grants to Licensee the right to install and use the Software on a single personal navigation device (PND). Neither concurrent use on two or more PNDs nor use in a local area network or other network (including but not limited to the Internet) is authorized without the advance written consent of Licensee and the payment of additional license fees. Subject to the foregoing, Licensee may not use the Software in a manner that allows other users than Licensee to use the Software. If Licensee has multiple Licenses for the Software, then, at any time, Licensee may have as many copies of the Software in use as Licensee has Licenses. 2. Alturion's Rights. Licensee acknowledges that the Software consists of proprietary, unpublished products of Alturion, protected under copyright law and trade secret laws of general applicability of the U.S.A. and/or other countries. Licensee further acknowledges and agrees that all right, title and interest in and to the Software are and shall remain with Alturion. This Agreement does not convey to Licensee an interest in or to the Software, but only a limited right of use, revocable in accordance with the terms of this Agreement. Alturion reserves all rights not expressly granted to Licensee. The data used in combination with the Software Package are the property of a third party and are subject to terms and conditions of such third party. 3. Term. This License is effective upon Licensee's first use of the Software and shall continue until terminated. Licensee may terminate this Agreement at any time by returning the Software to Alturion. Alturion may terminate this Agreement upon breach by Licensee of any terms hereof. Upon such termination by Alturion, Licensee agrees to return immediately the Software to Alturion. 4. Other Restrictions. This License is Licensee's proof of a non-exclusive license to exercise the rights granted herein and must be retained by Licensee. Licensee may not rent, lease, or otherwise commercialize the Software in any manner. Licensee may not reverse engineer, decompile, or disassemble the Software, except to the extent that the foregoing restriction is expressly prohibited by applicable law. Licensee may not export the Software or the Hardware or transfer them to another who exports them in violation of applicable US law or other export laws and regulations. 5. Limited Warranty. Alturion warrants solely to Licensee that the Software shall perform substantially in accordance with the program specifications in effect at the time of delivery and shall be free from defects in materials and workmanship, when given normal, proper and intended usage, for a period of thirty (30) days from the date of delivery of the Software Package to Licensee. Alturion agrees to repair or replace at its option and without cost to Licensee, all defective Software Package components, provided that Licensee has given Alturion written notice of such warranty claim within such thirty (30) day warranty period. Alturion shall have no obligation to make repairs or replacements which are required by normal wear and tear, or which result, in whole or in part, from catastrophe, fault or negligence of Licensee, or from improper or unauthorized use of the Software Package (including any use by third parties and by Licensee's employees, consultants and agents who are not authorized users), or use of the Software Package in a manner for which it is not designed, or by causes external to the Software Package. No suit or action shall be brought against Alturion more than one (1) year after the related cause of action has occurred. Furthermore, Alturion grants to Licensee only such warranty on the Hardware, as it receives from its Hardware provider. 6. Limitation of Liability. IN NO EVENT WILL ALTURION BE LIABLE FOR ANY INDIRECT, SPECIAL, INCIDENTAL, ECONOMIC OR CONSEQUENTIAL DAMAGES, ARISING OUT OF THE USE OF OR INABILITY TO USE THE SOFTWARE PACKAGE, INCLUDING SOFTWARE, DOCUMENTATION, OR HARDWARE, IF APPLICABLE, EVEN IF ADVISED OF THE POSSIBILITY OF SUCH DAMAGES. IN NO CASE SHALL ALTURION'S LIABILITY EXCEED THE AMOUNT PAID BY LICENSEE FOR THE SYSTEM. Furthermore, Alturion explicitly states that Licensee should not operate the Software Package while its vehicle is in motion. Licensee must keep its attention focused on the road, road traffic and the operation of the vehicle. By using the Software Package, Licensee acknowledges that it releases Alturion, Alturion's partners, employees and shareholders from any actions directly or indirectly related to the use and/or operations of the Software Package. 7. Remedies. A breach by Licensee will irrevocably harm Alturion and Alturion shall be entitled to injunctive and/or other equitable relief, in addition to other remedies afforded by law. 8. Governing Law. This Agreement shall be governed by the laws of Belgium. 9. Severability. Should any term of this Agreement be declared void or unenforceable by any court of competent jurisdiction, such declaration shall have no effect on the remaining terms hereof. 10. No Waiver. The failure of either party to enforce any rights granted hereunder or to take action against the other party in the event of any breach hereunder shall not be deemed a waiver by that party as to subsequent enforcement of rights or subsequent actions in the event of future breaches. 11. Restricted Rights. RESTRICTED RIGHTS: If this Product is acquired by or for the U.S. Government, then it is provided with Restricted Rights. Use, duplication, or disclosure by the U.S. Government is subject to restrictions as set forth in subparagraph (c)(1)(ii) of The Rights in Technical Data and Computer Software clause at DFARS 252.227-7013, or subparagraphs (c)(1) and (2) of the Commercial Computer Software - Restricted Rights at 48 CFR 52.227-19, or clause 18-52.227-86(d) of the NASA Supplement to the FAR, as applicable, or any successor regulations. The contractor/ manufacturer is Alturion N.V., Vollickstraat 67, 1785 Brussegem, Belgium. 12. Register your Alturion GPS solution within 30 days of your purchase on www.alturion.com/registration. If the product is still unregistered 30 days after purchase of the product, the purchaser can not benefit from technical support and access to the Alturion Auto Update Service. The serial number provided with this software is your personal serial number. If you hand it over to 3rd parties, you will be denied access to the Alturion Auto Update Service. 13. You are not allowed to use the application in combination with a back-end solution for track and trace. If you connect a back-end solution for track and trace to the Alturion GPS navigation application, an additional royalty fee for use of the map data will apply. Please contact Alturion NV for price information on prices. © Copyright 2001 - 2006 Alturion N.V. All rights reserved. All product names referenced herein are trademarks or registered trademarks of their respective owners. Screenshots and pictures used in this manual can change without prior notice and are for reference only.
Aandeslag
Componenten en bedienings-elementen

www.cardrek.info/support.aspx
On line-handleding:
www cartrek.info > Support > Manuals
Components and controls


9. Point of interest (Zielort)
9. Point of interest
www.cardrek.info/support.aspx