
COMFIGRIP - Iron MORPHY RICHARDS - Free user manual and instructions
Find the device manual for free COMFIGRIP MORPHY RICHARDS in PDF.
| Product Type | Steam Iron |
| Brand | MORPHY RICHARDS |
| Model | COMFIGRIP (models 40701, 40707, 40711) |
| Tank Capacity | 350 ml or 400 ml depending on model |
| Steam Functions | Continuous steam, steam burst, spray, vertical steam |
| Anti-drip System | Yes |
| Auto-off | Yes (on some models): 1 min horizontal, 8 min vertical |
| Anti-scale Filter | Integrated permanent filter |
| Cleaning System | Blast cleaning after each use; Self-clean (on some models) |
| Soleplate | Stainless steel or coated depending on model (turbo tip on some) |
| Thermostat | Progressive temperature control with temperature guide (nylon, wool, cotton) |
| Indicator light | Yes, lights up during heating |
| Power supply | 220-240 V ~, 50/60 Hz, earthing mandatory |
| Intended use | Household only |
| Warranty | 2 years (subject to conditions, keep proof of purchase) |
Frequently Asked Questions - COMFIGRIP MORPHY RICHARDS
User questions about COMFIGRIP MORPHY RICHARDS
0 question about this device. Answer the ones you know or ask your own.
Ask a new question about this device
Download the instructions for your Iron in PDF format for free! Find your manual COMFIGRIP - MORPHY RICHARDS and take your electronic device back in hand. On this page are published all the documents necessary for the use of your device. COMFIGRIP by MORPHY RICHARDS.
USER MANUAL COMFIGRIP MORPHY RICHARDS
Comfigrip iron steam/spray/shot
Please read and keep these instructions
Getting the best from your new iron...
Safety first
Caution must be used when handling this appliance as it does get very hot. Always switch off the unit and allow to cool before cleaning or storing.
- Jet cleaning (certain models only) Your iron will give the best ironing results and will last longer if you apply jet cleaning after each period of ironing.
Self cleaning (certain models only) Your iron will give the best ironing results and will last longer if you clean the soleplate once a month.
Important safety instructions
The use of any electrical appliance requires the following common sense safety rules.
Primarily there is danger of injury or death and secondly the danger of damage to the appliance. These are indicated in the text by the following two conventions:
WARNING: Danger to the person!
- IMPORTANT: Damage to the appliance! In addition we offer the following safety advice.
Location
- Do not use outdoors.
Personal safety
WARNING: Burns can occur from touching hot metal parts, hot water or steam. Use caution when you turn a steam iron upside down, there may be hot water in the water tank.
WARNING: To protect against the risk of electric shock do not put the appliance in water or in any other liquid.
- Do not use the vertical steam feature on clothes that are being worn.
- Do not leave the iron unattended whilst plugged in or on an ironing board. Never allow the mains lead to over hang the work surface.
- The socket should always be off before plugging or unplugging from the socket. Never yank the cord to disconnect from the socket, instead, grasp plug and pull to disconnect.
- Do not allow the cord to touch hot surfaces. Let the iron cool completely before putting away. Loop cord loosely around the iron before storing.
- This appliance is not intended for use by persons (including children) with reduced physical, sensory or mental capabilities, or lack of experience and knowledge, unless they have been given supervision or instruction concerning use of the appliance by a person responsible for their safety.
Children
- Never allow a child to operate this appliance. Teach children to be aware of dangers in the kitchen, warn them of the dangers of reaching up to areas where they cannot see properly or should not be reaching.
- Young children should be supervised to ensure that they do not play with the appliance.
Other safety considerations
Use the iron only for its intended use.
Always disconnect the iron from the electrical socket when filling with water or emptying, and when not in use.
- Do not operate the iron with a damaged cord or if the iron has been dropped, damaged or leaking. To avoid the risk of electric shock, do not disassemble the iron, but telephone Morphy Richards for advice. Incorrect reassembly can cause a risk of electric shock when the iron is used.
The iron must be used and rested on a stable surface
- When placing the iron on its heel, ensure that the surface on which the iron is placed is stable.
The iron is not to be used if it has been dropped, if there are visible signs of damage or if it is leaking.
If the supply cord is damaged, it must be replaced by the manufacturer, its service agent or similarly qualified persons in order to avoid a hazard.
Special Instructions
If your iron does not work, check the following points:
Has the temperature control been set to the required temperature' Is the plug in its socket' Is the plug itself or the socket faulty' (Check by plugging in another appliance).
WARNING: When not in use, your iron should never be placed flat and left on an ironing board.
- To prevent damage to the textile being ironed, follow the temperature guide carefully. (Test the inside of the hem of the garment).
- When ironing is complete, remove the plug from the socket, empty any remaining water from the tank, and allow to cool before storage.
If you drop or severely knock your iron this could cause internal damage even if the outside appears alright. Have it checked by a qualified electrician.
It is recommended that you use up one beaker of water by operating your iron's steam and shot of steam functions before ironing any clothes as some dripping may occur while your irons steam system is activated.
INSTRUCTIONS FOR USE
Temperature guide
Heat setting markings on the adjustable control dial of all Morphy Richards irons match those of the International Textile Care Labelling Code.
| Symbol | (120°C Max) Cool | (160°C Max) Warm | (210°C Max) Hot | |
| Control knob positions | Do not iron at all | ● | ●● | |
| Fabric | Nylon, Acetates e.g. Acrilan Courtelle, Orlon Triacetates, e.g. Tricel/Polyester | Wool, Polyester mixtures e.g. Polyester/Cotton Cotton, Linen Rayon, Rayon mixtures, e.g. Rayon/Linen | ||
| Ironing | Iron on wrong side if moisture required use damp cloth (Not Acetate) | Fabrics requiring this setting usually require steam pressing for heavy cotton, denim etc. | ||
| With water in tank | ← Dry and spray→ | ← Steam/spray/shot of steam→ | ||
| ← Jet clean*→ | ||||
| ← Self clean*→ | ||||
| Without water in tank | ← | Dry ironing | → | |
- (certain models only)
Electrical requirements
Check that the voltage on the rating plate of your appliance corresponds with your house electricity supply which must be A.C. (Alternating current).
WARNING: This appliance must be earthed.
UK only
If the socket outlets in your home are not suitable for the plug
supplied with this appliance the plug should be removed and the appropriate one fitted.
WARNING: The plug removed from the mains lead, if severed, must be destroyed as a plug with a bared flexible cord is hazardous if engaged into a live socket outlet.
Where used, should the fuse in the 13 amp plug require changing a 13 amp BS1362 fuse must be fitted.
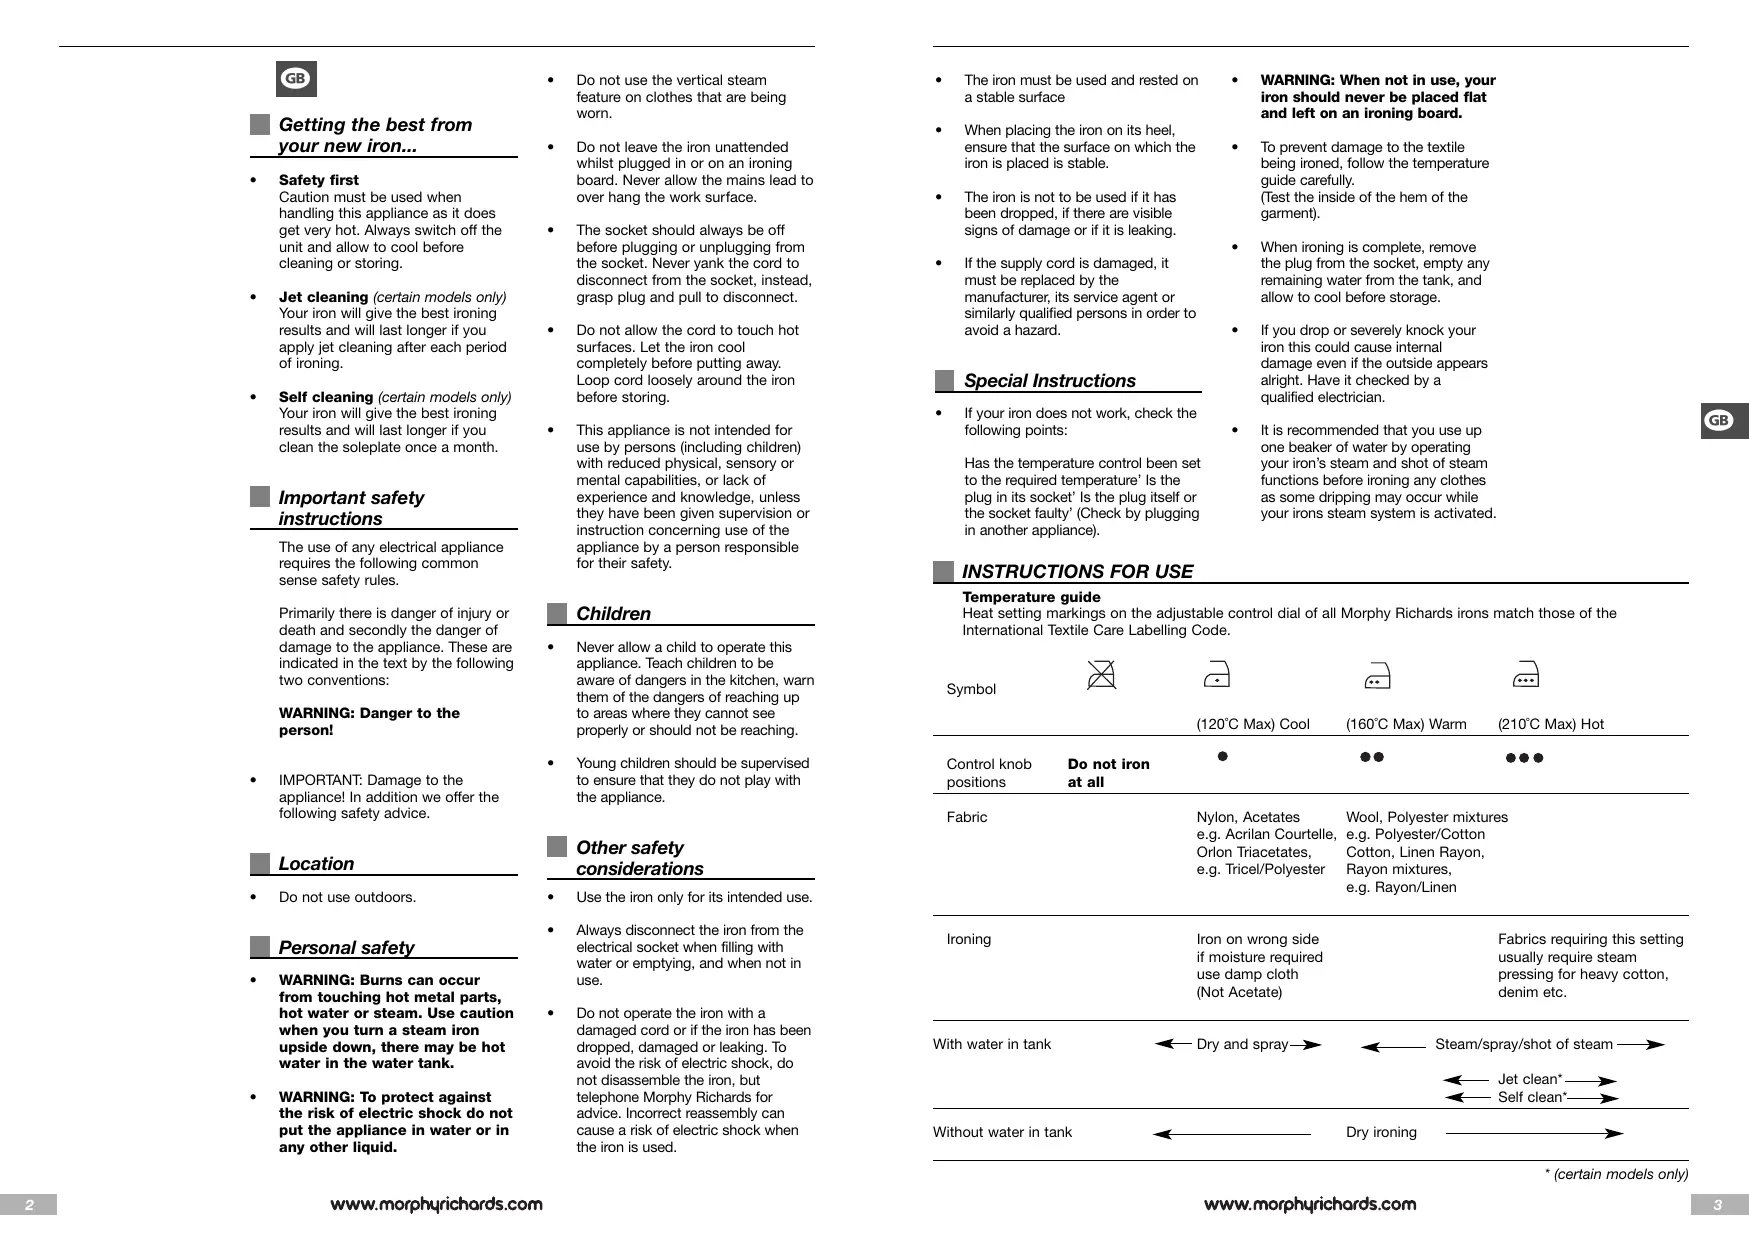
Components of your iron
Spray button
Shot of steam button
3 Variable steam button
4 Filling hole with cap
5 Spray nozzle
6 Soleplate
Temperature control dial with indicator
Water tank (Illuminated on certain models)
9 Life long anti-scale (certain models only)
10 Temperature indicator light (red)
Graduated filling beaker
12 Self clean button (certain models only)
Soleplate (certain models only)
Turbo Tip
Powerful shot of steam gets into the trickiest of places
14 Constant Steam
Remove all creases at a level you control
15 Press and Set
Removes moisture to set a crease-free finish
Before first use
Note: The steam facility should only be used on garments which are suitable for ironing at the 2 and 3 dot settings.
When ironing with the steam facility at the 2 dot setting, the steam output should be set at the lower end of the steam range (see variable steam section).
Textiles and clothes are supposed to carry ironing instructions. If they don't you should follow the temperature guide on the previous page, but be sure to test the temperature by ironing the hem of the garment or similar area first.
If you turn the control dial down from a hot setting to a cooler setting, wait until the iron temperature has stabilised before you continue ironing.
Filling
1 Make sure that the iron is not plugged in and then set the variable steam control to the '0' position before filling the iron with water.
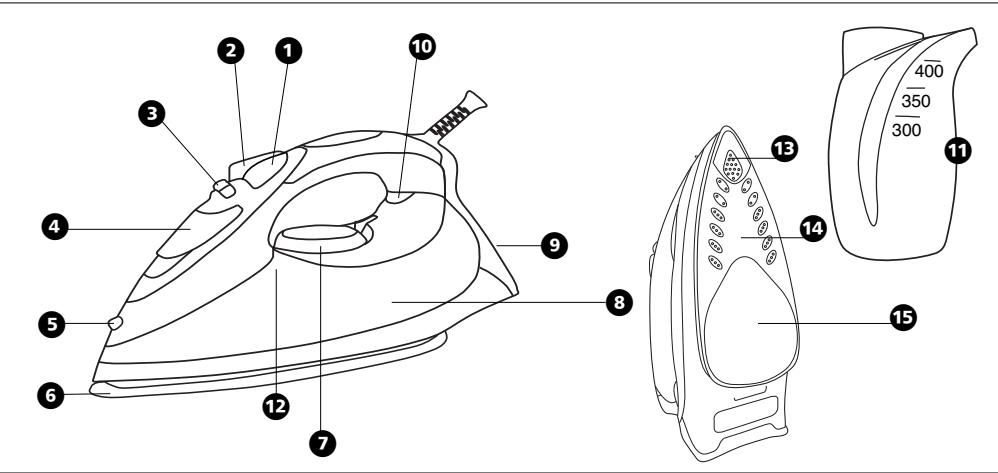
2 Lift up the fill cap and fill the water through the filling hole 4 into the water tank, using the beaker provided A. After filling replace the fill cap. In hard water areas the use of distilled or demineralised water is recommended.
WARNING: Never use battery topping up fluid or water containing any substances like starch, or sugar, or defrosted water from a refridgerator.
3 Always pour out the remaining water after use.
WARNING: When filling your iron with tap water always use the beaker provided. Never fill directly under the tap.
Tank capacity
Models 40701 - 400ml
Model 40707 and 40711 - 350ml
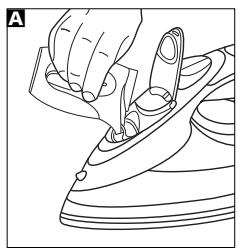
Temperature control
Plug in the iron and switch on. Set the temperature control dial 3 to the temperature required, but don't start ironing immediately.
If you wait a few minutes, the iron will stabilise at the required setting. Your Morphy Richards iron is fitted with an indicator light 10 which will go on and off while you are ironing.
This is perfectly normal as it shows that the iron is maintaining the heat setting you have chosen.
It is always a good idea to begin with cool fabrics and work up to higher settings.
An iron heats up quicker than it cools down so you'll save time and electricity.
Features of your iron
Temperature indicator light
The indicator light shows that the iron is warming up. When the required temperature is reached the light will go out and will cycle on-off during operation.
Dry ironing
You can use your iron as a dry iron only. Make sure the variable steam control is set to the '0' symbol.
Any temperature setting may be used depending on the garment. The spray feature may be used provided there is water in the tank (see filling section). You do not need to put any water in the tank when dry ironing only.

Spray
Press the spray button 1 and aim the spray of water at stubborn creases. You can do this whilst dry ironing providing there is water in the tank. When using the water spray it may be necessary to push the button a few times to get the spray pump primed.
Variable steam
Fill the iron with water as described in 'Filling', page 4 and insert the plug into the electrical socket.
The steam output can be varied from low to high by turning the variable steam control C. When using the iron at 2-Dot, the steam output should be adjusted to the low setting.
The steam facility should only be used on garments which are suitable for ironing at 2 and 3 dot setting.

Shot of steam
Press the shot of steam button to obtain a burst of extra steam for ironing out creases in heavy material such as denim etc.
The shot of steam can be used whilst dry ironing, providing there is water in the tank, and the temperature control is set within the steam range.
Do not use shot of steam at temperatures below the steam range shown on the control dial.
Note: For optimum steam quality, do not operate the shot more than three times in succession.
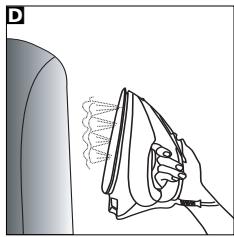
Vertical steam
Hold the iron in a vertical position between 1cm and 2cm away from the item D. Press the shot of steam button 2, this will create vertical steam. This feature is especially useful for removing creases from hanging clothes, curtains, wall hangings, etc.
Note; For optimum steam quality, do not operate the shot more than three times in succession.
No drip system
Your iron is fitted with a no drip system which is designed to prevent water escaping from the soleplate when the iron is too cold.
During use, the no drip system may emit a loud click, particularly during heat-up or whilst cooling down. This is perfectly normal and indicates that the system is functioning correctly.
Auto shut-off
(certain models only)
If your iron is fitted with the auto shut-off function it will automatically shut down after a set period.
If the iron is left unattended in the horizontal position it will shut down after 1 minute.
If it is left in the vertical position it will shut down after 8 minutes.
Flashing tank lights indicate the product is on shut down mode.
To reactivate the iron gently shake it, the temperature indicator light will come on indicating the iron is warming up and wait for the iron to heat-up as normal.
Life long anti-scale
system (certain models only)
The life long anti-scale system reduces scale deposits and helps prolong the life of the iron.
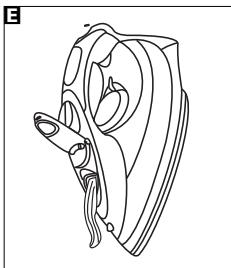
Emptying and storing
When you have finished ironing, unplug your iron. Ensure that the variable steam control is set at the '0' position, lift up the fill cap and empty any remaining water out of the filling hole E.
Do not store in the box, but in an upright position, so that any drops of water remaining cannot leak out and discolour the soleplate.
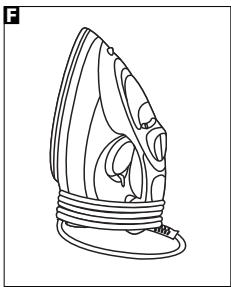
Important: The flex can be damaged if wound too tightly around the iron after use. Make a loose loop with the flex and wrap it around the iron F. The iron must be cool before winding the flex and storing on its heel.
Maintenance
(certain models only)
Jet cleaning
Your iron has a built in cleaning system designed to keep the water valve, steam chamber and steam vents clear of lint and loose mineral deposits. The 'jet clean' should be operated after each period of ironing.
To operate, ensure that there is little water in the tank, place the iron on its heel and turn the temperature control dial to the maximum setting. Wait for the temperature indicator light to go out, then unplug the iron and hold it about 6^ (150mm) above the sink in the ironing position. Press the shot of steam button about 10 times in succession.
After this cleaning operation, empty out any remaining water.
Self cleaning
(certain models only)
Your iron has a built in cleaning system designed to keep the water valve, steam chamber and steam vents clear of lint and loose mineral deposits.
1 Half fill the iron with water.
2 Place the iron on it's heel.
3 Connect to a mains supply outlet.
4 Set the temperature control to 'MAX'. See 'Temperature control' on page 5.
5 The indicator light will flash until the required temperature is reached.
6 The indicator light remains 'on' when the selected temperature is attained.
7 Disconnect the iron from the mains supply outlet.
Hold the iron horizontally over a sink.
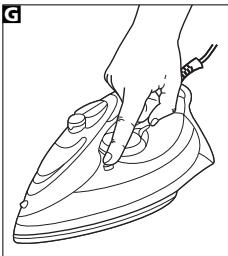
9 Press and hold down the Self-Cleaning button 12.
10 Steam and boiling hot water will drain from the holes in the soleplate, washing away the scale and minerals that have built up inside the Steam Chamber.
11 Gently move the iron back and forth until the water tank is empty.
12 When cleaning is complete, release the Self-Cleaning button 12.
13 Rest your steam iron back on it's heel and allow to fully cool down.
14 Wipe the soleplate with a cold, damp cloth.
After this cleaning operation, empty out any remaining water.
WARNING: Keep hands and body away from the hot water.
WARNING: Do not attempt to descale the soleplate with descending products.
To clean a stainless steel soleplate (certain models only)
To keep the soleplate of your iron clean and free of limescale, we recommend that you use one of the gentle chrome, silver or stainless steel cleaners that are generally available. Always follow the manufacturers instructions. To clean off melted man-made fibres set the iron at 3 dot position and pass it over a clean piece of cotton which will draw the deposit off the surface.
To clean a coated soleplate (certain models only)
In the unlikely event of any man-made fibre fusing to the soleplate, set the iron at the 3 dot position and pass it over a clean piece of cotton which will draw the deposit off the surface.
Do not use scouring powder or solution as this could damage the coating.
To clean the exterior
Allow the iron to cool and wipe over with a damp cloth and mild detergent, then wipe with a dry cloth.
Helpline
If you have any difficulty with your appliance, do not hesitate to call us.
We are more likely able to help than the store from where you bought it.
Please have the following information ready to enable our staff to deal with your query quickly.
Name of the product
- Model number as shown on the underside of the appliance.
Your two year guarantee
It is important to retain the retailers receipt as proof of purchase. Staple your receipt to this back cover for future reference.
Please quote the following information if the product develops a fault. These numbers can be found on the base of the product.
Model no. Serial no.
All Morphy Richards products are individually tested before leaving the factory. In the unlikely event of any appliance proving to be faulty within 28 days of purchase it should be returned to the place of purchase for it to be replaced.
If the fault develops after 28 days and within 24 months of original purchase, you should contact the Helpline number quoting Model number and Serial number on the product, or write to Morphy Richards at the address shown. You may be asked to return a copy of proof of purchase.
Subject to the exclusions set out below (see Exclusions) the faulty appliance will then be repaired or replaced and dispatched usually within 7 working days of receipt.
If for any reason this item is replaced during the 2 year guarantee period, the guarantee on
the new item will be calculated from original purchase date. Therefore it is vital to retain your original till receipt or invoice to indicate the date of initial purchase.
To qualify for the 2 year guarantee the appliance must have been used according to the manufacturers instructions. For example kettles should have been regularly descaled.
Exclusions
Morphy Richards shall not be liable to replace or repair the goods under the terms of the guarantee where:
1 The fault has been caused or is attributable to accidental use, misuse, negligent use or used contrary to the manufacturers recommendations or where the fault has been caused by power surges or damage caused in transit.
2 The appliance has been used on a voltage supply other than that stamped on the products.
3 Repairs have been attempted by persons other than our service staff (or authorised dealer).
4 Where the appliance has been used for hire purposes or non domestic use.
5 Morphy Richards are not liable to carry out any type of servicing work, under the guarantee.
6 Plastic filters for all Morphy Richards kettles and coffee makers are not covered by the guarantee.
This guarantee does not confer any rights other than those expressly set out above and does not cover any claims for consequential loss or damage. This guarantee is offered as an additional benefit and does not affect your statutory rights as a consumer.
AUSTRALIAN WARRANTY
This appliance is guaranteed for 2 years against faulty material, components and workmanship.
This warranty is in addition and does not affect your statutory rights.
Proof of purchase must be produced for any warranty benefit.
In the unlikely event of any appliance proving to be faulty, securely pack and return the item to the place of purchase accompanied by the original receipt or invoice.
NOT COVERED BY THIS WARRANTY (Australian only)
If the appliance has not been used in accordance with the manufacturers' recommendations or Instructions.
- If the fault is deemed to be caused by abuse, misuse, neglect, modifications or in proper use and or care
- Eg: Kettles: Excessive build up of scale.
- Toasters: Excessive build up of crumbs or foreign matter etc.
- Connection to incorrect voltage to that stamped on the product
- Unauthorised repairs
- Appliance used other than for domestic purposes.
- Excluding bags, filters, glass, carafes, and cutting blades.
Freight and insurance costs.
If for any reason this item is replaced during the 2 year guarantee period, the guarantee on the new item will be calculated from original purchase date. Therefore it is vital to retain your original receipt or invoice to indicate the date of original purchase.
Morphy Richards's policy is to continually improve quality design and product quality. The company therefore reserves the right to change any specifications or to carry out modifications as deemed worthy at any time.
The Australian supplier ASKO Appliances reserves the right to repair, modify, exchange or replace the faulty appliance with the same or similar model or product of equivalent value.

Service-Portal: www.ewt-eio.de
Service-eMail: service@glendimplex.de
Temperaturregulating
Udtom resterende vand after rengoring.
Selvrens
(Kun visse modeller)
WARNING: Fara for person!
Viktigt: Fara forhushalssapparaten! Dessutom erbjuder vi foljande sakerhetsradr.
Placering
Zalecane temperature
WOJA DWULETNIA GWARANCJA
EcnBnBnKa shHpya nTahnna
npBn6pa He noDxOHT K DomaunHM
3NeKTPnueckm P0e3Kam,
Heo6XoDnmo Ee 3aMeHnBt BnKnO
COOTBeCTByIoUeO 6bpa3ca.
PNEyPEXDEHVE: Pn
NoBpeKdEHN CHrToT co shhpya
NtAHAn BvKnK ee Heo6xOdmO
YHHTOKnTB, NcOKbky BvKnKa C
OrOJIeHHbIM nPoBODOM
npTeCTabJnET ONaCHOT npIe ee
noDKIIOUChEN K HaxOJaIeCN
NOHnAPRKeHem po3TeK.
Pn Heo6xOdmOCTn 3aMeHbI
npDeoxpAHntEnB V BInKe Ha 13 A
CneDyET YCTAHOBITb
npDeoxpAHntEn BS1362 Ha 13 A..
PNEyIePExJEHHe: DaHHbI 3JIeKTPoPn6Op DoJxKeH 6bITb 3a3eMJIeN.
PykoBoDCTBO no yctaHOBKe tempepaTyp
OTMeTKn TEmpeApTypbI Ha NsCKOBbIX peryIaTopax BcEx yTHIOB KOMpaHmN Morphy Richards cooTBetCTByIOT OTMeTkAm MeJxHyapOndHO KoJa Ha MetKax TeKCTnIbHbIX n3dJIeN.
xIoOnHbHnKa, He donyckaetc.
3 Pocne nCnoIb3ObaHn yTIOrA BceEJa CInBaIte OCTaBlyIOc BOy.
PNEyPPEKDEHNE: Ppi
HANOJIHEHm yTora BODONPOBHOI BOOIB CERda NOpb3yIteCb npInaeraMbIM MEPbIM cTaKaHnKOM. HnKOrda He HnBaBte BoY DHeNocpeDCTBeHNO 13-ND KpaHa
BmecTmoctpe3epByapa
Moei 40701-400mI MoeJIb 40707n40711-350mI
PerylnpobkA
TemnepaTpybI
IopKnIOHnTE WtTencBHyO BnKy yIOrA K 3eNKTpUeCKoP03eTKe IN BKIOHnTE erO.VcTahONeDmIO DnCKOBbl peryJrTOpeTMepaTpbl HHa Heo6xOdmyIO TempepaTyP, HO He npCtynaiTe cpa3y Jke K IJaxEnHeIO.
Ecnn nooJxDaTb HeckOJIbKO MnHyT, TempepaTypa yIora yCTAHOBNTc Ha Tpe6yEMOM yOpBE. Bau yTHor Morphy Richards, o6opyDoban CBTeOBIM INdIkaTOPom 10, KOTOPbIy 6yET 3aOpaTbCS n raChyTB BO BpMa IaXeHIN.
3To a6c0nHTo HOpMaJIbHo, n Yka3bIbAeHT Ho, YTO yTHOr NODepKnaBaET BbIbpaHbB BamN TeMnePAtypHbI pexMM.
Lelceoo6pa3Ho haunHaTb
rJaxKeHne C TkaHe, Tpe6yUoXn
MeBhSyIO TEMpeAtpTy, n
NoCTeEHNO nepExOaDIn k 60nee
BbICOKIM 3NaueHnM TMpePaTypbl.
YIHor 6bICTpee HabipaET Heo6XdImyIO Temnepatpy,3aTeM OXIAJkDAETC,TAKIMOBpa3OM,Bbl 3KOHOMITE BpEMr I 3NeKTPO3HePrrIO.
Bo3MOxHocTn yTHora
CBeTOBmHnDKaTOp TEMpePaTypbI
CBeHHe INNdkaTopa yKa3bIbaeT Ha To, YTOYTOHARpeBaetc. KOrDaIOCTnAeTc HUxHaNTEMHepatya, INNdkaTop rachet n
BO BpEMRa pa6oBtI nepNoDmUeCKn MEHReT CBOE COCTOHNHe C BKNIQUHHO H Ba BYIKNIOUeHHO H ao6obOpOT.
Cyxoe rnaKeHne
YTOI MOXHO INCIOB3OBAbT TOnIbKO
dmyCFO rnaKeHHN. Y6eIaTeCeB,
yTOpeYJrTOP IOaDnH npa 3
yCTAHOBJIEN HcMMBONE '0'.
MoxHo BbI6paTb IIObIy UcTaHOBky Temepatypbl B 3aBcIMMOCTN OT Tnla OeJXbl. MoKHO nOJIb3OBaTbCByPfHKUeI paCNblJeHnpr NpI yCIOBn, YTO Bpe3epByape IMeETcRBOda (CM. pa3dEe "HaONHeHne BOIo"). Het Heo6xoDMOCr 3aJIbBaTb BOy Bpe3epByBa, KOrDa Bbl rJaNTe TOIbKO BCxYIO.

PacnbilnteIb
HaKMTe KHONKY paCbIJIInTeJ 1
HaHapBaJIaIe PaCbIJIHeMyo BOy
Ha TpydNo PA3rJaXnBaEMbIe
CKlaIaKn. 3ToI qHyKcUeM oKHO
NONb3OBATcbN I npri CyCMO
rJaKeHmPi NpI yCIOBm, YTO B
pe3epByape IMMeTcR BOa.ДЯ
NoKaChN BObl B HACOC
paCbJIInTeJRA,BO3MOxHO,
NoHaIO6BtCAHkaTb Ha KHONKY
HECKoJIbKO pa3.
PerylTop napa
HanoHInTe yTIOB OBOJ, KaK OnncaHO Bpa3dJe "HanoHHeHne BOOJ (CTP.4), N BCTaBbTe wTEnCeJIbHyIOB INKY yTORa B p03eTKy 3NeKTPOcETM.
ПОНЗВОДNTIELBOCTьnapaMOЖHO
ИМЕНТьOTиH3K0ДdoBbICOKOД,
NOBOPAUNHAPeYIANTOPnapaC.
ПИпсINONЛБOTAHINyTOrA
peXIMe,OTMeyehnOM2TOUkAMn,
PERITOPNOdAnnipaDOJXeH
6bITbYCTaHOBENHa camyoH
HN3KYIOOTMfTKy.
PpeDoTbpaueHnO6pa3OBaHnHaKnPi
(TOJIbKOДПЕНКOTOpbIXMODEJIe)
CnCTema npedotBpaueHnna 0b3aobAHnHaKmN yMeHbShaET OTOXKeHne HAKnN n POpIeBaET cPoK cnJxbl yTOrA.
CnB BoI xpaHeHne
Iocne TOrO, KaK Bbl 3aKaOHnTe
rnaKHeNe,OTKnIOHTe yTOr OT cTn
nITAHn. NpeBeMeNTe perynTOp
napa B NOXKeHne '0, NOHNMTe
KoNnAOK OTBepCTnI dJI
HaONJIeHnI BODoI n CSeIte Ypee3
3TO OTBepCTne OCTabWyOcR BoYd.
E.
He xpaHnTe yTIOB Kopo6ke, NOCTABBeIero BEPTNkaIbHO, YTObI KaIIIN OCTaBUnecBaBOI He MOrJI BbITeYb I OBEcUBeTb NIOOuBy yTOrA.
BHHMaHHe:UHyp NITaHnMoXHO NOBpeDntb, eCTb ERO HAMOTab CNIuKOM PLOTHo HA yTOr nOcJe NCOnb3ObaHn. CdenaTe n3 UHpyuNITaHn CBO6OHyoNETnIO uHAMotaTe ee BOKpyr yTOra F. IpeDe TEM KAK HAMOTab hHyp NITaHn Y b6pTaB yTOr Ha xpaHenHe B BEptkAJIbHOM NONOxKeHmYb6eNTecb, qTO yTOr OCTBJL.

(TOJIbKO B HekOTOpbIX MOdEJIAX)
CTpyHnA OChTka
BaW yTIOI mEeT BCTpoEHHyIO CNTTEMY ONUCTKIN, InpdHa3HaueHHyIO IJN yUdAJIeHnRA pa3IINHO rPOda IyUIMHK, HITOK IN pbIXbIX MInHepaIbNbIX OTNOxKeHn IN3 BOJARHO KJNAHAp, NapoBOI KaMepbl NOTBepCTM bIxOJa napa. "CTpyHyo ONUCTKy" cJeDyET npOBODtB nOcIe KaJxDORO rJAXeHbJr.
ДлгЗТOrO,у6eDINBWHScb,ЧTO B pe3eRByape IMeETc HEmHORO BObl, NOCTaBbTe yTtO HA NpTky I yUtaHOBuIte NdKOBbIy peryIaTOp TEmNepaTpbyHa MaKcIMaIbHyIO OTMeTky.ПоJOxДITE,пoka norachET CBeTOBoI INdIkaTOp TEmNepaTpby,OTKnIOUHTeYtOg OT pOsetKIN I NOMeCTIte erO Ha BbICote npImepHO 6ДIOHMOB (150 MM) NaIpaKOBiHoi, YpeDxNBA B nIoJoxEHmДЯ rIaNJaXeHnA. HaxMJIte Ha KONKY napBOrO ydapa npImepHo 10 pa3NoIpaI.
Iocne OcHCTKn CneTe BCHO OCTaBHyOCA BOy.
Camoouctka
(TOJIbKO B HΕΚΟΤΟβIx MΟΕΝΑX)
Baw yTIO nMeET BCTpoEHHyO CNTcEMy OChCTKn, npeDaHa3NaeHHyIO dIaYdaJIeHnra pa3NlHuHO rOpaNtUHOK, HHTOK n pbXbIX MInHePaIbHbIX OTNoXKeHn N3 BOdHoro KLnAnaHa, NapoBOI KaMepbI n OTBepCTNI BixOda npa.
1 3aene Te Body ByTIOr HanoNoBnHy.
2 NocTaBte yTnHa nTky.
3 POnKlnHouHTe K 3neKtpoCetn.
4 YctaHOBIne pepyIATOp TEMpePATpyHa OTMeTKy "MAX". CM. "KoHTpOJIb TEMpePATpyi" Ha cTpaHnue 5.
5 Ioka He 6ydet DoctnHyta Tpe6yemam Temnepatypa, INdkaTopHa JAmNochka 6ydet MInATb.
6 Korda 6ydet DoctnHyta Tpe6yemam Temnepatypa, INdkaTOp 6ydet ropeTb NoCToHHNo.
7 OToeHNHHTe UHHyp yTHOra OT 3NeKTPocETn.

8 Diepxte ythor ropn3oHTaIbHo haD paKOBHoi.
9 HaxmTe udepKnBaIe KHOIIky cMOOCHCTKn 12.
10 IV3 OTBepctn IIOOoBbI HaChHeT BbTEKATb KINPIaB BAoDc NapOM, BbIMBaIa HAKINb IMHepaJIbHbIe OTLOKEHNI 3NapOBO KaMePbI.
11 Cnerka BCTPAXHnTE yTOrB npepernHa3aI, YTObI ONOPOXHNbpe3epByap IaR BObl.
12 Pocne 3aBepseHnOCHcTKN OTNcyTHe KONKy CaMOOHCTKN
13 YctaHOBIte npAOBOy yTOr 6oPaTHO Ha NtKyu N daTe EMy IONHOCTbHO OCTbTb.
14 PpOtpnTe pIoOuBxOIoDHO BnaXHOr TKaHbIO.
IocneOCHCTKnCneTe BcIO OCTaBsyOCA BOy.
PNEyPPEKxDEHNE:He donyckaite npikocnoBENpy K nTeLa K roprh BoE.
PNEyPEXKDEHNE:He nbTaitreTcB ydaJIbT cIebl HaKNnC NOBepxHOCTN nOoDBbl, Nol3yRcB cpeCTBaMn IpOTHB HAKIN.
OuNTKa IIOoWbbl yTOra n3 HepXaBeIoUeI cTaN
(TONbKOДПЯ HeKOTOpbIX MOdJIeN)
ДлnoДерханnoBepxHoctn NODOWBbl yTOrAчNTOnи CBO6ObHOnOT hakinn peKoMEnDyETcN OJIb3OBAtbcN MЯrkIM CpeDCTBM DnI yXoJa 3a XpOMIpOBaHHbIMN NOCepe6BeHbIMn NOBepxHOCTaMn I NoBepxHOCTaMn N3 HepXaBeOuSei CTaNl, KOTOpbe ObIyHo IMeHTc B IpoJdaKe. O6Ba3aTeNbHO CteUyTe INHCTpyKlMaM N3rTOBtENTa.Дл YdJIeHnC CleIOB pPrOpaHn CINTeTNeCKnx TkaHeN, yCTaHOBtNE yTOr B pexim, O6O3aHuEhNb TpEm KHOKnAmn, n pOboEaInTe yTfOrm NO KcKcY UcCTToN XLOTHaTObymaxHoT KaHn, YTO NOMOxET ChrTa HacLoHne C NObepxHOCTN NOODWBbl.
OuHCTKa IIOoOWBbI C NOKpbITHeM (TOJIbKO B HEKOTOBIX MoJeIrx)
B TOM Cnyuae, ecnn K NOBepxHoctn
noDOnBBI npNIINn
pacJIaNAbLeHHeHbI NcKycCTBeHNbIe
BONOKha, yCTaHObNTe peryJITOP
HarpeBa yTOra Ha 3 Tockn
npOBeDiTe No NOBepxHoctn
noDOnBBi KYCKOM YHCtOTo BAtbl,
yDaJIaC HeE octATkn
paCnJIaNBeHbIX BOLOKOH.
He nCnoB3yIe Tnla 3toi ceJIIN abpaBnBHbIe npOpiKu I naCTbI, TaK KAK 3TO MOKeT NOBpeDITb NOKpblTe.
OuNCTKa BHeuHEn NOBepXHOCTN
DaIte yTIOy OCTbITn IpOTpTe ETO KAnbHIO,CMOeHHO MArKIM MOIOUm CpeCDTBOM,3aTEM IpOTpTe CyXO TKAhBIO.
KoHTaKTbI TeJefoH
Ecni y Bac cctb KaKHe-1n60 3aTpyHEnHn, KacaOuIeNc DaHHoro np6opora, 3BOHnTe Ham 6e3 npomoeHn.
Mbl bIcTpee NOMOXEM BAM, cEM MaRa3INH,B KOTOPOM Bb KUYINI DAHNOE n3dJIeN.
Morphy Richards products are intended for household use only.
Morphy Richards has a policy of continuous improvement in product quality and design.
The Company, therefore, reserves the right to change the specification of its models at any time.
The After Sales Division,
Morphy Richards Ltd, Mexborough, South Yorkshire, England, S64 8AJ
Helpline (offices) Ltd, M870 060 2609 Republic of Ireland 1800 40915
AUS Australia - Service centre locations
Asko Appliances (Australia) Pty Ltd. Victoria 35 Sunmore Close, Moorabbin. 3189 T:03 8551 2200
New South Wales F3/3-9 Birnie Ave., Lidcombe, 2141 T: 02 8748 2900
Queensland 2/112 Fison Ave., Eagle Farm. 4009 T: 07 3623 2700
South Australia 45 Hampton Road, Keswick, 5035 T: 08 8292 9500
Western Australia 15 Walters Drive, Osborne Park. 6017 T: 08 9347 0600
www.morphyrichards.be
For electrical products sold within the European Community.
At the end of the electrical products useful life it should not be disposed of with household waste. Please recycle where facilities exist.
Check with your Local Authority or retailer for recycling advice in your country.