
RCD-06 SE - CD Player ROTEL - Free user manual and instructions
Find the device manual for free RCD-06 SE ROTEL in PDF.
| Product Type | CD Player |
| Brand | ROTEL |
| Model | RCD-06 SE |
| Dimensions (W x H x D) | 435 x 72 x 342 mm |
| Front panel height | 60 mm |
| Weight | 5 kg |
| Power supply | 230 V~ 50 Hz (European version) |
| Maximum power consumption | 20 watts |
| Total harmonic distortion + noise | 0.0045% at 1 kHz |
| Frequency response | 20 - 20,000 Hz (±0.5 dB) |
| Signal-to-noise ratio | >100 dB |
| Digital-to-analog converter | Wolfson |
| Analog outputs | 1 pair RCA (stereo) |
| Digital output | Coaxial RCA (75 ohms) |
| Playback functions | Play, pause, stop, forward/backward search, direct access, programming (20 tracks), random play, repeat (1 or all), intro scan, time display |
| Remote control | Infrared RR-D95 (AAA batteries included) |
| External remote input | 3.5 mm jack socket (EXT REM IN) |
| 12 V trigger input | Yes (3-30 V AC/DC) |
| Maintenance and cleaning | Dry cloth or vacuum cleaner |
| Safety | Class 1 laser device, double insulation |
| Included accessories | Remote control, batteries, power cord, manual |
| Warranty | Consult your authorized Rotel dealer |
Frequently Asked Questions - RCD-06 SE ROTEL
User questions about RCD-06 SE ROTEL
0 question about this device. Answer the ones you know or ask your own.
Ask a new question about this device
Download the instructions for your CD Player in PDF format for free! Find your manual RCD-06 SE - ROTEL and take your electronic device back in hand. On this page are published all the documents necessary for the use of your device. RCD-06 SE by ROTEL.
USER MANUAL RCD-06 SE ROTEL
Stereo Compact Disc Player
Important Safety Instructions
WARNING: There are no user serviceable parts inside. Refer all servicing to qualified service personnel.
WARNING: To reduce the risk of fire or electric shock,do not expose the unit to moisture or water. Do not expose the unit to dripping or splashing. Do not place objects filled with liquids, such as vases, on the unit. Do not allow foreign objects to get into the enclosure. If the unit is exposed to moisture, or a foreign object gets into the enclosure, immediately disconnect the power cord from the wall. Take the unit to a qualified service person for inspection and necessary repairs.
Read all the instructions before connecting or operating the component.
Keep this manual so you can refer to these safety instructions.
Heed all warnings and safety information in these instructions and on the product itself. Follow all operating instructions.
Clean the enclosure only with a dry cloth or a vacuum cleaner.
Do not use this unit near water.
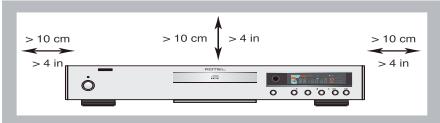
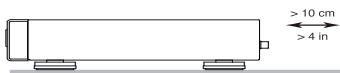
You must allow a minimum 10cm or 4 inches of unobstructed clearance around the unit.
Do not place the unit on a bed, sofa, rug, or similar surface that could block the ventilation openings. If the unit is placed in a bookcase or cabinet, there must be ventilation of the cabinet to allow proper cooling.
Keep the component away from radiators, heat registers, stoves, or any other appliance that produces heat.
The unit must be connected to a power supply only of the type and voltage specified on the rear panel. (USA: 120 V/60Hz, EC: 230V/50Hz)
Connect the component to the power outlet only with the supplied power supply cable or an exact equivalent. Do not modify the supplied cable. A polarized plug has two blades, with one wider than the other. A grounding plug has two blades plus a third grounding prong. These are provided for your safety. Do not defeat grounding and/or polarization safety provisions. If the supplied plug does not fit your outlet, please consult an electrician for replacement of the obsolete outlet. Do not use extension cords.
The main plug of the power cordset is a disconnect device of the apparatus. In order to completely disconnect the apparatus from the supply mains, the main plug of the power cordset should be unplugged from the mains (AC) outlet. The stand-by LED indica-tor will not be lit up to show the power cord is unplugged. The disconnect device shall remain readily operable.
Do not route the power cord where it will be crushed, pinched, bent, exposed to heat, or damaged in any way. Pay particular attention to the power cord at the plug and where the cord exits the back of the unit.
The power cord should be unplugged from the wall outlet during a lightning storm or if the unit is to be left unused for a long period of time.
Use only accessories specified by the manufacturer.
Use only with a cart, stand, rack, bracket or shelf system recommended by Rotel. Use caution when moving the unit in a stand or rack to avoid injury from a tip-over.
Immediately stop using the component and have it inspected and/or serviced by a qualified service agency if:
The power supply cord or plug has been damaged
- Objects have fallen or liquid has been spilled into the unit
The unit has been exposed to rain
The unit shows signs of improper operation
The unit has been dropped or damaged in any way
CLASSE 1
LASER PRODUCT
IMPORTANT FOR LASER PRODUCT
- CLASS 1 LASER PRODUCT
- DANGER: Visible laser radiation when open and interlock failed or bypassed. Avoid direct exposure to beam.
- CAUTION: Do not open the top cover. There are no user serviceable parts inside the player; leave all servicing to qualified service personnel.
WARNING!
To reduce the risk of electrical shock, fires, etc.:
- Do not remove screws, covers or cabinet.
- Do not expose the unit to rain or moisture.
- Do not touch the power cord or plug with wet hands.

CAUTION
RISK OF ELECTRIC SHOCK DO NOT OPEN

CAUTION: TO REDUCE THE RISK OF ELECTRIC SHOCK, DO NOT REMOVE COVER. NO USER-SERVICEABLE PARTS INSIDE REFER SERVICING TO QUALIFIED SERVICE PERSONNEL.
APPLICABLE FOR USA, CANADA OR WHERE APPROVED FOR THE USAGE
CAUTION: TO PREVENT ELECTRIC SHOCK, MATCH WIDE BLADE OF PLUG TO WIDE SLOT. INSERT FULLY.
ATTENTION: POUR EVITER LES CHOICES ELECTRIQUES, INTRODUIRE LA LAME LA PLUS LARGE DE LA FICHE DANS LA BORNE CORRESPONDANTE LE PRISÉ ET POUSSER JUSQU AU FOND.

This symbol is to alert the user to the presence of uninsulated dangerous voltages inside the product's enclosure that may constitute a risk of electric shock.

This symbol is to alert the user to important operating and maintenance (service) instructions in this manual and literature accompanying the product.

Rotel products are designed to comply with international directives on the Restriction of Hazardous Substances (RoHS) in electrical and electronic equipment and the disposal of Waste Electrical and Electronic Equipment (WEEE). The crossed wheelie bin symbol indicates compliance and that the products must be appropriately recycled or processed in accordance with these directives.

This symbol means that this unit is double insulated. An earth connection is not required.

Place the unit on a fixed, level surface strong enough to support its weight. Do not place it on a moveable cart that could tip over.

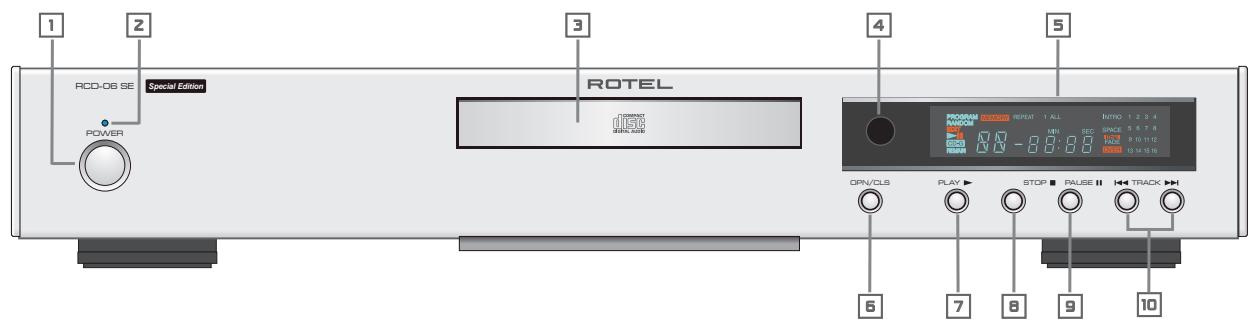
Figure 1: Controls and Connections Commandes et branchements Bedienelemente und Anschlusses Controles y Conexiones De bedieningsorganen en aansluitingen Controllie e collegamenti Kontroller och anslutningar Opranblu npablenn np3bEmbl
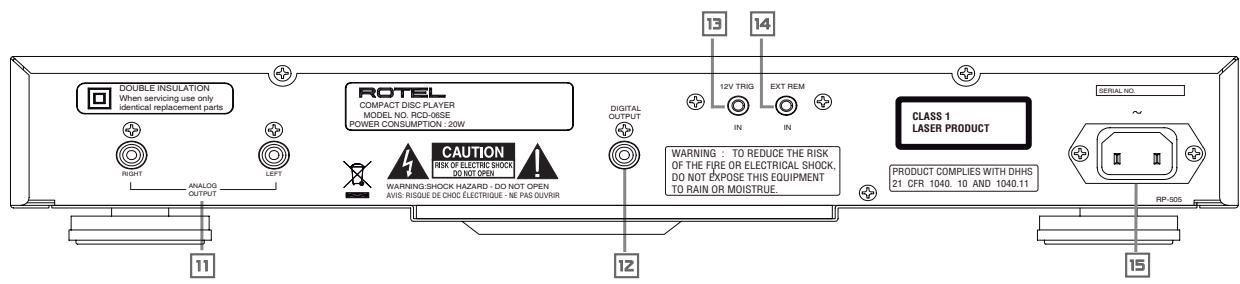
Figure 2: RR-D95 Remote Control
Télécommande RR-D95
Fernbedienung RR-D95
Mando a Distancia RR-D95
De RR-D95 afstandsbediening
Telecomando RR-D95
Fjärrkontroll RR-D95
Пульт ДУ RR-D95
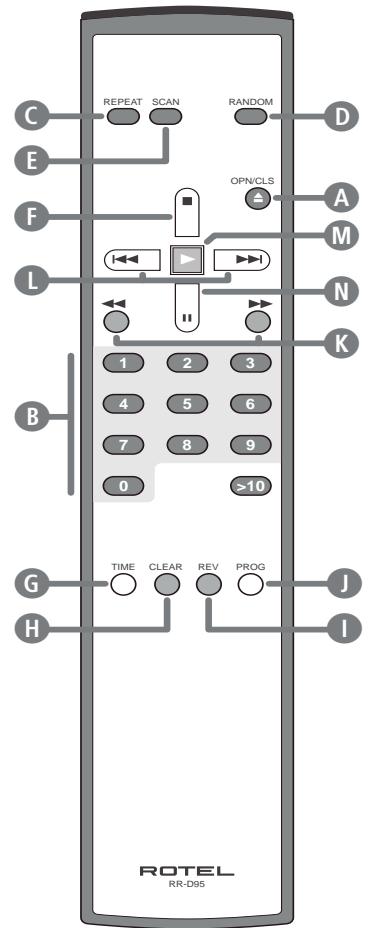
Figure 3: Analog Outputs
Sorties analogiques
Analoge Ausgabe
Salidas AnLGicas
De analogeuitgangen
Uscite analogiche
Analoga utgangar
AHAJIOROBblbBIXObl
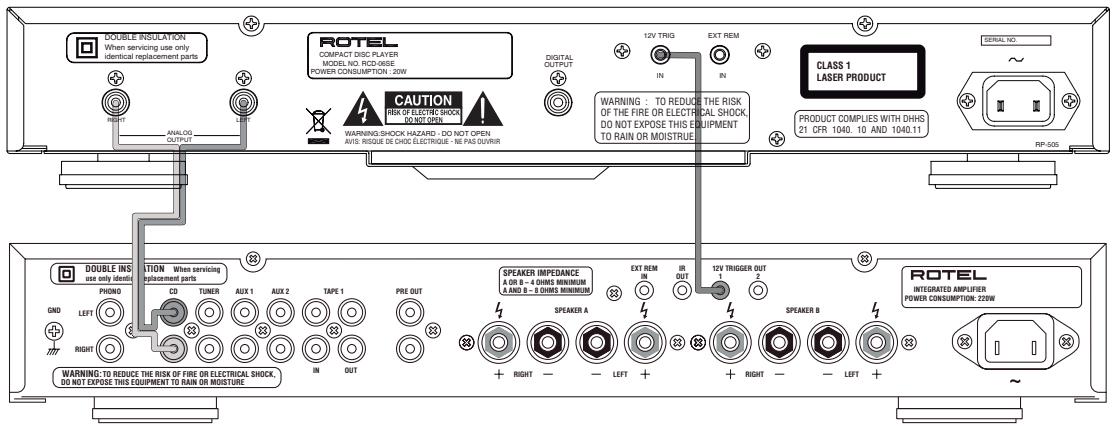
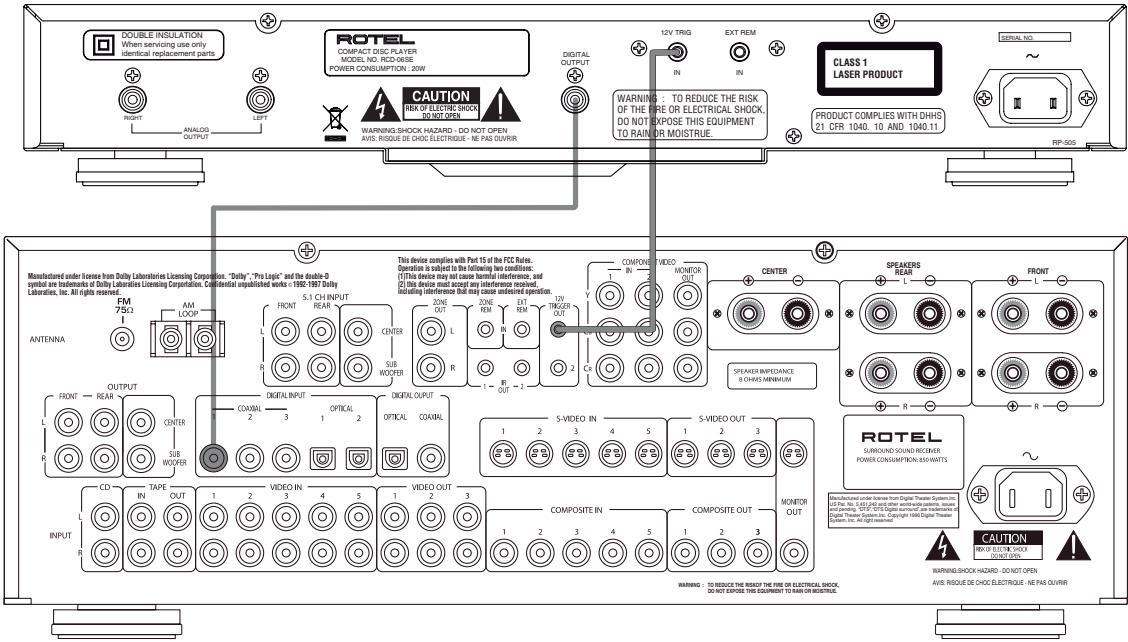
Figure 4: Digital Outputs
Sorties numériques
Digitalausgang
Salidas Digitales
De digitale uitgangen
Uscite digitali
Digitala utgangar
UcpOBbIe BblXObl
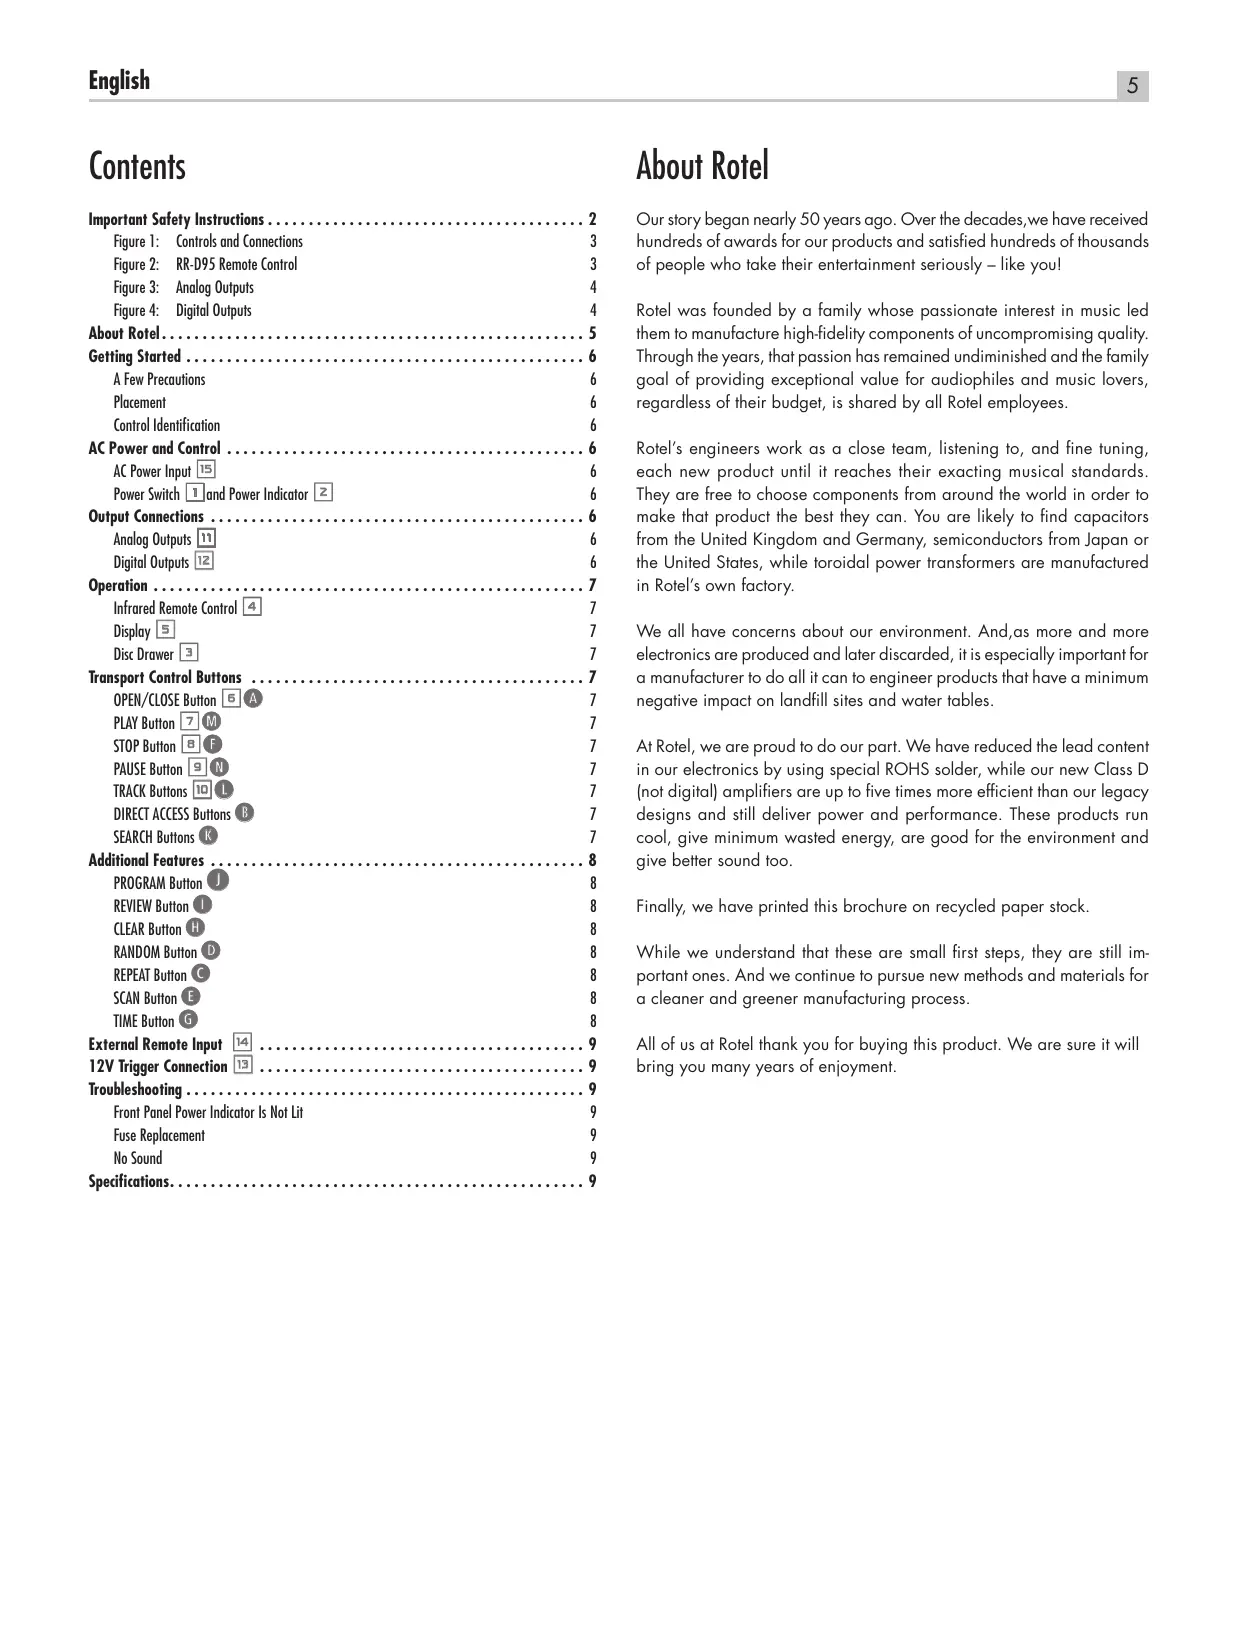
Contents
Important Safety Instructions 2
Figure 1: Controls and Connections
Figure 2: RR-D95 Remote Control
Figure 3: Analog Outputs 4
Figure 4: Digital Outputs 4
About Rotel. 5
Getting Started 6
A Few Precautions
Placement 6
Control Identification 6
AC Power and Control 6
AC Power Input 15 6
Power Switch 1 and Power Indicator 2
Output Connections 6
Analog Outputs 6
Digital Outputs 6
Operation 7
Infrared Remote Control 4
Display 5 7
DiscDrawer 7
Transport Control Buttons 7
OPEN/CLOSEButton 7
PLAYButton 7
STOP Button F 7
PAUSE Button 7
7
DIRECT ACCESS Buttons 7
SEARCH Buttons 7
Additional Features 8
PROGRAMButton 8
REVIEWButton 8
CLEAR Button 8
RANDOM Button 8
REPEAT Button 8
SCAN Button 8
TIME Button 6 8
External Remote Input 14 9
12V Trigger Connection 13 9
Troubleshooting 9
Front Panel Power Indicator Is Not Lit 9
Fuse Replacement 9
No Sound 9
Specifications. 9
About Rotel
Our story began nearly 50 years ago. Over the decades, we have received hundreds of awards for our products and satisfied hundreds of thousands of people who take their entertainment seriously – like you!
Rotel was founded by a family whose passionate interest in music led them to manufacture high-fidelity components of uncompromising quality. Through the years, that passion has remained undiminished and the family goal of providing exceptional value for audiophiles and music lovers, regardless of their budget, is shared by all Rotel employees.
Rotel's engineers work as a close team, listening to, and fine tuning, each new product until it reaches their exacting musical standards. They are free to choose components from around the world in order to make that product the best they can. You are likely to find capacitors from the United Kingdom and Germany, semiconductors from Japan or the United States, while toroidal power transformers are manufactured in Rotel's own factory.
We all have concerns about our environment. And, as more and more electronics are produced and later discarded, it is especially important for a manufacturer to do all it can to engineer products that have a minimum negative impact on landfill sites and water tables.
At Rotel, we are proud to do our part. We have reduced the lead content in our electronics by using special ROHS solder, while our new Class D (not digital) amplifiers are up to five times more efficient than our legacy designs and still deliver power and performance. These products run cool, give minimum wasted energy, are good for the environment and give better sound too.
Finally, we have printed this brochure on recycled paper stock.
While we understand that these are small first steps, they are still important ones. And we continue to pursue new methods and materials for a cleaner and greener manufacturing process.
All of us at Rotel thank you for buying this product. We are sure it will bring you many years of enjoyment.
Getting Started
Thank you for purchasing the Rotel RCD-06 SE Stereo Compact Disc Player. Its precision transport is back up by a high performance Wolfson D/A converter. These features, combined with Rotel's Balanced Design, ensure the RCD-06 SE will deliver the highest level of audio performance. When used in a high-quality audio system, your Rotel CD player will provide years of enjoyment.
A Few Precautions
Please read this manual carefully. In addition to installation and operating instructions, it provides valuable information on various RCD-06 SE system configurations as well as general information that will help you get optimum performance from your system. Please contact your authorized Rotel dealer for answers to any questions you might have. In addition, all of us at Rotel welcome your questions and comments.
Save the RCD06 SE shipping carton and all enclosed packing material for future use. Shipping or moving the RCD-06 SE in anything other than the original packing material may result in severe damage that is not covered by the warranty.
Fill out and send in the owner's registration card packed with the RCD-06 SE. Also be sure to keep the original sales receipt. It is your best record of the date of purchase, which you will need in the event warranty service is required.
Placement
Use common sense when placing the RCD-06 SE in a cabinet or when stacking other equipment. Make sure that the shelf or cabinet can support its weight. Do not stack heavy components on top of the RCD-06 SE. Avoid placing the unit where it may be subject to excessive heat such as on top of a large power amplifier or near a heat register. For best performance, avoid placing the unit where it may be subject to vibration, such as near a speaker.
Control Identification
This manual shows illustrations of the front and rear panels and the RR-D95 remote control. Each item in the illustrations is identified with a call out in a gray box. Through out this manual the items referred to in the text are identified by the corresponding call out. The items on the front and rear panels are identified with a number call out, such a 1 . The items on the remote control are labeled with a letter call out, such as .
AC Power and Control
AC Power Input
Your RCD-06 SE is configured at the factory for the proper AC voltage in the country where you purchased it (either 120 volts or 230 volts). The AC line configuration is noted on a decal on the back panel.
Note: Should you move your CD player to another country, it may be possible to reconfigure it for use on a different line voltage. Do not attempt to perform this conversion yourself. Opening the enclosure of the RCD-06 SE exposes you to dangerous voltages. Consult a qualified service person or the Rotel factory service department for information.
The RCD-06 SE should be plugged directly into a 2-pin polarized wall outlet or into the switched outlet on another component in your audio system. Do not use an extension cord.
Be sure the power switch on the front panel of the RCD-06 SE is turned off (in the "out" position). Then, connect the supplied power cord to the AC power receptacle on the rear of the unit and the AC power outlet.
If you are going to be away from home for an extended period of time such as a month-long vacation, it is a sensible precaution to unplug your CD player (as well as other audio and video components) while you are away.
Power Switch 1 and POWER Indicator 2
The power switch is located on the front panel of your CD player. To turn the CD player on, push the switch in. The LED indicator above the switch and the Display will light up, indicating that the CD player is turned on. To turn the CD player off, push the button again and return it to the "out" position.
Note: If you are using a switched outlet to turn on and off your CD player, you should leave the power switch in the "on" position. When AC power is applied to the unit, it will power up in fully active mode.
Output Connections
The RCD-06 SE gives you a choice of two different kinds of output connections—an analog output signal from the built-in D/A converter for use with conventional analog audio components and a coax digital output which provides an unprocessed digital data signal for use with outboard D/A converters or digital processors.
Note: To prevent loud noises that neither you nor your speakers will appreciate, make sure the CD player is turned off when you make any signal connections.
Analog Outputs
[See Figure 3 for wiring illustration]
A pair of standard RCA jacks supplies an analog output signal from the RCD-06 SE to the source inputs of an audio preamplifier, integrated amplifier, or receiver.
Select high quality audio interconnect cables. Connect the left channel output of the RCD-06 SE to the left channel source input on the preamplifier or other component. Connect the right output of the RCD-06 SE to the right channel source input on the preamplifier or other component.
Digital Output 12
[See Figure 4 for wiring illustration]
If you are using an outboard D/A converter or other digital processor, you will need an unprocessed digital data stream from the RCD-06 SE, taken before the built-in D/A converter. This signal is supplied by The RCD-06 SE's backpanel digital output jack. Using a standard 75 ohm coax digital cable, connect the RCD-06 SE's coax digital output to the coax digital input connector on the outboard D/A converter.
OPERATION
The RCD-06 SE can be operated using its front panel buttons or from corresponding buttons on the supplied infrared remote control. Specific instructions for each of these controls are detailed below. Most of the buttons are duplicated on the front panel and on the IR remote control. However, there are a few exceptions where the buttons are only available on one or the other. These exceptions are noted in the instructions.
Infrared Remote Control 4
Before using the IR remote control, it is necessary to install two "UM-4/ AAA" batteries (supplied). Remove the plastic cover on the back of the IR remote, install the batteries (observing the + and - polarity indications), and reinstall the cover.
To use the IR remote control, aim it at the IR sensor located in the Display area on the front panel of the RCD-06 SE.
Display
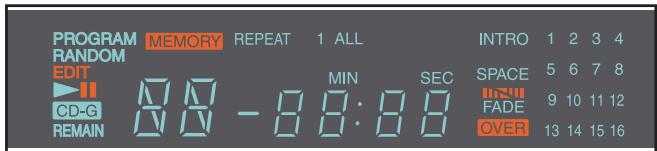
A lighted Display on the front panel of the RCD-06 SE provides useful information about the status of the unit, activation of special features, and track/time information for the disc being played. Each of these indicators is described in the detailed operating instructions that follow.
DiscDrawer
A motor-driven disc drawer, located in the center of the RCD-06 SE, slides out to accept a compact disc and retracts to play the disc. Place the compact disc in the drawer label-side up. Make sure the disc is properly centered in the tray. The drawer can be closed in two ways: pushing the OPN/CLS button or pushing the PLAY button.
Transport Control Buttons
These buttons provide basic control functions for the disc transport mechanism. Except where noted, all functions are available on the RCD-06 SE front panel and the IR remote control.
OPEN/CLOSEButton
When the transport disc drawer is closed, pressing this button automatically opens the drawer. To close the drawer, press this button again. The drawer can also be closed by pressing the PLAY button.
When the drawer is open, the Display will read "OPEN". When it is closed with no disc, the display will read "NO DISC". When the drawer closes with a disc inserted, the Display will indicate the number of tracks on the disc and the total time of the disc in minutes and seconds.
PLAYButton
Press the PLAY button to start playing the disc. If the disc drawer is open, it will close automatically. The number of the track being played and the elapsed time will be shown in the display, along with the PLAY indicator. Normally, the disc will start playing with the first track. However, you can select a different track using the TRACK buttons or the DIRECT ACCESS buttons (see below) before pressing the PLAY button to start playing a different selection.
STOP Button
This button stops a disc that is playing and resets the player, i.e. if play is resumed, the disc will start over from the first track. Pressing the STOP button twice quickly in succession cancels any programmed selections (see below).
PAUSE Button
This button is used to temporarily suspend play. The disc continues to spin and play will be resumed from the current position. The PAUSE indicator will light in the Display. To resume playing the disc, press the PAUSE button again or press the PLAY button.
TRACK Buttons
These buttons are used to select tracks on the disc. When a disc is playing, pressing the right TRACK button advances to the beginning of the next track. Pressing the left TRACK button returns to the beginning of the current track. Pressing twice quickly in succession returns to the beginning of the previous track. The new track number appears in the Display.
These buttons are also used to select a track before pressing the PLAY button or when memorizing tracks for the PROGRAM play mode (see below). These selections are made by continuously pressing the TRACK buttons until the desired track is reached.
In PROGRAM mode, the TRACK buttons advance or reverse to the next track in the memorized selection list.
DIRECT ACCESS Buttons
Remote Only
These eleven numeric buttons (labelled 1 through 0 and >10 ) are used to directly access a track from the IR remote control instead of stepping through the tracks using the TRACK buttons.
The first ten tracks on a disc can be selected by pressing the corresponding button. For example, to play the third track, press the 3 button on the remote control.
When accessing track numbers greater than 10, press the >10 button followed by the track number. For example, to select track 12, press the >10 button followed by the 1 button and then the 2 button.
The number of the selected track will appear in the main numeric area at the center of the Display.
There is also a four by four matrix of track numbers (1 - 16) located at the right side of the display. This display indicates all of the tracks on the disc. If there are more than 16 tracks on the disc, all of the digits will light accompanied by the word OVER, regardless of which track is playing. This matrix is independent of the main numeric area of the Display, which will always indicate the currently playing track, even if above 16.
The DIRECT ACCESS buttons may also be used to memorize tracks in PROGRAM mode (see below).
SEARCH Button
Remote Only
These buttons fast forward or fast reverse through the currently playing disc as long as they are pressed. While the buttons are pressed, you will hear high-speed audio. Releasing the buttons returns to PLAY mode.
Additional Features
These convenience features add extra functionality to the RCD-06 SE, including the ability to memorize a group of tracks to be played, to repeat a disc, program, or track over and over, to play the tracks on a disc in random order, to automatically play the first 10 seconds of each track, and to select from several available time displays.
PROGRAM Button
Remote Only
This button, labeled PROG, allows you to memorize as many as 20 tracks on the current disc for playback in a specific order. For example, you could instruct the RCD-06 SE to play track 5, followed by track 3, followed by track 8. To begin a program:
- Insert a disc and press the OPEN/CLOSE button to close the drawer. The RCD-06 SE will read the contents of the disc.
- Press the PROG button on the remote control. The PROGRAM indicator will light up in the Display, along with "P:00" indicating that the unit is waiting for the first track to be memorized.
- Enter the first track number using the DIRECT ACCESS buttons. Your selection will be memorized automatically and the Display indicator will change to "P:01", indicating that one track has been memorized. Continue entering the rest of your selections using the DIRECT ACCESS buttons. Note that there is no need to press the PROG button as each selection is memorized as it is entered.
Once you have memorized a play list, the RCD-06 SE remains in PROGRAM mode until you open the disc drawer or press the STOP button twice in succession. If you press the PLAY button, the memorized program will play instead of the entire disc, starting with the first selection in the memorized list.
When a PROGRAM has been memorized, most functions that would normally affect the entire disc operate on just the memorized program. For example, the TRACK buttons advance to the next track in the memorized program, not the next track on the disc. Likewise, the REPEAT button (see below) continuously plays the memorized program, not the entire disc.
REVIEWButton
This button is used to review the memorized tracks in PROGRAM mode. Press the button and the first memorized track number will appear in order in the Display, flashing for approximately five seconds. Pressing the REV button again while the track number is flashing will continue the review sequence, showing the next memorized track. Continue pressing the REVIEW button to see the complete memorized track list.
If you do not press the REVIEW button while the track number is flashing, the review process is terminated and the unit resumes whatever mode it was in before you started to review, except that the last reviewed track number will remain active and shown in the display.
Note that you may remove a selection from the play list during the review procedure using the CLEAR button, as described below.
CLEAR Button
Remote Only
This button allows you to remove a track selection from the memorized program play list during the review procedure described above. Follow the review procedure until the desiredtrack number is flashing. Then, instead of pressing the REVIEW button to continue, remove thedisplayed track by pressing the CLEAR button while the number is still flashing. You may then continue the review procedure.
RANDOM Button
Remote Only
This instructs the CD player to play tracks from the entire disc in random order. Once all of the selections have been played once, the disc will stop playing, unless the REPEAT Button (see below) has been engaged, in which case the random play will continue until the STOP button is pressed. When the RANDOM button is engaged, the word RANDOM appears in the Display.
REPEAT Button
Remote Only
This button allows you to repeat the current track or the entire disc continuously until the feature is cancelled by disengaging the REPEAT button or pressing STOP. The REPEAT button steps sequentially through the available options. Press the button once and the RCD-06 SE will repeat just the current track, displaying the indicator REPEAT 1 in the Display. Press the button a second time and the RCD-06 SE will repeat the entire disc, displaying REPEAT ALL in the Display. Press the button a third time to cancel the REPEAT function.
As noted above, REPEAT can be used in conjunction with the RANDOM play feature.
Note: The REPEAT function is automatically cancelled when the disc drawer is opened.
SCAN Button
Remote Only
This feature automatically plays the first ten seconds of each track on the disc (or the memorized program). To activate the feature, press the SCAN button. The word INTRO appears in the Display. To stop scanning and resume normal operation at the current track, press the SCAN button again or press the PLAY button.
TIME Button
Remote Only
Normally, the RCD-06 SE displays the elapsed time of the currently playing track. The TIME button allows you to step through two alternative time displays. Pressing the button once displays the time remaining in the current track, which counts down as the track continues playing. Pressing the button a second time displays the time remaining on the entire disc (or memorized program). Pressing the button a third time reverts to the standard elapsed time display. When the TIME feature is activated, the word REMAIN appears in the Display.
External Remote Input 14
This 3.5 mm mini-jack (labeled EXT REM IN) receives command codes from an industry-standard infrared receiver (Xantech, etc.) located in the main listening room. This feature is useful when the unit is installed in a cabine and the front-panel sensor is blocked. Consul your authorized Rotel dealer for information on external receivers and the proper wiring to a jack to fit the mini-jack receptacle.
12V Trigger Connection
The RCD-06 SE can be activated by a 12 volt trigger signal from a Rotel preamplifier. The trigger input accepts any control signal (AC or DC) ranging from 3 volts to 30 volts. When a cable is connected to the input and a trigger signal is present, the CD Player is activated.
When the trigger signal is interrupted, the unit goes into standby mode. The front panel indicator light remains lit, but the display goes dark and the unit will not operate.
Note: When using the 12V Trigger feature, leave the POWER button in the ON position.
Troubleshooting
Most difficulties in audio systems are the result of incorrect connections, or improper control settings. If you encounter problems, isolate the area of the difficulty, check the control settings, determine the cause of the fault and make the necessary changes. If you are unable to get sound from the RCD-06 SE, refer to the suggestions for the following conditions:
Power Indicator Is Not Lit
The Power Indicator and the basic items in the Display window should be lit whenever the RCD-06 SE is plugged into the wall power outlet and the Power button is pushed in. If it does not light, test the power outlet with another electrical device, such as a lamp. Be sure the power outlet being used is not controlled by a switch that has been turned off.
Fuse Replacement
If another electrical device works when plugged into the power outlet, but the Power Indicator and the Display still will not light when the RCD-06 SE is plugged into the wall outlet, it indicates that the internal power fuse may have blown. If you believe this has happened, contact your authorized Rotel dealer to get the fuse replaced.
NO SOUND
Check the cables between the RCD-06 SE and the amplifier inputs to be sure they are connected properly. Be sure the correct amplifier input is selected. Be sure the tape monitor system of the amplifier has not been activated. Check the wiring between the amplifier and the speakers.
Specifications
| Total Harmonic Distortion + Noise | 0.0045%@1kHz |
| Intermodulation Distortion | 0.0045%@1kHz |
| Frequency Response (±0.5db) | 20-20,000 Hz |
| Channel Balance | ±0.5db |
| Phase Linearity | ±0.5degree |
| Channel Separation | >98 dB @ 1kHz |
| Signal to Noise Ratio | >100dB |
| Dynamic Range | >96 dB |
| Digital to Analog Converters | Wolfson |
| Speed Accuracy, Wow & Flutter | Quartz Crystal Precision |
| Output Impedance | 100 Ohms |
| Digital Output | 0.5 Volt, Peak to Peak |
| Load Impedance | 75 Ohms |
| Power Requirements | AC 230V, 50 Hz |
| Power Consumption | 20 Watts |
| Dimensions (W, H, D) | 171/8" × 27/8" × 125/16" |
| 437 × 73 × 313 mm | |
| Panel Height | 60 mm / 23/8" |
| Weight (net) | 5 kg, 11lbs |
All specifications are accurate at the time of printing.
Rotel reserves the right to make improvements without notice.
Rotel and the Rotel HiFi logo are registered trademarks of The Rotel Co, Ltd., Tokyo, Japan.
Touchedouverture/fermeture OPEN/CLOSE
TouchedeffacementCLEAR
LASERPRODUKT KLASSE 1
WICHTIG FÜR LASERPRODUKTE
De toets "OPN/CLS" 6A
LASERPRODUKT AV KCLASS 1
VIKTIG INFORMATION FÜR LASERPRODUKT
3TOT CMBON O3HauaET, YTO UCTPOIcTB0 MMeET DBOHYNO N3OJIaMIO 3a3eMJIHe He Tpe6yetc.

Pa3meuaTe annapat Ha yToHmBo, IIOckoN nobepxHocTm, DoCTatoTuNo npouHoi, YTO6bI bIdepXaTb erO Be. He CTabBe annapat Ha TeLEkKy, KOTOPa MOeT ONpOKMHyTbC.

Coepexahanne
Baxkhble MHCTpyKzMM no 6e3oNaCHOCTM. 2
Figure 1: OprahtbI ynpablenHn np3bembl
Figure 2: IyIbT DY RR-D95
Figure 3: Ananorobble BbIXoDbI
Figure 4: LmfpobbIe bblxObl
OKOMPAHNNROTEL 5
IepbIe 6
Mepb npedoctopoxhoctn
YCTAHOBKA
0603haueHnOpranHOynpabHeHH
IHTAHne npomrpbibatela 6
Pazbem dny ceteboro shhya 15
BbkyHouateIbNtOHa 1 HnHdkatOp NtOHa 2
IopcoeHHeMe BbIXoOB. 6
AHAJOROBbie BbIXOdb1
UHpOBOB BIXoD 12
OchOBhpie onepaunn. 7
IynbT MhPpKaPcHOrO DmCTaHnOHnHO ynpabHeMa (NK DY) 4
Dnnne
3aqrpyoohy hnoTOK
KhoNKn ynpabEnnna nleepom. 7
Khonka OPEN/CLOSE
Khonka PLAY
Khonka STOP
Khonka PAUSE
KhoNKn TRACK
KhoonkDIRCT ACCESS B
Khoonki SEARCH
IonoJIHnTeIbIbe cyHKcII. 8
Khonka PROG
Khonka REVIEW
Khonka CLEAR H
Khonka RANDOM D
Khonka REPEAT
Khonka SCAN
Khoonka TIME
Bxod 3nEeKtpueckoro CnHraIa NK dctanuHnHO ynpabEnna
External Remote 14 8
12-B TpHrrepnbl BxOa 13 9
MharhOCTMa M yctpaHene HenoJaOK. 9
He CBeNTcHnNkATOp NTaTHn
3amehnpedoxpahntela
Het 3byka
TexHHueckne xapaKTepeHCTMKN 9
OKompanHnROTEL
Ictopna haewekompann Hauanacb noa 50 net hazad.3 npoeweune DecaTneTMy bnoynuCOTn Hargad 3a Hau npodkytBu n CdeJann CactnBbIMn COTH Tbcay JIOJe, KOTOpbIe OTHocTcK CBOm pa3BneHem BnonHe cepbe3HO -TAK Xe, KAK B!
KomnaHra Rotal 6bIa ochoBaHa cemcTbOM, yBa cTpaCTb K My3bKe npoDIna cTpeMHeHne co3dAbatb hi-fi KOMnoHEtbl 6eCKOMnpomnccchoro KaueCTBa. 3a MHOrHe roBb 3Ta cTpaCTb HnyTb He ocNa6la, n no Cei Deh b O6sA qEh - BbInyckAtb npOyKtbl NCKHOnHTbeHoi CEHHocTn dJa ayDnOΦnIOB n IHO6NteMe My3bIKn, He3ABuCmO OT INx CpHAnCOBbIX BO3MOXHOCTei, pa3dEnJeTc BcEMn cOTpyDnKamr Rotal.
HJkehepb RoTe pa6oTaOT kAc eDnHaKOMaHda, npocnyuBaN H TtateIbHO DOBODA KAKDbHOBH npOdyKT Do TAKORO yPOBn COBepuehCTBa, KOrDa OH 6yDet yDobNETBOPaTb IN CTporIM My3bIKaNbHbIM CTAHdaptam. Nm npedocTabHeA CBO6Oa Bb6opa KomJIeKToUoxn NO BCemy Mpy, YTO6bI CdeLaTb Annapat KAc MOxHo JyUwe. BepoTHo, Bbl CMOxete HaTn B HAux Annapatax OT6OpHbIe KOHDeHCATOpb I3 BeNko6pTuAnHH n TepMaHN, nonynpOboDnHKu n3 JnoHN u CLJA, Ondako TopoJaalnbHbe CInOBbIe TpaHcΦopMaTOpbMbI N3rotABlnBaem Ha co6CTBeHHom 3aBoDE ROTEL.
BceMb3a60tMc8 o6 oxpae OOKpyKaioe CpeDbI. Mo mepe toro, kac BCE 6OJIbwe 3JIeKTOPHHbX yCTPOiCTB MIPe BbInyCKaETcA, a Nocne OKOHuaHN cPoka Cnyk6b BbIbpaCbBaETc, IIN pOnu3BOAnTeJr Oco6eHNO BaxHo npN KOHCTpyuropOBAHn INPOyKToB CSeIaTb BCE BO3MOxHoe, UTo6bOHN HAnOCHNI MNHMAMJIbHbYUep6 Zemne n IctOCHNKAM BoIbI.
MlbB KOMpanHHn Rotel, ropdmcBc0m BknaDom B o6uee deNo.Bo-epBBx,MbCOKpatnnCoadpKahne CBNuA B CBOe 3NeKtpoHnke,3a cuetncno3obAHn npinno,OTBeuaOJero Tpe6obAHnM ROHS,BO-BtOpbix, HauHn HObIe ycuiNTen,pa6otaUoJne BKnace D,ImeOt BnTepo 6Oonee BICOKK K.I.D.,yem PpeBduJnce pa3pa6OTKn,piOn OndaHKOBo BBXoHDn MOChOCTN KauCTBe 3ByaHn. Iono6HbIe npOdyKtbl npakTneckn He BbiEJIaHOT TePLNa,He pactpaunBaIOT nOncy3heprHIO,XopoSi nToCKN 3peHn OxaHbI OkpyKaIoSe CpeBn IBdoabok Lyuwe 3Byat.
Hakoene, daxe 3Ty INCTpyKUHO Mbl OTneuataIHa 6yMaRe, noIyuHenHou n3 BTOPNHbIX pecypcoB.
Mbl noHmamaem, yTo 3To MaIeHbKne IaRn Bpepe,IHO OHN OueHb Baxhbl. BeB MbI npOIoJkaem POnCKn HObIX MeTOOB n MATEpuaNoB dIg 6oJIee uCTbIX n DpyXeCTBeHHbIX K OkpyXaUoSe cpeDe TexHOJoruYecknx npoueccoB.
BceMbI,coTpynKnKOMnAnHnROTEL,6naoradapumBac3a nokynky 3Toro n3denny.MbYbepenb,yTO OHO doCTabNT BAM MHORoNET yDOBOJbCTBn.
Первьешагn
Blaorapim Bac 3a nokynky CD-npourpmbatei Rotei RCD-06 SE. TpaHcnpTbmy MexAHm3M BlicOKoToUHOCTn, BlicOKOkIacChbI cAIP Wolfson B coHTAHm C KOHcENuE rAPMOHcHOrO KOHcTpyKTHBHorO uCOnHHeHn "Balanced Design" rapaHTnpyOT blicOauHwe KaeCTBO BocPon3BeDeHn 3Byka. B COCTABe BlicOKoAcYeCTBeHHo ayDInOCnCTEmbl npourpmbateIb RCD-06 SE 6yDet Cnykntb Bam MHOrne robl.
Mepbippeoctopokxoctn
Bhmatelbho npoHTaTe 3To pykoBoDCTBO. NOMM0 OCHOBHX HCTpyKcHn no yctahOBke n 3kCnPyatauHN, B HEM coepXatcpeKomeHdaun, KOTOpble nomoryt Bam mAcncmAbHo nCNoJIb3ObaTb BCE Bo3MOxHocTn BaWe cnCTembl. IIO Bcem INTEpcyHouzum Bac Bonpocam o6paauNTecb kynonHomooHHomy dInepy Rotel. BceMbI, cotpydHnKn Rotal, Bcerda rotobbl OTbetntb Ha BaUn Bonpocbl nPnInrTa BAsn 3ameAHnra.
Coxpanite Kopo6ky IJn TpAnCnpOpTnpOBK n BCE octaIbHbIe ynaKoBOUHbIe MaTePnAbIy, YTO6bl BdaIbHeIeMMeTb BO3MOXHOCTb BOCnOb3OBaTbcNIM. IpeMeueHne NIn TpAnCnpOpTnpOBKa npOnrpbBaTeRg RCD-06 SE B dpyroynyakOBKe MOKeT Bb3BaTc cepbe3HbIe nobpejKeHnry cTpoCTBa, He NOKpbBaemble rapaHTne.
O6raTeIbHo coXpaHnTe yeK n rapaTnHbI TaIOn. 3To rIaBhIe DOKymEnTbI, yIOCTOBepraUoIe DaTy NOKyNKn, B Cnyuae o6paueHn3a rapaHTnHbIM O6cnyKbAHnEM.
YCTAHOBKA
Bb6upar meTo dnyctahOBKn npOnrpblBateta RCD-06 SE B wka4y dny aaynO-BuJeo annapatpyb, nIn N KOMNoHya erO c Dpyrnnu yctpoiCTBAMn cnCTeMbI, pykoBOdCTByTeCB coo6paXeHnA M 3dpaboro Cmblcna. Y6eINTEcb B TOM, qTO noJa WkaFa cnoc6Ha BidepKaTb Bec annapata. He yCTAHABNBAITE CBepxHa nOnpRpbATenb TjKeJbIe KOMnoHentb. He CTABtE npOnrpblBATEB MeCTax, rDe OH 6yET NOBBePraTbCnblHOMy HarpRey, HApnpMep, Ha ycNlnteB MoUHOCTHn INI PRAOM C OTONHTBbIMn np6opamn. IaonLyuEHn LyuWnx pa6OuNx xapaKtepcntk He yCTAHABNBAITE npOnrpblBATEB MeCTax, rDe OH MOKeT NOBBePHyTbCBAO3deCTBIO B6paun, HApnpMep, OKOLO AkyCTNuCeckO cnCTeMbI.
06o3haeHnOpraHOb ynpabHeHn
Ha pncyHKax Page 3 n B dAnbHeuHx OnncaHnx Ycna OTHocTc K DeTaNAM annapata (pnc. 1), a 6ykbbl OTHocTc K KHONkAM Ha nyIbTe (pnc. 2).
AhaororObbie BbIXOdbi
(cm.pnc.3)
Yepe3 aHaIorOBbI BbIXoI, npEcTabIaHIOuI co6oI dBa rHe3da Tnna RCA, CunHan c RCD-06 SE noJaetca Ha ayDIO npEpyCInTeB, INTerpupobAHbI ycNInTeB nII pecBep.
Iolb3yItecb BvICOKoKaueCTBeHHbIMn CoeHNHTeBbHbIMn ayDIO Ka6eJMaN. CoeHNHTe BbXoJLeBOrO KaHana RCD-06 SE co BXoDM leBorO KaHana npEycuNTeTn nn dpYrOro KOMNoHEnTa. CoeHNTe BbXoJnpaBorO KaHana RCD-06 SE co BxOdom npaBorO KaHana npEycuNTeTn nn dpYrOro KOMnoHEnTa.
UHPOBOB BbIXoD
(cM. pnc. 4)
Дя подан Ha Bheunn IAN nIu npoepobO npoueeccop tpe6yetcnoTOK Heo6pa6otahhbix unpoOBbIX dAHbIX, He npoWeJnx BHytpenHnI RCD-06 SE. TaKo noTOK oBecneuBaET uNpOBOB BbXoD RCD-06 SE. POncoeHNHTe 3OT BxOD CTaHApTHbIM 75-OmHbIMKa6eNm, npedHa3NaueHHbIM JIЯ nepedauu nIupoOBbIX daHHbIX, K npOpOBOMBy BXOy BHeuHero IAP.
OchOBhble onepaun
Pneepom RCD-06 SE moKHO ynpabTb KaC c nepeHne nane, taK i npnlaraoemoro nyIbTa. HNCTpyKuIN NO NCNOB3OBAHIN COOTBETCTBYUxN KNONK pInBeHeH bHKe. BoJbUnHCTBO n3 Hnx PPOy6NIpOBaHbI - nHa nepeHne nanei, n ha nyIbTe. Ondako IMeetc HeCKOJIbKO NCKIOueHn, KOtOpble YkA3AHb I HNCTpyKuIN.
IyblnHpaKpachoro nctanuOHoro ynpabJeHHa (NK D) 4
Ipxkde, qem noJb3ObaTc nplbTom, 3arpy3nte B hero Dba 3nemeHTa nHTAHN Tnna UM-4/AAA, BXoJHne B KOMPNeKT NoCTABKN. CHMNTe pIactNKOByIO KpbIuKy C o6patoH cStOpHO bIpyTa, yCTaHOBtE 3nemeHbI nHTAHN, co6JIIOdA yKa3aHHyIO BHyTpIn OTceKa nOJaPHocTh (+ I -), 3aTe M BepHNTe KpbIuKy Ha MeTo.
Iocbina KOMaHdy, HnpaBnaIte npblt B cstopohy NK cehcopa 4, HaxoJaueroCpAOnCM DCnCnneM npOnrpbBatena.
Ducnne
Iucnne I OTo6paKaet Tekyuiee coctOraHne annapata,akTNBHOCTb pa3InuHbIX cyHKcun,a TAKKHe Homepa n Bpemr BocnpOn3BeDeHnna dopoKeK npounrpBaEMoro DNCKa.

3arpy30uHbI JIoTOK
KhoIIkN DIRECT ACCESS
(TOJIbKO HnIyIbTe)
UncpoBbIe KhoNkN, NomeueHbIe OIT "1" Do "10" u">10", nCNoJb3yIOTc IaI npraMOrO bbl6opA DOpoxKn C pynbTa, BmecTo TOrO, yTO6bI dO6npaTbcdo Hee nytem nepe6opac nOMoUbHO KhoNOK TRACK.
IepbIe DecaTb DopoXek BbIbpaTOc npocTbIM HaxKaTne KhoNkH, HapnMpE, yTo6bblb6paTb TpeTbO dopoKky, HaxMnte KhoNkY "3".
YTo6bBb6paTb DopoKky C Homepom 60JIbwe 10, ChaQana HaxMnte >10^n , 3aTe m BBeIne Homep DopoKKn. HanpImep, YTo6bBb6paTb DopoKky 12, HaxMnte >10^n , 3aTe m "1", 3aTe "2".
Homep Bb6paHHoI DOpOxKn OTo6paXaetc Ha Iucnnee.
Matpua 4 x 4 c npaboi CTopoHbI dncnpe ("kaneHapb") OTO6paKaet BCE dopoxkn Dncka. Ecni dopoxek 6onbwe 16-Tn, To, He3abucmo OT TORO, kakai dopoxka nrgaet, 6ydt CBeTntbcr Bce Homepa NlHoc Hndnkatop "OVER". 3ta Matpua He3abucma ot ochOBHO zufoPoBoi 6bnactn dincne, rde Bcerda noka3bBaetcHomep Tekyuei dopoxkn, daxe ecn OH npebuwaet 16.
KhoNkDIRCT ACCESS MOxHo TaKxe NcNoJb3OBaTb DnBBoa nporpaMbl (cm. HxKe).
KhoNKe SEARCH
(TOJIbKO HA NyIbTe)
C nOMOJIbO 3TNK HONOK OCUIeCTBIIeTcYCKOpHHOB BOCpOn3BeDeHne B HApBaJIeHNn BpePe IINn Ha3aD. Noka Bbl yapedXIBaete KhONky B HAXATOM COCTOAHN, DNCK DBNXeTcC NOBbIeHHoN CKOpOCTbIO n CbIbIeH 3ByK BbICOKOCKOPoCTHO CHTbIBAHNA. PIn OTnyCKaHNI KhoNKn npOn3OJET BO3BPAT K HopMaJIbHOMY BOCpON3BeDEHIO.
IOnoHnTeIbHbIe cyHKcnn
Khonka PROG
(TOJIbKO HA NpIbTe)
Moxho BBeCTn B namrI npOnrPbIbATEI npOrpAmMy BocnpOn3BedeHna, coepkauyo do 20-Tn dOpokek.
- 3a rpy3nte nck k hnonkO PNO/CLS 3akpoTe loToK.RCD-06 SE cHTaET coepxkanne nckka.
- Haxmte KhoNky PROG Ha npIbTe. Ha dinPnee 3arOpntc nHnKAtop PROGRAM HaDnncb "P:00", 03NaHauOuOa, yTo npOnrpBbATEnb XdET BBOda Homepa nepBoi dopoXkn.
- Пи поши Кногok DIRECT ACCESS Вьаде Homep nepвой дорожкnporpaMbI.Homep 3anomnaeTc ABTomatnueckи И напсь мehяетс на "P:01", noka3bBa, уTO odHa dopoxka BvedehaВnamr.ПobtorряЗТOT WAr, Вьаде octaNBhe dopoxknporpaMbI.
Iocne BBOda nporpammb RCD-06 SE octaetcB pexkme nporpammb do tex nop, noka he 6ydet OTkpbl Notok nII nDbaxkbI noiprdn hakata kHonka STOP. Pn Haxatnn KhoKn PLAY 6ydet Bocnpon3boDnTbcr He BeCb dNcK cHauana, a BBeDeHHaR nporpamMa. BoIbUnHCTBO cyHKcuN 6ydet DeICTBOBaTB dnn nporpammb KaK dIra ObUHoro DnCKa. HanPmep, HxKatne KhoKn TRACK Bb3OBet nepexoJ He K cIeDuOsei dopoxke DnCKa, a K cIeDuOSei dopoxke nporpammb. KhoKna REPEAT (cm. HnKe) Bb3OBet NOBtOp He DnCKa, a nporpammb.
Khonka REVIEW
3Ta KhoNka HcNoIb3yETcI dI npocmToPa nporpamMb. Iocne ee haxatna Ha dncnnee noarBJeTcHomep nepBoJ dopoxKn nporpamMb. OH muraet npimepHO 5 cekynd. Ecnn ChOBA HaxaTB KhoNky REVIEW, noka muraet Homep, 6ydt NOKa3ah Homep cIeDyUoSei dopoxKn. TAKIM o6pa3om MOxHo npocmToPeTb Bcho nporpamMy.
Ecnn He haxkath KhoNky REVIEW, noka Homep dopoxkMiraet, npoecnpocmotpa OTmeHaretc n annapat BO3bpaauaetc B uCXoJHOe COCTOHNHe. TOnbKO Ha dncnnee ocTaetc Homep nocneJeH ne pocmOTpeHHoH nopoxkN.
B npouecce npocmoTpa moxho ydaNTb dopoxky n3 npoPamMb npn noMoUz KhoNk CLEAR.
KhoNka CLEAR
(TOJIbKO HA nYIbTe)
3Toi KhoKoi nI nporpaMbl MoXHO ydaIInTb Ty IIN INHyO dopoXky.
HaIInTe dopoXky B nporpamMe, BbINOHNb npoueDpy npocmoTa c
nOMoUbIO KhoKN REVIEW, n Haxmte CLEAR, noka homep dopoxKn
miraet Ha dncnnee. Pocne 3toro moxHo npoJOnXntb npoueDpy npocmoTa.
Khoinka RANDOM
(TOJIbKO HA NpIbTe)
3Toi KhoNko 3aynCkaetcn npOnrPbBaHnne Bcex dOpoxKe Dncka B CnyauHnom nopAke. Ho dinCnnee 3aropaetcn Hndnkatop "RANDOM".Korda BCEdoPoxKKn 6ydt BocnpoN3BeDeHb NO ONDMy pa3y, BocnpoN3BeDeHne OCTAHOBITcR, ecn He BKInoue npExm nobTopa (REPEAT).B npOTNBHom Cnyae BocnpoN3BeDeHne 6ydet npOdoJXatbcR B CnyauHnom nopAke Do Hxatna KhoNkn STOP.
Khoinka REPEAT
(TOJIbKO HA NpIbTe)
Nobtophoe Bocnpoun3BedeHne dopokkn, dincka nIn nporpaMMbl npoDnkaetcdo tex nop, noKa he 6ydet otmeHeno KhoKoRePEAT nIN STOP. NepBoe Haxatne KhoKn REPEAT BKIOaet pexm REPEAT 1 (noBtop tekuyen dopokkn). Btopoe Haxatne BkIOaet pexm REPEAT ALL (noBtop BCero dincka). TpeTbe Haxatne OTMeHert pexm noBtopa. PnB BkIOueHHom pexmne noBtopa Ha DCnJIee CBETTC coOTBETCTBYUOuIN INDnKATOP.
Kak OTmeHc HbIe,peXIM NOBTOpa MOKeT 6bITb NcNtB3OBAH COBMeCTHO C peXIMOM BOCPON3BeDHeN B CnyaHOM NopRJaKe.
ПРМЕЧАНЕ: Ржим NOВТОРа АВТOMATУСЕСКИ OTМЕнЯЕТС ПИ OTКрьВАн И NOTKA.
Khoika SCAN
(TOJIbKO HA NyIbTe)
Pn Haxatnn KhoNk SNAN no oupeepn npoIrpBbAOTc npBbIe DecaTb cekyHd KaKdoJ doPOxKu DNCKa (nIIN pOporpMMbl, ecN B nAmrB BveDeHa npOprpMa). Ha dncnlee 3aropaetc nHnDnKaTOp INTRO. YTo6bl npEkapntb cKaHnpOBaHne n npoDOnXHTB BocnPon3BeHeHne TekyuSei doPOxKu B HopMaJIbHOM peXImme, HAXMITE KhoNkY SCAN uIIN PLAY.
Khonka TIME
(TOJIbKO HnIyIbTe)
B npocece Bocnpoun3BedeHn Ha dnCpIee OTo6paXaetc Homepe Tekyuuei dopoxknu Bpem, npoweJooe C hauana ee Bocnpoun3BedeHn. IepBoe haxatne KhONKTIIME MeHReT npoweJooe Bpem Ha octabweecdo KOHua dopoxknu. Btopoe haxatne KhONKTIIME BbIOuNT Ha dnCpIeu Bpem, OCTabweecdo KOHua BOCnpoun3BedeHn DnCKa (NJn nporpamMbI, ecn B pAmrTB BBeHa nporpamMa). TpeBe haxatne Bo3BaPaaet K o6bHybIM POKa3AHm DNcPJIe. INDInKaTop REMAIN CBETntcB TOM clyuae, ecn Ha dnCpIee BbIOuNTcOCTabweecBpem.
BxoJ 3JIeKtpnueckoro cnHana IKДиCTaHcNoHOrO ynpabJeHna External Remote
Ha 3to 3,5 MM rHe3do, nomuehenhoe EXT REM IN, moKHO noaTaB cHrHan OT BbHeceHHoro ceHCopa dIcTahuOnHoro ynpabJeHnra (HanpImep, Mapkn Xantech). 3To nOe3Ho, KOrda npOnrpBbATEnb HaxoDITcRe He B rIaBHoi KOMHate npocnyuBaHnra, a NOMEUEN B CkpyTO cToKY BMeCTe C DpyIMN KOMNoHTAMn DomAunHe ABTomATnK; IIn6 npOnrpBbATEnb HaxoDITcB KOMHate npocnyuBaHnra, HO B WkaCy dIra annapatypb C TEMbIMN CTeklAmn -CNOBOM, ecN CNrHaN C pYbTa He MoKET nonactb npMa H bCTpoEHn b CEHCOP npOnrpBbATEnb. O BbHocbIX ceHCopax nix noCoedHHeHH npOKOHcybTnpyTeCb y abTopu3OBaHHoro dInlepa Rotel.
12-B TpnrrephbBxOd
RCD-06 SE MoXHo BkIIOuHaTb TprrrreHbIM CnIHaIOM ypoBna 12 B ot npeducnte Rotel.
TprrrepnBxOJ npHnHaemTIO6oB cnHan ynpablenna (nepeMeHHoro nIIN noCToHHoro TOka) HnprjKeHmE O3 Do 30 BoJIb. Ioka CnHAn npCytCTbyET, CD npOnrpBbATEnb BkHouen. Korda CnHAN npOnaAet, npOnrpBbATEnb nepexoDNT B pexmrotobHOCTN. B 3tOM pexmme INdkatop Ha nepeJeHn paHeN CBETntc, Ho dinCnne NOraWeH annapat HaxoDntc B hep6oUem CoCToHHn.
PIMMEAHHE: EcnBbIKJIOOaTe N BIKJIOOaTe npOnrpbBaTeIb TpNIRrepHbIM CnIHaIOM, OCTABTe KHOKNy NITAHIN BO BKJIIOUeHHOM noLOXKeHN.
ДиагнoctикayuctpaHeHne HeNoJaIOK
BolbshnCTBO HENoIaOk B ayDIOscNCTeMaX npOnxCoIIT M3-3a HEnpabunhBx coeHNHeH Nnn HEnpabunhBx yctAHOBOK oprAHOB ynpabNeHn. Ecn, HeCMOTpa HA tIaTeJIbHyIO npOBepky coeHNHeH N yCTAHOBOK, Bbl He MoKte Do6ntbc 3Byka OT RCD-06 SE, npocMOTpnte npedctABneHHn HnKe cncok.
He CBETcHnDkKatop nHTAHN
Korda KhoNka NtAnra RCD-06 SE haxkata, u BnIka ero shhupa nItanna BCTabJIeHa B cTeByO po3eTky, DOnJXhbl CBETNTbC rHdNkATOp nITANNA u OCHOBHbI eIeMentbI dncnIeE. Ecn OHn He CBeTcR, npOBepbTe HAnuue HaprrKeHb B cTeBoi po3eTke dpyrIm 3JeKTPonpnpOom, HApnpMeP, IaMNoi. Y6eINTecb, yTo po3eTKa HE KOHTpONpUpyetc KaKIM-nIb6o BbIKNoHcyATEJeM, KOTOpB b DAHHb MOpENT BbIKNoHey.
3aMeHa npeDoXpaHntTeia
Ecnn npryo 3neKtponpnp6op, noKnIOUeHHN K ToI Ke po3etke, pa60taet, a RCD-06 SE - HeT, BO3MOxHO, nepeorpen BHyTpeneHHn pnaBkni npdeOxApanHteb npOnrpbBatela. B 3ToM cnyae o6paNTecb B abTopu3OBaHHyO cepBcHcyO cnyk6y Rotel dIraero 3aMeHbl.
Het 3byka
Поберьткабени, поcodияншюие bixoR RCD-06 SE к усипenteю; totи BXOD bIbpaH ha ycunnteile; He BKIOHeyen li Ha ycunntepe pexim KONTPONa CINHana, 3anucsbiaemoro Ha marHnTOcoH (Tape Monitor). Поберьтakxe nocodoenHHne ycunnteЯ K konOHkam.
TexHnueckne xapakTepeNtukn
North Reading, MA 01864-2699
USA
Phone: +1 978-664-3820
Fax: +1 978-664-4109
Rotel Europe
Dale Road
Worthing, West Sussex BN11 2BH
England
Phone: +44 (0)1903 221 761
Fax: +44 (0)1903 221 525
Rotel Deutschland

- Important Safety Instructions
- CLASSE 1
- LASER PRODUCT
- IMPORTANT FOR LASER PRODUCT
- WARNING!
- CAUTION
- RISK OF ELECTRIC SHOCK DO NOT OPEN
- APPLICABLE FOR USA, CANADA OR WHERE APPROVED FOR THE USAGE
- Contents
- About Rotel
- Getting Started
- A Few Precautions
- Placement
- Control Identification
- AC Power and Control
- AC Power Input
- Power Switch 1 and POWER Indicator 2
- Output Connections
- Analog Outputs
- Digital Output 12
- OPERATION
- Infrared Remote Control 4
- Display
- DiscDrawer
- Transport Control Buttons
- OPEN/CLOSEButton
- PLAYButton
- STOP Button
- PAUSE Button
- TRACK Buttons
- DIRECT ACCESS Buttons
- Remote Only
- SEARCH Button
- Additional Features
- PROGRAM Button
- REVIEWButton
- CLEAR Button
- RANDOM Button
- REPEAT Button
- SCAN Button
- TIME Button
- External Remote Input 14
- 12V Trigger Connection
- Troubleshooting
- Power Indicator Is Not Lit
- Fuse Replacement
- NO SOUND
- Specifications
- Touchedouverture/fermeture OPEN/CLOSE
- TouchedeffacementCLEAR
- LASERPRODUKT KLASSE 1
- WICHTIG FÜR LASERPRODUKTE
- De toets "OPN/CLS" 6A
- LASERPRODUKT AV KCLASS 1
- VIKTIG INFORMATION FÜR LASERPRODUKT
- Coepexahanne
- OKompanHnROTEL
- Первьешагn
- Mepbippeoctopokxoctn
- YCTAHOBKA
- 06o3haeHnOpraHOb ynpabHeHn
- AhaororObbie BbIXOdbi
- UHPOBOB BbIXoD
- OchOBhble onepaun
- IyblnHpaKpachoro nctanuOHoro ynpabJeHHa (NK D) 4
- Ducnne
- 3arpy30uHbI JIoTOK
- KhoIIkN DIRECT ACCESS
- KhoNKe SEARCH
- IOnoHnTeIbHbIe cyHKcnn
- Khonka REVIEW
- KhoNka CLEAR
- Khoinka RANDOM
- Khoinka REPEAT
- Khoika SCAN
- Khonka TIME
- BxoJ 3JIeKtpnueckoro cnHana IKДиCTaHcNoHOrO ynpabJeHna External Remote
- 12-B TpnrrephbBxOd
- ДиагнoctикayuctpaHeHne HeNoJaIOK
- He CBETcHnDkKatop nHTAHN
- 3aMeHa npeDoXpaHntTeia
- Het 3byka
- TexHnueckne xapakTepeNtukn
- Rotel Europe
- Rotel Deutschland
Brand : ROTEL
Model : RCD-06 SE
Category : CD Player