
7204BRB - Internet router SMC - Free user manual and instructions
Find the device manual for free 7204BRB SMC in PDF.
| Product Type | ADSL Barricade Router |
| Brand | SMC |
| Model | 7204BRB |
| Power Supply | 12 V, 1.2 A |
| Ethernet Ports | 4 RJ-45 10/100 Mbps ports |
| DSL Port | 1 RJ-11 port |
| Reset Button | Yes (press 1-2 s: reset; >5 s: factory reset) |
| Supported Protocols | PPPoA, PPPoE, RFC1483 Bridging/Routed |
| IP Assignment | Built-in DHCP server (automatic assignment) |
| Configuration | AutoSetup utility or Web interface |
| LED Indicators | Power (green), DSL Link (green), DSL TX/RX (green flashing), Ethernet Link (green/yellow), Ethernet TX/RX (yellow flashing) |
| Firewall Function | Integrated (NAT) |
| System Requirements | ADSL service, Ethernet network card, Web browser (IE 5.0+ / Netscape 6.1+) |
| Package Contents | Router, power cord, RJ-45 Ethernet cable, RJ-11 telephone cable, CD-ROM, quick installation guide |
| Supported Operating Systems | Windows 98/Me/2000/XP (TCP/IP configuration) |
| Maintenance and Cleaning | Unplug before cleaning; use a soft dry cloth; do not use solvents |
| Security | Reset button for factory reset in case of forgotten password |
| Repairability | Contact SMC support for spare parts |
| General Information | ADSL router for home and small businesses; easy to install with AutoSetup utility |
Frequently Asked Questions - 7204BRB SMC
User questions about 7204BRB SMC
0 question about this device. Answer the ones you know or ask your own.
Ask a new question about this device
Download the instructions for your Internet router in PDF format for free! Find your manual 7204BRB - SMC and take your electronic device back in hand. On this page are published all the documents necessary for the use of your device. 7204BRB by SMC.
USER MANUAL 7204BRB SMC
4-port ADSL Router with built-in ADSL Modem (Annex B)
4-port ADSL Router with built-in ADSL Modem
Routeur ADSL 4 ports avec modem ADSL intégré
Router ADSL de 4 puertos con MODem ADSL integrado
4-poorts ADSL-router met ingebouwde ADSL-modem
Router ADSL de 4 Portas com Modem ADSL Integrado
Quick Installation Guide
Guide d'installation rapide
Guía de inizio
Beknopte installmentehandleiding
Manual de instalação
Contents
| English | 2 - 21 |
| Deutsch | 22 - 41 |
| Français | 42 - 61 |
| Espanol | 62 - 81 |
| Nederlands | 82 - 101 |
| Portugues | 102 - 121 |
| Compliances & Information | 122 - 130 |
Package Contents
One ADSL BarricadeTM.
One Power adapter.
One RJ-45 Ethernet cable.
One RJ-11 Standard phone/DSL line cable.
One Installation utility and Documentation CD.
Quick Installation Guide.
Note: ADSL splitters/microfilters are included with some models.
System Requirements
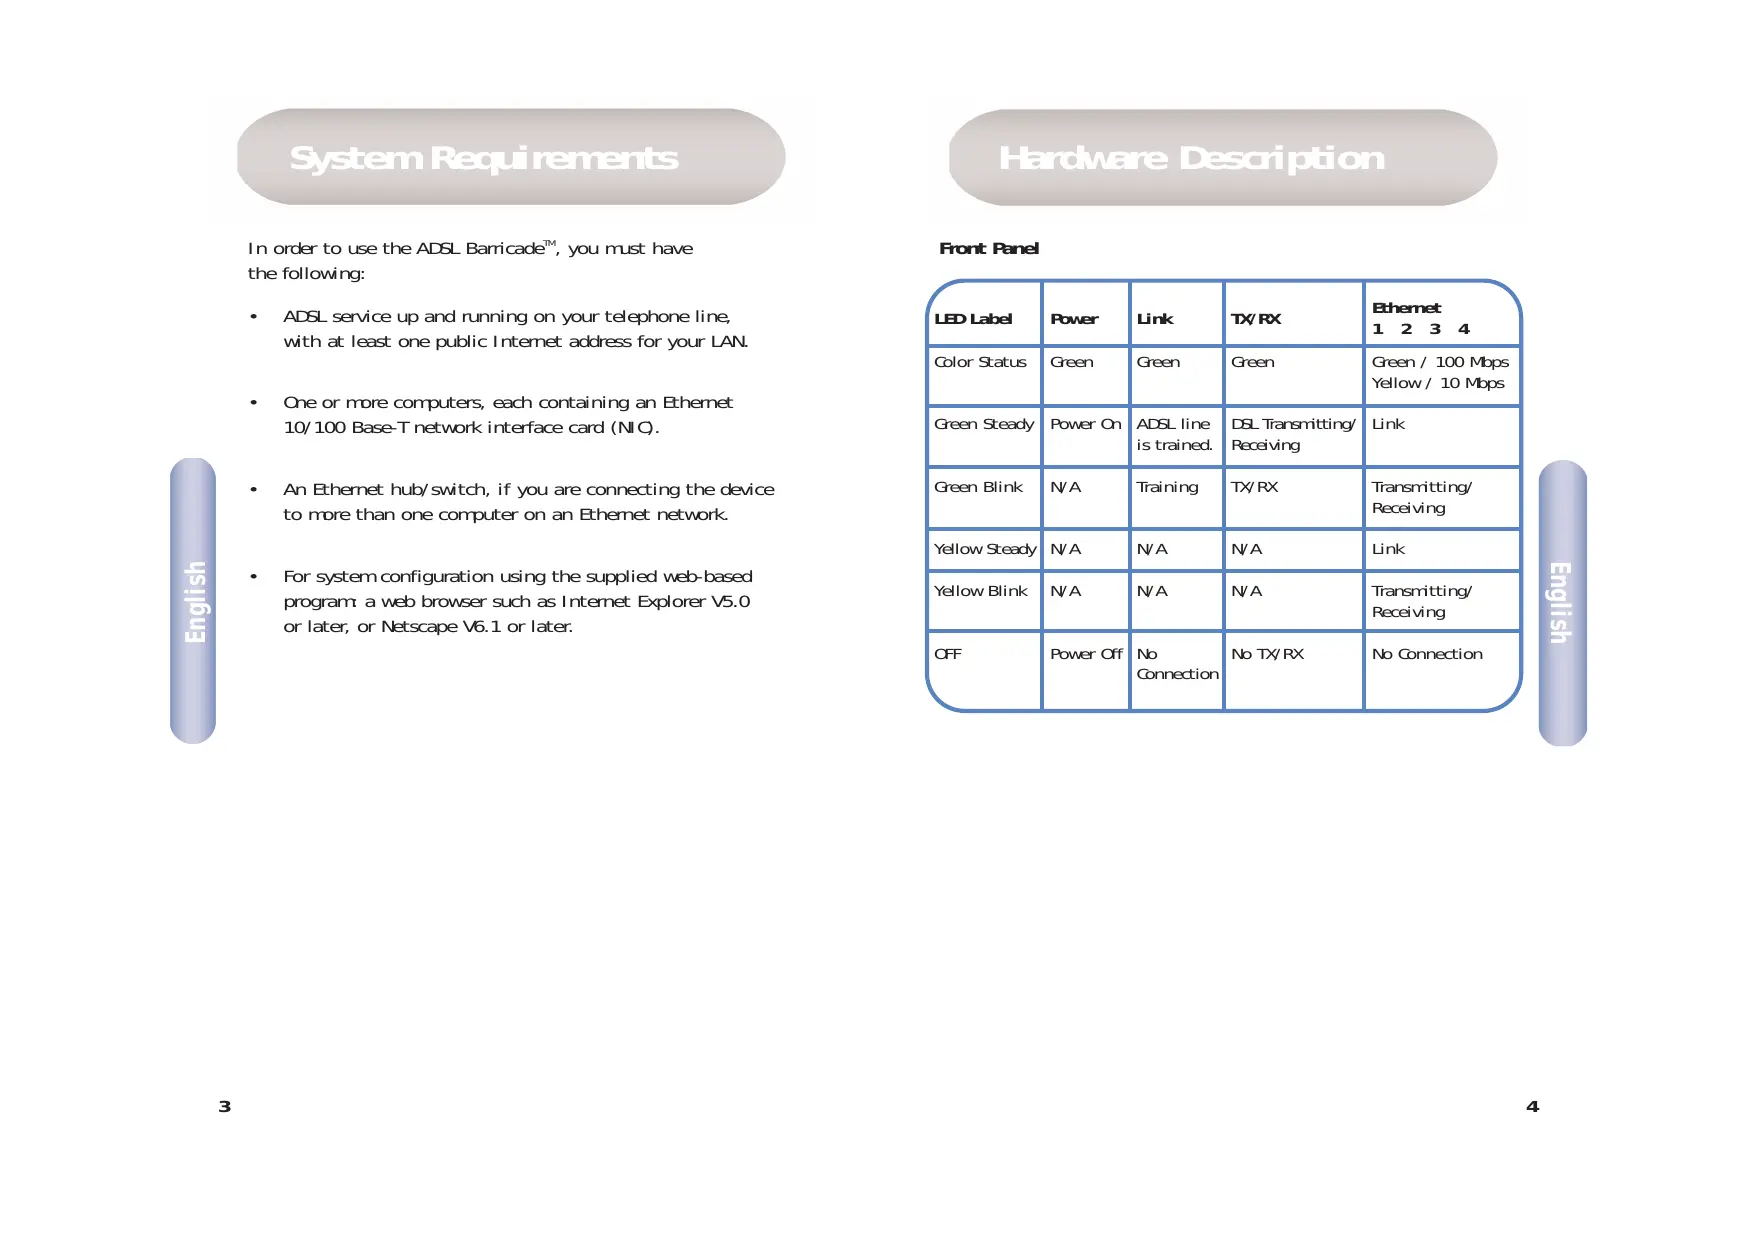
In order to use the ADSL Barricade™, you must have the following:
- ADSL service up and running on your telephone line, with at least one public Internet address for your LAN.
One or more computers, each containing an Ethernet 10/100 Base-T network interface card (NIC). - An Ethernet hub/switch, if you are connecting the device to more than one computer on an Ethernet network.
- For system configuration using the supplied web-based program: a web browser such as Internet Explorer V5.0 or later, or Netscape V6.1 or later.
Hardware Description
Front Panel
| LED Label | Power | Link | TX/RX | Ethernet 1 2 3 4 |
| Color Status | Green | Green | Green | Green / 100 Mbps Yellow / 10 Mbps |
| Green Steady | Power On | ADSL line is trained. | DSL Transmitting/Receiving | Link |
| Green Blink | N/A | Training | TX/RX | Transmitting/Receiving |
| Yellow Steady | N/A | N/A | N/A | Link |
| Yellow Blink | N/A | N/A | N/A | Transmitting/Receiving |
| OFF | Power Off | No Connection | No TX/RX | No Connection |
Rear Panel
| Rear Panel Connector | Description |
| Power Supply | 12V, 1.2A |
| Reset and Restore Factory Defaults Button | If depressed for 1-2 seconds: reset. If depressed for 5 seconds or more: reset to factory default. |
| DSL Port | RJ-11 phone connector |
| Ethernet Port | Four 10/100M RJ-45 connectors |
This Quick Installation Guide provides basic instructions for connecting the ADSL Barricade™ to a computer or LAN and to the Internet.
Section 1 describes how to set up the hardware.
Section 2 describes how to configure Internet properties on your computer(s).
- Section 3 shows you how to configure ISP settings using Auto Setup utility.
This Guide assumes that you have already established an ADSL service with your Internet service provider (ISP). These instructions provide a basic configuration that should be compatible with your home or small office network setup.
1 Connecting the Hardware
Warning: Before you begin, turn the power off for all devices. These include your computer(s), your LAN hub/switch (if applicable), and the ADSL Barricade™.
Step 1. Connect the ADSL cable
Connect one end of the provided phone cable (RJ-11) to the port labeled DSL on the Rear Panel of the device. Connect the other end to your ADSL Microfilter/Splitter*.
*Note: ADSL splitters/microfilters are included with some models.
Step 2. Connect the Ethernet cable
If you are connecting a LAN to the ADSL Barricade™, attach one end of a provided Ethernet cable to hub/switch port and the other to the Ethernet port on the ADSL Barricade™. If you are using the ADSL Barricade™ with a single computer and no hub, you must use an Ethernet cable to attach the PC directly to the device.
Step 3. Attach the power connector
Connect the AC power adapter to the Power connector on the back of the device and plug in the adapter to a wall outlet or power strip.
Step 4. Power up your systems
Turn on and boot up your computer(s) and any LAN device such as hubs or switches.
2 Configuring Your Computers
This section provides instructions for configuring the Internet settings on your computers to work with the ADSL Barricade™.
Before you begin
By default, the ADSL Barricade™ automatically assigns all required Internet settings to your PCs. You need only to configure the PCs to accept the information when it is assigned. Follow the instructions that correspond to the operating system installed on your PC.
WindowsXP
- In the Windows task bar, click the [Start] button, and then click [Control Panel].
-
Double-click the [Network Connections] icon.
-
In the [LAN or High-Speed Internet] window, right-click on the icon corresponding to your network interface card (NIC) and select [Properties]. (Often, this icon is labeled [Local Area Connection].) The [Local Area Connection] dialog box displays a list of currently installed network items.
- Ensure that the check box to the left of the item labeled [Internet Protocol TCP/IP] is checked, and click [Properties].
- In the [Internet Protocol (TCP/IP) Properties] dialog box, click the radio button labeled [Obtain an IP address automatically]. Also click the radio button labeled [Obtain DNS server address automatically].
- Click [OK] twice to confirm your changes, and close the [Control Panel].
Windows 2000
First, check for the IP protocol and, if necessary, install it.
- In the Windows task bar, click the [Start] button, point to [Settings], and then click [Control Panel].
- Double-click the [Network and Dial-up Connections] icon.
-
In the [Network and Dial-up Connections] window, right-click the [Local Area Connection] icon, and then select [Properties]. The [Local Area Connection Properties] dialog box displays a list of currently installed network components. If the list includes [Internet Protocol (TCP/IP)], then the protocol has already been enabled. Skip to Step 10.
-
If [Internet Protocol (TCP/IP)] does not appear as an installed component, click [Install...].
- In the [Select Network Component Type] dialog box, select [Protocol], and then click [Add...].
- Select [Internet Protocol (TCP/IP)] in the [Network Protocols] list, and then click [OK]. You may be prompted to install files from your Windows 2000 installation CD or other media. Follow the instructions to install the files.
- If prompted, click [OK] to restart your computer with the new settings. Next, configure the PCs to accept IP information assigned by the ADSL Barricade™.
-
In the [Control Panel], double-click the [Network and Dial-up Connections] icon.
-
In the [Network and Dial-up Connections] window, right-click the [Local Area Connection] icon, and then select [Properties].
- In the [Local Area Connection Properties] dialog box, select [Internet Protocol (TCP/IP)], and then click [Properties].
- In the [Internet Protocol (TCP/IP) Properties] dialog box, click the radio button labeled [Obtain an IP address automatically]. Also click the radio button labeled [Obtain DNS server address automatically].
- Click [OK] twice to confirm and save your changes, and then close the [Control Panel].
Windows 98/Me/SE
- In the Windows task bar, click the [Start] button, point to [Settings], and then click [Control Panel].
- Double-click the [Network and Dial-up Connections] icon.
-
In the [Network and Dial-up Connections] window, right-click the [Network] icon, and then select [Properties]. The [Network Properties] dialog box displays a list of currently installed network components. If the list includes [Internet Protocol (TCP/IP)], then the protocol has already been enabled. Skip to Step 11.
-
If [Internet Protocol (TCP/IP)] does not appear as an installed component, click [Add...].
- In the [Select Network Component Type] dialog box, select [Protocol], and then click [Add...].
- Select [Microsoft] in the [Manufacturers] box.
- Select [Internet Protocol (TCP/IP)] in the [Network Protocols] list, and then click [OK]. You may be prompted to install files from your Windows Me installation CD or other media. Follow the instructions to install the files.
-
If prompted, click [OK] to restart your computer with the new settings. Next, configure the PCs to accept IP information assigned by the ADSL Barricade™.
-
In the [Control Panel], double-click the [Network and Dial-up Connections] icon.
- In the [Network and Dial-up Connections] window, right-click the [Network] icon, and then select [Properties].
- In the [Network Properties] dialog box, select [TCP/IP], and then click [Properties].
- In the [TCP/IP Settings] dialog box, click the radio button labeled [Server assigned IP address]. Also click the radio button labeled [Server assigned name server address].
- Click [OK] twice to confirm and save your changes, and then close the Control Panel.
Note: For Windows 95 and NT, please see the installation instructions in the User Guide contained on the CD Rom.
3 Configuring the ADSL BarricadeTM
This section provides instructions on how to use the Auto Setup utility for configuration of the ADSL Barricade™ for your ISP.
- Insert the Installation utility and Documentation CD into your CD drive.
- Browse to the location of your CD drive and run AutoSetup.exe. This will start the Auto Setup utility, which provides an easy way to configure the ADSL Barricade™ for your ISP.
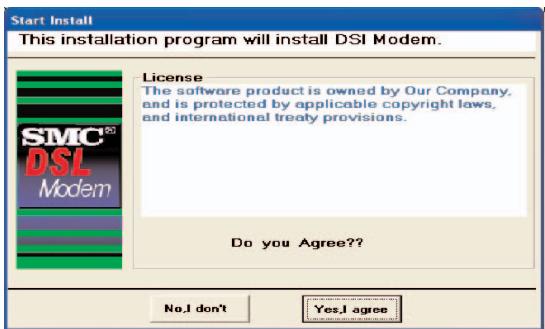
-
Click [Yes, I agree] to accept terms of license agreement and continue with the setup.
-
Select your country from the drop down list, then click [Next] to continue. If your country is not listed, click [Custom] and skip to section Custom.
- Select your ISP/Network provider from the drop down list, then click [Next] to continue. If your ISP/Network Provider is not listed, click [Custom] and skip to section Custom.
- Enter theUsername and password supplied by your ISP, then click [Next] to continue.
Note: You will only be required to enter a username and password if your ISP uses protocol PPPoA or PPPoE. If your ISP uses RFC1483 Bridging no further input is required, simply click [Next] to continue.
If your ISP uses RFC1483 Routed after clicking [Next] you will be required to enter the IP address, Netmask, Gateway address, Primary and Secondary DNS address supplied by your ISP. Click [Next].
- Finally click [Finish]. The AutoSetup utility will now configure the ADSL Barricade™ with the settings you have entered. This may take a few moments. When the setup is complete you will see the following message:

Your ADSL Barricade™ is now setup. Go to section Troubleshooting of the User Guide if you cannot make a connection to the Internet.
Custom
If your Country or ISP is not listed, you will be required to manually enter your ISP settings. This is done using the option [Custom]. For custom installation you will also need to know the following settings supplied by your ISP:
What Protocol? (PPPoA, PPPoE, RFC1483 Bridging or RFC1483 Routed).
What Encapsulation? (VC-Mux or LLC).
What are the VPI/VC1 circuit numbers? E.g. 0/38.
- Select/enter the values corresponding to the above settings supplied by your ISP.
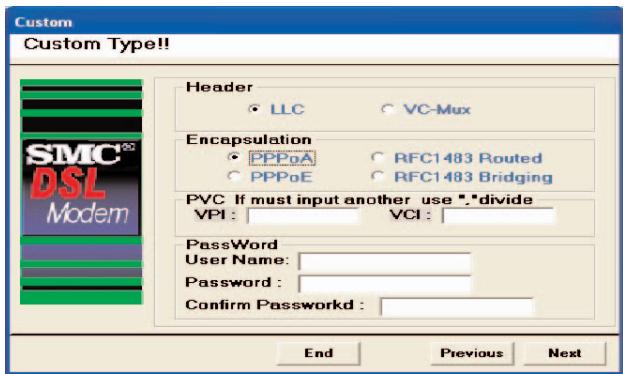
- Go back to Step 6.
Lieferumfang
Protocole? (PPPoA, PPPoE, RFC1483 Bridging
ou RFC1483 Routed).
This equipment has been tested and found to comply with the limits for a Class B digital device, pursuant to Part 15 of the FCC Rules. These limits are designed to provide reasonable protection against harmful interference in a residential installation. This equipment generates, uses and can radiate radio frequency energy and, if not installed and used in accordance with instructions, may cause harmful interference to radio communications. However, there is no guarantee that the interference will not occur in a particular installation. If this equipment does cause harmful interference to radio or television reception, which can be determined by turning the equipment off and on, the user is encouraged to try to correct the interference by one or more of the following measures:
- Reorient the receiving antenna.
- Increase the separation between the equipment and receiver.
- Connect the equipment into an outlet on a circuit different from that to which the receiver is connected.
- Consult the dealer or an experienced radio/TV technician for help.
Note: In order to maintain compliance with the limits for a Class B digital device, you are required to use a quality interface cable when connecting to this device. Changes or modifications not expressly approved by our company could void the user's authority to operate this equipment.
FCC - Part 68
This equipment complies with Part 68 of the FCC rules. This equipment comes with a label attached to it that contains, among other information, the FCC registration number and ringer equivalence number (REN) for this equipment. If requested, this information must be provided to the telephone company.
This equipment uses the following USOC jacks: RJ-11C.
The REN is used to determine the quantity of devices that may be connected to the telephone line. Excessive RENs on the telephone line may result in the devices not ringing in response to an incoming call. In most, but not all areas, the sum of the RENs should not exceed five (5.0.) To be certain of the number of devices that may be connected to the line, as determined by the total RENs, contact the telephone company to determine the maximum REN for the calling area.
If this equipment causes harm to the telephone network, the telephone company will notify you in advance that temporary discontinuance of service may be required. If advance notice not practical, the telephone company will notify the customer as soon as possible. Also, you will be advised of your right to file a complaint with the FCC if you believe it is necessary. The telephone company may make changes in its facilities, equipment, operations, or procedures that will provide advance notice in order for you to make the necessary modifications in order to maintain uninterrupted service.
If trouble is experienced with this equipment, please contact our company at the numbers shown on back of this manual for repair and warranty information. If the trouble is causing harm to the telephone network, the telephone company may request you to remove the equipment from the network until the problem is resolved. No repairs may be done by the customer.
This equipment cannot be used on telephone company-provided coin service. Connection to Party Line Service is subject to state tariffs.
When programming and/or making test calls to emergency numbers:
- Remain on the line and briefly explain to the dispatcher the reason for the call.
- Perform such activities in off-peak hours such as early morning or late evenings.
The Telephone Consumer Protection Act of 1991 makes it unlawful for any person to use a computer or other electronic device to send any message via a telephone facsimile machine unless such message clearly contains, in a margin at the top or bottom of each transmitted page or on the first page of the transmission the date and time it is sent and an identification of the business, other entity, or individual sending the message and the telephone number of the sending machine or such business, other entity, or individual.
In order to program this information into your facsimile, refer to your communications software user manual.
EC Conformance Declaration - Class B
This information technology equipment complies with the requirements of the Council Directive 89/336/EEC on the Approximation of the laws of the Member States relating to Electromagnetic Compatibility and 73/23/EEC for electrical equipment used within certain voltage limits and the Amendment Directive 93/68/EEC. For the evaluation of the compliance with these Directives, the following standards were applied.
RFI Emission:
- Limit class B according to EN 55022:1998
- Limit class B for harmonic current emission according to EN 61000-3-2/1995
- Limitation of voltage fluctuation and flicker in low-voltage supply system according to EN 61000-3-3/1995
Immunity:
Product family standard according to EN 55024:1998
- Electrostatic Discharge according to EN 61000-4-2:1995 (Contact Discharge: ± 4kV , Air Discharge: ± 8kV )
- Radio-frequency electromagnetic field according to EN 61000-4-3:1996 (80 - 1000 MHz with 1 kHz AM 80% Modulation: 3 V/m)
- Electrical fast transient/burst according to EN 61000-4-4:1995 (AC/DC power supply: ± 1kV , Data/Signal lines: ± 0.5kV )
Surge immunity test according to EN 61000-4-5:1995 (AC/DC Line to Line: ± 1kV AC/DC Line to Earth: ± 2kV
- Immunity to conducted disturbances, Induced by radiofrequency fields:
EN 61000-4-6:1996 (0.15 - 80 MHz with 1 kHz AM 80% Modulation: 3 V/m)
- Power frequency magnetic field immunity test according to EN 61000-4-8:1993 (1 A/m at frequency 50 Hz)
- Voltage dips, short interruptions and voltage variations immunity test according to EN 61000-4-11:1994 (>95% Reduction @10 ms, 30% Reduction @500 ms, >95% Reduction @5000 ms)
LVD:
- EN 60950 (A1/1992; A2/1993; A3/1993; A4/1995; A11/1997)
Safety Compliance Wichtige Sicherheitshinweise (Germany)
Full installation manuals are provided on the Installation CD-Rom. Manuals in other languages than those included on the CD-Rom are provided on www.smc-europe.com (section support).
Firmware and Drivers
For latest driver, technical information and bug-fixes please visit www.smc-europe.com for EMEA and www.smc.com for North America.
Limited Lifetime Warranty Statement
For detailed information on SMC's limited lifetime warranty please check the English full manual on this CD-Rom or visit www.smc-europe.com (section support, product registration).
Contact SMC
Contact details are available on www.smc-europe.com for EMEA and www.smc.com for North America.
Statement of Conditions
In line with our continued efforts to improve internal design, operational function, and/or reliability, SMC reserves the right to make changes to the product(s) described in this document without notice. SMC does not assume any liability that may occur due to the use or application of the product(s) described herein. In order to obtain the most accurate knowledge of installation, bug-fixes and other product related information we advise to visit the relevant product support page at www.smc-europe.com for EMEA and www.smc.com for North America before you start installing the equipment. All information is subject to change without notice.
Limitation of Liability
In no event, whether based in contract or tort (including negligence), shall SMC be liable for incidental, consequential, indirect, special or punitive damages of any kind, or for loss of revenue, loss of business or other financial loss arising out of or in connection with the sale, installation, maintenance, use, performance, failure or interruption of its products, even if SMC or its authorized reseller has been advised of the possibility of such damages.
Copyright
Information furnished by SMC Networks, Inc. (SMC) is believed to be accurate and reliable. However, no responsibility is assumed by SMC for its use, nor for any infringements of patents or other rights of third parties which may result from its use. No license is granted by implication or otherwise under any patent or patent rights of SMC. SMC reserves the right to change specifications at any time without notice.
Trademarks
SMC is a registered trademark and Barricade is a trademark of SMC Networks, Inc. Other product and company names are trademarks or registered trademarks of their respective holders.