
ORIANA - Fireplace insert WANDERS - Free user manual and instructions
Find the device manual for free ORIANA WANDERS in PDF.
| Product type | Insert fireplace |
| Brand | WANDERS |
| Model | ORIANA |
| Nominal power | 7 kW |
| Flue diameter | 150 mm |
| Maximum wood charge | 3 kg (approximately 3 logs) |
| Maximum briquette charge | 3 kg (approximately 4 pieces) |
| Combustion chamber volume | 0.08 m³ |
| Combustion chamber floor area | 0.2 m² |
| Efficiency (wood) | 78.7 % |
| Efficiency (briquettes) | 79.3 % |
| Flue gas temperature (wood) | 320 °C |
| Flue gas temperature (briquettes) | 300 °C |
| CO at 13% O2 (wood) | 0.06 % |
| CO at 13% O2 (briquettes) | 0.09 % |
| Minimum chimney draft | 12 Pa (0.12 mbar) |
| Power supply (fans) | 230 V, grounded outlet |
| Authorized fuels | Logs (30×10 cm), lignite briquettes |
| Safety distance to combustible materials | 80 cm around the appliance and flue |
| Minimum floor plate | 50 cm in front, 30 cm on sides |
| Warranty | 5 years (glass and electrical parts: 1 year) |
| Standard | EN 13240 |
| Annual maintenance | Chimney sweeping, checking seals and dampers |
Frequently Asked Questions - ORIANA WANDERS
User questions about ORIANA WANDERS
0 question about this device. Answer the ones you know or ask your own.
Ask a new question about this device
Download the instructions for your Fireplace insert in PDF format for free! Find your manual ORIANA - WANDERS and take your electronic device back in hand. On this page are published all the documents necessary for the use of your device. ORIANA by WANDERS.
USER MANUAL ORIANA WANDERS
User's Guide and Installation Manual Oriana

Dear Client,
Congratulations on your new wood-burning stove, which will be a comfortable source of heat to enjoy for many years on end.
The Oriana has an integrated energy-saving valve to regulate the draught in the chimney, and two stepless variably ventilators to increase the operating capacity.
When designing this fireplace we took particular care regarding the ease of use, the operational safety and the design. The Oriana is developed and produced at our own factory in Netterden (the Netherlands) and is for the greater part handmade. Only the best materials are used for the construction and comply with current international standards. This will guarantee that your woodstove has a long life.
The first part of this user's guide gives you tips and directions about how to use your wood-burning stove correctly and safely. The second part of the manual contains the installation instructions and the technical specifications of the Oriana. They are of particular importance to the installer.
We advise you to read this manual thoroughly before using your new stove and to keep the manual in a handy place. Your installer may need the manual for the yearly maintenance of your fireplace.
We wish you much warmth with your new fireplace!
The WANDERS team
Table of Contents
Your Oriana stove at a single glance 19
Installation 19
Lighting the stove 19
Lighting the stove for the first time 20
Fuel: wood and browncoal 20
The best way to burn your stove 21
Chimney and flue 21
Maintenance 22
Safety 22
Guarantee 22
Installation Instructions for the Oriana 24
Technical drawings 60
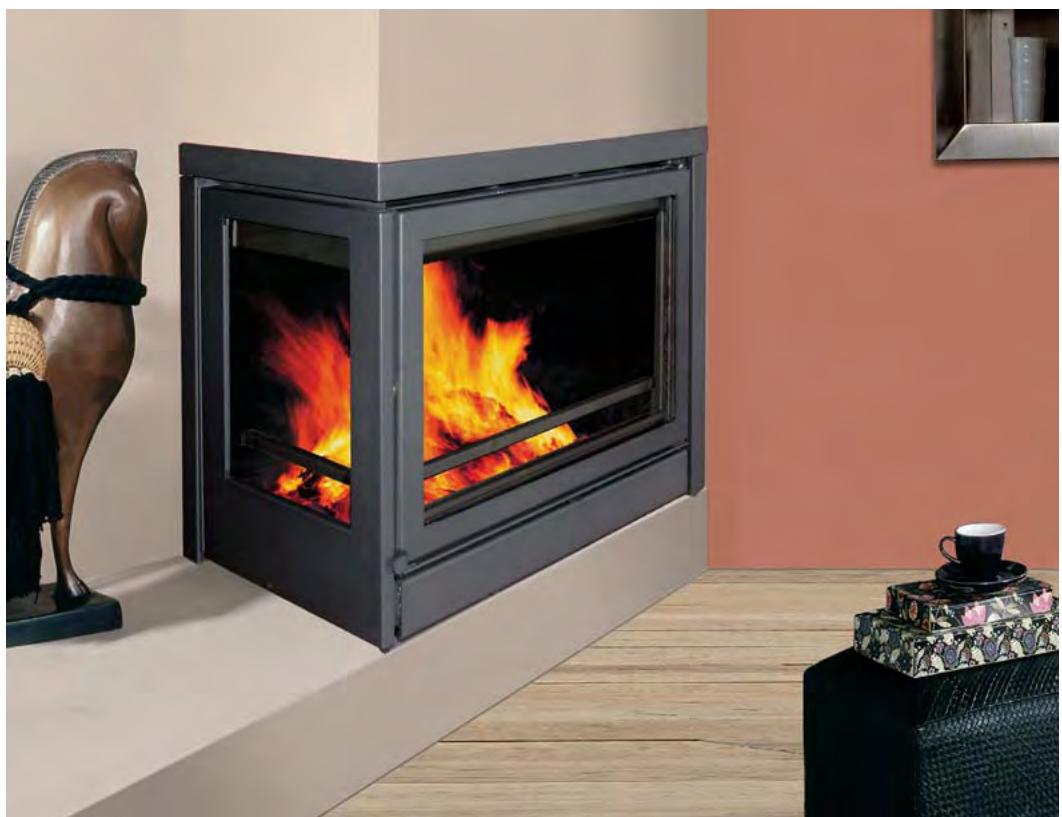
Your Oriana stove at a single glance
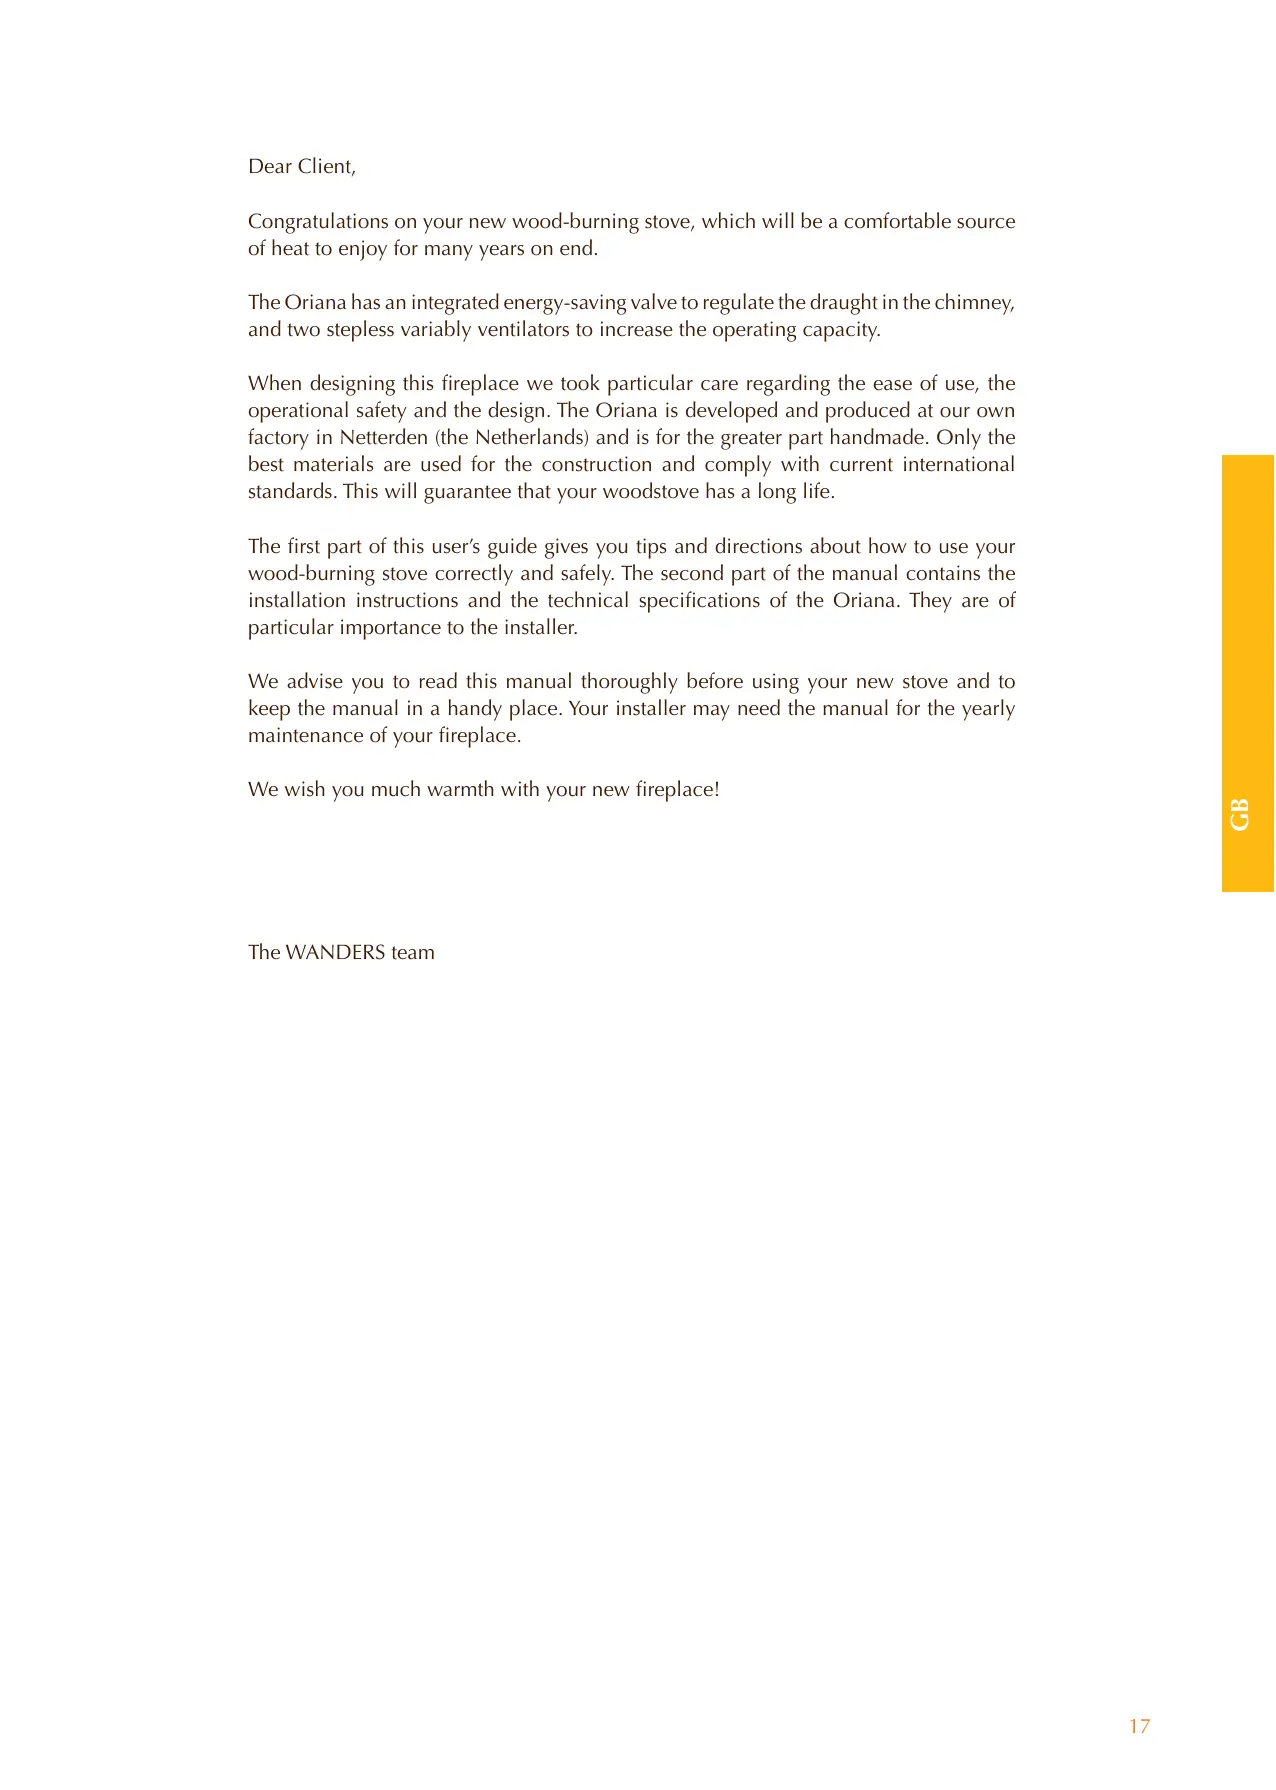
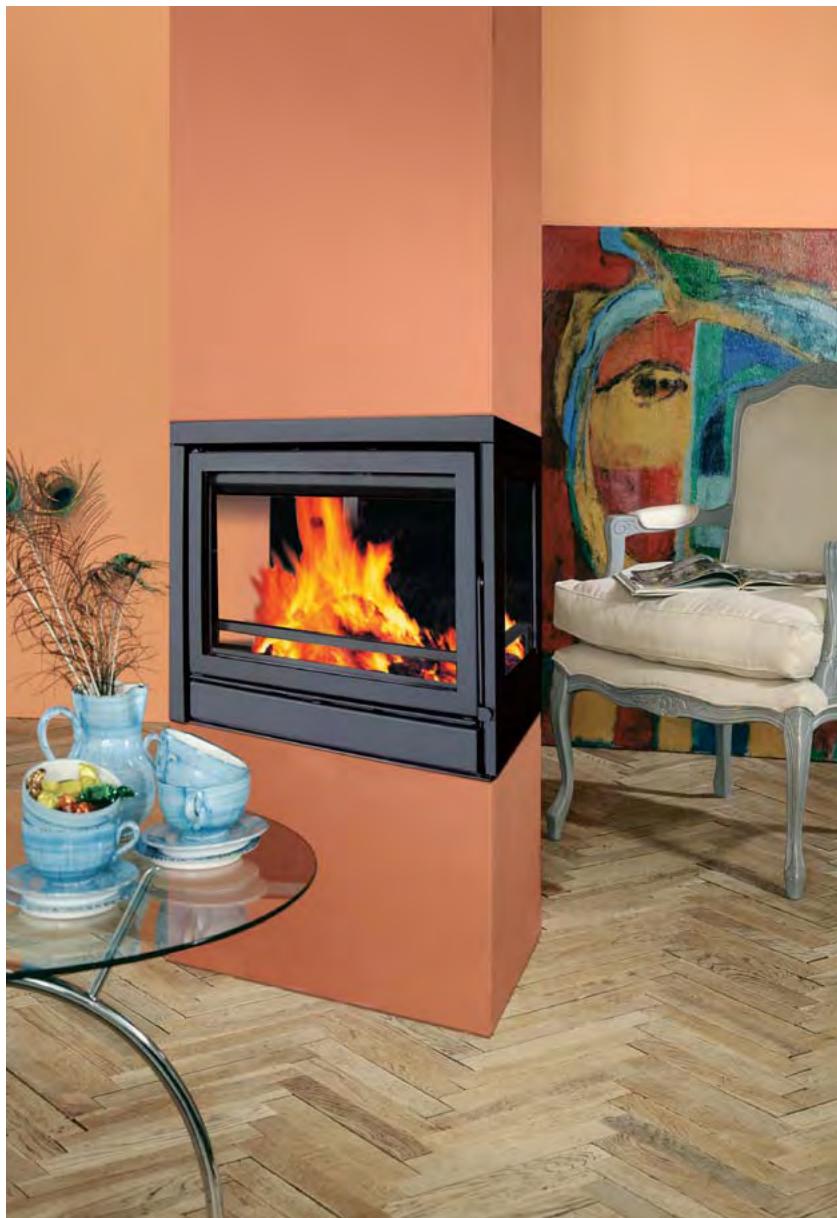
One of the Oriana models
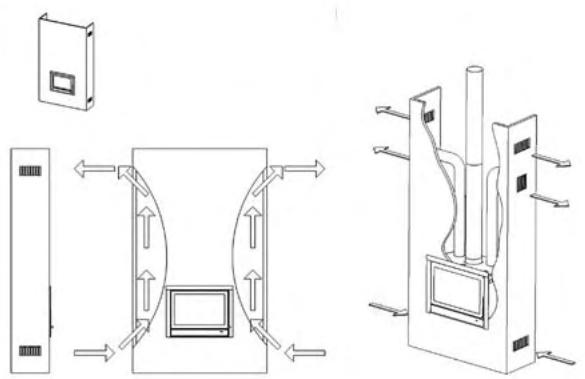
The Oriana hearth is a combination of comfort and efficient heat output. The stove has an outer cover and an interior chamber which ensures the radiation of 70% heat output through convection to the room, while the remaining 30% of the heat is released through radiation via the glass area. The integrated flue gas deflector makes the flue gases circulate through the interior chamber to increase the heat output of your stove. Though not without sound, the 1 or 2 integrated ventilators draw in cold air from underneath the stove and lead the air up via the backside and blow it out again via the front side. The velocity of the ventilators can be manually adjusted.
The hearth is equipped with an automatic thermostat valve which regulates the air intake to your woodstove via the ash pan. Open the valve completely when lighting the stove. Once the stove has heated up, the valve will close automatically to minimize the chance of overheating provided that the other air inlets remain closed. Please don't forget to clean the ash pan regularly to ensure optimum air supply.
Installation
It is common practice for the dealer where you purchased your Oriana stove to also take care of installing it. If this is not the case, please ensure that the installation is done by a certified installer. A certified installer can also give
you the right advice about the flue tube to which the stove must be connected. Connecting wood-burning stoves by unqualified persons is prohibited, in which case we cannot give any guarantee about proper functioning of your Oriana stove. Please bear the fire safety in mind when installing the stove. See also page 24.
The wood-burning stove is suitable as an extra heat source and does not replace your principal heating device.
Usage early in autumn or late in winter
When the external and internal temperatures do not differ much, a proper chimney draught is a real challenge. You can help chimney draught get started by burning some wood while keeping all air inlets maximally open. An abundant air supply speeds up quick heating which in turn increases the draught in the chimney. Lighting up the stove with only a little wood prevents smoke from streaming into the room.
Lighting the stove
The stove will become very hot when you light it and will need at least two hours to cool off. Don't touch the stove without protection during firing and for two hours after. Handle the stove always with a glove to avoid getting serious burns.
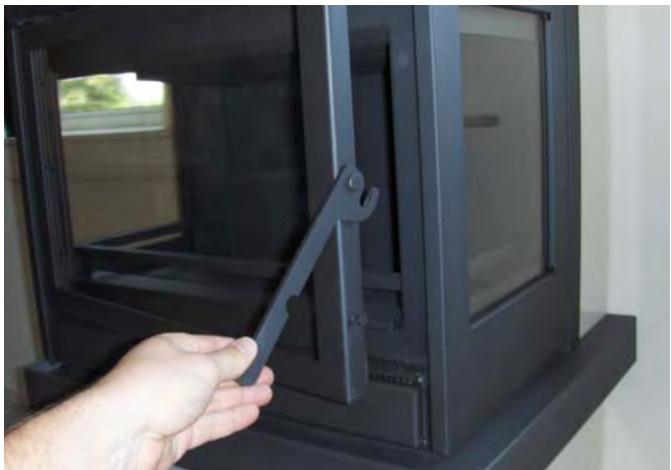
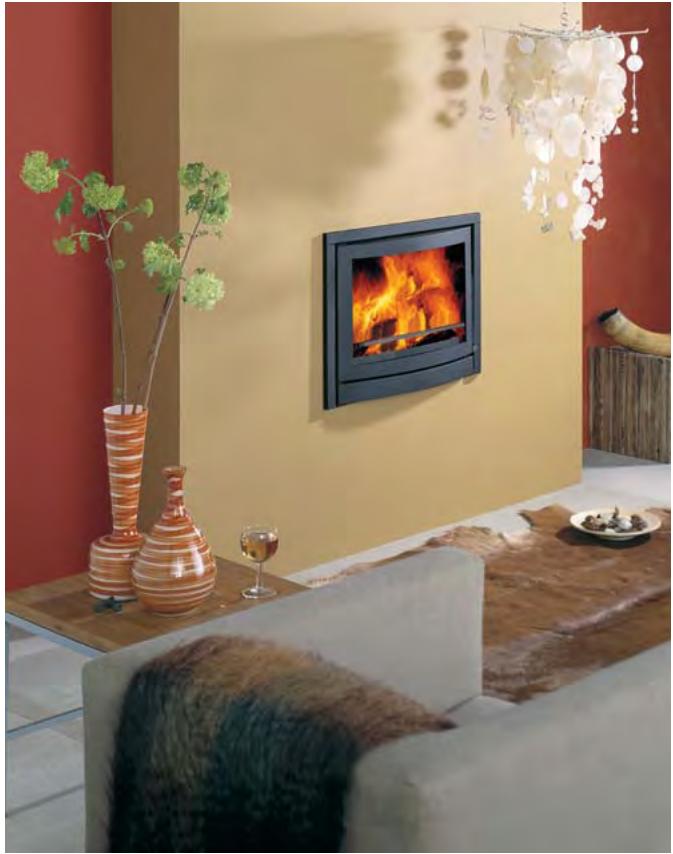
Open the door
Operation of the shaking grate (A) with the shaking bar.
Button for the automatic thermostat valve (B).
Open the door and put some balls of paper or firelighters in the stove and place some wood kindling or brown coal briquettes on top. Fully open the automatic thermostat valve (see photograph). Open the grate shaker with the shaking bar and keep the ash pan open for the first five to ten minutes to let extra air in. Light the kindling or briquettes and leave the door ajar for extra air supply. You can close the door after a couple of minutes. Once the kindling or briquettes is burning you can add extra fuel and close the ash pan. Do not place more than three logs in the stove at a time. Once the stove is burning the air supply is regulated automatically. Be sure that there is always enough ventilation when the stove is burning.
Avoid finger marks
Do not touch the glass of the stove with your fingers. Finger marks will burn into the glass and cannot be removed later.
It is prohibited to light the stove with liquids like petrol or spirits. Do not have the cooker hood on in the room where you operate your stove. Never touch the varnished parts when you heat your stove.
Lighting the stove for the first time
Discolouration of walls, ceilings and grates
The walls, ceilings and grates may show some discolouration after lighting your hearth. This is caused by the dust particles that burn in the convection cover. This is a natural process for which WANDERS cannot be held responsible. To minimize discolouring we refer to the advice given for atmospheric hearths. Your installer can give you more information about this.
When you light the Oriana for the first time, the hearth
must still 'anneal' and temper itself. The unit has a heat resistant lacquer which must burn in the stove at temperatures above 400^ Celsius. This will happen during the first few times of lighting the stove and temperatures rise to 600^ C. Though this may give an unpleasant smell, it is otherwise harmless. It is advisable to keep the stove burning with limited fuel for at least 6 hours when lighting the stove for the first 4 or 5 times. Air the room well when the stove is burning. Make sure that any cooking hood is not turned on when the stove is burning; a cooking hood extracts the combustion air that the stove needs.
Some deposit may form on the glass panes of the stove when you 'anneal' your hearth. You can easily remove this deposit with a damp cloth after the stove has cooled down. You can also use some cleansing agent for ceramic rings. Please make sure you do not leave any finger marks on the clean glass. Finger marks burn into the glass and cannot be removed later.
Newly-built house or recently renovated?
It is advisable to wait six weeks before lighting the stove in a newly-built house that has recently been completed, or in a space that has recently been renovated drastically. The walls and ceilings still contain gases, softeners and moisture from plasterwork or paint. The warm air-streams may discolour the dust particles in the space which may stick to walls and ceilings. Even the moisture in the walls and ceilings will become warm and may cause yellow stains.
Fuel: wood and browncoal
| Wood species | Drying time | |
| Fir, Poplar | 1 | year |
| Lime, Willow, Spruce, Birch, Ash, Alder | 1.5 | years |
| Fruit trees, Beech | 2 | years |
| Oak | 2.5 | years |
The Oriana burns on wood and coal. Do not put more than 3 to 4kg of fuel in the stove at the time. Always use clean and cut logs, which have sufficiently dried. Please see the above list for drying times. Wet wood does not burn well and gives heavy smoke emission. It may blacken the glass pane of your stove with soot and build up smut in the flue pipe. This may increase the risk of chimney fire.
Fresh, moist wood contains about 50 % moisture. Cleaved wood still contains 20 % moisture after drying it for a year and moisture percentage will be decreased to 12 to 15 % after drying it for two years. Dry wood gives nice flames and little or no smoke, and the fire will crackle when burning. Wet wood makes a hissing
sound, gives much smoke and only small flames which will considerably dampen the pleasure of burning your stove and the heat output.
What to do in case of chimney fire.
In case of chimney fire, immediately close the shut-off valve in the chimney and all air supply ducts. Call the fire department. After the fire is extinguished, the chimney and the stove must be inspected again by your installer.
Do not put any paraffin-containing logs in your stove. When the door is closed, the high heat will melt the paraffin from the logs too quickly. The polluted flue gasses which consequently develop will deposit on and burn in the glass of your stove and cannot be removed later.
Do not use any wood that is painted, impregnated, glued together or processed in any other way. The flue gases are very harmful to the environment and may affect your stove. It is also prohibited to burn plastics and other waste matter due to poisonous smoke development.
Wood species and storage
You can use all kinds of woods as fuel as long as it is clean, split and dry. Hardwood like oak, beech and birch burn slowly, give off much heat and form charcoal easily. Softer woods like spruce, fir and poplar give more flames but less heat and less charcoal.
The best place to store timber is in a windy spot but sheltered from the rain. This is how the logs can dry in a natural way. Pile the logs on an old pallet or a frame to let the wood dry from underneath and to prevent the lower logs from being in contact with water.
The best way to burn your stove
All WANDERS' stoves are designed so that they give a maximum output. A well-lit wood-burning stove can produce a yield of about 75% . This means that you need less wood for the same amount of heat. Moreover, a well-lit stove produces less smoke pollution. Below are a few tips to give you optimum pleasure:
- Always burn your stove with its door closed; this will improve the output within 8 to 10 times. When the door of the stove is open, the chimney will draw more air than is needed for proper combustion. The relatively cold air will cool the fire. It will also preclude fire damage by any sputtering sparks, especially from softwood.
- Do not put more than 3 logs on the fire at one time. Too
much fuel at one time thwarts efficient combustion and burdens the environment unnecessarily.
- Ventilate the space well when you have the stove on. A crackling fire has a minimum air consumption of 25 cubic metres an hour. Never put on your cooking hood when you have a stove burning in the same space.
- If you use brown coal as fuel you must shake the ash in the ash pan and leave your shaking grate open every morning. This is to add combustion air to the coals via the underside of the stove. This will give optimum combustion of the coal.
- Be careful with lighting the stove when it is foggy or when there is no wind outside. There is hardly any draught in the cold chimney when the weather is calm. Since smoke is heavier than air there is the chance of smoke streaming into the room. In foggy weather, the smoke from the chimney (outside) cools quickly and may descend and become a nuisance in your neighbourhood.
- Don't smother the fire suddenly with water, but let it burn out. The materials inside the stove may deform or crack as a result of sudden or great differences in temperature.
- Do not put more than three logs or four briquettes on the fire at a time. Too much fuel at a time hinders efficient combustion and burdens the environment unnecessarily.
Chimney and flue
The chimney is the most important part of your wood-burning hearth.
When the chimney is right it will not distribute any smoke into your room, leave any deposit on the glass pane or create bad combustion. Before starting the installation of the stove, your installer or a qualified chimney sweep must check whether the chimney flue has a diameter of at least 150 millimetres over the entire length, and whether the channel is clean, smooth and leak-proof.
Chimney with a proper draught
Warm air wants to ascend. This is the principle of every chimney. It helps when the wind near the chimney mouth draws the air from the chimney.
Fall wind may give the opposite effect and blow the air back into the chimney. Relatively cold foggy air may thwart proper draught in your chimney as does a long flue pipe with a rough inside and many bends. If the natural draught in your chimney is poor your installer can give you information about using a ventilator for your flue tube.
Maintenance
Small maintenance
- It is advisable to leave an ash layer of two to three centimetres. It will protect the fire plate.
- Clean the exterior of the stove with a damp cloth that does not give off fluff. Do not use any aggressive cleansing agents or abrasives.
- Clean the cold glass pane with a cleaning agent for ceramic cooking rings. Do not touch the clean glass with your fingers. Finger marks burn into the glass.
- Oil the hinges and the door fastener once in a while.
Do not use any aggressive cleaning agents or abrasives to maintain your stove.
When the stove is not used
- Close all doors and air inlets in summer season
- Place absorbent salt inside the stove if it is stored in a humid space.
Yearly maintenance
- Have your chimney properly cleaned by a qualified chimney sweep every year; this is for safety reasons and any fire insurance.
- Have the flue gas outlet and the combustion air supply of the double-walled flue tube system checked for airtightness every year.
- Have the complete tube system checked every year; this includes the roof or wall ducts and the outlet just outside the wall.
- Have the valves and/or flaps checked for their functioning.
- Have the sealing of doors and glass panes checked for wear and tear.
Safety
A WANDERS wood-burning stove gives you a comfortable and a safe source of heat in your home. Fire safety starts with a proper installation and a properly working flue tube. Your installer must therefore comply with the installation instructions as listed on page 24 and further. To burn your stove safely, the following points are important:
- Burn your stove as much as possible with a closed door; it increases the output and is better for the environment.
- Prevent small children or the infirm from getting too close to a burning stove and do not leave them alone in the room when the stove is burning. You could use a fire-screen.
- Do not pour or put combustible liquids and materials in the stove, as it may damage the fireplace beyond repair.
- If the floor around the fireplace is made of combustible material you must use a floor slab. The floor slab must
have a minimum size of:
- 50~cm measured from the fireplace on the front side of the door:
-
30~cm measured from the fireplace on all sides from the door:.
-
Do not place any combustible materials, such as curtains, wooden objects (cupboards, paintings) close to the fireplace or the flue tube. A minimum distance of 80~cm measured from the exterior of the stove and the flue tube is required.
- Never cover the chimney breast or mantelpiece with combustible material (e.g. paper covering).
- Please bear in mind the points of the section on 'the best way to burn your stove', on page 21.
- Have your stove repaired only by a certified installer and with original parts.
Guarantee
WANDERS Metaalproducten B.V. in Netterden, the Netherlands, gives a guarantee of five years after the purchase date of your wood-burning stove, provided that the fireplace is properly installed and used in accordance with the instructions in the manual.
The guarantee includes all defects which can be reduced to flaws in material and construction, in which case you will receive the new parts free of charge. Labour costs or other expenses are not covered by the guarantee. You can send defect parts (shipping paid) to WANDERS Metaalproducten B.V., Amtweg 4, 7077 AL in Netterden [The Netherlands].
Before installing your stove you must check if there is any visible damage to the unit. If there is, do not accept the unit and contact your supplier.
The guarantee does not include: the glass, failure due to improper use; non-compliance with the national regulations and enclosed installation and operating instructions; installation by an installer of dealer who is not acknowledged by WANDERS, negligence of the unit and change of owner. The guarantee is also disclaimed when a wrong fuel is used.
There is a guarantee period of one year for all cast iron and vermiculite parts, and the lacquer.
WANDERS disclaims responsibility for any cracks in stuccoed walls or discolouration of walls, ceilings and/ or grates after burning the fireplace. Discolouration can be caused when dust particles burn in the convection cover. To minimize the chance of cracks in stucco and discolouration we refer to the advice given for decorative hearths. Your installer can give you more information.
Any complaints will be dealt with after the sales firm, the installer has filed a complaint and sent a copy of
the purchase receipt with purchase date. Any repairs do not entitle you to extend the guarantee term. All consequential damages or loss are excluded.
Installation Instructions for the Oriana
| General instructions | 24 |
| Preparation | 24 |
| Installation | 25 |
| Repairs | 27 |
| Technical details Oriana | 28 |
General instructions
The Oriana is tested in accordance with the international EN 13240 standardization, and has an extra additional standardization for optimally environment-friendly heating devices related to flue gases (Section 15a B-Vg. Des BmfWA). The stove can be connected to a flue tube to which several stoves are connected. The flue tube has a diameter of 150 millimetres.
The heating device must be placed by an acknowledged installer and according to the installation instructions given below. The national and local rules and regulations for placing and using wood-burning stoves are equally applicable. WANDERS does not give any guarantee if the Oriana is connected or installed incompletely or incorrectly.
It is not allowed to place the stove in:
Arcades and corridors accessible to the public.
- Stairwells, except in buildings with no more than 2 dwellings.
- Spaces where highly flammable or explosive materials are used.
- Spaces where an exhaust system is used or where a mechanical exhaust system is placed, except when the air supply is taken directly from outside to assure a hazardous combustion.
Preparation
The chimney flue
Install ventilation grills to avoid cracks and discoloration in plasterwork.
Before placing the stove you must observe the following points:
- If the stove is connected to an existing chimney, you must first have the chimney professionally cleaned and checked by a qualified chimney sweep company. Any cut-off valves or stop valves must be removed.
- The flue tube of the stove must be connected with the chimney without diversions.
- The underpressure in the chimney must be at least 12 Pa or 0.12 mbar.
- The chimney flue must always end up in outlet area 1 (see the drawing and the table on page 25)
- At the time of placing the stove, the chimney flue must be clean, leak-proof and without obstructions, and must have a diameter of 150~mm .
- Any bends in the flue tube must not exceed 45 degrees.
- Ensure that the chimney tube can discharge the flue gases adequately, properly and safely.
- The values for calculating the chimney tube is given in the section on Technical Information, page 25.
Fire Safety
For reasons of fire safety it is important to observe the following instructions before installing the fireplace.
- If the floor around the stove is made of combustible material, you must use a floor slab.
The floor slab must measure at least: - 50 cm from the stove on the front side of the door
- 30~cm from the stove on the sides of the door.
- Keep a distance of at least 80~cm between the fireplace and combustible objects such as curtains, wooden objects (cupboards and paintings) and glass objects.
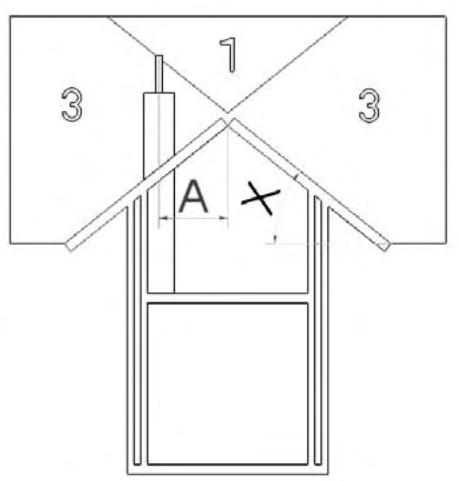
Roof slope x larger than 23^
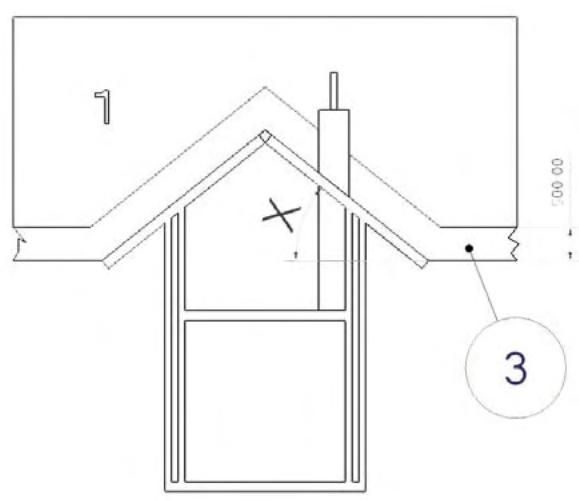
Roof slope x smaller than 23^
| Height of chimney on the roof at a horizontal distance A measured from the ridge | |||||||||
| Roof with slope X | Horizontal distance A from the ridge, in metres | ||||||||
| On the ridge | 0.5 m | 0.75 m | 1 m | 1.25 m | 1.5 m | 2 m | 3 m | 4 m | |
| 25° | 0.5 | 0.75 | 0.85 | 1.0 | 1.1 | 1.2 | 1.6 | 2.5 | 3.3 |
| 30° | 0.5 | 0.85 | 1.2 | 1.6 | 2.0 | 2.4 | 3.2 | 4.9 | 6.5 |
| 35° | 0.5 | 1.0 | 1.8 | 2.4 | 3.0 | 3.6 | 4.8 | 7.3 | 10 |
| 40° | 0.5 | 1.2 | 2.4 | 3.2 | 4.0 | 4.8 | 6.4 | 10 | 13 |
| 45° | 0.5 | 1.5 | 3.0 | 4.0 | 5.0 | 6.0 | 8.0 | 12 | 16 |
Keep the same distance from the flue tube.
- Wooden construction parts within the radiation range of the stove (80 cm from the exterior of the stove) must be covered with fireproof material.
- Keep a distance of at least 50~cm (in all directions) between the stove and supporting steel construction parts.
- If the flue tube goes through a ceiling and/or roof consisting of flammable materials, the ceiling and the roof must be covered with fireproof materials all around (about 80~cm ). Also pay attention to joisted floor layers and any electric wiring.
- Never cover the chimney breast or the wall with combustible material (e.g. paper covering).
- Walls and other materials that are located within 80 cm from the fireplace must consist of, or be insulated with, fire-proof materials. The insulation material to be used must resist a temperature of 700^ C and have a density of 80 ~kg / m^3 . (Please see page 29 for insulation materials).
- Avoid heat transmission when placing the stove and the flue gas tube. Heat transmission of a burning stove may penetrate the wall and even cause fire damage on the other side of the wall. Prevention is better than cure.
Installation
The Oriana is tested in accordance with the international EN 13240 standardization, and has an extra additional standardization for optimally environment-friendly heating devices related to flue gases (Section 15a B-Vg. Des BmfWA). The stove can be connected to a flue tube to which several stoves are connected.
Supply of combustion air
The stove must have a sufficient fresh supply of combustion air. To avoid draft, make if necessary an extra air supply opening as close to the stove as possible. An extra air supply opening is definitely required if:
the room has a heat recovery system.
the room has a central exhaust system.
the same space has a cooker hood.
The air supply opening must be sealable if it goes through a fire-resistant wall. If there are several heating devices in the same room there must be enough air openings to guarantee proper combustion.
Electricity
You must have an electricity supply (230V) for the
ventilators. The connection must be carried out by a certified installer in accordance with the prevailing standards. Please ensure that there is no extra wiring inside, onto or through the chimney breast. Electrical parts may melt by the heat emission of the fireplace and create unsafe situations. Always connect the fireplace to an earthed wall socket. Moreover, there must be the possibility to disconnect the stove from the electricity supply during any service or maintenance.
Connecting the front and the corner fireplace
- First follow the instructions given in the previous chapter on 'Preparation'.
- Remove any valves from the existing hearth.
- Insulate the stove between the wall and the outer cover with fireproof materials (please see the insulation materials in the table on page 29).
- Be sure that the connection to the outside is airtight. When there is a chimney you may install a stovepipe with a diameter of 150~mm . Fit this pipe to the stove.
- Remove the pipe collar from the hearth. (see illustration 1)
- Place the hearth in the opening and mind any power cables.
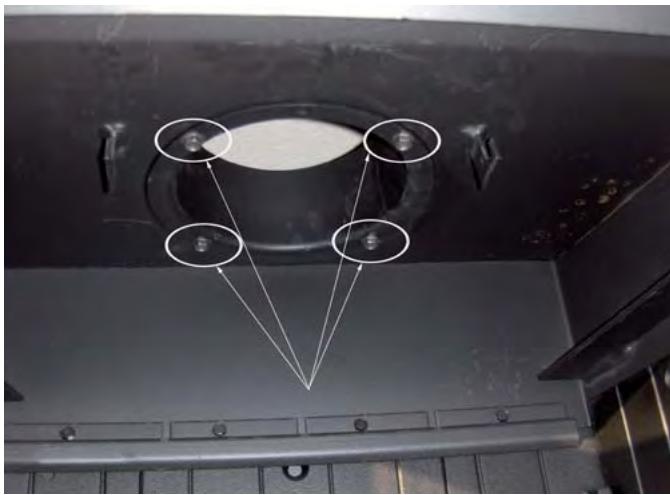
Illustration 1 Remove the pipe collar from the hearth

Illustration 2 Install the energy-saving valve and the push rod.
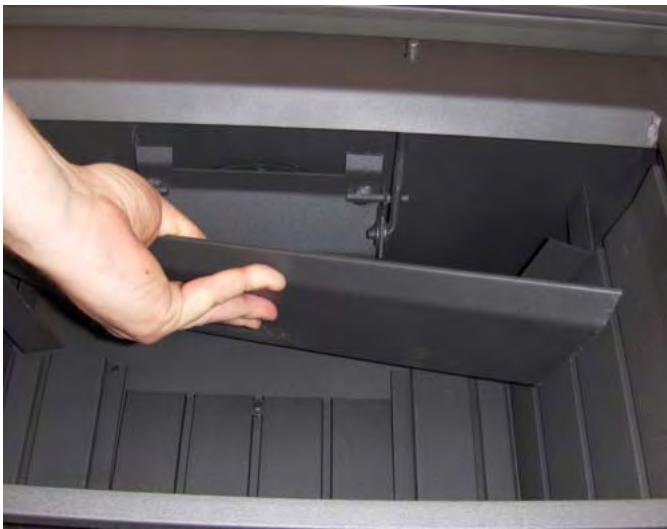
Illustration 3 Place the deflector inside the stove
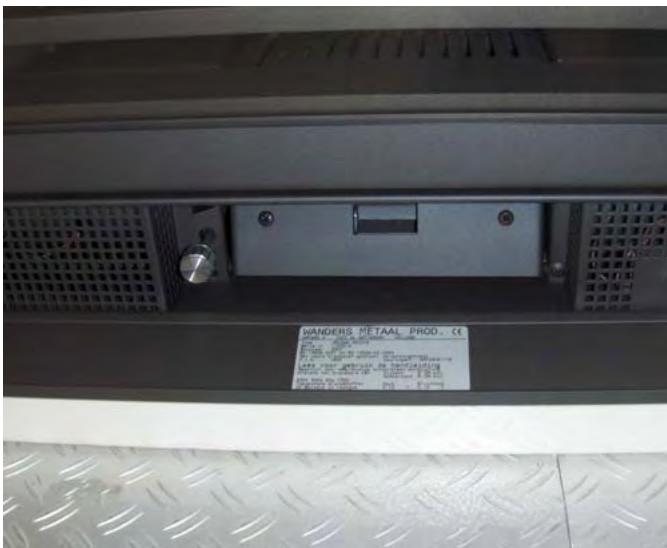
Illustration 4 Photograph of the place of the typeplate
- Connect the pipe to the pipe collar. Then fit the pipe collar again to the hearth.
- Fit the energy-saving valve and place the push rod towards the door into the recess on the front side of the hearth. Hang the valve in the hinge brackets (see illustration 2).
- Place the flue gas deflector on the supports underneath the energy-saving valve (see illustration 3)
- Fit the supplied frames on the sides and on top of the hearth.
- Put the plug in the earthed wall socket.
- If you want you can change the type plate into the type plate in your own language (Illustration 4)
Ensure that the electric wire does not crack or break during installation.
The hearth should only be connected to an earthed socket outlet.
Repairs
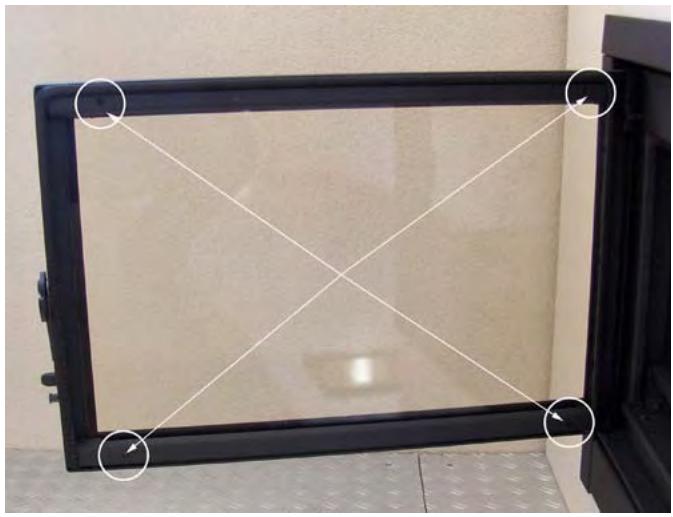
Illustration 5: Replacing the glass in the door
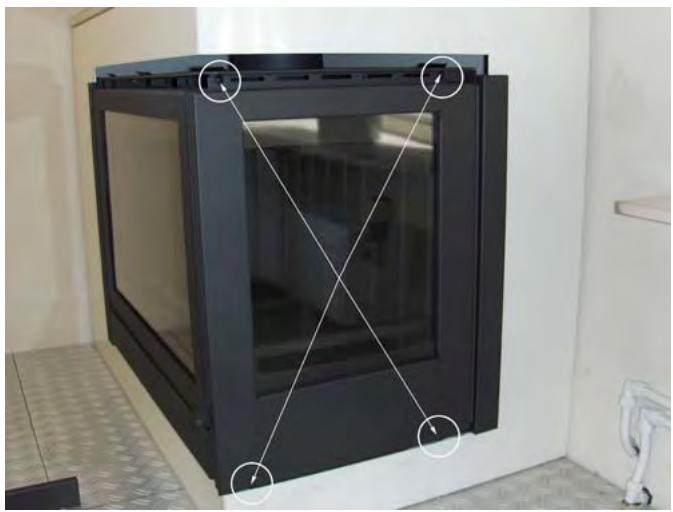
Illustration 6: Replacing the glass in the side panel
Changing the glass pane in the door
- Open the door of the hearth.
- Remove the four screws (see illustration 5).
- Remove the glass strips. Remember that the glass is sharp.
Changing the side panel
- Remove the four screws above and underneath the side pane.
- Remove the glass strips on the inside of the hearth.
- Remember that the glass is sharp.
Changing the ventilators and/or the safety fuses
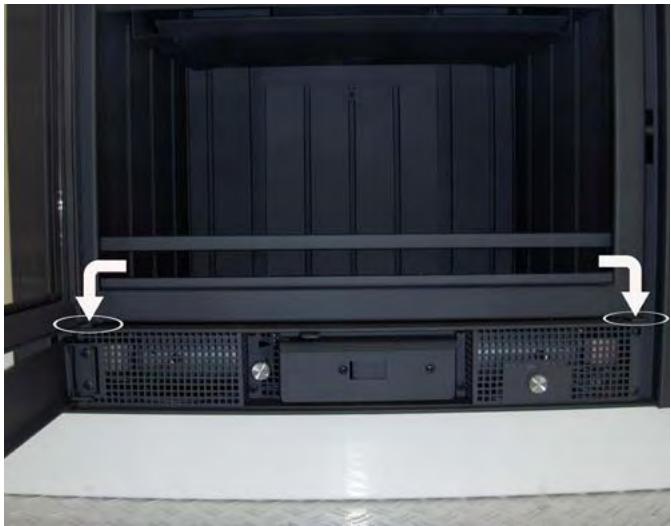
Illustration 7: Remove the 2 screws on the right and left bottom side.
- Be sure that the electricity is disconnected.
- Remove the two screws left and right at the bottom.
- Pull the entire ventilator unit out. Watch the cable!
- Remove the front panel of the ventilator unit.
- Remove the ventilator or replace the safety fuse in the regulator.
You can reach the regulator by removing it from the front.
Technical details Oriana
Technical details
| Door latch | Ba | I/II |
| Nominal capacity* | 7 | kW |
| Diameter tube for combustion gases | 150 | mm |
| Maximum lumber supply in the stove | 3 | kg |
| Maximum brown coal supply | 3 | kg |
| Volume of the combustion chamber | 0.08 | m3 |
| Surface bottom of combustion chamber | 0.2 | m2 |
- a nominal heat of 8 kW is obtained with a chimney draught of 0.12 mbar
| Fuel | wood logs, 30 x 10 cm | brown coal |
| Maximum supply | 3 pieces | 4 pieces |
| Primary air valve | max. | max. |
| Secondary air outlet | max. | max. |
| Fuel burning period | about 1 hour | about 1 hour |
Flue gas values in accordance with DIN 4705, DIN 18895 part 2
| When door is closed | logs | brown coal | ||
| Flue gas quantity | 7,2 | g/s | 9,3 | g/s |
| Flue gas temperature | 320 | °C | 300 | °C |
| Pre-pressure | 0.12 | mbar | 0,12 | mbar |
| Yield | 78.9 | % | 79,3 | % |
| CO at 13% O2 | 0.07 | % | 0,09 | % |
| Particulate matter | -- | mg/m3 | -- | mg/m3 |
| Certificate Institute 1625. Test standard EN 13240. Test report no. RRF-400169 | ||||
Target value for the volume of the space to be heated:
Not all spaces meet the present insulating values. According to DIN 18893, the following values can be taken for the volume of the space to be heated:
If heating circumstances are favourable: Calculate according to DIN 4701
In less favourable circumstances: 115 m3
In unfavourable circumstances: 75 m3
For temporary heating you may assume a reduction of 25% for the volume to be heated if the interval is more than 8 hours.
Table for thickness of insulation cf thickness of the wall
| Wall thickness 10 cm | Insulation | Convection house | |
| Protection of the wall | back side 8 cm | X | |
| Walls made of combustable construction parts | X | ||
| Supporting walls in steel construction | X | X | |
| Intergrated pieces against stove | X | X | |
| Intergrated pieces in the wall behind | X | on the side 8 cm | X |
| Other walls | |||
| Wall thickness < 10 cm | X | under side 6 cm | X |
| Wall thickness > 10 cm (e.g. a brickwork wall) | - | - |
Table gives the insulation thickness to be used for a given wall thickness to protect intergrated wall.
Table for insulation material.
Please note! Only use products given in the grey-shaded part.
| Insulation no | Article | Packed no | Form | Thermal conduction no | packed | Maximum appl. temp. no | °C | Density no | Kg/m3 |
| 10 | Mineral wool | 01 | Bands | 01 | Stitched mats | 10 | 100 | 02 | 20 |
| 11 | Glass wool | 02 | Loose wool | Stitched mats | 12 | 120 | 03 | 30 | |
| 12 | Rock wool | 03 | Wool | 02 | Stitched mats | 14 | 140 | 04 | 40 |
| 13 | Waste products | Granule | G. curve 2 | 16 | 160 | 05 | 50 | ||
| 04 | Felt | 06 | 60 | ||||||
| 05 | Lamella mat | 10 | Flakes | 07 | 70 | ||||
| G. curve 1 | 08 | 80 | |||||||
| 06 | Stitched into | 11 | Flakes | 09 | 90 | ||||
| mats | |||||||||
| 07 | Plates | G. curve 2 | 10 | 100 | |||||
| 08 | Scales | 72 | 720 | 11 | 110 | ||||
| 09 | Segments | 20 | Plates | 74 | 740 | 12 | 120 | ||
| 10 | Interwoven | G. curve 1 | 76 | 760 | 13 | 130 | |||
| 21 | Plates G. curve 2 | 18 | 180 | ||||||
| 99 | Otherwise | 99 | Single | 99 | 99 |
Select the insulation material from this table. PLEASE NOTE: Group 99 is NOT ALLOWED.
FR
Date of purchase / Kaufdatum
- User's Guide and Installation Manual Oriana
- Table of Contents
- Your Oriana stove at a single glance
- Installation
- Usage early in autumn or late in winter
- Lighting the stove
- Avoid finger marks
- Lighting the stove for the first time
- Discolouration of walls, ceilings and grates
- Newly-built house or recently renovated?
- Fuel: wood and browncoal
- What to do in case of chimney fire.
- Wood species and storage
- The best way to burn your stove
- Chimney and flue
- Chimney with a proper draught
- Maintenance
- Small maintenance
- When the stove is not used
- Yearly maintenance
- Safety
- Guarantee
- Installation Instructions for the Oriana
- General instructions
- It is not allowed to place the stove in:
- Preparation
- The chimney flue
- Fire Safety
- Supply of combustion air
- Electricity
- Connecting the front and the corner fireplace
- Repairs
- Changing the glass pane in the door
- Changing the side panel
- Changing the ventilators and/or the safety fuses
- Technical details Oriana
- Target value for the volume of the space to be heated:
- Table for thickness of insulation cf thickness of the wall
- Table for insulation material.
- FR
Brand : WANDERS
Model : ORIANA
Category : Fireplace insert