EZY 80 - Audio System ADVANCE - Free user manual and instructions
Find the device manual for free EZY 80 ADVANCE in PDF.
User questions about EZY 80 ADVANCE
0 question about this device. Answer the ones you know or ask your own.
Ask a new question about this device
Download the instructions for your Audio System in PDF format for free! Find your manual EZY 80 - ADVANCE and take your electronic device back in hand. On this page are published all the documents necessary for the use of your device. EZY 80 by ADVANCE.
USER MANUAL EZY 80 ADVANCE
Disposal of your old appliance
English
This symbol on the product or on its packaging means that your electrical and electronic equipment should be disposed at the end of life separately from your household wastes. There are separate colection systems for recycling in EU. For more information, please contact the local authority or the dealer where you purchased the product.
French
To reduce the risk of fire or electric shock, do not expose this appliance to rain or moisture.
WARNING:
Refer servicing to qualified service personnel.
THE LIGHTNING FLASH with arrow-head symbo is intended to alert the user to the presence of uninsulated "dangerous voltage" within the product's enclosure that may be of sufficient magnitude to constitute a risk of electric shock to persons.
An appliance and cart combination should be moved with care. Before any transportation, your product must be packed correctly in order to avoid any damage.
MEMORISER CES INSTRUCTIONS
All the safety and operating instructions should be read before the appliance is operated.
RETAIN INSTRUCTIONS
The safety anil operating instructions should be retained for future use.
HEED WARNINGS
All warnings on the appliance and in the operating instructions should be adhered to.
FOLLOW INSTRUCTIONS
All operating and use instructions should be followed.
WATER AND MOISTURE
The appliance should not be used near water for example, near a bathtub, washbowl, kitchen sink, laundry tub, in
a wet basement, or near a swimming pool, etc.
VENTILATION
The appliance should be situated so that its location or position does not interfere with its proper ventilation. For example, the appliance should not be situated on a bed, sofa, rug, or similar surface that may block the ventilation openings; or, placed in a built-in installation, such as a bookcase or cabinet that may impede the flow of air through the ventilation
openings.
HEAT
The appliance should be situated away from heat sources such as radiators, heat registers, stoves, or other appliance
(including amplifiers) that produce heat.
POWER SOURCES
The appliance should be connected to a power supply only of the type described in the operating instructions or as marked on the appliance.
GROUNDING OR POLARIZATION
Precautions should be taken so that the grounding or polarization means of an appliance is not defeated.
POWER-CORD PROTECTION
Power-supply cords should be routed so that they are not likely to be walked on or pinched by paying particular attention to cords at plugs, convenience receptacles, and the point where they exit from the appliance.
CLEANING
The appliance should be cleaned only as recommended by the manufacturer.
POWER LINES
An outdoor antenna should be located away from power lines.
NON-USE PERIODS
The power cord of the appliance should be unplugged from the outlet when left unused for a long period of time.
OBJECT AND LIQUID ENTRY
Care should be taken so that objects do not fall and liquids are not spilled into the enclosure through openings.
DAMAGE REQUIRING SERVICE
The appliance should be serviced by qualified service personnel when:
- The power-supply cord or the plug has been damaged; or
- Objects have fallen, or liquids have spilled into the appliance; or
- The appliance has been exposed to rain: or
- The appliance does not appear to operate normally or exhibits a marked change in performance; or
- The appliance has been dropped, or the enclosure damaged.
SERVICING
The user should not attempt to service the appliance beyond that described in the operating instructions.
All other servicing should be referred to qualified service personnel.
Congratulations on your purchase of our wireless EZY 80 system
Bienvenu !
Welcome!
Bienvenu !
We're pleased that you've chosen an Advance Acoustic product.
Your wireless audiophile media stream center will give you real musical pleasure for long time.
Those wireless and connected HiFi system combine a superb presentation to perfect technical accuracy.
The EZY 80 is the ideal complement of your iPhone, iPad, iPod, smartphone, tablet, PC and Mac computer.
With Ezy 80, nothing was left to chance, all the components are sound-friendly: it has a high power transformer, bipolar high current transistors, Apt-X codec for wireless to ensure outstanding performing ability, as weel as a delicate and subtle rendering of your favorite music.
Warranty period is two years.
EZY 80 REAR PANEL
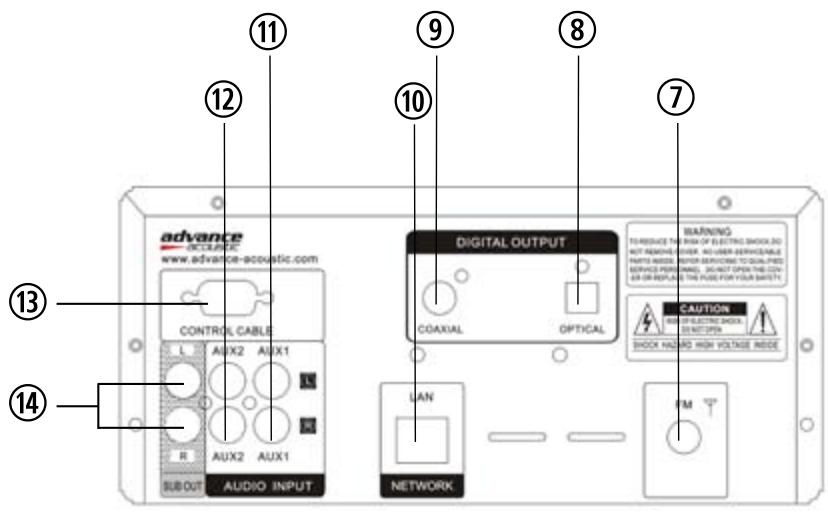
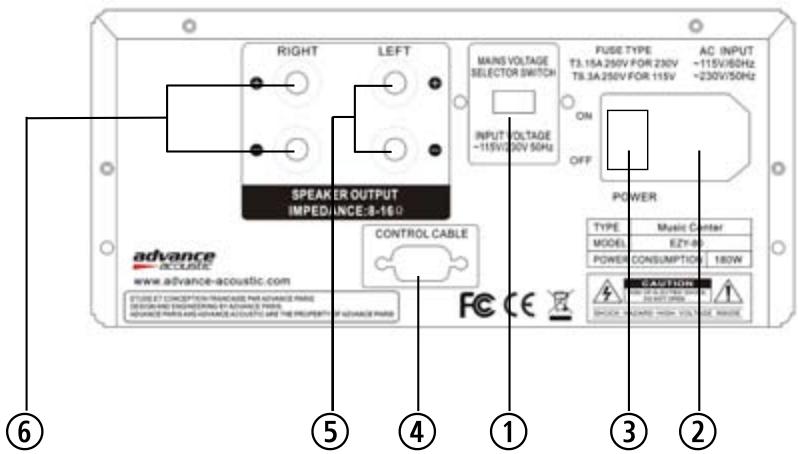
When making connection between this unit and other components, be sure all connection with power-off. Audio cables are connected according to the different colour identification and they should be fitted firmly.
① FUSE HOLDER / VOLTAGE SELECTOR
② Before plugging in the amplifier, its master power switch must be in the OFF position. Also, you need to be sure about the voltage of your country. In case that you need to use your appliance in 115V, you need to change the position of the voltage switch and to replace the voltage fuses by those included in your product. (T 3.15 pour 220V et T 6.3 pour 115V).
3 MASTER ON/OFF SWITCH
To switch ON your appliance, please use the master ON/OFF switch (MASTER). If you expect not to use the appliance for a long period, it is recommended to set the power selector to OFF. In case of stormy weather, unplug the power and LAN cable.
Connect the stereo power amplifier unit on the source unit with the RS-232 cable. Be sure that cable is correctly fixe
BORNIER HAUT-PARLEURS
Connect speakers with impedance of 4 Ohms or greater. Connect the right
speaker to the right terminals + and - ensuring that the + (RIGHT) is connected to the +^ terminal of your loudspeaker and the - (RIGHT) is connected to the loudspeaker's -terminal. Connect the terminals marked + and - (LEFT) to the left speaker in the same way.
The high current binding post terminals can be used as a screw terminal for cables terminating in spade or pin connectors or for cables with bare wire ends.
SPADE CONNECTORS
These should be slotted under the terminal's screw bushing, which is then fully tightened. Ensure the connector is tightly secured and there is no danger of bare metal from spade connectors touching the back panel or another connector as this may cause damage.
BARE WIRES AND PIN CONNECTORS
Bare wires and pin connectors should be inserted into the hole in the shaft of the terminal.
Unscrew the speaker terminal's plastic bushing until the hole in the screw shaft is revealed. Insert the pin or bare cable end into the hole and secure the cable by tightening down the terminal's bushing.
BANANA CONNECTORS
You also can use banana connectors on the speakers terminal.
Avoid any danger of bare metal from the speaker cables touching the back panel or another connector. Ensure that the total striped lenght of the cable will not exceed 1/2 (1cm).
⑦
PRISE D'ANTENNE
Connect a FM Antenna to the FM Antenna connection. The FM antenna may be an external roof antenna, an inside powered or wire lead antenna or a connection from a cable system. Note that if the antenna or connection uses 300-ohm twin-lead cable, you need to use a 300-ohm-to-75-ohm adapter to make the connection. The supplied antenna is for indoor use only.
(8)
SORTIE COAXIALE NUMÉRIQUE ET SORTIE OPTIQUE DU LECTEUR CD
If you want to use an external DAC (Digital Audio Converter) or a cd recorder, connect the coaxial digital output or optical coaxial output of your cd player to the coaxial or optical digital input of the DAC (Digital audio converter) or cd recorder.
(10)
CONNEXION A UN RESEAU DOMESTIQUE LAN
This unit lets you play via your home network (LAN) music files stored on a computer and music content such as that from Internet radio.
Our EZY-80 require a broadband internet connection, a modem or ADSL box or a device that connects to the broadband circuit and conducts communications on the Internet.
We recommend you use a router equipped with built-in DHCP server (this function automatically assigns IP addresses on the LAN. When connecting multiple devices, we recommend a switching
hub with a speed of 100 Mbps or greater.
Ethernet cable (CAT-5 or greater recommended) with RJ-45 connectors.
Connect one RJ-45 plug on the EZY-80 LAN input and the other on your router.
You can connect your stereo sources on those inputs. These inputs are suitable for any line level source equipment such as tuners, CD players, DVD, MP3 players, etc.
Note: These inputs are for analogue audio signals only. They should not be connected to the digital output of a CD player or any other digital device.
These RCA connectors allow you to connect another power amplifier or an active subwoofer (subwoofer with built-in amplifier). To connect them use an stereo analog RCA audio cable. This stereo output is adjustable with the volume control.
SUB OUT/PREAMPLIFIER Connects to part 1 and 2
SUB OUT/PREAMPLIFIER
These connections allow you to connect L and R input from an additional power amplifier here. You also have the possibility to connect an active subwoofer. The signal level of this output is adjustable with the volume knob of your EZY-80.
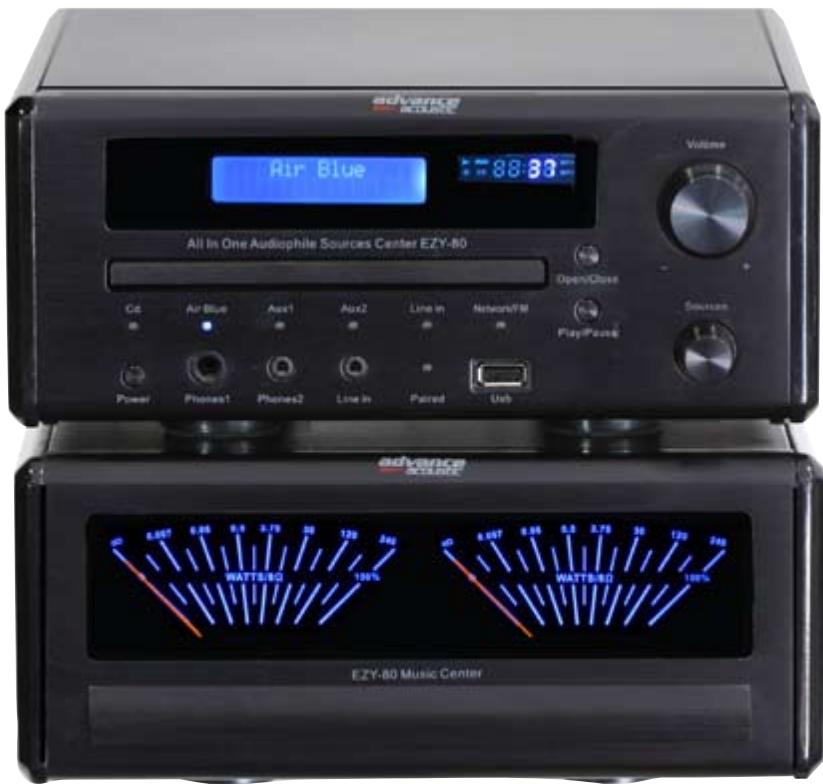
RÉGLAGES FACE AVANT FRONT PANEL CONTROLS
(1)
BOUTON STANDBY/ON
Press this button to turn ON your appliance, power is supplied to your unit and it becomes operational, the meters and the display will light ON. Please note that the main power switch located on the back panel must be ON in order to use the Power/Standby button located on the front panel. When set to STANDBY the main power is cut-off and the unit is no longer fully operational except for the micro controller.
③ ⑤
PHONES 1 / PHONES 2
You can connect a stereo headphones to the phone jack for private listening. Notes: always turn down the volume before connecting your headphones. Please note that all connected speakers are turned off automatically while the headphones plug is inserted in the phone jack.
⑦
ENTREE MINJACK NORMALISEE
You can connect a source with a minijack male 3,5mm stereo audio cable. These inputs are suitable for any standard line level sources such as cd player,DVD player, tuner, iPod dock, mp player, media source, etc...
They are compatible with analogue audio signals appliances only.
⑪
ENTRÉE USB (TYPE A)
The USB type A (MP3 only) port allows you to hook up your MP3 Player or MP3 drive to play back your downloaded MP3 music library directly thru the EZY-80.
(17)
BOUTON DE SELECTION DE SOURCES
Turn the sources button to select the input source that you want to listen: CD, Airblue (Bluetooth Apt-X), Aux.1, Aux.2, Line In ou Network/FM.
Each time that you turn this button, the selected source will be indicated by its led ② ④ ⑥ ⑧ ⑩ ⑫
13
TRAPPE DE CHARGEMENT DU CD
The disc is inserted in this tray with the labelled side up
(14)
BOUTON OPEN/CLOSE
This button is used for opening or closing the tray.
(15)
BOUTON MULTIFONCTIONS: PLAY/PAUSE/CLOSE
Press this button to close the tray and play the disc. If you push this button when your cd is playing, you will interrupt the track, if you push again, then your cd will play.
(16)
BOUTON DE VOLUME
Your amplifier used a rotary type knob to control the 2 channel output sound level (left and right). Turn this volume knob clockwise to increase the output sound level and turn this volume knob counterclockwise to decrease the output sound level.
(17)
SELECTEUR DE SOURCES
Turn this knob to choose the source that you want to play.
(19)
MULTI AFFICHEUR GENERAL
This dual display will indicate different informations: The alphanumeric left display indicates the listening source and the different menus concerning the NETWORK/FM source. The right display indicates the sound volume, tone level (Bass and treble) and informations concerning the cd player.
TELECOMMANDANTE MULTIFONCTIONS
REMOTE CONTROL
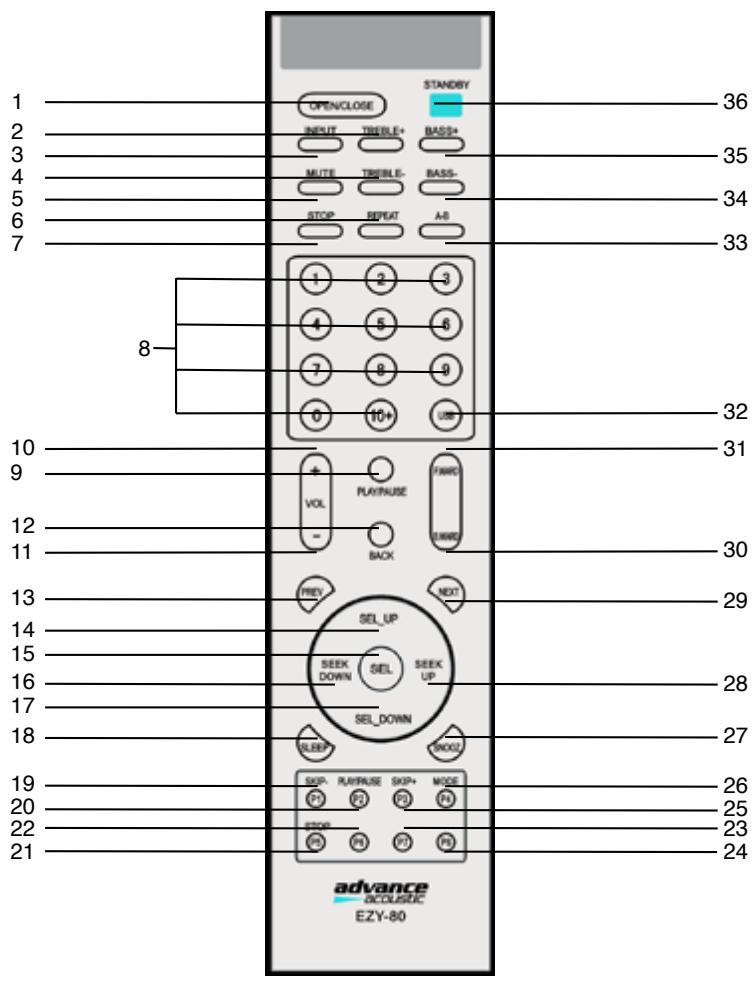
- OPEN/CLOSE
2.TREBLE+
3.INSUT
4.TREBLE-
5.MUTE
6.REPEAT
7.STOP
8.NUMBER BUTTON
9.PLAY/PAUSE
10.VOLUME+
11.VOLUME-
12.BACK
13.PREVIOUS
14. SELECT UP
15 SELECT
16.SEEK_DOWN
17. SELECT DOWN
18.SLEEP
19.SKIP-/P1
20.PLAY/PAUSE/P2
21.STOP/P5
22.P6
23.P7
24.P8
25.SKIP+/P3
26.MODE/P4
27.SNOOZE
28.SEEL_UP
29.NEXT
30.B.WARD
31.F.WARD
32.USB
33.A-B
34.BASS-
35.BASS+
36.STANDBY
FONCTIONS BASIQUES
BASIC FUNCTIONS
ECOUTER VOTRE MUSIC EN 5 ETAPES
Your sources, pair of speakers, power cord and communication cable between connectors 13 and 4 must be connected (rear panel of your appliance)
-1- Switch ON your master ON/OFF switch located on the rear panel ③
-2- Press ① button to turn ON your appliance, power is supplied to your unit and it becomes operational, the meters and the display will light ON.
-3- Turn ⑰ button to select source that you want listen: CD/or USB, Airblue (Bluetooth Apt-x), Aux.1, Aux.2, Line In or Network/FM
-4- Adjust level of volume 16 and eventually modify tone control level (bass and treble) with the remote control (button 2,4,35 and 34). The small right display will indicate the level of the volume (00 to 60), level of bass and treble (-10 to +10).
-5- Play the selected source. Enjoy music!
UTILISATION ENTREE AIRBLUE (BLUETOOTH APT-X)
AIRBLUE OPERATION (BLUETOOTH APT-X)
VERBINDEN DER BLUETOOTH QUELLE
SUIVEZ IMPÉRATIVÉMENT CES 3 ÉTAPES POUR RÉGLER VÔTRE SYSTÉME
1 - Check that your EZY-80 has been switch ON and that input selected is Airblue. The blue led is flashing. 2 - Go to the Bluetooth Manager of your iPhone, iPod touch, iPad, tablet, smartphone, PC or MAC computer, then go on the bluetooth settings. You will see a new bluetooth connection under ADVANCE ACOUSTIC name. Confirm that you choose it, after few seconds, your audio device is pairing with the EZY 80 system. If pairing is ok, then, the blue led of the Air amplifier will be fixed. You don't need any Pin code confirmation. Your EZY 80 is now connected and ready to play music! Just play music on your device as you normally would and the sound will come out of your Air system.
If you move out of range or turn off the Bluetooth feature on your audio device, the Bluetooth Music Receiver will disconnect from your device.
To reconnect, simply access the Bluetooth Manager on your device and select the ADVANCE ACOUSTIC connection.
A PROPOS DE L'ENTREE NETWORK / FM
FONCTIONS "MY STUFF"
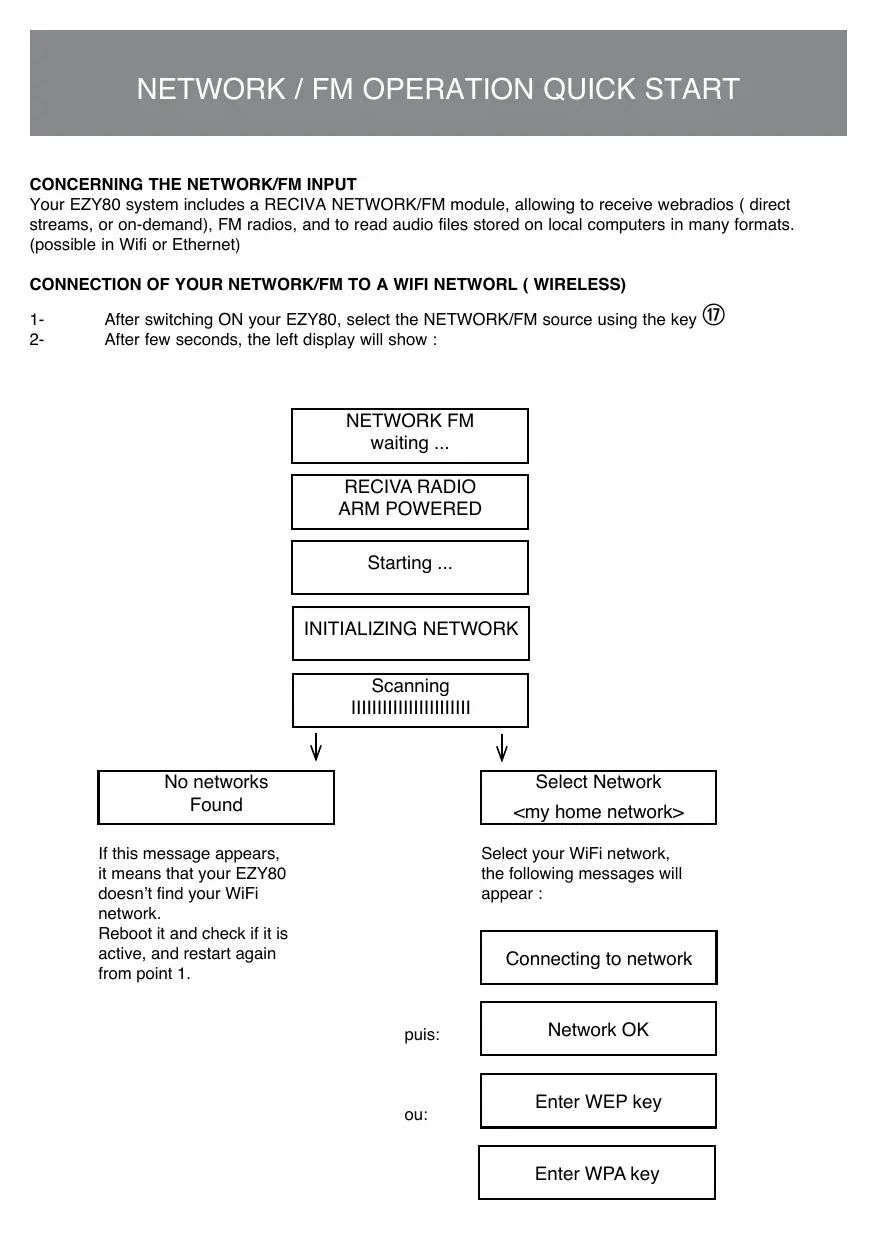
Your EZY80 system includes a RECIVA NETWORK/FM module, allowing to receive webradios ( direct streams, or on-demand), FM radios, and to read audio files stored on local computers in many formats. (possible in Wifi or Ethernet)
CONNECTION OF YOUR NETWORK/FM TO A WIFI NETWORL ( WIRELESS)
1- After switching ON your EZY80, select the NETWORK/FM source using the key ⑰
2- After few seconds, the left display will show :
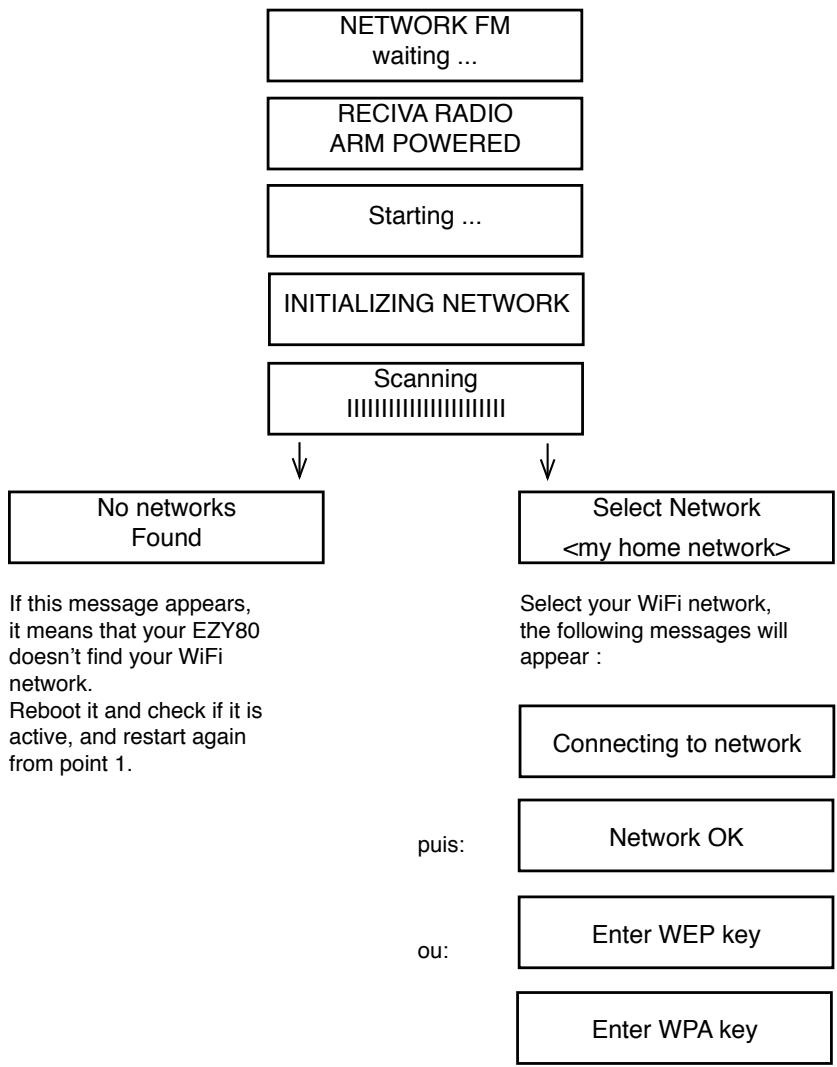
In some places, the EZY80 can find more than one wireless access. In this case, you can choose the one you want to be connected to.
Your network uses a system of WAP ( Wi-Fi Protected Access) or WEP ( Wired Equivalent Privacy) ciphering. In this case, enter the right WAP or WEP code to connect the webradio to the network.
After 3 seconds, the display shows the mode to enter the code. To enter the code, use the SEL UP key (to scroll through the characters A to B to C ...) and SEL DOWN for the other way. The cursor under the character indicates the active letter, you can select pressing SELECT; The WAP or WEP codes are case sensitive to upper or lower case letters.
So please remember to enter them correctly.
Press Back key to delete wrong characters. Once the last character entered, use the button to select « END », and press SELECT to confirm. Now the radio should be connected to the network. If the message « Invalid key » or « Network Error » appears on the display, that means your password was not correctly entered.
Search for a radio station : please follow the instructions below.
The Menu scrolls down and indicates
- Press SELECT
- Select one of the options :
or or using SEL UP, SEL DOWN keys and SELECT on the remote control :
- Searching by <Location> , choose the country and press Select key;
Select your radio station and press SELECT. Please wait until the EZY80 is connected to this station.
Remark : Some radios are not playing programs 24h a day, and some others are not always broadcasting.
If the selected station provides an « on-demand » content ( that means , you can listen programs already played), refer to the webradio station section allowing you to choose what you want to listen
Searching by <Genre> , select the search by Genre with the Select key (Alternative, Blues, Rock etc...), and select the desired station. Please wait until the EZY80 is connected to this station.
If the selected station provides an « on-demand » content ( that means , you can listen programs already played), refer to the webradio station section allowing you to choose what you want to listen
You can store up a maximum of 8 radio stations in the internal memory of your device. When you are listening a radio station, press down and hold one of the P1 to P8 keys, located on the remote control until the display shows « Assigned to preset # », the # symbol is showing the number of the button you are holding.
The presets 1 and 2 are on factory basis, and can be re-programmed.
Additional presets can be added using your personalized space on the RECIVA website ( see process at the end of this owners manual).
When you want to listen to a webradio station, press briefly on one of the keys P1 to P8 on your remote control.
If you want to listen to a webradio that is not available at the moment :
If you want to listen to a webradion,which is not broadcasting at the moment, visit the RECIVA website :
http://www RECiva.com/ and request that this webradio be added to the list.
RADIOS PROVIDING THE OPTION ON-DEMAND
Some webradio stations allow to listen programs that have been already played. When you choose a radio providing this option, this station will not play immediately the requested program. The display will show :
Select
If you choose
The content of the display will vary in function of the selected station. The following steps are only a guide.
When you select
After confirming your choice, you could start to listen, or the display will ask you to choose for specific days. Confirm again pressing the SELECT on the remote control. Once the day chosen, you can schedule the time of the program beginning. Set the correct time of the day, and press SELECT.
STORAGE AND LISTENNING OF FM RADIOS
Check that your antenna is well connected.
Your EZY80 has been designed with a stereo radio tuner, that will allow you to access to FM radio stations. Select FM from the drop-down menu, after or you make a quick search of the stations using SEEK UP or SEEK DOWN keys on the remote control, or a step by step search using SEL UP and SEL DOWN keys.
You can store up a maximum of 8 FM radio stations in the device memory. When you are listening a FM radio station, press down and hold one of the P1 to P8 keys on the remote control, until the following screen shows the memorization.
This menu allows you to access directly to your preset list made on your personalized space on the RECIVA website.
Registering allows you to get even more options : MY STATIONS, MY STREAMS, and MY PODCASTS through the MY STUFF Menu as third parties ( not free).
To register you on your RECIVA space, you need the identification number of your EZY80. To find this one, go on the menus:
USE OF YOUR MEDIA PLAYER
Note that this function is more oriented for advanced users.
Installation of your computer to allow your EZY80 to access to audio files on Windows Shares.
- Check that your computer is connected to the webradio network. Using Windows Explorer software, Locate the folder where the audio files are saved.
- Click on the right on the folder
- Select
- Click on
- Select « Share this folder on the network » and « Allow network user to change my files »
LOCATION OF SOUND FILES ON WINDOWS SHARES
- Switch on your EZY80
- Go on the main menu of the NETWORK/FM source and select Media Player
- Confirm by pressing SELECT
- By means of the keys SEL UP and SEL DOWN, navigate into the menu and select the shared audio files.
- Press on SELECT, and acced to « Scan for PCs », press again on SELECT
- « Finding PCs appears on screen. Choose the right computer and confirm, pressing again on SELECT key.
- The EZY80 will search for the shared users
- Choose the right shared folder, and press SELECT
- « File scan... » appears on screen as the device is searching for the files with multimedia content in the shared folder.
the files search, the text at the bottom page is running. If you have a large number of audio files, the automatic search could last several minutes.
- When the search is completed, « By Album » will appear on screen. You are now able to navigate in the files with multimedia content, which are classified by Album, by Artist, by Playlists, if available.
Remark : the first time, the search is launched, one file called « reciva_media_cache » appears in the folder containing the saved audio files. This will allow a faster process for future search.
Listening of only one shared track
- In the menu, go to « By Artist »
- Press SELECT
- In the menu, choose the desired Artist
-
Press SELECT
-
In the menu, choose the desired Album
- Press SELECT. « Add to Queue » will appear on screen.
- In the menu, choose the desired track.
- Pres SELECT and the track will be played.
Listening of a complete shared album
- In the menu, go to « By Artist »
- Press SELECT
- In the menu, choose the desired Artist
- Press SELECT
- In the menu, choose the desired Album
- Press SELECT. « Add to Queue » will appear on screen.
- Press SELECT and the Album will be played.
Tracks added to queue for listening later on
- Highlight the desired track
- Press SELECT. « Track added to queue » will appear on screen.
Albums added to queue for listening later on
- Highlight the desired album
- Press SELECT
- In the menu, go till « Add to Queue » appears on screen.
- Press SELECT. « Albums Added to Queue » appears on screen.
LISTENNING CONTROL
- Press STOP button, to stop playing
- Press Play/Pause button to temporarily stop the track playing, to start again the playing of the temporarily stopped track, to start again playing the stopped track.
- Press SKIP - to start playing the previous track added to queue
- Press SKIP + to start playing the next track added to queue
CLOCK ADJUSTMENT
- Go to the main menu SETTINGS, after SET TIME/DATE
- Confirm pressing SELECT
- Press SELECT
- The TIME format appears on screen. Press SELECT if it is correct, or modify with the SEL UP and SEL DOWN keys on the remote control, and press SELECT to validate.
- For the DATE, repeat same process
LANGUAGE SETTING OF MENUS
By default, the language use is English language.
To select another one, go to SETTINGGS, and choose the desired language in the proposed list : French, English, German, Spanish, Danish, Italian, Dutch,Portuguese, Swedish, Norwegian etc..
This web portal is designed and managed by a Cambridge's firm, producing modules for digital audio transmission and receiver used by the main webradio manufacturers.
Easy to use, it gives direct access to several stations as AUPEO.com http://AUPEO.com, Live365.com and SiriusXM or MediaFly.
The memorisation of your webradios can be made directly on your EZY80, but limited to 8 stations or on the RECIVA website in your personalised space ( illimited memorisation)
Log you onto the RECIVA web portal using your internet browser to http://www RECiva.com
Register you on the RECIVA website
To create an account on the RECIVA website, you have to choose an user name and a password, this will allow you to do some interesting things :
The Reciva website provides you 2 possibilities : browse directory by genre or by location, or search for a station.
The search by genre or by location allows to scan a pleiade of stations, that you can listen to or register in your favorites called « my stuff »
- The stations can be listened to, added or deleted, and retrieve in memory even after website disconnection.
The best interest of the RECIVA website is to create a direct link between your EZY80 and your favorite radios stored on the RECIVA website.
- firstly, register your EZY 80 on the RECIVA website, so the web portal can link your device and the account you created on the website : follow instructions on the owners manual to recover the device serial number and the registration key.
- New services provided by RECIVA, the serial number of your radio, and your previously stored favorite radios are then displayed on the website
Use the RECIVA services
When you will switch on your Tuner, three new headings will appear in MY STUFF: « My stations», My Aupeo » and « My Live365.comhttp://Live365.com »
- « My Stations » regroups the list of the webradios you stored on the RECIVA website. The RECIVA database will update your playlist on your EZY80 after one working day.
To receive « My Aupeo » and « My Live365.comhttp://Live365.com », go to « Add new services » on radios/reciva.comhttp://*radios-reciva.com and click on the chosen portal, or log onto their website directly to create an account, that will be relayed via your EZY80.
IMPORTANT WICHTIGE INFORMATION
Some appliances which are used on same mains networks can create interference which can switch ON the subwoofer when it is in AUTO mode.
Advance Acoustic recommends using a quality surge suppressor on all electronics equipment. Voltage variations and spikes can damage electronic components in any system.
Magnetic interferences
The AIR system should be at least 50~cm from your TV set to prevent
magnetic interferences. Generally, it's better to move away all products which can be damaged by magnetic shields like (cassettes, magnetic storages, etc...).
Water damages
The apparatus shall not be exposed to dripping or splashing and that no objects filled with liquids, such as vases, shall be placed on the apparatus.
Disconnection
The mains plug is used as the disconnect device, the disconnect device shall remain readily operable.
Class 1
an apparatus with class I construction shall be connected to a mains socket outlet with a protective earthing connection.

More than 17.000 radios
- capable of playing live and on-demand internet radio streams and music files stored on local computers in a variety of formats
Multi software audio decoders: Real audio, Microsoft Window Media Audio, MP3, AAC (iPod, iPhone, iPad, iTunes, etc...), MPEG4, AU, WAV, AIFF
- Radio station lists are provided from web based gateways managed by Reciva.
- Streams are tested and the station lists updated daily
- In addition, our media player supports playback of MU playlists containing MWM audio files from UPnP, SMB/CIFS servers (including Microsoft Windows shared drives) on your local network
The following streaming protocols are supported: RTSP Real Time Streaming Protocol, MMS Microsoft Media Server Protocol and HTTP Hyper Text Transfer Protocol
advance
acoustic
Design and development in France by Advance Paris