
PERCEPTION 120 USB - USB microphone AKG - Free user manual and instructions
Find the device manual for free PERCEPTION 120 USB AKG in PDF.

| Product type | USB condenser microphone |
| Brand | AKG |
| Model | PERCEPTION 120 USB |
| Category | USB Microphone |
| Polar pattern | Cardioid |
| Frequency response | 20 Hz - 20 kHz |
| Diaphragm diameter | 17 mm (2/3") |
| Power supply | USB (5V) |
| Analog-to-digital converter | 24-bit, 128x oversampling |
| Sampling frequency | 44.1 / 48 kHz |
| Pre-attenuation filter | 0 / -20 dB |
| Low-cut filter | 6 dB/octave at 120 Hz |
| OS compatibility | Windows XP/Vista/7, Mac OS X (10.4+) |
| Connectivity | USB 1.1 / 2.0 |
| Dimensions (ø x L) | 53 x 165 mm |
| Net weight | 460 g |
| Color | Matte gray-blue |
| Included accessories | Table stand, adapter, USB cable, quick-start guide |
| Optional accessories | PF80 pop filter, W4000 wind screen |
| Cleaning | Slightly damp cloth |
| Safety | Avoid moisture; do not sing directly into the microphone |
| Environment | Recycling at end of life: separate housing, electronics, cables |
Frequently Asked Questions - PERCEPTION 120 USB AKG
User questions about PERCEPTION 120 USB AKG
0 question about this device. Answer the ones you know or ask your own.
Ask a new question about this device
Download the instructions for your USB microphone in PDF format for free! Find your manual PERCEPTION 120 USB - AKG and take your electronic device back in hand. On this page are published all the documents necessary for the use of your device. PERCEPTION 120 USB by AKG.
USER MANUAL PERCEPTION 120 USB AKG
Please read the manual before using the equipment!
MODE D'EMPLOI 30
1 Safety 17
Environment 17
2 Description. 18
Introduction 18
Scope of supply 18
Optional Accessories 18
Summary. 18
3 Installation 19
Setting up the microphone 19
Connecting the microphone 19
4 Configuration 20
WINDOWS XP 20
Volume control 20
WINDOWS VISTA. 21
Volume control 21
WINDOWS 7 22
Volume control 22
MAC OS X. 23
Volume control 23
Level settings 24
5 Operation 25
Operating instructions 25
Control elements 26
6 Cleaning 27
Microphone 27
7 Specifications 28
1 Safety

ATTENTION
Risk of damage
Please make sure that the piece of equipment your microphone will be connected to fulfills the safety regulations in force in your country and is fitted with a ground lead.
Environment
1) When the product reaches the end of its life, separate the housing, electronics and cables and dispose of all components in accordance with local waste disposal regulations.
2) The packaging can be recycled. Dispose of the packaging in a suitable collection system.
2 Description
| Introduction | Thank you for purchasing an AKG product. This Manual contains important instructions for setting up and operating your equipment. Please take a few minutes to read the instructions below carefully before operating the equipment. Please keep the Manual for future reference. Have fun and impress your audience! |
| Scope of supply | • Perception 120 USB microphone • Table tripod • Tripod adapter • USB cable • Quick Start Guide Please check that the packaging contains all the components listed above. If anything is missing, please contact your AKG dealer. |
| Optional Accessories | For optional accessories, refer to the current AKG catalog or folder, or visit www.akg.com. Your dealer will be glad to help. |
| Summary | The Perception 120 USB microphone expands AKG's successful Perception range and is also the first USB-equipped condenser microphone from AKG. With the widespread USB standard, ease of use and real plug-and-play, users without any recording experience can quickly and easily make high-quality, professional recordings using PC or Mac - with no installation and no additional equipment such as mixing desks or special sound cards. The microphone features an integral analog-to-digital converter. It is the only USB microphone in its class to have a separate analog-to-digital converter (24-bit, 128x oversampling) instead of the normal single chip system, offering convincing sound quality and low noise. The Perception 120 USB contains a 2/3" condenser capsule for clear, transparent sound, an integral pop filter, a switchable bass-cut filter and an attenuation switch. |
| NOTE | For further information about the features and use of USB microphones and frequently asked questions, see the product description on the AKG website at http://www.akg.com/perception120usb |
3 Installation
Setting up the microphone
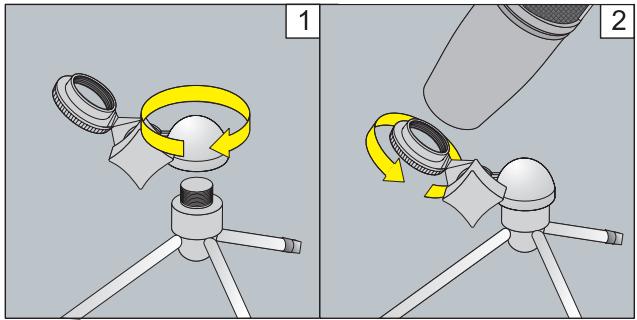
Figure 1: Setting up the microphone
Connecting the microphone
1) Screw the tripod adapter on to the table tripod.
2) Screw the microphone on to the tripod adapter.
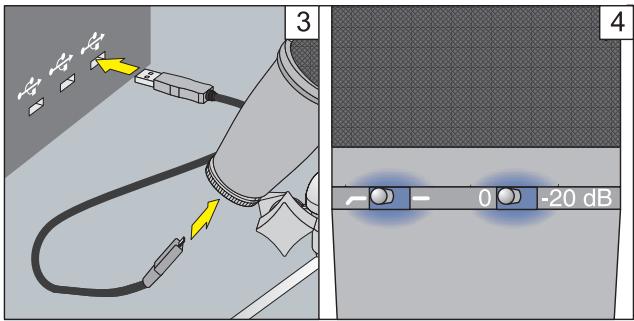
Figure 2: Connecting the microphone
3) Connect the USB cable to the microphone and the recording device (e.g. computer).
4) The LEDs on the selector switches light up to show that the power supply is OK.
The computer operating system detects the microphone and automatically installs the device driver.
4 Configuration
WINDOWS XP
Volume control
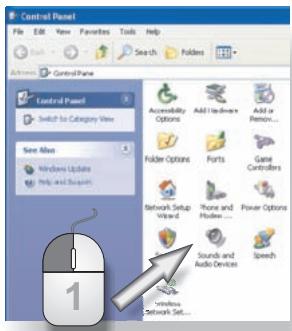
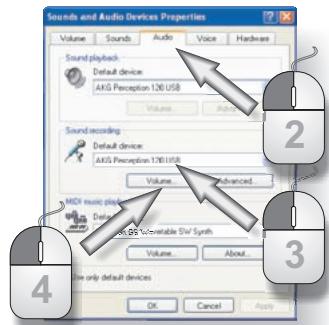
Figure 3: Sound settings in WINDOWS XP
1) Open the sound settings in Control Panel.
2) Select the Audio tab.
3) If the AKG Perception 120 USB is not selected automatically as the default sound recording device, select it using the drop-down menu. Recommendation: The Sound playback device must be changed from "Perception 120 USB" back to the original playback device.
4) Open the volume control on your recording software or click on Volume to open the volume control window.
5) Use the slider to select the volume required for your recordings, see Level settings (Page 24).
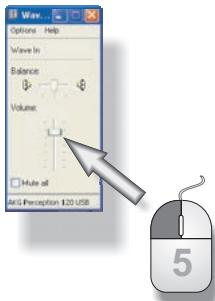
Figure 4: Volume control in WINDOWS XP
WINDOWS VISTA
Volume control
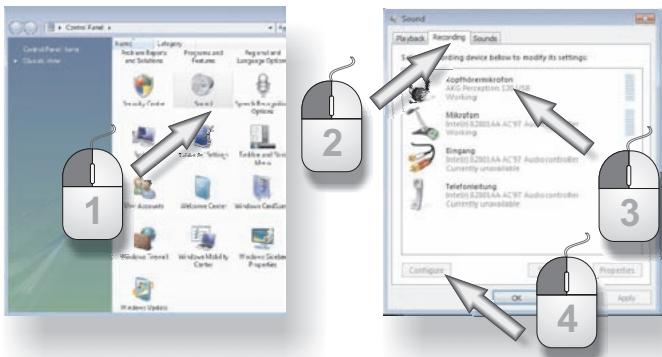
Figure 5: Sound settings in WINDOWS VISTA
1) In the Control Panel open the "Hardware and Sound" category and select Sound.
2) Select the Recording tab.
3) Ensure that the AKG Perception 120 USB is highlighted and the green tick is in place.
4) Click on Configure to open the volume control.
5) Use the slider to select the volume required for your recordings, see Level settings (Page 24).
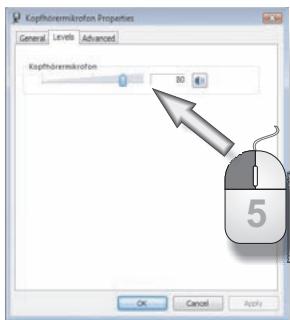
Figure 6: Volume control in WINDOWS VISTA
WINDOWS 7
Volume control
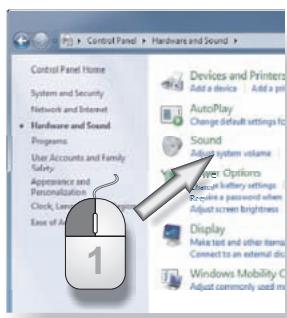
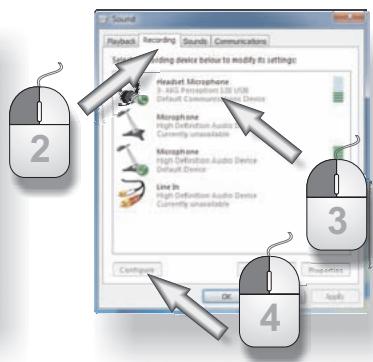
Figure 7: Sound settings in WINDOWS 7
1) In the Control Panel open the "Hardware and Sound" category and select Sound.
2) Select the Recording tab.
3) Ensure that the AKG Perception 120 USB is highlighted and the green tick is in place.
4) Click on Configure to open the volume control.
5) Use the slider to select the volume required for your recordings, see Level settings (Page 24).
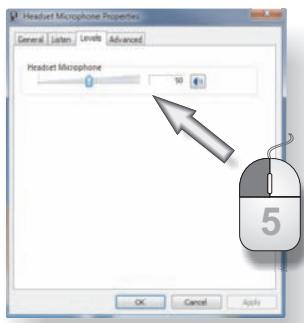
Figure 8: Volume control in
WINDOWS 7
MACOSX
Volume control

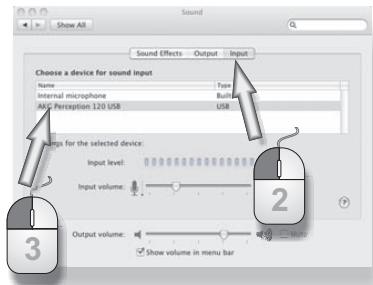
Figure 9: Sound settings in MAC OS
1) Open the sound settings in the system preferences.
2) Select the Input tab.
3) If the AKG Perception 120 USB is not selected automatically on the list of sound recording devices, highlight it in the list.
4) Open the volume control in your recording software or use the slider to select the volume required for your recordings, see Level settings (Page 24).
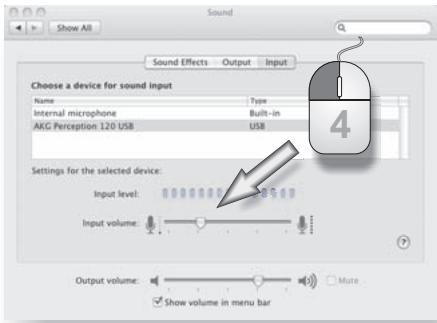
Figure 10: Volume control in MAC OS
Level settings
Use your recording software to set the volume. When using the microphone or recording from a sound source, adjust the volume control and check the level indicator.
For best results we recommend the highest possible volume setting to reduce unwanted noise. The setting should not be too high, however, as this can cause unpleasant distortion. This will normally be indicated in red on the recording software.
Carefully increase the volume until the level display in your recording software no longer shows an overload (red).
For best results when recording speech we recommend placing the microphone 20 to 40~cm in front of the speaker(s).

Figure 11: Volume control
5 Operation
Operating instructions
The front of the microphone is the side of the housing with the AKG logo. The Perception 120 USB microphone has a cardioid polar pattern so it records very little sound from the rear. Always point the logo towards the sound source to be recorded. The microphone should be 20 to 40 cm from the speaker's mouth in order to obtain the best results.
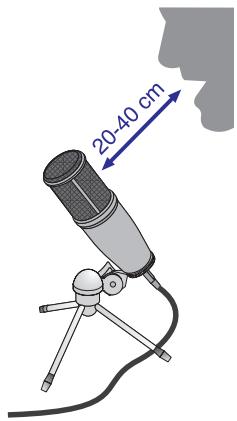
Figure 12: Distance from speaker's mouth

Risk of damage
Keep the microphone dry.
Moisture directly entering the capsule during use of the microphone (singing a short distance away, high air humidity) can cause crackling in the microphone as tiny short-circuits can short-circuit the polarisation voltage.
When recording wind instruments, speech or singing ensure that you do not sing or blow directly into the microphone.

For optimum results, we also recommend the optional PF 80 pop screen to prevent unwanted blowing and popping sounds or moisture problems.


When using the microphone outdoors, use the optional AKG W 4000
windscreen to protect the microphone from moisture and to reduce wind noise.
Control elements
The Perception 120 USB has attenuation and bass-cut selector switches.
Attenuation selector switch
Selector switch 1 on the right-hand side of the microphone enables you to increase the control limit by 20 dB to enable distortion-free recording of very loud sound sources and in close proximity to sound sources. This attenuation prevents the microphone output level from exceeding critical control limits, particularly at low frequencies, in miniature transformers that are used in mixing desk inputs, for example.

Figure 13: Attenuation selector switch
Bass-cut selector switch
Rumble or wind noises, etc. may cause distortion at the lowest frequencies. The switchable bass-cut provides additional distortion reduction. The filter slope is 6 dB/octave with a corner frequency of 120 Hz. The bass-cut also counteracts the proximity effect that can occur when the microphone is only a short distance (less than 15cm ) from the sound source.
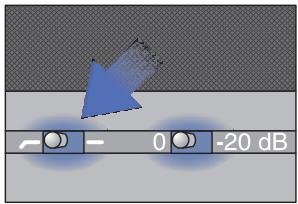
Figure 14: Bass-cut selector switch
6 Cleaning
Microphone
- Use a soft cloth moistened with water to clean the surface of the microphone body.
7 Specifications
| Working principle: | Condenser converter with 17 mm diaphragm diameter |
| Polar pattern: | Cardioid |
| Frequency range: | 20 to 20,000 Hz |
| Attenuation pad: | 0 -20 dB |
| Bass-cut filter: | 6 dB/octave, 120 Hz |
| Supply voltage: | power supply via USB |
| USB support: | USB 1.1, 2.0 |
| Scanning frequency: | 44.1 and 48 kHz |
| Analog-digital converter: | High-quality, integral 24-bit analog-digital converter |
| Oversampling: | 128x |
| Operating systems supported: | Windows XP, Windows Vista, Windows 7, Mac OS X (from Version 10.4) |
| Surface: | grey-blue matt |
| Dimensions: | ø 53 mm x 165 mm |
| Weight: | 460 g, net |
This product conforms to the standards listed in the Declaration of Conformity. To order a free copy of the Declaration of Conformity, visit http://www.akg.com or contact sales@akg.com.
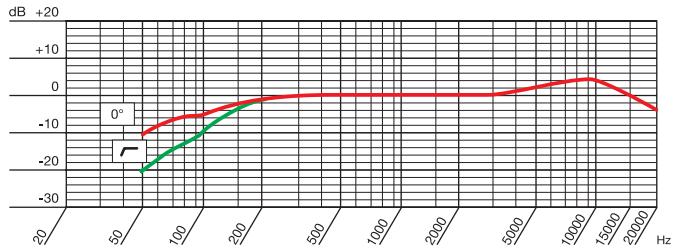
Frequency response
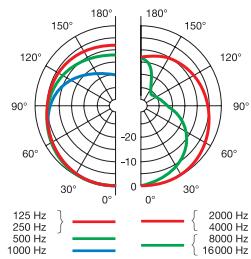
Polar diagram
Sommaire
Raccorder le microphone
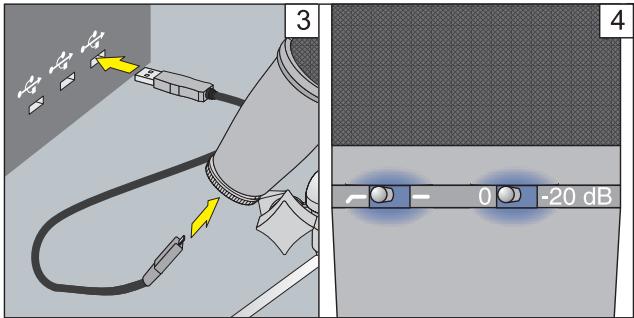
Figure 2: Raccorder le microphone
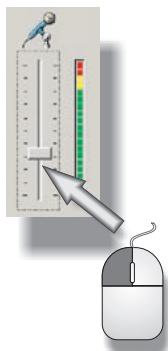
Figura 11: Regular o volume
For other products and distributors worldwide visit www.akg.com or www.harman.com


ROHS OK
H A Harman International Company
Technische Änderungen vorbehalten. Specifications subject to change without notice. Ces caractéristiques sont susceptibles de modifications. Ci riserviamo il diritto di effettute modifiche techniche. Nos reservamos el dato de introducirmericanas. Especificações sujetas a mudanças sem征求意见 prévio.
Printed in Austria on recycled paper
12/09/9100 U 13130

- Safety
- Risk of damage
- Environment
- Description
- Installation
- Configuration
- WINDOWS VISTA
- Volume control
- WINDOWS 7
- MACOSX
- Level settings
- Operation
- Operating instructions
- Control elements
- Attenuation selector switch
- Bass-cut selector switch
- Cleaning
- Specifications
- Sommaire
- H A Harman International Company
Brand : AKG
Model : PERCEPTION 120 USB
Category : USB microphone