
GB 40 GUITARBUG - Wireless guitar transmission system AKG - Free user manual and instructions
Find the device manual for free GB 40 GUITARBUG AKG in PDF.

| Product type | Wireless guitar transmission system |
| Brand | AKG |
| Model | GB 40 GUITARBUG |
| Frequency range | 710 - 865 MHz (UHF) |
| Modulation | FM |
| Audio bandwidth | 40 Hz - 20 kHz |
| Frequency stability | ±15 kHz (between -10°C and +50°C) |
| Nominal deviation | 15 kHz |
| Typical distortion (1 kHz) | 0.8% |
| Signal-to-noise ratio | 103 dB (A) |
| RF output power | 5 mW |
| Typical consumption | 75 mA |
| Power supply | 1 x 1.5V AAA battery or 1.5V NiMH rechargeable battery |
| Battery life | > 11 h (battery), > 6 h (rechargeable battery) |
| Audio input level | 1050 mV/1 kHz (for nominal deviation) |
| Dimensions (L x W x H) | 76 x 20 x 28 mm |
| Net weight | 28 g |
| Connector | Adjustable 6.35 mm jack plug, integrated |
| Antenna | Permanently mounted antenna |
| Control functions | ON/MUTE/OFF switch, battery status LED, input potentiometer |
| Supplied accessories | GB 40 transmitter, long adapter, AAA battery, black cover |
| Care and cleaning | Housing cleanable with a slightly damp cloth (clear water) |
| Safety | Avoid exposure to sun, dust, moisture, rain, vibrations; dispose of batteries according to regulations |
| Spare parts and repairability | Optional accessories available; no specific spare parts mentioned |
Frequently Asked Questions - GB 40 GUITARBUG AKG
User questions about GB 40 GUITARBUG AKG
0 question about this device. Answer the ones you know or ask your own.
Ask a new question about this device
Download the instructions for your Wireless guitar transmission system in PDF format for free! Find your manual GB 40 GUITARBUG - AKG and take your electronic device back in hand. On this page are published all the documents necessary for the use of your device. GB 40 GUITARBUG by AKG.
USER MANUAL GB 40 GUITARBUG AKG
Please read the manual before using the equipment!
MODE D'EMPLOI p.18
1 Safety and Environment 11
1.1 Safety 11
1.2 Environment 11
2 Description 12
2.1 Introduction 12
2.2 Packing List. 12
2.3 Optional Accessories 12
2.4 Descriptiunon 12
2.5 Controls 12
3 Setting Up 13
3.1 Inserting/Replacing and Testing Batteries 13
3.2 Using Rechargeable Batteries 14
Page
4 Operating Notes 15
4.1 Attaching the Transmitter 15
4.2 Setting Gain 15
4.3 Instruments with Recessed OOutput Jacks 16
4.4 Troubleshooting 16
5 Cleaning 16
6 Specifications 17
FCC Statement
This equipment has been tested and found to comply with the limits for a Class B digital device, pursuant to Part 74 of the FCC Rules. These limits are designed to provide reasonable protection against harmful interference in a residential installation. This equipment generates, uses, and can radiate radio frequency energy and, if not installed and used in accordance with the instructions, may cause harmful interference to radio communications. However, there is no guarantee that interference will not occur in a particular installation. If this equipment does cause harmful interference to radio or television reception, which can be determined by turning the equipment off and on, the user is encouraged to try to correct the interference by one or more of the following measures:
Reorient or relocate the receiving antenna.
- Increase the separation between the equipment and the receiver.
- Connect the equipment into an outlet on a circuit different from that to which the receiver is connected.
- Consult the dealer or an experienced radio/TV technician for help.
Shielded cables and I/O cords must be used for this equipment to comply with the relevant FCC regulations.
Changes or modifications not expressly approved in writing by AKG Acoustics may void the user's authority to operate this equipment.

1 Safety and Environment
1.1 Safety
- Do not expose the equipment to direct sunlight, excessive dust, moisture, rain, mechanical vibrations, or shock.
1.2 Environment
- Be sure to dispose of used batteries as required by local waste disposal rules. Never throw batteries into a fire (risk of explosion) or garbage bin.
- When scrapping the equipment, remove the batteries, separate the case, circuit boards, and cables, and dispose of all components in accordance with local waste disposal rules.
- The packaging of the equipment is recyclable. To dispose of the packaging, make sure to use a collection/recycling system provided for that purpose and observe local legislation relating to waste disposal and recycling.

2 Description
2.1 Introduction
Thank you for purchasing an AKG product. Please take a few minutes to read the instructions below carefully before operating the equipment. Please keep the Manual for future reference. Have fun and impress your audience!
2.2 Packing List
| 1 GB 40 trans-mitter | 1 long adapter plug | 1 AAA size dry battery | 1 black battery compartment lid |
- Check that the package contains all the parts listed above. If anything is missing, please contact your AKG dealer.
2.3 Optional Accessories
- For optional accessories, refer to the current AKG catalog or folder, or visit www.akg.com. Your dealer will be glad to help.
2.4 Description
The GB 40 is a WMS 40 microtools Series miniature transmitter that has been specifically designed for electric guitars and basses but is also suited for keyboards.
The transmitter features a permanently attached, swiveling 1/4 jack plug that allows you to plug the transmitter directly into the output jack of your instrument. A built-in spring presses the transmitter against the instrument to hold it securely in place. The bottom of the transmitter is fitted with a soft plastic pad that will leave no trace on the instrument.
The GB 40 operates on a single fixed, quartz stabilized carrier frequency in the 710MHz to 865MHz UHF band and uses a permanently attached flexible antenna.
The color of the battery cover indicates the carrier frequency of your transmitter (refer to the Manual Supplement). You can replace the color code battery cover with the supplied black replacement cover.
2.5 Controls (refer to fig. 1)
1 ON/MUTE/OFF: This slide switch provides three positions:
ON: Power to the transmitter is on.
M: The signal delivered by the microphone is muted while power and the RF carrier frequency remain on. This prevents the receiver responding to interference from other transmitters.
OFF: Power to the transmitter is off.
2 Battery compartment for one 1.5-V AAA size battery (supplied).
3 Status LED: Indicates battery status. LED flashes momentarily upon switching ON and extinguishes: battery is OK.
LED is lit constantly: battery will be dead in about 60 minutes.
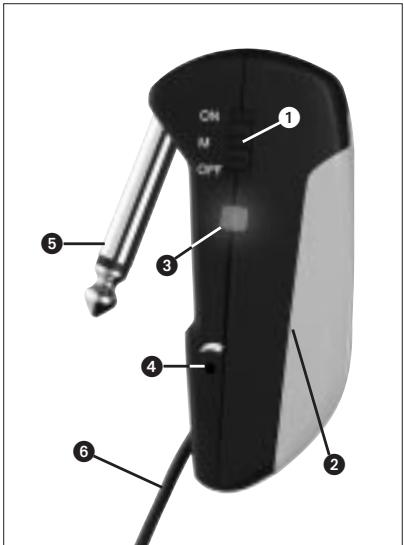
Fig. 1: GB 40 controls
4 Input Gain: This rotary pot sets the sensitivity of the transmitter's audio section.
5 Jack plug: 1/4" TS jack plug for plugging the transmitter directly into an instrument output jack.
6 Flexible antenna

3 Setting Up
3.1 Inserting/Replacing and Testing Batteries (refer to fig. 2)
- Depress the snap hook on the battery compartment lid (1).
- Pull the battery compartment lid (1) down to remove it from the transmitter.

Important!
The foam pad on the inside of the battery compartment lid (1) holds the battery in place. Do not remove the foam pad. If you do, the battery will not be held in place properly and may cause a rattling noise.
- If there is a dead or defective battery inside the battery compartment, remove the battery.
- Insert the supplied or new battery (2) into the battery compartment as shown in fig. 2.
- Set the ON/MUTE/OFF switch (3) to ON.
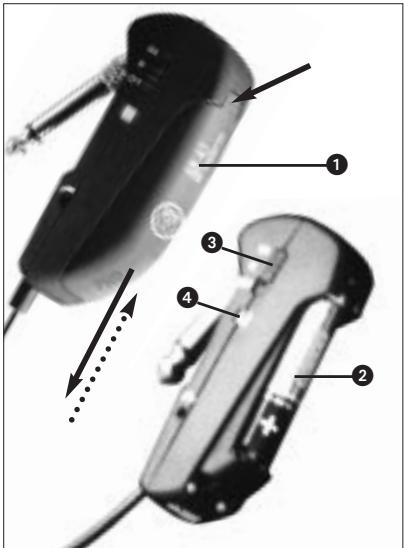
Fig. 2: Inserting a battery.
The status LED (4) will flash momentarily. If the battery is in good condition, the status LED (4) will extinguish.
If the status LED (4) lights constantly the battery will be dead within about 60 minutes. Replace the battery with a new one as soon as possible.
If the status LED (4) fails to flash momentarily the battery is dead. Insert a new battery.
- Slide the battery compartment lid (1) onto the transmitter against the direction of the arrow to the point that the lid (1) will click shut.
3.2 Using Rechargeable Batteries)
Instead of dry batteries, you can also use a 1.5-V rechargeable battery to power the transmitter. We recommend SANYO HR-4U (650 mAh) or Panasonic Rechargeable PRO+ (550 mAh) NiMH rechargeable batteries.

4 Operating Notes
4.1 Attaching the Transmitter (refer to fig. 3)
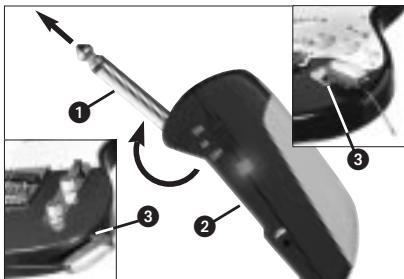
Fig. 3: Fixing the transmitter on the instrument.
- Swivel the jack plug (1) away from the transmitter (2) to the stop.
- Insert the jack plug (1) all the way into the output jack (3) on your instrument. The spring inside the transmitter will hold the transmitter securely in place on the instrument.
The soft plastic pad on the bottom of the transmitter will leave no trace on the instrument surface.

Important!
To avoid damaging the transmitter, NEVER place the instrument on top of the transmitter.
4.2 Setting Levels (refer to fig. 1)
- Check that the receiver is marked with the same color code as the transmitter.
- Use a small screwdriver to turn the input gain control (4) on the transmitter to a position halfway between the left and right stops.
- Set the ON/MUTE/OFF switch (1) to ON to switch power to the transmitter on.
- Switch power to your sound system or amplifier on.
- Turn the volume control on your instrument all the way CW and play a few bars.
- If your instrument sounds distorted turn the
input gain control (4) down CCW to the point that you will hear no more distortion.
If your instrument sounds too quiet, turn the input gain control (4) up CW. As soon as your instrument sound becomes distorted, turn the input gain control (4) back down CCW to the point that the distortion will stop.
4.3 Instruments with Recessed Output Jacks (refer to fig. 4)
If your instrument has a recessed output jack, the jack plug on the transmitter may be too short to make contact between the instrument and transmitter.
In this case, mount the supplied long adapter plug:
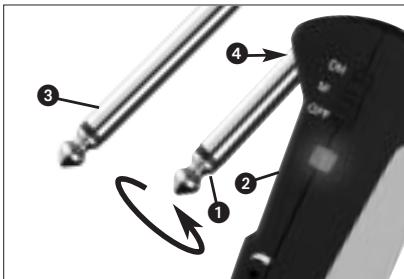
Fig. 4: Mounting the adapter plug.
-
Unscrew the jack plug (1) from the transmitter (2) CCW.
-
Screw the adapter plug (3) onto the threaded plug (4) on the transmitter (2) CW.
4.4 Troubleshooting
- For troubleshooting hints, refer to your receiver manual.

5 Cleaning
To clean the transmitter case, use a soft cloth moistened with water.
| Carrier frequency range | 710 to 865 MHz |
| Modulation | FM |
| Audio bandwidth | 40 to 20,000 Hz |
| Frequency stability (-10°C to +50°C) ±15 kHz | |
| Rated deviation | 15 kHz (SP1, SP2: 13.5 kHz) |
| T.H.D. at 1 kHz | typ. 0.8% |
| Compander | integrated |
| Signal/noise ratio | typ. 103 dB(A) |
| RF output | typ. 5 mW |
| Current consumption | typ. 75 mA |
| Power requirement | single 1.5-V AAA size battery |
| Battery life | >11/>6 hours (dry/rechargeable battery) |
| Audio input level for rated deviation | 1050 mV/1 kHz |
| Size (WxDxH) | 76 x 20 x 28 mm (3 x 0.8 x 1.1 in.) |
| Net weight | 28 g (1 oz.) |
This product conforms to the standards listed in the Declaration of Conformity. To order a free copy of the Declaration of Conformity, visit http://www.akg.com or contact sales@akg.com.
Page
4.4 Resolver problemas
For other products and distributors worldwide visit www.akg.com


ROHS OK

A Harman International Company
Tectnische Änderungen vorhabten. Specificnes subject to change without notice. Cesacteristiques sont susceptibles de modifications. Ci risviamil dirito di effetuae modifie tcnique. Nos reservam el rdeo de introducir modifica tionicas. Especiacoas sujtes a mudanaz sem aviso previo.
Printed in China (P.R.C.)
01/08/9100 U 12590
- Safety and Environment 11
- Description 12
- Setting Up 13
- Operating Notes 15
- Cleaning 16
- Specifications 17
- FCC Statement
- Safety and Environment
- Safety
- Environment
- Description
- Introduction
- Optional Accessories
- Description
- Controls (refer to fig. 1)
- Setting Up
- Inserting/Replacing and Testing Batteries (refer to fig. 2)
- Important!
- Using Rechargeable Batteries)
- Operating Notes
- Setting Levels (refer to fig. 1)
- Instruments with Recessed Output Jacks (refer to fig. 4)
- Troubleshooting
- Cleaning
- Resolver problemas
Brand : AKG
Model : GB 40 GUITARBUG
Category : Wireless guitar transmission system