USER MANUAL PR-D7 SANGEAN
Important Safety Instructions
- Read these instructions.
- Keep these instructions.
- Heed all warnings.
- Follow all instructions.
- Do not use this apparatus near water.
- Clean only with dry cloth.
- Do not block any ventilation openings. Install in accordance with the instructions.
- Do not install near any heat sources such as radiators, heat registers, stoves or other apparatus ( including amplifiers ) that produce heat.
-
Do not defect the safety purpose of the polarized or grounding-type plug. A polarized plug has two blades with one wider than the other. A grounding type plug has two blades and a third grounding prong. The wide blade or the third prong are provided for your safety. If the provided plug does not fit into your outlet, consult an electrician for replacement of the obsolete outlet – USA version only.
-
Protect the power cord from being walked on or pinched particularly at plug, convenience receptacles, and the point where they exit from the apparatus.
- Only use attachments/accessories specified by the manufacturer.
- Use only with the cart, stand, tripod, bracket, or table specified by the manufacturer, or sold with the apparatus. When a cart is used, use caution when moving the cart/apparatus combination to avoid injury from tip-over.
- Unplug this apparatus during lightning storms or when unused for long periods of time.
- Refer all servicing to qualified service personnel. Servicing is required when the apparatus has been damaged in any way, such as power-supply cord or plug is damaged, liquid has been spilled or objects have fallen into the apparatus, the apparatus has been exposed to rain or moisture, does not operate normally, or has been dropped.
- To reduce the risk of fire or electric shock, Do not expose this appliance to Rain or Moisture.
- The Shock Hazard Marking and Associated Graphical Symbol is provided on the bottom panel of unit.
- Apparatus shall not be exposed to dripping or splashing and no objects filled with liquids, shall not be placed on the apparatus.
GB
Controls
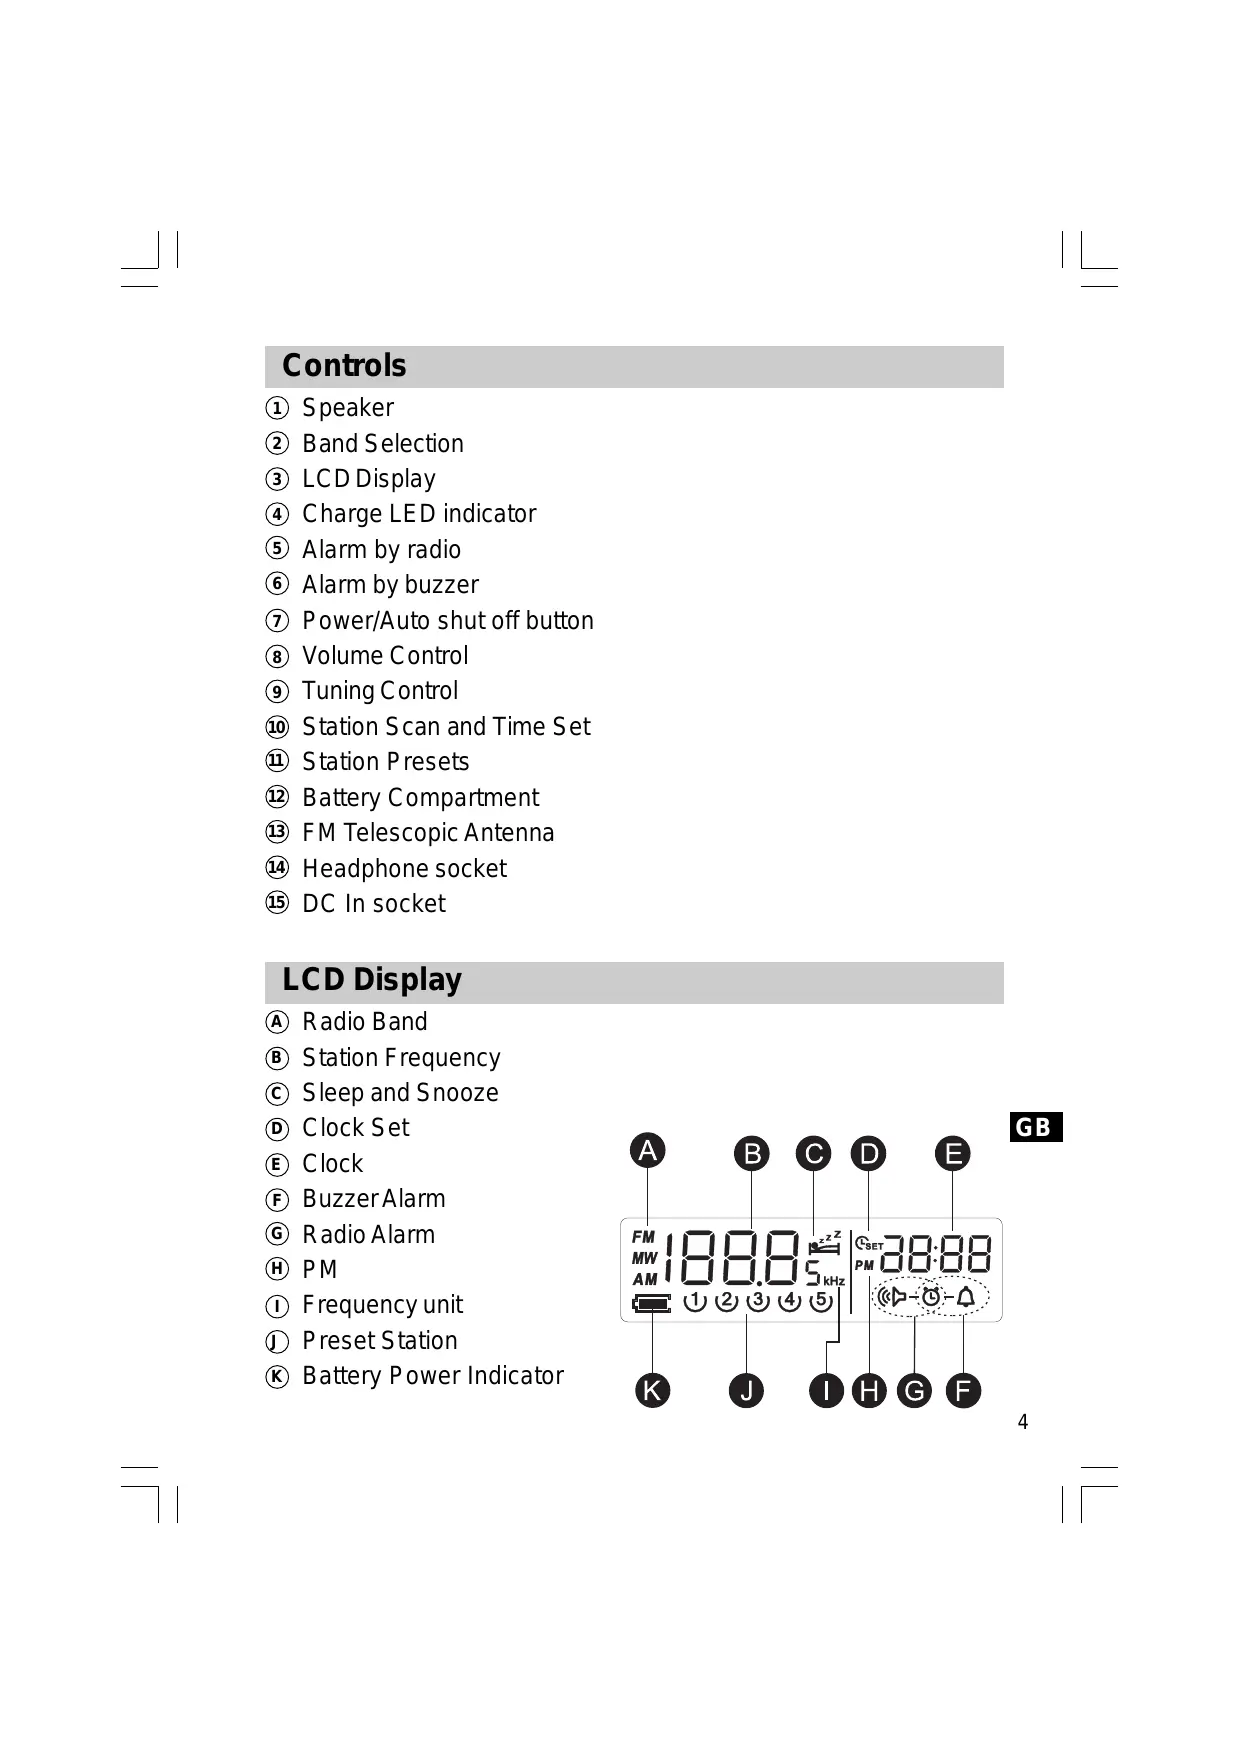
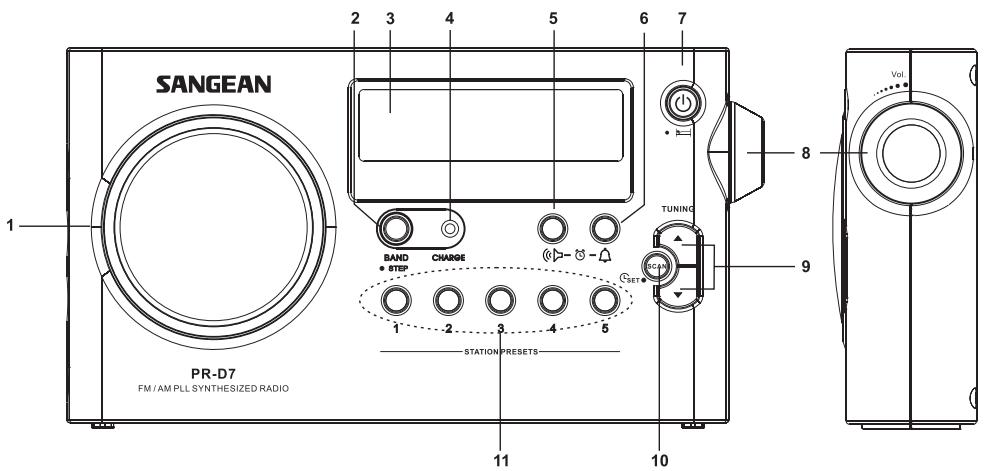
(1) Speaker
② Band Selection
③ LCD Display
④ Charge LED indicator
(5) Alarm by radio
⑥ Alarm by buzzer
(7) Power/Auto shut off button
Volume Control
(9) Tuning Control
⑩ Station Scan and Time Set
(1) Station Presets
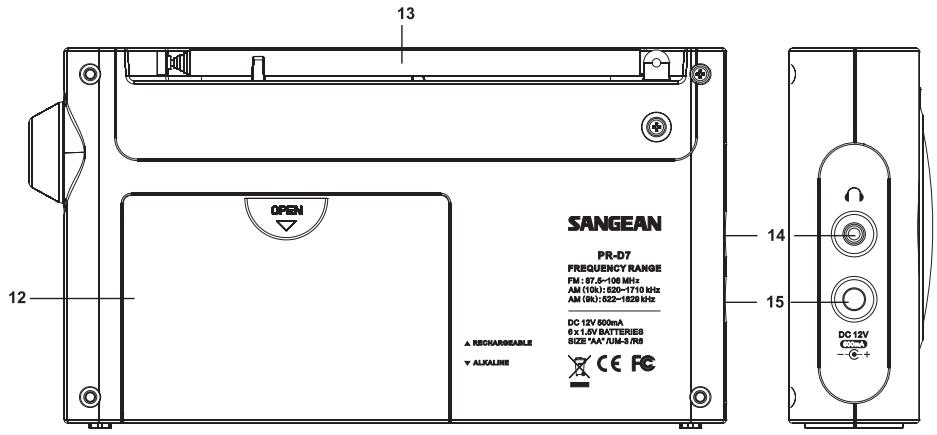
Battery Compartment
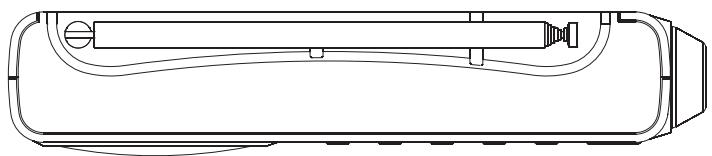
⑬ FM Telescopic Antenna
14 Headphone socket
15 DC In socket
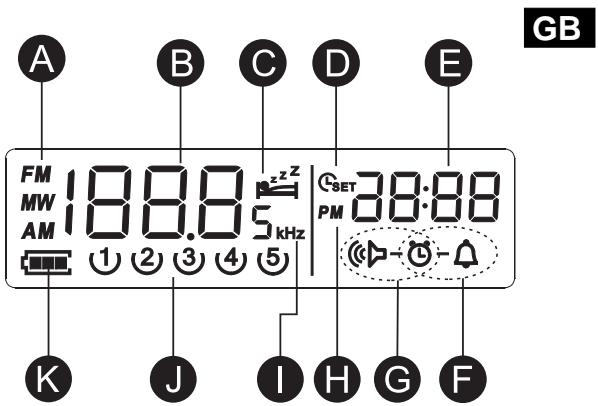
LCD Display
Radio Band
(B) Station Frequency
⑤ Sleep and Snooze
Clock Set
Clock
Buzzer Alarm
⑥ Radio Alarm
PM
(1) Frequency unit
Preset Station
Battery Power Indicator
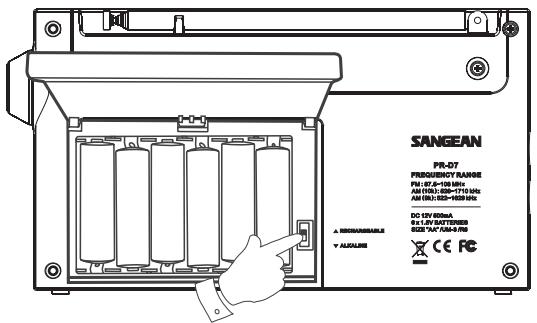
Battery operation using alkaline batteries
- Remove the battery cover on the back of the unit by sliding the cover in the direction of the arrow.
- Insert 6 x AA ( UM3, LR6 ) alkaline batteries into the spaces in the compartment. Take care to ensure the batteries are inserted with correct polarity as shown inside the battery compartment.
- Slide the battery switch to the Alkaline position and then replace the battery cover.
Important:
when using alkaline batteries, the battery switch must be placed in the alkaline position. Failure to do so could result in serious damage to the batteries or radio.
Reduced power, distortion and a "stuttering" sound are all signs that the batteries may need replacing.
If the radio is not to be used for any extended of time, it is recommended that the batteries are removed from the radio.
We would suggest for economy that the radio is used via the supplied AC power adaptor whenever possible, with battery operation for occasional or stand-by use only. If extended listening using anticipated, then the use of rechargeable batteries is suggested.
Battery operation using rechargeable batteries
- Remove the battery cover on the back of the unit by sliding the cover in the direction of the arrow.
- Insert 6 x rechargeable AA ( UM3 ) batteries into the spaces in the compartment. Take care to ensure all batteries are inserted with the correct polarity as shown inside the battery compartment. The radio is designed to be used with Nickel Metal Hydrive ( NiMH ) rechargeable batteries.
- Slide the battery switch to the Rechargeable position and then replace the battery cover.
- Insert the supplied AC power adaptor into the DC IN socket on the left hand side of the radio and plug the adaptor into a standard 13A mains socket outlet.
- The charge light will flash indicating batteries are charging. Batteries will be fully charged in around 7 hours while charge LED will stop flashing.
Important:
when using rechargeable batteries, the battery switch must be placed in the Rechargeable position. Batteries will only be charged when the radio is switched off and connected to the AC adaptor.
GB
-
Reduced power, distortion and a “ stuttering “ sound are all signs that the batteries may need recharging. Charge LED will be lighted when batteries have no power to turn on the radio.
-
If the radio is not to be used for any extended period of time, it is suggested that the batteries are removed from the radio.
Using the supplied AC power adaptor
The supplied AC adaptor is 12 Volts DC output 500mA center pin positive.
- Insert the adaptor plug into the DC IN socket on the left hand side of the radio.
- Plug the adaptor into a standard 13A mains socket outlet. Whenever the adaptor is plugged into the radio and switched on the mains, the batteries are automatically disconnected.
If the adaptor is plugged into the radio but not the mains is not switched on then the radio will run from the batteries if fitted.
The AC adaptor should be disconnected from the mains supply and the radio when not is use.
Setting the clock
- Clock can be set either the radio is power on or off.
- Display will show “- : - - ” when the batteries are installed when the radio is connected to the mains supply.
- Press and hold the SET^(SAC) button for more than 2 seconds, display will flash time set symbol SET^(SAT) and also the hour digit, followed by a beep.
- Press Tuning Up/Down to set required hour.
- Press button again, the minute digits will flash.
- Press Tuning Up/Down to set required minute.
- Press button to complete time setting.
Operating the radio
This radio is equipped with three tuning methods – Scan tuning, Manual tuning and Memory presets recall.
Scan tuning
- Press the Power button to turn on the radio.
- Select the required waveband by pressing the Band button. For FM band fully extend and rotate telescopic aerial to get best reception. For AM ( MW ) band, rotate the radio to get best signal.
- Press and release Scan button ( long press Scan button more than 2 seconds will activate time setting ), the radio will up search and stop automatically when it finds a radio station with good signal.
Press the Scan button again to pick up the found station.
The radio will continue to search next available stations if you do not press Scan button again when it finds a radio station.
- Rotate the Volume Control to get required sound level.
- To turn off the radio, press the Power button. Display will show OFF.
GB
Manual tuning/station searching
- Press the Power button to turn on the radio.
- Select the required waveband by pressing the Band button. Adjust the antenna as described above.
- A single press on either the Tuning Up or Down button will change the frequency in the following increments: FM: 50 or 100kHz AM (MW): 9 or 10kHz
- Press and hold either Tuning Up or Down button until the frequency in the display begins to change rapidly. Release the button. Your radio will search the selected waveband and stop automatically when it finds a station of sufficient signal.
- Rotate the Volume control to get required sound level.
- To turn off the radio, press the Power button. Display will show off.
Storing stations in preset memories
There are 5 memory presets for each waveband.
- Press the Power button to turn on the radio.
- Tune to a required station using one of the methods previously described.
- Press and hold down the required preset until the radio beeps. The preset number will appear in the display and the station will be stored under chosen preset station.
- Repeat this procedure for the remaining presets.
- Stations stored in preset memories can be overwritten by following above procedures.
Recalling stations from preset memories
- Press the Power button to turn on the radio.
- Select the required waveband.
- Momentarily press the required preset button, the preset number and station frequency will appear in the display.
Setting the radio alarm
When the radio alarm is selected, the radio will turn on and play the chosen radio station at the chosen alarm time. The radio alarm will continue for an hour unless turned off by pressing the Power button. Press the Power button whilst the alarm is activated will cancel the alarm for 24 hours.
Note:
Radio alarm can be activated only until both radio alarm time and radio alarmed station are set. Radio alarm will be automatically switched to buzzer alarm when the radio is in low battery status or the selected radio alarm station signal is too weak.
a. Setting radio alarm time
- The radio alarm can be set either radio is on or off.
- Press and release radio alarm button, the radio will show radio alarm symbol and radio frequency last tuned.
- Press button for more than 2 seconds followed by a beep.
- Display Hour will flash, using Tuning Up/Down button to select the hour then press ④ button again to confirm hour setting.
- Follow same procedures of setting hour to set required minute. Press _rate button again to complete alarm time setting.
- Display will flash radio frequency last tuned, press Tuning Up/Down button to select required wake up radio station or simply press preset station button to select wake up station.
- Press button again to complete radio alarm setting.
- Press and hold radio alarm button for 2 seconds to cancel the radio alarm. Display radio alarm symbol will disappear followed with a beep.
Note:
If new radio alarm station is not selected, it will select the last alarm station.
Setting the HWS ( Humane Wake System ) buzzer alarm
A beep will activate when selecting the HWS alarm. The alarm beep will increase in volume every 15 seconds for one minute followed by one minute silence before repeating the cycle. The HWS alarm will sound for an hour until turning off by pressing the Power button. Press the Power button whilst the alarm is activated will cancel the alarm for 24 hours.
- The HWS buzzer alarm can be set either radio is on or off.
- Press and release the HWS buzzer alarm button _ the symbol - will show on the display.
- Long press the button for more than 2 seconds followed by a beep, display Hour digit will flash.
- Pressing Tuning Up/Down button to select required alarm hour, then pressing button again, the minute digit will then flash.
- Pressing Tuning Up/Down button to select required alarm minute, then press button again to complete alarm setting. Display will appear when buzzer alarm has been set.
- Press and hold down Buzzer alarm button for more than 2 seconds followed by a beep to switch on or off the alarm.
Snoopze function
- Whilst the alarm is activated, press any buttons except the Power button will activate the snooze function. The radio or HWS buzzer alarm will be silenced with interval of 5 minutes.
- The display will flash both the snooze symbol zz^Z and the alarm symbol. The snooze function can be repeatedly during the one hour that the alarms are active.
Sleep function
The sleep timer will automatically switched off the radio after a preset time has elapsed.
- Press and continue to hold down the Power button for more than 2 seconds, followed by a beep, the display will cycle through the available sleep timers in the order of 60-45-30-15-120-90-60. Release the Power button when the required sleep timer appears in the display. The symbol will appear in the display and the radio will play the last station selected.
- To cancel the sleep function, press the Power button.
The symbol will disappear and radio is off.
Display backlight
Press any buttons will illuminate the LCD display for approx.
15 seconds. During scanning stations and alarm activated will also automatically illuminate the display.
Setting tuning step
Tuning steps on some countries are different from where you purchase the radio. If you buy the radio in Europe and intend to use in Northern America or some Southern American countries.
You may have to adjust tuning step so the radio may continue to serve you well.
While radio is switched off, long press Band/Step button for more than 2 seconds will first show current FM tuning step.
Continue pressing Band/Step button for approx. another 5 seconds until display FM and 50kHz ( tuning step ) flashing followed by a beep. By pressing Tuning Up/Down button, you may adjust to 100kHz per tuning step.
After FM tuning step is reset, pressing Band/Step button again, display will show MW and flash 9 kHz. By pressing Tuning Up/Down button, you may adjust to 10 kHz per tuning step. Complete the setting by pressing Band/Step button.
After FM/MW tuning step is reset, display will flash 12H, press Tuning Up/Down to select 24 Hour format, complete the setting by pressing Band/Step button.
GB
Headphone socket
A 3.5 mm headphone socket located on the left hand of your radio is provided for use with either headphones or an earpiece.
Insert a plug automatically mutes the internal speaker.
Specifications
Power Requirements
AC Power adaptor: DC 12V 500 mA center pin positive
Batteries: 6 x UM-3 (AA size, LR6)
Battery life:
Approx. 38 hours of listening for 4 hours a day at normal volume using alkaline cells.
Frequency Coverage:
FM 87.50 - 108 MHz
MW 522 – 1629 kHz ( 9 kHz/step ) or
MW 520 – 1710 kHz ( 10 kHz/step )
Circuit Feature
Loudspeaker: 3 inches, 8 ohm
Output Power: 1.5 Watt using AC power adaptor
Headphone socket: 3.5 mm dia
Aerial System: Telescopic aerial

If at any time in the future you should need to dispose of this product please note that: Waste electrical products should not be disposed of with household waste. Please recycle where facilities exist. Check with your Local Authority or retailer for recycling advice. (Waste Electrical and Electronic Equipment Directive)
Specifications techniques
Alimentation
AM (MW): 9 of 10 kHz
MW 522 – 1629 kHz ( 9 kHz/interval ) of
MW 520 – 1710 kHz ( 10 kHz/interval )
Circuitkenmerken
Luidspreker: 3 inches , 8 ohm