
PT-80 - Portable radio SANGEAN - Free user manual and instructions
Find the device manual for free PT-80 SANGEAN in PDF.
User questions about PT-80 SANGEAN
0 question about this device. Answer the ones you know or ask your own.
Ask a new question about this device
Download the instructions for your Portable radio in PDF format for free! Find your manual PT-80 - SANGEAN and take your electronic device back in hand. On this page are published all the documents necessary for the use of your device. PT-80 by SANGEAN.
USER MANUAL PT-80 SANGEAN
To ensure that this device provides you with long-term satisfaction and enjoyment, please observe the following instructions.
This device is designed for the playback of audio signals.
Any other use is expressly prohibited.
Protect the device from moisture (water drops or splashes). Do not place any vessels such as vases on the device. These may be knocked over and spill fluid on the electrical components, thus presenting a safety risk. Do not place any objects such as burning candles on the device.
When deciding where to place the device, please note that furniture surfaces are covered by various types of varnish and plastic, most of which contain chemical additives. These additives can corrode the device supports, leaving residues on the furniture surfaces which can be difficult or impossible to remove.
Do not use any cleaning agent, as this may damage the casing. Clean the device with a clean, moist leather cloth.
Never open the device casing. Warranty claims are excluded for damage resulting from improper handling.
The type plate is located on the bottom of the device.
Attention
Continuous use of earphones at high volume can damage the user's hearing.
Environmental note
As little material as possible was used in the packaging of your device. It consists of two separate materials: cardboard (box) and polyethylene (bag). Please observe the local regulations for disposing of the packing material.
Scope of delivery
1 ProTravel 80
2 Earphones
3 External SW antenna
4 Leather bag
5 Operating manual
Note:
If the radio is fastened to the leather bag, you can use the bag to stand it. Undo the bag at the front and fold it back. Then stand the radio at an angle.
OVERVIEW
Controls
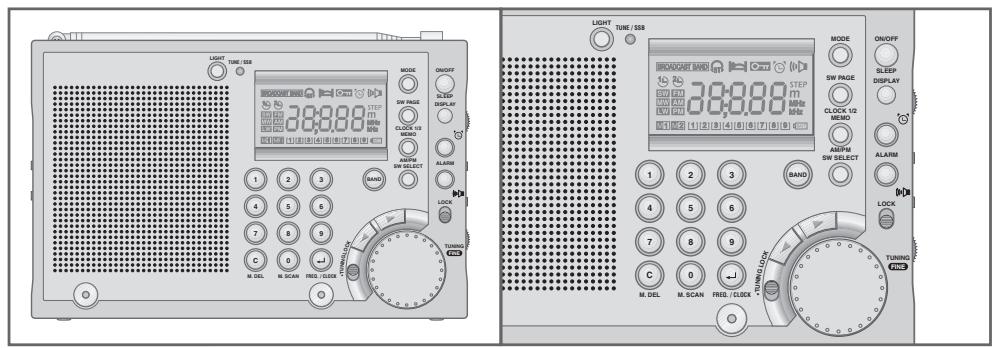
Front
ON/OFF Switches the device on and off.
SLEEP For setting the sleep timer.
DISPLAY Switches the display between the frequency and time while the radio is on.
ALARM Selects the signal tone alarm.
ALARM Selects the radio alarm.
LOCK Disables and enables the buttons.
TUNING Control dial for fine tuning to radio stations. FINE
TUNING Disables and enables the TUNING FINE 己 dial. LOCK
For setting the time.
Press briefly to change the frequency in steps. Hold down to change the frequency quickly up or down.
MODE For setting various function modes, such as 12 or 24 hour clock format.
SW PAGE Switches between the first and second memory levels in CLOCK 1/2 short wave. Switches the clock between local time 1 and local time 2, for example summer and winter time.
MEMO Activates the memory function and stores settings.
AM/PM Switches between AM and PM in 12-hour clock format.
SW SELECT Selects short wave frequency bands.
BAND Switches between the FM (VHF), SW (short wave), MW (medium wave) and LW (long wave) frequency bands.
OVERVIEW
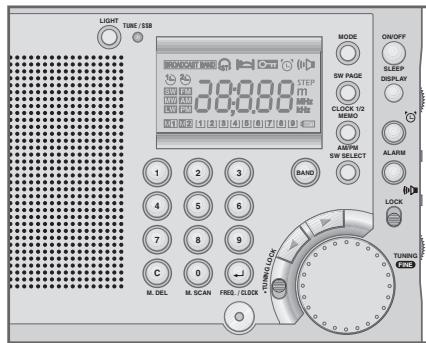
1 ... 9 Numerical buttons for various entries. Select stored radio stations.
C M. DEL Deleted incorrect entries and preset stations. Switches off the alarm.
O M. SCAN Numerical button for various entries. Selects stored radio stations in sequence (memory scan).
Activates frequency and time settings. FREQ./CLOCK
LIGHT Switches on the back light of the display.
TUNE/SSB LED lights up green when tuning to radio stations. Lights up red when searching for an SSB (Single Side Band) station on short wave. Lights up orange when receiving an SSB station.
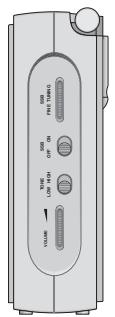
Right side of device
SSB FINE For fine-tuning SSB stations on short wave. TUNING
SSB ON/OFF Switches the SSB function on and off.
TONE For setting the tone. LOW HIGH
VOLUME Adjusts the volume.
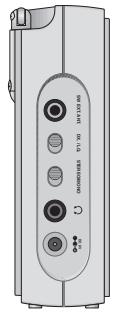
Left side of device
SWEXT. Connection socket for an external SW antenna. ANT.
DX./LO. Switches between short-range and long-range reception.
STEREO/ Switches between stereo and mono reception.
MONO
OVERVIEW


Earphone socket (3.5 mm stereo socket). Automatically switches off the loudspeaker.
DC 6 V
Connection socket for mains adapter (not supplied), input voltage 6 V (200 mA).

Top of device
ANTENNA
Telescopic antenna for FM and SW reception.
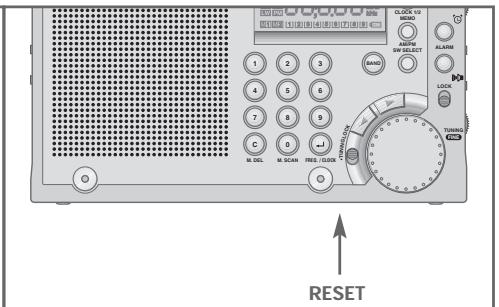
Bottom of device
RESET
Returns the device to its original setting.
Back of device
Battery compartment
Map of world time zones
Frequency scale
OVERVIEW
The display
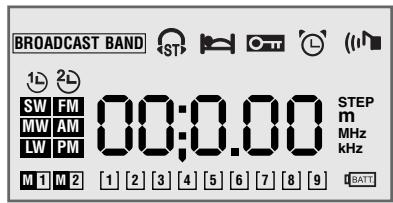
00:0.0 Frequency, time, alarm time or sleep timer display
The radio alarm function is activated
The signal alarm function is activated
The key lock is activated
The sleep timer is activated
A stereo FM station is being received

BROADCAST BAND
A regular SW (short wave) band is set

Local time 1 is displayed

Local time 2 is displayed

Displays the SW (short wave) waveband

Displays the FM (VHF) waveband

Displays the MW (medium wave) waveband

Displays the LW (long wave) waveband

Displays the first half of the day in 12-hour format

Displays the second half of the day in 12-hour format

Display memory levels 1 and 2

Preset position displays

Flashes when the batteries are low

Frequency display for MW, LW and SW

Frequency display for FM

SW frequency band display

Displays the increments in which the frequency is changed
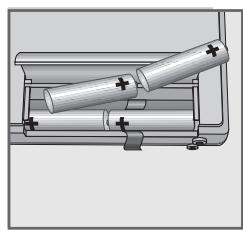
POWER SUPPLY
Battery operation
1 Open the battery compartment on the back of the device by pressing the marking and opening the lid.
2 Insert the batteries (4 x 1.5 V, Mignon type LR6/AM3/AA).
Notes:
When the batteries are low, [BAT] flashes in the display. Each time you switch off the radio, the battery charge indicator, for example 3 appears for seven seconds. If the charge level falls below 2 you must change the batteries. Put in the new batteries within 3 minutes, otherwise all stored settings will be lost.
Take out the batteries when you know that the device will not be used for a long period of time. The manufacturer accepts no liability for damage resulting from used batteries.
Environmental note:
Batteries, including those which contain no heavy metal, may not be disposed of with household waste. Please dispose of used batteries in an environmentally sound manner. Find out about the legal regulations which apply in your area.
Mains operation (with standard 6 V/200 mA mains adapter)
Check if the mains voltage on the mains adapter type plate corresponds to your local mains supply. The only way to disconnect the device from the mains supply is to unplug the adapter.
1 Plug the mains adapter cable into the DC 6 V -包 包 socket on the left of the device.
2 Insert the mains adapter plug in the socket.
- The batteries in the compartment are switched off.

SETTINGS
Setting the clock
Due to the earth's rotation, places to the west of you are behind you in time, and places to the east are ahead of you. Therefore, the earth is divided into 24 hourly time zones. This system is based on a standard time zone called UTC (Universal Time Coordinated), previously known as GMT (Greenwich Mean Time). Short wave stations always give the time according to UTC. Before you set the clock, find out your local time zone.
You can set two different local times. Local time 1 is the time where you live. If, for example, you travel to Hong Kong, you can set the time there as local time 2. The setting for local time 1 is retained.
Setting local time 1
When you first switch on the device, or if it has been without a power supply for a lengthy period, 0: 00 and 0 for local time 1 appear in the display to indicate that the clock has to be set.
1 With the device switched off, keep pressing FREQ./CLOCK « until «: -- « appears in the display and » 《 flashes.
Note:
If the radio is switched off, press DISPLAY to switch the display to the clock, and start at step 1.
2 Enter the time using the numerical buttons 1 ... 0 in the correct sequence, for example 12:30
Note:
if you enter the digits incorrectly, a signal sounds and Err flashes briefly in the display. You then have to start again.
3 Press FREQ./CLOCK to confirm the entry.
Setting local time 2
1 With the device switched off, press SW PAGE CLOCK 1/2.
- Display: 2 ∩ flashes for local time 2.
2 Press FREQ./CLOCK.
-
Display: 2 stays lit for local time 2.
-
The display is now set to local time 2.
3 To set local time 2, do the same as for local time 1 (steps 1 to 3).
Note:
If you are operating the device in the 12-hour format, you can choose between MEMO AM/PM AM and PM.
SETTINGS
Setting and storing radio stations
There are various ways to set radio stations and store them at preset positions.
1 Press ON/OFF SLEEP to switch on the device. - You will hear the radio station last selected.
2 Press BAND to select the frequency band.
Tuning radio stations directly
1 Press FREQ./CLOCK. -Display: 一 · 一 · 一 · 一 · e.g. FM and MHz flash.
2 Enter the frequency using the numerical buttons 1 ... 0 in four digits, for example 1, 0, 0, 6 for 100.50
3 Press FREQ./CLOCK to confirm the entry. - Display: the frequency you entered, for example 100.50 . - You will hear the selected radio station.
Tuning radio stations manually (1)
1 Use the TUNING FINE dial to tune to the station you want.
- Display: the frequency in 100 or 200kHz increments (FM), in 9 or 10kHz increments (MW), in 3kHz increments (LW) or in 5kHz increments (SW).
2 If you want, you can fine tune to the station by briefly pushing in and turning the TUNING FINE dial.
- Display: The frequency changes in 50kHz increments (FM) or 1kHz increments (MW, LW and SW).
3 To return to the original mode (for example 100kHz increments in the FM band) push in the TUNING FINE « dial again.
Tuning radio stations manually (2)
1 Keep pressing or until you reach the frequency you want. -Display: the frequency changes in increments
or
Hold down or until the frequency changes to a rapid runthrough.
- Display: the automatic search stops at the next station with a strong signal.
Saving radio stations on preset positions
You can store up to 45 radio stations, including 18 on two memory levels on short wave, and nine each on FM, MW and LW.
1 Select the frequency band and the radio station.
SETTINGS
2 Press MEMO AM/PM<.
- Display: [1] and the preset number, for example [1] flash.
3 Press FREQ./CLOCK to store the radio station.
- Display: the frequency and [1]
- The current radio station is stored on preset position 1.
Storing short wave (SW) stations
The short wave band is divided into frequency bands of different lengths. This means that very many stations and institutions use this wave band for international communication. Therefore, you can store up to 18 SW stations on two memory levels.
1 Save short wave stations in the same way as described in the previous section.
2 Once you have stored nine stations on one memory level M1, press SW PAGE CLOCK 1/2 to switch to the second memory level. - Display: M2.
3 Store the remaining nine stations as described above.
Note:
If you try to store more than 18 stations and press MEMO AM/PM, FULL appears in the display.
Automatic station search
This function allows you to automatically search for and store nine stations in each of the FM, MW and LW bands (not SW).
1 To start the search, press and at the same time and hold them down until you hear a signal.
- The search starts at the lowest frequency in the selected wave band, and stores the nine stations with the strongest signals. After the search has finished, a signal sounds and the last station stored can be heard.
- Display: M 1 « and the preset number, for example » [3] «.
Notes:
When you start the search, all the previously stored stations are deleted. During the search, the status line [1] ... [3] ... [8] ... shows the progress, but not the stations found.
You can stop the search by pressing ON/OFF*.
You can reorganise the preset stations using MODE 50 or 51 (see page 16).
SETTINGS
Deleting preset stations
1 Enter the preset station using the numerical buttons 1 9
- Display: the frequency and the preset number, for example [8] «.
2 Press MEMO AM/PM.
- Display: The selected preset station flashes.
3 Press C M. DEL<.
- The selected preset station is deleted.
Setting the alarm time
The alarm time is always set in the time shown on the display.
You can set the alarm as a signal tone, a radio station, or both.
1 Press ALARM (signal tone) or ALARM (radio station) with the device switched off.
- Display: the alarm time most recently set, « or « (« flash.
Note:
If the radio is switched off, press DISPLAY to switch the display to the clock, and start at step 1.
2 Enter the alarm time using the numerical buttons 1 0
3 Press FREQ./CLOCK to confirm the entry.
- Display: the alarm time you entered, or (stay lit.
- The device switches on at the set time with the signal tone or the radio station most recently selected.
OPERATION
Switching on and off
1 Press ON/OFF SLEEP to switch on the device. - You will hear the radio station last selected.
2 Press ON/OFF SLEEP to switch off the device. - Display: Local time 1 or 2.
Radio operation
Selecting the frequency band
1 Select the desired waveband (FM, SW, MW or LW) by pressing «BAND«.
2 If you select short wave, you can select the frequency band by pressing SW SELECT. - Display: the SW frequency bands from 120m to 11m .
Calling up stored radio stations
1 Select the station using the numerical buttons 1 ... 9 for the preset number. - Display: the frequency and the preset number, for example [8]
2 To call up preset numbers 10 to 18 in the SW band, press SW PAGE CLOCK 1 / 2 to switch to the second memory level. - Display: M 2
Notes:
For FM reception pull out the telescopic antenna and tilt it until you receive the best signal. For short wave reception (SW) the antenna should be upright. For medium wave and long wave reception, align the antenna by turning the device.
Checking stored radio stations
You can call up all the stored radio stations in a wave band automatically for seven seconds (memory scan).
1 With the radio playing, press 0 M. SCAN\$.
- The device starts with the current preset station and soon changes to the next one.
- When you reach the station you want, press 0 M. SCAN to stop the function.
Swapping preset positions
1 Enter the preset station to swap using the numerical buttons 1 9
2 Press MEMO AM/PM.
- Display: the selected preset position flashes.
3 Enter the new preset position using the numerical buttons 1 9
- A signal sounds and the preset positions are exchanged.
OPERATION
Adjusting the volume
1 Adjust the volume using VOLUME (on the right side of the device).
Adjusting the tone
1 Adjust the tone using >TONE LOW HIGH (on the right side of the device).
Listening with earphones
1 Insert the earphone plug (Ø 3.5 mm, stereo) into the «» « jack on the left of the device.
- This automatically switches off the loudspeakers.
Switching between stereo and mono reception
FM stereo reception is only available with earphones.
1 Connect the earphones and select an FM station.
2 Set the MONO/STEREO switch (on the left of the device) to stereo.
-Display:» 《
3 If the reception of the station is weak in FM stereo, move the MONO/STEREO × switch (on the left of the device) to mono.
- Display: , disappears from the display.
Setting the reception sensitivity
1 Set the DX./LO. switch (on the left of the device) to DX.
- The sensitivity is set to high, in other words, long-range reception.
2 If the signal is too strong, and is causing distortion, move the DX./ LO. switch to LO. (low sensitivity).
Special features of SW reception
Short wave reception
Your radio can receive signals in a number of frequency bands. It is easy to get used to tuning to stations in the FM, MW and LW bands, since they are always on the same frequencies.
Unfortunately, this is not always the case with short wave stations. Due to atmospheric conditions, short wave stations must frequently broadcast on different wavelengths. Most short wave bands are available all over the world and can be used by international broadcasters. At present these are the only wavelengths which provide listeners with direct reception over long distances. For this reason, short wave frequencies are not only used by radio stations, but also by other users such as amateur radio enthusiasts, shipping, aircraft and radio navigation systems.
OPERATION
If you want to listen to a particular SW station, you need to know the precise frequency and wavelength. Many short wave stations will send you broadcasting schedules which give you the information you need. You can also download the information from the Internet.
Connecting the external SW antenna
To improve short wave reception, you can connect the external SW antenna supplied.
1 Insert the plug of the antenna cable into the SW EXT. ANT. < socket on the left of the device.
Note:
Unroll and align the antenna to achieve the best reception. If there is interference, you can move the DX./LO. switch to LO. .
SSB reception (for example for radio hams and shipping)
Some short wave stations broadcast Morse code for shipping using continuous waves (CW). Voice signals, for example amateur radio, is normally broadcast on the single side band (SSB).
1 Select the SW waveband using BAND
2 Select the frequency band, for example 15m , using SW SELECT.
3 Set the SSB ON OFF switch (on the right of the device) to ON . - The TUNE/SSB LED lights up red and then goes out.
4 Slowly turn the SSB FINE TUNING dial on the right of the device until you achieve a clear reception. - If an SSB station is received, the TUNE/SSB LED lights up orange.
Notes:
For fine tuning, you can also press in the «TUNING FINE« dial.
The range for SSB fine tuning is around ± 1.5kHz
OPERATION
Alarm mode
Displaying the alarm time
1 Press ALARM 忍 « or ALARM (iN.
- Display: briefly, the alarm time most recently set, or (n) flash.
Alarm with signal tone
1 With the device switched off, press ALARM (signal tone).
- Display: the last alarm time set, «» « flashes.
2 Enter the alarm time using the numerical buttons 1 0
3 Press FREQ./CLOCK to confirm the entry.
- Display: the alarm time you entered, stays lit.
- The device switches on with the signal tone at the set time (alarm duration 1 hour). The signal tone increases in volume for one minute, stops for a minute and starts again.
Alarm with radio station
1 Press ON/OFF SLEEP to switch on the device.
2 Select the frequency band and the radio station.
3 Adjust the alarm volume using VOLUME (on the right of the device).
4 Press DISPLAY to switch the display to the clock.
5 Press ALARM (radio station).
- Display: the last alarm time set, « (« flashes.
6 Enter the alarm time using the numerical buttons 1 0
7 Press FREQ./CLOCK to confirm the entry.
- Display: the alarm time you entered, (m) stays lit.
8 Press ON/OFF SLEEP to switch off the device.
- The device switches the radio on at the set time (alarm duration 1 hour).
Cancelling the alarm for the day
1 Press ON/OFF SLEEP while the alarm is sounding.
- The alarm (signal tone or radio) stops, but the alarm function remains activated for the next day at the set time.
Cancelling alarm stand-by
1 Press ALARM or ALARM (u)
- Display: the set alarm time, or (n) flash.
2 To deactivate the alarm, press C M. DEL<.
- Display: the alarm time and or go out, and you can see the current time.
OPERATION
Sleep timer mode
The device has a sleep-timer, which switches it off at a time you set.
Setting the sleep timer
1 With the radio playing, press and hold down ON/OFF SLEEP. - Display: the sleep times 60 , 30 , 15 , 120 , 30 and again 60 , flashes.
2 To set the desired switch-off time, release ON/OFF SLEEP. - Display: after a pause, the frequency, stays lit.
Deactivating the sleep timer
1 To deactivate the sleep timer, press ON/OFF SLEEP to switch off the device. - Display: the time, goes out.
Additional functions
Displaying local time 1 or 2
If you have set two local times, local time 1 (» Ⓞ «) is normally displayed.
1 To temporarily change from local time 1 to local time 2, press SW PAGE CLOCK 1/2. - Display: Local time 2 and After seven seconds the display returns to local time 1.
2 To permanently change from local time 1 to local time 2, press SW PAGE CLOCK 1/2 « and then »← FREQ./CLOCK «. - Display: Local time 2 and «
3 To permanently change from local time 2 to local time 1, press SW PAGE CLOCK 1 / 2 and then FREQ./CLOCK. - Display: Local time 1 and
OPERATION
Setting various function modes
Using the MODE button and a two-digit code, which you enter using the numerical keys 0 9 , you can change various functions:
| Code | Function | Code | Function | |
| MODE ➔ | 10 | FM frequency change in 100 kHz steps | 11 | FM frequency change in 200 kHz steps |
| MODE ➔ | 20 | MW frequency change in 9 kHz steps | 21 | MW frequency change in 10 kHz steps |
| MODE ➔ | 30 | Time display in 12 hour format | 31 | Time display in 24 hour format |
| MODE ➔ | 40 | Signal tone off | 41 | Signal tone on |
| MODE ➔ | 50 | Arrange stations in sequence from low to high frequency range | 51 | Arrange stations in sequence from low to high frequency range |
This is how to change the various function modes:
1 Press MODE<.
-Display: [ ] flashes.
2 Enter the code, for example 40 using 0 9
- Display: 40 flashes.
3 Press FREQ./CLOCK to confirm.
- Display: briefly OFF, then the time or frequency.
- The signal tone is deactivated.
Switching on the back lighting for the display
1 Press LIGHT to switch on the display lighting for 7 seconds.
2 Press LIGHT to switch off the display lighting.
Disabling and enabling the buttons
1 To disable the buttons, move LOCK to the position.
-Display: 0m
2 To enable the buttons, move LOCK to the opposite position.
- Display: Oπ « disappears from the display.
OPERATION
Disabling and enabling the fine tuning dial
In order to prevent the frequency being changed accidentally, you can disable the «TUNING FINE« dial.
1 To disable the dial, move TUNING LOCK to the position.
2 To enable the dial, move TUNING LOCK to the opposite position.
Deleting all settings
You can reset the device to its original state. All settings are lost when you do this.
1 Press RESET on the bottom of the device using a suitable implement such as a paper clip.
- The times, alarm time and radio settings are deleted.
CE
INFORMATION
This device is noise-suppressed according to the applicable EU directives.
This product fulfils the European directives 89/336/EEC, 73/23/EEC and 93/68/EEC.
This device conforms to the safety regulation DIN EN 60065 (VDE 0860) and therefore the international safety regulation IEC 60065.
Technical data
Power supply
Battery operation 4 x 1.5 V (type Mignon LR 6/AM 3/AA)
Mains operation 6 V (200 mA) mains adapter, DC
Output 300 mW 10% THD
Antennas
Telescopic antenna FM (VHF) and SW (short wave)
Ferrite rod antenna MW (long wave) and LW (medium wave)
Frequency bands
FM (VHF) 87.5 ... 108 MHz
MW (medium wave) 520 ... 1710 kHz or 522 ... 1710 kHz
LW(long wave) 153...283kHz
SW 1 ... 14 (short wave) 120 m 2.3 ... 2.495 MHz
90 m 3.2 ... 3.4 MHz
75 m 3.85 ... 4.0 MHz
60 m 4.75...5.06 MHz
49 m 5.9 ... 6.2 MHz
41 m 7.1 ... 7.35 MHz
31 m 9.4 ... 9.99 MHz
25 m 11.6 ... 12.1 MHz
21 m 13.5 ... 13.87 MHz
19 m 15.1 ... 15.8 MHz
16 m 17.48 ... 17.9 MHz
15 m 18.9 ... 19.02 MHz
13 m 21.45 ... 21.75 MHz
11 m 25.6 ... 26.1 MHz
Sockets
DC socket 4.0 mm, 6 V (200 mA)
Earphone jack 3.5 mm stereo, 2 × 32 impedance
SW antenna socket 03.5 mm Mono
Dimensions and weight
W x H x D 184 mm x 120 mm x 40 mm
Weight 510g
Technical and design modifications reserved.
FRANÇAIS

SECURITE, INFORMATION
Sécurité
Contips - Converting a text to a number is a useful way of converting a text into a number. - Converting a number to a text is also useful in converting a text to a number.
75 m 3,85 ... 4,0 MHz
60m 4,75...5,06MHz
49 m 5,9...6,2MHz
41 m 7,1 ... 7,35 MHz
31 m 9,4 ... 9,99 MHz