
CST 500 E - Jigsaw KRESS - Free user manual and instructions
Find the device manual for free CST 500 E KRESS in PDF.

| Product type | Electronic pendulum jigsaw |
| Brand | KRESS |
| Model | CST 500 E |
| Power consumption | 500 W |
| Power output | 275 W |
| Idle speed | 3600 strokes/min |
| Stroke adjustment range | 700 - 3600 strokes/min |
| Blade stroke | 19 mm |
| Cutting capacity in wood | 70 mm |
| Cutting capacity in mild steel | 5 mm |
| Bevel cut | 22.5° and 45° |
| Pendulum motion stages | 3 (0, I, II) |
| Weight | 1.6 kg |
| Power supply | Mains 230 V / 50 Hz |
| Dust extraction connection | Ø 35 mm |
| Electronic speed adjustment | Yes, adjustment wheel on the handle |
| Tool-free blade change | Yes, tension lever |
| Dust protection | Protection cover |
| Parallel guide | Included (special accessory) |
| Splinter guard | Removable plastic piece |
| Double insulation | Yes |
| Sound pressure level | 79.5 ± 3 dB(A) |
| Acceleration value | 5.6 m/s² |
| Maintenance | Cleaning of ventilation slots, oiling of blade roller |
| Warranty | 24 months |
Frequently Asked Questions - CST 500 E KRESS
User questions about CST 500 E KRESS
0 question about this device. Answer the ones you know or ask your own.
Ask a new question about this device
Download the instructions for your Jigsaw in PDF format for free! Find your manual CST 500 E - KRESS and take your electronic device back in hand. On this page are published all the documents necessary for the use of your device. CST 500 E by KRESS.
USER MANUAL CST 500 E KRESS
Electronic pendulum jigsaw
Operating Instructions
| Technical data | CST 500 E |
| Input watts | 500 |
| Output watts | 275 |
| Idling speed stroke number/min. | 3600 |
| Control range strokes/min. | 700...3600 |
| Stroke height mm | 19 |
| Cutting depth into: | |
| wood mm | 70 |
| soft steel mm | 5 |
| Mitre cuts up to ° | 22.5 and 45 |
| Pendulum stroke levels | 3 |
| Weight kg | 1.6 |
Use
This saw is a general-purpose jigsaw for all sawing jobs on hardwoods, soft woods, coated woods, chipboard, plywood, metal and plastics up to the given cutting depth.
Safety instructions and prevention of accidents
Before operating the machine, please read through the operating instructions completely, follow the Safety Instructions in this manual as well as the general Safety Instructions for Power Tools in the accompanying booklet.
Caution!
Always remove the mains connector from the appliance before making changes to the tool.
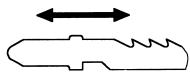
- Never put your hands in the vicinity of the tappet or saw blade (7) while the machine is running - risk of injury.
- To avoid injuries, wear protective gloves when changing the saw blade.

Starting position (= tense position)
Striking point
Clamping saw blade
- Rotate clamping lever (8) as far as it will go and hold in place.
- Insert saw blade (7) as far as it will go.
- Release clamping lever (8).
Important (must be observed)
-
Press jigsaw against saw blade tip on wooden board, until clamping lever (8) springs back to its starting position.
-
It is only by doing this that the secure clamping of the saw blade (7) can be ensured and the hood (3) can be closed.
Unclamping saw blade
- Rotate clamping lever (8) as far as it will go and hold in place.
- Remove saw blade (7).
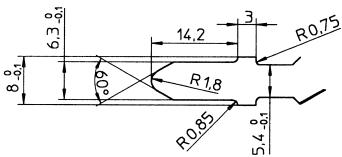
Only original Kress saw blades as listed in the operating manual or in accordance with the following sketch with a max. thickness of 1.5mm may be used. This is the only way to guarantee that the saw blade is securely fastened and reduce as far as possible the risk of accidents caused by the jigsaw blades becoming loose.
- Do not work with materials containing asbestos!
- Outside power sockets must be protected with residual-current-operated circuit-breakers (r.c.c.b.).
- Do not drill holes into the housing to label the machine. The protective insulation will be bridged. Please use self-adhesive labels.
- Always lead cables away towards the back of the machine.
Double insulation
Our equipment is designed in accordance with European regulations (EN standards) for the utmost safety of the user. Machines with double insulation always carry the international symbol. The machines should not be earthed. A two-core cable is sufficient.
The machines are interference-suppressed in accordance with EN 55014.
Initial operation
Before the first operation check that the mains voltage corresponds to that given on the machine nameplate.
Motor
At the heart of the jigsaw is a powerful universal motor with welded collector which can cope with extended use of the tool. The motor has a great power reserve. Since it is very important for the motor to be constantly well-ventilated, it is of particular importance to pay special attention to the maintenance and servicing instructions for removing dust and dirt.
2
Clamping and unclamping the saw blades
The advantage of the clamping system is that saw blades can be changed without tools.
First push the dust hood (3) up. Open the quick-change clamping system by turning the clamping lever (8) so that the saw blade (7) can be inserted. Make sure that it is pushed back as far as it can go. By releasing the clamping lever (8) and then pushing in the direction of the tappet, it is automatically fixed in position, and the clamping lever (8) returns to its starting position.
When unclamping, the saw blade (7) is released from the fixed position by turning the clamping lever (8).
Warning
Do not press back turned clamping levers as this makes it very difficult to remove the saw blade.
It can then be taken out of the tappet.
The supporting roller, which prevents the saw blade from warping and alleviates the stress placed on the mechanics (tappet), automatically gives the clamping angle 90^ as a fence. This of course only applies when our original saw blades are used.
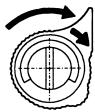
Switching the machine on and off
The machine is activated by turning the on/off switch (1) in the direction of the arrow. The switch is engaged at the end of the turning range. The machine is switched off by turning in the opposite direction.
Working with pendulum jigsaws
When sawing, ensure that the base plate is securely positioned on the work piece. The jigsaw can now be easily operated by hand. To achieve clean cuts and optimal cutting performance, ensure that the pendulum stroke setting and forward feed selected are appropriate to the material (e.g. pendulum stroke setting 0 and slow forward feed when sawing metals).
The built-in blower keeps the cut continuously free of shavings for perfect visibility.
When sawing metals, put some oil onto the cutting line. Sheet metal is to be clamped to a suitably solid base (clamping plate or plywood plate). This eliminates as far as possible the risk of the material springing back and forth.
3
Cutouts/pocket cuts
For cutouts, drill a hole i.e. a starting point where the saw can be inserted. Plunge cuts can be made into the material (only when working wood), but should only be attempted by skilled people. The switched-on jigsaw is placed on the work piece at an angle of 55 - 60^ to the front edge of the base plate and pushed down slowly and carefully. Particular care is required at the start of this work; kick-backs and jerks will result if the jigsaw is placed the wrong way, whilst excessively fast plunge cuts may result in broken blades. Only perform plunge cuts at the max. number of strokes.
4
Mitre cuts
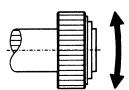
The base plate can be adjusted in both directions by 22.5^ and 45^ . 0^ , 22.5^ and 45^ angles can be fixed securely. Adjustments are made by loosening the clamping wheel (6) beneath the handle. As soon as the toothed wheel work of the saw bench mounting is released, the base plate (4) can be turned to positions 22.5^ or 45^ and be tightened again with the clamping wheel (6).
Full-wave control electronics
The stroke number range can be varied infinitely between 700 and a maximum of 3600 / min . and be adjusted to suit the requirements of the material being worked (full rating for every stroke number). Adjustments are made using the setting dial (2) at the front of the handle. The setting can be changed at any time during operation.
Control range
min. stroke number
approx. 700 strokes/min.
max. stroke number
approx. 3600 strokes/min.
Recommended stroke numbers
Low stroke number when sawing glass, ceramics, metal.
Medium-range stroke number when sawing plastic, pressed material and plywood.
High stroke number when working hardwood, soft wood and chipboard.
The optimal speed setting is to be determined in tests at the beginning of the sawing job, as several factors such as material, thickness of material, condition of the saw blade, may influence the results of the job.
Pendulum stroke setting
The change-over from setting 0 to II is effected by means of the pendulum-stroke adjusting knob (turning knob). The coloured mark indicates the pendulum stroke setting selected.
Recommendations for pendulum stroke settings
Pos. 0 for glass, ceramics, soft steel, non-ferrous metals, aluminium and pressed materials
Pos. I for plastics
Pos. I for plywood
Pos. II for hardwood, soft wood, chipboard
It should be noted that the values given are standard values which may vary according to thickness and hardness of material, grain direction, and also to the condition of the saw blade.
Parallel fence (optional accessory)
For perfect results with parallel cuts, use the graduated parallel fence (11). Once the clamping wheel (6) is loosened, the parallel fence (11) is inserted from the side into the slot in the base plate (4), set according to scale, and fixed with the clamping wheel (6).
Chip-flyoff guard
The synthetic part is placed into the saw opening of the base plate from below (snap fastening). The wood fibre structure is thereby pressed during sawing against this chip-flyoff guard, thus preventing the wood fibres from being damaged.
This application can only be used when cutting at a right angle (90^)
Dust extractor
The jigsaw is equipped to be connected to a commercially available vacuum cleaner. In order to keep the cut free of shavings, the flexible suction tube is inserted from the back into the housing opening. The dust hood is to be pushed downwards until it locks into place. In the case of mitre cuts, the dust hood is to be pushed upwards.
Changing the carbon brushes
Our service centres will do this and all other servicing work quickly and professionally.
Mains cable
Damaged mains cables must not be used. They are to be replaced immediately.
This has been made very straightforward by the new mains cable module (13). Press both locking keys (14) and pull the mains cable module (13) out of the handle. Insert the new mains cable into the handle and lock in place. Different lengthed mains cables are available as special accessories.
Only use the mains cable module for KRESS power tools! Do not attempt to operate other electrical appliances with it!
Maintenance
All tools are contaminated by dust when working with wood. Proper care is therefore essential. Always keep the openings free of dust and dirt. The movable supporting roller for the saw blade should be given a drop of oil from time to time. Other than this, the jigsaw is virtually maintenance-free. Before leaving the factory, all moving parts are well lubricated.
Noise/vibration information
Measured values correspond with EN 50144.
Sound pressure level: = 79.5^+3 dB (A)
Sound power level: = 92.5^+3 dB (A)
Work place
emission value: = 82.5^+3 dB (A)
Operators require noise protection equipment.
The weighted acceleration is typically 5.6m / s^2
Environmental protection
Kress takes back worn-out machines for the purpose of resource-saving recycling. As a result of their modular construction, Kress machines can be very easily dismantled into their reusable materials.
Give your worn-out Kress machine to your dealer or send it directly to Kress.
Subject to change without notice.
Français
Recommendation cycle
Reservation for andringar.
Dansk
Endringer forbeholds.
Suomi
GB CE Declaration of conformity
We declare under our sole responsibility that this product is in conformity with the following standards or standardization documents: see below
Manager of Product Development

Josef Leins,
Quality Assurance Manager
Garantie
- This electrical tool has been designed with high precision and was approved after undergoing strict quality control checks in the factory.
- We are therefore able to guarantee free servicing of any production or material faults which arise in the 24 months after the date of sale to the purchaser. We reserve the right to repair defective parts or else replace them with new parts. Parts which have been replaced become our property.
- The guarantee will be rendered void if the device is used improperly, mistreated or opened up by unauthorised repair personnel. Parts which are subject to wear are not covered by the guarantee.
- The guarantee may only be enforced when defects are reported without undue delay (including shipping damage). Guarantee implementation does not extend the guarantee period.
- If the tool is defective, please complete the guarantee card and return the unit, guarantee card and a brief description of the problem to the responsible service location. Please enclose your sales receipt.
- The guarantee obligations assumed by us shall exclude any further claims on the part of the buyer, in particular the right to recission of a sale, reduction and the assertion of damage claims.
- However, the buyer shall have the right to either a reduction (in the purchase price) or the recission of the sale (cancellation of the sales agreement) should we fail to eliminate any defects within a reasonable period of time.
- Damage claims in accordance with §§ 463, 480 Paragraph 2, 635 BGB due to absence of guaranteed quality shall not be excluded.
- The provisions defined in Items 7 and 8 only apply to the Federal Republic of Germany.
Garantie
| Type | Pitch mm | Construction | Metal | Wood | Plastics |
| T 144 D | 4 | offset sharpened | Hard and soft wood up to 68 mm, particularly suitable for cutting radiiHigh cutting capacity | ||
| T 301 CD | 3 | sharpened | Hard and soft wood, plywood and woodfiber boards up to 68 mm Clean cut | Plastics Clean cut | |
| T 101 BF | 2.5 | sharpened bimetal HSS cutters | Hard and soft wood, plywood, woodfiber boards and laminated up to 60 mm Clean cutLong service life | Fiberglass - reinforced plastics Plexiglass Clean cut | |
| T 118 A | 1.2 | wavy | Soft steel, nonferrous metal, aluminium and aluminium alloys up to 4 mm using suitable coolants | ||
| T 118 B | 2 | wavy high-speed steel | Soft steel up to 6 mm, nonferrous metal, aluminium and aluminium alloys from 3-16 mm using suitable coolants |
Present Handel bvba/sprl
Industriezone "Wolfstee"
Toekomstlaan 6
B-2200 Herentals
Telephone: +32 - (0)14 - 25 74 74 - Telefax: +32 - (0)14 - 25 74 75
E-mail: info@present.be
France
S.A.R.L. Induba
Westcross Centre, 15 Shield Drive
Brentford TW8 9EX
Phone: +44 (0)208-560 0885 - Telefax: +44 (0)208-847 0790
E-mail: njtoolsbrentford@btopenworld.com