
CSS 15 - Battery charger KRESS - Free user manual and instructions
Find the device manual for free CSS 15 KRESS in PDF.

| Product type | Fast battery charger |
| Brand | KRESS |
| Model | CSS 15 |
| Input voltage | 230 V ~ |
| Output voltage | 7.2 - 14.4 V = |
| Max charging current | 8.0 A |
| Compatible battery types | NiCd and NiMH 7.2 - 14.4 V |
| Charging time (example 2.0 Ah NiCd) | approx. 40 min |
| Charging time (example 3.0 Ah NiMH) | approx. 60 min |
| Weight | approx. 1.5 kg |
| Protection class | II |
| LED indicators | Flashing green (charging), steady green (charged), steady red (too hot/cold), flashing red (fault) |
| Trickle charge function | Yes, after fast charge |
| Wall mount | Possible (bracket included) |
| Overheat protection | Automatic shutdown if temperature out of range |
| Charging temperature range | +5°C to +45°C |
| Safety instructions | Do not expose to water, do not open, use only KRESS batteries |
| Maintenance | Keep dry and clean, check contacts |
| Repairability | Do not repair yourself, contact customer service |
| Included accessories | Manual, wall mount bracket |
Frequently Asked Questions - CSS 15 KRESS
User questions about CSS 15 KRESS
0 question about this device. Answer the ones you know or ask your own.
Ask a new question about this device
Download the instructions for your Battery charger in PDF format for free! Find your manual CSS 15 - KRESS and take your electronic device back in hand. On this page are published all the documents necessary for the use of your device. CSS 15 by KRESS.
USER MANUAL CSS 15 KRESS
Operating Instructions GB 9
Mode d'emploi F 14
| Technical Data | +++ POWER +++ | +++ POWER +++ NiMH ++ POWER ++ | +++ POWER +++ | 24V-Akku 24V-Akku NiCd NiMH |
| Battery Charger Type | MSL 60 | MSL 60/2 | CSS 15 | CSS 20/45 |
| Article number | 98033401 | 98034301 | 98023904 | 98035201 |
| Input voltage | 230 V ~ | 230 V ~ | 230 V ~ | 230 V ~ |
| Output voltage | 12 - 13.2 V = | 7.2 - 13.2 V = | 7.2 - 14.4 V = | 24 V = |
| Charging current - Quick charging | max. 1.65 A | max. 3.2 A | max. 8.0 A | max. 8.0 A (at 2.0 Ah/NiCd) max. 4.0 A (at 3.0 Ah/NiMH) |
| - Sustaining charge (average value) | 6 mA | 60 mA | 100 mA | 100 mA |
| Charging time for battery capacity *, based on the standard batteries. 1.5 Ah NiCd/13.2 V = 2.0 Ah NiCd/13.2 V = 3.0 Ah NiMH/13.2 V = 2.0 Ah NiCd/24 V = 3.0 Ah NiMH/24 V = | max. 60 min | max. 40 min | max. 15 min | - |
| max. 60 min | - | - | ||
| - | - | max. 20 min | ||
| - | - | max. 45 min | ||
| Weight | approx. 1.3 kg | approx. 0.5 kg | approx. 1.5 kg | approx. 1.1 kg |
| Safety class | ☐ / II | ☐ / II | ☐ / II | ☐ / II |
- The actual charging times can deviate from the specified times, depending on the battery voltage, the residual capacity and also the temperature of the battery.

10 English
For our program of cordless devices we have developed battery chargers, incorporating state-of-the-art technology in this field. The computer-monitored charging process guarantees optimum charging safety, as well as the maximum service life and utilisation of the battery capacity.
The application possibilities for the battery charger can be found in the tabulated overview at the end of these operating instructions.
2

Safety Instructions and Accident Prevention
WARNING! When using battery-driven tools basic safety precautions are to be taken, including the following, in order to reduce the risk of fire, batteries leaking and persons becoming injured.
Before operating the machine, please read through the operating instructions completely, follow the Safety Instructions in this manual as well as the general Safety Instructions for Power Tools in the accompanying booklet.
Important instructions, which should be read before starting operation, and which we strongly recommend observing:
- For charging the batteries, only use a charger which is recommended by the manufacturer and never use the recommended charger to charge other electrical equipment.
- Do not use any defective or deformed batteries.
- Any machines and batteries that are not being used should be kept separately in a dry place that is high up or locked, out of the reach of children. For safety's sake, a battery charger connected to the mains should also be permanently supervised.
- Do not expose the machine, battery and battery charger to rain. Do not use the machines in a wet or damp environment.
- Always keep the battery and battery charger clean and dry.
- Do not open the battery and protect from impact.
-
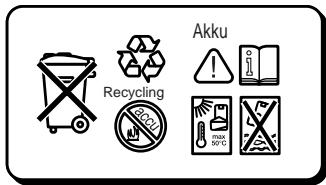
Protect the battery from heat and fire: Danger of explosion! Do not place the battery on radiators or expose to strong sun rays for a longer time; temperatures over 50^ cause damage.
-
In extreme conditions battery fluid can leak out. This does not mean it is defective. If in such a case the casing is no longer sealed and battery fluid comes into contact with the skin, proceed as follows:
- Wash affected skin immediately with soap and water.
- Neutralise the battery fluid with vinegar or lemon juice.
- If the eyes are affected, rinse with clear water with at least 10 minutes. Consult a doctor immediately!
- Before connecting the charger to the mains, please check that the voltage of your mains connection corresponds to the voltage stated on the nameplate of the charger.
- Always inspect the plug and cable before use. If damaged, they must be replaced by a qualified professional.
- Caution - High voltage: Do not open the battery charger!
- Ensure that the connection between the battery charger and battery is correctly positioned and is not obstructed by foreign bodies.
- Keep battery charger slot free of foreign objects and protect against dirt and humidity. Store in a dry and frost-free place.
- When the battery is outside the battery charger, cover battery terminals to avoid short circuits from metal objects. Danger of fire or explosion results when shorted by a metal object!
- Do not charge batteries of other manufacturers. Only use genuine Kress accessories.
- Observe notes on environmental protection.
3 Charging the batteries
Important!
Only use this device to charge batteries that have been recommended for the device by the manufacturer.
The rated voltage of the battery must agree with the value on the machine.
- The batteries are not charged. They therefore have to be charged before use.
- A new battery develops full power only after it has been subjected to approx. 5 charging and discharging cycles.
- The maximum service life of the batteries is attained if you charge these at an ambient temperature of between +5^ and max. +45^ .
- If the battery is not within the permitted loading temperature range (approx. +5^ and +45^ ) charging time is extended by the cooling or warm-up time.
- Important! Batteries will discharge even if the tool is not used. They should therefore be re-charged regularly.
Or better still - connect the battery to the mains charger which will automatically switch to maintenance charging after the battery has been fully charged. This is particularly useful for maintenance and for the optimal operational readiness of the batteries.
- Do not leave the battery in the charger if the latter is not in operating condition.
If the batteries cannot be charged correctly:
- Make sure the socket is providing voltage.
- Make sure the charging points provide good contact.
- Should charging still not be possible, please send the battery and battery charger to our nearest service centre.
Notes for the correct use of the battery:
- To ensure long service life, the batteries should always be charged in good time. This is particularly important if you notice a reduction in power output.
- To obtain the maximum service life, do not recharge the battery immediately after a short period of use but, if possible, discharge to the lower capacity limit and then recharge.
- Avoid to the extent possible the blocking of the machine. The resulting excessive current flow leads to quick discharging and increased wear of the battery.
- An increasingly shorter operating time per recharging of the battery is an indication that the battery is worn out and must be replaced.
Do not carry out any repair on the charger yourself!
As a basic rule, return the faulty machine to our next customer service centre (also in the case of defective mains cables)!
4 Battery charging unit Type: MSL 60
Use as Intended
The device is only designed for charging Kress NiCd batteries with voltages between 12 V and 13.2 V.
The application possibilities for the battery charger can be found in the tabulated overview at the end of these operating instructions.
Putting into Operation
Remove the battery from the device as described in the pertaining operating instructions. Re-assemble in the reverse sequence. Insert the battery into the battery charger as far as it will go.
Charging Procedure
The charging process begins as soon as the mains plug is inserted into the power supply socket and the battery is placed into battery charger slot.
The "intelligent" battery charger recognises the charged condition of the battery and switches a fully charged battery immediately to trickle charging. By means of this charging process, the battery is protected and always fully charged.
Rapid charging is only possible when the temperature of the battery is between +5^ and +45^ .
The charging unit it suitable for continuous operation.
Display and Key
Blinking green indicator light: The battery has contact; charging is in progress (max. 60 minutes).
Constant green indicator light: The battery is charged; the charger has switched to maintaining charge.
Constant red light: The battery is not connected or too warm. Remove the battery from the charger and reconnect or allow to cool off to room temperature, then recommence charging.
Blinking red ligh: The battery is defective or there is a short between the charging contacts.
- Remove the battery from the battery charger.
- Pull out the mains plug!
- Check the charging slot for foreign bodies.


12 English
5 Battery charging unit Type: MSL 60/2
Use as Intended
The device is only designed for charging Kress batteries with voltages between 7.2 V and 13.2 V.
Both NiCd batteries and NiMH batteries can be charged.
The application possibilities for the battery charger can be found in the tabulated overview at the end of these operating instructions.
Putting into Operation
Remove the battery from the device as described in the pertaining operating instructions. Re-assemble in the reverse sequence. Insert the battery into the battery charger as far as it will go.
Charging Procedure
The charging process begins as soon as the mains plug is inserted into the power supply socket and the battery is placed into battery charger slot.
The "intelligent" battery charger recognises the charged condition of the battery and switches a fully charged battery immediately to trickle charging. By means of this charging process, the battery is protected and always fully charged.
Rapid charging is only possible when the temperature of the battery is between +5^ and +45^ .
The charging unit it suitable for continuous operation.
Display and Key
Constant yellow light: The device is ready for use; there is no battery in the charging slot.
Blinking green indicator light: The battery has contact; charging is in progress (approx. 40 minutes for an NiCd battery/approx. 60 minutes for an NiMH battery).
Constant green indicator light: The battery is charged; the charger has switched to maintaining charge.
Constant red light: The battery is too hot or too cold.
The charging process begins automatically as soon as the battery is in the permissible temperature range.
Blinking red ligh: The battery is defective or there is a short between the charging contacts.
- Remove the battery from the battery charger.
- Pull out the mains plug!
- Check the charging slot for foreign bodies.
6 Battery charging unit Type: CSS 150
Use as Intended
The device is only designed for charging Kress NiCd batteries with voltages between 7.2V and 14.4V .
The application possibilities for the battery charger can be found in the tabulated overview at the end of these operating instructions.
Putting into Operation
Remove the battery from the device as described in the pertaining operating instructions. Re-assemble in the reverse sequence. Insert the battery into the battery charger as far as it will go.
Charging Procedure
The quick, computerised battery charger has an extensive function for monitoring the battery and charging parameters and charges the battery with the optimum quick-charging current in each case, depending upon the temperature. This enables the shortest charging times and a long battery service life.
After completion of the quick charging process, the charging unit switches automatically to trickle charging. This compensates for the natural self-discharging of the battery.
Display and Key
Constant yellow light: The charging unit is correctly connected to the power mains and is ready for operation. No battery is inserted in the charging cavity or it is not making contact.
Blinking green indicator light: The battery is making contact and quick charging is in progress.
Constant green indicator light: The quick charging process has ended and the charging unit has switched to trickle charging. The battery is completely charged and can be removed.
Constant red light: The battery temperature is outside the allowable range. The charging process begins as soon as the battery temperature is again within the prescribed temperature range.
Blinking red ligh: The battery is defective or there is a short between the charging contacts.
- Remove the battery from the battery charger.
- Pull out the mains plug!
- Check the charging slot for foreign bodies.
Wall Mounting of the Charging Unit
The charging unit can be attached to the wall with the aid of the wall holder provided and standard screws.
The charging unit can be removed again at any time by lifting and unhooking and used as a table unit, for example.

The device is only designed for charging Kress batteries with a voltage of 24V .
Both NiCd batteries and NiMH batteries can be charged.
The application possibilities for the battery charger can be found in the tabulated overview at the end of these operating instructions.
Putting into Operation
Remove the battery from the device as described in the pertaining operating instructions. Re-assemble in the reverse sequence. Fully insert the battery into the charging slot until it is heard and/or felt to notch. For removing the battery, press both lock-release buttons until the battery can be taken out of the battery charger without any resistance. Do not exert any force!
Charging Procedure
The quick, computerised battery charger has an extensive function for monitoring the battery and charging parameters and charges the battery with the optimum quick-charging current in each case, depending upon the temperature. This enables the shortest charging times and a long battery service life.
After completion of the quick charging process, the charging unit switches automatically to trickle charging. This compensates for the natural self-discharging of the battery.
Display and Key
Constant yellow light: The charging unit is correctly connected to the power mains and is ready for operation. No battery is inserted in the charging cavity or it is not making contact.
Blinking green indicator light: The battery is making contact and quick charging is in progress.
Constant green indicator light: The quick charging process has ended and the charging unit has switched to trickle charging. The battery is completely charged and can be removed.
Constant red light: The battery temperature is outside the allowable range. The charging process begins as soon as the battery temperature is again within the prescribed temperature range.
Blinking red ligh: The battery is defective or there is a short between the charging contacts.
- Remove the battery from the battery charger.
- Pull out the mains plug!
- Check the charging slot for foreign bodies.
Wall Mounting of the Charging Unit
The charging unit can be attached to the wall with the aid of the wall holder provided and standard screws.
The charging unit can be removed again at any time by lifting and unhooking and used as a table unit, for example.
8 Environmental Protection

Kress takes back worn-out machines for the purpose of resource-saving recycling. As a result of their modular construction, Kress machines can be very easily dismantled into their reusable materials.
Defective
rechargeable
batteries must be recycled
according to the Guidelines
91/157/EEC.
Do not throw used batteries in household waste, in fire or in water.
Do not open battery and dispose of it through the available collection points.
Give your worn-out Kress machine to your dealer or send it directly to Kress.
Subject to change without notice
Con这对于 the apparecchiatura, it is important to note that this is not a case of the same kind as for the apparecchiatura.
Reservation for andringar


| Tekniske data | +++ POWER +++ | +++ POWER +++ | +++ POWER +++ | 24V-Akku NiCd 24V-Akku NiMH |
| Ladeaggregat Type | MSL 60 | MSL 60/2 | CSS 15 | CSS 20/45 |
| Varenummer | 98033401 | 98034301 | 98023904 | 98035201 |
| Indgangsspænding | 230 V ~ | 230 V ~ | 230 V ~ | 230 V ~ |
| Udgangsspænding | 12 - 13,2 V = | 7,2 - 13,2 V = | 7,2 - 14,4 V = | 24 V = |
| Ladestrøm | ||||
| - Hurtigladning | maks. 1,65 A | maks. 3,2 A | maks. 8,0 A | maks. 8,0 A (bei 2,0 Ah/NiCd) |
| - Kompensationsladning (middelværdi) | 6 mA | 60 mA | 100 mA | maks. 4,0 A (bei 3,0 Ah/NiMH) |
| Ladetid ved akku-kapacitet*) ved hjælp af basis-akkuerne | ||||
| 1,5 Ah NiCd/13,2 V = | maks. 60 min | maks. 15 min | - | |
| 2,0 Ah NiCd/13,2 V = | maks. 40 min | - | ||
| 3,0 Ah NiMH/13,2 V = | - | maks. 60 min | - | - |
| 2,0 Ah NiCd/24 V = | - | - | - | maks. 20 min |
| 3,0 Ah NiMH/24 V = | - | - | - | maks. 45 min |
| Vægt | ca. 1,3 kg | ca. 0,5 kg | ca. 1,5 kg | ca. 1,1 kg |
| Dobbeltisoleret | ☐ / II | ☐ / II | ☐ / II | ☐ / II |
Ladeaggregat for alkumulator Type: MSL 60
Ladeaggregat for alkumulator Type: MSL 60/2
Ladeaggregat for alkumulator Type: CSS 15
Diatnpoume Toikaiwma aalaywv


GB (C) Declaration of conformity
We declare under our sole responsibility that this product is in conformity with the following standards or standardization documents: EN 60 335, EN 55 014-1, EN 55 014-2, EN 61 000-3-2, EN 61 000-3- according to the provisions of the regulations 73/23/EEC, 89/336/EEC.