
ULTRA THIN KEYBOARD - Keyboard PALM - Free user manual and instructions
Find the device manual for free ULTRA THIN KEYBOARD PALM in PDF.
| Product type | Foldable keyboard for Palm OS |
| Brand | PALM |
| Model | ULTRA THIN KEYBOARD |
| Compatibility | Palm OS handhelds (selected models) |
| Dimensions (closed) | 139 x 99 x 13 mm |
| Dimensions (open) | 251 x 148 x 13 mm |
| Weight | 165 g |
| Power | Powered by the handheld (no batteries) |
| Key layout | AZERTY (standard) |
| Key spacing | 18 mm horizontal and vertical |
| Key travel | 3 mm |
| Key mechanism | Scissor Key Lift |
| Function keys | Blue FN and Green FN |
| Main functions | Text entry, keyboard shortcuts, pointer (Palm OS 4.1), browser (Palm OS 5) |
| Connectivity | Specific Palm docking connector |
| Operating temperature | -40°C to 60°C |
| Storage temperature | 0°C to 50°C |
| Certifications | FCC Class B, ICES-003, CE |
| Box contents | Keyboard, CD-ROM, user manual |
| Maintenance | Clean with a soft, dry cloth |
| Safety | Avoid prolonged use without breaks; consult a doctor if discomfort occurs |
Frequently Asked Questions - ULTRA THIN KEYBOARD PALM
User questions about ULTRA THIN KEYBOARD PALM
0 question about this device. Answer the ones you know or ask your own.
Ask a new question about this device
Download the instructions for your Keyboard in PDF format for free! Find your manual ULTRA THIN KEYBOARD - PALM and take your electronic device back in hand. On this page are published all the documents necessary for the use of your device. ULTRA THIN KEYBOARD by PALM.
USER MANUAL ULTRA THIN KEYBOARD PALM
Palm™ Ultra-Thin Keyboard Handbook
Installing the Application 5
Setting Up the Keyboard 6
Closing the Keyboard 7
Customizing the Keyboard 8
Changing general settings 8
Assigning applications to command key combinations 9
Working with the pointer and the navigator 10
Changing layout settings 12
Viewing keyboard shortcuts 14
Keyboard Navigation, Shortcuts, and Special Characters 15
Using keyboard function keys 15
Cursor movements 18
Menu commands 19
Extended character set 19
Frequently Asked Questions 21
Product Specifications 22
Product Regulatory Information 23
Palm™ Ultra-Thin Keyboard Handbook
Copyright
© 1998-2002 Palm, Inc. All rights reserved. Graffiti, HotSync, and Palm OS are registered trademarks of Palm, Inc. Palm and the Palm logo are trademarks of Palm, Inc. All other brands are trademarks or registered trademarks of their respective owners.
Disclaimer and Limitation of Liability
Palm, Inc. assumes no responsibility for any damage or loss resulting from the use of this guide.
Palm, Inc. assumes no responsibility for any loss or claims by third parties which may arise through the use of this software. Palm, Inc. assumes no responsibility for any damage or loss caused by deletion of data as a result of malfunction, dead battery, or repairs. Be sure to make backup copies of all important data on other media to protect against data loss.
IMPORTANT Please read the End User Software License Agreement with this product before using the accompanying software program(s). Using any part of the software indicates that you accept the terms of the End User Software License Agreement.
Introducing the Palm™ Ultra-Thin Keyboard
The Palm™ Ultra-Thin Keyboard is the convenient, portable keyboard solution for typing text and commands quickly and easily into your Palm OS® handheld. This compact and fully functional keyboard enables you to do the following:
Create and respond to e-mail messages
Type meeting and classroom notes
- Type memos, reports, and other documents while on a plane, on the subway, in a classroom, and in many other places
- Fold to fit in your pocket, backpack, or briefcase
This Handbook describes how to install and set up your keyboard, how to customize settings to optimize your use of the keyboard, and the keyboard shortcuts that are available for quick navigation and data entry.
Before you can use your keyboard, you must do the following:
Install the Palm Ultra-Thin Keyboard application on your handheld
- Set up the keyboard and attach your Palm OS handheld
Installing the Application
Before you install the Palm Ultra-Thin Keyboard application on your handheld, it's a good idea to perform a HotSync® operation to back up your data.
The application for the keyboard controls the way the keyboard interacts with your handheld. It's a PRC file like most other applications for your handheld.
To install the keyboard application (Windows users):
- Insert the CD-ROM into the CD-ROM drive.
- Follow the onscreen instructions for completing the installation.
NOTE If installation does not begin, click the Windows Start button, select Run, enter D:\autorun.exe, and then click OK. If necessary, replace D: with the drive letter assigned to your CD-ROM drive.
To install the keyboard application (Mac users):
- Insert the CD-ROM into the CD-ROM drive.
- Double-click the Setup icon.
- Double-click the keyboard.prc file. The file will be installed during your next HotSync operation.
Setting Up the Keyboard
A few steps is all is takes to set up the keyboard and connect it to work with your handheld.
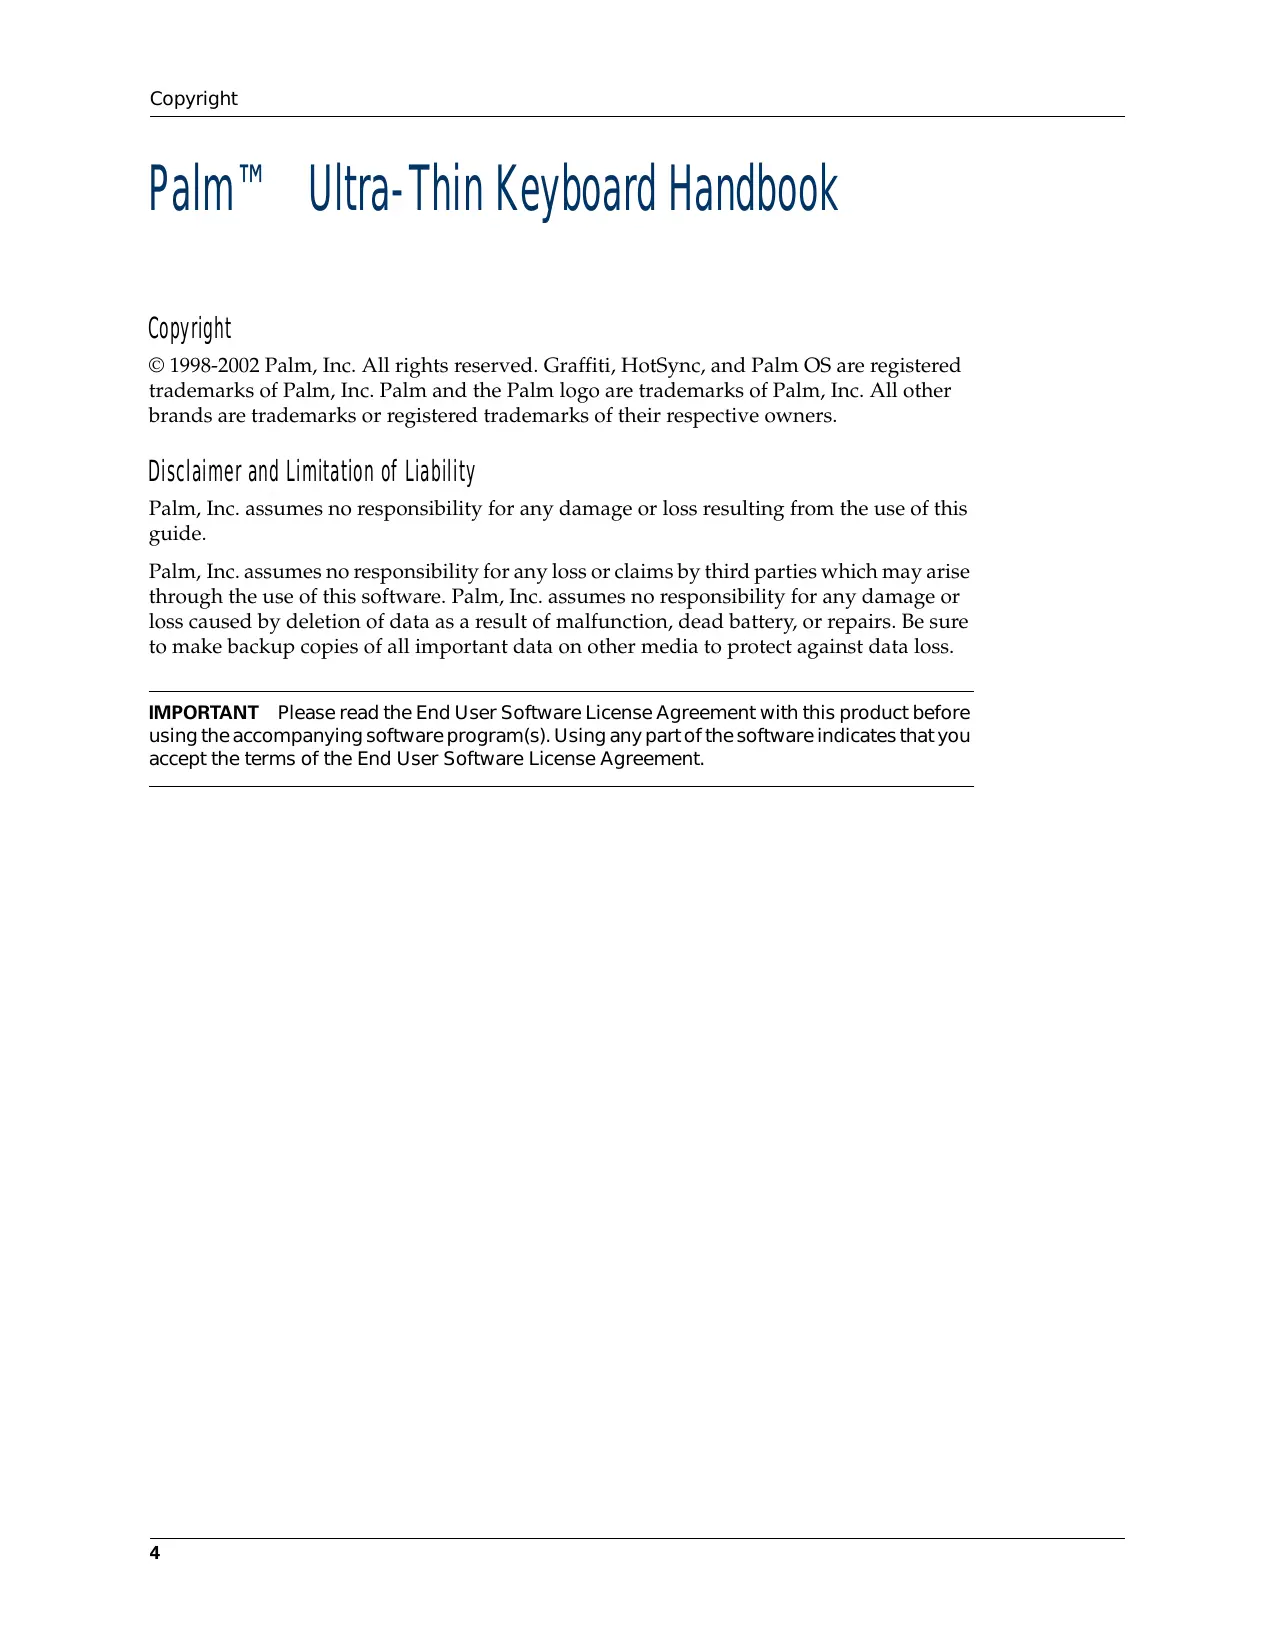
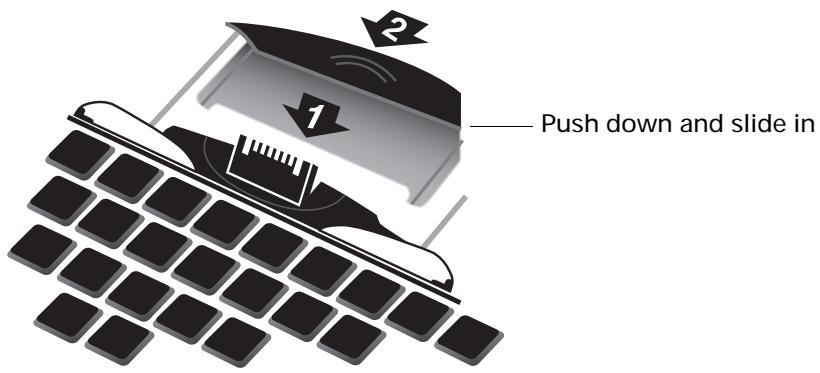
To open the keyboard:
- Hold the keyboard in your right hand and push the latch button, located on the left side.
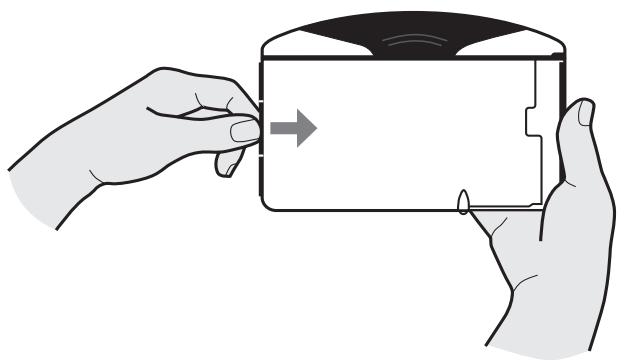
- Unfold the keyboard from left to right and push down on the right panel to snap it into place. Place the keyboard on a hard, flat surface or on your lap to type anywhere, anytime.
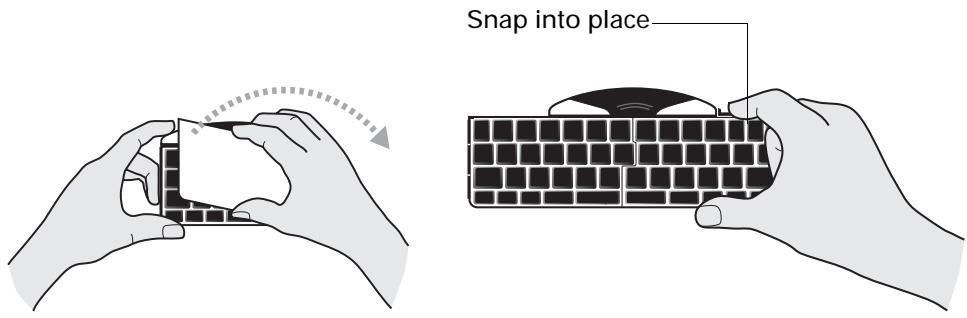
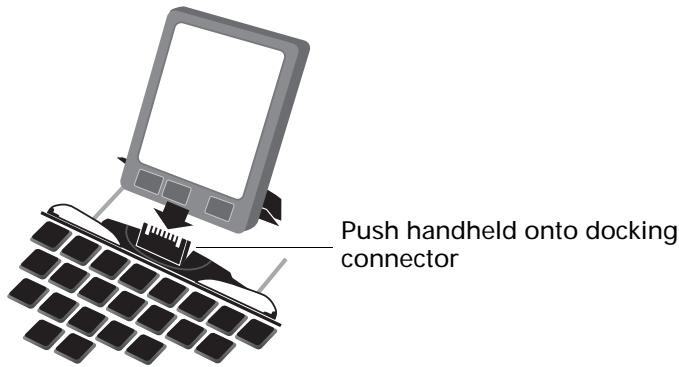
To attach your handheld:
- Locate the black connector cover at the top-center of the keyboard and slide it out until the foot support springs upward.
- Insert your handheld by lining up the docking connector at the top-center of the keyboard and pushing down firmly to make the connection.
After you install the keyboard application and connect the handheld, you can begin typing.
NOTE If you connect your handheld to the keyboard before installing the keyboard PRC file, you will start a HotSync operation. If this happens, simply remove the handheld and press the onscreen cancel button. Then, install the keyboard PRC file.
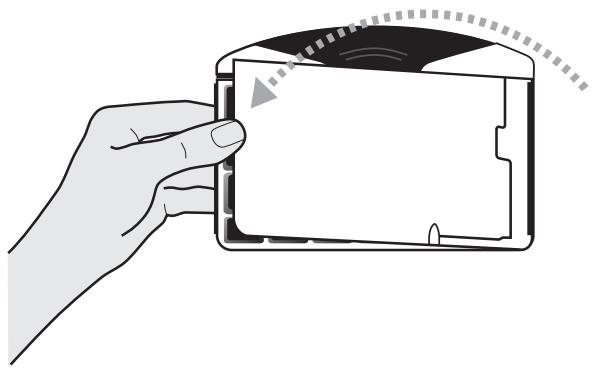
To remove your handheld:
- Rotate your handheld forward in the docking connector, in the same way that you remove it from the cradle.
Closing the Keyboard
When you finish using your keyboard, simply remove the handheld, unlock and fold up the keyboard, and close it back into a portable case.
To close the keyboard:
- Push the foot support down and slide the black connector cover back into the keyboard.
- While holding the keyboard, slide the tab on the upper-right side of the keyboard to the right so that the keyboard snaps out of the locked position.
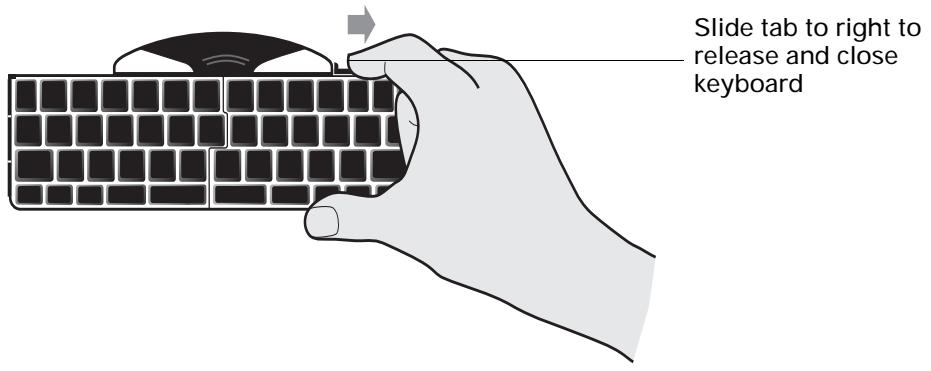
- Fold the right side of the keyboard into the left side, and snap to close.
Customizing the Keyboard
You can customize your keyboard using the options available in the keyboard application on your handheld.
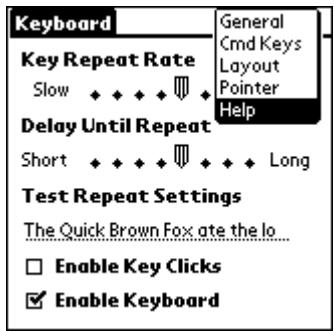
Changing general settings
The general settings control the interaction of the keyboard with the handheld.
To change general settings:
- Tap the Home icon .
- Tap the Keyboard icon 喜
3. Change the settings.
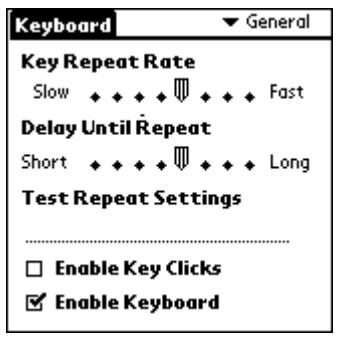
Key Repeat Rate Drag the indicator to speed up or slow down the rate at which a character is typed when you hold down the key.
Delay Until Repeat Drag the indicator to lengthen or shorten the time between typing the first key to repeat and the rate at which subsequent repeated keys appear.
Test Repeat Settings Hold down a key in the edit line to test your selections for Key Repeat Rate and Delay Until Repeat.
Enable key clicks Select the check box if you want to hear a click when you press a key. You must also set the System Sound option in the General Preferences for your handheld to Low, Medium, or High.
Enable keyboard Select or deselect the check box to turn the keyboard driver on or off. The default setting is on (selected).
Assigning applications to command key combinations
You can open the main handheld applications—Date Book, Address Book, To Do List, Note Pad, Launcher, Menu, Favorites, and Find—using the Blue FN key on your keyboard.
You can also open an application by using a command key combination that you assign to it.
To assign an application to a command key combination:
- Tap the Home icon ±b
-
Tap the Keyboard icon .
-
Tap the pick list in the upper-right corner of the screen and select Cmd Keys.
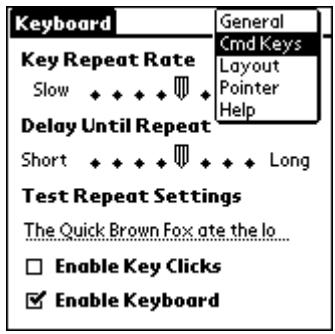
- Tap the pick list of the command key combination that you want to assign to an application.
- Select the application that you want to assign to the key combination.

You can launch mapped applications in one of two ways:
PressCMD+BlueFN+theassignednumberkey.
If NUMLOCK (Blue FN+CAPS LOCK) is enabled: Press CMD+the assigned number key.
Working with the pointer and the navigator
All Palm OS 4.1 handhelds support use of a pointer. You use keyboard commands in combination with the pointer to navigate the screen.
Some Palm OS 4.1 handhelds support both the pointer and the navigator on the front of the handheld. Pointer functionality works identically on all Palm OS 4.1 handhelds, whether or not the navigator is supported.
Palm OS 5 handhelds do not support pointer functionality. Instead, these handhelds support the navigator on the front of the handheld.
Optimizing pointer functionality
For Palm OS 4.1 handhelds, you can customize pointer settings to optimize pointer performance.
To optimize pointer functionality:
-
Tap the Home icon 0 .
-
Tap the Keyboard icon .
-
Tap the pick list in the upper-right corner of the screen and select Pointer.

- Change the settings.
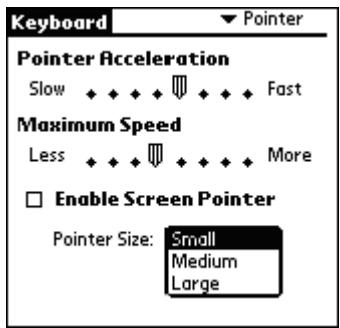
Pointer Acceleration Adjust how quickly the onscreen pointer reaches its maximum speed.
Maximum Speed Adjust the onscreen pointer's maximum speed.
Enable Screen Pointer Select or deselect the check box to turn the pointer on or off.
Pointer Size Tap to select the pointer size: Small, Medium, or Large.
When you enable the pointer, you can use the following commands to navigate it:
| Command | Action |
| ALT+up arrow | Moves the pointer upward |
| ALT+down arrow | Moves the pointer downward |
| ALT+right arrow | Moves the pointer to the right |
| ALT+left arrow | Moves the pointer to the left |
Using the navigator
For all Palm OS 4.1 and Palm OS 5.0 handhelds that support the navigator, you can use the following commands:
| Command | Action |
| CMD+up arrow | Navigates up |
| CMD+right arrow | Navigates right |
| CMD+left arrow | Navigates left |
| CMD+down arrow | Navigates down |
Changing layout settings
You can select from among four keyboard layouts and between two tab options.
To change layout settings:
- Tap the Home icon ±b
- Tap the Keyboard icon .
- Tap the pick list in the upper-right corner of the screen and select Layout.
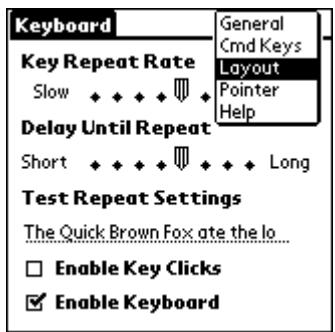
4. Change the settings.
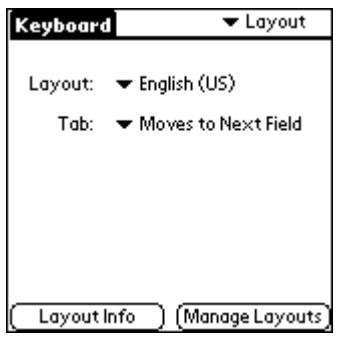
Layout Select from four keyboard layouts:
■ English (US)
■ English (US-Dvorak)
German
Japanese
Tab Select either Moves to Next Field (default setting) or Inserts Tab.Whichever option you choose, pressing FN + TAB performs the other action. For example, if you select Inserts Tab, pressing TAB inserts a tab in the current text field while pressing FN + TAB moves the cursor to the next field.
NOTE You can press either the blue or the green FN button with the TAB button to perform the alternate Tab function.
Layout Info Get information about the keyboard layout you selected.
Manage Layouts View the layout databases (.pdb files) for each of the four keyboard layouts.
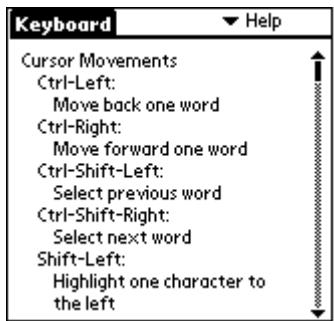
Viewing keyboard shortcuts
Your keyboard comes with a full set of keyboard shortcuts for performing handheld functions. Use the shortcuts list to view the available shortcuts.
To view the list of keyboard shortcuts:
- Tap the Home icon .
- Tap the Keyboard icon
- Tap the pick list in the upper-right corner of the screen and select Help.
- Use the onscreen scroll bar or the scroll button on the front panel of your handheld to move through the list.
See "Keyboard Navigation, Shortcuts, and Special Characters" for descriptions of the keyboard shortcuts that appear in the list on your handheld.
Keyboard Navigation, Shortcuts, and Special Characters
This section lists the various shortcuts that are available on your keyboard.
Using keyboard function keys
The keyboard provides two separate color-coded function keys (blue FN and green FN) that enable you to navigate the device or access numbers and symbols.
| Blue Function key | Character or Action |
| FN+q | The number 1 |
| FN+w | The number 2 |
| FN+e | The number 3 |
| FN+r | The number 4 |
| FN+t | The number 5 |
| FN+y | The number 6 |
| FN+u | The number 7 |
| FN+i | The number 8 |
| FN+o | The number 9 |
| FN+p | The number 0 |
| FN+- | The character [ |
| FN+= | The character ] |
| FN+CAPS LOCK | Number lock |
| FN+a | Opens Date Book |
| FN+s | Opens Address Book |
| FN+d | Opens To Do |
| FN+f | Opens Note Pad |
| FN+j | Opens Launcher window |
| FN+k | Opens pull-down menu for screen currently displayed |
| FN+I | Opens Favorites |
| FN+; | Opens Find |
| FN+' | The character ` |
| FN+z | OK |
| FN+x | Done |
| FN+c | Cancel |
| FN+v | Details |
| FN+b | Edit |
| FN+n | New |
| FN+m | Delete |
| FN+, | Note |
| FN+. | Send |
| FN+/ | The character \ |
| FN+CTRL | Shortcut key & |
| FN+CMD | Command stroke √ |
| FN+ENTER | Select |
| FN+up arrow | Selects line of text above the cursor |
| FN+left arrow | Selects character to the left of the cursor |
| FN+down arrow | Selects line of text below the cursor |
| FN+right arrow | Selects character to the right of the cursor |
| FN+DEL | Brightness |
| Green Function key | Character or Action | Description |
| FN+q | ! | Exclamation point |
| FN+w | @ | At |
| FN+e | # | Number sign |
| FN+r | $ | Dollars |
| FN+t | % | Percent |
| FN+y | ^ | Caret |
| FN+u | & | And |
| FN+i | * | Asterisk |
| FN+o | ( | Left parenthesis |
| FN+p | ) | Right parenthesis |
| FN+- | { | Left curly bracket |
| FN+= | } | Right curly bracket |
| FN+; | £ | Pound sterling |
| FN+' | ~ | Tilde |
| FN+, | € | Euro |
| FN+. | ¥ | Japanese yen |
| FN+/ | | | Bar |
| FN+up arrow | Page up | Moves cursor up one page |
| FN+left arrow | Home | Moves cursor to the beginning of the line |
| FN+down arrow | Page down | Moves cursor down one page |
| FN+right arrow | End | Moves cursor to the end of the line |
Cursor movements
The following table lists the shortcuts for moving the cursor and selecting text.
| Shortcut | Action |
| CTRL+left arrow | Moves cursor left (back) one word |
| CTRL+right arrow | Moves cursor right (forward) one word |
| Blue FN+left arrow | Selects character to the left of the cursor |
| Blue FN+right arrow | Selects character to the right of the cursor |
| Blue FN+up arrow | Selects line of text above the cursor |
| Blue FN+down arrow | Selects line of text below the cursor |
| Green FN+left arrow | Moves cursor to the beginning of the line |
| Green FN+right arrow | Moves cursor to the end of the line |
| Green FN+up arrow | Moves cursor up one page |
| Green FN+down arrow | Moves cursor down one page |
| TAB | If “Moves to Next Field” is selected in the layout settings screen: Tabs forward through edit lines If “Inserts Tab” is select in the layout settings screen: Tabs a tab into a line See “Optimizing pointer functionality” earlier in this chapter for information on Tab selection in the layout settings screen. |
| SHIFT+TAB | Tabs backward through edit lines |
| FN (Blue or Green)+TAB | If “Moves to Next Field” is selected in the layout settings screen: Inserts a tab into a line If “Inserts Tab” is select in the layout settings screen: Tabs forward through edit lines See “Optimizing pointer functionality” earlier in this chapter for information on Tab selection in the layout settings screen. |
Menu commands
The following table lists the key combinations for activating handheld commands.
| Keystroke | Action |
| CTRL+x | Cuts selected text |
| CTRL+C | Copies selected text |
| CTRL+V | Pastes cut or copied text |
| CMD+left spacebar | Brings up handheld's onscreen international keyboard |
Extended character set
The following two tables list the function key and character combinations for generating extended characters.
Accent marks
First, type the letter to which you want to add an accent. Then press the CTRL+ALT keys and the character indicated.
For example, to type the o in Köln, type the o, and then press CTRL+ALT+; (CTRL key, ALT key, and semicolon). The umlaut appears over the o.
| Keystroke | Character example | Description |
| CTRL+ALT+' | á | Acute accent |
| CTRL+ALT+Green FN+y | á | Circumflex |
| CTRL+ALT+; | á | Umlaut |
| CTRL+ALT+Blue FN+' | á | Grave accent |
| CTRL+ALT+Green FN+' | á | Tilde |
| CTRL+ALT+Blue FN+p | á | Aring (with letter “a” only) |
See "Does the keyboard support international characters?" later in this book to learn how to use the CTRL+ALT keys to make the keyboard mimic the onscreen international keyboard on your handheld.
Characters, symbols, and punctuation marks
Use a combination of command keys and letter/symbol keys to create mathematical symbols, currency designations, and more.
| Keystroke | Character | Description |
| CTRL+ALT+SHIFT+O | ∅ | Capital O with slash (naught) |
| CTRL+ALT+O | ∅ | Lowercase o with slash (naught) |
| CTRL+ALT+SHIFT+up arrow | i | Upside-down "?" |
| ALT+Green FN+q | i | Upside-down "!" |
| CTRL+ALT+SHIFT+a | A | Uppercase AE ligature |
| CTRL+ALT+a | æ | Lowercase ae ligature |
| CTRL+ALT+b | β | Beta |
| CTRL+ALT+W | ■ | Bullet |
| CTRL+ALT+C | , | Cedilla |
| CTRL+ALT+g | © | Copyright |
| CTRL+ALT+d | ° | Degrees |
| CTRL+ALT+- | ÷ | Divide |
| Green FN+, | € | Euro |
| CTRL+ALT+u | μ | Micro |
| CTRL+ALT+Blue FN+/ | ¶ | Paragraph |
| Green FN+; | £ | Pound sterling |
| CTRL+ALT+r | ® | Registered trademark |
| CTRL+ALT+S | § | Section |
| CTRL+ALT+t | ™ | Trademark |
| Green FN+. | ¥ | Japanese yen |
| CTRL+ALT+SHIFT+= | ± | Plus or minus |
| CTRL+ALT+Blue FN+w | 1/2 | Half |
| CTRL+ALT+Blue FN+e | 3/4 | Three-quarters |
| CTRL+ALT+Blue FN+r | 1/4 | One-quarter |
| CTRL+ALT+Green FN+r | ¢ | Cents |
| CTRL+ALT+f | f | Script f |
Frequently Asked Questions
If you encounter a problem with your keyboard, first review the questions and answers in this section, as well as the following sources:
The readme file on the CD-ROM included with your keyboard
The web site www.palm.com/support/keyboard for the latest FAQ and/or Troubleshooting guide for the keyboard
If you are still having problems, contact technical support. For U.S. and international telephone numbers, see the Worldwide Customer Support card that comes with your keyboard. International support numbers are also available on the International page of the web site www.palm.com.
Does the keyboard require batteries?
No. The keyboard is designed to use an extremely low amount of power from your handheld, an amount similar to using Graffiti® writing or the onscreen keyboard.
Can I use the same keyboard for all handhelds?
No. There are several Palm keyboards available, each of which works with specific handheld models. Please check the packaging of your Palm Ultra-Thin Keyboard for specific handheld model compatibility.
Can I perform a HotSync operation on the handheld while using the keyboard?
No. The keyboard does not replace the functionality of your cradle. To perform a HotSync operation after entering data with the keyboard, remove your handheld from the keyboard and place it in your cradle. Then press the HotSync button.
Does the keyboard support international characters?
Yes. You can enter international characters in two ways:
- Use keyboard shortcuts: Use the CTRL and ALT keys (CTRL+ALT) in combination with another key to add accent marks to letters you type and to type punctuation marks. See "Extended character set" earlier in this book.
For example, to type the in Kohn, type the o, and then press CTRL+ALT+; (CTRL key, ALT key, and semicolon). The umlaut appears over the o.
- Use the ALT key on the keyboard: When you press and hold down the ALT key, the next key you press produces the character corresponding to that location on your handheld's onscreen international keyboard.
Product Specifications
-
Meets ISO/IEC Specification 9995 for full-size keyboards:
-
Key Spacing: 18mm horizontally and vertically; center-to-center key spacing
- Key Travel: 3 mm (similar to best notebook keyboards)
Dimensions:
- Closed: 5.5'' × 3.90'' × .50'' (139 mm × 99 mm × 13 mm)
- Open: 9.9'' × 5.80'' × .50'' (251 mm × 148 mm × 13 mm)
Weight: 6.5 ounces (165 g)
Key Switch Mechanism: Scissor Key Lift Mechanism
Operating Temperature: -40^ to 60^
Storage Temperature: 0^ to 50^
No batteries or cables required
- Uses minimal power, an amount similar to Graffiti writing or the onscreen keyboard
Standard Keyboard Layout (QWERTY)
Patents Pending
Product Regulatory Information
Safety Statement
Warning: Prolonged or improper use of the keyboard may result in discomfort or injury.
You should use the method of inputting data into your Palm OS® handheld that is most comfortable for you. You may use this keyboard or purchase any of several shapes of styli from Palm, Inc. or third-party accessory providers.
The keyboard is not intended for extended or intensive use. If discomfort develops, consider changing your method of input or the manner in which you use the keyboard or stylus. If discomfort or pain persists, either decrease usage or consult a medical or ergonomics professional.
FCC Statement
This device complies with part 15 of the FCC rules. Operation is subject to the following two conditions: (1) This device may not cause harmful interference, and (2) this device must accept any interference received, including interference that may cause undesired operation.
NOTE This equipment has been tested and found to comply with the limits for a Class B digital device, pursuant to Part 15 of the FCC rules. These limits are designed to provide reasonable protection against harmful interference in a residential installation. This equipment generates, uses, and can radiate radio frequency energy and, if not installed and used in accordance with the instructions, may cause harmful interference to radio communications. However, there is no guarantee that interference will not occur in a particular installation. If this equipment does cause harmful interference to radio or television reception, which can be determined by turning the equipment off and on, the user is encouraged to try to correct the interference by one or more of the following measures:
Reorient or relocate the receiving antenna.
Increase the separation between the equipment and receiver.
Connect the equipment into an outlet on a circuit different from that to which the receiver is connected.
■ Consult the dealer or an experienced radio/TV technician for help.
The use of shielded I/O cables is required when connecting this equipment to any and all optional peripheral or host devices. Failure to do so may violate FCC rules.
CAUTION Changes or modifications not covered in this manual must be approved in writing by the manufacturer's Regulatory Engineering Department. Changes or modifications made without written approval may void the user's authority to operate this equipment.
Responsible Party:
Think Outside, Inc.
5790 Fleet Street
Suite 130
Carlsbad, CA 92008
(760) 431-9090 Phone
(760) 431-7875 Fax
www.thinkoutside.com
Palm™ Ultra-Thin Keyboard

Tested to Comply With FCC Standards
FOR HOME OR OFFICE USE
Canadian ICES-003 Statement
This Class B digital apparatus meets all of the requirements of the Canadian Interference-Causing Equipment Regulations.
CE Compliance Statement
This product was tested and found to comply with all the requirements of the EMC Directive 89/336/EEC as amended.

This is a Class B product based on the standard of the Voluntary Control Council for Interference from Information Technology Equipment (VCCI). If this is used near a radio or television receiver in a domestic environment, it may cause radio interference. Install and use the equipment according to the instruction manual.
■ English (US)
■ English (US-Dvorak)
German
Japanese
Partie responsible :
Think Outside, Inc.
5790 Fleet Street
Suite 130
Carlsbad, CA 92008
Telephone:(760)431-9090
Fax:(760)431-7875
www.thinkoutside.com
Clavier ultra-fin Palm™

Conforme aux normes FCC
POUR UNE UTILISATION CHEZ SOI OU AU BUREAU
Avertissement ICES-003 (Canada)
This Class B digital apparatus meets all of the requirements of the Canadian Interference-Causing Equipment Regulations.
■ English (US)
■ English (US-Dvorak)
German
Japanese
■ English (US)
■ English (US-Dvorak)
German
Japanese
■ English (US)
■ English (US-Dvorak)
German
Japanese
■ English (US)
■ English (US-Dvorak)
German
Japanese
Palm™ Ultra-Thin Keyboard

Tested to Comply With FCC Standards
FOR HOME OR OFFICE USE
Canadian ICES-003 識明
- Palm™ Ultra-Thin Keyboard Handbook
- Copyright
- Disclaimer and Limitation of Liability
- Introducing the Palm™ Ultra-Thin Keyboard
- Installing the Application
- Setting Up the Keyboard
- To open the keyboard:
- To attach your handheld:
- Closing the Keyboard
- Customizing the Keyboard
- Changing general settings
- Change the settings.
- Assigning applications to command key combinations
- Working with the pointer and the navigator
- Optimizing pointer functionality
- Using the navigator
- Changing layout settings
- Change the settings.
- Viewing keyboard shortcuts
- Keyboard Navigation, Shortcuts, and Special Characters
- Using keyboard function keys
- Cursor movements
- Menu commands
- Extended character set
- Accent marks
- Characters, symbols, and punctuation marks
- Frequently Asked Questions
- Product Specifications
- Product Regulatory Information
- Safety Statement
- FCC Statement
- Responsible Party:
- Canadian ICES-003 Statement
- CE Compliance Statement
- Avertissement ICES-003 (Canada)
- Canadian ICES-003 識明
Brand : PALM
Model : ULTRA THIN KEYBOARD
Category : Keyboard