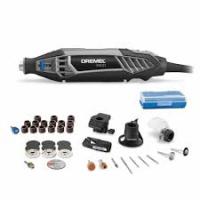
761 - Rotary tool DREMEL - Free user manual and instructions
Find the device manual for free 761 DREMEL in PDF.

| Product type | Rotary tool for trimming pet claws |
| Brand | DREMEL |
| Model | 761 |
| Dimensions (approx.) | 15.2 x 5.1 x 5.1 cm |
| Weight (approx.) | 272 g |
| Power source | 4 AA 1.5 V alkaline batteries (not included) |
| Rated voltage | 6.0 V DC |
| No-load speed | 7,000-14,000 RPM (2 speeds: low/high) |
| Collet capacities | 0.8 mm, 1.6 mm, 2.4 mm, 3.2 mm |
| Included accessories | 1/4 in. sanding drum (no. 430), 4 sanding bands 60 grit (no. 431) |
| Main functions | Trimming and polishing dog and cat claws |
| Care and cleaning | Clean with dry compressed air after removing battery pack; do not use harsh solvents |
| Safety instructions | Do not use near water; keep away from children; read complete manual |
| Replacement parts available | Sanding drums (1/4 in. and 1/2 in.), abrasive bands, collets, battery pack |
| Repairability | Repair by Dremel authorized center; no user-serviceable parts |
| Warranty | 5 years (excluding abuse, accessories, etc.) |
Frequently Asked Questions - 761 DREMEL
User questions about 761 DREMEL
0 question about this device. Answer the ones you know or ask your own.
Ask a new question about this device
Download the instructions for your Rotary tool in PDF format for free! Find your manual 761 - DREMEL and take your electronic device back in hand. On this page are published all the documents necessary for the use of your device. 761 by DREMEL.
USER MANUAL 761 DREMEL
Model 761 Pet Nail Grooming Tool Owner's Manual
Safety
Assembly
Operation
- Accessory Information
Warranty
Service Parts
Dremel brand products are manufactured and sold by the
Dremel Division of Robert Bosch Tool Corporation
IMPORTANT SAFETY INSTRUCTIONS
When using electrical appliances, especially when children are present, basic safety precautions should always be followed, including the following:
READ ALL INSTRUCTIONS BEFORE USING
KEEP AWAY FROM WATER
DANGER - To reduce the risk of electrocution:
- Do not place or store appliance where it can fall or be pulled into a tub or sink.
- Do not use while bathing.
- Do not place in or drop into water or other liquid.
- Do not reach for an appliance that has fallen into water.
WARNING - To reduce the risk of injury to persons:
- Close supervision is necessary when the appliance is used by, on, or near children or invalids.
- Use this appliance only for its intended use as described in this manual. Do not use
attachments not recommended by the manufacturer.
- Never operate this appliance if it is not working properly, if it has been dropped or damaged, or if it has been dropped into water. Return the appliance to a service center for examination and repair.
SAVE THESE INSTRUCTIONS
General Safety Rules for All Battery Operated Tools

WARNING
Read and understand all instructions. Failure to follow all instructions listed below, may result in electric shock, fire and/or serious personal injury.
SAVE THESE INSTRUCTIONS
Work Area
Keep your work area clean and well lit. Cluttered benches and dark areas invite accidents.
Do not operate power tools in explosive atmospheres, such as in the presence of flammable liquids, gases, or dust. Power tools create sparks which may ignite the dust or fumes.
Keep bystanders, children, and visitors away while operating a power tool. Distractions can cause you to lose control.
Personal Safety
Stay alert, watch what you are doing, and use common sense when operating a power tool. Do
not use tool while tired or under the influence of drugs, alcohol, or medication. A moment of inattention while operating power tools may result in serious personal injury.
Dress properly. Do not wear loose clothing or jewelry. Contain long hair. Keep your hair, clothing, and gloves away from moving parts. Loose clothes, jewelry, or long hair can be caught in moving parts.
Avoid accidental starting. Be sure switch is in the locked or off position before inserting battery pack. Carrying tools with your finger on the switch or inserting the battery pack into a tool with the switch on invites accidents.
Remove adjusting keys or wrenches before turning the tool on. A wrench or a key that is left attached to a rotating part of the tool may result in personal injury.
Do not overreach. Keep proper footing and balance at all times. Proper footing and balance enable better control of the tool in unexpected situations.
Use safety equipment. Always wear eye protection. Dust mask must be used for appropriate conditions.
Tool Use and Care
Do not force tool. Use the correct tool for your application. The correct tool will do the job better and safer at the rate for which it is designed.
Do not use tool if switch does not turn it on or off. A tool that cannot be controlled with the switch is dangerous and must be repaired.
Disconnect battery pack from tool or place the switch in the locked or off position before making any adjustments, changing accessories, or storing the tool. Such preventive safety measures reduce the risk of starting the tool accidentally.
Store idle tools out of reach of children and other untrained persons. Tools are dangerous in the hands of untrained users.
When battery pack is not in use, keep it away from other metal objects like: paper clips, coins, keys,
nails, screws, or other small metal objects that can make a connection from one terminal to another. Shorting the battery terminals together may cause sparks, burns, or a fire.
Maintain tools with care. Keep cutting tools sharp and clean. Properly maintained tools with sharp cutting edge are less likely to bind and are easier to control.
Check for misalignment or binding of moving parts, breakage of parts, and any other condition that may affect the tool's operation. If damaged, have the tool serviced before using. Many accidents are caused by poorly maintained tools.
Use only accessories that are recommended by the manufacturer for your model. Accessories that may be suitable for one tool may create a risk of injury when used on another tool.
Service
Tool service must be performed only by qualified repair personnel. Service or maintenance performed by unqualified personnel may result in a risk of injury.
When servicing a tool, use only identical replacement parts. Follow instructions in the Maintenance section of this manual. Use of unauthorized parts or failure to follow Maintenance Instructions may create a risk of shock or injury.
Safety Rules for Cordless Rotary Tools
Accessories must be rated for at least the speed recommended on the tool warning label. Other accessories running over rated speed can fly apart and cause injury.
Hold tool by insulated gripping surfaces when performing an operation where the cutting tool may contact hidden wiring. Contact with a "live" wire will make exposed metal parts of the tool "live" and shock the operator. If cutting into existing walls or other
blind areas where electrical wiring may exist is unavoidable, disconnect all fuses or circuit breakers feeding this worksite.
Before changing accessories remove battery pack. Accidental starting may occur because battery tools with a battery inserted are in the operative condition.
Be aware of the switch location, when placing the tool down or when picking the tool up. You may accidentally activate the switch.
Always hold the tool with two hands during startup. The reaction torque of the motor can cause the tool to twist.
Always wear safety goggles and dust mask. Use only in well ventilated area. Using personal safety devices and working in safe environment reduces risk of injury.
After changing the accessories or making any adjustments, make sure the collet nut and any other adjustment devices are securely tightened.
Loose adjustment device can unexpectedly shift, causing loss of control, loose rotating components will be violently thrown.
Do not reach in the area of the spinning accessory. The proximity of the spinning accessory to your hand may not always be obvious.
Never start the tool when the accessory is engaged in the material. The accessory may grab the material causing loss of control of the accessory.
Do not leave a running tool unattended, turn power off. Only when tool comes to a complete stop it is safe to put it down.
Do not sand near flammable materials. Sparks from the acessory could ignite these materials.
Do not touch the bit or collet after use. After use the bit and collet are too hot to be touched by bare hands.
Regularly clean the tool's air vents by compressed air. Excessive accumulation of powdered nail inside the motor housing may cause electrical failures.
Do not allow familiarity gained from frequent use of your tool to become commonplace. Always remember that a careless fraction of a second is sufficient to inflict severe injury.
Do not alter or misuse tool. Any alteration or modification is a misuse and may result in serious personal injury.
This product is not intended for use as a dental drill, in human or veterinary medical applications. Serious injury may result.
WARNING Some dust created by power sanding, sawing, grinding, drilling, and other construction activities contains chemicals known to cause cancer, birth defects or other reproductive harm. Some examples of these chemicals are:
- Lead from lead-based paints,
- Crystalline silica from bricks and cement and other masonry products, and
- Arsenic and chromium from chemically-treated lumber.
Your risk from these exposures varies, depending on how often you do this type of work. To reduce your exposure to these chemicals: work in a well ventilated area, and work with approved safety equipment, such as those dust masks that are specially designed to filter out microscopic particles.
Battery Disposal
Nickel-Cadmium Batteries
If equipped with a nickel-cadmium battery, the battery must be collected, recycled or disposed of in an environmentally sound manner.

"The EPA certified RBRC Battery Recycling Seal on the nickel-cadmium (Ni-Cd) battery indicates Robert Bosch Tool Corporation is voluntarily participating in an industry program to collect and
recycle these batteries at the end of their useful life, when taken out of service in the United States or Canada. The RBRC program provides a convenient alternative to placing used Ni-Cd batteries into the trash or the municipal waste stream, which may be illegal in your area.
Please call 1-800-8-BATTERY for information on Ni
Cd battery recycling and disposal bans/restrictions in your area, or return your batteries to a Skil/Bosch/Dremel Service Center for recycling. Robert Bosch Tool Corporation's involvement in this program is part of our commitment to preserving our environment and conserving our natural resources."
WARNING
Do not attempt to disassemble the battery or remove any com
ponent projecting from the battery terminals. Fire or injury may result. Prior to disposal, protect exposed terminals with heavy insulating tape to prevent shorting.
Alkaline Batteries
Commercially available alkaline cells can be disposed of in a municipal solid waste stream.
Symbols
IMPORTANT: Some of the following symbols may be used on your tool. Please study them and learn their meaning. Proper interpretation of these symbols will allow you to operate the tool better and safer.
| Symbol | Name | Designation/Explanation |
| V | Volts | Voltage (potential) |
| A | Amperes | Current |
| Hz | Hertz | Frequency (cycles per second) |
| W | Watt | Power |
| kg | Kilograms | Weight |
| min | Minutes | Time |
| s | Seconds | Time |
| ∅ | Diameter | Size of drill bits, grinding wheels, etc. |
| n0 | No load speed | Rotational speed, at no load |
| .../min | Revolutions or reciprocation per minute | Revolutions, strokes, surface speed, orbits etc. per minute |
| 0 | Off position | Zero speed, zero torque... |
| 1, 2, 3, ... | Selector settings | Speed, torque or position settings. Higher number means greater speed |
| I, II, III, | Infinitely variable selector with off | Speed is increasing from 0 setting |
| → | Arrow | Action in the direction of arrow |
| ~ | Alternating current | Type or a characteristic of current |
| --- | Direct current | Type or a characteristic of current |
| ~ | Alternating or direct current | Type or a characteristic of current |
| 回 | Class II construction | Designates Double Insulated Construction tools. |
| ⊕ | Earthing terminal | Grounding terminal |
| ! | Warning symbol | Alerts user to warning messages |
| Ni-Cad RBRC seal | Designates Ni-Cad battery recycling program |
Symbols
IMPORTANT: Some of the following symbols may be used on your tool. Please study them and learn their meaning. Proper interpretation of these symbols will allow you to operate the tool better and safer.

This symbol designates that this tool is listed by Underwriters Laboratories.

This symbol designates that this tool is listed to Canadian Standards by Underwriters Laboratories.


This symbol designates that this tool is listed by the Canadian Standards Association.

This symbol designates that this tool is listed by Underwriters Laboratories, and listed to Canadian Standards by Underwriters Laboratories.
This symbol designates that this tool complies to NOM Mexican Standards.

WARNING
Disconnect battery holder from tool or place the switch in the locked or off position before making any assembly, adjustments or changing accessories. Such preventive
safety measures reduce the risk of starting the tool accidentally.
Pet Nail Grooming Tool
| Model number | 761 |
| Voltage rating | 6.0 V=== |
| No load speed | n07,000-14,000/min |
| Collet Capacities | 1/32", 1/16", 3/32", 1/8" |
WARNING ALWAYS BE SURE THE TOOL IS IN THE "OFF" POSITION BEFORE CHANGING ACCESSORIES, CHANGING COLLETS OR SERVICING YOUR CORDLESS ROTARY TOOL.

(1/8" Collet is included with your tool)
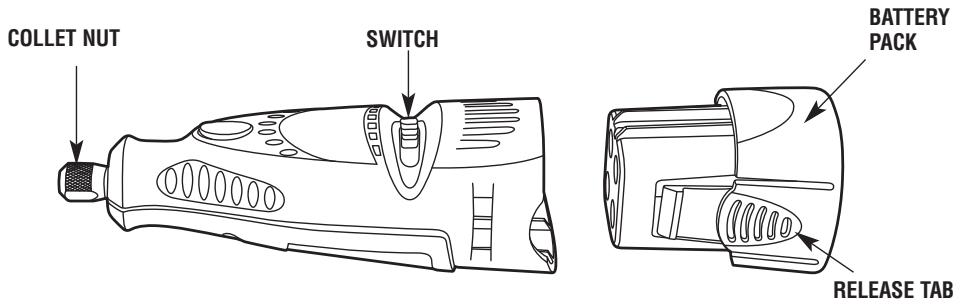
COLLET NUT—To loosen, first press shaft lock button and rotate the collet nut by hand until the lock engages the shaft preventing further rotation.
CAUTION Do not engage lock while the Tool is running.
With the shaft lock engaged, loosen the collet nut by hand. Change accessories by inserting the new one into the collet as far as possible to minimize runout and unbalance. With the shaft lock engaged, finger tighten the collet nut until the accessory shank is gripped by the collet. Avoid excessive tightening of the collet nut when there is no bit inserted.
COLLETS — Four different size collets (see illustration), to accommodate different shank sizes, are available for your Cordless Rotary Tool. To install a different collet, remove the collet nut and remove the old collet. Insert the unslotted end of the collet in the hole in the end of the tool shaft. Replace collet nut on the shaft. Always use the collet which
COLLET IDENTIFICATION CHART — Collet sizes can be identified by the rings on the back end of collet.
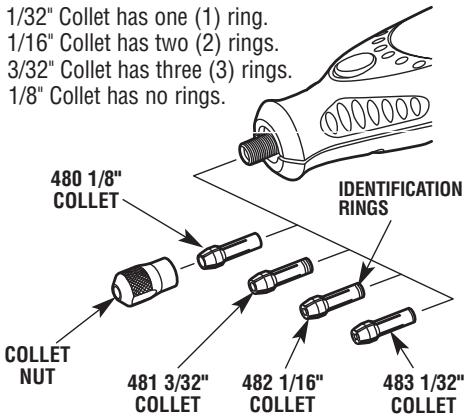
matches the shank size of the accessory you plan to use. Never force a larger diameter shank into a collet.
BALANCING ACCESSORIES — For precision work, it is important that all accessories be in good balance (much the same as the tires on your automobile). To true up or balance an accessory, slightly loosen collet nut and give the accessory or collet a 1/4 turn. Retighten collet nut and run the Tool. You should be able to tell by the sound and feel if your accessory is running in balance. Continue adjusting in this fashion until best balance is achieved.
Remember, your new Dremel Cordless Rotary Tool is the finest power tool of its kind. But its performance is only as good as the accessories with which it is used. We recommend only Dremel accessories be used. Use of any other accessories may create a hazard. We hope you'll enjoy many years of trouble free pleasure from your Dremel Cordless Rotary Tool.
Inserting batteries
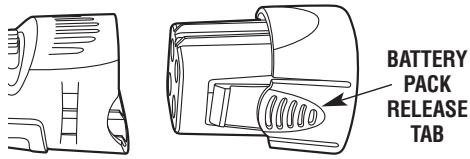
- Remove the battery pack from the tool by squeezing the two tabs on the battery pack together and slide the battery pack out of the tool.
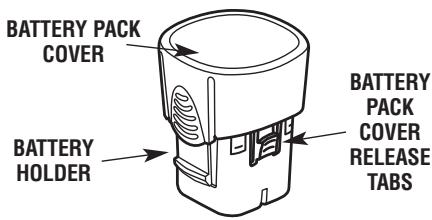
- Remove battery pack cover from the battery holder by squeezing the two tabs and remove the battery cover from the battery holder.
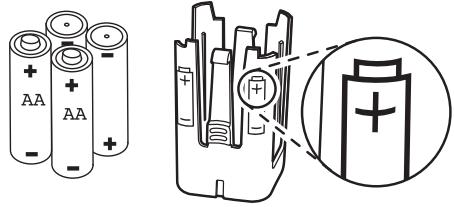
- Paying special attention to the orientation of the batteries, insert four AA batteries into the battery pack cover. Note diagram on the battery holder showing correct battery direction.
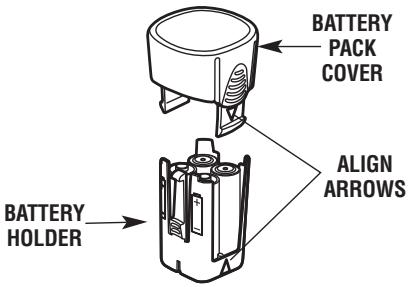
- Align arrow in battery pack cover with arrow in the battery holder and press together. The two parts will only fit together when the arrows are aligned. The two parts will join together with a click.
- Insert the battery pack into the tool by aligning the guide ribs on the battery with the guide track on the tool. The two parts will only fit together when the two arrows align. The two parts will join together with a click.

WARNING RISK OF FIRE USE ONLY 1.5V ALKALINE BATTERIES ONLY.
WARNING Do not install backwards, charge or put in fire. Batteries may explode or leak.
Why Use a Dremel Rotary Tool to Groom Pet Nails?
Of the reasons why people prefer to groom their pet's nails with a Dremel rotary tool, the main reason they do is for the pet's overall comfort. Scissors and guillotine-type clippers apply pressure and pinch the toenail, which can be very uncomfortable to pet toes and feet. Also, clipping toenails increases the likelihood of cutting the internal blood supply to the nail, called the quick. Because grinding is more gradual than clipping, it is easier to stop in time before reaching the quick. Should you nick the quick using a rotary tool, the cut is usually smaller, and will heal more quickly than a cut made with a nail clipper.
Before you start
Grooming a pet's nails for the first time can be a worrisome experience for both the pet and the pet owner. Nail grooming does not have to be a stressful experience. By starting early and considering grooming to be part of your pets training, your pet will become used having their nails groomed.
It is recommended that your pet should feel comfortable with you touching and handling their feet before you expose them to the rotary tool. One way to do this is to take time to manipulate their paws for a few minutes at least once daily. Giving your pet a snack that they enjoy is a good way to associate having their feet touched with a positive food-related experience.
The next step is to get the pet gradually accustomed to the rotary tool itself. Let the pet sniff the tool while it is turned off. Next while keeping the tool in your hand, turn the tool on and let him get used to the sound it makes. Try to get him to sit or lay on his side while the tool is in your hand and running.
Eventually, you need to work up to being able to touch the rotating sanding drum to the pet's toe
nails. Do no grinding at this time; simply let the animal become familiar with this new situation. You do not need to touch the tool to the nail for more than a second.
Throughout the entire acclimation process, continue to praise the pet and reward good behavior with his favorite snack. This process may take a couple of days or even weeks. Before long, both you and your pet will be able to relax and even enjoy this grooming time that you share together.
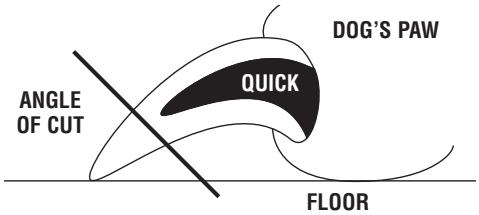
Nail Anatomy
Before trimming pet nails you will need to be able to identify the quick. The diagram shows the basic anatomy of a dog's toenail. The outer nail is hard, and has no feeling because it has no nerve endings. The core of the nail is the quick. It is made up of tiny blood vessels, nerve endings and is very sensitive. The quick is a vein that "feeds" the toenail. Should you cut the quick while trimming a nail, the nail will start to bleed.
Light colored nails are often transparent enough to allow you to see the quick's pink core. Dark colored nails may not allow you to see where the quick is. Sometimes, dog's have both light and dark colored nails that allow you to estimate the length of the quick.
The diagram also shows the ideal angle in which to trim a pet's nails. The proper angle may vary according to the pet owner's wishes or the pet's unique anatomy.
The Nail Grooming Process
It is important to let the speed of the rotary tool do the work. You should never apply pressure to the toenail with the spinning sanding drum. Allow the speed of the sanding drum to remove the nail material without adding pressure. Pressure causes the nail to get too hot causing discomfort for your pet.
The rotary tool's spinning sanding drum should not be kept against the nail longer than three seconds at a time. It is recommended that you alternate between all the nails on two paws at a time. This rotation method allows the nails to cool before they are ground a second time.
Support the toe and nail in one hand while using the rotary tool in the other hand. This lessens the vibration of the grinding procedure and is more comfortable for your pet. Pushing gently on the bottom of the paw's pad extends the nail slightly for easier grooming.
Pet Safety
Secure the pet. Some pets may become nervous in the presence of the tool. The operator needs both hands to groom the nail. It may be helpful to have another person assist in restraining the pet.
Keep pet hair away from spinning parts. Hair can entangle in the tool, causing injury to your pet.
Safety Tips
Should hair be accidentally caught in the rotary tool, immediately turn off the tool and untangle the hair from the tool.
For pets with particularly long hair, use an old sock to cover the toe, foot and leg of the pet and isolate the nail. Push the nail out through a small opening at the tip of the sock to groom the nail.
Keep styptic powder on hand in case of bleeding. Styptic powder is available at most pet supply stores. Follow the directions on the packaging for proper use instructions.
Using the Cordless Rotary Tool
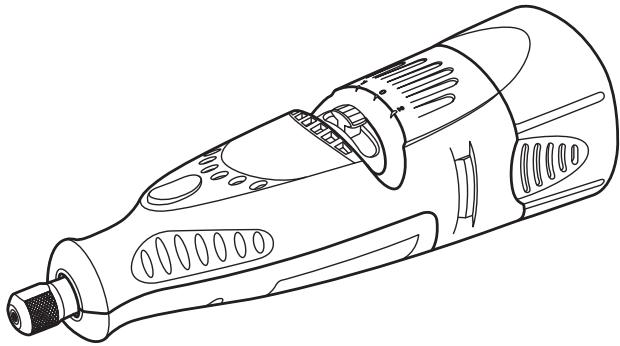
The first step in learning to use the Cordless Rotary Tool is to get the "feel" of it. Hold it in your hand and feel its weight and balance. Feel the taper of the housing. This taper permits the tool to be grasped much like a pen or pencil.
When you turn on the tool for the first time, hold it away from your face. Accessories can be damaged during handling, and can fly apart as they come up to speed. This is not common, but it does happen.
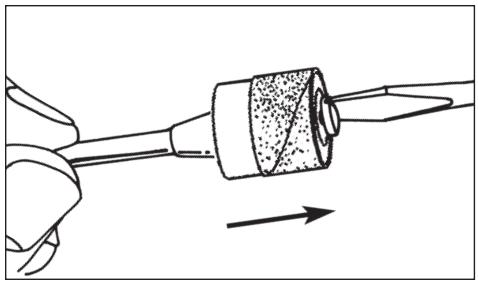
Practice on scrap materials first to see how the Cordless Rotary Tool works. Keep in mind that the work is done by the speed of the tool and by the accessory in the collet. You should not lean on or push the tool into the work.
Instead, lower the spinning accessory lightly to the work and allow it to touch the point at which you want to begin. Concentrate on guiding the tool over the work using very little pressure from your hand. Allow the accessory to do the work.
Usually, it is best to make a series of passes with the tool rather than attempt to do all the work in one pass. Pass the tool back and forth over the work, much as you would a small paint brush. For most work, the deft, gentle touch is best. With it, you have the best control, are less likely to make errors, and will get the most efficient work out of the accessory.

For best control in close work, grip the Rotary Tool like a pencil between your thumb and forefinger.
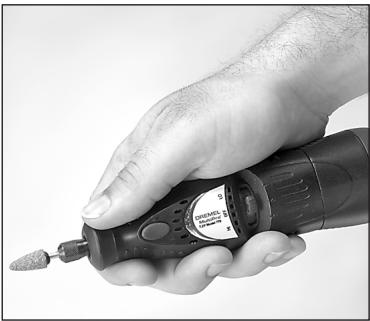
The "handgrip" method of holding the tool is used for operations such as sanding a flat surface.

Set the speed indicator to fit the job to achieve the best job results when working with different materials.
To select the right speed for each job, use a practice piece of material. Vary speed to find the best speed for the accessory you are using and the job to be done.
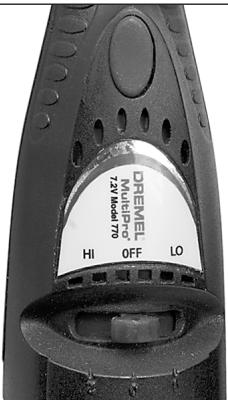
On the Model 761, there is a LO and HI switch. When the switch indicator is in position 1 or LO, the tool runs at about 7,000 RPM. When the switch indicator is in position 2 or HI, the tool runs at about 14,000 RPM.
NOTE: Speed is affected by voltage changes. Weaker batteries with reduced voltage will slow the RPM of the tool, especially at the lowest setting. If your tool appears to be running more slowly than normal, replace the batteries with fresh ones to increase tool speed.
Most applications using the 761 Pet Nail Grooming Tool can be accomplished using the LO speed setting (position 1). The LO speed setting (position 1) is recommended when using the 431 sanding drum
included with the tool. HI speed is needed only for larger animals or nail buffing applications.
The speed of Model 761 is controlled by setting this indicator on the housing.
761 Pet Nail Grooming Tool Accessories
The 761 Pet Nail Grooming Tool can be outfitted with different Dremel accessories to perform a variety of nail grooming tasks. Included below are descriptions of popular Dremel accessories used with the 761 tool.

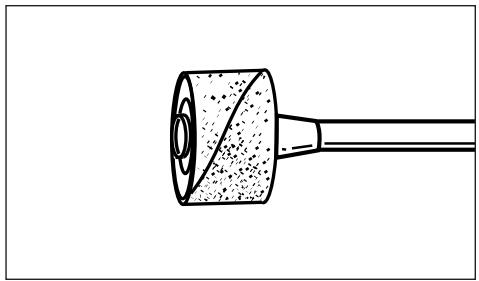
1/4" Sanding Drum (included)
One #430 Dremel 1/4" sanding drum and four #431 60-grit sanding bands are included with the Dremel Pet Nail Grooming Tool.
Tip: The #430 1/4" sanding drum works best on cats and small to medium sized dogs.
Other Accessories (not included)

1/2" Sanding Drum
The #407 Dremel 1 / 2 sanding drum equipped with a 1 / 2 120-grit or 60-grit sanding band is useful for larger breed dogs.
To replace a band on the Drum Sander, loosen the screw without removing it to contract the drum then slide the old band off. Slide the new sanding band on and then expand the drum by tightening the screw once again.
WARNING Before each use, check to make certain that all components are assembled to accessory shank and that the drum is sufficiently expanded to secure the band during use. If sanding band is loose on the drum during operation it may "fly" off and strike you or bystanders.
Maintenance
Service
WARNING NO USER SERVICEABLE PARTS INSIDE. Preventive maintenance performed by unauthorized personnel may result in misplacing of internal wires and components which could cause serious hazard. We recommend that all tool service be performed by a Dremel Service Facility.
D.C. motors
The motor in your tool has been engineered for many hours of dependable service. To maintain peak efficiency of the motor, we recommend it be examined every six months. Only a genuine Dremel replacement motor specially designed for your tool should be used.
Cleaning
WARNING To avoid accidents, always disconnect battery pack from tool before cleaning. The tool may be cleaned most effectively with compressed dry air. Always wear safety goggles when cleaning tools with compressed air.
Ventilation openings and switch levers must be kept clean and free of foreign matter. Do not attempt to clean by inserting pointed objects through opening.
CAUTION Certain cleaning agents and solvents damage plastic parts.
Some of these are: gasoline, carbon tetrachloride, chlorinated cleaning solvents, ammonia and household detergents that contain ammonia.
Your Dremel product is warranted against defective material or workmanship for a period of two years from date of purchase. In the event of a failure of a product to conform to this written warranty, please take the following action:
- DO NOT return your product to the place of purchase.
- Carefully package the product by itself, with no other items, and return it, freight prepaid, along with:
A. A copy of your dated proof of purchase (please keep a copy for yourself).
B. A written statement about the nature of the problem.
C. Your name, address and phone number to:
UNITED STATES
Dremel Service Center
4915 Twenty-First Street
Racine, Wisconsin 53406
Dremel Service Center
OR
4631 E. Sunny Dunes
Palm Springs, CA 92264
CANADA
Giles Tool Agency
6520 Lawrence Av. East
Scarborough, Ont.
Canada M1C 4A7
1-888-285-3476
OUTSIDE
CONTINENTAL UNITED STATES
See your local distributor or write
to Dremel, 4915 Twenty-First St.
Racine, Wisconsin 53406
We recommend that the package be insured against loss or in transit damage for which we cannot be responsible.
This warranty applies only to the original registered purchaser. DAMAGE TO THE PRODUCT RESULTING FROM TAMPERING, ACCIDENT, ABUSE, NEGLIGENCE, UNAUTHORIZED REPAIRS OR ALTERATIONS, UNAPPROVED ATTACHMENTS OR OTHER CAUSES UNRELATED TO PROBLEMS WITH MATERIAL OR WORKMANSHIP ARE NOT COVERED BY THIS WARRANTY.
No employee, agent, dealer or other person is authorized to give any warranties on behalf of Dremel. If Dremel inspection shows that the problem was caused by problems with material or workmanship within the limitations of the warranty, Dremel will repair or replace the product free of charge and return product prepaid. Repairs made necessary by normal wear or abuse, or repair for product outside the warranty period, if they can be made, will be charged at regular factory prices.
DREMEL MAKES NO OTHER WARRANTY OF ANY KIND WHATEVER, EXPIRESSED OR IMplied, AND ALL IMPLIED WARRANTY OF MERCHANTABILITY AND FITNESS FOR A PARTICULAR PURPOSE WHICH EXCEED THE ABOVE MENTIONED OBLIGATION ARE HEREBY DISCLAIMED BY DREMEL AND EXCLUDING FROM THIS LIMITED WARRANTY.
This warranty gives you specific legal rights and you may also have other rights which vary from state to state. The obligation of the warrantor is solely to repair or replace the product. The warrantor is not liable for any incidental or consequential damages due to any such alleged defect. Some states do not allow the exclusion or limitation of incidental or consequential damages, so the above limitations or exclusion may not apply to you.
For prices and warranty fulfillment in the continental United States, contact your local Dremel distributor.
Exportado por: Robert Bosch Tool Corporation Mt. Prospect, IL 60056 -2230, E.U.A.
Importado en Mexico por: Robert Bosch, S.A. de C.V., Calle Robert Bosch No. 405, Zona Industrial, Toluca, Edo. de Mexico, C.P. 50070, Tel. (722) 2792300
DREML
Piles nickel-cadmium
Dremel Service Center
4915 Twenty-First Street
Racine, Wisconsin 53406
1-800-437-3635
CANADA
Giles Tool Agency
6520 Lawrence Av. East
Scarborough, Ontario
Canada M1C 4A7
1-888-285-3476
0U
Dremel Service Center
4631 E. Sunny Dunes
Palm Springs, California 92264
1-800-437-3635
A L'EXTÉRIEUR DU TERRITOIRE
CONTINENTAL DES ETATS-UNIS
4915 Twenty-First St., Racine, Wisconsin 53406
Dremel Service Center Dremel Service Center
4915 Twenty-First Street 0 4631 E. Sunny Dunes
Racine, Wisconsin 53406 Palm Springs, California 92264
CANADA
Giles Tool Agency
6520 Lawrence Av. East
Scarborough, Ont.
Canada M1C 4A7
1-888-285-3476
oswana a Dremel, 4915 Twenty-First St.
Racine, Wisconsin 53406