
DC 6322 COMBO - Phone SWITEL - Free user manual and instructions
Find the device manual for free DC 6322 COMBO SWITEL in PDF.
User questions about DC 6322 COMBO SWITEL
0 question about this device. Answer the ones you know or ask your own.
Ask a new question about this device
Download the instructions for your Phone in PDF format for free! Find your manual DC 6322 COMBO - SWITEL and take your electronic device back in hand. On this page are published all the documents necessary for the use of your device. DC 6322 COMBO by SWITEL.
USER MANUAL DC 6322 COMBO SWITEL
Operating Instructions
SWITEL
Operating Instructions 99
natural_image
Line drawing of a classic telephone handset with coiled cord (no text or symbols)natural_image
Simple geometric diagram with a rectangle and an oval, no text or symbols present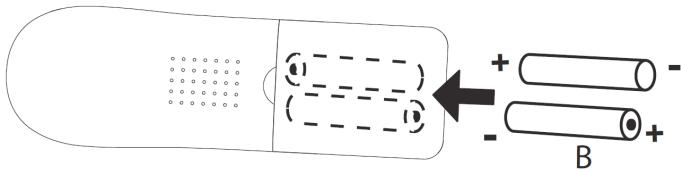
text_image
Diagram illustrating charge distribution in a battery with positive and negative charges, showing ion movement and charge distribution.3.5 Wandmontage
text_image
Diagram of a mobile phone keypad with numbered labels pointing to various function keys and buttonsnatural_image
Top-down line drawing of a car inside a rectangular frame with a circular annotation labeled '34' (no text or symbols on the diagram itself)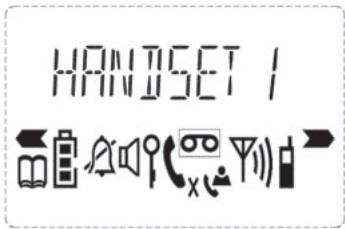
text_image
HANDSET / ←→natural_image
Line drawing of a telephone handset and cord with coiled cable (no text or symbols)B. Piles rechargeables
A
natural_image
Simple geometric diagram with a rectangle and an oval, no text or symbols present
text_image
Diagram illustrating charge distribution in a battery with positive and negative charges, showing ion movement and charge distribution.3.5 Montage mural
text_image
- 3D Support 100 mmtext_image
Diagram of a mobile phone keypad with numbered labels pointing to function keys and buttonsnatural_image
Top-down line drawing of a car interior with no text or symbols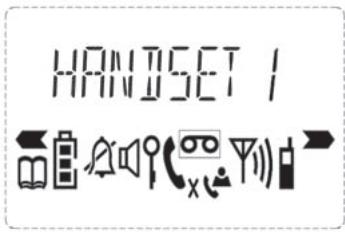
text_image
HANDSET / ←→| 1 | Espace+ - / 1 |
| 2 | A B C 2 |
| 3 | D E F 3 |
| 4 | G H I 4 |
| 5 | J K L 5 |
| 6 | M N O 6 |
| 7 | P Q R S 7 |
| 8 | T U V 8 |
| 9 | W X Y Z 9 |
| 0 | _ 0 |
5.5 Mute (mode Muet)
natural_image
Line drawing of a telephone handset and cord with coiled cable (no text or symbols)natural_image
Simple geometric diagram with a rectangle and an oval, no text or symbols present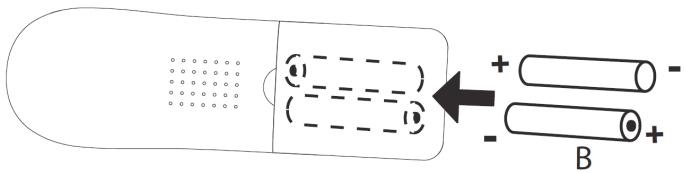
text_image
Diagram illustrating charge distribution in a battery with positive and negative charges, labeled with arrows and symbolstext_image
- Supporto in 3D - 100 mmtext_image
Diagram of a mobile phone keypad with numbered labels pointing to various function keys and buttonsnatural_image
Top-down line drawing of a car interior with no text or symbols1 General information 100
2 Safety notes 102
3 First steps 104
4 Operating the telephone 110
5 Using the cordless handset 117
6 Registering and de-registering a handset ..... 123
7 Call forwarding and internal calls 125
8 Abbreviations and technical terms 126
9 Troubleshooting 127
10 Servicing 128
11 Technical data 129
12 Warranty 130
13 Declaration of Conformity 130
14 Electrical consumption 130
1 General information
Before Initial use
Thank you for purchasing this new digital cordless telephone.
Intended Purpose:
This product is intend to be connected indoor to an analogue telephone line.
This product is made in accordance with the Digital Enhanced Cordless Telecommunications (DECT). DECT technology is characterized by high-security protection against interceptions as well as high-quality digital transmission. This telephone was designed for a wide range of applications. For example, this telephone can be used within a network of 5 handsets.
Caller ID is a network provider service. After subscribing to Caller ID, this phone will display the caller's phone number.
Important
To use `Caller ID' (display caller), this service has to be activated on your phone line. Normally you need a separate subscription from your telephone company to activate this function. If you don't have the Caller ID function on your phone line, the incoming telephone numbers will NOT be shown on the display of your telephone.

Caution: This product works with rechargeable batteries only. If you put nonrechargeable batteries in the handset and place it on the base, the handset will be damaged and this in NOT covered under the warranty conditions.
To be connected to the public analogue telephone network.
The features described in this manual are published with reservation to modifications.
This User Guide contains all the information you need to install, set up and operate your device. It also contains information and important notes for your safety and help in the event of problems. Always keep the User Guide near the device. Keep this User Guide in a safe place and pass it on to another user if necessary.
1.1 The product: DCC632x
This product has been manufactured in accordance with the uniform digital standard for cordless telephones (DECT). DECT technology features a high level of security against interception as well as highquality digital transmission. This telephone is intended for various applications, for example on a network of base stations and cordless handsets that make up a complete PBX: up to 5 cordless handsets can be operated on one base station and one cordless handset can be operated on up to 4 base stations. Internal calls can be made between the base station and handset or between two handsets. If available on your line, caller ID and SMS services from your telephone service provider are possible on this telephone. If you use these services, the caller's telephone number is shown in the telephone display.

Important: To use "Caller ID", this feature must first be enabled for your telephone line. Contact your telephone line provider for information about activating this feature. If this feature is not enabled, the numbers from which incoming calls originate will NOT be shown in the telephone display.
1.2 Signal words and symbols
| Symbol | Signal word | Meaning |
 | Warning | Warning of risk of potential serious injury or death if you fail to comply with this information. |
 | Caution | Warning of risk of potential minor injury if you fail to comply with this information. |
| None | Caution | Risk of material or environmental damage. |
 | Important | This provides important information about the function. |
| [CS5D] | Info, tip | General information or particular tips. |
1.3 Intended use
This product is intended for making telephone calls via a fixed line within a telephone network. The pre-requisite for proper use of the phone is professional installation taking account of the information in this User Guide. Any other use is deemed improper and is not permitted. Any modifications or conversions by the user that are not described in this User Guide, are deemed improper and are not permitted. We accept no liability for any damage that may arise from these.
1.4 Contents of box
Check that the contents of the box are complete and undamaged. Contact your dealer immediately if parts are missing or defective. Keep the packaging in case you need to return the telephone or send it for repair.
1 Base station with receiver and connecting cable
1 Mains adapter for base station
1 Telephone cable for base station
1 Charging station incl. mains adapter
1 Cordless handset incl. 2 rechargeable batteries (AAA, 1.2 V / 450 mAh, NiMH) and a battery compartment cover
1 User Guide

Warning: Risk of suffocation for children! Keep packaging films out of the reach of children.

Important: Dispose of packaging material in an environmentally responsible way!
2 Safety notes
The following basic safety notes must always be taken into account when using electrical devices. Carefully read the following safety notes and details on the correct use of the device. Familiarise yourself with all the functions of the device. Keep this User Guide in a safe place near the device and pass it on to another user if necessary. Do not pass the telephone on to third parties without the User Guide.
Electrical risks:

Warning: Risk of injury or death due to electrical current! In the event of danger, disconnect the device from the 230 V mains immediately.
- Do not use the device if the mains adapter, cable or device are damaged. Take care not to drop the device as it could be damaged.
- The voltage within the device is at hazardous levels. Never open the casing or insert object through the ventilation slot.
- Prevent liquids penetrating the device. If this should occur, unplug the mains adapter from the power socket and the telephone cable connector from the wall socket.
- Also unplug the mains adapter from the power socket and the telephone cable connector from the wall socket if faults occur during operation and before cleaning the device.
- Do not touch the charger and plug connectors with sharp or metal objects.
- Do not modify or repair the device. The device or cable should only be repaired by a specialist in the service centre. Repairs that are not carried out properly can cause significant risks to the user.
- Children frequently underestimate the dangers of handling electrical devices. Never allow children near electrical devices unsupervised.
- Do not allow children to play with the devices or their parts.
Caution: Possible damage to the device. In the event of danger, disconnect the device from the 230 V mains immediately.
- Do not use the device in humid areas (e.g. bathroom) or very dusty areas.
- Devices connected to the mains may be damaged during thunderstorms. Therefore always unplug the device in a thunderstorm.
- The mains adapter must be completely removed from the socket to disconnect the device fully from the power supply. Always pull the plug and never the cable.
- Check cables regularly for damage, protect them against hot surfaces and other hazards, unwind them fully, lay them so that nobody can trip over them and do not constrict them.
Fire risks:

Warning: Risk of injury or death due to fire! Do not expose the device to excessive heat and disconnect it from the 230 V mains supply immediately in the event of danger.
The heat generated inside the device may cause a fault or a fire in the device. Therefore do not expose this device to extreme temperatures:
■ Avoid direct sunlight and heat
■ Do not cover the ventilation slot on the device
Risk of explosion:

Warning: Risk of injury due to explosion! Exercise particular caution in respect of children!
- Never throw disposable or rechargeable batteries into fire.
- Do not operate the device in an environment with a risk of explosions!
Risk of poisoning:

Warning: Risk of injury due to poisoning! Exercise particular caution in respect of children!
- Keep disposable and rechargeable batteries out of the reach of children.
Risk of suffocation:

Warning: Risk of injury due to suffocation! Exercise particular caution in respect of children!
- Keep packaging films out of the reach of children.
- Consider possible risks to children (risk of strangulation) if you use extension cables.
Faults:

Warning: Possible risk of injury due to faults in the device! Exercise particular caution in respect of medical equipment.
- The function of medical electrical devices may be affected by electromagnetic radiation from your device. Therefore make sure that the device is installed and operated sufficiently far away from medical electrical devices. The same applies to implanted medical devices such as pacemakers.
- The cordless handset may cause an unpleasant buzz in hearing aids so keep it sufficiently far away from hearing aids.
Possible damage:
Caution: Possible damage to the device! Read the information in this User Guide.
- Only use the supplied main adapters. Do not use any third-party adapters as the rechargeable batteries could be damaged.
- The socket for connecting the mains adapter must be near the device and easily accessible.
- Only use the supplied rechargeable batteries. When they need to be replaced, use rechargeable batteries of the same type. Make sure the batteries are inserted the right way round (information can be found in the battery compartment on the device). Never use ordinary disposable batteries!

Important: In the event of a power failure, it is only possible to make calls using the base station.
2.1 Notes on low-radiation operation
This cordless telephone (compliant with the DECT standard) facilitates low-radiation operation (ECO mode). During a call, the handset reduces the radio output depending on the distance from the base station. When no call is being conducted, the handset reduces the radio output to a minimum. This does not mean that normal DECT radiation is harmful to health. Rather, low-radiation operation avoids any unnecessary radiation exposure. The base does not reduce radio output! Set up the base station in a location where you do not spend much time, for example in the hallway. Avoid setting it up in your or your children's bedrooms or the lounge.
3 First steps
3.1 How to use this User Guide
The following method is used in this User Guide to clarify instructions:

Text ..... HANDSET
Key to be pressed
Text that appears on the telephone display
3.2 Installing the base station
Install the base station as follows:
1 Connect the mains adapter to the base station first and then to a socket.
2 Connect one end of the telephone cable to the telephone socket on the wall and the other to the connector on the back of the base station.
3 The telephone and power cables should be connected as shown in figure 3A.

text_image
- 3A Base station - A. Telephone wall socket B. Mains adapter with cable C. Telephone cable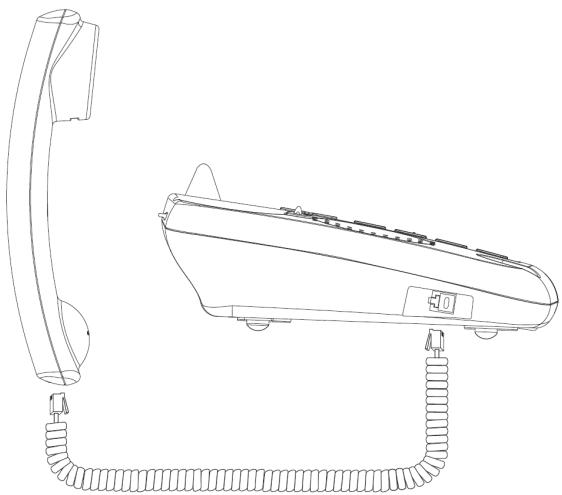
natural_image
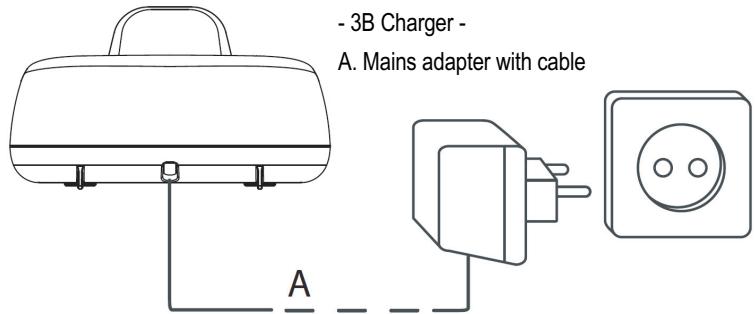
Line drawing of a telephone handset and cord with coiled cable (no text or symbols)3.3 Handset charger
1 Plug the mains adapter into a power socket.
text_image
- 3B Charger - A. Mains adapter with cable A3.4 Handset

Caution: Risk of injury due to explosion! Only use the supplied rechargeable batteries or batteries of a similar type. Do not use ordinary disposable batteries! Otherwise the cordless handset may be damaged.
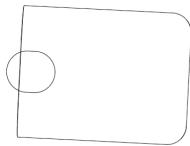
1 Open the battery compartment as shown in figure 3C.
2 Insert the rechargeable batteries. Make sure the polarity is correct (+ and -).
3 Close the battery compartment.
4 Place the handset in the charger and charge it for 16 hours. The charging LED is illuminated
- 3C Back of the handset -
A. Cover
B. Rechargeable batteries
A
natural_image
Simple geometric diagram with a rectangle and an oval, no text or symbols present
text_image
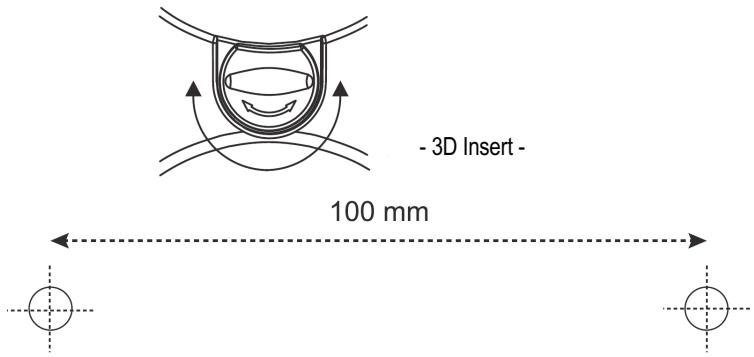
Diagram illustrating charge distribution in a battery with positive and negative charges, showing ion movement and charge distribution.3.5 Wall mounting
You can fix the base station to the wall using 2 screws, 100 mm apart. To hang the receiver on the base station, the insert must be turned 180^ as shown.
text_image
- 3D Insert - 100 mm3.6 Battery status display
The handset will stop working when the batteries are flat. If the batteries are completely flat and you place the handset on the handset charger for just a short time, the battery charge indicator will show that they are full. However they are not and the battery performance will deteriorate rapidly. You must leave the handset on the charger for 16 hours to charge batteries fully.

Charged batteries

Flat batteries
The handset will emit a warning tone when the batteries are nearly flat during a call. Place the handset on the handset charger to recharge the batteries.
3.7 Keys/Display
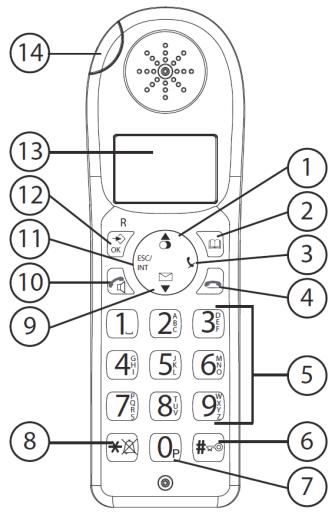
Cordless handset
- Redial / Up
- Phone book
- Mute / Delete
- Hang up
- Alphanumeric keys
- Key lock
- Pause
- Ringer ON/OFF
- Calls list / Down
- Answer call / Hands free / Call button
- INT / Escape
- Menu / OK / Flash
- Display
- Red LED, flashes during a call
Base station
- Escape
- Menu / OK
- Left
- Redial / Up
- Right
- Display
- Phone book
- Calls list / Flash
- Down
- Abbreviated dialling (M1 - M2 - M3)
- Hands free
- Alphanumeric keys
- Red LED on the base station, flashes
- Paging / Call diversion / Internal call
- Mute / Delete
- Volume control
- Loudspeaker
- Receiver holder for wall mounting
- Lug: for putting down the receiver briefly during a call when the phone is wallmounted
text_image
Diagram of a mobile phone with numbered labels pointing to various function keys and buttons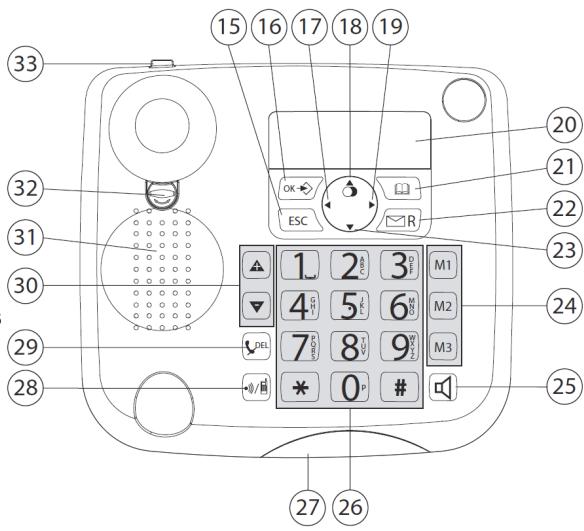
text_image
15 16 17 18 19 33 32 31 30 29 28 1 2 3 M1 4 5 6 M2 7 8 9 M3 * 0 # 27 26Charger
- LED: Handset charging in progress.
3.8 Handset display

natural_image
Top-down line drawing of a car inside a rounded rectangular frame, with a circled number 34 pointing to the bottom (no text or symbols on the diagram itself)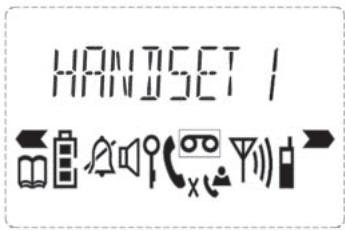
text_image
HANDSET / ←→| HANDSET X | X = handset number | ||
 | Other numbers or scroll left through the menu | [226W] | Other numbers or scroll right through the menu |
 | Find or create phone book entries | (1280) | Battery status display |
| (8800) | Ringer off | (8800) | Hands free mode on |
| (8801) | Key lock on |  | New voicemail message |
| (8408) | Call created | (1080) | Microphone muted |
| [ZYAS] | New numbers in the calls list | (1280) | The antenna indicates the strength of the reception signal. The antenna flashes when the handset is out of range. |
| (7752) | Internal call |
3.9 Base station display


text_image
CLIP 04 ×106:32 AM 08/12| [TOXO] | Other numbers or scroll left through the menu | Other numbers or scroll right through the menu | ||
 | Ringer off | New voicemail message | ||
| CLIP | New numbers in the calls list | 04 | Item number in the calls list | |
 | Find or create phone book entries | Hands free mode on | ||
 | Call created | Microphone muted | ||
| [###] | Internal call | 06:32 PM 08/12 | Time and date | |
3.10 Navigating through the menu
The DCC632x has an easy-to-use menu system. Every menu consists of a series of options. A summary of the menus on the handset and base station can be found below.
 | 1 Press the Menu/OK key to open the main menu. |
 | 2 Scroll to the required menu option. |
 | 3 Press the Menu/OK key to open more options or to confirm the displayed setting. |
 | 4 Press the Escape key to go back to the previous menu level |
Handset
| PHONEBOOK | |
| HANDSET | RING TONE |
| HANDSET NAME | |
| KEYPAD BEEP | |
| SELECT BASE | |
| RESET | |
| LANGUAGE | |
| REGISTER | |
| DE-REGISTER |
Base station
| PHONEBOOK | |
| RING TONE | EXTERNAL |
| INTERNAL | |
| VOLUME | |
| KEYPAD BEEP | |
| LANGUAGE | |
| SETTINGS | DIAL MODE |
| RECALL | |
| SYSTEM PIN | |
| TIME | DATE TIME |
| FORMAT | |
| REMOVE HS | |
| RESET |
3.11 Using the alphanumeric keys
You can use the alphanumeric keys to enter text. Press the appropriate alphanumeric key to select a letter. For example, if you press the 5 numeric key, the letter 'j' appears in the display first. Press the key several times to select the other letters. Press the 2 key once to select the letter "a". If you want to enter the letters "a" and "b" in succession, first press the 2 key once to select the letter "a". Wait 2 seconds until the cursor has moved to the next position. Now press the 2 key twice to select "b". You can use the delete key to delete letters that have been entered incorrectly. The letter before the cursor is deleted. Use the Left/Right key to move the cursor.
Table of characters
| 1 | Space+ - / 1 |
| 2 | A B C 2 |
| 3 | D E F 3 |
| 4 | G H I 4 |
| 5 | J K L 5 |
| 6 | M N O 6 |
| 7 | P Q R S 7 |
| 8 | T U V 8 |
| 9 | W X Y Z 9 |
| 0 | _ 0 |
4 Operating the telephone

Info: This section only describes the functions of the base station! Information on using the handset can be found in „5 Using the cordless handset“.
4.1 Setting the display language

1 Press the Menu / OK key.

2 Select "LANGUAGE" and confirm.

3 Now select the language.
OK
4 Press OK to confirm.
4.2 Setting the date and time

Info: If caller ID (CLIP) is activated on your telephone line and the provider transmits the date and time, the clock is set automatically when an incoming call is received. When you have set the time, it will be adopted by all handsets registered to the base station.

1 Press the Menu / OK key.

2 Select "TIME" and confirm.

3 Select "DATE TIME" and confirm.

4 Enter the year and confirm.

5 Enter the month and confirm.

6 Enter the day and confirm.

7 Enter the hours and confirm.

8 Enter the minutes.
OK
9 Press OK to confirm.

Important: The date and time will be lost in the event of a base station power failure.
4.3 Setting the time format

1 Press the Menu / OK key.

2 Select "TIME" and confirm.

3 Select "FORMAT" and confirm.

4 Select the time format as "24 HOUR" or "12 HOUR" and confirm.
4.4 Outgoing calls
Making a call

1 Lift the receiver or press the hands free key.

2 Enter the telephone number.

3 Hang up the receiver or press the hands free key again to end the call.
| OR | |
| 456 | 1 Enter the telephone number. |
| 2 Lift the receiver or press the hands free key. | |
| 3 Hang up the receiver or press the hands free key again to end the call. |
Redialling the last telephone number called
| 1 Lift the receiver or press the hands free key. | |
| 2 Press the redial key. The last telephone number is automatically dialled. |
Redialling one of the last 3 telephone numbers called
| 1 Press the redial key. | |
| 2 Select one of the last 3 numbers dialled. | |
| 3 Lift the receiver or press the hands free key. |
Calling a number in the phone book
| 1 Press the phone book key. | |
| 2 Scroll to the required name or enter the initial letters of the name. | |
| OK | 3 Press the Menu / OK key to display the telephone number. |
| 4 Lift the receiver or press the hands free key. The telephone number is automatically dialled. |
4.5 Activating/deactivating hands free mode
You can use this function to answer a call without having to lift the receiver or if the receiver has already been lifted.
| 1 Press the hands free key to activate the function. | |
| 2 Press the hands free key again to switch the call back to the receiver. |
4.6 Mute
The microphone can be muted during a call so that you can talk without being overheard by the person on the other end of the line.
| t_x | 1 Press the mute key. The microphone is muted. |
| t_x | 2 Press the mute key again to reactivate the microphone. |
4.7 Setting the speaker and receiver volume

1 Press the volume key during a call.
2 You can set the volume to levels 1 to 5.
Operating the telephone
4.8 Activating and deactivating the keypad beep
| OK | 1 Press the Menu / OK key. |
| OK | 2 Select "KEYPAD BEEP" and confirm. |
| OK | 3 Select "ON" or "OFF" and confirm. |
4.9 Phone book
50 telephone numbers and names can be stored in the phone book. Names may be up to 16 characters long and numbers up to 24 digits long.
Adding a new name and number
| 1 Press the phone book key. | |
| OK | 2 Press OK. |
| ▲▼ OK | 3 Select "NEW ENTRY" and confirm. |
| 456 OK | 4 Enter the name and confirm. |
| 456 OK | 5 Enter the telephone number and confirm.6 A confirmation tone is now sounded. |
Editing the name and telephone number
| 1 Press the phone book key. | |
| ▲▼ | 2 Select the name using the up and down keys.OR |
| 456 | Enter the initial letters of the name. |
| OK | 3 Press OK. |
| ▲▼ OK | 4 Select "EDIT ENTRY" and confirm. |
| DEL | 5 Press the delete key to delete the letters. |
| 456 OK | 6 Enter the name and confirm. |
| 456 OK | 7 Enter the telephone number and confirm.8 A confirmation tone is now sounded. |
Deleting one entry or all entries in the phone book
| 1 Press the phone book key. | |
| ▲▼ | 2 Select the name using the up and down keys.OR |
| 456t | Enter the initial letters of the name. |
| OK | 3 Press OK. |
| ▲▼ OK | 4 Select "DELETE ENTRY" or "DELETE ALL" and confirm. |
| OK | 5 Press OK to confirm or press the Escape key to go back. |
4.10 Abbreviated dialling keys
You can store 3 direct abbreviated numbers M1, M2 and M3 (each up to 24 digits) in the base station.
Saving direct abbreviated dialling numbers (M1 - M2 - M3)
| M1-M2-M3 | 1 Press one of the abbreviated dialling keys. |
| OK | 2 Press OK. |
| ▲▼ OK | 3 Select "NEW ENTRY" and confirm. |
| 456 OK | 4 Enter the name and confirm. |
| 456 OK | 5 Enter the telephone number and confirm.A confirmation tone is now sounded. |
| [XK20] Info: To save a pause in the telephone number, press the pause key 'P' for 2 seconds at the place where you want to inserted a 3 -second pause. Abbreviated dialling numbers can be edited or deleted in the same way described for the phone book above. Unassigned abbreviated dialling keys are displayed as "EMPTY". | |
Dialling an abbreviated number
| 1 Lift the receiver or press the hands free key. | |
| M1-M2-M3 | 2 Press the abbreviated dialling key. The telephone number is automatically dialled. |
| 3 Hang up the receiver or press the hands free key again to end the call. |
4.11 Setting the internal / external ring tone
There are 9 different ring tones available (1 - 9).
 | 1 Press the Menu / OK key. |
 | 2 Select "RING TONE" and confirm. |
 | 3 Select "INTERNAL" for internal calls.OR |
| 4 Select "EXTERNAL" for incoming external calls. |
 OK OK | 5 Now select a ring tone (1 to 9) and confirm. |
4.12 Setting the ring tone volume
 | 1 Press the Menu / OK key. | |
 | OK | 2 Select "RING TONE" and confirm. |
| OK | 3 Select "VOLUME" and confirm. |
 | OK | 4 Select the required volume (Off, 1-5) and confirm. |
4.13 Setting the dialling mode
There are two dialling modes for telephone connections:
■ DTMF / tone dialling (most common)
■ Pulse dialling mode (only necessary if this devices is operated on an older PBX!)

1 Press the Menu / OK key.
| ▲▼ OK | 2 Select "SETTINGS" and confirm. |
| ▲▼ OK | 3 Select "DIAL MODE" and confirm. |
| ▲▼ OK | 4 Select "TONE" or "PULSE" and confirm. |
4.14 Setting the system PIN
Some functions are only available if you know the PIN code for the base station. The PIN code is 4 characters long. The default PIN code is "0000". Proceed as follows to change the PIN code and set your own PIN:
| → OK | 1 Press the Menu / OK key. |
| ▲▼ OK | 2 Select "SETTINGS" and confirm. |
| ▲▼ OK | 3 Select "SYSTEM PIN" and confirm. |
| 4560K | 4 Enter the "OLD PIN-" and press OK. |
| 4560K | 5 Enter the "NEW PIN-" and confirm. |
4.15 Resetting the base station
You can reset all the settings on the base station and delete all entries in the phone book, calls list, VIP list and redial list. To restore the default settings:
| OK | 1 Press the Menu / OK key. |
| OK | 2 Select "RESET" and confirm. |
| OK | 3 Press OK to confirm. |
| OK | 4 Enter the PIN code (0000) and confirm. |
The default settings are:
■ External ring tone 8
■ Internal ring tone 1
■ Ring tone volume 4
■ Keypad beep ON
- Earpiece volume 4
■ Hands free volume 4
■ Date and time format 24

Important: All the stored data (redial, phone book, call list, abbreviated numbers) will be deleted.
4.16 The call list
Incoming calls are stored in a calls list (max. 30 numbers) on the base station and the handsets. The number of missed calls is shown by "X MISSED" (X = number of missed calls) and the flashing CLIP symbol. Briefly press the calls list key to display the last call.

Important: The "caller ID" (CLIP) feature is only available if it is activated for your line. Contact your telephone line provider for additional information.
The telephone number and name of the last caller appear in the display. If the telephone number is longer than 12 digits, you can show the remaining digits by pressing the key. If the calls list is empty, the word "EMPTY" appears in the display. The date and time of the incoming call are displayed at the top right for every call.

1 Press the up and down keys to scroll through the list.
The position number of the call in the calls list appears next to the CLIP symbol.

2 Press the left and right keys to display the name or number.

Info: The phone reverts to standby mode if neither the up or down key is pressed within 15 seconds. When a call is received, the caller's number is shown in the display for another 5-8 seconds after the last ring.
Calling a number in the call list

1 Press the calls list key.

2 Press the up and down keys to scroll through the list.

3 Pick up the receiver or press the hands free key again to make the call.
Storing a number in the phone book or as an abbreviated dialling number under M1 to M3

1 Press the calls list key.

OK
2 Press the up and down keys to scroll through the list and confirm.

OK
3 Select "SAVE TO PB" or "SAVE TO MX" (MX = M1 to M3) and confirm.

OK
4 You can now enter or edit the name and then confirm.

OK
5 Enter or edit the telephone number and confirm.
Deleting one entry or all entries in the calls list

1 Press the calls list key.

OK
2 Press the up and down keys to scroll through the list and confirm.

OK
OK
3 Select "DELETE ENTRY" or "DELETE ALL" and confirm twice.

Important: Only old calls will be deleted. New calls that have not been viewed or were unanswered will be kept.
4.17 Making an internal call to a handset and forwarding a call to the cordless handset
You can forward a call from the base station to the handset or talk to the external subscriber and a second subscriber on the cordless handset at the same time (conference call).

1 Hold down the INT key for 3 seconds until you hear an audio signal, then release the key. "INT" appears in the display.

2 Enter the number of the handset. Once the call has been set up with the handset, you can talk internally.

3 Put the receiver down to transfer the call to the cordless handset. OR

4 Hold down the INT key for 3 seconds to set up a conference call.
4.18 Finding the handset (paging function)
You can use this function to locate your handset.

1 Press the paging key on the base station.
The handset will ring for 30 seconds and the red LED on the handset will flash.
2 Press any key on the handset to stop it ringing.
4.19 The R key (Flash)
Press the Flash key on the base station to use special services on your external line such as "call waiting" (providing your telephone line provider offers this service) or to forward a call when you are using a PBX. The flash key R briefly interrupts your call. You can set this interruption time to 100 ms or 300 ms. However, if your system requires a longer flash time, you can change this.
| → OK | 1 Press the Menu / OK key. |
| ▲▼ OK | 2 Select "SETTINGS" and confirm. |
| ▲▼ OK | 3 Select "RECALL" and confirm. |
| ▲▼ OK | 4 Now select "LONG" or "SHORT" and confirm. |
5 Using the cordless handset

Info: This section only describes the functions of the cordless handset! Information on using the base station can be found in „4 Operating the telephone“.
5.1 Changing the language

1 Press the Menu / OK key.


2 Select "HANDSET" and confirm.


3 Select "LANGUAGE" and confirm.


4 Select the desired language and confirm.

5 Press the Esc key to return to standby mode.
5.2 Outgoing calls
Making a call

1 Press the call button.

2 Enter the telephone number.

3 Press the hang up key to end the call.
Call preparation

1 Enter the telephone number.

You can correct a wrong number using the mute key.
If you do not press any key for 10 seconds, the number disappears and the handset reverts to standby mode.

2 Press the call button.
The telephone number is automatically dialled.

3 Press the hang up key to end the call.
Redialling the last telephone number called

1 Press the call button.

2 Press the redial button.
The last telephone number is automatically dialled.

3 Press the hang up key to end the call.
Redialling one of the last 3 telephone numbers called

1 Press the redial key.
The last number called appears in the display.

If you want to redial one of the last 3 numbers, keep pressing the redial key until the number you want appears in the display.

2 Press the call button.
The telephone number is automatically dialled.

3 Press the hang up key to end the call.
5.3 Incoming calls
When an incoming call is received, the handset and the base station ring and the "Visual call signal"
LED flashes on the handset and base station.

1 Press the answer call key to answer the call.

2 Press the hang up key to end the call.
5.4 Activating/deactivating hands free mode
You can use this function to answer a call without having to hold the handset or if the a call is already being conducted on the handset.
During the call:

1 Press the hands free key to activate the function.

2 Press the hands free key again to switch the call back to the handset.

Important: The batteries discharge more quickly if you use hands free mode for a long time!
5.5 Mute
The microphone can be muted during a call so that you can talk without being overheard by the person on the other end of the line.

1 Press the mute key.
The microphone is muted and "MUTE ON" is displayed.

2 Press the mute key again to reactivate the microphone.
5.6 Setting the earpiece/hands free volume
During a call:

1 Press the up and down keys.
You can set the volume to levels 1 to 5.
5.7 The R key (Flash)
| R | Press the Flash key on the base station to use special services on your external line such as "call waiting" (providing your telephone line provider offers this service) or to forward a call when you are using a PBX. The flash key R briefly interrupts your call. You can set this interruption time to 100 ms or 300 ms. To set a different flash time, see „4.19 The R key (Flash)“. |
5.8 Selecting the ring tone and setting the volume
Handset ring tone for internal/external calls

1 Press the Menu / OK key.

2 Select "HANDSET" and confirm.

3 Select "RING TONE" and confirm.

4 Select "INTERNAL" or "EXTERNAL" and confirm.

5 Now select a ring tone (1 to 9) and confirm.
Handset ring tone volume
| → OK | 1 Press the Menu / OK key. |
| ▲▼ OK | 2 Select "HANDSET" and confirm. |
| ▲▼ OK | 3 Select "RING TONE" and confirm. |
| ▲▼ OK | 4 Select "VOLUME" and confirm. |
| ▲▼ OK | 5 Select the required volume (Off, 1-5) and confirm. |
| [87K×] Important: You can switch the ring tone volume of any individual handset ON or OFF by simply holding the ring tone ON/OFF key in standby mode. | |
5.9 Key lock
When the key lock is on, pressing any key in standby mode has no effect (with the exception of the key lock key).
| [W@D4] | 1 Press and hold the key lock key. |
| The symbol appears in the display. | |
| [KA25] | 2 Press the key lock key again to deactivate key lock. |
| [W6€5] | When key lock is activated, you can still answer incoming calls by pressing the answer call key . The keypad functions as usual during the call. Key lock is activated again after the call. |
5.10 Handset name
You can change the name that appears in the display (max. 12 characters) if no call is being conducted.
 | 1 Press the Menu / OK key. | |
 | OK | 2 Select "HANDSET" and confirm. |
| OK | 3 Select "HANDSET NAME" and confirm. |
| [0x+0] | [0x+0] | 4 Delete the previous name using the mute key and enter a new one. |
 | 5 Press to confirm. | |
 | 6 Press the Esc key to return to standby mode. |
5.11 Activate / deactivate keypad beep
 | 1 Press the Menu / OK key. | |
 | OK | 2 Select "HANDSET" and confirm. |
| OK | 3 Select "KEYPAD BEEP" and confirm. |
| 4 Now select "ON" or "OFF". | |
 | 5 Press to confirm. | |
 | 6 Press the Esc key to return to standby mode. |
5.12 Phone book
You can store 50 entries in the phone book. Names may be up to 16 characters long and telephone numbers up to 24 digits long.
Adding a phone book entry
| 1 Press the phone book key. | |
| OK OK | 2 Press the OK key twice. |
| 456 OK | 3 Enter the name and confirm. |
| 456 OK | 4 Enter the desired telephone number and confirm.A confirmation tone is now sounded. |
Dialling an abbreviated number
| 1 Press the phone book key. | |
| 2 Scroll to the required name or enter the initial letters of the name. | |
| 3 Press the phone book key to display the telephone number. | |
| 4 Now press the call key. The telephone number is automatically dialled. | |
| 5 Press the hang up key to end the call. |
Editing a phone book entry
| 1 Press the phone book key. | |
| 2 Scroll to the required name or enter the initial letters of the name. | |
| 3 Press the phone book key to display the telephone number. | |
| → OK | 4 Press the Menu / OK key. |
| 5 Select "EDIT ENTRY" and confirm. | |
| 6 Enter the name and confirm. | |
| 7 Enter or edit the telephone number and confirm. |
Deleting one entry or all entries in the phone book
| 1 Press the phone book key. | |
| 2 Scroll to the required name or enter the initial letters of the name. | |
| 3 Press the phone book key to display the telephone number. | |
| OK | 4 Press the Menu / OK key. |
| OK | 5 Select "DELETE ENTRY" to delete the current phone book entry and confirm.OR |
| OK | 6 Select "DELETE ALL" to delete all phone book entries and confirm. |
| OK | 7 Confirm again or press the Esc key to skip. |
| 5.13 Caller ID (CLIP)The DCC632x displays the telephone number of incoming calls. This function can only be used if you are registered for this service with your telephone line provider. Contact your provider for more information. When you receive a call, the telephone number is stored in a calls list. This list can hold up to 30 numbers (each of up to 23 digits). | |
| If the telephone number consists of more than 12 digits, you can scroll to the right in the display to see the other digits. | |
| New calls | |
| When there is a new call received in the calls list, the CLIP symbol flashes in the display. | |
| Opening the calls list | |
| 1 Press the calls list key.The last call received is displayed. If the calls list is empty, the word "EMPTY" appears in the display. | |
| 2 Press the phone book key to skip the number. | |
| 3 Press the phone book key to skip the date and time. | |
| 4 Press the up and down keys to scroll through the list. | |
| ESC | 5 Press the Esc key to exit the calls list. |
| Calling a number in the call list | |
| 1 Press the calls list key. | |
| 2 Scroll through the calls list until the telephone number you want is displayed. | |
| 3 Press the call key to start the call. The telephone number is automatically dialled. | |
| 4 Press the hang up key to end the call. | |
Deleting a number from the call list
| 1 Press the calls list key. | |
| ▲▼ | 2 Scroll through the calls list until the telephone number you want is displayed. |
| → OK | 3 Press the Menu / OK key. |
| ▲▼ OK | 4 Select "DELETE" to delete the current telephone number and confirm.OR |
| ▲▼ OK | 5 Select "DELETE ALL" to delete all calls list entries and confirm. |
| OK | 6 Press to confirm or press the Esc key to return. |
Storing a number in the call list as an abbreviated dial number
| 1 Press the calls list key. | |
| 2 Scroll through the calls list until the telephone number you want is displayed. | |
| OK | 3 Press the Menu / OK key. |
| OK | 4 Select "SAVE TO PB" and confirm. |
| OK | 5 Edit or add a name and then confirm. |
| OK | 6 Edit the telephone number and confirm. |
5.14 Resetting the handset to default settings
This deletes all the changes and restores all the defaults (ring tone volume, ring tone etc.). The calls list, redial list and phone book are also deleted!
| OK | 1 Press the Menu / OK key. |
| OK | 2 Select "HANDSET" and confirm. |
| OK | 3 Select "RESET" and confirm. |
| 4 Enter the PIN number of the base station (default 0000).5 The device reverts to standby mode. |
The default settings are:
| Handset name | SWITEL |
| Earpiece volume | Level 3 |
| Ring tone volume | Level 3 |
| External ring tone | Ring tone 8 |
| Internal ring tone | Ring tone 1 |
| Keypad beep | On |
5.15 Voicemail display
This display only works if you have enabled the voicemail or telephone message service and your telephone service provider transmits this information along with the caller ID! When you receive a new message in your voicemail box, the 📄 symbol appears in the display. The 📄 symbol disappears when you have listened to your message.
6 Registering and de-registering a handset
6.1 Registering a handset to the DCC632x base station
You can register to 5 handsets onto one base station. Every handset is already registered to the base station on delivery. You only need to register the handset if:
• the handset has previously been de-registered from this base station (e. g. to reinitialise it)
• you want to register a different handset to the base station.
The following description only applies to DCC632x handsets and base stations.
| 1 Hold down the paging key on the base station for 10 seconds."REGISTER" is now shown in the base station display. This means that the base station is in registration mode. The handset can now be registered as follows: | |
| OK | 2 Press the Menu/OK key on the handset. |
| 3 Select "REGISTER" and confirm. | |
| 4 Enter the number of the base station (1-4) to which you want register the handset.5 The device will search for the base station. When it has found it, you will be asked to enter the (fourdigit) PIN code. | |
| 6 Enter the PIN code of the base station (default 0000). If the PIN code if wrong, the handset will search for the base station again.Once the handset has been registered, its name and number appear on the display. |

Info: To change the base station PIN code, see „4.14 Setting the system PIN“.
6.2 De-registering a handset from the DCC632x base station
You can de-register a handset from a base station in order to register a different handset.
| OK | 1 Press the Menu / OK key. |
| OK | 2 Select "REMOVE HS" and confirm. |
| OK | 3 Enter the PIN code of the base station (default 0000). |
| OK | 4 Enter the internal number of the handset you want to de-register (1-5) and confirm.Once the handset has been successfully deregistered, it reverts to standby mode. Otherwise you will be asked to enter the handset number again. |
6.3 De-registering a handset from the DCC632x base station via the handset
| OK | 1 Press the Menu / OK key. |
| OK | 2 Select "DE-REGISTER" and confirm. |
| OK | 3 Enter the PIN code of the base station (default 0000). |

OK
4 Enter the internal number of the handset you want to de-register (1-5) and confirm.
Once the handset has been successfully deregistered, it reverts to standby mode. Otherwise you will be asked to enter the handset number again.

Important: Handsets can only be de-registered when they are not in use.
6.4 Selecting a base station
If your handset is registered to more than one base station (max. 4), you must select one of these base stations since the handset only communicates with one base station at a time. There are two options:
Auto Select
If you set the handset to 'Auto Select', the handset will automatically search for the nearest base station in standby mode.
| → OK | 1 Press the Menu / OK key. |
| ▲▼ OK | 2 Select "HANDSET" and confirm. |
| ▲▼ OK | 3 Select "SELECT BASE" and confirm. |
| ▲▼ OK | 4 Select "AUTO" and confirm. |

Info: If you allow the base station to be selected automatically and the handset goes out of range of the current base station, the handset will only search for the strongest base station in standby mode (not during a call).
Manual Select
If you set the handset to 'Manual Select', the handset will only search for the base station you have set.
| → OK | 1 Press the Menu / OK key. |
| ▲▼ OK | 2 Select "HANDSET" and confirm. |
| ▲▼ OK | 3 Select "SELECT BASE" and confirm. |
| ▲▼ OK | 4 Select "MANUAL" and confirm. |
| ▲▼ OK | 5 Select the base station and confirm. |

Important: For the base and the handset to be able to communicate, the handset must be registered to that base.
7 Call forwarding and internal calls
7.1 Call forwarding and conference calls during an external call
| INT 456 | 1 During an external call, press the INT key and then the number of the handset (1-5, select "0" for the base station).The other handset will ring.If the call was set up with the other handset, you can talk internally.When you hang up, the external call will be forwarded to the other handset. |
| INT | 2 Hold down the INT key for 3 seconds. You can now talk to the second handset and the external call at the same time (conference call). |
| INT | 3 Press the INT key again to switch back to the external call. |
| 4 Press the hang up key to end the call. |
7.2 Internal call (house phone function)
| Info: You can conduct a call between the base station and the cordless handset. The base station has the internal number "0". | |
| INT | 1 In standby mode, press the INT key and then the number of the handset (1-5, select "0" for the base station).The handset or base station you have called will now ring. |
| 2 Press the call key or pick up the receiver on the base station.You can now talk internally. |
8 Abbreviations and technical terms
| CLIP | Calling Line Identification Presentation, display of the caller's telephone number on the called party's display. |
| DECT | Digital Enhanced Cordless Telecommunication; European telecommunications standard for digital cordless telephones. |
| ECO mode | Economic Mode; in DECT telephony this is low-radiation operation. |
| Flash key | Effects a brief line interruption that is used to activated features such as toggling or call forwarding. On PBXs, the flash or R key is used for internal recall. |
| GAP | Generic Access Profile; interface between the base station and handset that facilitates the cordless connection. |
| INT | Internal subscriber. Other handset or extensions within a PBX. |
| Pulse mode | Obsolete analogue dialling mode ("clattering" dialling noises). |
| LCD | Liquid Crystal Display |
| LED | Light Emitting Diode |
| DTMF | Dual Tone Multiple Frequency; modern, digital dialling mode. |
| PIN | Personal Identification Number. |
| R key | Recall key (see Flash key) |
| Stand by | "Idle" status of a device without being completely switched off. |
| Twin | Designation for a device unit with two identical devices e.g. two handsets. |
9 Troubleshooting
| Problem | Possible cause | Solution |
| No display | The batteries are not charged | Check that both batteries have been inserted correctly |
| Charge the batteries | ||
| No sound | The telephone cable is not connected correctly. | Check the cable connection. |
| The line is engaged by a different handset | Wait until the other handset hangs up | |
| The caller is too quiet. | Adjust the volume during the call using the volume key | |
| The handset ring tone is too quiet. | Adjust the ring tone volume | |
| A number cannot be dialled. | The dialling mode is incorrectly set. | See „4.13 Setting the dialling mode“ to set the correct dialling mode |
| The antenna symbol is flashing | Handset is out of range | Move the handset within range of the base station. |
| The base station has no power | Check the mains adapter and cable. | |
| The handset is not registered to the base station | Register the handset to the base | |
| The base station or handset does not ring | The ring tone volume is off or too low | Adjust the ring tone volume |
| A call cannot be forwarded to an extension. | The flash time is too short | Set the device to a long flash time |
| The telephone does not respond when keys are pressed | Operating error | Remove the batteries and reinsert them. |
| "LINE IN USE" | The line is engaged by a different handset | Wait until the other handset hangs up |
Do not modify or repair the device. Repairs that are not carried out properly can cause significant risks to the user.
In the case of technical problems, you can contact our hotline service, Tel. 0900 00 1675 within Switzerland (Swisscom fees at time of going to print: CHF 2.60/min). In the case of claims under the terms of guarantee, please contact your sales outlet. There is a 2 year period of guarantee.
10 Servicing
10.1 Maintenance
The device is maintenance-free. Occasionally check the condition of the batteries and replace them with new batteries of the same type if performance is impaired or if they are beginning to leak.

Warning: Danger of chemical burns!
Wear protective gloves to remove flat rechargeable batteries.
If the device comes into contact with liquid, remove the batteries immediately and disconnect the device from the power supply (base station) and dry it out carefully. Check its operation after 2-3 days.
10.2 Cleaning

Warning: Risk of electric shock or short circuit from contact with components that conduct electricity. Prevent liquids penetrating the device. If this should occur, unplug the mains adapter from the power socket and the telephone cable connector from the wall socket and remove the batteries. Do the same if the device, cable or mains adapter are damaged: avoid direct contact with liquids and disconnect the device from the 230 V mains immediately.
Clean the telephone with a damp cloth that has been dipped in lukewarm water or an anti-static cloth. Never use cleaning agents or abrasives.
10.3 Decommissioning, storage
To decommission the device temporarily, disconnect the telephone cable from the wall socket and from the telephone jack on the base station. Unplug the base station and handset mains adapters from the 230 V sockets.
Remove the batteries from the handsets. If the telephone is decommissioned for a long time, replace the rechargeable batteries with new ones of the same type when the phone is recommissioned. Store the devices and rechargeable batteries in a dry place that is not too warm.
10.4 Disposal
In order to dispose of your device, take it to a collection point provided by your local public waste authorities (e.g. recycling centre). According to laws on the disposal of electronic and electrical devices, owners are obliged to dispose of old electronic and electrical devices in a separate waste container. The adjacent symbol indicates that the device must not be disposed of in normal domestic waste!

Risks to health and the environment from batteries!
Never open, damage or swallow batteries or allow them to pollute the environment. They could contain toxic and ecologically harmful heavy metals. You are legally obliged to dispose of power packs and batteries at the point of sale or in the corresponding containers provided at collection points by local public waste authorities. Disposal is free of charge. The above symbols indicate that the batteries must not be disposed of in domestic waste and that they must be disposed of at an authorised collection point.

Packaging materials must be disposed of according to local regulations.
11 Technical data
| Standard | DECT (Digital Enhanced Cordless Telecommunications)GAP ( Generic Access Profile ) |
| Frequency range | 1,880 MHz to 1,900 MHz |
| Emissions | 10 mW (average output per channel) |
| Range | Up to 300 m in open terrain - up to 50 m in buildings |
| Handset batteries: | 2 x 1.2 V, 450mAh AAA type rechargeable NiMh batteries |
| Base station power supply | Input: 100~240 V AC / 50-60 HzOutput: 6 V DC / 500 mA |
| Charger power supply: | Input: 230 V AC / 50 HzOutput: 7 V DC / 420 mA |
| Handset standby time: | 100 hours |
| Handset talk time | 10 hours |
| Charging time: | 16 hours |
| Permitted operating temperatures | +5 °C to + 45 °C |
| Permitted relative humidity | 25 to 85 % |
| Dialling mode | Pulse and tone dialling (DTMF) |
| Flash time | 100 or 300 ms |
| Handset number memory | 50 phone book entries of up to 24 digits and 16 letters. |
| Base station number memory | 3 direct abbreviated dial numbers (M1-M3) of up to 24 digits.50 phone book entries of up to 24 digits and 16 letters. |
| Dimensions Base station / Charger / Handset | 200 mm x 71 mm x 183 mm /104 mm x 100 mm x 59 mm /182 mm x 284 mm x 58 mm |
| Weight Base station / Charger / Handset | 763 g with mains adapter /185 g with mains adapter /147 g with batteries |
| Maximum power consumption | Base station with receiver: 2.0 WCharger with handset: 1.3 W |
12 Warranty
SWITEL equipment is produced and tested according to the latest production methods. The implementation of carefully chosen materials and highly developed technologies ensure trouble-free functioning and a long service life. The terms of guarantee do not apply where the cause of equipment malfunction is the fault of the telephone network operator or any interposed private branch extension system. The terms of guarantee do not apply to the batteries or power packs used in the products. The period of guarantee is 24 months from the date of purchase.
All deficiencies related to material or manufacturing errors within the period of guarantee will be redressed free of charge. Rights to claims under the terms of guarantee are annulled following tampering by the purchaser or third parties. Damage caused as the result of improper handling or operation, normal wear and tear, incorrect positioning or storage, improper connection or installation or Acts of God and other external influences are excluded from the terms of guarantee. In the case of complaints, we reserve the right to repair defect parts, replace them or replace the entire device. Replaced parts or devices become our property. Rights to compensation in the case of damage are excluded where there is no evidence of intent or gross negligence by the manufacturer.
If your device does show signs of a defect within the period of guarantee, please contact the sales outlet where you purchased the SWITEL device, producing the purchase receipt as evidence. All claims under the terms of guarantee in accordance with this agreement can only be asserted at the sales outlet. No claims under the terms of guarantee can be asserted after a period of two years from the date of purchase and hand-over of the product.
13 Declaration of Conformity
This device fulfils the requirements stipulated in the EU directive: 1999/5/EC directive on radio equipment and telecommunications terminal equipment and the mutual recognition of their conformity. Conformity with the above mentioned directive is confirmed by the CE mark on the device. To view the complete Declaration of Conformity, please refer to the free download available on our web site www.switel.com.

14 Electrical consumption
The telephone base station is equipped with an energy-efficient switching power supply (input 100\~240 V_AC , output 6 V_DC , 500 mA). The zero load is approx. 0.06 W. The average efficiency is approx. 71%. The power consumption of the base station is:
- in operation (standby/talking): approx. 0.52 W, approx. 0.68 W
The charging station(s) supplied with the telephone set is/are equipped with an energy-efficient switching power supply (input 100\~240 V_AC , output 7 V_DC , 420 mA). The zero load is approx. 0.06 W. The average efficiency is approx. 72.1%. The power consumption of the charging station is:
- without handset: approx. 0.06 W
- when charging the handset: approx. 0.65 W
SWITEL
Declaration of Conformity
This equipment complies with the European R&TTE directive.
To view the complete Declaration of Conformity, please refer to the free download available at our web site: www.switel.com.
Service Hotline
In the event of technical problems, you can contact our hotline service, Tel. 0900 00 1675 within Switzerland (cost via Swisscom at time of going to print: CHF 2.60/min).