CLICK N MOVE - Stroller KIDDY - Free user manual and instructions
Find the device manual for free CLICK N MOVE KIDDY in PDF.

User questions about CLICK N MOVE KIDDY
0 question about this device. Answer the ones you know or ask your own.
Ask a new question about this device
Download the instructions for your Stroller in PDF format for free! Find your manual CLICK N MOVE - KIDDY and take your electronic device back in hand. On this page are published all the documents necessary for the use of your device. CLICK N MOVE by KIDDY.
USER MANUAL CLICK N MOVE KIDDY
- General safety tips 14
- Unpacking 15
- Assembling 15
- Setting up the "kiddy click'n move" 16
- Collapsing the "kiddy click'n move" 17
- Locking the front wheels 18
- Using the brake 18
- Using the infant carrier. 18
8.1 Inserting the infant carrier 18
8.2 Removing the infant carrier 19
8.3 Removing the adapters 19 - Using the pushchair seat 20
9.1 Inserting and removing the pushchair seat 20
9.2 Securing the child 20 - Features of the pushchair seat 21
10.1 Safety bar. 21
10.2 Adjustable footrest 22
10.3 Adjustable angle 22
10.4 Sun shade 23 - Maintenance 23
11.1 Frame 23
11.2 Pushchair seat 23 - Warranty 24
Instructions for using "kiddy click'n move"
Thank you for purchasing the "click'n move" travel system from kiddy.
Your "kiddy click'n move" travel system is a high-quality product that will give you years of enjoyment with proper use. Your "kiddy click'n move" has been tested and approved according to EN (DIN) 1888.
Your "kiddy click'n move" ist intended for use with children weighing up to 15 kg (approximately to age 4 using the pushchair seat).
1. General safety tips

Please read these entire instructions carefully before using your "kiddy click'n move". Improper use can result in injury.

Do not attempt to alter the components of your "kiddy click'n move".

Check all parts and locks to make sure they are securely in place before use. Make sure than no screws or rivets are loose or missing.

Check the brakes and wheels regularly to see that they are functioning properly. If a wheel is squeaking, you can lubricate it with silicon or machine oil.

Never leave your child unattended in your "kiddy click'n move".

Lock the emergency brake before seating or removing your child (in the child seat).

This product is not suitable for using while jogging or skating.

The basket can carry an additional 5kg maximum.

Never hang bags, purses or other items on the handle, as this can impair the stability and therefore safety of your "kiddy click'n move".

Never use your "kiddy click'n move" on stairs or escalators.

Using the "kiddy click'n move" as a toy is strictly prohibited.

Use only replacement parts or accessories authorized by the manufacturer.
2. Unpacking

To avoid danger of suffocation, please keep all packing material out of reach of children.
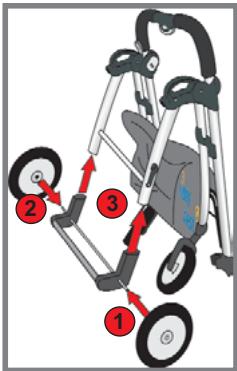
3. Assembling
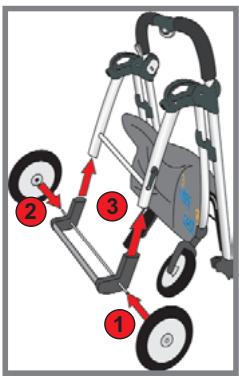
Insert the rear axle into both rear wheels until you hear them snap into place with a click (1 & 2).
Next, slide the the complete rear axle assembly onto the rear axle carrier (3). The emergency brake handle should be facing outside.
Slide the axle until it snaps into place on both sides with a click.

Make sure the wheels and axles are fully locked in place.
4. Setting up the "kiddy click'n move"
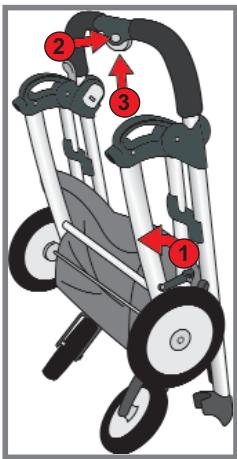
The frame is designed to be collapsible for easy storage. This is also the position the frame is in when it is first delivered.

Be careful not to pinch your finger while unfolding the frame!
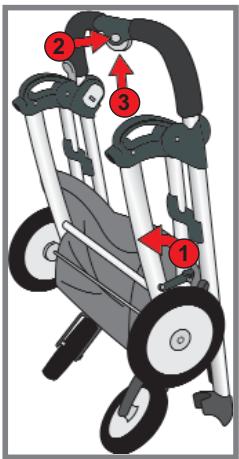
Open the locking bar on the right side of the frame (1).
Press and hold the safety lock (2) under the operation button on the grip handle.
Press the operation button simultaneously (3).
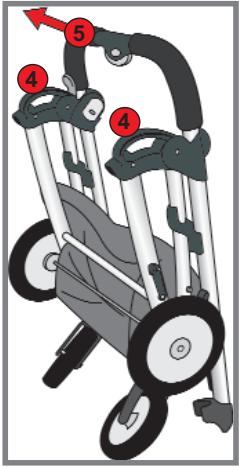
Hold of the frame still by the side handles (4), and pull the grip handle (5) up until it engages in place.
The frame is now extended and ready for use.

Test to see that the grip handle is fully engaged by holding the pram still and pushing down on the grip handle.
5. Collapsing "kiddy click'n move"


Please remove the child seat or pushchair seat from the frame before you collapse your "kiddy click'n move".
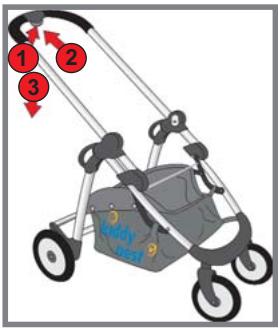
Press the safety lock (1) under the operation button on the grip handle and the operation button at the same time (2).
Press down on the grip handle (3).

A safety latch snaps into place, preventing you from pinching your fingers.
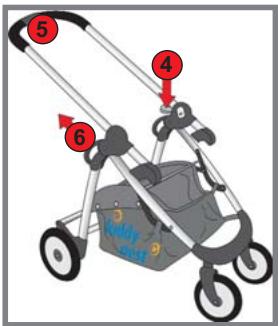
Carefully press down slightly on the safety latch (4).
Hold the grip handle (5) still, and pull on the side handles on the frame (6) until the pram collapses.

To keep the frame collapsed for storage, close the locking bar on the side (7).
6. Locking the front wheels

Position the front wheels pointing forward.
Now you can press the grey lock gears into the square notches. These keep the wheels from steering.
To unlock the front wheels, simply pull both left and right lock gears down again.
7. Using the brake

Always use the brake when you wish to place your child (i.e. the child seat) in or remove your child from your "kiddy click'n move".
To set the brake, depress the brake lever with your foot. Always check to make sure the brake has engaged.
To release the brake, lift up on the brake lever with the tip of your foot.

Never leave your child unattended in the travel system, even if the brake is set!
8. Using the infant carrier
8.1 Inserting the infant carrier
Set up your "kiddy click'n move" as described in Section 4.
The infant carrier may be inserted facing forwards or backwards.
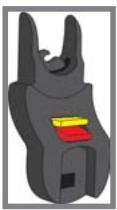
Insert both child seat adapters into the travel system until they snap in place.
Check to make sure that the adapter locks are open (levers are in the position indicated in red).
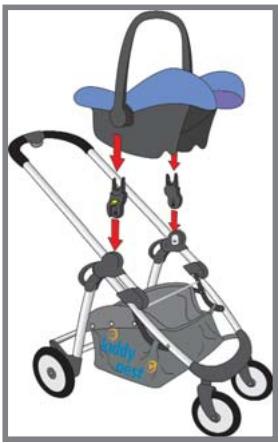

Make certain that your child is properly secured in the infant carrier and that the brake is engaged!
Now you can insert the infant carrier.
Lock the seat in place by pressing down.
Always check to see that the adapters in the child seat are locked by observing that the levers on both adapters are now in the upper position (indicated in yellow).
8.2 Removing the infant carrier
To be able to remove the seat, press down on both levers on the adapters (red position). Now you can pick up the infant carrier.
8.3 Removing the adapters
Press the button on the inner side of the adapter, and pull the adapters up out of the frame.
9. Using the pushchair seat

The pushchair seat in intended for children weighing approximately 8 to 15kg (6 months to 4 years)!

Secure your child properly in the pushchair seat!
When you want to use the pushchair seat with your "kiddy click'n move", you must first remove both child seat adapters. Press the button on the inner side of both adapters, and pull them up out of the frame.
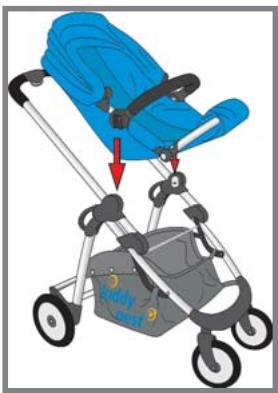
9.1 Inserting and removing the pushchair seat
Set up your "kiddy click 'n move" as described in Section 4.
The pushchair seat may be inserted facing forwards or backwards.
Engage the emergency brake.
Place the pushchair seat on the frame, and check ensure that it is securely locked in place.
To remove the pushchair seat, press and hold in both grey buttons on the side of the pushchair seat, and then pull it up.
9.2 Securing your child
To ensure the safety of your child, the pushchair seat is outfitted with a five-point restraint system.
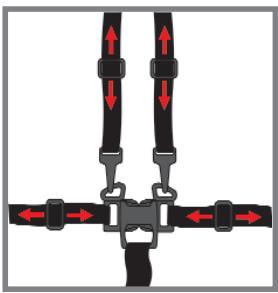

Always use the restraint system whenever you transport your child in the pushchair seat.
Adjust the belts to fit your child's size.
To do this:
Slide the belt cushion up so you can see the belt adjustors, and move them to fit your child. There should be at most a finger-width of slack between the belt and your child.
The seat belts are adjusted in the same manner.
10. Features of the pushchair seat
10.1 Safety bar
For smaller children, the safety bar should always be used in combination with the five-point belt restraint system. Larger children do not need the safety bar.
Installation:
Insert the safety bar (with locking prongs pointed downward) into the designated sockets on the pushchair seat.
Removal:
To remove the safety bar, press in the springs on the underside of the safety bar, and pull the bar out.
10.2 Adjustable footrest
The footrest can be set in three positions to suit the size of your child.
To adjust the footrest, press both grey buttons (on the outer side of the pivot point) and simultaneously rotate the footrest to the desired position.
10.3 Adjustable angle
The angle of the pushchair seat can be changed to three different positions, from upright to nearly lying flat.
To adjust the angle, press the two grey buttons on the inner side of the seat's pivot point) and simultaneously rotate the seat to the desired position.
10.4 Sun shade
To protect your child from too much sun exposure, the pushchair seat is outfitted with a sun shade.
Installation:
Insert the feet of the sun shade frame into the designated sockets. Lay the back of the shade over the backrest of the seat.
Now you can use the sun shade.
Removal:
Press the levers on the outside left and right of the sun shade mount, and simultaneously pull the sun shade up and off.
11. Maintenance
11.1 Frame
Check the frame regularly for loose screws and rivets, worn parts and breakage.
Stop using your "kiddy click'n move" if you discover a defect. Defective parts must be replaced or repaired before you use the travel system again.
If a wheel begins squeaking, spray a small amount of silicon oil or place a drop of fine machine oil on the axle. Wipe away any excess oil.
To clean your "kiddy click'n move", use a mild soap and water. Never use astringent cleansers or grease-cutters.
If you have problems, please consult your dealer.
11.2 Pushchair seat
Check the seat regularly for splitting seams or other damage.
To clean the seat frame, use a mild soap and water. Never use astringent cleansers or grease-cutters.
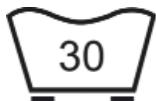
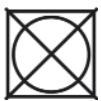
The seat cover is removable and can be washed with delicates at 30^ . Do not use a spin cycle or a wringer on the seat cover.
12. Warranty
For the travel system we provide a warranty against all defects in materials or workmanship for up to two years. The warranty period begins from the day of purchase.
Please present the original purchase receipt for all claims.
The warranty requires that the travel system be properly used and and returned in good condition.
The warranty does not cover:
- normal wear and tear and damage due to overuse
- damage due to improper and unauthorized use
Material: all our materials meet the highest standards for colourfastness against UV radiation. Nevertheless, all materials bleach under constant exposure to UV radiation. Such damage arises not from inferior material but from normal signs of wear, against such there is no warranty.
For warranty claims, please consult your dealer immediately.
Inhoud
8.1 Colocar a alcofa
Feche o "kiddy click'n move" conforme descripto no punto 4.

A Anything's gonna be a good idea.
Mbl 6narOapm Bac 3a To, UTO Bbl octaHOBnncBbIbOp Ha cncTeMe dnyteeeTbn ot kiddy.
CnCTema IyIyTeIeCTBm "kiddy click'n move" - 3TO BbICOKKJIacCHbI npOdyKT, KOTOpB II pI N HdNexKaIeM yXoJe npocLyKHT Bam OcHb DOnIro. BaI ,kiddy click'n move" 6bl npOBepEN n DonuIeH K nCnOJIb3ObaHIO corJaIaco CTaHdApTy EN (DIN) 1888.
Baw "kiddy click'n move" (B coCyTeHn C cnDhenm ETeCKo KOnJcKn) npEnHa3NaHEn dIy DeTei BECOM Do 15 Kr (coOTBeTCTByeT pe6eHky B Bo3paTe Okono 4 let).
1.Obuye yka3aHnno 6e3oNaChOCTN

Ipeep nepbblm nCnoJb3ObaHnem BHnMaTeNbHO npOuHTne daHHoe pykoBoDCTBO. HenpabunlbHoe nCnoJb3ObaHnene CnCTEmbl MoKet noctabntb pod yrpo3y kni3Nb BaWero pe6eHaKa.

He nbitaiTecb BHOCHTb 3MeHEnB KOHCTpyKzIIO BaJero ,kiddy click'n move".

Ipepe KaKdbim yNontpe6bHnem npOBepaTe Bce cactu n KpePHeHnna, a TaKke NaDeEKnOCTb Nx FmKCaun. CneDte 3a TeM, YTObbl BVNTbl NlN 3akJeNk He packaJInCb N He BInaJN.

Pergyarpno npobepaTe nCnpaBHOCTb TopMo3OB u Konec. EcJIK OKeco CkPnNT, CmXkbTe erO cnJIHKOHOBbIM NIN MaJINHHbIM MaclOM.

HnKoIa He ocTabnIe "kiddy click'n move" c haxOJaIzIMcB Hne pe6eHkom 6e3 npICMOTpa.

Ipeep TeM, KaK ycaunTb NIN BbHyTb pe6eHka (NIObKy), NaIeXHO 3aΦNKcpyTe HOxHOr TOPMO3.

3To n3dene He npedHa3NayeHo dIy IcNoJIb3OBaHn BO BpeM 6e TaPcOJ nn KaTaHn Ha poNkax.

He harpykaite KOp3InHy DoOnHnTeIbHbIM BECOM 6oJIbe 5 Kr.

Hikorda He BeaTe NaKeTbI, CymKn IIN DpyrNe PnpdMeTbI HApuyk - 3TO MoKet PnBecTN K 3HaunTeNbHOMy HapuWeHIO yToOnBOcTN (6eOanachocTN) BaWero ,kiddy click'n move".

Hikorda He nCpOJIb3yIe cBoi_kiddy click'n move"Ha IecTHnIax nn 3ckanaTopax.

IcnoIb3ObaHnne ,kiddy click'n move" B KaueCTBe nrgyUKN KaTeOpNueCkn 3aIpeSeNo.

Pa3pe7aetcN IcNoIb3OBAbT ToJIbKO IOnyUeHHbIe IpnI3BOdnteIeM 3aIacHbIe Yactn I KOMPJIeKTyOuIe.
2. PacnaKOBka

I3-3a onachoctn ydyuweHnXpaHNTe ynaKOBOHyB MaTePnA B HeoCTyHOM DJI DaTeN MceTe.
3. C6opka
BCTABJIte 06a 3aDHnx KOleca B 3aDHne oCN, noka KOleca He BOyDyT B HNX CO UeJYKOM (UuΦpa 1 u2).
3aTeM BCTaBtBe BCIO 3aHIOO Ocb (pbUaXOK HOxHOro TOPMo3a DoJKeH yKa3bIBaTb Ha3aD) B NOpaMHNK 3aHNei NOBeCKn (uΦpa 3).
3aDnBraIte oCb IDo Tex nop, noka oBe ee cTOpHbI CO 7eJyKOM He 3aФNkCpIyOTc.

YIOCTOBePbTecb, YTO KOJeca N OcB NOHOCTBIO 3aΦNKCuPOBaHbI.
4. PacklaIbIBaHne „kiddy click'n move"
Для obleneyehna xpaehnla Waccn CkOHCTpynpoBaHO TAK, YTO eRO MOXHO CLOXHTb. Waccn nocTabIeTc TaKKe B CLOXeHHOM nOIOKeHn.

Co6IoudaTe ocToPOxHocTb npnpacknaDbIbAHnn 1aaccn, TTo6bI He npniueMntb ce6e naIbcuI!
OtkpoTe 3aueJky-ФNKcaTOp c npaBoN cTopoHbI
Waccn (uΦpa1).
HaxmTe Ha KhoNkI npedeoxpaHnteTn (zHpa 2), HaxoJyUoc Ha pyUke PoD KhoNko ynpabHeHn.
OndOBpeMeHHo HaxMnte KhoNky ynpabIeHnna (znppa 3).
Tepeb coKmTe 60KOBbIe pyuKn Koprnyca nNotHnTe BepXHIOpyuKy BBepx (znppa 5), noka OHa CO uJcKOM He 3aФNKcPyeTc.
Uacn co6paHO.

IpoBepbTe HadeJxHocTb 0nKcaunn BepxHei pyuKn, npndepXaB KOJaCKy n HaxaB pyuKy BHN3.
5.Складываhoe „kiddy click'n move"

IpeXeJe cEm cNoXnTb ,kiddy click'n move", cHmnte C waccn Iohbky dIJI nepeBO3Kn pe6eHka nIIcNIDHe JeTCKO KONrCKN.
HaxmTe OndHOBpeMeHHo KhONky ynpaBHeHn I KhONky npedoxpaHnteIa (uΦpa 1), pacnoJooKHeHHyo IOd KhONkOy npaBHeHn BO3ne BepxHei pyKn.
HaxmTe pyky Bn3 (zufpa 3).
Jaee 3aueIKNHcT pyedoxpaHntbHbI pyuKaKo, KOtOpBn He n03BOIn Bam npuemeMTb ce6e naBcI.
Tenepb octopoxho onyctnte npedeoxpaHntbHbI pbIaKoK (u4) HEMHOrO BHN3.
CoxMMTe BepxHIO pUky (uΦpa 5) nnotHNte 60KOBbIe puKn (uΦpa 6) uaccn, noka KOLrCKa He cNoKITcR.
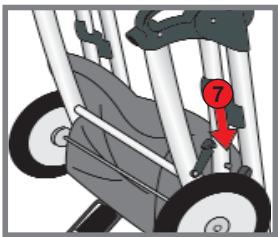
Ytobu waccn ocTabaIocb B cIOXeHHOM nOxKeHm, 3akpoIte paCNOJoxeHHyU c60ky 3aueKky-Φnkcatop (uΦpa 7).
BCTaBbTe HOxKn paMbI TeHTa B IpeDyCMOTpeHbIe IJRA 3TOrO OTBepCTnI. OKINbTe 3aDIOU YacTb TeHTa Ha CnIHky CnDEHnI.
TeHT rOToB K mCNoJIb3OBAHnIO.
Pa360pka:
Haxmnte pbyarni, paonoloxeHHbIe Ha BHeUHeI cTOpOHe KpePJIeHnIa THTA, CneBa I cnpaBa, I oDHOBpeMeHHo NOTAHTE TeHT BBepX.
11. yxoA
11.1 Waccn
Perynapno npoBepyte waccn Ha npedmet pa360ntabuxcxc BHTOB, 3aKnENoK, n3HOWeHbIX YaCTeN I NIOJOMAHHOrO MaTePnAna.