
PT8051 - Bluetooth speaker ALTEC LANSING - Free user manual and instructions
Find the device manual for free PT8051 ALTEC LANSING in PDF.
| Product Type | Wireless Surround Home Theater System |
| Brand | ALTEC LANSING |
| Model | PT8051 |
| Dimensions (Main Unit) | 1016 x 170 x 152 mm |
| Dimensions (Surround Speaker) | 560 x 170 x 152 mm |
| Weight (Main Unit) | 8.2 kg |
| Weight (Surround Speaker) | 4.4 kg |
| Power | 120 V AC / 60 Hz |
| Power Consumption | 25 W (Main Unit) / 20 W (Surround Speaker) |
| Output Power | 125 Watts (5 x 25 W) |
| Amplifiers | Three NXT Flat Panel Digital Drivers |
| Digital Audio Inputs | 3 Optical / 1 Coaxial |
| Analog Audio Inputs | Stereo x 3 |
| Outputs | Subwoofer x 1, Composite Video x 1 |
| Frequency Response | 70 Hz - 20 kHz +/- 3 dB |
| Wireless Technology | 2.4 GHz |
| Wireless Range | 12.2 meters |
| Signal-to-Noise Ratio | > 75 dB (A-weighted) |
| Surround Functions | Dolby Digital, DTS, Dolby Pro Logic II, Stereo |
| Care and Cleaning | Use a dry cloth. Do not expose to moisture. |
| Safety | Unplug during thunderstorms; refer servicing to qualified personnel. |
| Spare Parts and Repairability | Contact Altec Lansing customer service. |
Frequently Asked Questions - PT8051 ALTEC LANSING
User questions about PT8051 ALTEC LANSING
0 question about this device. Answer the ones you know or ask your own.
Ask a new question about this device
Download the instructions for your Bluetooth speaker in PDF format for free! Find your manual PT8051 - ALTEC LANSING and take your electronic device back in hand. On this page are published all the documents necessary for the use of your device. PT8051 by ALTEC LANSING.
USER MANUAL PT8051 ALTEC LANSING
This product has been tested and complies with the specifications for a Class B digital device, pursuant to Part 15 of the FCC Rules. These limits are designed to provide reasonable protection against harmful interference in a residential installation. This equipment generates, uses, and can radiate radio frequency energy and, if not installed and used according to the instructions, may cause harmful interference to radio communications. However, there is no guarantee that interference will not occur in a particular installation. If this equipment does cause harmful interference to radio or television reception, which is found by turning the equipment off and on, the user is encouraged to try to correct the interference by one or more of the following measures:
Reorient or relocate the receiving antenna
- Increase the separation between the equipment or devices
- Connect the equipment to an outlet other than the receiver's
Consult a dealer or an experienced radio/TV technician for assistance
Changes or modifications not expressly approved by the party responsible for compliance could void the user's authority to operate the equipment.
FCC Radiation Exposure Statement
This equipment complies with FCC radiation exposure limits set forth for an uncontrolled environment. This equipment should be installed and operated with minimum distance 20cm between the radiator and your body.
Industry Canada (Canada)
This device complies with Canadian ICES-003 and RSS210 rules. Cet appeirel est conforme aux normes NMB-003 et RSS210 d'Industry Canada.
CAUTION
To prevent electric shock do not use this (polarized) plug with an extension cord, receptacle or other outlet unless the blades can be fully inserted to prevent blade exposure.
WARNING
To reduce the risk of fire or electric shock, do not expose this appliance to rain or moisture.
IMPORTANT SAFETY INSTRUCTIONS
- Read these instructions.
- Keep these instructions.
- Heed all warnings.
- Follow all instructions.
- Do not use this apparatus near water — This apparatus shall not be exposed to dripping or splashing, and no objects filled with liquids, such as vases, shall be placed on the apparatus.
- Clean only with dry cloth.
- Do not block any ventilation openings. Install in accordance with the manufacturer's instructions. The apparatus should not be situated on a bed, sofa, rug or similar surface that may block the ventilation openings. The apparatus must not be placed in a built-in installation, such as a closed bookcase or cabinet that may impede the flow of air through the ventilation openings. Ventilation should not be impeded by covering the openings with items such as newspapers, tablecloths, curtains, etc.
- Do not install near any heat sources such as radiators, heat registers, stoves, or other apparatus (including amplifiers) that produce heat.
- No naked flame sources, such as lighted candles, should be placed on the apparatus.
- Do not defeat the safety purpose of the polarized or grounding-type plug. A polarized plug has two blades with one wider than the other. A grounding type plug has two blades and a third grounding prong. The wide blade or the third prong are provided for your safety. If the provided plug does not fit into your outlet, consult an electrician for the replacement of the obsolete outlet.
- Protect the power cord from being walked on or pinched — particularly at plugs, convenience receptacles, and the point where they exit from the apparatus.
- Do not install in an area which impedes the access to the power plug. Disconnecting the power plug is the only way to completely remove power to the product and must be readily accessible at all times.
- Power source — Use only power supplies of the type specified in the operating instructions or as marked on the appliance. If a separate power supply is included with this apparatus, do not substitute with any other power supply — use only manufacturer-provided power supplies.
- Unplug this apparatus during lightning storms or when unused for long periods of time.
- Refer all servicing to qualified service personnel. Servicing is required when the apparatus has been damaged in any way, such as power-supply cord or plug is damaged, liquid has been spilled or objects have fallen into the apparatus, the apparatus has been exposed to rain or moisture, does not operate normally, or has been dropped. For service, refer to qualified service personnel, return to the dealer, or call the Altec Lansing service line for assistance.
- For products which incorporate batteries, please refer to local regulations for proper battery disposal.
- Only use attachments/accessories specified by the manufacturer.
- Use only with the cart, stand, tripod, bracket, or table specified by the manufacturer or sold with the apparatus. When a cart is used, use caution when moving the cart/ apparatus combination to avoid injury from tip-over.

Altec Lansing One Year Limited Warranty
(Two-Year Limited Warranty in the European Union and Asia)
What Does The Warranty Cover?: Altec Lansing warrants that its products shall be free from defects in materials or workmanship, with the exceptions stated below.
What Is The Period Of Coverage?: For units purchased in European Union or Asia, this warranty runs for two years from the date of purchase. For units not purchased in Europe or Asia, this warranty runs for one year from the date of purchase. The term of any warranties implied by law shall expire when your limited warranty expires. Some states and/or Member States in the European Union do not allow limitations on how long an implied warranty lasts, so the above limitation may not apply to you.
What Does The Warranty Not Cover?: This warranty does not cover any defect, malfunction or failure that occurs as a result of: improper installation; misuse or failure to follow the product directions; abuse; or use with improper, unintended or faulty equipment. (For information on proper installation, operation and use consult the manual supplied with the product. If you require a replacement manual, you may download a manual from www.alteclansing.com.) Also, consequential and incidental damages are not recoverable under this warranty. Some states do not allow the exclusion or limitation of incidental or consequential damages, so the above limitation or exclusion may not apply to you.
What Will Altec Lansing Do To Correct The Problem?: Altec Lansing will, at its option, repair or replace any product that proves to be defective in material or workmanship. If your product is no longer being manufactured, or is out of stock, at its option, Altec Lansing may replace your product with a similar or better Altec Lansing product.
How To Get Warranty Service: To get a covered product repaired or replaced, you must contact Altec Lansing during the warranty period by email (csupport@alteclansing.com). You must include in your email, your name, address, email address, telephone number, date of purchase and a complete description of the problem you are experiencing. In the United States, you may alternatively contact Altec Lansing by telephone at 1-800-ALTEC88 — please be prepared to provide the same information. If the problem appears to be related to a defect in material or workmanship, Altec Lansing will provide you a return authorization and instructions for return shipment. Return shipments shall be at the customer's expense, and the return must be accompanied by the original proof of purchase. You should insure the shipment as appropriate because you are responsible for the product until it arrives at Altec Lansing.
How Will State Law Affect Your Rights?: This warranty gives you specific legal rights, and you may also have other rights which vary from state to state. Please note that in the European Union, you as a consumer might have other legal rights under national legislation of European Union Member States governing the sale of Altec Lansing's goods. Those rights are not affected by this guarantee.
The above limited warranties and remedies are sole warranties and remedies available to purchaser, if, and to the extent, valid and enforceable under the applicable law.
Customer Service
The answers to most setup and performance questions can be found in the Troubleshooting guide. You can also consult the FAQs in the customer support section of our Web site at www.atteclansing.com. If you live in North America and still can't find the information you need, please call our customer service team for assistance before returning the speakers to your retailer under their return policy.
Tel: 800-258-3288
Email: csupport@alteclansing.com
If you live outside of North America, please visit our website at www.alteclansing.com and select your region to locate your country's distributor.
For the most up-to-date information, be sure to check our Web site at www.alteclansing.com.
International Distribution
International customers: For information regarding the distribution of Altec Lansing products in your country, please visit www.alteclansing.com and click on your region.
Disposal of Old Electrical & Electronic Equipment

This symbol on the product or on its packaging indicates that this product shall not be treated as household waste. Instead it shall be handed over to the applicable collection point for the recycling of electrical and electronic equipment. By ensuring this product is disposed of correctly, you will help prevent potential negative consequences for the environment and human health, which could otherwise be caused by inappropriate waste
handling of this product. The recycling of materials will help to conserve natural resources. For more detailed information about recycling of this product, please contact your local city office or your household waste disposal service.
PT8051 Surround Sound System
Thank you for purchasing the Altec Lansing PT8051 Wireless Surround Sound System.
The PT8051 is designed to replace the traditional A/V receiver and separate speakers and provide a complete, multi-channel surround system sound from just two components using DTS and Dolby Digital decoding to faithfully reproduce your favorite music and movie soundtracks. The PT8051 system's NXT Digital flat-panel driver technology accurately reproduces the full frequency range and delivers all the subtleties and spatial depth that today's digital formats are capable of. In addition, the PT8051's advanced wireless transmission means it's easy to experience theater quality surround effects without the need to run wires to the rear speakers.
The PT8051's design is well suited for use with today's large format LCD and plasma flat panel displays and both components can be wall mounted with them using the supplied brackets. A universal remote control is included that allows you to consolidate remote controls from various devices such as your TV, DVD player and VCR.
Contents
Refer to the PT8051 Quick Connect Card to identify these items.
- PT8051 main and rear surround units
- Remote control and batteries
A/V Cable - Wall mount bracket (hardware not included)
- User's guide and quick connect instructions
Controls and Connections for Your PT8051
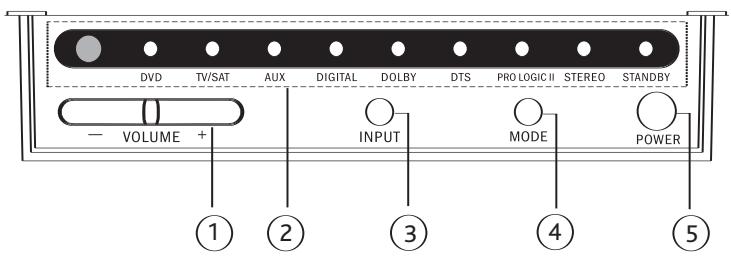
Front Panel (Main Unit)
| 1. VOLUME +/- | Controls the volume level of all audio channels. |
| 2. LEDs | Displays information about the operational status. |
| 3. INPUT | Press to switch between input sources (DVD, TV/SAT, AUX, DVD digital, TV/SAT digital or AUX digital). |
| 4. MODE | Press to select the surround (DOLBY, DTS or PRO LOGIC II) or stereo (STEREO) mode. |
| 5. POWER | Press to power on the system or switch to standby. |
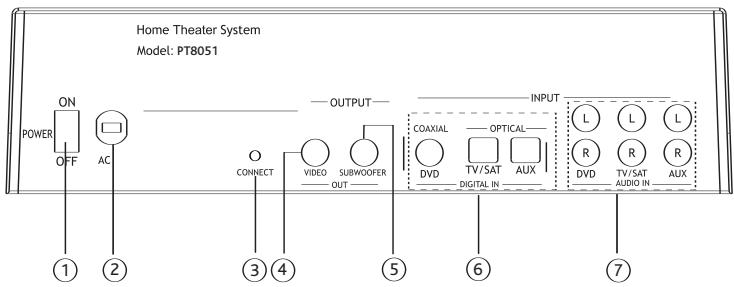
Rear Panel (Main Unit)
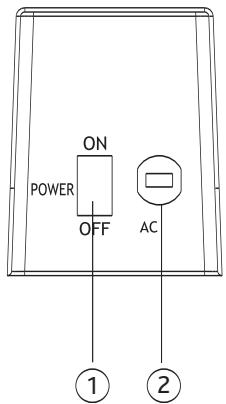
| 1. Power ON/OFF | Switches power on or off. |
| 2. AC Power Cord | Connect to standard AC outlet. Refer to frequency and voltage range for Power Source as indicated on rear panel. |
| 3. CONNECT | Press this button to manually synchronize the wireless audio link between the main and rear surround units. Under most circumstances it is not necessary to use this button as the units automatically synchronize when powered on. |
| 4.VIDEO OUT | Used to display on-screen display information. Connect to composite video input of TV. |
| 5. SUBWOOFER OUT | Use to connect an optional subwoofer if additional bass is required from the system. |
| 6. DIGITAL INPUT: COAXIAL (DVD IN) | Use to connect a DVD player that has a coaxial digital output. |
| OPTICAL (TV/SAT IN) | Use to connect a digital satellite tuner or cable TV tuner that has an optical audio output. |
| OPTICAL (AUX IN) | Use to connect to an auxiliary sound source such as a PVR or second TV tuner that has an optical audio output. Can also be used to connect a DVD player that has an optical output but not a coaxial output. |
| 7. AUDIO ANALOG INPUT: DVD IN | Use to connect to a DVD player with audio analog output. |
| TV/SAT IN | Use to connect to a TV or satellite tuner with audio analog output. |
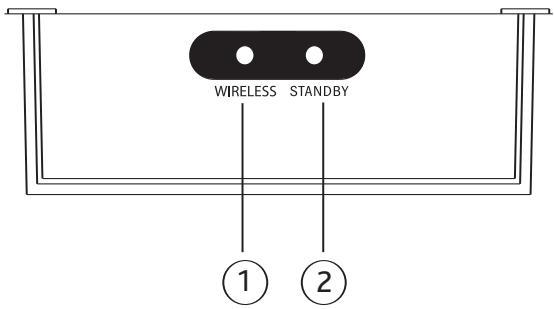
Front Panel (Rear Surround Unit)
| 1. WIRELESS | Illuminates in a steady state when the main and rear surround speakers are synchronized to indicate the wireless audio link is operating normally. Synchronization between the main and rear units will occur automatically when main unit is powered on provided the rear surround unit's power switch on the rear panel is in the on position. Flashes when the wireless connection between the main and rear surround speaker has become unsynchronized. To manually resynchronize the main and rear surround units press the CONNECT button on the rear panel of the main unit. |
| 2. STANDBY | Illuminates when unit is plugged in and the POWER ON/OFF switch on the rear panel is in the ON position. This light will automatically switch from red to green once the main unit has been powered up. |
Rear Panel (Rear Surround Unit)
| 1. Power ON/OFF | Switches power on or off. |
| 2. AC Power Cord | Connect to standard AC outlet. Refer to frequency and voltage range for Power Source as indicated on rear panel. |
Remote Control
This section describes the function of each control on the remote control used to control the PT8051.
Note: You can also control other components using the remote control once you set the appropriate remote control codes. See the "Programming device remote control codes" section of this manual.
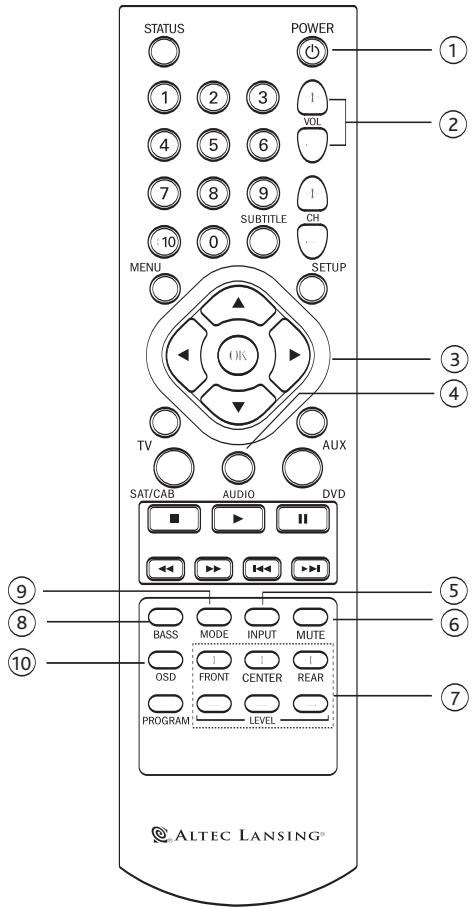
| 1. POWER | Use to toggle between On and Standby modes. |
| 2. VOL +/- | Increases or decreases the overall volume level of the unit. |
| 3. ↕ ↕ ↕ and OK | Move to highlight items in the on-screen display (OSD) setup menu. Press OK to confirm. |
| 4. AUDIO | Sets the remote's shared keys to control the PT8051 as opposed to DVD, TV, SAT/CAB or AUX devices. |
| 5. INPUT | Press to cycle through inputs - DVD, TV/SAT, AUX, DVD digital, TV/SAT digital and AUX digital. |
| 6. MUTE | Press to turn off or restore sound. |
| 7. FRONT, CENTER, REAR +/- LEVEL | Increases or decreases the volume level of the individual channels for the main and rear surround units. |
| 8. BASS | Enhances low frequency or bass output. |
| 9. MODE | Use to select between DTS, Dolby Digital, Dolby Pro Logic II or stereo mode of the system depending on the sound modes available from your audio source. |
| 10. OSD | Press to enter or exit the on-screen display (OSD) setup menu. |
Installing the PT8051
This section provides guidelines for locating and installing your new PT8051.
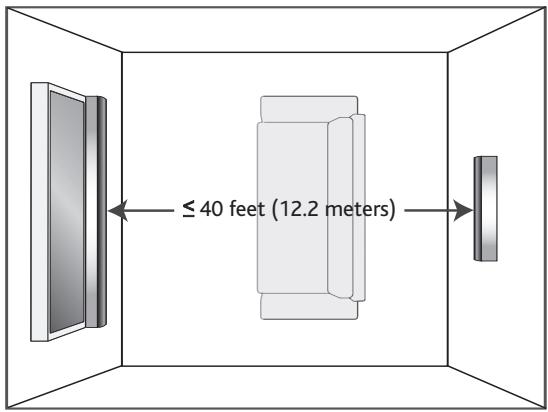
The PT8051 creates a realistic surround sound experience from just two units. Usability is further enhanced by utilizing an advanced 2.4 GHz wireless transmission system that eliminates the need to run wires to the rear surround speakers. While placement is less critical than similar systems, the following general guidelines should be followed where possible to ensure best sound quality:
- Avoid placement where furniture or other items would obstruct the grill area.
- Center the PT8051 below the TV so that dialogue appears to be coming from it.
- The maximum allowable distance between the main and rear surround units is approximately 40 feet (12.2 meters).
- The rear surround unit should be placed behind the primary listening position to maximize the surround sound effects from the system. For maximum sound quality it should be placed at or near ear level when they are seated in the listening position.
- Avoid placing the PT8051 on or near surfaces that may vibrate.
Locating the PT8051
The PT8051's front and rear units can be placed on suitable level surfaces or mounted on the wall using the supplied wall mounting brackets.

Safety Notes:
- Be sure to leave adequate ventilation space – at least 2 inches (50mm) above both the main and rear surround units.
- We do not recommend installing this unit so that it is directly on the floor.
- The main unit of the PT8051 weighs approximately 18.1 lbs. (8.2kg) and the rear surround unit weighs approximately 9.8 lbs. (4.4kg) . Be sure to secure it where it will not fall and where it is out of the reach of children.
- Do not install the main or rear surround units directly above a cathode-ray tube (CRT) TV as stray magnetic fields may distort the TV.
Wall Mounting
If you are mounting the PT8051 on the wall please follow these steps:
- Determine a suitable wall location for mounting each speaker unit within reach of its AC cord.
- Position and level the supplied metal mounting bracket in the desired location on the wall.
- Being careful to avoid any items (wires, pipes, etc.) hidden inside the wall secure the metal mounting bracket using appropriate fasteners for the application. If you are unsure which type of fasteners to use or are unable to determine if there are items within the wall that could be damaged please consult a licensed contractor.
- Place the speaker on the mounting bracket by aligning the two buttonholes on the rear of the speaker with the posts on the mounting bracket. Check to make sure the wall mount bracket and speaker are securely fixed in place.
Caution: The wall-mounting bracket should be installed only by qualified personnel. The mounting bracket can be installed on many different types of walls. When installed, the mounting bracket must support at least 100 lbs. (45 kg.) The installer must be sure that the installing surface can support the 100 lb. (45 kg.) weight requirement. The qualified installer must also determine and use the proper hardware to obtain the weight requirements for the wall.
Placing the PT8051 on a Stand
You can mount your TV on a commercially-available stand and place the main unit of the PT8051 under your TV. Ensure that the stand being used can support the weight of the TV, the PT8051 and any other items it will be required to support.
Note: Consult the instructions supplied with the stand for details on how to install the stand and how to mount the PT8051 and the TV on the stand.
NOTE: Placement of this product on wood surfaces with certain types of finishes, such as clear varnish, may result in damage to the finish. Consult the furniture manufacturer's care instructions for direction as to the types of objects that may safely be placed on the wood surface. Altec Lansing shall not be responsible for any damage to wood surfaces from contact with this product.
Setting Up the PT8051
Warning: Do not insert the PT8051's power plug into a wall outlet until you connect other sources such as your TV, DVD player, satellite tuner or alternate audio source. Also, turn off audio sources before connecting them to the PT8051.
The PT8051 is designed to connect external components such as your DVD player, satellite TV tuner, cable TV tuner, VCR, game console and TV. The PT 7031 can be connected to the source equipment (DVD, VCR, etc.) using either a digital (coaxial or optical) or analog connection. In cases where there are both digital and analog outputs such as a DVD player we recommend using the digital output to ensure best sound quality and optimal surround sound reproduction.
Connecting Devices Equipped with a Digital Audio Output (DVD Player, DVR, etc.)
The PT8051 can accept digital input signals using standard, commercially available optical or coaxial cables.
Typical Digital Connections
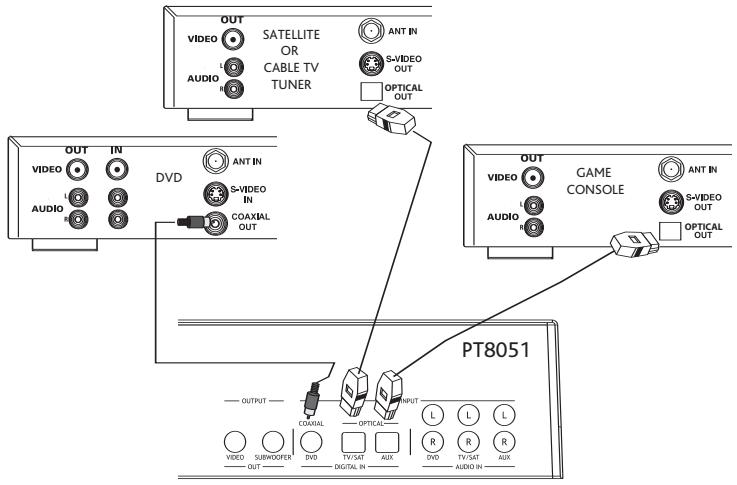
To connect a digital audio source:
- Use a coaxial cable to connect the COAXIAL IN (DVD) jack on the PT8051 to the coaxial output jack on the DVD player.
- Use an optical cable to connect the OPTICAL IN (AUX) jack on the PT8051 to the optical output jack on a digital audio source such as a game console or digital video recorder.
- Use an optical cable to connect the OPTICAL IN (TV/SAT) jack on the PT8051 to the optical output jack on the satellite tuner or cable TV tuner.
Note: When connecting a DVD player we recommend using the coaxial input found on the rear of the PT8051. However, if your DVD player only has an optical output it can be connected to the AUX input.
Connecting Devices Equipped with an Analog Audio Output (VCR or Similar Device)
To connect the PT8051 to a VCR or similar analog audio device, connect the cables as shown in the diagram below.
Analog Audio Connections

To connect audio from an analog (VCR, etc.) audio device:
- Use a standard stereo audio cable to connect the AUDIO IN (AUX) jacks on the PT8051 to the audio output jacks on the VCR or similar audio source. Ensure that the cables are connected correctly observing left (white) and right (red) connections at both the PT8051 and the source device.
-
Use a standard stereo audio cable to connect the AUDIO IN (TV/SAT) jacks to the audio output jacks on the satellite TV or cable TV tuner. If your satellite TV or cable TV tuner has a digital output this input can be used for another device.
-
Use a standard stereo audio cable to connect the AUDIO IN (DVD) jack to the audio output jack on the DVD player. If you have connected your DVD player using an optical or coaxial digital cable you can use this input for another device.
Video Connection
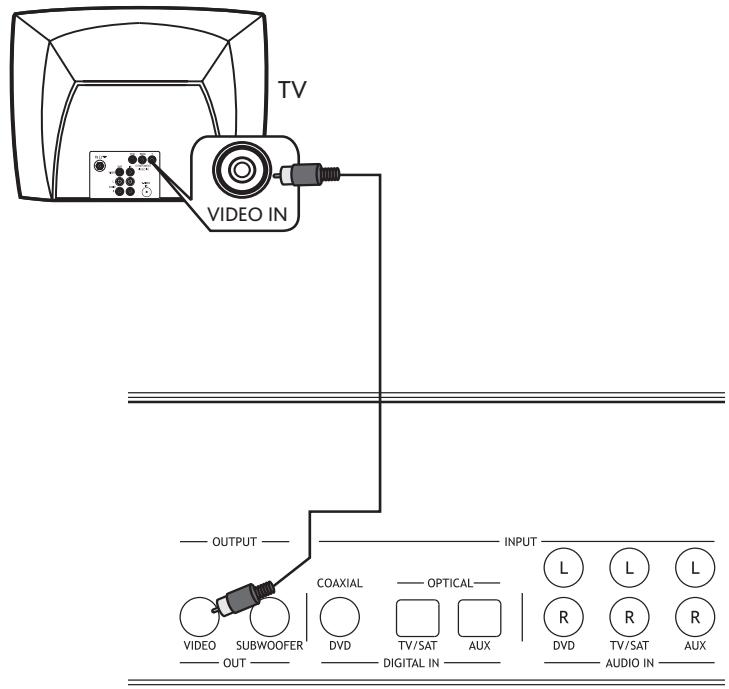
To connect the video out:
- Using the supplied A/V cable, connect one yellow end to connect the VIDEO OUT on the PT8051 and the other yellow end to the video input jack on the TV. This connection allows you to view the on-screen display (OSD) on your TV screen when the corresponding input is selected.
Connecting a Subwoofer
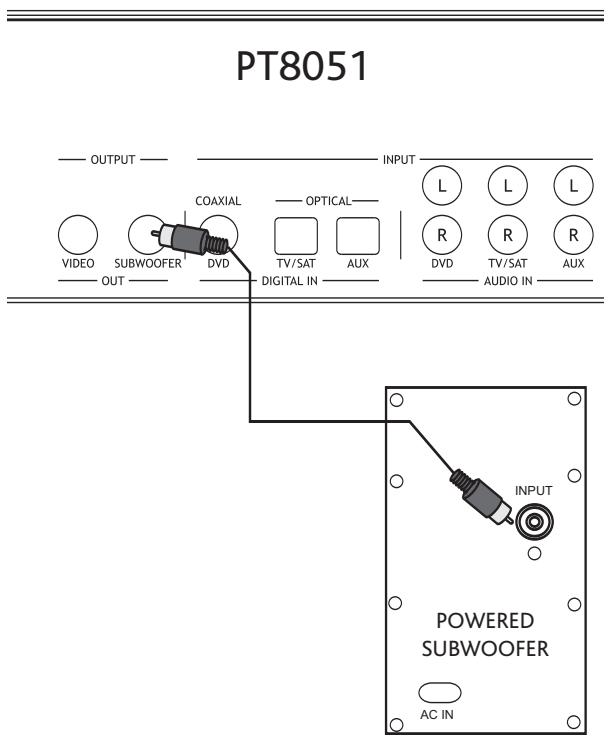
To connect an optional subwoofer:
- Use an optional commercially available mono audio cable to connect the SUBWOOFER OUT jack on the rear of the PT8051 to the SUBWOOFER INPUT jack on the subwoofer.

Installing Batteries
- Depress the latch on the back of the remote as shown to remove the battery cover.
- Insert two AAA batteries.
- Close the battery cover.
Notes:
- Change all of the batteries if you notice that the operation range of the remote decreases or the indicator does not blink or its light becomes dim.
- Do not use old batteries together with new ones.
- Do not use different types of batteries such as alkaline and manganese batteries together. Read the packaging carefully as these different types of batteries may have the same shape and color.
- Exhausted batteries may leak. If the batteries have leaked, dispose of them immediately. Avoid touching the leaked material or letting it come into contact with skin or clothing. Clean the battery compartment thoroughly before installing new batteries.
- Do not throw away batteries with general house waste. Dispose of them correctly according to local regulations.
Basic Operation
- After all audio and video connections are secure; you can plug in the PT8051's AC cords into a suitable AC outlet.
- Turn on the power switch on the rear panel of the PT8051's main and rear surround units to the on position. The PT8051 will enter into STANDBY mode. The power LED on front panel will turn red indicating that the unit is in standby mode.
- Press the POWER button on the front panel to power on the PT8051. The power LED will switch from red to green indicating the unit is on. The LED on the rear unit will illuminate once the main unit has been powered on.
- Begin playback on the DVD player or other device that you want to listen to.
- Select the desired input using the INPUT button on the front panel or remote control. The corresponding LED will illuminate to indicate the input that has been selected
- Select the desired audio mode by using the MODE button on the front panel or remote control. For most devices you can choose between surround sound or stereo modes.
- Adjust the system volume using the VOL +/- buttons on the remote control or front panel.
Advanced Operation
Setting Channel (Speaker) Levels
Individual levels can be set for front, center and rear or surround channels by using the corresponding + / - level buttons on the remote. These levels should be adjusted so that all channels are at a similar volume when the listener is seated using the Test Tone function as described in the Setup Menu section that follows.
Adjustments are made by:
- Pressing LEVEL (Front +/- , Center +/- and Rear +/- ) for each channel to be set. The level of the channel will appear on the TV screen.
- The range for each level is -10 dB to +10 dB, in 1 dB steps. The initial volume is 00 dB.
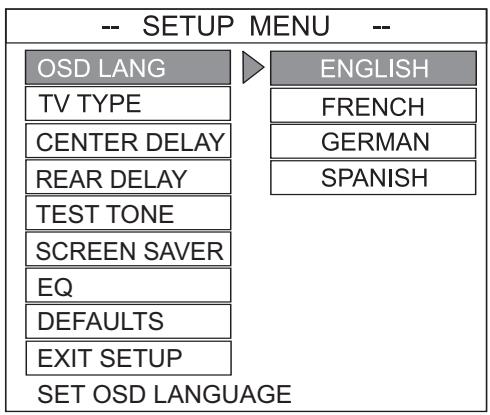
Setup Menu
The setup menu is displayed on your TV screen using the On-Screen Display (OSD). The OSD will only work if a video connection has been established as described in "video connection" section of this manual. You can customize your PT8051 for language, TV type, test tone setting, screen saver, and EQ. The setup menu can also be used to reset the unit to factory default settings if necessary.
Displaying the On-screen Display
- Press the OSD button on the remote to display the setup menu.
- Use the buttons on the remote to toggle through the selections.
- Highlight your desired option.
- Press the OK button on the remote to confirm your selection.
- To exit the setup menu, press the OSD button or select EXIT SETUP from the menu.
Setting the OSD Language
Select the language for on-screen display. The default setting for the OSD is ENGLISH.
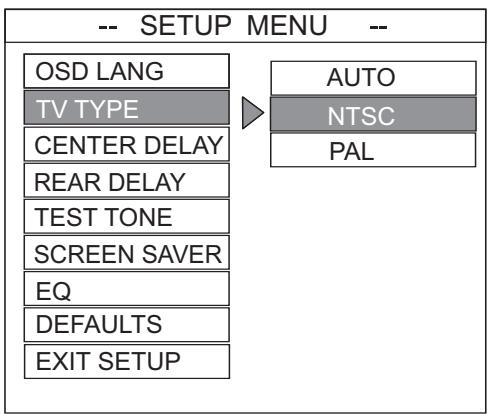
TV Type Setting
The color system of the DVD system, DVD and TV should match. Only then will it be possible to play a DVD on this system. Before changing the TV system, determine the color system of your TV.
The default setting is NTSC. NTSC is used in several countries including the United States, Canada and Japan. PAL is used in most European and Asian countries.
AUTO: Select this if the connected TV is compatible with both NTSC and PAL. The output format will be in accordance with the video signal of the DVD disc.
NTSC: Select this if the connected TV has the NTSC color system. It will change the video signal of a PAL disc and output it to NTSC format. PAL: Select this setting if the connected TV has the PAL color system. It will change the video signal of an NTSC disc and output it to PAL format.
Center Delay Setting
Used to set the delay time that is used for the CENTER channel. This setting is adjustable from 0 to 5mS (milliseconds) in one millisecond increments. This setting is useful if your PT8051 main unit cannot be positioned near the TV. As a general rule one foot (30cm) is equal to a delay of approximately 1mS . Therefore if your PT8051 main unit was one foot from the screen you would set the CENTER delay for 1mS . It can also be adjusted so that the sound coming from the PT8051 is synchronized with the video image. The default setting is CENTER DELAY TURNOED OFF.
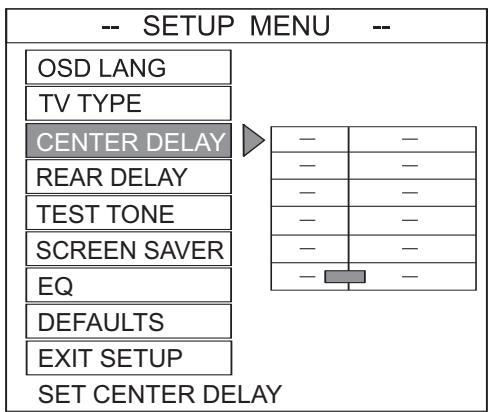
CENTER DELAY SET TO 5MS
CENTER DELAY SET TO 4MS
CENTER DELAY SET TO 3MS
CENTER DELAY SET TO 2MS
CENTER DELAY SET TO 1MS
CENTER DELAY OFF
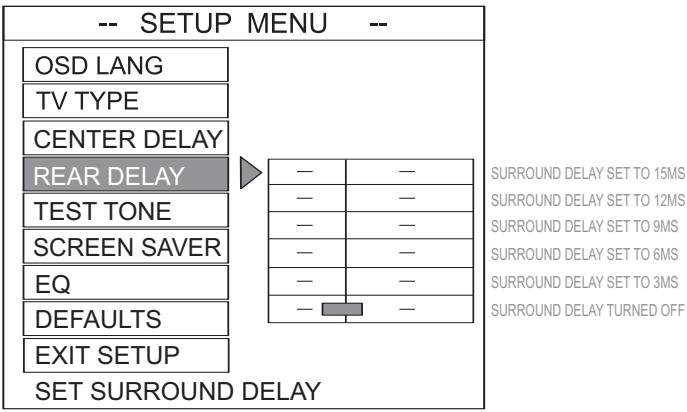
Rear Delay Setting
Used to set the delay time that is used for the REAR (surround) channel. This setting is adjustable from 0 to 15mS (milliseconds) in three millisecond increments. This setting is used to accurately reproduce the surround information that is encoded on certain DVDs as the producer intended by allowing you to tailor the sound to your listening room size. In this case you would set the delay as follows; The delay in milliseconds for the rear (surround) speaker setting is equal to the number of feet closer that speaker is to your listening position than the main unit.
For an example, let's assume the main unit is 15 ft away from the main listening position and the rear (surround) unit is 5 feet away.
Surround's Delay = 15ft - 5ft = 10ft = 10mS of delay
In this case you would select 9 mS from the menu as it is closest to 10 mS.
The idea is to have the sound from the main and rear units reach your ears at the same time, in relation to the signal being sent to those speakers. For the speakers that are close to you, a delay has to be added so that their sound reaches your ears at the same time as the speakers
that are farther away from you, with respect to the music signal that is sent to all the speakers at the same instant. The default setting is REAR DELAY TURNED OFF.
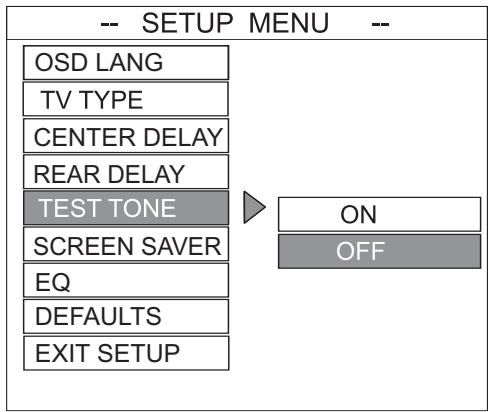
Test Tone Setting
When set to the ON position, the system will test the speaker output by using an internally generated test tone. The test signal is output sequentially through various channels. The default setting is OFF.
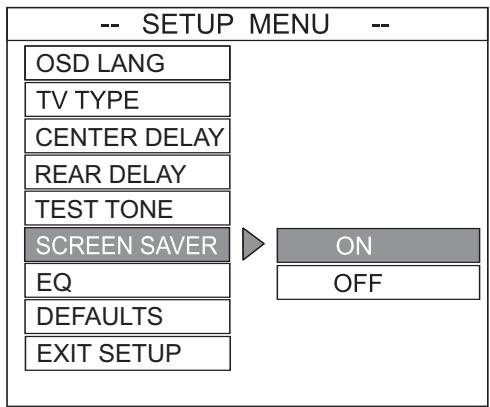
Screen Saver Setting
When set to ON the PT8051 will automatically enter the screen saver mode when no changes have been made after five minutes. This is useful for preventing image burn from occurring that can damage certain plasma TVs. The default setting is ON.
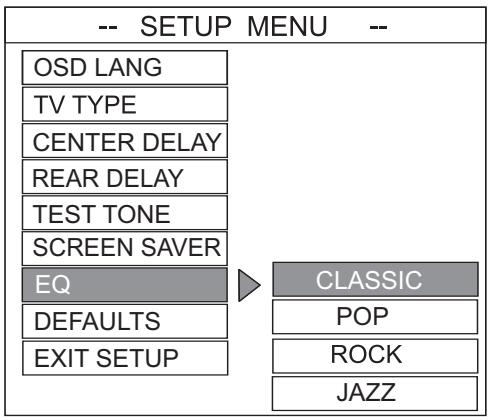
EQ (Equalizer)
Use this function to select equalizer settings. Choose from CLASSIC, POP, ROCK, or JAZZ. The default setting is CLASSIC.
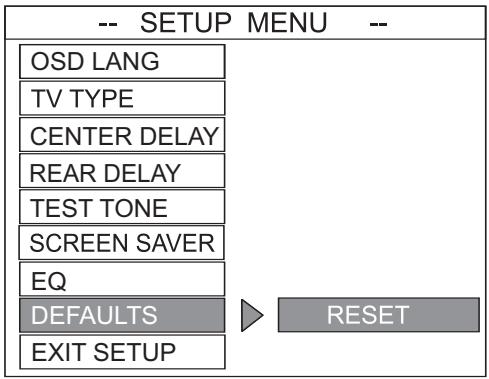
Default Setting
If RESET is selected, all the items in the setup menu will be reset to the factory default settings as previously indicated.
Operating the PT8051 Remote Control
In addition to controlling your PT8051 you can program the remote control to operate audio/video components from other manufacturers. Codes can be set up for each device to be controlled: TV, SAT/CAB, AUDIO, DVD, and AUX.
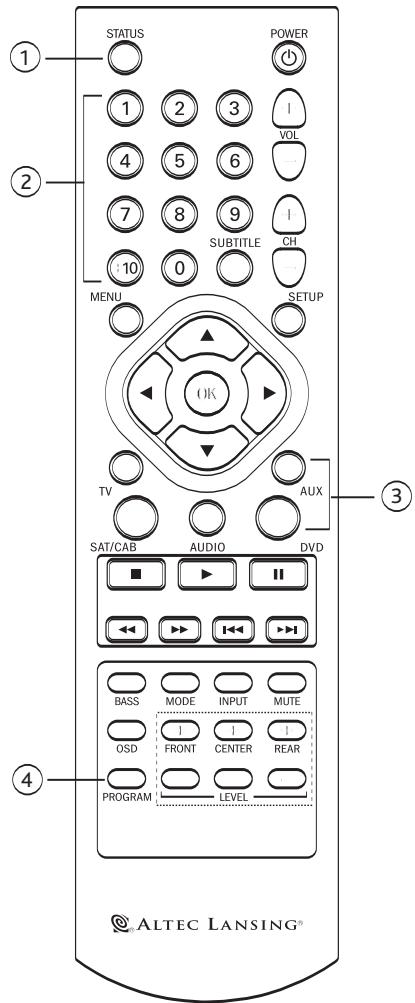
| 1. STATUS | Indicates operation of remote when specific buttons are pressed. Illuminates continuously to indicate remote is in program mode. |
| 2. NUMERIC BUTTONS | Use to enter preprogrammed remote codes for other devices. |
| 3. DEVICE BUTTONS | Use to program or switch remote modes for operating other devices. |
| 4. PROGRAM | Use to enter program mode when programming remote control codes for other devices. |
Default Preprogrammed Remote Control Codes
Your PT8051 remote control is preset to the default codes listed in the table below. If your component is not listed please consult the list in the Preprogrammed Remote Control Codes section. You can also use the search procedure in the Searching for Remote Control Codes section of this manual.
| Remote Button | Initial code | Equipment |
| TV | 082 | Philips TV |
| SAT/CAB | 039 | Philips Cable Box |
| AUDIO | 900 | Altec Lansing PT8051 |
| AUX | 144 | Panasonic VCR |
| DVD | 124 | Sony DVD |
Programming Device Remote Control Codes
Find the brand, model and code number of your components in the Preprogrammed Remote Control Codes section of this manual, then follow these steps:
- While holding down the PROGRAM button, press the button for the device to be programmed, i.e., TV or DVD or CAB/SAT or AUX.
The Status LED illuminates. - Release both buttons.
- Enter the CODE NUMBER using the numeric buttons on the remote. If the CODE NUMBER is valid the LED will flash twice and then turn off, indicating the code has been programmed. If the code number is not valid the LED flashes twice and turns on;
- Check to see that the remote can control the device that was programmed by using the CH + / - or similar button to control the device that was programmed. If it does not control the device, repeat this procedure.
Note: If you want to leave the setup mode, press the device button (TV, SAT/CAB, DVD, etc.). If you do not press any buttons after 10 seconds, SETUP MODE exits automatically.
Searching for Remote Control Codes
If you cannot find a code number from the Preprogrammed Remote Control Codes section of this manual that matches your equipment, the PT8051 remote can search its database for a suitable control code from the codes programmed into the remote. The PT8051 remote control will find the best possible component code for any audio source.
To search for codes follow these steps:
- Turn the device (TV, SAT/CAB, DVD, AUX, etc) that you wish to locate the remote control code for to the on position.
- On the PT8051 remote press and hold the PROGRAM button while pressing the device button you wish to search for (TV, SAT/CAB, DVD, AUX, etc).
- The STATUS LED on the PT8051 will illuminate and remain on.
- Press and release the PROGRAM button again. The LED will flash to indicate that the remote has entered the search mode.
-
Aiming the PT8051 remote at the device you want to control repeatedly and slowly press and release the POWER button. The PT8051 will send a different POWER code to the device each time the POWER button is pressed.
-
Once the device you wish to control powers off, immediately stop pressing the POWER button and press the device (TV, SAT/CAB, DVD, AUX, etc) button again.
- The PT8051 should now be programmed to control your device.
- You can verify this by turning the device on, and entering other applicable commands such as PLAY or STOP for a DVD player or CHANNEL +/- for a SATELLITE TV box.
Note: While the POWER button was used for searching here, you can use other commands such as the PLAY button for devices that do not have a POWER button. In this case the PT8051 uses the PLAY button to search. Simply use the PLAY button instead of the POWER button as described below ensuring that the device you wish to control is ready to enter the play mode and has a DVD or tape loaded, is on, etc.
Troubleshooting
| Symptom | Possible Problem | Solution |
| No power. | One or both power cords are not connected or the main or rear surround units have not been turned on. | Plug the PT8051's AC cords into a suitable AC outlet. Then, turn on the PT8051 by pushing the on/off switch in the rear of the unit for both the main and rear surround units. |
| Power switch on the back panel is not turned on for one or both units. | Turn it on. | |
| A safety mechanism powered down the PT8051. | Unplug the PT8051 from the AC outlet briefly and then plug it in again so it will reset itself. | |
| No sound comes from the PT8051. | The volume is set too low. | The “+/-” buttons on the top of the PT8051 remote are the master volume controls. Press and hold the “+” button to increase the volume. |
| Loose or no cable connections on the PT8051 or source equipment. | Check that the cables are correctly and firmly seated on both the PT8051 and the source equipment. | |
| MUTE is on. | Be sure mute function is not activated. | |
| No on-screen display. | Video cable is loose or not connected. | Check that the video cable is connected and properly seated at both the PT8051VIDEO OUTPUT and the TV input. |
| The wrong input is selected on the TV. | Select the correct input on the TV, the one that corresponds to where theVIDEO OUT cable from the PT8051 is connected. | |
| No sound is coming from the rear surround unit. | Power switch on the back panel is not turned on for one or both units. | Turn it on. |
| There is no surround information on the DVD soundtrack. | It is normal not to have surround sound information present at all times. | |
| The REAR +/- level is set too low. | Increase the REAR +/- level by using the remote control. | |
| The rear surround unit has lost synchronization with the main unit. This is indicated by a blinking green WIRELESS light on the rear surround unit. | Make sure that the front and rear units are within 40 feet (12.2 meters) of each other. To manually resynchronize the main and rear surround units press the CONNECT button on the rear of the front unit. Once synchronization has occurred the WIRELESS light on the rear surround unit will stop blinking and remain lit in a steady on state. |
Specifications
| Power Supply Rating | 120 V AC/60 Hz |
| Power Consumption | 25W (Main Unit) 20W (Rear Surround Unit) |
| Signal-to-Noise Ratio | (A-weighted) >75dB |
| Dimensions (W x H x D) | 40" x 6¾" x 6" (1016mm x 170mm x 152mm) 22" x 6¾" x 6" (560mm x 170mm x 152mm) (Rear Surround Unit) |
| Weight | 18.1 lbs. (8.2 kg) (Main Unit) 9.8 lbs. (4.4 kg.) (Rear Surround Unit) |
| Output Power | 125 Watts (5 x 25) Continuous Average Power |
| Drivers | Three NXT Digital 2" x 8" (50mm x 200mm) Flat Panel Drivers (Main Unit) 2.3" x 4" (58mm x 100mm) (Rear Surround Unit) |
| Digital Audio Inputs | Two Optical/One Coaxial |
| Analog Audio Inputs | Stereo x 3 |
| Analog Audio Outputs | Subwoofer x 1 |
| Video Output | Composite x 1 |
| Frequency response | 70 Hz – 20 kHz +/- 3dB |
| Wireless Transmission Frequency | 2.4 GHz |
| Wireless Transmission Range (Maximum) | 40 Feet (12.2 Meters) |
ATTENTION
© 2007 Altec Lansing
ALTEC, ALTEC LANSING, the Altec Lansing logo, the swirl design, and The Voice of the Theatre logo are registered trademarks or trademarks of Altec Lansing. Manufactured under license from Dolby Laboratories. Dolby and the double-D symbol are trademarks of Dolby Laboratories. NXT and the NXT logo are registered trademarks of NXT plc. Manufactured under license from one or more of the following DTS, Inc. U.S. Pat. Nos.: 5,451,942; 5,956,674; 5,974,380; 5,978,762; 6,226,616; 6,487,535 and other U.S. and world-wide patents issued and pending. "DTS" and "DTS Digital Surround" are registered trademarks of DTS, Inc. Copyright 1996,2002-2006, DTS,Inc. All Rights Reserved. All other trademarks appearing herein are the property of their respective owners.
- FCC Radiation Exposure Statement
- Industry Canada (Canada)
- CAUTION
- WARNING
- IMPORTANT SAFETY INSTRUCTIONS
- Altec Lansing One Year Limited Warranty
- (Two-Year Limited Warranty in the European Union and Asia)
- Customer Service
- International Distribution
- Disposal of Old Electrical & Electronic Equipment
- PT8051 Surround Sound System
- Contents
- Controls and Connections for Your PT8051
- Remote Control
- Installing the PT8051
- Locating the PT8051
- Wall Mounting
- Placing the PT8051 on a Stand
- Setting Up the PT8051
- Connecting Devices Equipped with a Digital Audio Output (DVD Player, DVR, etc.)
- Typical Digital Connections
- Connecting Devices Equipped with an Analog Audio Output (VCR or Similar Device)
- Analog Audio Connections
- Video Connection
- Connecting a Subwoofer
- Installing Batteries
- Notes:
- Basic Operation
- Advanced Operation
- Setting Channel (Speaker) Levels
- Setup Menu
- Displaying the On-screen Display
- Setting the OSD Language
- TV Type Setting
- Center Delay Setting
- Rear Delay Setting
- Test Tone Setting
- Screen Saver Setting
- EQ (Equalizer)
- Default Setting
- Operating the PT8051 Remote Control
- Default Preprogrammed Remote Control Codes
- Programming Device Remote Control Codes
- Searching for Remote Control Codes
- ATTENTION
Brand : ALTEC LANSING
Model : PT8051
Category : Bluetooth speaker