
IMT800 - Bluetooth speaker ALTEC LANSING - Free user manual and instructions
Find the device manual for free IMT800 ALTEC LANSING in PDF.
| Product Type | Bluetooth Speaker with iPhone/iPod Docking Station |
| Brand | ALTEC LANSING |
| Model | IMT800 (Mix) |
| AC Power | AC Adapter (included) – 100-240 V, 50/60 Hz |
| Battery Power | 8 D-size batteries (LR20) not included – battery life up to 30 hours |
| Dock Compatibility | iPhone and iPod (all models with appropriate adapter) |
| Auxiliary Inputs | 2 x 3.5mm jacks (AUX 1 and AUX 2) |
| FM Radio | Yes, with 4 presets |
| Equalizer | Graphic 7-band + 4 presets (ALTEC EQ, Rock, Hip Hop, Pop) |
| Remote Control | Carabiner remote control with included button cell battery |
| Display | LCD Screen |
| Charging of docked device | Yes, AC power only |
| Auto Power Off | Yes (after 4 minutes without audio on battery, or after several minutes of inactivity on AC) |
| Customization | Customizable welcome message |
| Maintenance | Clean with a soft cloth and mild soap. Avoid harsh chemicals (benzene, etc.) |
| Safety | Do not open the device, do not expose to water or excessive heat. Use the provided adapter. |
| Warranty | 1 year (outside EU) / 2 years (EU) |
| Spare Parts | Dock adapters (different models), carabiner remote control |
| Repairability | Any repair should be carried out by qualified personnel. No user-serviceable parts. |
Frequently Asked Questions - IMT800 ALTEC LANSING
User questions about IMT800 ALTEC LANSING
0 question about this device. Answer the ones you know or ask your own.
Ask a new question about this device
Download the instructions for your Bluetooth speaker in PDF format for free! Find your manual IMT800 - ALTEC LANSING and take your electronic device back in hand. On this page are published all the documents necessary for the use of your device. IMT800 by ALTEC LANSING.
USER MANUAL IMT800 ALTEC LANSING
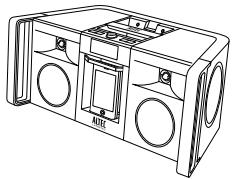
Altec Lansing Mix™ Portable Speaker for iPhone™ and iPod®
PykoBoDCTBO noIb3ObaTeJia
Käytöopas
Bruksanvising
Welcome
Thank you for purchasing the Altec Lansing Mix speaker system. Designed specifically to work with your iPhone and iPod, this system provides high-quality audio and radio performance that brings out the best in your music.
This Altec Lansing speaker system is compatible with all iPhone and iPod models.
Please carefully read this User Guide for instructions on setting up and using your Mix speaker system.
Prior to installing or operating the Altec Lansing Mix speaker system, refer to the important product safety information.
Getting Assistance
If you cannot find the answer to your setup and performance questions in this package, you can also consult the FAQs in the customer support section of our Web site at www.altelansing.com. If you live in North America and still can't find the information you need, please call our customer service team for assistance before returning the product to your retailer under their return policy.
Tel: 800-258-3288 (Toll Free in US and Canada)
Email: csupport@alteclansing.com
If you live outside of North America, please visit our website at www.alteclansing.com and select your region to locate your country's distributor.
International Distribution
International customers: For information regarding the distribution of Altec Lansing products in your country, please visit www.alteclansing.com and click on your region.
Registering Your Product
Visit www.alteclansing.com to register your product online, so we can provide you with the best possible service and technical support.
FCC Compliance
Changes or modifications not expressly approved by the party responsible for compliance could void the user's authority to operate this equipment.
This device complies with Part 15 of the FCC Rules. Operation is subject to the following two conditions:
- This device may not cause harmful interference, and
- This device must accept any interference received, including interference that may cause undesired operation.

The lightning flash with arrowhead, within an equilateral triangle, is intended to alert the user to the presence of uninsulated "dangerous voltage" within the product's enclosure that may be of sufficient magnitude to constitute a risk of electric shock to persons.
CAUTION
RISK OF ELECTRIC SHOCK
DO NOT OPEN
Caution: To prevent the risk of electric shock, do not remove cover (or back). No user-serviceable parts inside. Refer servicing to qualified service personnel.

The exclamation point within an equilateral triangle is intended to alert the user to the presence of important operating and maintenance (servicing) instructions in the literature accompanying the appliance.
BATTERIES
CAUTION: Danger of explosion if battery is incorrectly replaced. Replace only with the same or equivalent type. Do not expose to excessive heat such as sunshine, fire, or the like. The battery used in this product must be properly recycled or disposed of. Instructions for removing the battery can be found in the Quick Start Guide. Please contact your local recycling center for proper battery handling and disposal instructions.
POWER SOURCE
Use only power supplies of the type specified in the operating instructions or as marked on the appliance. If a separate power supply is included with this apparatus, do not substitute with any other power supply - use only manufacturer-provided power supplies.
CAUTION
To prevent electric shock do not use this (polarized) plug with an extension cord, receptacle or other outlet unless the blades can be fully inserted to prevent blade exposure.
WARNING
To reduce the risk of fire or electric shock, do not expose this appliance to rain or moisture.
IMPORTANT SAFETY INSTRUCTIONS
- Read these instructions.
- Keep these instructions.
- Heed all warnings.
- Follow all instructions.
- Do not use this apparatus near water. This apparatus shall not be exposed to dripping or splashing, and no objects filled with liquids, such as vases, shall be placed on the apparatus.
-
Clean only with dry cloth.
-
Do not block any ventilation openings. Install in accordance with the manufacturer's instructions.
- Do not install near any heat sources such as radiators, heat registers, stoves, or other apparatus (including amplifiers) that produce heat.
- Do not defeat the safety purpose of the polarized or grounding-type plug. A polarized plug has two blades with one wider than the other. A grounding type plug has two blades and a third grounding prong. The wide blade or the third prong are provided for your safety. If the provided plug does not fit into your outlet, consult an electrician for the replacement of the obsolete outlet.
- Protect the power cord from being walked on or pinched particularly at plugs, convenience receptacles, and the point where they exit from the apparatus.
- Only use attachments/accessories specified by the manufacturer.
- Use only with the cart, stand, tripod, bracket, or table specified by the manufacturer or sold with the apparatus. When a cart is used, use caution when moving the cart/apparatus combination to avoid injury from tip-over.
- Unplug this apparatus during lightning storms or when unused for long periods of time.
- Refer all servicing to qualified service personnel. Servicing is required when the apparatus has been damaged in any way, such as power-supply cord or plug is damaged, liquid has been spilled or objects have fallen into the apparatus, the apparatus has been exposed to rain or moisture, does not operate normally, or has been dropped.
- Do not install in an area which impedes the access to the power plug. Disconnecting the power plug is the only way to completely remove power to the product and must be readily accessible at all times.
Contents
Welcome. ii
Safety Information 1
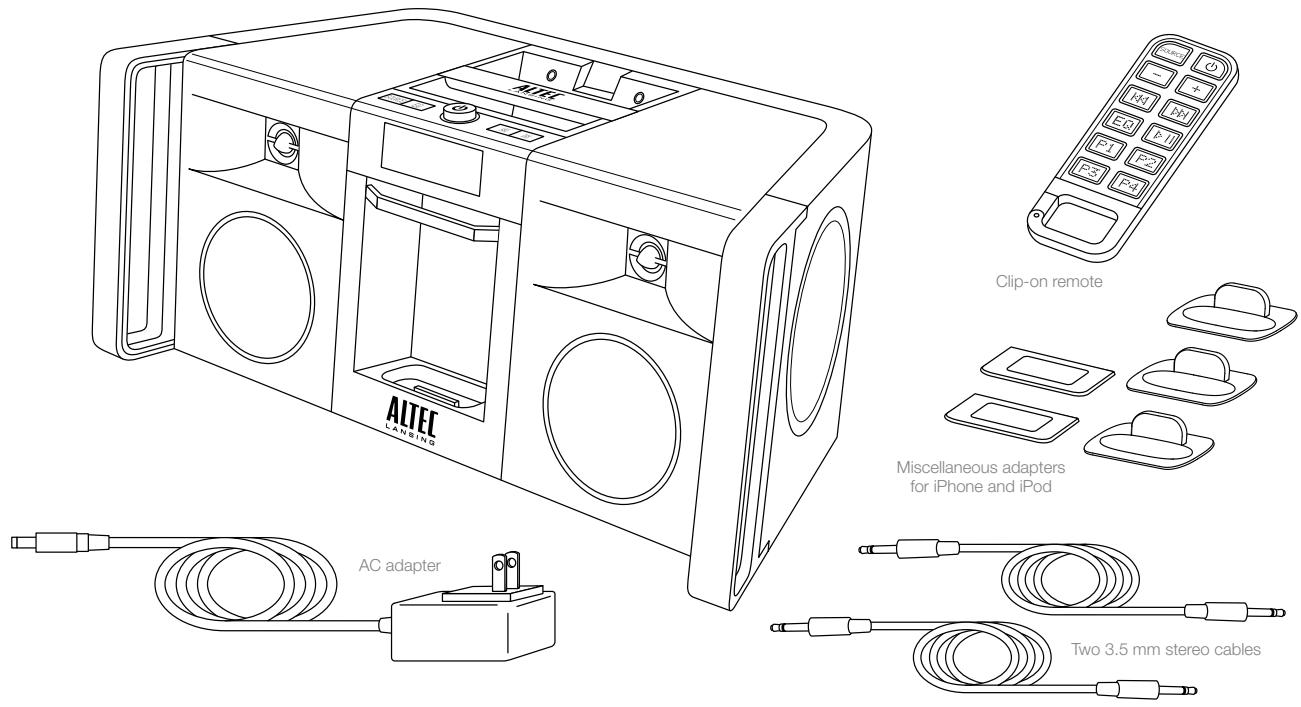
Package Contents 3
Getting Started 4
Placing and Removing Adapters for the iPhone and iPod 5
Speaker Features and Indicators 6
Speaker Controls. 7
Clip-On Remote Features 9
Listening to Your iPhone or iPod 11
Setting EQ Controls. 13
Charging your iPhone or iPod 15
Listening to the FM Radio 15
Listening to Additional iPhone, iPod, Non-Docking iPod or Other Audio Devices 16
Personalizing the Power-On Message 17
Maintaining Your Speaker System 17
Troubleshooting 18
Warranty 21
Altec Lansing Mix speaker system
Getting Started
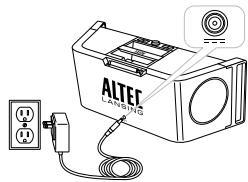
How to Install the AC Adapter
1 Connect the AC adapter cable plug into the speaker system's jack.
The jack is located on the back of the system.
2 Plug the AC adapter into the wall outlet.
How to Install the Speaker Batteries
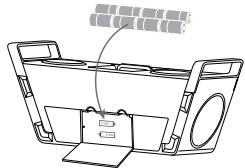
Your Altec Lansing Mix speaker system can also be powered by 8 D-size (LR20) batteries (not included). To install the batteries, follow the steps below:
1 Make sure that there is no iPhone or iPod in the system's dock and that no other devices are connected to the system.
2 Unplug the AC adapter from the Mix speaker system.
3 Open the battery compartment.
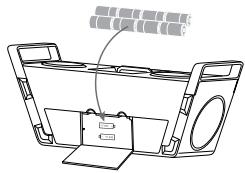
The battery door is located on the bottom of the Mix speaker system. To access it, place the unit on its back, so that the speakers are facing the ceiling. Then simply pull the tabs to open the battery compartment.
Caution: Do not place the unit on its top side. This may damage the volume knob.
4 Install 8 D-size (LR20) batteries (not included) in the battery compartment.
Make sure the batteries are correctly installed as illustrated in the battery compartment. The batteries will provide up to 30 hours of continuous playing time.
5 Replace the battery door.
NOTE Please discard used batteries properly.
NOTE When you are finished listening to your portable audio device, please remember to turn both it and your speaker system off to conserve electricity.
How to Install the Clip-On Remote Battery
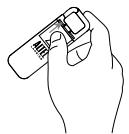
The clip-on remote battery (included) is not installed at the factory. To install the battery, follow the steps below. The battery compartment is at the back of the remote. Push the battery compartment door in the direction of the arrow to unlock it.
1 Open the battery door.
The battery door is located on the back of the remote. Using your thumb, push the battery door toward the carabiner clip. Then lift the battery door open.
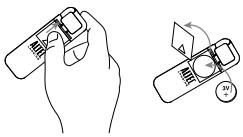
2 Position the battery (included) so it sits in the battery holder correctly.
Make sure the polarity (the + and - sides of the battery) is correct.
3 Replace the battery door.
NOTE Please discard used batteries properly.
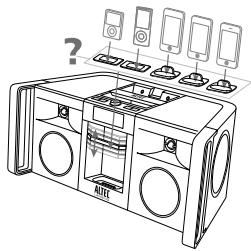
Placing and Removing Adapters for the iPhone and iPod
Your Altec Lansing Mix speaker system includes removable adapters for today's popular iPhone and iPod models. These adapters ensure that your iPhone and iPod properly fit in the speaker system's dock. As new iPhone and iPod models are introduced, new adapters will be made available to customers. You may also use the adapter supplied with your iPhone or iPod, or available for purchase at www.apple.com.
How to Place an Adapter
1 Select the correct adapter for your iPhone or iPod.
Using the correct adapter ensures a proper fit for your iPhone or iPod.
2 Gently press the iPhone or iPod adapter into the dock.
Now you can carefully place your iPhone or iPod into the dock.
NOTE Your iPhone or iPod cannot be in a case.
How to Remove an Adapter
1 Remove your iPhone or iPod.
2 Grip the adapter and pull gently upward.
Speaker Features and Indicators
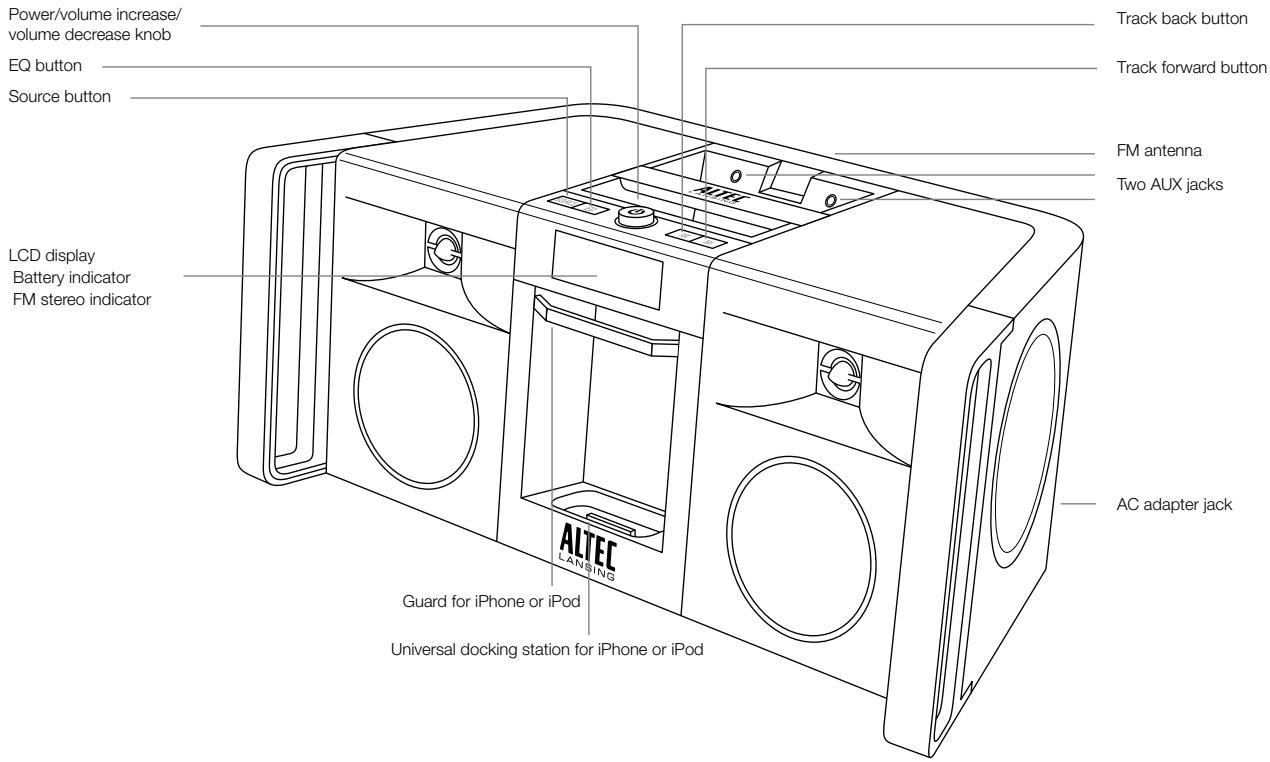
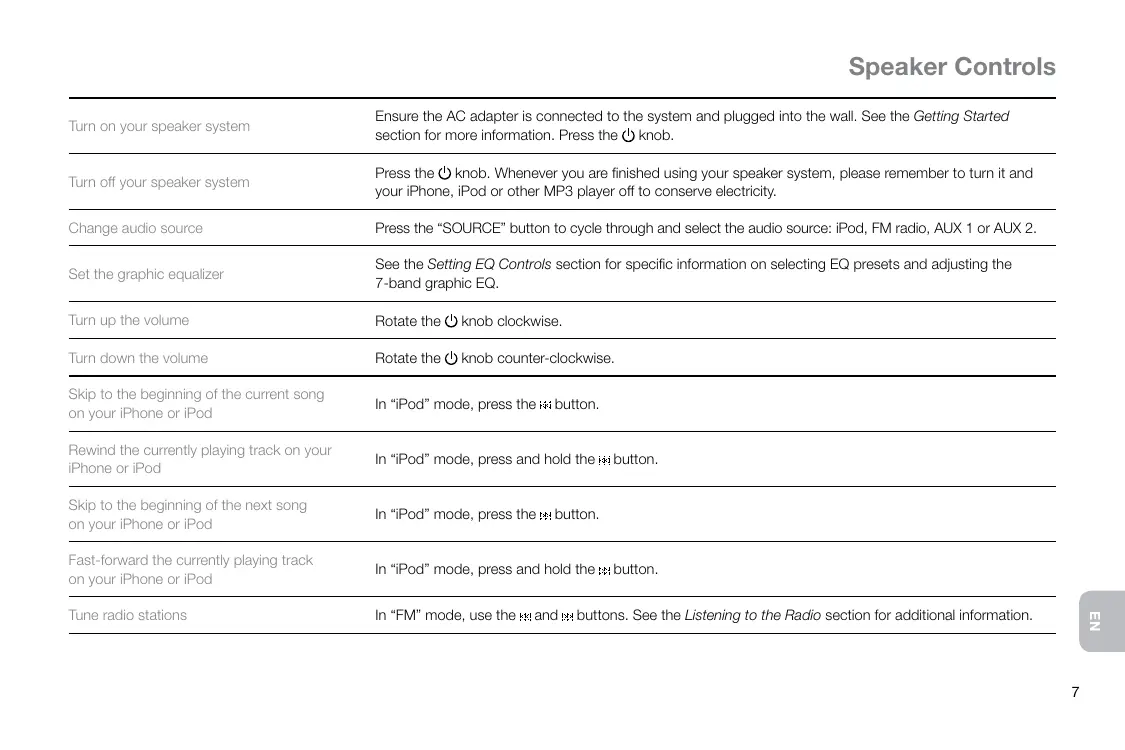
Speaker Controls
| Turn on your speaker system | Ensure the AC adapter is connected to the system and plugged into the wall. See the Getting Started section for more information. Press the ① knob. |
| Turn off your speaker system | Press the ① knob. Whenever you are finished using your speaker system, please remember to turn it and your iPhone, iPod or other MP3 player off to conserve electricity. |
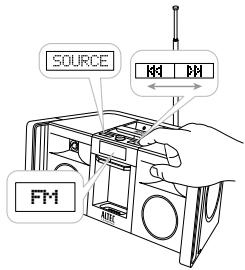
| Change audio source | Press the “SOURCE” button to cycle through and select the audio source: iPod, FM radio, AUX 1 or AUX 2. |
| Set the graphic equalizer | See the Setting EQ Controls section for specific information on selecting EQ presets and adjusting the 7-band graphic EQ. |
| Turn up the volume | Rotate the ① knob clockwise. |
| Turn down the volume | Rotate the ① knob counter-clockwise. |
| Skip to the beginning of the current song on your iPhone or iPod | In “iPod” mode, press the ④ button. |
| Rewind the currently playing track on your iPhone or iPod | In “iPod” mode, press and hold the ④ button. |
| Skip to the beginning of the next song on your iPhone or iPod | In “iPod” mode, press the ④ button. |
| Fast-forward the currently playing track on your iPhone or iPod | In “iPod” mode, press and hold the ④ button. |
| Tune radio stations | In “FM” mode, use the ④ and ④ buttons. See the Listening to the Radio section for additional information. |
Speaker Controls
| Scan radio stations | In “FM” mode, press and hold the ⋅ or ⏽ button. See the Listening to the Radio section for additional information. |
| Listen to an additional iPhone, iPod, non-docking iPod or other portable audio device | See the Listening to Additional iPhone, iPod, Non-Docking iPod or Other Portable Audio Devices section for specific information on using devices attached to your speaker system's AUX jacks. |
| Enter a personalized power-on message | See the Personalizing the Power-On Message section for specific information on using this feature. |
| Reset all settings | With the speaker system turned on, press the Ⓞ and ⏽ buttons simultaneously for a few seconds. Once the word “RESET ?” is displayed on the screen, press the Ⓞ button to reset all settings. |
| Select FM Band region | Reset all settings (see above), and use the ⋅ and ⏽ buttons to select the region closest to you (“REGION 1: USA,” “REGION 2: EUROPE/ASIA,” “REGION 3: JAPAN WIDE” or “REGION 4: JAPAN”). Then, press the Ⓞ knob to save your selection. |
| Check battery status | If the Mix is being powered by batteries, you can see how much battery power you have left. Press and hold the “SOURCE” button to display the amount of battery power remaining and press it again to exit this mode. The unit will automatically exit this mode after a few seconds. |
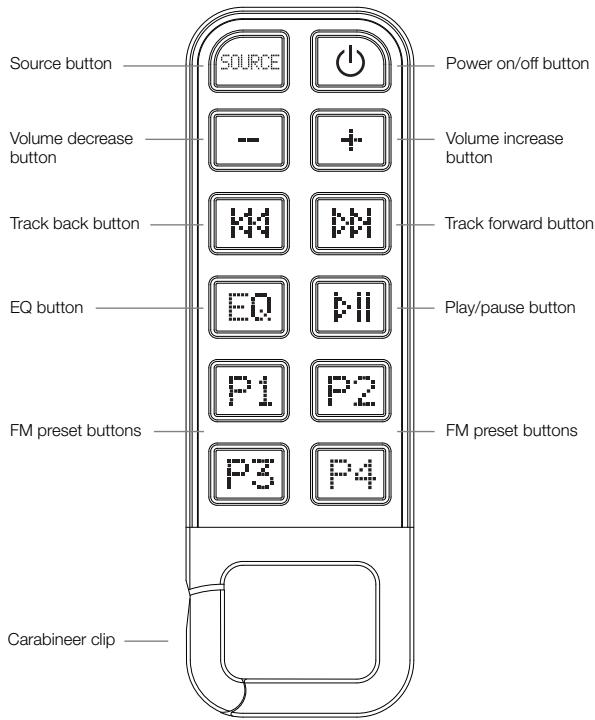
Clip-On Remote Features
The clip-on remote lets you operate many functions of your Altec Lansing Mix speaker system:
| Turn on your speaker system | Press the ① button. |
| Turn off your speaker system | Press the ① button. |
| Change audio source | Press the “SOURCE” button to cycle through and select the audio source: iPod, FM radio, AUX 1 or AUX 2. |
| Turn up the volume | Press the "+" button. |
| Turn down the volume | Press the "-" button. |
| Skip to the beginning of the current song on your iPhone or iPod | In “iPod” mode, press the ④ button. |
| Rewind the currently playing track on your iPhone or iPod | In “iPod” mode, press and hold the ④ button. |
| Skip to the beginning of the next song on your iPhone or iPod | In “iPod” mode, press the ④ button. |
| Fast-forward the currently playing track on your iPhone or iPod | In “iPod” mode, press and hold the ④ button. |
| Set the graphic equalizer | See the Setting EQ Controls section for specific information on selecting EQ presets and adjusting the 7-band graphic EQ. |
Clip-On Remote Features
| Play/pause a song on your iPhone or iPod | In “iPod” mode, press the ➔ button to begin playing a selected track. Press the button again to pause it. |
| Tune radio stations | In “FM” mode, use the ➔ or ➔ buttons. See the Listening to the Radio section for additional information. |
| Seek radio stations | In “FM” mode, press and hold the ➔ or ➔ button. See the Listening to the Radio section for additional information. |
| Store a radio station | In “FM” mode, tune to the station you’d like to store, and then press and hold one of the PRESET buttons (P1, P2, P3 or P4). See the Listening to the Radio section for more information. |
| Select a preset radio station | In “FM” mode, press the PRESET button (P1, P2, P3 or P4) that corresponds to the station you’d like to hear. See the Listening to the Radio section for more information. |
NOTE For best results, aim the clip-on remote toward the Mix speaker system.
Listening to Your iPhone or iPod
1 Dock your iPhone or iPod in the Altec Lansing Mix speaker system. Make sure the correct adapter for iPhone or iPod is inserted in the speaker system's dock. Slide the guard down to protect the iPhone or iPod.
2 Select "iPod" mode.
Press the "SOURCE" button on your speaker system or clip-on remote until the iPod icon appears on the LCD.
3 Press the button on your iPhone, iPod, or clip-on remote.
Music from your iPhone or iPod will start playing. The speaker system and the clip-on remote are capable of controlling basic functions of 3rd-generation iPod models, the iPod touch, the iPod nano and the iPhone.
4 Adjust the volume.
Rotate the knob on the Altec Lansing speaker system to adjust the system volume. Or, use the "+" and "-" buttons on the clip-on remote.
5 Find your desired song.
Press the button on your speaker system or clip-on remote to go to the next or previous track. Press and hold the button on your speaker system or clip-on remote while the track is playing for high-speed forward or reverse music search of the current track.
NOTE To conserve battery power, reduce the speaker system volume level.
NOTE During battery-only operation, the speaker system automatically shuts down if no audio is detected for a few minutes. This is to conserve battery power. Press the button on the speaker system or the button on the clip-on remote to turn the speaker system back on.
NOTE The speaker system is compatible with the alarm clock and sleep timer features built into select iPhone and iPod models. For these features to work properly, the speaker system must be connected to a wall outlet. When an iPhone or iPod is docked, the speaker system will not shut down automatically, enabling the alarm or sleep timer to play through the speaker system. See the user guide for iPhone or iPod for details on how to access these features.
NOTE During AC operation, if there is no iPhone or iPod docked and no audio input signal is detected for a few minutes, the speaker system automatically shuts down to conserve energy. Press the button on the speaker system or the button on the clip-on remote to turn the speaker system back on.
Listening to Your iPhone or iPod
How to Access Additional Features on Your iPhone or iPod Using the Clip-on Remote
First, select "iPod" mode.
Press the "SOURCE" button on your speaker system or clip-on remote until the iPod icon appears on the LCD.
Shuffle function
Press the P1 button once on the clip-on remote to advance to the next shuffle mode:
- "Shuffle S" is displayed when the system is in song shuffle mode.
- "Shuffle A" is displayed when the system is in album shuffle mode.
Shuffle Off" is displayed when the shuffling function has been turned off.
Note: Use the P2 button on some older iPod models. Functionality may vary per iPhone or iPod model.
| Repeat function | Press the P2 button once on the clip-on remote to advance to the next repeat mode: ·“Repeat 1” is displayed when the system is in the repeat one mode. ·“Repeat” is displayed when the system is the repeat all mode. ·“Repeat Off” is displayed when the repeat function has been turned off. Note: Use the P1 button on some older iPod models. Functionality may vary per iPhone or iPod model. |
| Access the previous playlist | Press the P3 button on the clip-on remote. |
| Access the next playlist | Press the P4 button on the clip-on remote. |
Setting EQ Controls
How to Set the Bass and Treble Control Using the Onboard Controls
1 Access the bass and treble settings.
Press the "EQ" button once. The Bass Control screen will appear on the LCD.
2 Increase or decrease the bass level.
Rotate the knob.
3 Enter the Treble Control screen.
Press the EQ button again. The Treble Control screen will appear.
4 Increase or decrease the treble level.
Rotate the knob.
5 Exit the Treble Control screen.
Press the "EQ" button again. Or the unit will automatically exit this screen after a few seconds.
How to Set the Bass and Treble Control Using the Clip-On Remote
1 Access the bass and treble settings.
Press the "EQ" button once. The Bass Control screen will appear on the LCD.
2 Increase or decrease the bass level.
Press the "+" or "-" buttons.
3 Enter the Treble Control screen.
Press the "EQ" button again. The Treble Control screen will appear.
4 Increase or decrease the treble level.
Press the "+" or "-" buttons.
5 Exit the Treble Control screen.
Press the "EQ" button again. Or the unit will automatically exit this screen after a few seconds.
How to Change the EQ Presets Using the Onboard Controls
1 Access the EQ presets.
Press and hold the "EQ" button for approximately 3 seconds.
2 Select your desired preset.
Press the or buttons to cycle through the four EQ presets.
Presets include: 1) ALTEC EQ, 2) ROCK, 3) HIP HOP, and 4) POP.
3 Exit the EQ Preset screen.
Press the "EQ" button again. Or the unit will automatically exit this screen after a few seconds.
NOTE: To reset the EQ Presets to factory settings, press and hold the EQ button for a few seconds.
How to Change the EQ Presets Using the Clip-On Remote
1 Access the EQ presets.
Press and hold the "EQ" button for approximately 3 seconds.
2 Select your desired preset.
Press the or buttons to cycle through the four EQ presets.
Presets include: 1) ALTEC EQ, 2) ROCK, 3) HIP HOP, and 4) POP. Or, press P1 for ALTEC EQ, P2 for ROCK, P3 for HIP HOP or P4 for POP.
3 Exit the EQ Preset screen.
Press the "EQ" button again. Or the unit will automatically exit this screen after a few seconds.
Setting EQ Controls
NOTE You can personalize the EQ presets by selecting a Preset EQ then pressing the "EQ" button twice to enter the Bass/Treble Control Mode. There you can make adjustments to the Preset EQs as described in the Bass and Treble Control sections. Changes are saved automatically.
NOTE: To reset the EQ Presets to factory settings, press and hold the EQ button for a few seconds.
How to Adjust the 7-Band Graphic EQ Using the Onboard Controls
For even greater personalization of your music, you can dial in your sound with the onboard 7-band graphic EQ.
1 Enter the Graphic EQ Mode.
Press and hold the "EQ" button while you press the or buttons.
2 Select a frequency slider for adjustment.
Press the or buttons until the desired slider is highlighted.
3 Increase or decrease the level of the frequency slider.
Rotate the knob.
4 Select the next frequency slider for adjustment.
Press the or buttons until the next desired slider is highlighted.
5 Increase or decrease the level of the frequency slider.
Rotate the knob.
6 Continue selecting and adjusting frequency sliders as desired.
7 Exit the Graphic EQ Mode.
Press the "EQ" button again. Or the unit will automatically exit this mode after several seconds.
NOTE: To reset the Graphic EQ to factory settings, press and hold the "EQ" button for a few seconds.
How to Adjust the 7-Band Graphic EQ Using the Clip-On Remote
1 Enter the Graphic EQ Mode.
On the speaker system, press and hold the "EQ" button while you press the or buttons.
2 Select a frequency slider to adjust.
Press the or K4 buttons on the clip-on remote until the desired slider is highlighted.
3 Increase or decrease the level of the frequency slider.
Press the + or - buttons on the clip-on remote.
4 Select the next frequency slider to adjust.
Press the or buttons on the clip-on remote until the next desired slider is highlighted.
5 Increase or decrease the level of the frequency slider.
Press the "+" or "-" buttons on the clip-on remote.
6 Continue selecting and adjusting frequency sliders as desired.
7 Exit the Graphic EQ Mode.
Press the "EQ" button on either the clip-on remote or the speaker system. Or the unit will automatically exit this mode after several seconds.
NOTE: To reset the Graphic EQ to factory settings, press and hold the "EQ" button for a few seconds.
Charging Your iPhone or iPod
Whenever your iPhone or iPod is docked and your Altec Lansing inMotion Max speaker system is plugged into an AC outlet, your iPhone or iPod is charging (until fully charged) – even if the speaker system is switched off.
CAUTION: The iPhone or iPod will not charge when the speaker system is operating on batteries.
Listening to the FM Radio
1 Extend the FM antenna fully for best FM reception.
2 Select "FM" mode.
Press the "SOURCE" button on your speaker system or clip-on remote until "FM" appears on the LCD.
3 Tune to the station you want to listen to.
Use the or H buttons on your speaker system or enhanced remote to tune in the desired station. Press and hold these same buttons to find the next clear FM station.
4 Adjust the volume.
Use the knob on your speaker system to adjust the system volume. Or, use the ^+ and - buttons on the clip-on remote.
How to Store Preset Stations
Your Altec Lansing Mix speaker system's clip-on remote enables you to program up to 4 FM station presets:
1 Tune to the station you wish to store.
While in "FM" mode, use the or buttons on your speaker system or clip-on remote to tune to the desired station.
2 Store the station.
Press and hold the P1, P2, P3 or P4 button on the clip-on remote for a few seconds. You can store one FM station in each preset.
3 To store other stations, repeat the above steps.
How to Recall Preset Stations
1 Make sure you are in "FM" mode.
If you're not in "FM" mode, press the "SOURCE" button on your speaker system or clip-on remote until "FM" appears on the LCD.
2 Press a PRESET button (P1, P2, P3 or P4) on the clip-on remote.
The radio will tune to your preset station.
3 Adjust the volume.
Use the knob on your speaker system to adjust the system volume. Or, use the "+" and "-" buttons on the clip-on remote.
Listening to Additional iPhone, iPod, Non-Docking iPod or Other Audio Devices
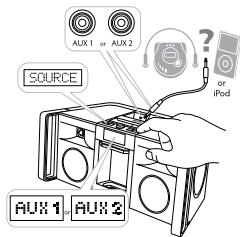
If you or a friend has an iPhone, iPod, non-iPod MP3 player or other non-docking audio device, you can enjoy it through your Altec Lansing Mix speaker system as well. Just connect it via the AUX 1 or AUX 2 jack. Here's how:
1 Locate one of the two 3.5mm stereo cables (included).
2 Plug one end of the stereo cable into your device.
Your device should have either a headache or LINE OUT jack for you to plug into.
3 Plug the other end of the stereo cable into your speaker system's AUX 1 or AUX 2 jack.
The AUX jacks are located on the top of the speaker system next to the handle.
4 Select "AUX 1" or "AUX 2" mode.
Press the "SOURCE" button on your speaker system or the clip-on remote until "Auxiliary Input 1" or "Auxiliary Input 2" appears on the speaker system's LCD.
5 Turn on your device and start playing it.
6 Adjust the volume.
Use the knob on the speaker system to adjust the volume. Or, use the "+" and "-" buttons on the clip-on remote.
NOTE You may need to adjust the device volume also. Your device's volume should be set to approximately 344 volume.
Personalizing the Power-On Message
Whenever you turn on your Altec Lansing Mix speaker system, the Altec Lansing logo will appear for approximately 3 seconds followed by a personalized message, if you've set one. The Mix comes with no preset power-on message. To create a personalized message, just follow these instructions:
1 Enter the Message Screen Edit Mode.
Press and hold the "SOURCE," "EQ," and buttons. All four buttons must be pressed at approximately the same time while the Altec Lansing logo is displayed. The following message will appear on the LCD: "Add a personal message by selecting letters with the track buttons and rotary control."
2 Add your personal message.
Rotate the knob until the desired letter, number or symbol is displayed. Press the button to make your selection and move to the next space. Continue this process until your entire message is displayed.
3 Exit the Message Screen Edit Mode.
Press the knob to save the message and exit the Message Screen Edit Mode.
How to Delete a Personalized Message
1 Enter the Message Screen Edit Mode.
Press and hold the "SOURCE," "EQ," and buttons. All four buttons must be pressed at approximately the same time while the Altec Lansing logo is displayed. The following message will appear on the LCD: "Add a personal message by selecting letters with the track buttons and rotary control."
2 Clear the message.
Press the "SOURCE" button to clear the message.
3 Exit the Message Screen Edit Mode.
Press the knob to exit the Message Screen Edit Mode.
Maintaining Your Speaker System
Place your speaker system on a level surface away from sources of direct sunlight or excessive heat.
Protect your furniture with a cloth or other protective material when placing your speaker system on a natural wood or lacquered finish.
Clean your speaker system with a soft cloth moistened only with mild soap and water. Stronger cleaning agents, such as benzene, thinner or similar materials, can damage the surface of the unit.
Troubleshooting
| Symptom | Possible Problem | Solution |
| Speaker system doesn’t respond (no power) | AC adapter isn’t plugged into a wall outlet or the connector isn’t plugged into the power supply jack on the back of the speaker system. | Plug the AC adapter into a wall outlet and plug the connector into the power supply jack on the back of the speaker system. |
| Wall outlet is not functioning. | Plug another device into the same outlet to confirm the outlet is working. | |
| The batteries are dead. | Replace with new batteries. (See the Getting Started section for details.) | |
| The power isn’t turned on. | Turn on the speaker system by pressing the ① button. The LCD display turns on. | |
| iPhone or iPod doesn’t dock properly | Using the wrong adapter for iPhone or iPod or no adapter. | Make sure the adapter is the proper fit for your iPhone or iPod. |
| iPhone or iPod didn’t install properly. | Remove your iPhone or iPod from the dock and check for obstruction on the connectors in the dock and on your iPhone or iPod. Then reseat it in the dock and slide the guard down to protect it. |
Troubleshooting
| Symptom | Possible Problem | Solution |
| iPhone or iPod doesn't respond to the speaker system | iPhone or iPod is not installed properly. | Remove your iPhone or iPod from the dock and check for obstructions on the connectors in the dock and on your iPhone or iPod. Then reseat it in the dock and slide the guard down to protect it. |
| Your iPhone or iPod software is too old. | Upgrade software on your iPhone or iPod. For details visit www.apple.com/ipod/download. | |
| iPhone or iPod is locked up. | Please make sure your iPhone or iPod is working properly before docking into the unit. Please refer to your iPhone or iPod manual for details. | |
| Using 1st- or 2nd-generation iPod, iPod shuffle or other devices. | Your speaker system cannot control those iPods or other devices. | |
| iPhone or iPod didn't charge | iPhone or iPod is not installed properly. | Remove your iPhone or iPod from the dock and check for obstructions on the connectors in the dock and on your iPhone or iPod. Then reseat it in the dock and slide the guard down to protect it. |
| iPhone or iPod is locked up. | Please make sure your iPhone or iPod is working properly before docking into the unit. Please refer to your iPhone or iPod manual for details. | |
| AC adapter isn't plugged into a wall outlet, or the connector is not plugged into the power supply jack on the back of the speaker system. | Plug the AC adapter into a wall outlet and plug the connector into the supply jack on the speaker system. The iPhone or iPod will not charge when the speaker system is operating on batteries. |
Troubleshooting
| Symptom | Possible Problem | Solution |
| Sound is distorted | EQ settings are set too high. | Decrease the EQ settings. |
| Sound source is distorted. | If the iPhone or iPod original sound source (MP3) is of poor quality, distortion and noise are easily noticed with high-power speakers. Try a different audio source such as a music CD. | |
| Clip-on remote doesn't work | Battery is weak. | Replace current battery with a new battery. |
| Clip-on remote is not pointed toward the speaker system. | Point the clip-on remote toward the Altec Lansing speaker system and move within 10 feet of the unit. | |
| Sound source is connected to the AUX 1 or AUX 2 jack. | Clip-on remote will not control devices connected to the AUX 1 or AUX 2 jack. | |
| No sound from the AUX 1 or AUX 2 device, such as an iPhone, iPod, MP3 player or CD player connected to the AUX 1 or AUX 2 jack | Volume on the device is set too low. | Increase the volume on the device to approximately ¾ full volume. |
| Source selector is not set to AUX 1 or AUX 2. | Set source selector to AUX 1 or AUX 2. | |
| The speaker system exhibits erratic or unexpected behavior. Controls do not function. | Static electricity, momentary interruption of power or abnormal operating conditions may be responsible. | 1. Disconnect the AC adapter cable plug from the speaker system's jack. 2. Wait 20-30 seconds. 3. Reconnect the AC adapter cable plug to the speaker system's jack. 4. Turn the unit back on |
| There is radio interference | The unit is too close to a radio tower. | Move the unit to see if the interference goes away. |
ALTEC LANSING ONE-YEAR LIMITED WARRANTY (TWO-YEAR LIMITED WARRANTY IN THE EUROPEAN UNION)
What Does the Warranty Cover?
Altec Lansing warrants that its products shall be free from defects in materials or workmanship, with the exceptions stated below.
What Is the Period of Coverage?
For units purchased in European Union, this warranty runs for two years from the date of purchase. For units not purchased in Europe, this warranty runs for one year from the date of purchase. The term of any warranties implied by law shall expire when your limited warranty expires. Some states and/or Member States in the European Union do not allow limitations on how long an implied warranty lasts, so the above limitation may not apply to you.
What Does the Warranty Not Cover?
This warranty does not cover any defect, malfunction or failure that occurs as a result of: improper installation; misuse or failure to follow the product directions; abuse; or use with improper, unintended or faulty equipment. (For information on proper installation, operation and use consult the manual supplied with the product. If you require a replacement manual, you may download a manual from www.alteclansing.com.) Also, consequential and incidental damages are not recoverable under this warranty. Some states do not allow the exclusion or limitation of incidental or consequential damages, so the above limitation or exclusion may not apply to you.
What Will Altec Lansing Do to Correct the Problem?
Altec Lansing will, at its option, repair or replace any product that proves to be defective in material or workmanship. If your product is no longer being manufactured, or is out of stock, at its option, Altec Lansing may replace your product with a similar or better Altec Lansing product.
How to Get Warranty Service
To get a covered product repaired or replaced, you must contact Altec Lansing during the warranty period by email (csupport@alteclansing.com). You must include in your email, your name, address, email address, telephone number, date of purchase and a complete description of the problem you are experiencing. In the United States, you may alternatively contact Altec Lansing by telephone at 1-800-ALTEC88 - please be prepared to provide the same information. If the problem appears to be related to a defect in material or workmanship, Altec Lansing will provide you a return authorization and instructions for return shipment. Return shipments shall be at the customer's expense, and the return must be accompanied by the original proof of purchase. You
should insure the shipment as appropriate because you are responsible for the product until it arrives at Altec Lansing.
How Will State Law Affect Your Rights?
This warranty gives you specific legal rights, and you may also have other rights which vary from state to state. Please note that in the European Union, you as a consumer might have other legal rights under national legislation of European Union Member States governing the sale of Altec Lansing's goods. Those rights are not affected by this guarantee.
The above limited warranties and remedies are sole warranties and remedies available to purchaser, if, and to the extent, valid and enforceable under the applicable law.
DISPOSAL OF OLD ELECTRICAL AND ELECTRONIC EQUIPMENT

This symbol on the product or on its packaging indicates that this product shall not be treated as household waste. Instead it shall be handed over to the applicable collection point for the recycling of electrical and electronic equipment. By ensuring this product is disposed of correctly, you will help prevent potential negative consequences for the environment and human
health, which could otherwise be caused by inappropriate waste handling of this product. The recycling of materials will help to conserve natural resources. For more detailed information about recycling of this product, please contact your local city office or your household waste disposal service.
Bienvenue
SOURCE D'ALIMENTATION
YcTaHOBKa 6aTapei nnHaMnKa
Akyctuueckara cuntema Altec Lansing Mix takoKe moKet noLyuTaB nItaHne ot 8 batae pa3mepa D (LR20) (B KOMnIeKT He BxOJaT).Дя toro yTo6bI yCTaHOBt bIX, BblONHInTe yKa3aHHBe HNKe DeiCTBn.
1 Y6eIITecb B TOM, YTO B DOK-CTaHcIMn CNTembl Het iPhone nIN iPod u K Hei He noDKJIoueHbI dpyrHe yCTpOHTBa.
2 OTKJIIOUHTe aadTep nepemehnoro TOKA O T AkyCTuCeCKoN CNTEmbl Mix.
3 OTKpoIte KpbIshky aKKymyIaTOPHOrO OTceKa.
AkkymyIITOpHbI OTcK pacnoJIOKeHN Ha HIXKHeI NaHEIM CNTEmbl Mix. 4TO6bl IOnyUHTK H EMH JOCTyn, IIOJOXITE yCTPOI CTBO Ha ZADHIOCTEHKY, 4TO6bl KOLOHN OKa3aJIncbHaBepxY. 4TO6bl OTPkBbTbOTcEK, IpOCTO NotraHIne 3a YLUKHO Ha KpBIuKE.
Octopoxho! He nepeBovapuHbAte yCTpoiCTBO BBepx HOrAM. TaKMM O6pa3oM MoXHO NOBpeDITb peYJrTOp rPOMKoCTn.
4 YctaHOBIne B aKcMyJrTOpHbI OTCeK 8 bAtapei pa3Mepa D (LR20) (6aTapei B KOMJIeKT He BXoJrT).
BatapeoDJIKHBt BCTABTbctcorgaCHO MapKIOBKE B aKKMyIaTOPHomOTcKe. BatapeoCnoCbHb oBeCeNHTb DO 30 cacob HneppeBHO pa6OtB pexIMMe BocnpOnBaDEHN.
5 3akpoTe KpbIuKy AkkymyTOpHoro OTecka.
IPIMMEYAHNE. Ytuiu3npyTe NcnoJIb3ObaHHbIe 6aTapeH NaJIeKaUIM 06pa3OM.
IPMMEYAHIE.3aBepuINbPocLyuBAHme My3bIKN C NOMOIOIbO nopTaTMBHOO ayDINOyCTpoCTBa, He 3a6bIABe OTKJIIOHbTe ERO IN akycTmHeCKyU cNTeMy dIra 3KOHOMIM 3JIeKTPo3HeprnI.
UctaHOBka 6aTapeB INpcTeRnBaIOuIcra NylbT dNCTaHcIOHOrO ynpabJIeHHIA
BaTapeI pIpcTeHbAoUceroCnyIbTa InCTaHcIOHOHO ynpaBHeHHA(BXODIT B KOMJIeKT) He yctaHABMbAeTCN3OTOBInTeJEM. Jy aYCTaHOBKn bAtapei BblIOHNTE YkaaAHbHe HNKe JeCTBnA.AKKyMylrTOhBIO TOCek HxOoNTCRHa 3aDHeK KpIbke NylbTa. YoBb OTKpbTb AkkyMylrTOhBIO TOCek, CdBHbTe Ero KpYka3aHHom I3ObpaKeHHo Ha Hm CTpeIK

1 OtkpoTe KpbIuKy AkkymyTOpHoro OTeKa.
KpbIuHa aKKyMylrTOpHOrO oTeKa pacnNoJoxHeHa ha 3aHnei CTOpHO pIbTa nCTaHcTaNIOHOrO ynpabLeHn. BoJIbIm nAIneM cDINHBte KpbIuHa aKKyMylrTOpHOrO oTeKa K 3aXIMy KapaBnHa, 3aTEM IOHNIMITE KpbIuHa.
YctaHOBka n n3BleuHne aadanTePoB dIy iPod n iPhone
2 BctabbTe 6aTaPeIO (BXoIIT B KOMnJIeKT) B depXaTeIb npabuNbHbIM o6pa30M.
Поберьтпларноctь (празиьную орпентацю CTOPOH “+” N“- 6batapeи).
3 3akpoTe KpbIbUkY akKymyTApTOphoro OtceKa..
IPVIMEYAHNE. YtInn3npyTe NcNoJIb3OBAHHbIe 6aTapeH NaJIeKaUIM o6pa3OM.
B KOMJIeKT NocTaBKn akCyTneCkoN CnCTEmbI Altec Lansing Max BxOJaT CbeEMbIe aadTepbl dny COBpeMeHHbIX MOJeE yCTpoCTb iPod n iPhone, PO3BOJIAOUIe YcTAHOBITb INX B DOK-CTAHmIO aKcyTneCko CnCTEmbI. Mope NoaBHeHna HbIke HOBbIX MOJeE iPhone n iPod 6yDyT BvIpyCaTbCn HOBBe aadTepbl. KpOME TORO, MOxHO NCNoB3OBaT b aadTepbl, NOCTaBNIeMbE B KOMJIeKTE C 3TIMN yCTpoCTBaMn I npodabaemble Ha Be6-caTe www.apple.com.
YcTaHOBka aJaTepa
1 BbI6epnte aanTep nIy iPhone nII iPod.
CoxpaenHe npedyctaHOBLeHHbIX paIIOCTaHcN
C nmoiBIO npriCTeNBIAOUIEOA pyIbTa IINCTaHUNHO HOrO ynpabJeHnA aycTneKcoN CStemoi Altec Lansing Mix MoXHo 3anpOpaMMIpOBaTB do 4 FM-padnoctAHm.
1 HactpoTe paHIOCTaHIO, KOTOPyIO XOTnTE coXpAHNTb. BpeKIMe FM hactpoTe HJxHyIO paHIOCTaHIO C nOMOLLbI KOHNOK NnHa akCyTneCKO CNCTe MnnPiPCTeMBAOLcEMCpyJIbTe Dv.
2 CoxpaHnte paIIOCTaHcIIO.
HaXMMTE u ydEpxKmbaiTe KhoKy P1, P2, P3 iIi P4 Ha pNCTeINBaIOEMcM yIbTe DnCTAHMOHORO ynpaBHeHn B TeYeHne HECKoJIbKnx cekyHd. B KaqDom npDeYctAHOBLeHHOM 3HaYeHm MOKHO COxpaHHTb TOnbKO Ody PAADIOCTaHIO.
3ДЯ coxpaHHeNJa dpyrHex paIIOCTaHcIy NOBTOpHTe ONHCaHbIe BblIe DeIcTBnIa.
Bb6op npeducTahOBJenHno paIIOCTaHcN
1 BkJIouHtepexHMFM-npneMHnka.
EcnBbHe HaxoDitecB bpeXime FM,haximaiTe KhoNkY "VICTOCHIK"Ha akcytueckoi CnCTeMe IINI pncTeRnBaIOeMcry nJIte NcTaHOnHO O npaBLeHn DO nOraBLeHn Ha KK-dmcPlee 3haKa FM.
2 Haxmte KhoNky npedyctaHOBnHOrO 3NaeHn (P1, P2, P3 nIi P4) na npicteRbAoUcEmcnyIbTe dntaHIOHOro ynpabLeHn.
Bpeyltate pao 6ydt HactpoeHO na npedyctahOBJIeHHyo paiaoctaHIO.
3 HactpoTe ypoBeHr pOMKOCTN.
Дянсторку уровBNI rpoMkOCTN CNTeMbI NOBOPaUHBAItepeYJIrTOp O.Таке моКHO ИСпOLьТБАВТБ KНОПК "+"И -"Ha npICTeRnBaOuEмСЯпьte DУ.
BbIeKa3aHbIe OrpaHnueHbIe rapaHTmN I MebpI npaBOoN 3aUNTbI YJIbIOTcERdHCTBEHHbIMraPAHTNMMI IN MepaMn npaBOoN 3aUNTbI, KOTOpbMMOxETpaoNoRaTb NOKyPntEIL, ECLNI OHN OOBCHOBaHbI N OBeCneHbI npaBOoN CaHKUeN BCOOTBCTBM C 3AkoHOM.
YTNIM3AUNI CTAPOTO 3NEKTPNCHECKOTO N 3NEKTPOHHORO OBOPYOBAHNI

3TOT CMMBOH Na ⅢdJIINN NII erO ynaKOBKE O3HaAeT, TIO daHHOE ⅢdJIENIE HNEBJIY TNIIN3IPoBAbT, KaK bIyIOBBe OTxObl. Ero cIeDyET 0TEB3TN B COOTBCTByUcHnI pyHKT C6Oba IJpepeBaOtKN 3NeKTPrHeCKORIO N3NeKTPOHNO O6OpyDOnuH.C NOMIoBu npaBbHOBY tYNIN3aCInN ⅢdJIINN Bbl NOMoAte TpeDToBPaTNTb
BO3MOXHbIe HERATVNBHeIO NcJcTeBTHy IaIK OOKYKAAUcEe CpeBbI y3OpOBbIe HENOBA, KOToTbe MOJIIN 6bIbT bIb3BaHbI HeMyCtBbIM UyaJIeHNEM I3dJIeNc C dApYrIMM OTxADOMI. PepeABoCTK MaTEpRnAO IOmOaTe COxPAHITb PnpOIOhBpeCpcBbI. DnyPOnyHMe B0lee NOpOBoH INHPOMaUNI O nepeABoCTKe daHORIO3dJIe CBxKInTe c LokaJIbHbIM OfNCOM B BaUeM RopOe IINI Co CNYkBoY tYtINIAuIN 6blTOBbX OTxODb.
Tervetuloa
International distribution
Radion staller in din forinstallda station.
3 Justera volym.
ASIA/PACIFIC 23/F, Office Tower, Shun Hing Square Diwang Commercial Centre, 5002 Shen Nan Dong Road, Shenzhen, China 518008
Made for iPod means that an electronic accessory has been designed to connect specifically to iPod and has been certified by the developer to meet Apple performance standards.
Works with iPhone" means that an electronic accessory has been designed to connect specifically to iPhone and has been certified by the developer to meet Apple performance standards.
Apple is not responsible for the operation of this device or its compliance with safety and regulatory standards.
Patents pending.
© 2009 Plantronics, Inc. All rights reserved.
ALTEC, ALTEC LANSING, the Altec Lansing logo, the horn design, Mix, and iMT800 are trademarks or registered trademarks of Altec Lansing, a division of Plantronics, Inc.
Plantronics, the logo design and Sound Innovation are trademarks or registered trademarks of Plantronics, Inc.
iPod is a trademark of Apple, Inc., registered in the U.S. and other countries.
iPhone is a trademark of Apple Inc.
All other trademarks appearing herein are the property of their respective owners.
Designed by Altec Lansing in the USA. Made in China.
- Welcome
- Getting Assistance
- International Distribution
- Registering Your Product
- FCC Compliance
- CAUTION
- BATTERIES
- POWER SOURCE
- WARNING
- IMPORTANT SAFETY INSTRUCTIONS
- Contents
- Getting Started
- How to Install the AC Adapter
- How to Install the Speaker Batteries
- Replace the battery door.
- How to Install the Clip-On Remote Battery
- Placing and Removing Adapters for the iPhone and iPod
- How to Place an Adapter
- How to Remove an Adapter
- Speaker Features and Indicators
- Speaker Controls
- Clip-On Remote Features
- Listening to Your iPhone or iPod
- Setting EQ Controls
- Charging Your iPhone or iPod
- Listening to the FM Radio
- How to Recall Preset Stations
- Listening to Additional iPhone, iPod, Non-Docking iPod or Other Audio Devices
- Personalizing the Power-On Message
- Enter the Message Screen Edit Mode.
- Add your personal message.
- Exit the Message Screen Edit Mode.
- How to Delete a Personalized Message
- Clear the message.
- Maintaining Your Speaker System
- Troubleshooting
- ALTEC LANSING ONE-YEAR LIMITED WARRANTY (TWO-YEAR LIMITED WARRANTY IN THE EUROPEAN UNION)
- What Does the Warranty Cover?
- What Is the Period of Coverage?
- What Does the Warranty Not Cover?
- What Will Altec Lansing Do to Correct the Problem?
- How to Get Warranty Service
- How Will State Law Affect Your Rights?
- DISPOSAL OF OLD ELECTRICAL AND ELECTRONIC EQUIPMENT
- Bienvenue
- SOURCE D'ALIMENTATION
- YcTaHOBKa 6aTapei nnHaMnKa
- YctaHOBka n n3BleuHne aadanTePoB dIy iPod n iPhone
- YcTaHOBka aJaTepa
- YTNIM3AUNI CTAPOTO 3NEKTPNCHECKOTO N 3NEKTPOHHORO OBOPYOBAHNI
- Tervetuloa
Brand : ALTEC LANSING
Model : IMT800
Category : Bluetooth speaker