DGB900BCE - Coffee machine CUISINART - Free user manual and instructions
Find the device manual for free DGB900BCE CUISINART in PDF.
| Product type | Coffee maker with built-in grinder |
| Brand | Cuisinart |
| Model | DGB900BCE |
| Capacity | Up to 12 cups |
| Grinder function | Built-in, for coffee beans |
| Aroma setting | 3 levels: light, medium, bold (Strength Control) |
| Programming | Delayed start with clock |
| Auto shut-off | Yes, after cycle completion with audible alert |
| Keep warm | 18/10 stainless steel thermal carafe (up to 4h) |
| Ground coffee function | Yes, with grinder deactivation (Grind Off) |
| Water filter | Removable, replace every 60 uses |
| Permanent filter | Included, washable |
| Body material | Brushed steel |
| Power supply | 220-240 V, 50/60 Hz |
| Power | 1500 W (estimated) |
| Maintenance | Descale every 6 months, clean grinder every 1 to 2 weeks |
| Safety | Auto shut-off if cover open, audible beep, cord should not be coiled |
| Spare parts | Water filter, bean hopper, filter holder, thermal carafe |
| Reparability | Repairs by a professional only |
Frequently Asked Questions - DGB900BCE CUISINART
User questions about DGB900BCE CUISINART
0 question about this device. Answer the ones you know or ask your own.
Ask a new question about this device
Download the instructions for your Coffee machine in PDF format for free! Find your manual DGB900BCE - CUISINART and take your electronic device back in hand. On this page are published all the documents necessary for the use of your device. DGB900BCE by CUISINART.
USER MANUAL DGB900BCE CUISINART
A. Assembly instructions 11
B. Programming 11
C. Operation instructions 12
- Advice from chefs 12
- Questions/Answers 13
- Cleaning and storage 13
- Safety instructions 14
INHALTSVERZEICHNIS
2. CARACTERISTIQUES PRODUIT
You have just purchased the Cuisinart® coffee maker with built-in coffee grinder.
Elegant and contemporary with its brushed stainless steel housing, it was specially designed to respond to all your needs. Whether you like your coffee mild or strong, thanks to the 'strength control' function, from now on you will be able to adjust the intensity of your coffee yourself to meet your desires.
To improve the aroma, the coffee maker has a built-in grinder. The coffee beans are ground just before brewing and so preserve their flavour until the end of the process. The coffee can then be kept warm for many hours in the thermal carafe.
Your machine was also designed to be used with either coffee beans or pre-ground coffee. Thanks to the 'grind off' function, quickly change from one mode to the other depending on your preference.
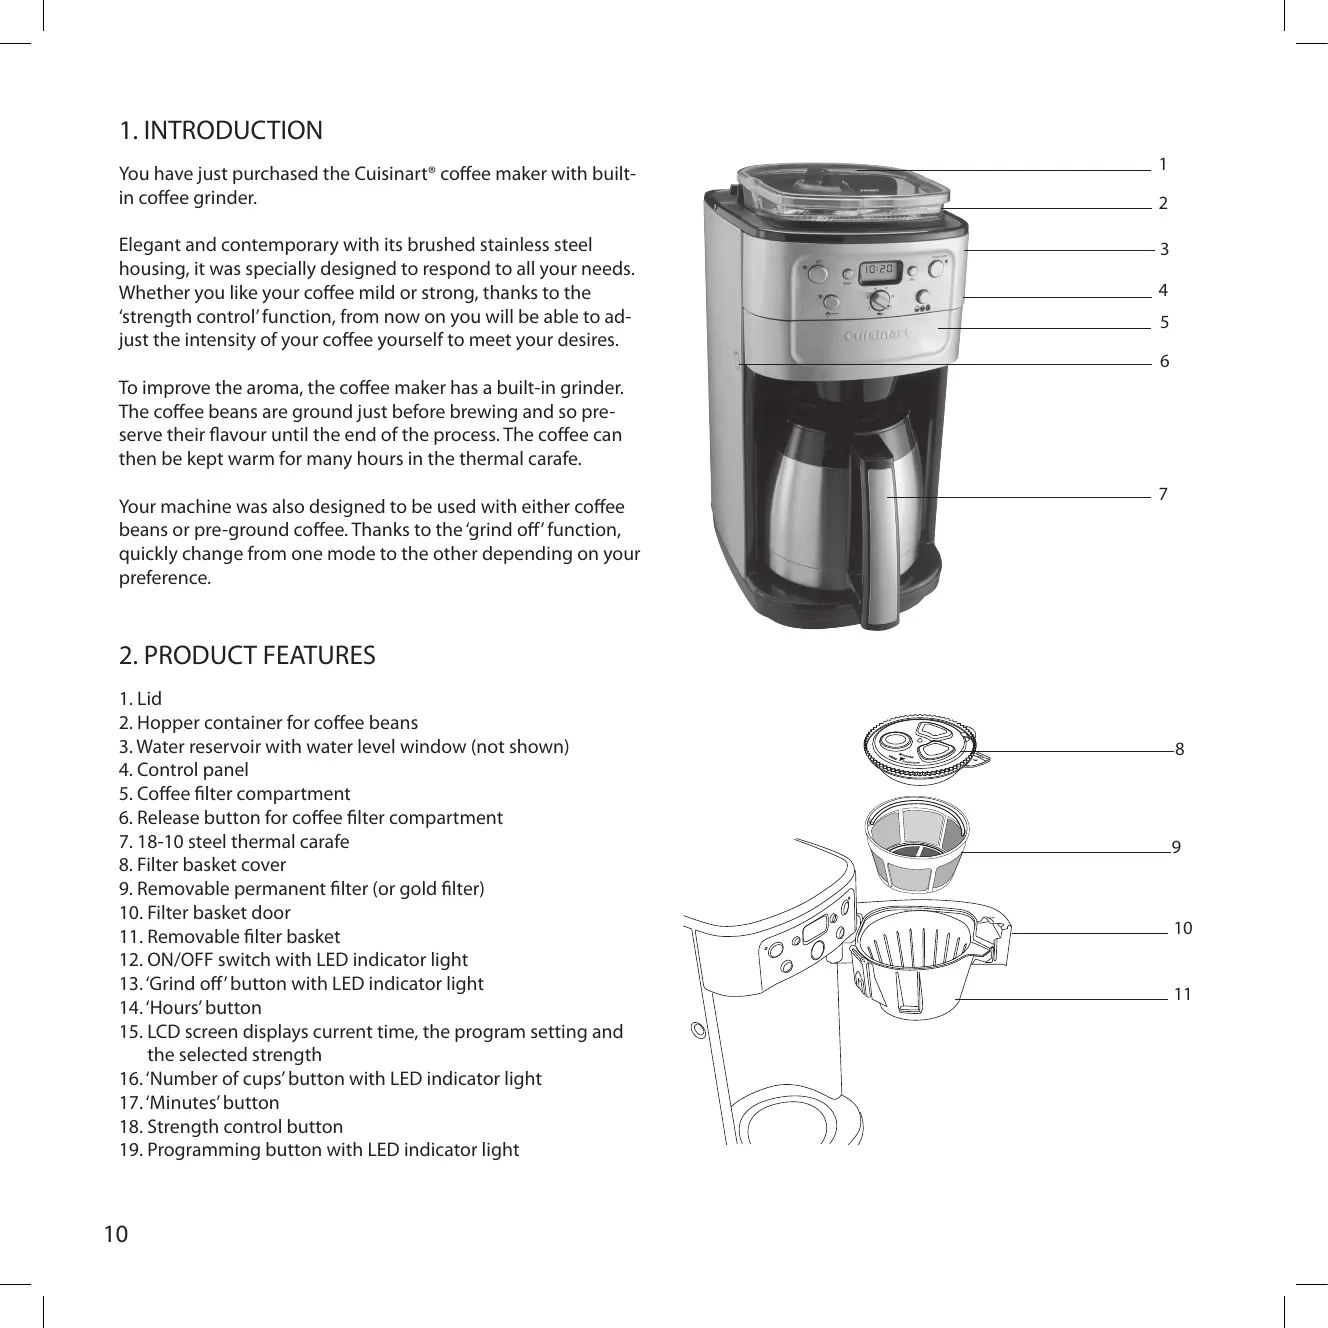
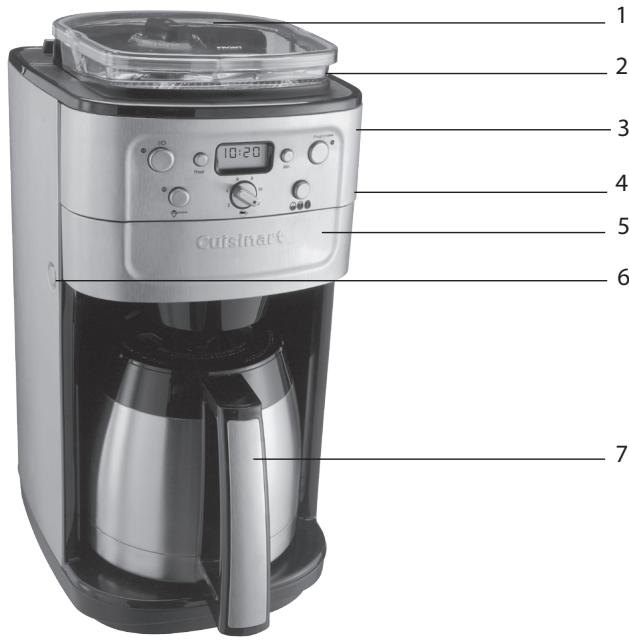
2. PRODUCT FEATURES
- Lid
- Hopper container for coffee beans
- Water reservoir with water level window (not shown)
- Control panel
- Coffee filter compartment
- Release button for coffee filter compartment
- 18-10 steel thermal carafe
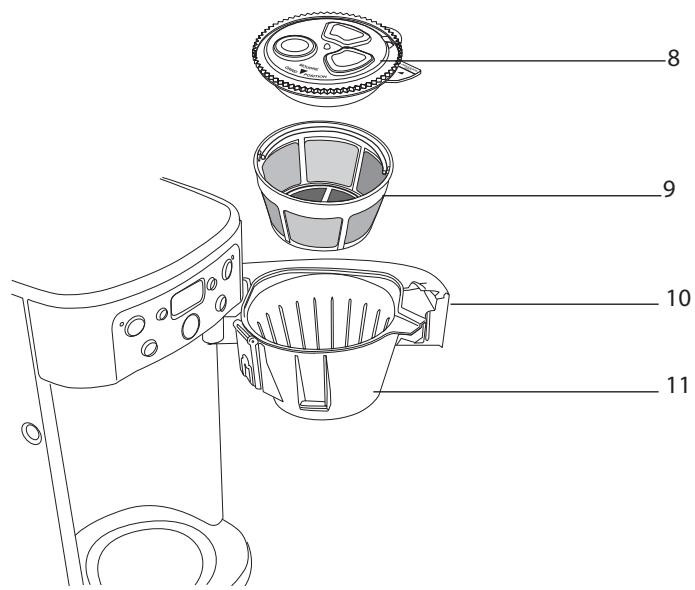
- Filter basket cover
- Removable permanent filter (or gold filter)
- Filter basket door
- Removable filter basket
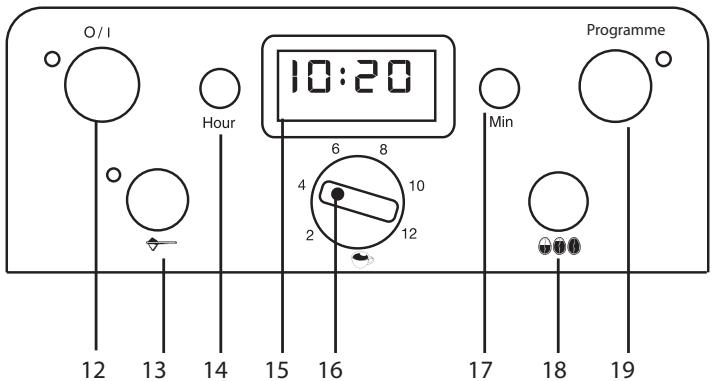
- ON/OFF switch with LED indicator light
- 'Grind off' button with LED indicator light
- 'Hours' button
- LCD screen displays current time, the program setting and the selected strength
- 'Number of cups' button with LED indicator light
- 'Minutes' button
- Strength control button
- Programming button with LED indicator light
3. USE
A. ASSEMBLY INSTRUCTIONS
Before you use the machine for the first time, or when it has not been used for some time, fill the water reservoir with cold water to the maximum level (without coffee or filter), deactivate the coffee grinder (push the 'Grind Off' button), put the carafe in position and run a full cycle.
1. Inserting the water filter
- Remove the filter from the plastic packing and soak in cold water for 15 minutes.
- Rinse the filter under running water for 10 seconds. Then allow the filter to drain completely.
- The filter compartment is to the left of the water reservoir. Open the compartment, pull out the filter basket, insert the filter, slide the filter basket into the bottom of the water reservoir and close.
- We recommend the filter be changed about every 60 uses.
2. Rinsing the carafe
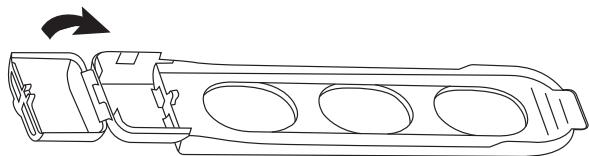
- Remove the coffee pot lid by turning it in the direction indicated.
3. Placing a coffee filter in the filter basket
- Open the filter compartment and insert the permanent filter.
- Then place the lid on top and close the compartment.
CAUTION! The unit can only operate if the coffee grinder covers and the filter basket door are closed firmly. A beep will sound and the unit will stop operating, if it is on, when one of the covers is open or if opened before the end of the cycle. The beep will stop as soon as the cover is closed. To turn the machine on, push the ON button.
B.PROGRAMMING
1. Setting the time
- When the unit is plugged in, the screen will show 12:00.
- Press and hold either the 'Hour' or the 'Min' button until the numbers start to flash.
- Then press the 'Hour' and 'Min' buttons to scroll through the numbers. When the numbers stop flashing, the time has been set.
CAUTION! When you go past the number 12, the letters 'PM' will appear to adjust the time from 12 noon to midnight. When 'PM' is not shown, the time indicated corresponds to the AM hours, from 12 midnight to 12 noon. Always make sure that the time is set according the correct period so that the programming is correct.
2. Programming the start time
- Press and hold the 'PROG' button. The numbers and the indicator light will flash.
- To set the desired start time, press the 'Hour' and 'Min' buttons as described for setting the time. When the numbers stop flashing, the scheduled time is programmed.
CAUTION! You will not be able to program the start time while the coffee machine is running.
C. OPERATION INSTRUCTIONS
CAUTION! When in use, the unit becomes very hot. This is due to the normal operation of your Cuisinart® coffee maker.
1. Selecting the number of cups
- The 'Cup Quantity' selector lets you select the desired number of cups (from 2 to 12).
2. Adding the coffee
Using with coffee beans
- Lift the lid to the coffee grinder.
- Fill the grinder with coffee beans but do not overfill.
- The amount of coffee beans depends on the number of cups selected.
Using with pre-ground coffee
- Open the coffee filter basket, raise the lid and fill with the desired amount of pre-ground coffee. We recommend 1 measure per cup in general. The maximum capacity is 16 scoops of coffee. Do not exceed this maximum capacity to avoid any risk of poor operation or of overflowing.
- Press the 'grind off' button to deactivate the grind function. The indicator light next to the button will light up.
3. Filling the reservoir with water
- Pour the desired amount of cold water into the water reservoir (use the water level indicator on the side of the reservoir).
4. Selecting the intensity of the coffee
This function lets you select the strength of the coffee (mild, medium or strong).
- Press the 'Strength Control' button for the desired strength. The selected intensity will appear on the screen of the digital clock (MILD, MED or STRONG).
5. Turning the machine on
To start it immediately, press the ON button
- To start at a programmed time, press the 'PROG' button. The indicator light will turn on and the screen will indicate the scheduled time as long as the button is held (see also 'programming').
CAUTION! Do not remove the carafe for more than 15 seconds at a time to avoid any possibility of the water overflowing the filter. When the cycle is completed, five beeps will sound indicating that the coffee is ready. The unit will then shut itself off automatically. The thermal carafe will keep the coffee hot for four hours. All the flavour of the coffee is preserved thanks to the hermetically sealed lid. You do not have to remove the lid to pour the coffee.
4. ADVICE FROM THE CHEFS

- You can select a greater amount of coffee beans to grind than the quantity of water selected. Your coffee will be stronger.
- Never reheat coffee that has lost some of its flavour.
- It is recommended, for the coffee maker to operate properly, that it be descaled every six months or so.
- It is best to use a coffee that has been freshly ground when not using the built-in grinder.
5. QUESTIONS/ANSWERS
| What do I do if: | answers |
| The coffee isn’t flowing through? | The carafe and the filter basket are poorly placed. |
| The coffee flows through very slowly? | Descale the coffee maker |
| When I start a cycle, there is a continuous beep? | You have forgotten to replace the rotary coffee filter cover. The hopper container is not properly engaged. |
| My coffee maker does not work? | Check that the unit is properly set up and that it is well connected to the electricity mains. |
6. CLEANING AND STORAGE
- Allow the unit to cool completely and unplug it before cleaning it. Use a sponge with soapy water to clean the outside of the coffee machine, then dry carefully.
- Open the reservoir cover and the filter compartment. Remove the hopper container, the filter basket, its cover and the support.
- Wash the parts as well as the measuring spoon, the carafe and its lid in warm, soapy water, rinse well and dry. Then put them back in the unit.
- All these parts are also dishwasher safe.
- Wipe the parts under the filter basket and under the carafe with a damp cloth.
- Do not wipe the inside of the water reservoir so as not to leave any residue from the cloth or paper.
- Do not use abrasive sponges or products that could damage the coatings.
- We suggest cleaning the hopper and coffee chute every 1-2 weeks depending on frequency of use.
- IMPORTANT: Do not put any water in the unit once the hopper container has been removed as this may cause damage to the appliance.
- The coffee channel cover can be flipped back for easy cleaning of the coffee chute. Push the coffee channel cover tab away from you and lift up.
Use a small brush to remove any ground coffee that remains. Brush grounds
toward you (when facing the unit head-on) and pull the grind chute lever toward you to send grounds through the chute. Be sure the filter basket is in place to catch the grounds.
- NEVER IMMERSE THE BASE OF THE UNIT IN WATER OR ANY OTHER LIQUID.
We recommend cleaning the reservoir for the coffee beans and the chute every one to two weeks depending on how often you use it.
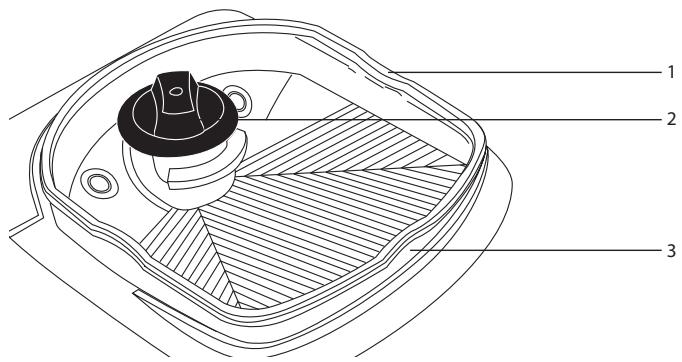
Coffee bean reservoir:
- Reservoir lid
- Unlock button
-
Coffee grain reservoir
-
Remove the lid from the reservoir.
- Turn the unlock button to the left and remove the reservoir from the machine.
- Remove the old coffee beans.
- Wash the reservoir and its lid in warm soapy water and rinse these thoroughly. They can also be washed in the upper rack of the dishwasher.
- Dry the washed pieces well before replacing them on the machine.
NOTE: Never put coffee beans in the machine without having replaced the reservoir.
Grinder
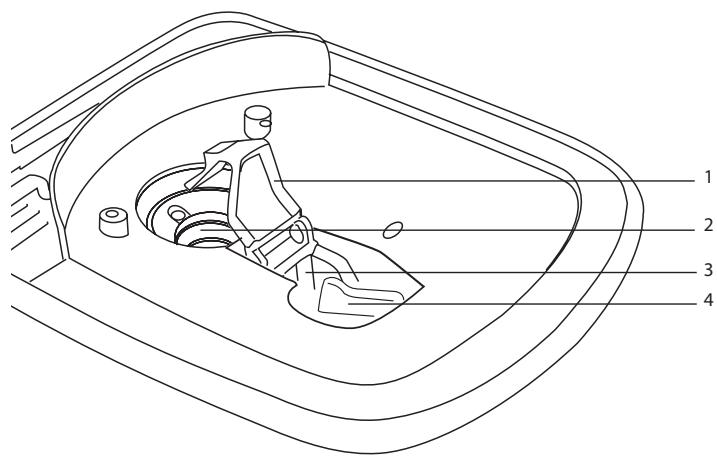
- Trap door
2.Grinder - Chute
-
Flapper opening lever
-
Begin by cleaning the section located under the coffee bean reservoir using a damp cloth.
- Using the brush included in the doser, brush the grinder vigorously.
Chute (passage through which the freshly ground coffee runs)
- Open the trap door by lifting it gently toward the back.
- If you notice a compact ball of ground coffee, you will have to loosen it.
- Push the opening lever to the left to open the flapper located at the bottom of the chute. Remove the excess coffee in the filter. Make sure beforehand that the permanent filter is properly in place for the coffee grounds.
DESCALING
Calcium deposits will form whenever the unit is used. Scale will interfere with the fine mechanics and give the coffee a harsh and bitter taste. This is why your unit should be descaled regularly to guarantee a good cup of coffee. How often you descale depends on how hard the water is and how often you use the coffee maker.
- To descale, dilute 30cl white vinegar in 30cl water, pour this vinegar mixture into the reservoir and run a cycle.
- Then run two full cycles using water (but without coffee) to rinse the circuit.
7. SAFETY INSTRUCTIONS
- CAUTION: the poly bags used for the product or its packaging may be dangerous. To prevent any risk of suffocation, keep these bags out of the reach of babies and children. A bag is not a toy.
- Always use cold water to make coffee. Water that is too warm will irreparably damage your unit.
- Never wind the cord around the unit.
- Do not allow the cord to hang over the work-top, and do not let it touch hot surfaces.
- Do not touch any of the hot surfaces of the unit.
- Do not place the unit on or near a source of heat.
- Always unplug the unit after use or before cleaning. Never leave the unit unattended when it is plugged in. Pull on the plug to unplug, never on the cord.
- This unit is not intended for use by people (adults or children) who lack experience or knowledge of the product or whose disability may cause a danger, unless they have been given instructions beforehand and are adequately supervised.
- Children should be supervised to ensure that they do not use the unit as a toy.
- Never use the unit if it has fallen or appears to be damaged.
- Stop using the unit immediately if the cord is damaged. If the power cord is damaged, it must be replaced by a professional.
- The user must not attempt to repair the unit.
- Use of any accessories not recommended or sold by Cuisinart® could result in fire, electrical shock and risk of injury.
- After use, do not wind the cord around the unit as this may damage it. Roll the cord up loosely and allow it to rest next to the unit.
- This appliance meets the essential requirements of Directives 04/108/EEC (electromagnetic compatibility) and 06/95/EEC (safety of domestic electrical equipment), as amended by Directive 93/68/EEC (CE marking).
- Use this unit only for making coffee and according to the instructions in this manual.
- Use the coffee grinder for coffee beans only.
- Do not use outdoors.
- For domestic use only.
ELECTRICAL AND ELECTRONIC EQUIPMENT AT THE END OF LIFE.
In everybody's interest and to participate actively in protecting the environment:
- Do not discard these products with your household waste.
- Use return and collection systems available in your country.
Some materials can in this way be recycled or recovered.