
PV 6 - Mixer PEAVEY - Free user manual and instructions
Find the device manual for free PV 6 PEAVEY in PDF.



| Product type | Compact mixing console |
| Brand | PEAVEY |
| Model | PV 6 |
| Number of channels | 4 mono channels + 2 stereo channels |
| Microphone inputs | 4 balanced XLR inputs (channels 1-4) |
| Line inputs | 4 balanced 6.35 mm TRS jack inputs (channels 1-4) |
| Stereo inputs | 2 pairs of 6.35 mm jack inputs (channels 3-4 in stereo mode) |
| Tape inputs | 2 RCA inputs (stereo) |
| Main outputs | 2 balanced 6.35 mm TRS jack outputs (L/R) |
| Headphone output | 1 6.35 mm TRS jack output |
| Effects send output | 1 balanced 6.35 mm TRS jack output |
| Effects return | 2 balanced 6.35 mm TRS jack inputs |
| Equalization | 3-band on mono channels (treble, mid, bass), 2-band on stereo channels |
| Phantom power | 48 V switchable |
| Low-cut filter | 80 Hz switchable |
| LED indicators | Level LED (4-segment) and Clip LED per channel |
| Dimensions (W x D x H) | 19.18 x 24.68 x 6.86 cm |
| Weight | 1.77 kg (with power adapter) |
| Power supply | 16.5 VAC 60 Hz, 8 W |
| Frequency response | 14 Hz – 25 kHz (+0 dB / -1 dB) |
| Harmonic distortion | < 0.01% (20 Hz – 20 kHz) |
| Signal-to-noise ratio | 102 dB (faders at minimum) |
| Cleaning | Use a dry, soft cloth; do not use solvents |
| Spare parts and repairability | Have maintenance and repairs carried out by a Peavey authorized technician |
| Safety instructions | Do not expose to rain or moisture; do not open the housing |
Frequently Asked Questions - PV 6 PEAVEY
User questions about PV 6 PEAVEY
0 question about this device. Answer the ones you know or ask your own.
Ask a new question about this device
Download the instructions for your Mixer in PDF format for free! Find your manual PV 6 - PEAVEY and take your electronic device back in hand. On this page are published all the documents necessary for the use of your device. PV 6 by PEAVEY.
USER MANUAL PV 6 PEAVEY
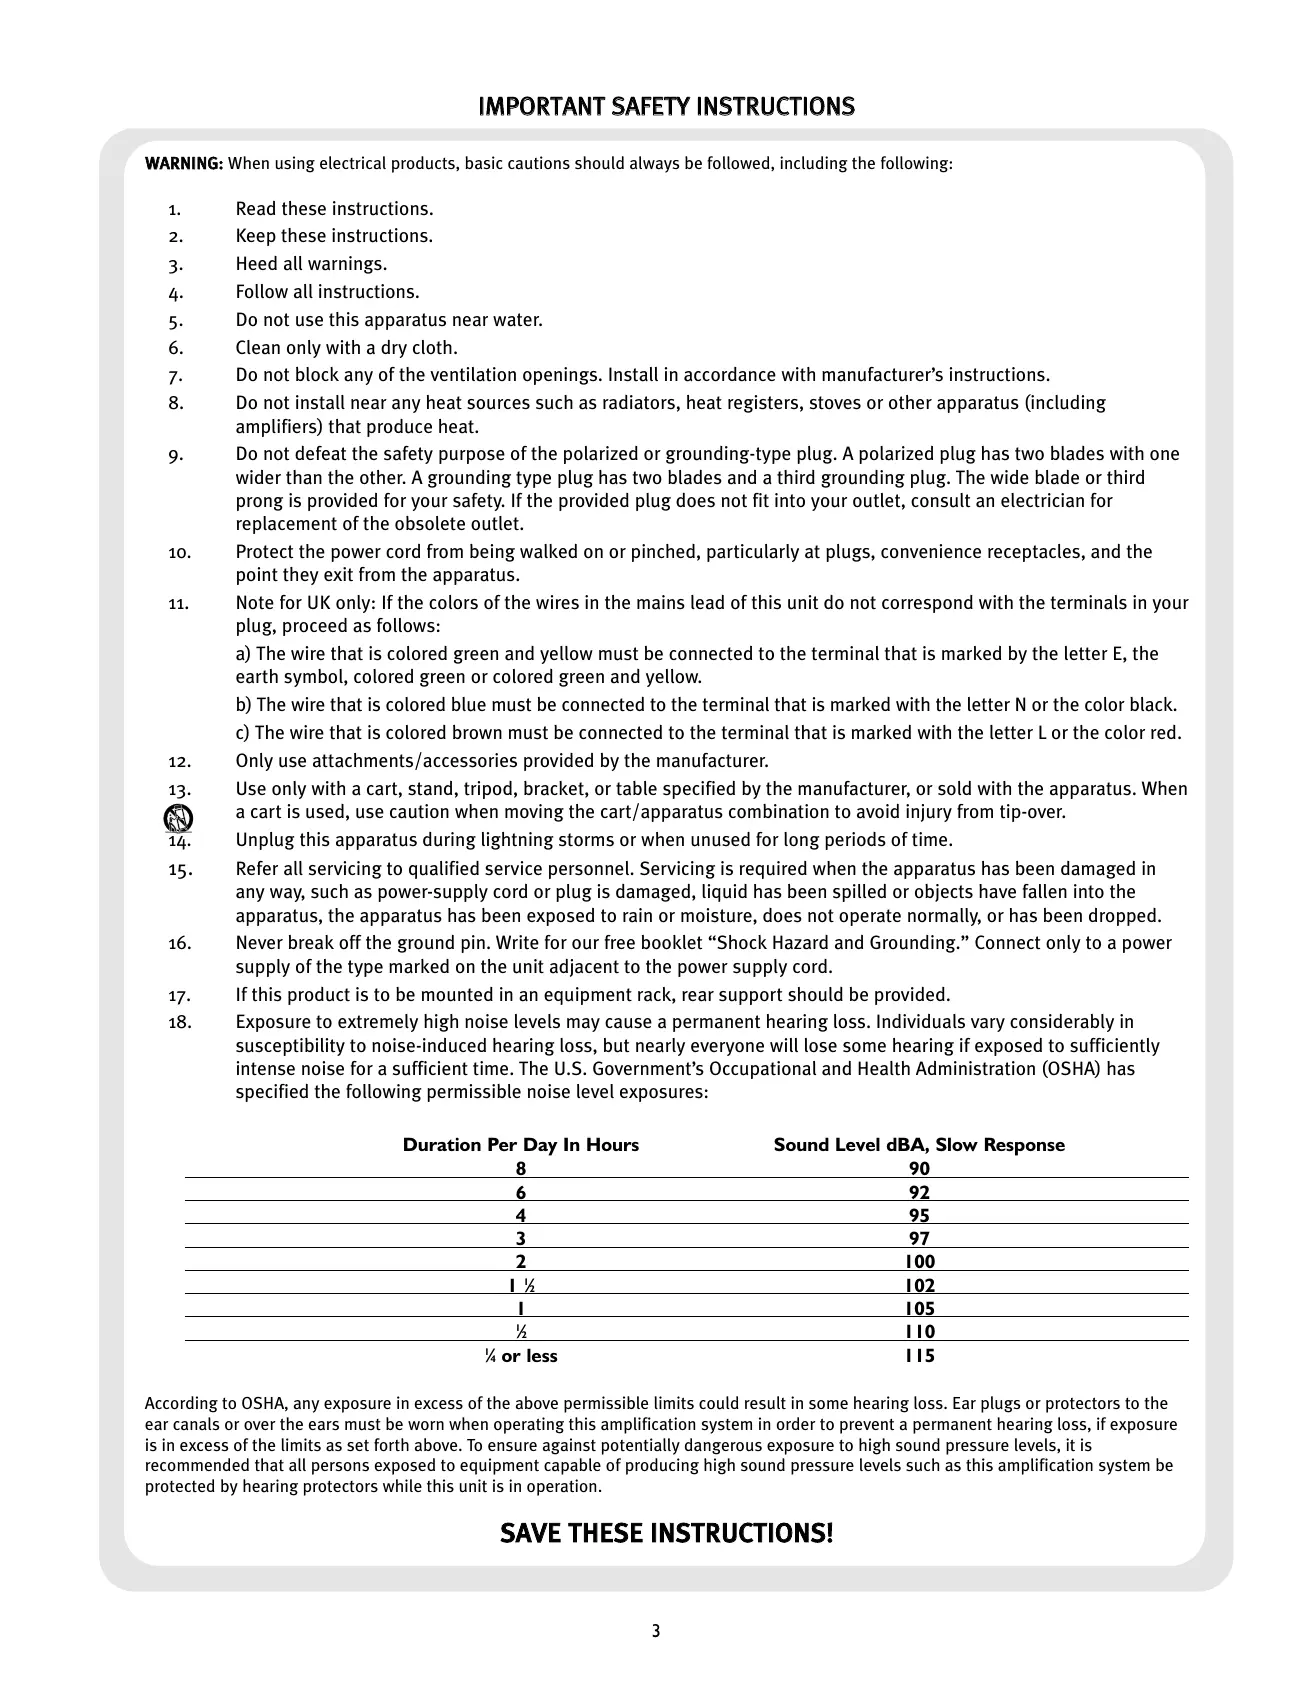
Intended to alert the user to the presence of uninsulated "dangerous voltage" within the product's enclosure that may be of sufficient magnitude to constitute a risk of electric shock to persons.

Intended to alert the user of the presence of important operating and maintenance (servicing) instructions in the literature accompanying the product.
CAUTION: Risk of electrical shock — DO NOT OPEN!
CAUTION: To reduce the risk of electric shock, do not remove cover. No user serviceable parts inside.
Refer servicing to qualified service personnel.
WARNING: To prevent electrical shock or fire hazard, do not expose this appliance to rain or moisture.
Before using this appliance, read the operating guide for further warnings.

WARNING: When using electrical products, basic cautions should always be followed, including the following:
- Read these instructions.
- Keep these instructions.
- Heed all warnings.
- Follow all instructions.
- Do not use this apparatus near water.
- Clean only with a dry cloth.
- Do not block any of the ventilation openings. Install in accordance with manufacturer's instructions.
- Do not install near any heat sources such as radiators, heat registers, stoves or other apparatus (including amplifiers) that produce heat.
- Do not defeat the safety purpose of the polarized or grounding-type plug. A polarized plug has two blades with one wider than the other. A grounding type plug has two blades and a third grounding plug. The wide blade or third prong is provided for your safety. If the provided plug does not fit into your outlet, consult an electrician for replacement of the obsolete outlet.
- Protect the power cord from being walked on or pinched, particularly at plugs, convenience receptacles, and the point they exit from the apparatus.
- Note for UK only: If the colors of the wires in the mains lead of this unit do not correspond with the terminals in your plug, proceed as follows:
a) The wire that is colored green and yellow must be connected to the terminal that is marked by the letter E, the earth symbol, colored green or colored green and yellow.
b) The wire that is colored blue must be connected to the terminal that is marked with the letter N or the color black.
c) The wire that is colored brown must be connected to the terminal that is marked with the letter L or the color red.
- Only use attachments/accessories provided by the manufacturer.
- Use only with a cart, stand, tripod, bracket, or table specified by the manufacturer, or sold with the apparatus. When a cart is used, use caution when moving the cart/apparatus combination to avoid injury from tip-over.
- Unplug this apparatus during lightning storms or when unused for long periods of time.
- Refer all servicing to qualified service personnel. Servicing is required when the apparatus has been damaged in any way, such as power-supply cord or plug is damaged, liquid has been spilled or objects have fallen into the apparatus, the apparatus has been exposed to rain or moisture, does not operate normally, or has been dropped.
- Never break off the ground pin. Write for our free booklet "Shock Hazard and Grounding." Connect only to a power supply of the type marked on the unit adjacent to the power supply cord.
- If this product is to be mounted in an equipment rack, rear support should be provided.
- Exposure to extremely high noise levels may cause a permanent hearing loss. Individuals vary considerably in susceptibility to noise-induced hearing loss, but nearly everyone will lose some hearing if exposed to sufficiently intense noise for a sufficient time. The U.S. Government's Occupational and Health Administration (OSHA) has specified the following permissible noise level exposures:
| Duration Per Day In Hours | Sound Level dBA, Slow Response |
| 8 | 90 |
| 6 | 92 |
| 4 | 95 |
| 3 | 97 |
| 2 | 100 |
| 1 1/2 | 102 |
| 1 | 105 |
| 1/2 | 110 |
| 1/4 or less | 115 |
According to OSHA, any exposure in excess of the above permissible limits could result in some hearing loss. Ear plugs or protectors to the ear canals or over the ears must be worn when operating this amplification system in order to prevent a permanent hearing loss, if exposure is in excess of the limits as set forth above. To ensure against potentially dangerous exposure to high sound pressure levels, it is recommended that all persons exposed to equipment capable of producing high sound pressure levels such as this amplification system be protected by hearing protectors while this unit is in operation.
SAVE THESE INSTRUCTIONS!
ENGLISH

Compact Mixer
Description
Congratulations on purchasing the Peavey PV6 compact mixer. The PV6 is a studio-quality mixing console designed to meet diverse needs while only occupying a small space. This is the perfect console for small venue performances or home recording environments.
Please read this guide carefully to ensure your personal safety as well as the safety of your equipment.
Features
XLR Mic inputs on all four channels
Two Stereo channels with 14 inputs
Three-band EQ on mono channels
Two-band EQ on stereo channels
Clip LEDs that thoroughly monitor clipping
48V phantom power switch
Effects send on every channel with stereo return
Zero latency record monitoring capabilities
Control room out with level control
Contour control switch
80 Hz low cut switch
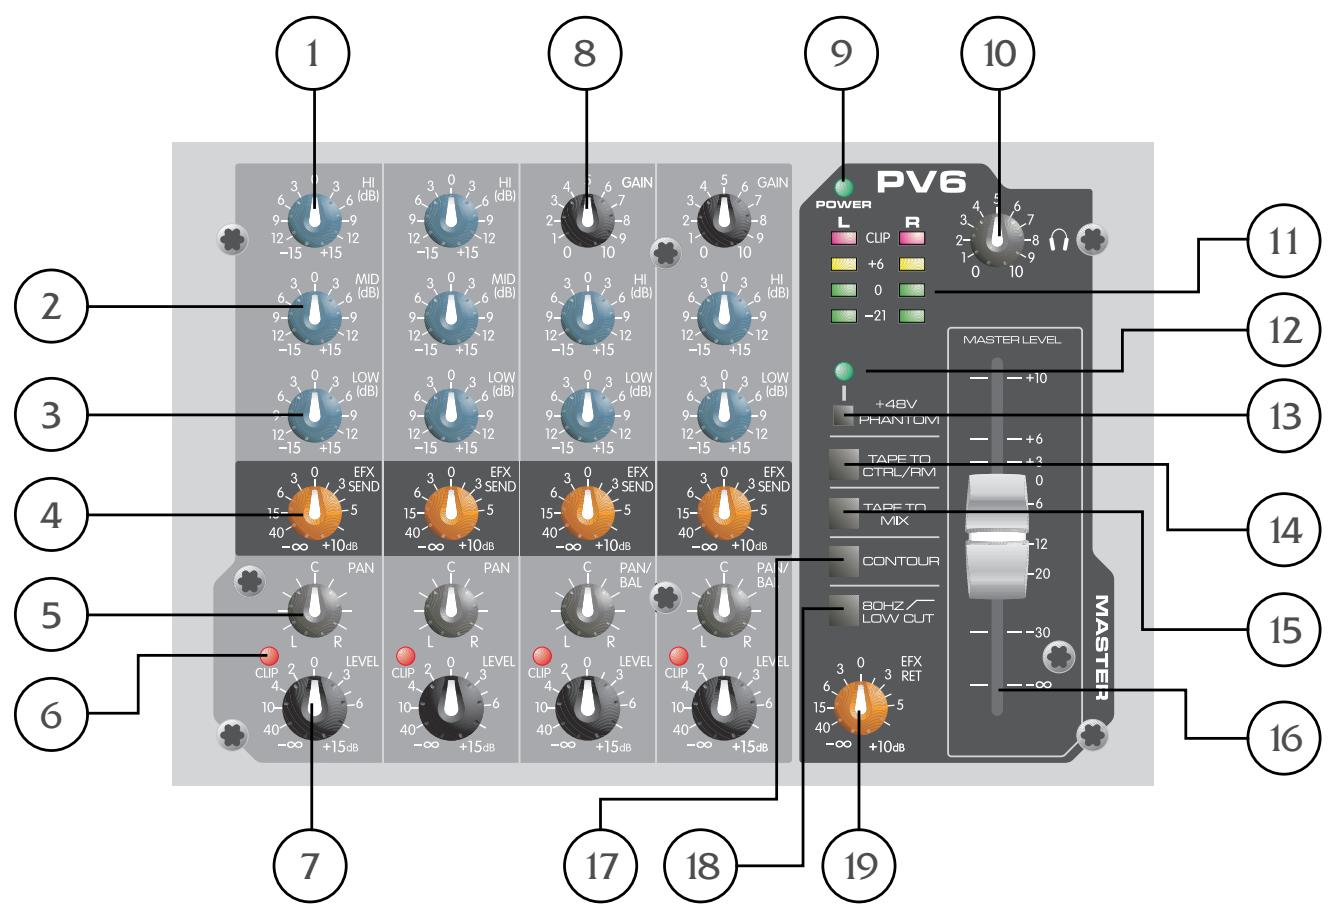
Hi EQ (I)
An active tone control (shelving type: ± 15 dB) that varies the level of the high frequency range.
Mid EQ (2)
An active tone control (shelving type: ± 15 dB) that varies the mid frequency range.
Low EQ (3)
An active tone control (shelving type: ± 15 dB) that varies the level of the low frequency range.
Caution: Excessive low frequency boost causes greater power consumption and increases the possibility of speaker damage.
EFX Send (4)
This adjusts the level of the channel signal added to the effects mix. The effects send signal is taken after the channel level controls (7) so that adjustments made to the level control will also affect the send level.
Pan (5)
This knob controls the placement of the signal in the stereo field. When rotated completely counterclockwise, the signal is present only on the left channel; when rotated completely clockwise, only in the right channel.
Clip LED (6)
This light normally indicates that the channel signal level is nearing the overload point. The clip indicator circuit monitors the signal at many points in the channel to ensure that it catches all instances of clipping. It illuminates at +19 dBu and warns that the gain or EQ boost should be reduced. When it light,s roughly 3 dB of headroom remains.

Level (7)
This is the channel output level control. The optimum setting is the 0 (unity gain) position.
Gain (8)
This control establishes the nominal operating level for the channel. The input gain can be adjusted over a wide range to compensate for soft voices or very loud drums. To maximize the signal-to-noise ratio, the gain should be set to the proper level with the channel level control (7) set to 0. If the clip LED comes on and remains lit, try reducing the gain.
Power LED (9)
This LED indicates that AC power is supplied to the unit, the power switch is on and the unit is functioning properly.
Headphone Level (10)
This knob sets the headphone and control room output level. To avoid damage to your hearing, make sure to turn the dial fully counterclockwise before using headphones. Slowly turn the knob clockwise until a comfortable listening level is set. Normally, the signal in the headphones is the Left/Right signal. If the Tape to Control Room (14) is engaged, the tape signal is also included.
LED Meters (II)
Two four-segment LED arrays are provided to monitor the levels of the main Left/Right outputs. These meters range from -21 dB to +19 dB. A reading of 0 db on the meter corresponds to +4 dBu at the outputs.
Phantom Power LED (12)
This LED lights when the Phantom Power Switch (13) has been engaged.
Phantom Power Switch (13)
Applies +48 VDC Voltage to the input XLR connectors to power microphones requiring phantom power.
If phantom power is used, do not connect unbalanced dynamic microphones or other devices to the XLR inputs that cannot handle this Voltage. The Phantom Power LED (12) indicates when phantom power is on.
Tape To Control Room (14)
Depressing this switch adds the tape return to the Control Room and Headphone Outputs (24) for zero latency monitoring.
Tape to Mix (15)
Depressing this switch routes the signal from the Tape Inputs to the Main Outputs (27).
Master Level Fader (16)
The Master Fader controls the level sent to the main Left/Right outputs. Best results are obtained when this control is set near the 0 point.
Contour Switch (17)
Engaging this switch enhances the signal by adding both bass and treble frequencies. This is especially effective at lower volumes or for tape/CD playback.
80 Hz Low Cut (18)
The Low Cut filter has a corner frequency of 80Hz . When engaged, it can improve clarity by removing low frequencies that can make a mix sound muddy. This feature is especially useful when playing outside on a windy day or on a hollow, noisy stage. These kinds of ambient noises can rob your sound system of power. Engaging this switch removes those frequencies from the system and restores power to where it's needed.
EFX/Return (19)
The EFX/Return Level Control adjusts the level sent to the Left/Right main bus from the return inputs.

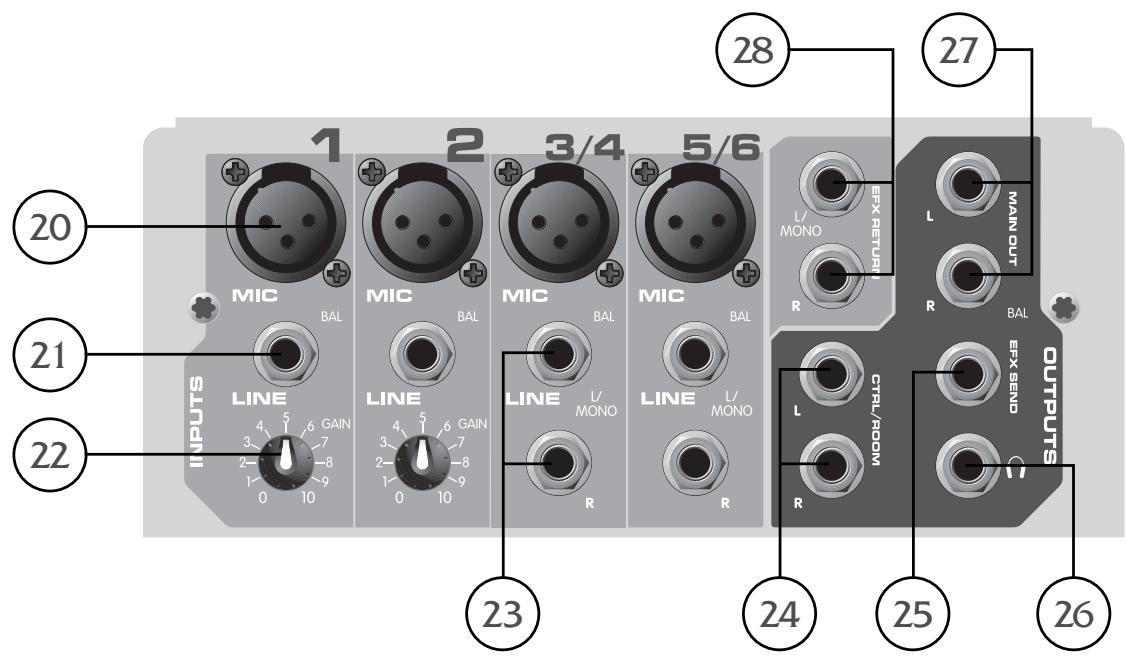
Mic (XLR) Inputs (20)
XLR balanced inputs optimized for a microphone or other low impedance source. Pin 2 is the positive input. Because of the wide range of gain adjustment, signal levels up to +14 dBu can be accommodated.
Line (1 / 4) Inputs (21)
14 " balanced (TRS) 10k Ohm impedance input. The tip is the positive input and should be used for unbalanced inputs. It has 20dB less gain than the XLR input and does not have phantom power available. The Mic and Line inputs should not be used simultaneously.
Gain (Channels I & 2) (22)
This control establishes the nominal operating level for the channel. The input gain can be adjusted over a wide range to compensate for soft voices or very loud drums. To maximize the signal-to-noise ratio, the gain should be set to the proper level with the channel level control (7) set to 0. If the Clip LED comes on and remains lit, try reducing the gain.
Stereo Inputs (23)
Channels 3 and 4 feature stereo inputs via 14 inputs and mono XLR inputs. When the 14 line inputs are in use, the XLR mic input is muted to prevent unwanted noise.

Control Room Outputs (24)
The Control Room Outputs feature two 14 TRS Z-balanced jacks. These outputs can be used with Tip, Ring Sleeve (TRS) balanced or Tip Sleeve (TS) unbalanced connectors. The Control Room Output Level is adjusted with the Headphone Level Control (10).
EFX Send (25)
The EFX Send features a 14 TRS Z-balanced jack in the master section. These outputs can be used with Tip, Ring Sleeve (TRS) balanced or Tip Sleeve (TS) unbalanced connectors. The EFX mix is determined by the amount of signal being sent to the EFX bus in each channel.
Headphone Output (26)
The Headphone Output is a 14 TRS (tip = left; ring = right; sleeve = ground). The signal sent to this output is normally the Left/Right mix. When the Tape to Control Room switch is engaged, the tape input signal is added to the Left/Right mix and can be monitored in the headphones.
Left/Right Outputs (27)
The Left/Right Outputs feature two 14 TRS Z-balanced jacks. These outputs can be used with Tip, Ring, Sleeve (TRS) balanced or Tip, Sleeve (TS) unbalanced connectors.
EFX Return (28)
The EFX Return inputs (Left/Mono, Right) feature two 14 TRS Z-balanced jacks. These outputs can be used with Tip, Ring, Sleeve (TRS) balanced or Tip, Sleeve (TS) unbalanced connectors. The EFX Return is controlled via the EFX/Return Level Control (19).
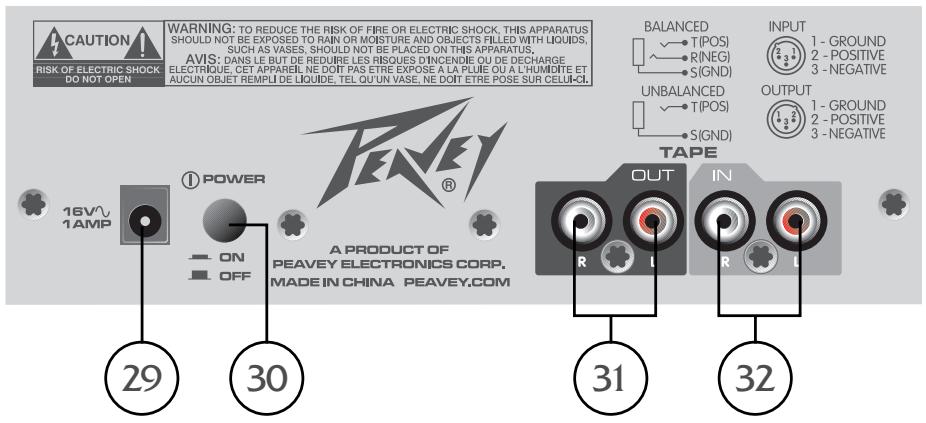
Power Adapter Input (29)
Use to connect the included power supply. Be sure the power supply is connected to the PV®6 before connecting to a power source. Use 16 VAC I A adapter only.
Power Switch (30)
Depressing the power switch applies power to the unit.
Tape In/Out (32 & 31)
The tape input jacks are designed to accommodate tape, CD or computer sound card output levels. The out level is +4 dBu for connection to a recorder or sound card input. The tape inputs can be used as an additional stereo input by engaging the Tape to Main Mix switch (15). The tape input can also be used to monitor the recorder/sound card output without the risk of feedback.

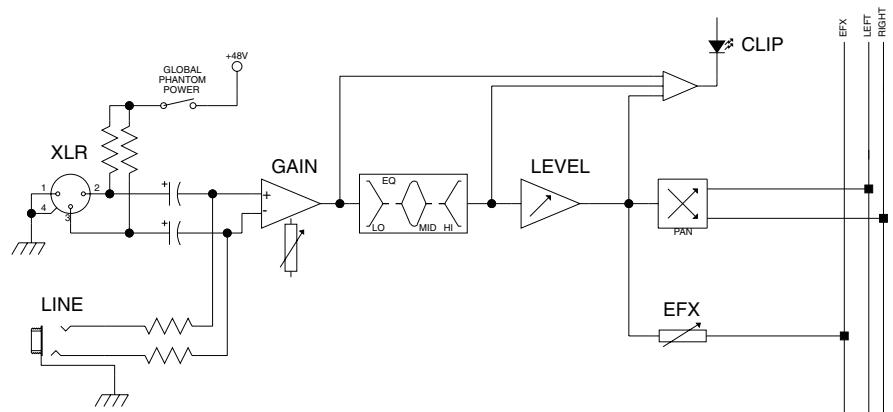
MONO INPUT
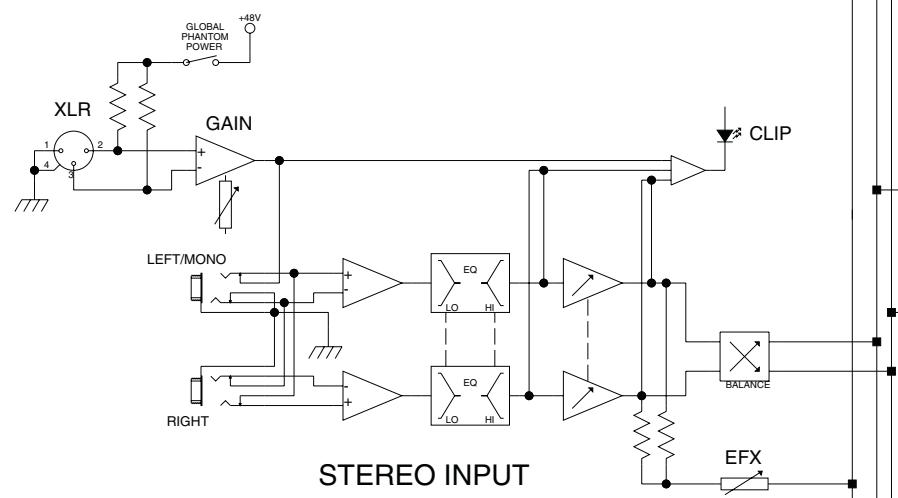
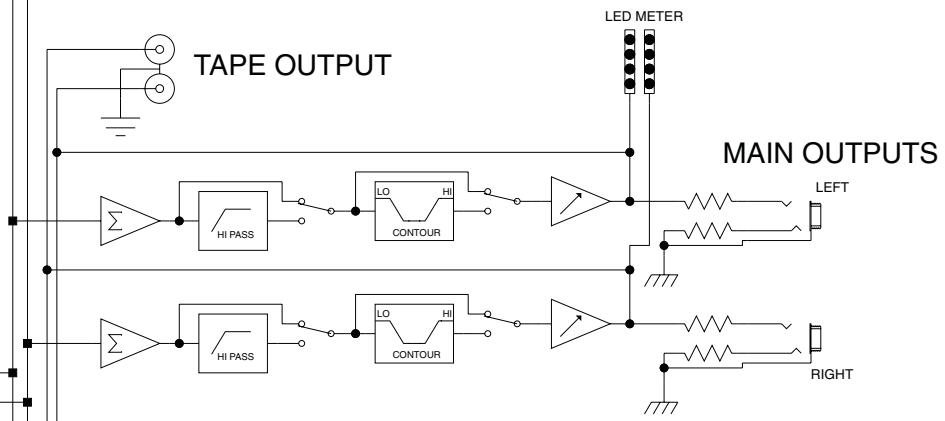
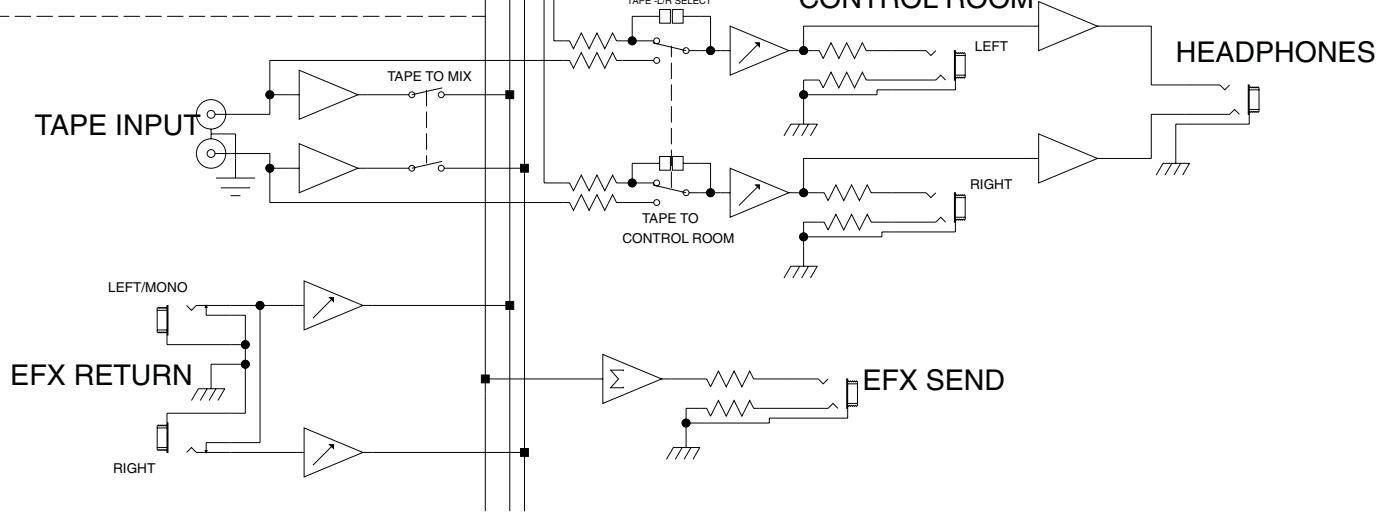
PV®6 Compact Console
SPECIFICATIONS
Inputs
| Function | Input Z (ohms min) | Input Gain Setting | Input Levels | Bal/Unbal | Connector | ||
| Min** | Nominal* | Max | |||||
| Microphone (150 ohms) | 2.2k | Max Gain (60 dB) | -83 dBu | -56 dBu | -38 dBu | Bal | XLR Pin 1 Gnd Pin 2 (+), Pin 3 (-1) |
| Min Gain (9 dB) | -31 dBu | -5 dBu | +13 dBu | ||||
| Line (10k ohms) | 10k | Max Gain (40 dB) | -63 dBu | -36 dBu | -18 dBu | Bal | ¼"TRS; Tip (+), Ring (-), Sleeve Ground |
| Min Gain (-10 dB) | -12 dBu | +14 dBu | +32 dBu | ||||
| Stereo Line Input | 10k | Max Gain (30 dB) | -26 dBu | +4 dBu | +22 dBu | Unbal | ¼"TRS; Tip (+), Sleeve Ground |
| Aux Returns | 10k | N/A (0 dB) | -17 dBu | +4 dBu | +22 dBu | Unbal | ¼"TRS; Tip (+), Sleeve Ground |
| Tape | 10k | N/A (10 dB) | -17 dBu | -10 dBV | +12 dBu | Unbal | RCA Phone |
0dBu = 0.775V (RMS)
* Min Input Level (sensitivity) is the smallest signal that will produce nominal output (+4 dBu) with channel and master faders set for maximum gain.
Nominal settings are defined as all controls set at 0 dB (or 50% rotation for rotary pots) except the gain adjustment pot which is as specified.
Outputs
| Function | Min Load Z (ohms) | Output Level | Bal/Unbal | Connector | |
| Nominal | Max | ||||
| Main Left/Right | 600 | +4 dBu | +22 dBu | Bal | 1⁄4" TRS: Tip (+); Ring (-); Sleeve Ground |
| Effects Sends | 600 | +4 dBu | +22 dBu | Bal | 1⁄4" TRS; Tip (+), Sleeve Ground |
| Headphone | 8 | +4 dBu (no load) | +22 dBu | Unbal | 1⁄4" TRS; Tip Left, Ring Right, Sleeve Ground |
| Tape | 2.2 k | +4 dBu | +22 dBu | Unbal | RCA Phone |
0 dBu = 0.775 V (RMS)
Gain
Mic Input Gain Adjustment Range: 10 dB to 60 dB
Mic Input to Left/Right Balance Output 87 dB (max gain)
Line Input Gain Adjustment Range: -10 dB to 40 dB
Line Input to Left/Right Balance Output 67 dB (max gain)
Stereo Line Input Gain Adjustment Range: 10 dB
Stereo Line Input to Left/Right Output 28 dB (max gain)
Aux Return to Left/Right Balance Output 21 dB (max gain)
Frequency Response
Mic Input to Left/Right Output
14 Hz to 25 kHz +0 dB/-1 dB
Total Harmonic Distortion
<0.01% 20 Hz to 20 kHz Mic to Left/Right Output (10 Hz to 80 kHz BW)
<0.005% Typical
Hum and Noise
| Output | Residual Noise | S/N Ratio (ref. +4 dBu) | Test Conditions |
| Master Left/Right | -98 dBu | 102 dB | Master Fader Down, Channel Levels Down |
| -90 dBu | 94 dB | Master Fader Nominal, Channel Levels Down | |
| -84 dBu | 90 dB | All controls nominal, mic gain minimum | |
| Effects Sends | -96 dBu | 100 dB | All controls off |
| -84 dBu | 88 dB | All channel sends nominal |
(Hum and noise measurements: 22Hz to 22kHz BW)
Equivalent Input Noise (EIN)
-129 dBu (input terminated with 150 ohms)
Crosstalk
80 dB Adjacent Input Channels (1 kHz)
75 dB Left to Right Outputs (1 kHz)
Common Mode Rejection Ratio (Mic Input)
50 dB minimum (20 Hz to 20 kHz)
70 dB typical @ 1 kHz
Meters
4-segment, peak reading (0dB = +4dBu)
Signal/Overload Indicators
Red LED lights 3 dB below clipping
Dimensions
7.55" (19.18 cm) wide x 9.717" (24.68 cm) deep x 2.7" (6.86 cm) high
Weight
Without power supply: 3.9 lbs (1.77 kg)
With power supply: 5.1 lbs (2.31 kg)
Power Requirements
Domestic: 16.5 VAC 60 Hz; 8 watts nominal
Beschreibung
Headphone-Pegel (10)
Phantomspeisung-LED (12)
Headphone Level (10)
Phantom Power LED (I2)
Gain (Channels I & 2) (22)
Headphone Output (26)
What This Warranty Covers
Your Peavey Warranty covers defects in material and workmanship in Peavey products purchased and serviced in the U.S.A. and Canada.
What This Warranty Does Not Cover
The Warranty does not cover: (1) damage caused by accident, misuse, abuse, improper installation or operation, rental, product modification or neglect; (2) damage occurring during shipment; (3) damage caused by repair or service performed by persons not authorized by Peavey; (4) products on which the serial number has been altered, defaced or removed; (5) products not purchased from an Authorized Peavey Dealer.
Who This Warranty Protects
This Warranty protects only the original retail purchaser of the product.
How Long This Warranty Lasts
The Warranty begins on the date of purchase by the original retail purchaser. The duration of the Warranty is as follows:
| Product Category | Duration |
| Guitars/Basses, Amplifiers, Pre-Amplifiers, Mixers, Electronic Crossovers and Equalizers | 2 years * (+ 3 years) |
| Drums | 2 years * (+ 1 year) |
| Enclosures | 3 years * (+ 2 years) |
| Digital Effect Devices and Keyboard and MIDI Controllers | 1 year * (+ 1 year) |
| Microphones | 2 years |
| Speaker Components (incl. speakers, baskets, drivers, diaphragm replacement kits and passive crossovers) and all Accessories | 1 year |
| Tubes and Meters | 90 days |
[Denotes additional warranty period applicable if optional Warranty Registration Card is completed and returned to Peavey by original retail purchaser within 90 days of purchase.]
What Peavey Will Do
We will repair or replace (at Peavey's discretion) products covered by warranty at no charge for labor or materials. If the product or component must be shipped to Peavey for warranty service, the consumer must pay initial shipping charges. If the repairs are covered by warranty, Peavey will pay the return shipping charges.
How To Get Warranty Service
(a) Take the defective item and your sales receipt or other proof of date of purchase to your Authorized Peavey Dealer or Authorized Peavey Service Center. OR
(2) Ship the defective item, prepaid, to Peavey Electronics Corporation, International Service Center, 412 Highway 11 & 80 East, Meridian, MS 39301 or Peavey Canada Ltd., 95 Shields Court, Markham, Ontario, Canada L3R 9T5. Include a detailed description of the problem, together with a copy of your sales receipt or other proof of date of purchase as evidence of warranty coverage. Also provide a complete return address.
Limitation of Implied Warranties
ANY IMPLIED WARRANTY, INCLUDING WARRANTY OF MERCHANTABILITY AND FITNESS FOR A PARTICULAR PURPOSE, ARE LIMITED IN DURATION TO THE LENGTH OF THIS WARRANTY.
Some states do not allow limitations on how long an implied warranty lasts, so the above limitation may not apply to you.
Exclusions of Damages
PEAVEY'S LIABILITY FOR ANY DEFECTIVE PRODUCT IS LIMITED TO THE REPAIR OR REPLACEMENT OF THE PRODUCT, AT PEAVEY'S OPTION. IF WE ELECT TO REPLACE THE PRODUCT, THE REPLACEMENT MAY BE A RECONDITIONED UNIT. PEAVEY SHALL NOT BE LIABLE FOR DAMAGES BASED ON INCONVENIENCE, LOSS OF USE, LOST PROFITS, LOST SAVINGS, DAMAGE TO ANY OTHER EQUIPMENT OR OTHER ITEMS AT THE SITE OF USE, OR ANY OTHER DAMAGES WHETHER INCIDENTAL, CONSEQUENTIAL OR OTHERWISE, EVEN IF PEAVEY HAS BEEN ADVISED OF THE POSSIBILITY OF SUCH DAMAGES.
Some states do not allow the exclusion or limitation of incidental or consequential damages, so the above limitation or exclusion may not apply to you.
This Warranty gives you specific legal rights, and you may also have other rights which vary from state to state.
If you have any questions about this warranty or service received or if you need assistance in locating an Authorized Service Center, please contact the Peavey International Service Center at (601) 483-5365 / Peavey Canada Ltd. at (905) 475-2578.
FEATURES AND SPECIFICATIONS SUBJECT TO CHANGE WITHOUT NOTICE.

Features and specifications subject to change without notice.
Peavey Electronics Corporation • 711 A Street • Meridian • MS • 39301
(601) 483-5365 • FAX (601) 486-1278 • www.peavey.com


- SAVE THESE INSTRUCTIONS!
- ENGLISH
- Compact Mixer
- Description
- Features
- Hi EQ (I)
- Mid EQ (2)
- Low EQ (3)
- EFX Send (4)
- Pan (5)
- Clip LED (6)
- Level (7)
- Gain (8)
- Power LED (9)
- Headphone Level (10)
- LED Meters (II)
- Phantom Power LED (12)
- Phantom Power Switch (13)
- Tape To Control Room (14)
- Tape to Mix (15)
- Master Level Fader (16)
- Contour Switch (17)
- Hz Low Cut (18)
- EFX/Return (19)
- Mic (XLR) Inputs (20)
- Line (1 / 4) Inputs (21)
- Gain (Channels I & 2) (22)
- Stereo Inputs (23)
- Control Room Outputs (24)
- EFX Send (25)
- Headphone Output (26)
- Left/Right Outputs (27)
- EFX Return (28)
- Power Adapter Input (29)
- Power Switch (30)
- Tape In/Out (32 & 31)
- PV®6 Compact Console
- SPECIFICATIONS
- Gain
- Frequency Response
- Total Harmonic Distortion
- Equivalent Input Noise (EIN)
- Crosstalk
- Common Mode Rejection Ratio (Mic Input)
- Meters
- Signal/Overload Indicators
- Dimensions
- Weight
- Power Requirements
- Beschreibung
- Headphone-Pegel (10)
- Phantomspeisung-LED (12)
- Phantom Power LED (I2)
- What This Warranty Covers
- What This Warranty Does Not Cover
- Who This Warranty Protects
- How Long This Warranty Lasts
- What Peavey Will Do
- How To Get Warranty Service
- Limitation of Implied Warranties
- Exclusions of Damages
Brand : PEAVEY
Model : PV 6
Category : Mixer