
DN-C635 - Professional CD player MARANTZ - Free user manual and instructions
Find the device manual for free DN-C635 MARANTZ in PDF.
| Product Type | Professional CD Player |
| Brand | Marantz |
| Model | DN-C635 |
| Supported Formats | Audio CD, CD-R/RW, MP3 (MPEG-1/2/2.5 Audio Layer-3) |
| Programmable Playback | Up to 99 tracks |
| Pitch Control | ±12% with slider control |
| Analog Audio Outputs | Balanced (XLR) and Unbalanced (RCA) |
| Digital Output | Coaxial (RCA), SPDIF or IEC-958 Type II |
| Headphone Output | Stereo, adjustable level |
| Remote Controls | Serial (RS-232C or RS-422A) and Parallel (25-pin D-Sub) |
| Rack Mount | 19 inches, 2U |
| Advanced Functions | Cascade playback, auto-cue, end-of-track control, EOM, CD-TEXT and ID3 text display |
| Frequency Response | 5 Hz - 20 kHz |
| Signal-to-Noise Ratio | 104 dB |
| Harmonic Distortion | 0.004% |
| Power Supply | 120 V AC 60 Hz (USA/Canada) or 230 V AC 50 Hz (Europe/UK) |
| Power Consumption | 15 W |
| Weight | 4.7 kg |
| Maintenance | Clean with a soft, dry cloth. Do not use chemicals. |
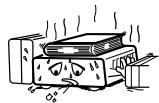
| Precautions | Use in a horizontal position. Avoid heat and moisture. Do not insert irregularly shaped CDs. |
| Included Accessories | User manual, RCA connection cables |
Frequently Asked Questions - DN-C635 MARANTZ
User questions about DN-C635 MARANTZ
0 question about this device. Answer the ones you know or ask your own.
Ask a new question about this device
Download the instructions for your Professional CD player in PDF format for free! Find your manual DN-C635 - MARANTZ and take your electronic device back in hand. On this page are published all the documents necessary for the use of your device. DN-C635 by MARANTZ.
USER MANUAL DN-C635 MARANTZ
TO PREVENT FIRE OR SHOCK HAZARD, DO NOT EXPOSE THIS APPLIANCE TO RAIN OR MOISTURE.
CAUTION
1. Handle the power supply cord carefully
Do not damage or deform the power supply cord. If it is damaged or deformed, it may cause electric shock or malfunction when used. When removing from wall outlet, be sure to remove by holding the plug attachment and not by pulling the cord.
2. Do not open the rear cover
In order to prevent electric shock, do not open the top cover. If problems occur, contact your DENON DEALER.
3. Do not place anything inside
Do not place metal objects or spill liquid inside the system.
Electric shock or malfunction may result.
Please, record and retain the Model name and serial number of your set shown on the rating label.
Model No. DN-C635
Serial No.

CAUTION
RISK OF ELECTRIC SHOCK DO NOT OPEN

CAUTION:
TO REDUCE THE RISK OF ELECTRIC SHOCK, DO NOT REMOVE COVER (OR BACK). NO USER-SERVICEABLE PARTS INSIDE. REFER SERVICING TO QUALIFIED SERVICE PERSONNEL.

The lightning flash with arrowhead symbol, within an equilateral triangle, is intended to alert the user to the presence of uninsulated "dangerous voltage" within the product's enclosure that may be of sufficient magnitude to constitute a risk of electric shock to persons.

The exclamation point within an equilateral triangle is intended to alert the user to the presence of important operating and maintenance (servicing) instructions in the literature accompanying the appliance.
NOTE:
This CD/MP3 PLAYER uses the semiconductor laser. To allow you to enjoy music at a stable operation, it is recommended to use this in a room of 5^ (41^) 35^ (95^)
LABELS (for U.S.A. model only)
CERTIFICATION
THIS PRODUCT COMPLIES WITH DHHS RULES 21 CFR SUBCHAPTER J APPLICABLE AT DATE OF MANUFACTURE.
CAUTION:
USE OF CONTROLS OR ADJUSTMENTS OR REFOR-MANCE OF PROCEDURES OTHER THAN THOSE SPECIFIED HEREIN MAY RESULT IN HAZARDOUS RADIATION EXPOSURE.
THE COMPACT DISC PLAYER SHOULD NOT BE ADJUSTED OR REPAIRED BY ANYONE EXCEPT PROPERLY QUALIFIED SERVICE PERSONNEL.
This device complies with Part 15 of the FCC Rules. Operation is subject to the following two conditions: (1) This device may not cause harmful interference, and (2) this device must accept any interference received, including interference that may cause undesired operation.
This Class B digital apparatus meets all requirements of the Canadian Interference-Causing Equipment Regulations.
- Read Instructions - All the safety and operating instructions should be read before the product is operated.
- Retain Instructions - The safety and operating instructions should be retained for future reference.
- HeedWarnings - All warnings on the product and in the operating instructions should be adhered to.
- Follow Instructions - All operating and use instructions should be followed.
- Cleaning - Unplug this product from the wall outlet before cleaning. Do not use liquid cleaners or aerosol cleaners.
- Attachments - Do not use attachments not recommended by the product manufacturer as they may cause hazards.
- Water and Moisture - Do not use this product near water - for example, near a bath tub, wash bowl, kitchen sink, or laundry tub; in a wet basement; or near a swimming pool; and the like.
- Accessories - Do not place this product on an unstable cart, stand, tripod, bracket, or table. The product may fall, causing serious injury to a child or adult, and serious damage to the product. Use only with a cart, stand, tripod, bracket, or table recommended by the manufacturer, or sold with the product. Any mounting of the product should follow the manufacturer's instructions, and should use a mounting accessory recommended by the manufacturer.
- A product and cart combination should be moved with care. Quick stops, excessive force, and uneven surfaces may cause the product and cart combination to overturn.
- Ventilation - Slots and openings in the cabinet are provided for ventilation and to ensure reliable operation of the product and to protect it from overheating, and these openings must not be blocked or covered. The openings should never be blocked by placing the product on a bed, sofa, rug, or other similar surface. This product should not be placed in a built-in installation such as a bookcase or rack unless proper ventilation is provided or the manufacturer's instructions have been adhered to.
- Power Sources - This product should be operated only from the type of power source indicated on the marking label. If you are not sure of the type of power supply to your home, consult your product dealer or local power company. For products intended to operate from battery power, or other sources, refer to the operating instructions.
- Grounding or Polarization - This product may be equipped with a polarized alternating-current line plug (a plug having one blade wider than the other). This plug will fit into the power outlet only one way. This is a safety feature. If you are unable to insert the plug fully into the outlet, try reversing the plug. If the plug should still fail to fit, contact your electrician to replace your obsolete outlet. Do not defeat the safety purpose of the polarized plug.
NEC-NATIONAL ELECTRICAL CODE
- Power-Cord Protection - Power-supply cords should be routed so that they are not likely to be walked on or pinched by items placed upon or against them, paying particular attention to cords at plugs, convenience receptacles, and the point where they exit from the product.
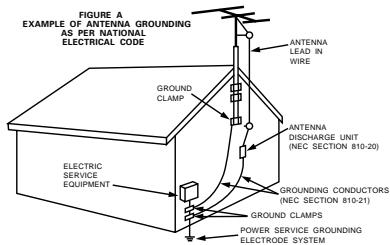
- Outdoor Antenna Grounding - If an outside antenna or cable system is connected to the product, be sure the antenna or cable system is grounded so as to provide some protection against voltage surges and built-up static charges. Article 810 of the National Electrical Code, ANSI/NFPA 70, provides information with regard to proper grounding of the mast and supporting structure, grounding of the lead-in wire to an antenna discharge unit, size of grounding conductors, location of antenna-discharge unit, connection to grounding electrodes, and requirements for the grounding electrode. See Figure A.
- Lightning - For added protection for this product during a lightning storm, or when it is left unattended and unused for long periods of time, unplug it from the wall outlet and disconnect the antenna or cable system. This will prevent damage to the product due to lightning and power-line surges.
- Power Lines - An outside antenna system should not be located in the vicinity of overhead power lines or other electric light or power circuits, or where it can fall into such power lines or circuits. When installing an outside antenna system, extreme care should be taken to keep from touching such power lines or circuits as contact with them might be fatal.
- Overloading - Do not overload wall outlets, extension cords, or integral convenience receptacles as this can result in a risk of fire or electric shock.
- Object and Liquid Entry - Never push objects of any kind into this product through openings as they may touch dangerous voltage points or short-out parts that could result in a fire or electric shock. Never spill liquid of any kind on the product.
- Servicing - Do not attempt to service this product yourself as opening or removing covers may expose you to dangerous voltage or other hazards. Refer all servicing to qualified service personnel.
- Damage Requiring Service – Unplug this product from the wall outlet and refer servicing to qualified service personnel under the following conditions:
a) When the power-supply cord or plug is damaged,
b) If liquid has been spilled, or objects have fallen into the product,
c) If the product has been exposed to rain or water,
d) If the product does not operate normally by following the operating instructions. Adjust only those controls that are covered by the operating instructions as an improper adjustment of other controls may result in damage and will often require extensive work by a qualified technician to restore the product to its normal operation,
e) If the product has been dropped or damaged in any way, and
f) When the product exhibits a distinct change in performance - this indicates a need for service. - Replacement Parts - When replacement parts are required, be sure the service technician has used replacement parts specified by the manufacturer or have the same characteristics as the original part. Unauthorized substitutions may result in fire, electric shock, or other hazards.
- Safety Check - Upon completion of any service or repairs to this product, ask the service technician to perform safety checks to determine that the product is in proper operating condition.
- Wall or Ceiling Mounting - The product should be mounted to a wall or ceiling only as recommended by the manufacturer.
- Heat - The product should be situated away from heat sources such as radiators, heat registers, stoves, or other products (including amplifiers) that produce heat.
FRONT PANEL / FRONTPLATTE / PANNEAU AVANT / RANNELLO ANTERIORE / PANEL FRONTAL /VOORPANEL / FRONT PANELEN
REAR PANEL / RÜCKWAND / PANNEAU ARRIERE / IL PANNELLO POSTERIORE / PANEL TRASERO / ACHTERPANEL / BAKSIDA
DISPLAY / DISPLAY / AFFICHAGE / DISPLAY / VISUALIZADOR / DISPLAY / DISPLAYEN
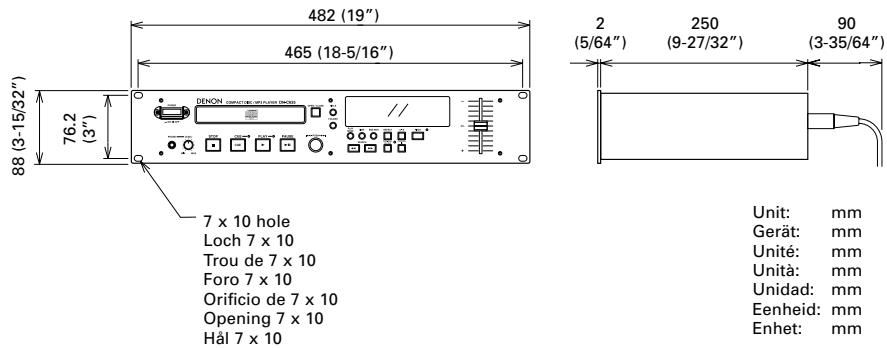
DIMENSIONS / ABMESSAGENGEN / DIMENSIONS / DIMENSIONI / DIMENSIONES / AFMETINGEN /YTTERMÄTT
NOTE ON USE / HINWEISE ZUM GEBRAUCH / OBSERVATIONS RELATIVES A L'UTILISATION / NOTE SULL'USO NOTAS SOBRE EL USO / ALVORENS TE GEBRIKEN / OBSERVERA

- Avoid high temperatures.
Allow for sufficient heat dispersion when installed on a rack. - Vermeiden Die hohe Temperatur.
Beachten Sie, daß eine ausreichend Luftzirkulation gewährleistet wird, wenn das Gerat auf ein Regal gestellt wird. - Eviter des températures élevées
Tenir compte d'une dispersion de chaleur suffisante lors de l'installation sur une étagère.
Evitate di esporre l'unità a temperature alte. Assicurative他们会 si sua un'adeguata dispersione del calorie quando installate l'unità in un mobile per componenti audio. - Evite altas temperativas
Permitte la suficiente dispersion del calor,
cuando está instalado en la consola.
Vermijd hoge temperaturen.
Zorg voor een degelijk hitteafvoer indien het apparaat op een rek worden geplaatst. - Undvik hoga temperaturer.
Se till att det finns möjighet till god värmeaeldning vid montering i ett rack.
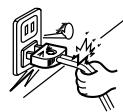
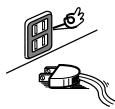
- Handle the power cord carefully.
- Hold the plug when unplugging to
- Gehen Sie vorsichtig mit dem Netzkabel um. Halten Sie das Kabel am Stecker, wenn Sie den Stecker Herausziehen.
- Manipulier le cordon d'alimentation avec précaution.
Tenir la prise lors du débranchement du cordon. - Manneggiate il filo di alimentazione con cura. Agite per la spina quando scollegate il cavo alla presa.
- Maneje el cordón de energia con cuidado.
Sostenga el enchufe cuando desconecte el cordón de energia. - Hanteer het netsnoor voorzichtig.
Houd het sneer bij de stekerst vast wanner deze要去 worden aan- of losekoppeld. - Hantera năkabeln vamsart.
Hälä i kabel nār den koplas frán el-uttaget.

- Keep the set free from moisture, water, and dust.
- Halten Si des Gerat von Feuchigkeit, Wasser und Staub fern.
- Protégé l'appaire contre l'humidité, l'eau et lapousseie.
- Tenete l'unità lontana dall'umidità, dall'acqua e dall'polvere.
- Mantenga el equipo libre de humedad, agua y polvo.
- Laat geen vochtigheid, water of stof in het appearata binnendringen.
- Utsattinte apparatenforfukt,vatten och damm.
- Unplug the power cord when not using the set for long periods of time.
- Wenn das Gerät eine längerere Zeit nicht verwendet werden soll, trennen Sie das Netzkabel vom Netzstecker.
- Débrancher le cordon d'alimentation lorsqu'ell'appareil n'est pas utilisé pendant delongues périodes.
- Disinestate il filo di alimentazione quando ave l'intenzione di non usare il filo di alimentazione per un lungo periodo di tempo.
- Desconnecte el cordón de energia cuando no utilise el equipo por是多么 tiempo.
- Neem altid het netsoeruih uit het stopkontakt wannier het apparat geudurende een lange periode niet worden gebruikt.
- Koppla ur natakabel om apparatein intekommen att anvandis lang tid.
-
(For sets with ventilation holes)
-
Do not obstruct the ventilation holes
- Die Belülfungsöffnungen dürfen nicht verdeckt werden.
- Ne pas obstruer les trouss d'airation.
Non coprite i fori di ventilazione
No obstruya los orificios de ventilacion. - De ventilatieopeningen mogen Niet worden beblokkekerd.
Tapp inte till ventilationsöppningarna.
- Do not let foreign objects in the set.
Keine fremden Gegenstände in das Gerätkommen lassen. - Ne pas laisser des objets étrangers dans l'appareil.
E' importante che NSSUN oggetto es inserto all'interno dell'unita. - Nodeojejobeosextraoindentredelequipo.
- Laat geen vreemde voorwerpen in dit apparaat vaallen.
- Se till att fremmande fremdal inte tränger in apparaten.

- Do not let insecticides, benzene, and thinner come in contact with the set.
- Lassen Sie das Gerät nicht mit Insektiziden, Benzin oder Verdünningsmitteln in Berührung kommt.
- NeASHINGTON:
- Le benzene est en contact des insecticides, du benzene et un diluant avec l'appareil.
- Assicuratevchi che l'unità non venga in contatto con insetticidi, benzo e soventil.
- No permita el contacto de insecticidas, gasolina y diluyentes con el equipo.
- Laat geen insektenverdelgende middelen, benzine of verfvedrunner met dit apparaat in contactkomen.
- Se till attinte insetktsmedel pa spraybruik, bensen och thinnerkommen i kontakt med apparaten hölje.

- Never disassemble or modify the set in any way.
Versuchen Sie niemals das Gerät auseinander zunehmen oder auf jegliche Art zu verändern. - Ne jamais démonter ou modifier l'appareil d'une manière ou d'une autre.
Non smontate mai, nè modifie l'unità in nessun modo. - Nunca desarme o modifie el equipo de rinsunga manera.
- Nooit dit apparat demonteren of op andere wijze modifierieren.
- Ta inte isär apparenten och förstk inte bygga om den.
CAUTION
- The ventilation should not be impeded by covering the ventilation openings with items, such as newspapers, table-cloths, curtains, etc.
- No naked flame sources, such as lighted candles, should be placed on the apparatus.
- Please be care the environmental aspects of battery disposal.
- The apparatus shall not be exposed to dripping or splashing for use.
- No objects filled with liquids, such as vases, shall be placed on the apparatus.
- DECLARATION OF CONFORMITY
We declare under our sole responsibility that this product, to which this declaration relates, is in conformity with the following standards:
EN60065, EN55013, EN55020, EN61000-3-2 and EN61000-3-3.
Following the provisions of 73/23/EEC, 89/336/EEC and 93/68/EEC Directive.
CLASS 1 LASER PRODUCT
LUOKAN 1 LASERLAITE
KCLASS 1 LASERAPPARAT
"CLASS 1 LASER PRODUCT"
ADVARSEL:
USYNLIG LASERSTRÁLING VED ÅNBING, NAR SIKKERHEDSAFBRYDERE URDE AF FUNKTION. UNDGA UDSAETTELSE FOR STRÁLING.
VAROITUS!
LAITTEEN KÄYTTÄMINEN MUULLA KUIN TÄSSÄ
KÄYTTOOHJESSA MAINITULLA TAVALLA SAATTAA
ALTISTAA KÄYTTÄJÄN TURVALLISUUSLUOKAN
YLITTVÄLLE NAKYMÄMTTÖMÄLLE LASERSÄEILYLLE.
WARNING-
OM APPARATEN ANVÄNS PÄ ANNAT SÄTT ÄN I DENNA BRUKSANVISING SPECICERATS, KAN ANVÄNDAREN UTSÄTTAS FOR OSYNLIG LASERSTRÄLNING SOM OVERSKRIDER GRÄNSEN FÜR LASERKLASS 1.


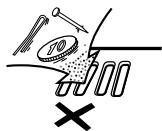
- Use compact discs that include the

CD's with special shapes (heart-shaped CD's, octagonal CD's etc.) cannot be played on this set.
Attempting to do so may damage the set. Do not use such CD's.
- This unit can display text information on the display when playing CD text discs which contain text information in English category.
The CD text disc includes the mark shown at the right.
NOTE:
-
This unit can provide a text display of the following types of characters. Other types of characters will result in " " being displayed.
-
Alphabet
ABCDEEFGHJIKLMNOPORSTLUUUYKXYZ
Numbers
0123456789
- Symbols
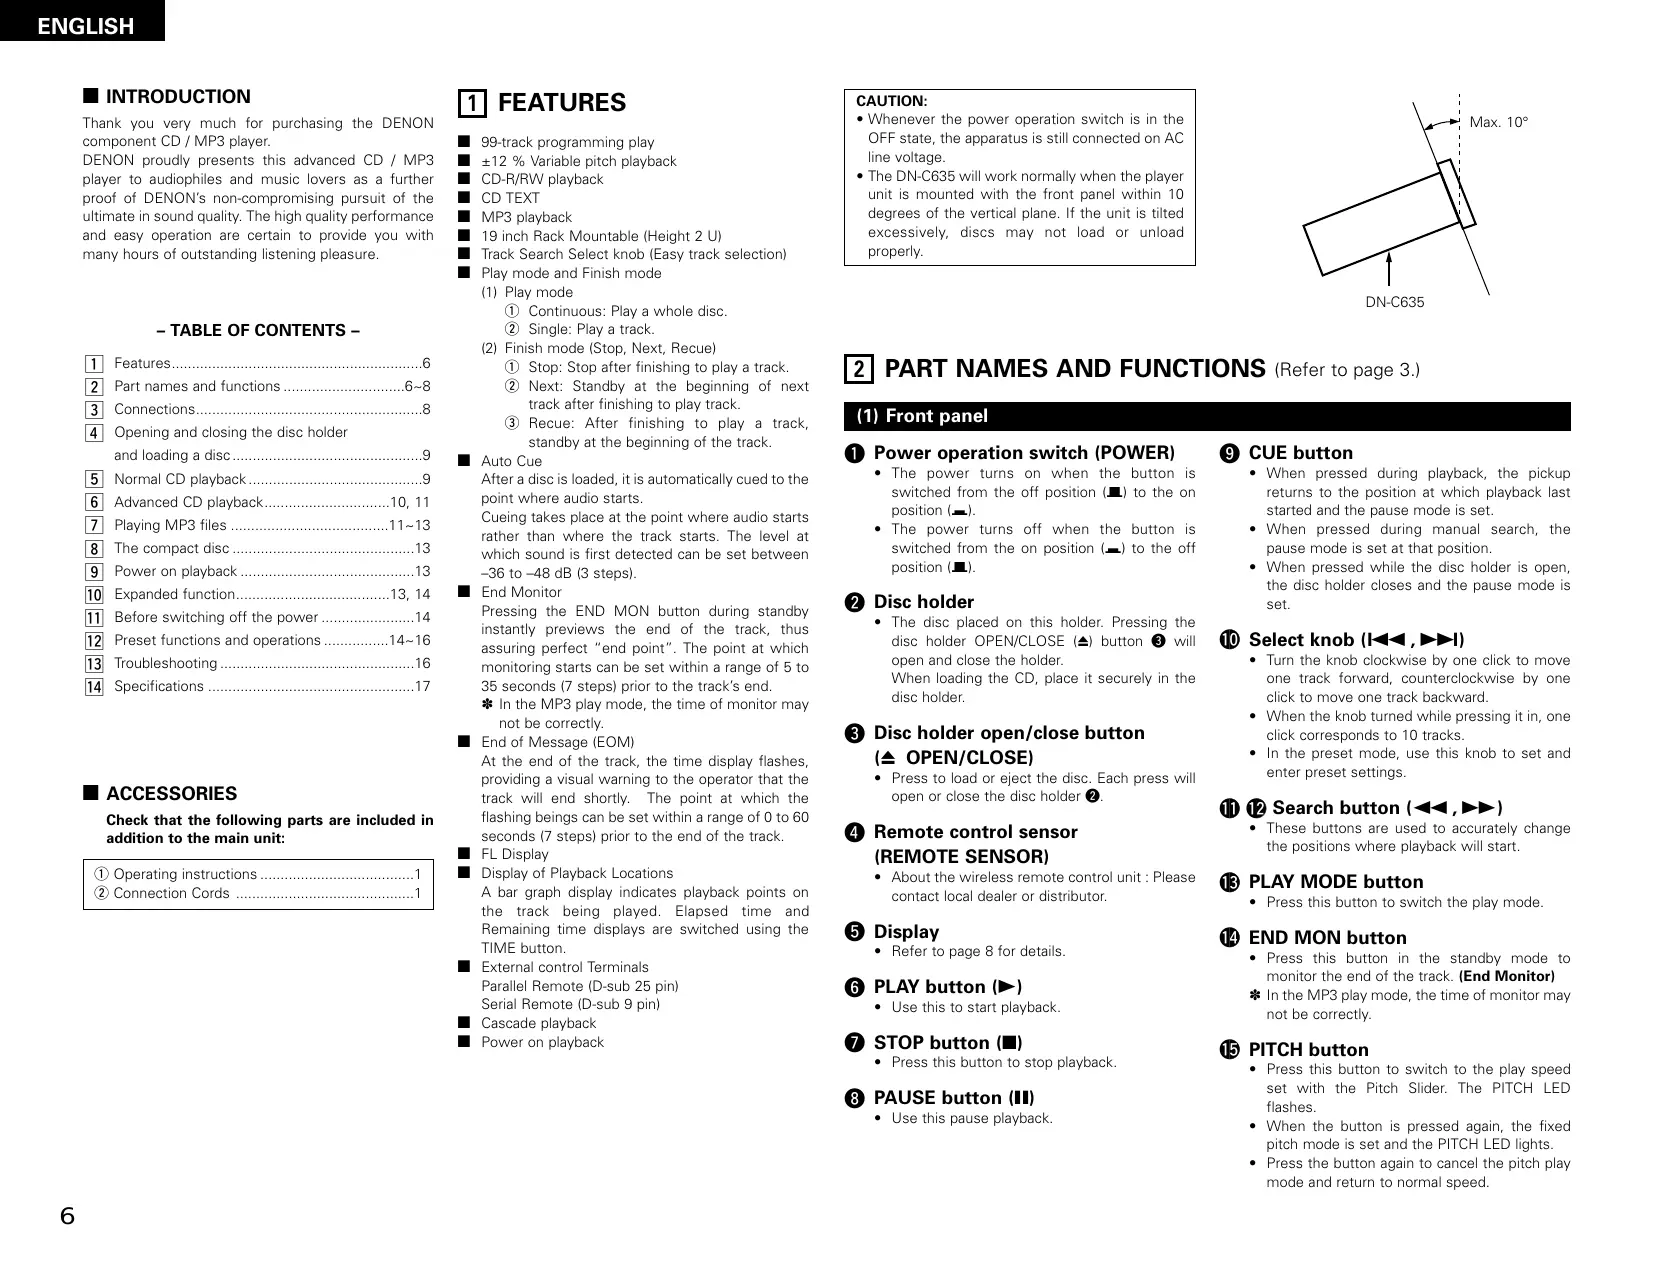
Thank you very much for purchasing the DENON component CD / MP3 player.
DENON proudly presents this advanced CD / MP3 player to audiophiles and music lovers as a further proof of DENON's non-compromising pursuit of the ultimate in sound quality. The high quality performance and easy operation are certain to provide you with many hours of outstanding listening pleasure.
TABLE OF CONTENTS
1 Features. 6
Part names and functions 6~8
3 Connections. 8
4 Opening and closing the disc holder and loading a disc. 9
5 Normal CD playback. 9
6 Advanced CD playback. 10, 11
7 Playing MP3 files 11~13
8 The compact disc 13
9 Power on playback 13
10 Expanded function. 13, 14
[11] Before switching off the power 14
12 Preset functions and operations 14~16
13 Troubleshooting 16
14 Specifications 17
■ ACCESSORIES
Check that the following parts are included in addition to the main unit:
① Operating instructions 1
② Connection Cords 1
1 FEATURES
99-track programming play
± 12% Variable pitch playback
CD-R/RW playback
CD TEXT
MP3 playback
19 inch Rack Mountable (Height 2 U)
Track Search Select knob (Easy track selection)
Play mode and Finish mode
(1) Play mode
① Continuous: Play a whole disc.
② Single: Play a track.
(2) Finish mode (Stop, Next, Recue)
① Stop: Stop after finishing to play a track.
② Next: Standby at the beginning of next track after finishing to play track.
③ Recue: After finishing to play a track, standby at the beginning of the track.
Auto Cue
After a disc is loaded, it is automatically cued to the point where audio starts.
Cueing takes place at the point where audio starts rather than where the track starts. The level at which sound is first detected can be set between -36 to -48 dB (3 steps).
End Monitor
Pressing the END MON button during standby instantly previews the end of the track, thus assuring perfect "end point". The point at which monitoring starts can be set within a range of 5 to 35 seconds (7 steps) prior to the track's end.
- In the MP3 play mode, the time of monitor may not be correctly.
End of Message (EOM)
At the end of the track, the time display flashes, providing a visual warning to the operator that the track will end shortly. The point at which the flashing beings can be set within a range of 0 to 60 seconds (7 steps) prior to the end of the track.
FL Display
Display of Playback Locations
A bar graph display indicates playback points on the track being played. Elapsed time and Remaining time displays are switched using the TIME button.
External control Terminals
Parallel Remote (D-sub 25 pin)
Serial Remote (D-sub 9 pin)
Cascade playback
Power on playback
CAUTION:
- Whenever the power operation switch is in the OFF state, the apparatus is still connected on AC line voltage.
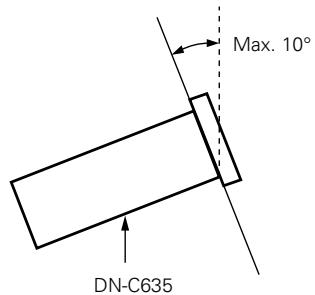
- The DN-C635 will work normally when the player unit is mounted with the front panel within 10 degrees of the vertical plane. If the unit is tilted excessively, discs may not load or unload properly.
2 PART NAMES AND FUNCTIONS (Refer to page 3.)
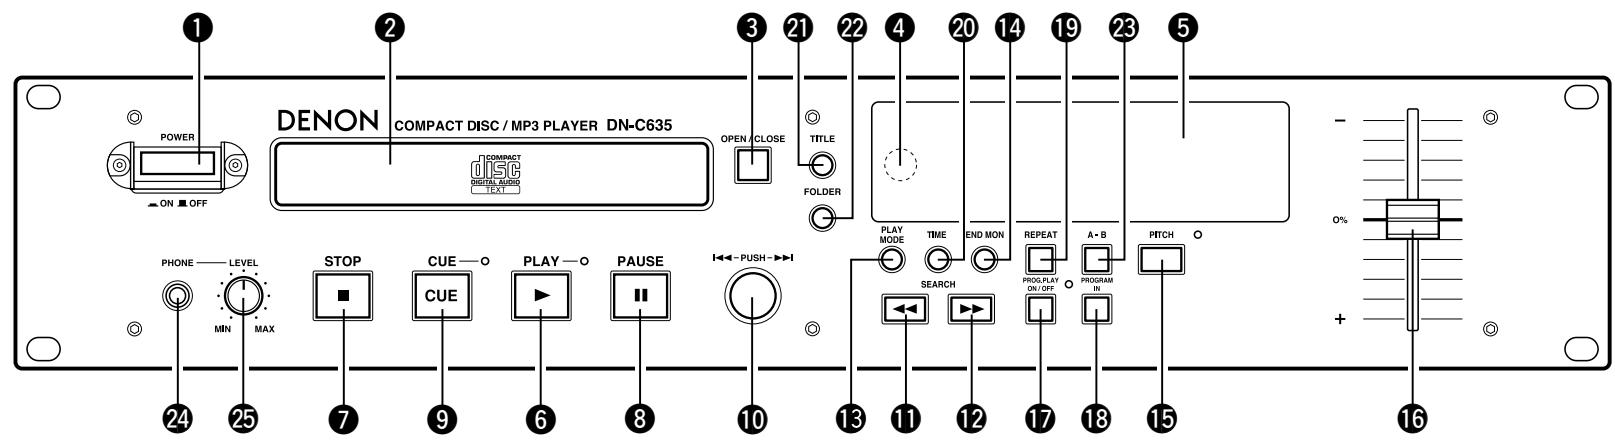
(1) Front panel
Power operation switch (POWER)
- The power turns on when the button is switched from the off position (■) to the on position (▲).
- The power turns off when the button is switched from the on position (■) to the off position (■).
2 Disc holder
- The disc placed on this holder. Pressing the disc holder OPEN/CLOSE (▲) button ③ will open and close the holder.
When loading the CD, place it securely in the disc holder.
3 Disc holder open/close button (△ OPEN/CLOSE)
- Press to load or eject the disc. Each press will open or close the disc holder ②.
Remote control sensor (REMOTE SENSOR)
- About the wireless remote control unit : Please contact local dealer or distributor.
⑤ Display
Refer to page 8 for details.
⑥ PLAY button (▶)
- Use this to start playback.
STOP button (■)
- Press this button to stop playback.
3 PAUSE button (II)
- Use this pause playback.
CUE button
- When pressed during playback, the pickup returns to the position at which playback last started and the pause mode is set.
- When pressed during manual search, the pause mode is set at that position.
- When pressed while the disc holder is open, the disc holder closes and the pause mode is set.
10 Select knob (I<,▶I)
- Turn the knob clockwise by one click to move one track forward, counterclockwise by one click to move one track backward.
- When the knob turned while pressing it in, one click corresponds to 10 tracks.
- In the preset mode, use this knob to set and enter preset settings.
11 12 Search button (▲▲, ▲▶)
These buttons are used to accurately change the positions where playback will start.
13 PLAY MODE button
- Press this button to switch the play mode.
14 END MON button
- Press this button in the standby mode to monitor the end of the track. (End Monitor)
- In the MP3 play mode, the time of monitor may not be correctly.
15 PITCH button
- Press this button to switch to the play speed set with the Pitch Slider. The PITCH LED flashes.
- When the button is pressed again, the fixed pitch mode is set and the PITCH LED lights.
- Press the button again to cancel the pitch play mode and return to normal speed.
Pitch Slider
- Use this slider to adjust the play speed. Slide up to decrease the play speed, down to increase the play speed.
PROG. PLAY ON/OFF button
- When this button is pressed while the PROG indicator is lit, the program play mode is set.
- The button will not function during the A-B play mode.
- The PROG. PLAY ON/OFF LED lights during the program play standby and play modes.
- When the button is pressed during the program play standby or play mode, the program play mode is cleared.
18 PROGRAM IN button
- Press this button to set the program input mode.
- The button will not function during the play mode.
- The PROG indicator flashes when in the program input mode.
- The PROG indicator lights when a program is set.
19 REPEAT button
- Press this to perform repeat playback.
20 TIME button
- The time display switches each time this button is pressed. ("REMAIN", "ELAPSED")
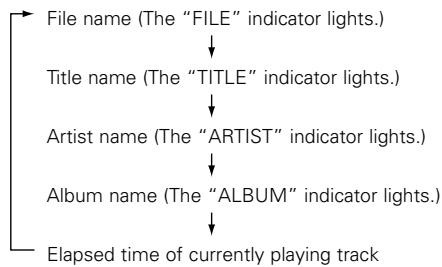
2 TITLE button
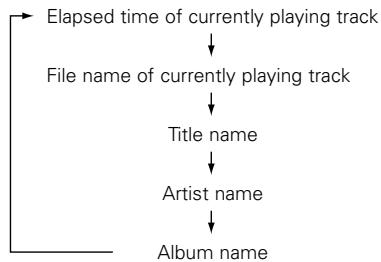
- When the button is pressed, the text information (Disc title, track title, disc artist or track artists) is displayed.
- When the button is pressed while in the stop mode with a disc containing an MP3 ID3-Tag loaded, the file name is displayed. When pressed during playback, the display switches as shown below.
2 FOLDER button
- When disc containing MP3 format files is loaded, in the stop mode press this button then the folder select mode is possible.
A-B (A-B repeat) button
- Use this to play a set section repeatedly.
- When the button is pressed once during playback, that position is set as the A point and the "A-B" indicator flashes on the display.
- When the button is pressed again, that position is set as the B point, the "A-B" indicator stops flashing (remaining lit), and the A-B section begins playing repeatedly.
- When the button is pressed again, A-B repeat is canceled and the mode returns to the normal play mode.
24 Headphones jack
- For private listening, you can connect your headphones to this jack.
25 PHONES LEVEL control
- Use this adjust the output level of the headphones.
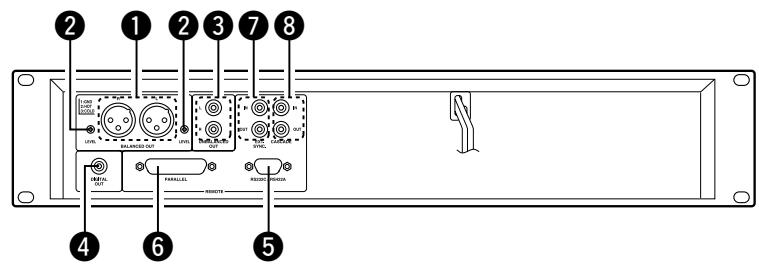
(2) Rear panel
1 BALANCED OUT connectors
- These are active balanced outputs using XLR type connections. The CD's playback signals are output from these connectors.
Pin layout: 1. Common / 2. Hot / 3. Cold
Applicable connector : Cannon XLR-3-31 or equivalent.
NOTE :
| ·Do not short-circuit the hot or cold pin with the common pin. |
LEVEL L/R controls
- Use these controls to adjust the level of the audio signals from the BALANCED OUT connectors.
UNBALANCED OUT jacks
- These are unbalanced outputs using RCA type jacks.
4 DIGITAL OUT jack
- This is a coaxial output using an RCA type jack.
- Signal format: SPDIF or IEC-958 Type II
Serial control port
This is serial remote connector.
Applicable connector : 9-pin D-sub (male)
Baud rate : 9600 bps
Pin layout
RS-232C
| Pin No. | Signal Name | I / O |
| 1 | GND | - |
| 6 | NC | - |
| 2 | TxD | O |
| 7 | NC | - |
| 3 | RxD | I |
| 8 | NC | - |
| 4 | NC | - |
| 9 | NC | - |
| 5 | S. GROUND | - |
RS-422A
| Pin No. | Signal Name | I / O |
| 1 | GND | - |
| 6 | NC | - |
| 2 | TxD (RETURN) | O |
| 7 | TxD | O |
| 3 | RxD | I |
| 8 | RxD (RETURN) | I |
| 4 | NC | - |
| 9 | NC | - |
| 5 | S. GROUND | - |
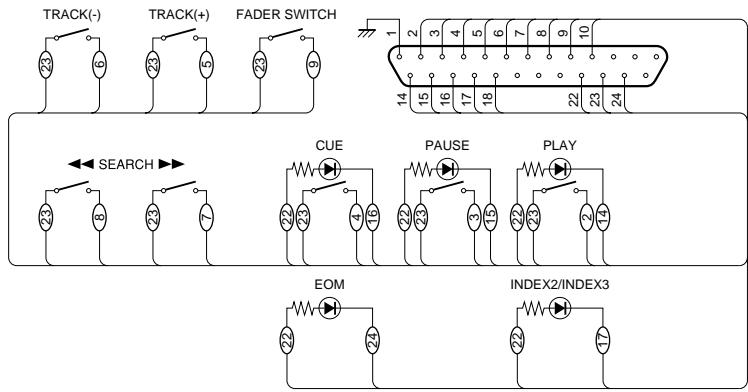
Parallel remote control port
- This is a parallel remote connector.
Applicable connector : 25-pin D-sub (male) - Connecting signal layout
| Pin No. | Signal Name | I / O | |
| 1 | FG | - | |
| 14 | PLAY tally | O | TTL (Iol = 20mA) |
| 2 | PLAY command | I | HCMOS (li = 3mA) |
| 15 | PAUSE tally | O | TTL (Iol = 20mA) |
| 3 | PAUSE command | I | HCMOS (li = 3mA) |
| 16 | CUE tally | O | TTL (Iol = 20mA) |
| 4 | CUE command | I | HCMOS (li = 3mA) |
| 17 | INDEX 2/INDEX 3 tally | O | TTL (Iol = 20mA) |
| 5 | TRACK (+) command | I | HCMOS (li = 3mA) |
| 18 | Tally common | - | |
| 6 | TRACK (-) command | I | HCMOS (li = 3mA) |
| 19 | Reserved | - | |
| 7 | SEARCH (Fwd) command | I | HCMOS (li = 3mA) |
| 20 | Reserved | - | |
| 8 | SEARCH (Rev) command | I | HCMOS (li = 3mA) |
| 21 | Reserved | - | |
| 9 | FADER START command | I | HCMOS (li = 3mA) |
| 22 | Tally power supply | - | +3.3V, 20mA |
| 10 | Command common | - | (II = 10mA) |
| 23 | Command common | - | |
| 11 | NC | - | |
| 24 | EOM tally | - | TTL (Iol = 20mA) |
| 12 | Reserved | - | |
| 25 | Reserved | - | |
| 13 | Reserved | - |
NOTE:
The tally output pin has open collector IC specifications (Imax. 20mA Vmax.3.3V), but the maximum supply current is 80~mA so use with a total load current of 80mA or less.
External synchronized control jacks (EXT. SYNC.)
- Connect these for synchronized recording.
3 Cascade control jacks (CASCADE)
- Connect these for continuous operation on multiple units.
- When the cascade mode is set to "ON", the start signal is output from this output jack once operation is finished. (Preset function)
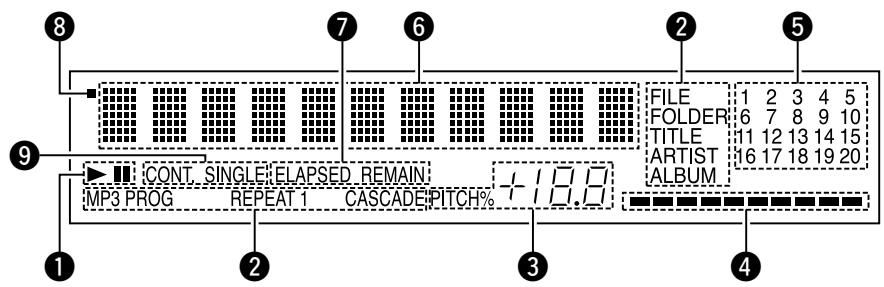
(3) Display
CD transport indicator
Mode display portion
FILE :This lights when the file name of MP3 is displayed.
FOLDER :This lights in the folder selection mode.
TITLE :This lights when the title in the MP3 ID3-Tag or CD Text is displayed.
MP3 :This lights when a disc containing MP3 format file is loaded.
PROG :This lights in the program mode.
REPEAT, 1 : This lights in the repeat mode.
CASCADE :This lights in the cascade mode. (Preset function)
ALBUM :This lights when the album name in the MP3 ID3-Tag is displayed.
ARTIST :This lights when the artist name in the MP3 ID3-Tag is displayed.
CD pitch display
4 Playing position display
- This indicates the current position within the track's totalplaying time.
- In the MP3 play mode, it may be unable to display correctly.
20 tracks music calender
- In the single track play mode, only the specified track lights.
- In the continuous play mode, everything from the specified track to the last track lights.
- Track numbers are displayed up to track 20.
Track 21 and on are not displayed. - MP3 is not displayed.
Multiple display
- This displays Track No. of CD, playing time of CD, various operational information, text message, etc.
Time mode indicator
ELAPSED: This lights when the elapsed time is displayed.
REMAIN : This lights when the remaining time is displayed.
Infrared remote control indicator
9 Play mode indicators
- "SINGLE" lights when in the single track play mode.
- "CONT." lights when in the continuous play mode.
3 CONNECTIONS
Leave your entire system (including the DN-C635) turned off until all connections between the DN-C635 and other components have been completed.
Connection precautions
- Before proceeding with connections or disconnections of cables and power cords, be sure to turn all system components off.
- Ensure that all cables are connected properly to the L (left) and R (right) jacks.
- Insert plugs fully into the terminals.
- Connect the CD output jacks to the amplifier CD or AUX input jacks.
Remote control connections
The rating of REMOTE connector pin 22 (TALLY POWER SUPPLY) is 3.3V , 80mA maximum. Avoid currents in excess of the rating.
Installation precautions
- If the DN-C635 is placed near an amplifier, tuner or other components, noise (induced hum) or beat interference may result (especially during AM or FM reception).
If this occurs, separate the DN-C635 from other components or reorient its position.
NOTE:
- Use this unit in a horizontal orientation.
When the unit is used with the front panel facing upward (and the unit us in a vertical orientation) or when the front panel is on an incline, the unit will not operate properly.
4 OPENING AND CLOSING THE DISC HOLDER AND LOADING A DISC
Opening and closing the disc holder
This operation only works while the power is on.
- Press the power operation switch ① to turn on the power.
- Press the OPEN/CLOSE button ①.
How to load a disc
- Make sure the disc holder is completely open.
- Hold the disc by the edges and place it on the disc tray. (Do not touch the signal surface, i.e., the glossy side.)
- When using 12cm diameter discs, make sure the outer edge matches the tray guide circumference and when using CD signals (8 cm. diameter) match the outer edge with the inner tray guide circumference.
- Press the OPEN/CLOSE button 3 to close the disc holder 2.
- When the disc holder is open and a disc is loaded, you may also press the PLAY (▶) button 6 to close the disc holder. (If the PLAY (▶) button is pressed, playback will start immediately upon the disc contents having been read.)
CAUTIONS:
- If you finger should get caught in the disc holder when it closes, press the OPEN/CLOSE button.
- Do not place any foreign objects on the disc tray, and do not place more than one disc on the tray at a time. Otherwise malfunction may occur.
- Do not push in the disc tray manually when the power is off as this may cause malfunction and damage the CD player.
- This player can play CD-R/RW discs, but only if they are finalized. Note however that depending on the recording quality, the player may not be able to play some finalized CD-R/RW discs.
■ Messages
Messages may appear on the display while using the DN-C635. The meanings of these messages are explained below.
| Message | Meaning |
| No Disc | No disc inserted, disc unreadable or disc inserted upside down. |
| TOC Error | The disc information has not been read properly. |
| Invalid CD | The disc is a CD-ROM that does not contain MP3 files. |
| Tray Error | The disc holder could not be opened or closed properly. |
NORMAL CD PLAYBACK
(1) Starting playback
- Press the power operation switch ① to turn on the power.
- Load the disc you want to play.
-
Make the presettings according to the usage purpose. (See page 14.)
-
Select the play finish mode. (Preset functions)
Finish stop :
The stop mode (the servo functions turn off) is set when playback finishes.
Finish next :
The standby mode is set at the beginning of the next track when playback is finished.
* After the final track is played, the standby mode is set at the beginning of the first track.
Finish recue :
When playback is finished, the standby mode is set at the position at which playback was started.
- To standby at the point where the sound begins. (Preset functions)
Set the "C Det" level.
When a track is selected, the position at which the sound begins is found when a track is cued and the standby mode is set at that point.
- Press the PLAY MODE button to select the play mode.
SINGLE: (single track play mode)
The stop mode is set after the specified track is played.
CONT.: (continuous play mode)
The stop mode is set after the last track is played.
- Press the PLAY (▶) button 6.
(2) Pausing playback at any point
(Pause)
Playback can be temporarily halted and then continued from the same point in the track.
- Press the PAUSE (I) button 8 during playback.
- To continue playback, press the PLAY (▶) button 6
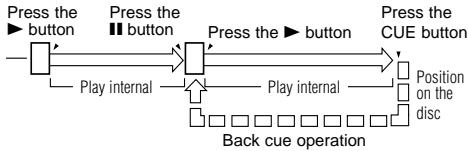
(3) Returning to the position at which playback started
(Back Cue)
When the CUE button 4 is pressed during the play mode, the pickup returns to the position at which playback started and the pause mode is set.
(4) Stopping playback
- Press the STOP (■) button 7
Sleep mode (Preset functions)
- The sleep mode is set if no operation is performed for set-up time in the standby, pause or manual search mode.
When in the sleep mode, if the PLAY button is pressed, playback will be started from the beginning of the track in which the sleep mode was set. If the CUE button is pressed, it will standby for the beginning of the track in which the sleep mode was set.
(1) Advancing to the next track during playback
(Automatic search)
-
Turn the select knob (▶▶I) 10 clockwise during playback.
-
The pickup will advance to the beginning of the next track and playback will continue.
Pressing the button several times will forward the pickup to the corresponding number tracks.
(2) Returning to the beginning of the current track during playback
(Automatic search)
-
Turn the select knob (1) counterclockwise during playback.
-
The pickup will return to the beginning of the current track and playback will continue.
Pressing the button several times will return the pickup to the corresponding number tracks.
(3) Audible quick search
Manual search
- Using this function, you can search for a desired point quickly with in a track in the both forward or reverse direction.
- Release the SEARCH button (← or →) 11 12 when the desired point has been reached. Normal playback then continues.
- When a SEARCH button (← or →) 11 12 is pressed during the pause mode and the button is released, the pause mode is set at that point with the sound being output.
Manual search forward
- Press the SEARCH (▶▶) button 12 during playback.
- Playback of the track is sped up.
Manual search in reverse
- Press the SEARCH (▶) button ① during playback.
- Reverse playback of the track is sped up.
(4) Repeating playback of a desired interval
(Single track repeat)
- Set the play mode to the single play mode.
- Press the REPEAT button 19
-
The "REPEAT 1" indicators light on the display and the single track repeat mode is set.
-
Use the select knob (I and to select the track to be played repeatedly.
-
Press the PLAY (▶) button 6.
-
Playback starts.
- Once the selected track ends, it is played again from the beginning.
- The single track repeat mode can also be set by pressing the REPEAT button 19 during playback. The current track is played repeatedly.
- To cancel the single track repeat mode, press the REPEAT button 10 repeatedly until the "REPEAT 1" indicator turns off.
(All track repeat)
-
Set the play mode to the continuous play mode.
-
Press the REPEAT button 19.
-
The "REPEAT" indicators light on the display and the all track repeat mode is set.
-
Press the PLAY (▶) button 6.
The disc is played repeatedly.
- The all track repeat mode can also be set by pressing the REPEAT button 19 during playback.
- If the REPEAT button is pressed during programmed playback, the tracks are played repeatedly in the programmed order.
- To cancel the all track repeat mode, press the REPEAT button repeatedly until the "REPEAT" indicator turns off.
(5) To play the set section repeatedly
(A-B repeat)
-
During playback, press the A-B button at the point where you want to start repeated playback (A point).
-
The "A-B" indicator flash on the display.
-
Press the A-B button again at the point where you want to end repeated playback (B point).
-
The "A-B" indicator stops flashing (remaining lit), and the A-B section begins playing repeatedly.
-
If no B point it set, the end of the current track is set as the B point when in the single mode, and the end of the disc is set as the B point when in the "continue" mode.
-
To cancel A-B repeat playback, press the A-B button again.
NOTE:
- Set the A and B points at least 1 second apart from each other.
(6) Playing specific tracks in a specific order
(Programmed play)
- With this function, you can choose any of the tracks on the disc and program them to play in any order.
- Up to 99 tracks can be programmed.
■ Inputting the program
- Press the PROGRAM IN button 18.
-
"PROG" indicator flashes, and "--Select?" appears on the display.
-
Turn the select knob to select the track.
- Press the select knob 10 to enter the track.
To enter the next track, press the select knob 10 again.
- Repeat steps 2 and 3 to program the tracks in the desired order.
- Press the PROGRAM IN button 18 to exit the program input mode.
PROG indicator lights, and set the return to the normal mode.
Changing the program
-
Press the PROGRAM IN button 18 to set the program edit mode.
PROG indicator flashes. -
Turn the select knob to select the program step.
-
Press the select knob to be edited.
-
Turn the select knob to change the track.
-
Press the select knob 10 to enter the track.
To edit the next track, press the select knob 0 again.
- Repeat steps 2, 3, 4, and 5 to change the tracks.
- Press the PROGRAM IN button 18 to exit the program edit mode.
Inserting the program
-
Press the PROGRAM IN button 18 to set the program edit mode.
PROG indicator flashes. -
Turn the select knob 10 to select the position at which to insert a track.
-
Press the SEARCH (▶▶) button 12 to set the program insert mode.
-
Turn the select knob 10 to insert the track.
-
Press the select knob 10 to enter the track.
-
The track corresponding to that number is inserted in the program before the track of step 2.
- To insert more tracks, press the select knob 10 again.
-
Repeat steps 2, 3, 4, and 5 to insert the tracks.
-
Press the PROGRAM IN button 18 to exit the program edit mode.
- Deleting the program
-
Press the PROGRAM IN button 13 to set the program edit mode.
PROGindicator flashes. -
Turn the select knob 10 to select the position at which to delete a track.
- Press the SEARCH (▶) button 1 to delete the track.
- Repeat steps 2 and 3 to delete more tracks.
- Press the PROGRAM IN button 18 to exit the program edit mode.
Playing the programs
-
Press the PROG. PLAY button to set the program play mode.
-
The program play mode LED is lit.
-
The first track in the program is cued and the standby mode is set.
-
Press the PLAY (▶) button 6.
- Programmed playback starts.
Clearing the program
- The program is also cleared when the OPEN/CLOSE button 3 is pressed.
Presetting program
- Programs can be stored in the preset memory. When a disc for which a program is preset is loaded, the programmed playback mode is set automatically.
-
Programs can be stored for up to three discs.
-
Follow the instructions under "Programming" to input the program.
-
Follow the instructions under "(2) Presetting Procedure" to set the preset mode. (See Page 15.)
-
Turn the select knob to select "02:Pr91" (or "03:Pr92" or "04:Pr93").
- Press the select knob 10
The character display changes as follows: [Before change] [After change]
Prg1 OFF Prg1 ON
Prg2 OFF Prg2 ON
Pr93 OFF Pr93 ON
-
Press the STOP (■) button 7
-
The preset setting mode is canceled and the set return to the normal mode.
To play a preset disc : Load a disc for which a program is preset. -
Press the PLAY (▶) button 6
NOTE:
- Programming is not possible with the disc holder open.
(7) Playing at a different pitch
(PITCH)
-
Press the PITCH button ⑤.
-
The pitch LED is flashed.
-
The play speed decreases when the pitch slider is moved upwards, increases when the pitch slider is moved downwards.
-
Press the PITCH button 15 again.
The pitch LED is lit.
- The play speed set with the pitch slider is held. In this state, the play speed will not change even if the pitch slider is moved.
- When the playback speed is preset in the preset mode, that play speed is set.
-
Press the PITCH button 15 again to return to the normal speed.
-
The pitch LED is turned off.
NOTE:
- When the play speed is changed, the sampling frequency of the digital output signal also changes, so it may not be possible to receive digital signals.
7 PLAYING MP3 FILES
There are many sites on the Internet from which you can download music files in MP3 format. These files can be downloaded following the instructions on the site and stored on CD-R/RW discs which can then be played on the DN-C635.
The music on commercially available music CDs can be converted into MP3 files on a computer using MP3 encoding programs. When this is done, the data is reduced to approximately 1/10 the original size. This MP3 data can then be stored on a CD-R/RW disc, allowing you to create a single 12cm CD-R/RW disc containing about 10 times more music than a normal music CD, that is some 100 tracks or more (^*)
- This is an approximately value for MP3 files of tracks about 5 minutes long converted at a standard bit rate (128 kbps) and stored on a CD-R/RW disc with a capacity of 650 MB.
- Recordings you make are for your personal use and should not be used in ways infringing upon the copyright holder as per copyright laws.
- MP3 may require time for reading.
- With disc condition it may not play properly.
NOTES :
- The DN-C635 is compatible with "MPEG-1 Audio Layer-3", "MPEG-2 Audio Layer-3" and "MPEG2.5 Audio Layer-3". It is not compatible with MP1 or MP2 standards.
SAMPLING FREQUENCY
| MPEG 1 | 48 kHz | 44.1 kHz | 32 kHz |
| MPEG 2 | 24 kHz | 22.05 kHz | 16 kHz |
| MPEG 2.5 | 12 kHz | 11.03 kHz | 8 kHz |
- When writing MP3 files on a CD-R/RW disc, set the writing program's format to "ISO9660 level 1" or "ISO9660 level 2", "Joliet" or "Romeo". MP3 files written in other formats may not play properly. With some writing programs it is not possible to record in "ISO9660" format. Use an "ISO9660" format writing program.
Generally speaking, the higher the MP3 file's bit rate, the better the sound quality. With the DN-C635 it is recommended to use MP3 files written with a bit rate of 128 kbps or greater. - The writing program may change the positions of the folders and files when writing the MP3 files on the CD-R/RW disc, so the files may not be played in the expected order.
- Make sure to give MP3 files the extension ".MP3". Files with extensions other than ".MP3" or without extensions cannot be played. (On Macintosh computers, MP3 files can be played by adding the extension ".MP3" after the file name consisting of a maximum of 8 Roman capital letters and / or numerals when recording them on CD-R/RW discs.)
-
To protect copyrights, no digital signals are output when playing MP3 files.
-
A maximum of 255 folders can be played on the DN-C635. Folders over 8 layers down, however, cannot be played. The maximum number of files is also 999. If there are 1,000 files, only the first 999 are played. (Files other than those with the extension ".MP3" are not counted.)
- On the DN-C635, folder and file names can be displayed like titles. Roman capital letters and/or numerals and "——" (underscores) are scrolled. (However, a maximum of 31 characters can be displayed.) In addition, folder and file names using other symbols will not be displayed properly.
- The DN-C635 is compatible with ID3-tag (Ver. 1.*, Ver. 2.0).
- It may not be possible to play some CD-R/RW discs due to dirt, scratches or the disc's properties.
- Do not apply seals or tape to the label or signal side of CDs or CD-R/RW discs. The glue could get on the disc surface, making the disc get stuck inside the set.
- The DN-C635 is multi-session compatible. Only music CDs can be played if the first session is a music CD, and only MP3 files can be played if the first session consists of MP3 files.
- The DN-C635 is compatible with play lists. (.m3u of WINAMP Form) (Preset functions)
NOTES:
- With some writing programs it may not play properly. In this case, please set to "PLst=OFF".
- Play List may require time for reading.
- The maximum number of play lists is also 255. If there are over 255 play lists, only the first 255 are performed.
(1) Playing folders or files
-
Load a disc containing MP3 files.
-
[To select a folder]
① In the stop mode, press the FOLDER button to turn on the "FOLDER" indicator.
② Turn the select knob 10 to select the folder you want to listen to.
- The folder name scrolls on the display.
③ When the CUE button 9 is pressed at this time, files in the folder can be selected.
- Operate following the procedure under "To select a file".
[To select a file]
① In the stop mode, press the TITLE button 2 to turn on the "FILE" indicator.
* This operation is only necessary when the "FOLDER" indicator is lit.
② Turn the select knob to select the file you want to listen to.
- The file name scrolls on the display.
- Press the PLAY (▶) button 6.
- When the TIME button 20 is pressed during playback, the "FOLDER" or "FILE" indicator turns off and the track number of elapsed track time are displayed.
- The display switches as follows each time the TITLE button ① is pressed during playback :
(2) Programmed playback of folders or files
Use this function to select certain tracks from the disc and program them to play in a certain order.
A maximum of 99 files and folders can be programmed.
(Programs can included both files and folders.)
Programming
- Press the PROGRAM IN button 18.
-
"PROG" indicator flashes, and "—Select?" appears on the display.
-
[To select a folder]
① Press the FOLDER button 2 to turn on the "FOLDER" indicator.
② Turn the select knob to select the folder.
③ Press the select knob to enter the folder.
[To select a file]
① Press the TITLE button ② to turn on the "FILE" indicator.
* This operation is only necessary when the "FOLDER" indicator is lit.
② Turn the select knob to select the file.
③ Press the select knob 10 to enter the file.
- To enter the next folder or the next file, press the select knob 10 again.
- Repeat steps 1, 2 and 3 to program the folder or file in the desired order.
- Press the PROGRAM IN button 18 to exit the program input mode.
PROG indicator lights, and set the return to the normal mode.
Changing the program
-
Press the PROGRAM IN button 18 to set the program edit mode.
PROGindicator flashes. -
Turn the select knob to select the program step.
- Press the select knob to be edited.
- Turn the select knob to change the folder or file. (Follow the procedure under "To select a folder" or "To select a file".)
-
Press the select knob to enter the folder or the file.
-
To edit the next folder or the next file, press the select knob 10 again.
-
Repeat steps 2, 3, 4 and 5 to change the folder or the file.
-
Press the PROGRAM IN button 18 to exit the program edit mode.
Inserting the program
-
Press the PROGRAM IN button 13 to set the program edit mode.
PROGindicator flashes. -
Turn the select knob to select the position at which to insert a folder or a file.
- Press the SEARCH (▶▶) button to set the program insert mode.
-
Turn the select knob to insert the folder or the file. (Follow the procedure under "To select a folder" or "To select a file".)
-
Press the select knob to enter the folder or the file.
-
The folder or the file corresponding to that number is inserted in the program before the folder or the file of step 2.
- To insert more folders or files, press the select knob 10 again.
-
Repeat steps 2, 3, 4 and 5 to insert the tracks.
-
Press the PROGRAM IN button 18 to exit the program edit mode.
- Deleting the program
-
Press the PROGRAM IN button 13 to set the program edit mode.
PROGindicator flashes. -
Turn the select knob to select the position at which to delete a folder or a file.
- Press the SEARCH (▲) button to delete the folder or the file.
- Repeat steps 2 and 3 to delete more folders or files.
- Press the PROGRAM IN button 18 to exit the program edit mode.
Playing the programs
- Press the PROG. PLAY button to set the program play mode.
The program play mode LED is lit. -
The first file in the program is cued and the standby mode is set.
-
Press the PLAY (▶) button 6.
-
Programmed playback starts.
NOTE:
- Programming is not possible with the disc holder open.
Preseting Programs
- Programs can be stored in the preset memory. When a disc for which a program is preset is loaded, the programmed playback mode is set automatically.
-
Programs can be stored for up to three discs.
-
Follow the instructions under "Programming" to input the program.
- Follow the instructions under "(2) Presetting Procedure" to set the preset mode. (See Page 15.)
-
Turn the select knob to select "02:Pr91" (or "03:Pr92" or "04:Pr93").
-
Press the select knob 10.
-
The character display changes as follows:
Before change] [After change]
Prg1 OFF Prg1 ON
Pr92 OFF Pr92 ON
Pr93 OFF Pr93 ON
- Press the STOP (■) button 7.
- The preset setting mode is canceled and the set return to the normal mode.
-
To play a preset disc : Load a disc for which a program is preset.
-
Press the PLAY (▶) button 6
(3) Repeat playback
1-folder all-track repeat
- Set the play mode to the single play mode.
- In the stop mode, press the FOLDER button 29.
The "FOLDER" indicator lights.
- Turn the select knob to select the folder you want to listen to.
-
The folder name scrolls on the display.
-
Press the REPEAT button 19.
-
The "REPEAT 1" indicators light on the display and the single track repeat mode is set.
-
Press the PLAY (▶) button 6.
-
Playback starts from the first track in the selected folder.
-
Once the last track in the selected folder has been played, playback resumes from the beginning of the first track in the selected folder and the tracks are repeated.
-
When the TIME button 20 is pressed during playback, the track number of elapsed track time are displayed. (The "FOLDER" indicator do not turns off.)
All track repeat
- Set the play mode to the continuous play mode.
-
In the stop mode, press the TITLE button to turn on the "FILE" indicator.
-
Press the REPEAT button 19.
-
The "REPEAT" indicators light on the display and the all track repeat mode is set.
-
Press the PLAY (▶) button 6.
The disc is played repeatedly. - Once the last track on the disc is played, playback continues from the beginning of the first track.
Single track repeat
- Set the play mode to the single play mode.
-
Press the REPEAT button 19.
-
The "REPEAT 1" indicators light on the display and the single track repeat mode is set.
- Turn the select knob to select the file you want to listen to.
- The file name scrolls on the display.
- Press the PLAY button (▶) 6
- Playback starts.
- Once the selected track ends, it is played again from the beginning.
- The single track repeat mode can also be set by pressing the REPEAT button during playback. The current track is played repeatedly.
- To cancel the single track repeat mode, press the REPEAT button 19 repeatedly until the "REPEAT" indicator turns off.
8 THE COMPACT DISC
Precautions on handling compact discs
- Do not allow fingerprints, oil or dust on the surface of the compact disc. If the signal surface is dirty, wipe it off with a soft, dry cloth. Wipe in circular motions from the center and out.
- Do not use water, benzene, thinner, record sprays, electrostatic proof chemicals, or silicone-treated cloth to clean discs.
Always use care when handling discs to prevent damaging the surface, in particular when removing a disc from the case and returning it. - Do not bend compact discs.
- Do not apply heat to compact discs.
- Do not enlarge the hole in the center of the disc.
- Do not write on the disc and do not attach any labels.
- Condensation will from on the disc surface if it is brought into a warm room from a cold area, such as outdoors during winter. Wait until the condensation disappears. Never dry discs with hair dryers, etc..
Precautions on storage
After playing a disc, always return it to its case.
- Keep discs in the cases when they are not to be played. This will protect them from dust and dirt and prolong their service life.
- Do not store discs in the following places:
1) Places exposed to direct sunlight for a considerable time.
2) Places subject to accumulation of dust or high humidity.
3) Places exposed to high temperatures, such as close to heater outlets.
9 POWER ON PLAYBACK
Playback starts automatically when the power is turned on.
- The power on playback function can be set with the "PRESET FUNCTIONS AND OPERATIONS" (See page 14).
10 EXPANDED FUNCTION
Multiple units of the DN-C635 or other DENON products (DN-780R etc.) can be used together for longer play time, simultaneous recording and other functions.
CASCADE (MULTIPULE CONTINUOUS) OPERATION
Refer to figure 1 to connect the equipment.
- Use a single RCA cable to connect the units' CASCADE OUT jacks with the units' CASCADE IN jacks.
- When the first and last units are connected as shown in figure 1, playback is performed endlessly.
- If the first and last units are not connected, operation stops at the last unit.
Cascade playback
- Set the cascade mode of all unit to the "Cas=ON". (Preset function)
-
Press the PLAY (▶) button 6 on unit 1. Playback starts.
-
Playback on unit 1 ends, playback starts on unit 2.
- Playback stops when the stop button on the unit currently playing is pressed.
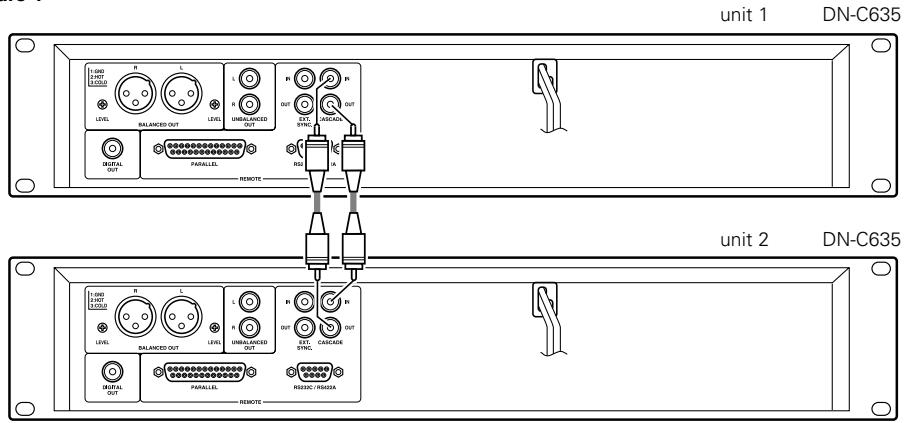
Figure 1
External synchronized recording
The synchronized recording can be used when the DN-C635 is used in combination with DENON other product (DN-780R etc.).
When the CD player's play button is pressed, a synchronized signal for starting is output from the EXT. SYNC. jack. When the STOP buttons on the CD player is pressed, a synchronized signal for stopping is output from the EXT. SYNC. jack.
Refer to figure 2 to connect the equipment.
- Use a single RCA cable to connect the units' EXT. SYNC. OUT jacks with the units' EXT. SYNC. IN jacks.
* Set the infrared remote sensors of all the units to "OFF" when using this function. Also set the same infrared remote control codes for all the units. (Refer to "PRESET FUNCTIONS AND OPERATIONS" (See page 14).) Failure to make these settings could result in malfunction.
- Load the CD into DN-C635. Load unrecorded cassette tapes into all decks.
- Set the reverse mode and Dolby NR of all decks.
- Adjust the twin recording level of DN-780Rs. (Master/Slave switch set to OFF.)
- Press the Twin recording button of DN-780R.
- Press the PLAY button 6 of DN-C635. Recording starts all decks.
NOTE:
-
Use tapes of the same times (lengths) as far as possible.
-
Press the STOP (■) button 7 of the DN-C635 to stop recording on all the connected units.
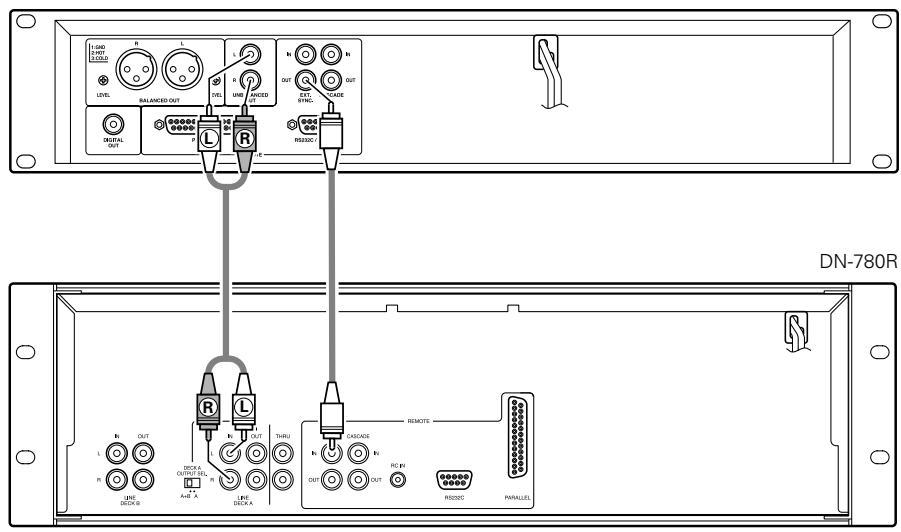
Figure 2
DN-C635

BEFORE SWITCHING OFF THE POWER
When you have finished using the CD player, before switching off the power be sure that the disc holder has been closed with the OPEN/CLOSE (▲) button.
CAUTION:
- Do not forcibly close the disc holder when the power is off. It may damage the unit when it is transported.

PRESET FUNCTIONS AND OPERATIONS
(1) List of Preset Functions
- Functions can be preset using the buttons on the front panel. These preset settings are stored in a permanent memory, so they are not cleared even when the power is turned off.
- The functions shown on the table below can be preset. Set the functions according to the usage purpose to efficiently achieve even higher quality playback.
- One of the preset functions can be used to display information on this set (microprocessor version).
| Preset function type | Description | Set upon shipment from factory | No. |
| Preset type | Selection of preset type. | Preset Type 1 | 1 |
| Finish mode | Setting of operation when playback ends. | Finish Next | 2 |
| Power on mode | Setting of operation when power is turned on. | Power On Standby | 3 |
| Auto cue | Setting of whether or not to perform the auto cue operation and the audio startup level. | CueDet. -48dB | 4 |
| Auto stop | Setting of whether or not to automatically stop the servo functions. | Sleep 30min | 5 |
| Program 1 | Setting of whether or not to play program 1. | Program 1 OFF | 6 |
| Program 2 | Setting of whether or not to play program 2. | Program 2 OFF | 7 |
| Program 3 | Setting of whether or not to play program 3. | Program 3 OFF | 8 |
| End monitor | Setting of whether or not to use the end monitor function and monitor time setting. | End Mon. 10 s | 9 |
| E.O.M. | Setting of whether or not to display the EOM and display time setting. | E.O.M. 10 s | 10 |
| Next track standby | Setting of whether or not to standby at the next track when the CUE button is pressed during playback. | Next Stb. OFF | 11 |
| Next Track Reserve | Setting of operation when select knob is turned during playback. | Reserve. OFF | 12 |
| Play speed | Standard playing speed setting. | Normal Speed | 13 |
| Delay start | Delay start time setting. | Delay OFF | 14 |
| Panel lock | Selection of whether or not to enable the panel buttons. | Panel OFF | 15 |
| Play lock | Selection of whether or not to inhibit the panel switches during playback. | Play Lock OFF | 16 |
| Eject lock | Selection of whether or not to lock ejecting during playback. | Eject OFF | 17 |
| Time mode | Setting of play mode when power is turned on. | Time REMAIN | 18 |
| Frame display | Selection of whether or not to display frames. | FR Disp ON | 19 |
| Text display | Selection of time or text display. | Text OFF | 20 |
| Parallel remote | Selection of whether or not to accept parallel remote signals. | Remote ENA | 21 |
| Parallel remote | Selection of whether or not to output standby tally. | ST. Tally ON | 22 |
| Parallel remote | External control tally output signal setting. | INDEX 2 Tally | 23 |
| Parallel remote | Fader start mode selection. | Fader Pause | 24 |
| Serial remote | Serial remote (9P D-Sub) setting. | RS 232C | 25 |
| Play mode | Setting of play mode when power is turned on. | Play SINGLE | 26 |
| Cascade | Selection of whether or not to output cascade signal. | Cascade OFF | 27 |
| RC cord | RC cord setting. | RC DENON | 28 |
| IR remote | Infrared remote control sensor setting. | IR OFF | 29 |
| Stereo/Mono | Selection of stereo or monaural playback. | Stereo | 30 |
| Play list (MP3) | Setting of whether or not to perform the play list. | Play List OFF | 31 |
| Preset clear | Setting for clearing presets and setting them to the initial values. | Ini. Preset | 32 |
| Set information | Microprocessor version display. | Ver. *** (* = number) | 33 |
(2) Presetting procedure
1 Press the STOP (■) button 7 for approximately 2 seconds while in the stop mode.
2 Turn the select knob 10 and select the preset item.
3 Press the select knob to change the setting.
4 The preset mode is canceled when the STOP (■) button 7. The setting are written at this time.
(3) Detailed Description of Preset Functions
(^* = initial setting)
1) "Preset Type (*)" (Three different sets (types) of presettings can be made and used for different purposes.)
*01:P No=1 : Set to preset type 1.
01: P No=2 : Set to preset type 2.
01:PNo=3 :Set to preset type 3.
2) "Finish Mode"
02:Fin=Stop : Stop mode is set after playback ends.
*02:Fin=Next : Standby mode is set at next track after playback ends.
02:Fin=Rcue : Standby mode is set at playback start position after playback ends.
3) "Power On (****)"
*03:P On=Stb : Standby mode is set at specified track after TOC is read.
03:P On= Ply :Playback begins in the all repeat mode after TOC is read.
03:P On=Stp : Stop mode is set after TOC is read.
4) "CueDet. Level"
04:CDet.=- : Set the audio detection level for cueing. (-48 / -42 / -36)
04:CDet. = OFF :Sound startup position is not cued.
5) "Sleep ON (OFF)"
05:Sleep= : Automatically turn the servo functions off if no button is operated for ** minutes in the pause, standby or manual search mode. (1 / 2 / 5 / 10 / 15 / 30)
05:Slp=OFF : Do not automatically turn the servo functions off.
6) "Program 1 OFF (ON)"
06:Prg 1 : Store the contents of program 1 when on. (Initial setting - OFF)
7) "Program 2 OFF (ON)"
07:Prg 2 : Store the contents of program 2 when on. (Initial setting - OFF)
8) "Program 3 OFF (ON)"
08:Prg 3 : Store the contents of program 3 when on. (Initial setting - OFF)
9) "End Mon (^**) s"
09:EndM () s : Set the end monitor time. (5/10/15/20/25/30/35)
09:EndM OFF : Do not use the end monitor function.
10) "EOM Time"
10:EOM=s : Set the EOM time. (0 / 5 / *10 / 15 / 20 / 30 / 60)
10:EOM=OFF : Do not use the EOM function.
11) "Next Standby"
*11:NStb=OFF : Return to the play start position and standby when the CUE button is pressed during playback.
11: NStb=ON : Standby at the beginning of the next track when the CUE button is pressed during playback.
12) "Next Track Reserve"
*12:Rsv=OFF : Specified track is searched for immediately when select knob is turned during playback.
12:Rsv=ON Track to be searched for is scheduled after playback of current track ends when select knob is turned during playback.
13) "CD Pitch"
13:Pit=Norm : Play at normal speed.
13: Pit = + / - ^.^* : Play at variable speed. ± (0.2 / 0.4 / 0.6 / 0.8 / 1.0 / 1.2 / 1.4 / 1.6 / 1.8 / 2.0 / 2.2 / 2.4 / 2.6 / 2.8 / 3.0), OFix
14) "Delay OFF (***ms)"
14:Dly=OFF (*ms) : Set the time for delayed start after the play start operation. (OFF/100 m/200 m/300 m)
15) "Panel Lock ON/OFF"
*15:Pane=OFF : Enable operation of all the buttons on the front panel.
15:Pane=ON : Inhibit operation of all panel buttons other than those use for presetting operations and OPEN/CLOSE button.
16) "Play Lock"
16:Play=ON :Inhibit all operations other than the I, TIME, PLAY MODE, FOLDER and TITLE buttons during playback.
*16:Play=OFF : Enable all functions during playback.
17) "Eject Lock ON/OFF"
17:Ejec=ON : The OPEN/CLOSE button is locked during playback.
*17:Ejec=OFF : The OPEN/CLOSE button is not locked during playback.
18) "Time Mode"
18:Time ELA
18:Time=REM
19) "Frame Display"
*19:Frm=ON
19:Frm=OFF
: Time display is elapsed time when power is turned on.
: Time display is remaining time when power is turned on.
19:Frm=OFF
: Display the frames on the time display during playback.
: Do not display the frames on the time display during playback. (The frames are displayed in the manual search, standby, pause and end monitor modes.)
20) "Text Display"
*20:Text=OFF
20:Text=ON
: Display is set time mode when power is turned on.
: Display is set text mode when power is turned on.
21) "Parallel Remote"
*21:Para=ON
21:Para=OFF
: Enable input of control signals to the parallel remote connector.
: Inhibit input of control signals to the parallel remote connector.
22) "St. Tally ON (OFF)"
*22:StbT=ON
22:StbT=OFF
: Output standby tally from parallel remote connector.
: Do not output standby tally from parallel remote connector.
23) "Index Tally"
*23:IndexTly2
23:IndxTly3
: Output index 2 tally signal to remote pin (17).
: Output index 3 tally signal to remote pin (17).
24) "Fader Start"
*24:F=Pause
: Start playback when remote fader pins (9-10) are short-circuited and pause when pins are open.
: Start playback when remote fader pins (9-10) are short-circuited and continue playback when pins are open.
25) "Serial Remote"
*25:RS=232C
25:RS=422A
25:RS=OFF
: Set the serial ports to RS232C.
: Set the serial ports to RS422A.
: Inhibit signals of 9P D-Sub connector.
26) "Play Mode"
26:Play=CON
26:Play = SIN
: Play mode is continuous when power is turned on.
: Play mode is single when power is turned on.
: Output the cascade signal (Cascade operation possible)
: Do not output the cascade signal.
28) "IR Code"
*28:RC=DENON
: Receive denom codes. (OPEN/CLOSE, PLAY, PAUSE, STOP, I▶, ▷▶I, ▷▶, ▷▶, TIME, REPEAT and A-B buttons are possible.)
: RC-5 codes can be received. (OPEN/CLOSE, PLAY, PAUSE, STOP, I▶, ▷▶, ▷▶, ▷▶, REPEAT and A-B buttons are possible.)
29) "IR Remote"
29:IR=ON
29:IR=OFF
:Accept infrared remote control signals.
: Do not accept infrared remote control signals.
30) "Stereo (Mono)"
30:Stereo
30:Mono
: Output L and R stereo signals from the output connector.
: Output mixed L and R signals from the output connector.
31) "Play List"
*31:PLst=OFF
31:PList=ON
: Play List does not perform.
: MP3 is performed according to Play List.
32) "Preset Clear (Ini. Preset)"
32:P Init?
: Clear the presettings (set to the initial factory values).
: Display the microprocessor version. ("xxxx" is a number.)

TROUBLESHOOTING
Make sure of the followings before you consider as any malfunctions :
- Are all the connections correct?
- Are all system components being operated correctly in accordance with the operating instructions?
- Are the speakers and amplifier/receiver functioning correctly?
If the tape deck still does not function properly, check the symptom against the list below. If the symptom does not correspond to the check list, please contact your DENON dealer.
| Problem | Cause | Remedy |
| Disc holder does not open/close. | •Power operation switch is not turned on. | •Turn the power operation switch on. |
| When a disc is loaded, "TOC Error" or "No Disc" is displayed. | •Disc is not properly loaded. | •Reload the disc. |
| When the PLAY (▶) button is pressed, playback does not start. | •Disc is dirty or scratched. | •Clean the disc. |
| There is no sound, or it is distorted. | •Output cord is not properly connected. •Amplifier adjustment is inappropriate. | •Connect the output cord properly. •Readjust the amplifier. |
| A specific section of the disc will not play. | •Disc is dirty or scratched. | •Clean the disc. |
| Programmed playback does not work. | •Programmed playback operation has been performed improperly. | •Restart programmed playback. |
14 SPECIFICATIONS
| Audio Channel : | 2 channel stereo |
| Quantization : | 16-bit Liner |
| Sampling Frequency : | 44.1 kHz at Normal Pitch |
| Oversampling Ratio : | 8 times |
| Frequency Response : | 5 to 20,000 Hz |
| Total Harmonic Distortion : | 0.004 % (at “CD Pitch = 0Fix” mode of the preset function) |
| Signal-to-noise Ratio : | 104 dB (at “CD Pitch = 0Fix” mode of the preset function) |
| Dynamic Range : | 100 dB (at “CD Pitch = 0Fix” mode of the preset function) |
| Channel Separation : | 90 dB (at “CD Pitch = 0Fix” mode of the preset function) |
| Unbalanced Output : | RCA jack |
| Output Level : | 2.0 V at 0 dB disc |
| Load Impedance : | 10 kΩ / kohms or more |
| Balanced Output : | 3-Pin XLR |
| Output Level (Stereo) : | +18 dBu at 0 dB disc |
| Load Impedance : | 600 Ω / ohms |
| Adjust Range : | +22 dBu to -20 dBu |
| Digital Output : | RCA jack |
| Signal Format : | SPDIF or IEC-958 Type II |
| Variable Pitch Control : | ±12 % max. |
| Frame Search Accuracy : | 1/75 second |
| Discs : | Standard compact discs (12 cm and 8 cm) |
| Remote : | 9P D-Sub (Serial port) |
| Remote Control Sensor | |
| 25P D-Sub (Parallel) | |
| Headphone Output : | Stereo |
| Outputs Level : | 7 mW |
| Load Impedance : | 33 Ω / ohms |
| Power supply : | 120 V AC ±10 %, 60 Hz (for U.S.A. & Canada models) |
| 230 V AC ±10 %, 50 Hz (for European & U.K. models) | |
| Power Consumption : | 15 W |
| Installation : | 19-inch rack mountable (2U) |
| Mass : | 4.7 kg |
- For improvement purposes, specifications and design are subject to change without notice.
EINFUHRUNG
| Pin-Nr. | Signalname | I / O | |
| 1 | FG | - | |
| 14 | PLAY tally | O | TTL (Iol = 20mA) |
| 2 | PLAY command | I | HCMOS (Ii = 3mA) |
| 15 | PAUSE tally | O | TTL (Iol = 20mA) |
| 3 | PAUSE command | I | HCMOS (Ii = 3mA) |
| 16 | CUE tally | O | TTL (Iol = 20mA) |
| 4 | CUE command | I | HCMOS (Ii = 3mA) |
| 17 | INDEX 2/INDEX 3 tally | O | TTL (Iol = 20mA) |
| 5 | TRACK (+) command | I | HCMOS (Ii = 3mA) |
| 18 | Tally common | - | |
| 6 | TRACK (-) command | I | HCMOS (Ii = 3mA) |
| 19 | Reserved | - | |
| 7 | SEARCH (Fwd) command | I | HCMOS (Ii = 3mA) |
| 20 | Reserved | - | |
| 8 | SEARCH (Rev) command | I | HCMOS (Ii = 3mA) |
| 21 | Reserved | - | |
| 9 | FADER START command | I | HCMOS (Ii = 3mA) |
| 22 | Tally power supply | - | +3,3V, 20mA |
| 10 | Command common | - | (Ii = 10mA) |
| 23 | Command common | - | |
| 11 | NC | - | |
| 24 | EOM tally | - | TTL (Iol = 20mA) |
| 12 | Reserved | - | |
| 25 | Reserved | - | |
| 13 | Reserved | - |
HINWEIS:
Pr92 OFF Pr92 ON
Pr93 OFF Pr93 ON
21) "Parallel Remote"
*21:Para=ON
21:Para=OFF
22) "St. Tally ON (OFF)"
*22:StbT=ON
22:StbT=OFF
13 Touche PLAY MODE (mode lecture)
4 Prises DIGITAL OUT
| Broche No. | Désignation du signal | I / O | |
| 1 | FG | - | |
| 14 | PLAY tally | O | TTL (Iol = 20mA) |
| 2 | PLAY command | I | HCMOS (li = 3mA) |
| 15 | PAUSE tally | O | TTL (Iol = 20mA) |
| 3 | PAUSE command | I | HCMOS (li = 3mA) |
| 16 | CUE tally | O | TTL (Iol = 20mA) |
| 4 | CUE command | I | HCMOS (li = 3mA) |
| 17 | INDEX 2/INDEX 3 tally | O | TTL (Iol = 20mA) |
| 5 | TRACK (+) command | I | HCMOS (li = 3mA) |
| 18 | Tally common | - | |
| 6 | TRACK (-) command | I | HCMOS (li = 3mA) |
| 19 | Reserved | - | |
| 7 | SEARCH (Fwd) command | I | HCMOS (li = 3mA) |
| 20 | Reserved | - | |
| 8 | SEARCH (Rev) command | I | HCMOS (li = 3mA) |
| 21 | Reserved | - | |
| 9 | FADER START command | I | HCMOS (li = 3mA) |
| 22 | Tally power supply | - | +3,3V, 20mA |
| 10 | Command common | - | (II = 10mA) |
| 23 | Command common | - | |
| 11 | NC | - | |
| 24 | EOM tally | - | TTL (Iol = 20mA) |
| 12 | Reserved | - | |
| 25 | Reserved | - | |
| 13 | Reserved | - |
REMARQUE:
Pr92 OFF Pr92 ON
Pr93 OFF Pr93 ON
9 LECTURE A LA MISE SOUS TENSION
21) "Parallel Remote"
*21:Para=ON
22) "St. Tally ON (OFF)"
*22:StbT=ON
| Pin No. | Nome del segnale | I / O | |
| 1 | FG | - | |
| 14 | PLAY tally | O | TTL (Iol = 20mA) |
| 2 | PLAY command | I | HCMOS (li = 3mA) |
| 15 | PAUSE tally | O | TTL (Iol = 20mA) |
| 3 | PAUSE command | I | HCMOS (li = 3mA) |
| 16 | CUE tally | O | TTL (Iol = 20mA) |
| 4 | CUE command | I | HCMOS (li = 3mA) |
| 17 | INDEX 2/INDEX 3 tally | O | TTL (Iol = 20mA) |
| 5 | TRACK (+) command | I | HCMOS (li = 3mA) |
| 18 | Tally common | - | |
| 6 | TRACK (-) command | I | HCMOS (li = 3mA) |
| 19 | Reserved | - | |
| 7 | SEARCH (Fwd) command | I | HCMOS (li = 3mA) |
| 20 | Reserved | - | |
| 8 | SEARCH (Rev) command | I | HCMOS (li = 3mA) |
| 21 | Reserved | - | |
| 9 | FADER START command | I | HCMOS (li = 3mA) |
| 22 | Tally power supply | - | +3,3V, 20mA |
| 10 | Command common | - | (Ii = 10mA) |
| 23 | Command common | - | |
| 11 | NC | - | |
| 24 | EOM tally | - | TTL (Iol = 20mA) |
| 12 | Reserved | - | |
| 25 | Reserved | - | |
| 13 | Reserved | - |
NOTA:
Pr92 OFF Pr92 ON
Pr-93 OFF Pr-93 ON
2) "Finish Mode" (CD)
5) "Sleep ON (OFF)" (CD)
6) "Program 1 OFF (ON)"
7) "Program 2 OFF (ON)"
8) "Program 3 OFF (ON)"
12) "Next Track Reserve" (CD)
15) "Panel Lock ON/OFF"
21) "Parallel Remote"
*21:Para=ON
21:Para=OFF
22) "St. Tally ON (OFF)"
*22:StbT=ON
22:StbT=OFF
23) "Index Tally"
*23:IndexTly2
23:IndxTly3
24) "Fader Start"
*24:F=Pause
24:F=Play
25) "Serial Remote"
*25:RS=232C
25:RS=422A
25:RS=OFF
26) "Play Mode"
26:Play=CON
*26:Play = SIN
| Número decontacto | Nome del segnale | I / O | |
| 1 | FG | - | |
| 14 | PLAY tally | O | TTL (lol = 20mA) |
| 2 | PLAY command | I | HCMOS (li = 3mA) |
| 15 | PAUSE tally | O | TTL (lol = 20mA) |
| 3 | PAUSE command | I | HCMOS (li = 3mA) |
| 16 | CUE tally | O | TTL (lol = 20mA) |
| 4 | CUE command | I | HCMOS (li = 3mA) |
| 17 | INDEX 2/INDEX 3 tally | O | TTL (lol = 20mA) |
| 5 | TRACK (+) command | I | HCMOS (li = 3mA) |
| 18 | Tally common | - | |
| 6 | TRACK (-) command | I | HCMOS (li = 3mA) |
| 19 | Reserved | - | |
| 7 | SEARCH (Fwd) command | I | HCMOS (li = 3mA) |
| 20 | Reserved | - | |
| 8 | SEARCH (Rev) command | I | HCMOS (li = 3mA) |
| 21 | Reserved | - | |
| 9 | FADER START command | I | HCMOS (li = 3mA) |
| 22 | Tally power supply | - | +3,3V, 20mA |
| 10 | Command common | - | ( li = 10mA) |
| 23 | Command common | - | |
| 11 | NC | - | |
| 24 | EOM tally | - | TTL (lol = 20mA) |
| 12 | Reserved | - | |
| 25 | Reserved | - | |
| 13 | Reserved | - |
NOTA:
Pr92 OFF Pr92 ON
Pr93 OFF Pr93 ON
| Pin nr. | Naam van signaal | I / O | |
| 1 | FG | - | |
| 14 | PLAY tally | O | TTL (Iol = 20mA) |
| 2 | PLAY command | I | HCMOS (li = 3mA) |
| 15 | PAUSE tally | O | TTL (Iol = 20mA) |
| 3 | PAUSE command | I | HCMOS (li = 3mA) |
| 16 | CUE tally | O | TTL (Iol = 20mA) |
| 4 | CUE command | I | HCMOS (li = 3mA) |
| 17 | INDEX 2/INDEX 3 tally | O | TTL (Iol = 20mA) |
| 5 | TRACK (+) command | I | HCMOS (li = 3mA) |
| 18 | Tally common | - | |
| 6 | TRACK (-) command | I | HCMOS (li = 3mA) |
| 19 | Reserved | - | |
| 7 | SEARCH (Fwd) command | I | HCMOS (li = 3mA) |
| 20 | Reserved | - | |
| 8 | SEARCH (Rev) command | I | HCMOS (li = 3mA) |
| 21 | Reserved | - | |
| 9 | FADER START command | I | HCMOS (li = 3mA) |
| 22 | Tally power supply | - | +3.3V, 20mA |
| 10 | Command common | - | (II = 10mA) |
| 23 | Command common | - | |
| 11 | NC | - | |
| 24 | EOM tally | - | TTL (Iol = 20mA) |
| 12 | Reserved | - | |
| 25 | Reserved | - | |
| 13 | Reserved | - |
OPMERKING:
5 NORMALE CD-WEERGAVE
(1) De weergave starten
9 WEERGAVE BIJ INSCHAKELING
5) "Sleep ON (OFF)" (CD)
05:Sleep=*
05:Slp=OFF
6) "Program 1 OFF (ON)"
06:Prg 1
7) "Program 2 OFF (ON)"
07:Prg 2
8) "Program 3 OFF (ON)"
08:Prg 3
12) "Next Track Reserve"
*12:Rsv=OFF
15) "Panel Lock ON/OFF"
*15:Pane=OFF
21) "Parallel Remote"
*21:Para=ON
21:Para=OFF
: Invoer van bedieningsssignalen via de parallelle-afstandsbedieningsaansluiting möglichkimen.
: Invoer van bedieningsssignalen via de parallelle-afstandsbedieningsaansluiting verhinderen.
22) "St. Tally ON (OFF)"
*22:StbT=ON
22:StbT=OFF
| Stiftnr. | Signal | I / O | |
| 1 | FG | - | |
| 14 | PLAY tally | O | TTL (Iol = 20mA) |
| 2 | PLAY command | I | HCMOS (li = 3mA) |
| 15 | PAUSE tally | O | TTL (Iol = 20mA) |
| 3 | PAUSE command | I | HCMOS (li = 3mA) |
| 16 | CUE tally | O | TTL (Iol = 20mA) |
| 4 | CUE command | I | HCMOS (li = 3mA) |
| 17 | INDEX 2/INDEX 3 tally | O | TTL (Iol = 20mA) |
| 5 | TRACK (+) command | I | HCMOS (li = 3mA) |
| 18 | Tally common | - | |
| 6 | TRACK (-) command | I | HCMOS (li = 3mA) |
| 19 | Reserved | - | |
| 7 | SEARCH (Fwd) command | I | HCMOS (li = 3mA) |
| 20 | Reserved | - | |
| 8 | SEARCH (Rev) command | I | HCMOS (li = 3mA) |
| 21 | Reserved | - | |
| 9 | FADER START command | I | HCMOS (li = 3mA) |
| 22 | Tally power supply | - | +3,3V, 20mA |
| 10 | Command common | - | (II = 10mA) |
| 23 | Command common | - | |
| 11 | NC | - | |
| 24 | EOM tally | - | TTL (Iol = 20mA) |
| 12 | Reserved | - | |
| 25 | Reserved | - | |
| 13 | Reserved | - |
OBSERVERVA:
Tally-utstiftet foljer specifikationen for oppna upssamlingskretsar (Imax. 20mA Vmax.3,3 V),men max. forsorjningsspänning ar 80 mA. Använd dārfor en total lastspanning pa 80 mA erler minnde.
Kontrolluttag for extern synchronising (EXT. SYNC.)
Pr92 OFF Pr92 ON
Pr93 OFF Pr93 ON
5) "Sleep ON (OFF)" (CD)
6) "Program 1 OFF (ON)"
06:Prg 1 : Lagra programmierad information i Program 1. (Grundinstallning = OFF)
7) "Program 2 OFF (ON)"
8) "Program 3 OFF (ON)"
12) "Next Track Reserve"
15) "Panel Lock ON/OFF"
21) "Parallel Remote"
*21:Para=ON
21:Para=OFF
: Enable input of control signals to the parallel remote connector.
: Inhibit input of control signals to the parallel remote connector.
22) "St. Tally ON (OFF)"
*22:StbT=ON
22:StbT=OFF
: Sänd Standby Tally-signal frän den parallella fjärrstyrningsanslutningen.
: Sänd ej Standby Tally-signal frän den parallella fjärrstyrningsanslutningen.
23) "Index Tally"
*23:IndxTly2
23:IndxTly3
: Sänd Index 2 Tally-signal till mottagarens stift (17).
: Sänd Index 3 Tally-signal till mottagarens stift (17).
24) "Fader Start"
*24:F=Pause
- CAUTION
- Handle the power supply cord carefully
- Do not open the rear cover
- Do not place anything inside
- CAUTION:
- NOTE:
- LABELS (for U.S.A. model only)
- CERTIFICATION
- NOTE ON USE / HINWEISE ZUM GEBRAUCH / OBSERVATIONS RELATIVES A L'UTILISATION / NOTE SULL'USO NOTAS SOBRE EL USO / ALVORENS TE GEBRIKEN / OBSERVERA
- - DECLARATION OF CONFORMITY
- CLASS 1 LASER PRODUCT
- LUOKAN 1 LASERLAITE
- KCLASS 1 LASERAPPARAT
- "CLASS 1 LASER PRODUCT"
- ADVARSEL:
- VAROITUS!
- WARNING-
- TABLE OF CONTENTS
- ■ ACCESSORIES
- FEATURES
- PART NAMES AND FUNCTIONS (Refer to page 3.)
- Front panel
- Power operation switch (POWER)
- Disc holder
- Disc holder open/close button (△ OPEN/CLOSE)
- Remote control sensor (REMOTE SENSOR)
- ⑤ Display
- ⑥ PLAY button (▶)
- STOP button (■)
- PAUSE button (II)
- CUE button
- Select knob (I<,▶I)
- 12 Search button (▲▲, ▲▶)
- PLAY MODE button
- END MON button
- PITCH button
- Pitch Slider
- PROG. PLAY ON/OFF button
- PROGRAM IN button
- REPEAT button
- TIME button
- TITLE button
- FOLDER button
- A-B (A-B repeat) button
- Headphones jack
- PHONES LEVEL control
- Rear panel
- BALANCED OUT connectors
- LEVEL L/R controls
- UNBALANCED OUT jacks
- DIGITAL OUT jack
- Serial control port
- Parallel remote control port
- External synchronized control jacks (EXT. SYNC.)
- Cascade control jacks (CASCADE)
- Display
- CD transport indicator
- Mode display portion
- CD pitch display
- Playing position display
- tracks music calender
- Multiple display
- Time mode indicator
- Infrared remote control indicator
- Play mode indicators
- CONNECTIONS
- Connection precautions
- Remote control connections
- Installation precautions
- OPENING AND CLOSING THE DISC HOLDER AND LOADING A DISC
- Opening and closing the disc holder
- How to load a disc
- CAUTIONS:
- ■ Messages
- NORMAL CD PLAYBACK
- Starting playback
- Finish stop :
- Finish next :
- Finish recue :
- Pausing playback at any point
- (Pause)
- Returning to the position at which playback started
- (Back Cue)
- Stopping playback
- Sleep mode (Preset functions)
- Advancing to the next track during playback
- (Automatic search)
- Returning to the beginning of the current track during playback
- Audible quick search
- Manual search
- Manual search forward
- Manual search in reverse
- Repeating playback of a desired interval
- (Single track repeat)
- (All track repeat)
- To play the set section repeatedly
- (A-B repeat)
- Playing specific tracks in a specific order
- (Programmed play)
- ■ Inputting the program
- Changing the program
- Inserting the program
- - Deleting the program
- Playing the programs
- Clearing the program
- Presetting program
- Playing at a different pitch
- (PITCH)
- PLAYING MP3 FILES
- NOTES :
- NOTES:
- Playing folders or files
- Programmed playback of folders or files
- Programming
- Preseting Programs
- Repeat playback
- 1-folder all-track repeat
- All track repeat
- Single track repeat
- THE COMPACT DISC
- Precautions on handling compact discs
- Precautions on storage
- POWER ON PLAYBACK
- EXPANDED FUNCTION
- CASCADE (MULTIPULE CONTINUOUS) OPERATION
- Cascade playback
- External synchronized recording
- BEFORE SWITCHING OFF THE POWER
- PRESET FUNCTIONS AND OPERATIONS
- List of Preset Functions
- Presetting procedure
- Detailed Description of Preset Functions
- TROUBLESHOOTING
- SPECIFICATIONS
- EINFUHRUNG
- HINWEIS:
- Touche PLAY MODE (mode lecture)
- Prises DIGITAL OUT
- REMARQUE:
- LECTURE A LA MISE SOUS TENSION
- NOTA:
- OPMERKING:
- NORMALE CD-WEERGAVE
- De weergave starten
- WEERGAVE BIJ INSCHAKELING
- OBSERVERVA:
- Kontrolluttag for extern synchronising (EXT. SYNC.)
Brand : MARANTZ
Model : DN-C635
Category : Professional CD player