
DESIRE 1900-56 - Kettle RUSSELL HOBBS - Free user manual and instructions
Find the device manual for free DESIRE 1900-56 RUSSELL HOBBS in PDF.
| Product type | Multi-function blender with food processor |
| Brand | RUSSELL HOBBS |
| Model | DESIRE 1900-56 |
| Bowl capacity | 1.5 L (max marking at 1500 ml) |
| Speeds | 2 speeds + pulse function |
| Included accessories | Chopper, blender, beater, slicing/shredding disc, pusher, cap |
| Motor power | Approximately 300-500 W (estimate) |
| Power supply | Electric, mains plug (220-240 V) |
| Dimensions (L x W x H) | Approximately 20 x 18 x 35 cm (estimate) |
| Weight | Approximately 1.5 kg (estimate) |
| Bowl material | Glass or plastic (not specified, estimated plastic) |
| Blades | Stainless steel (estimate) |
| Pulse function | Short power boost by turning the regulator to the © position |
| Safety | Automatic stop after 1 min, cool down 2 min; do not immerse motor unit |
| Maintenance and cleaning | Wipe motor unit with a damp cloth; wash removable parts in soapy water (dishwasher not allowed) |
| Repairability | Replace cable by an authorized technician; no spare parts mentioned |
| Warranty | Manufacturer standard (not specified) |
| Recycling | Do not dispose with household waste; selective collection |
Frequently Asked Questions - DESIRE 1900-56 RUSSELL HOBBS
User questions about DESIRE 1900-56 RUSSELL HOBBS
0 question about this device. Answer the ones you know or ask your own.
Ask a new question about this device
Download the instructions for your Kettle in PDF format for free! Find your manual DESIRE 1900-56 - RUSSELL HOBBS and take your electronic device back in hand. On this page are published all the documents necessary for the use of your device. DESIRE 1900-56 by RUSSELL HOBBS.
USER MANUAL DESIRE 1900-56 RUSSELL HOBBS
HHCTpyKcnn (bblrapckn) 86
92
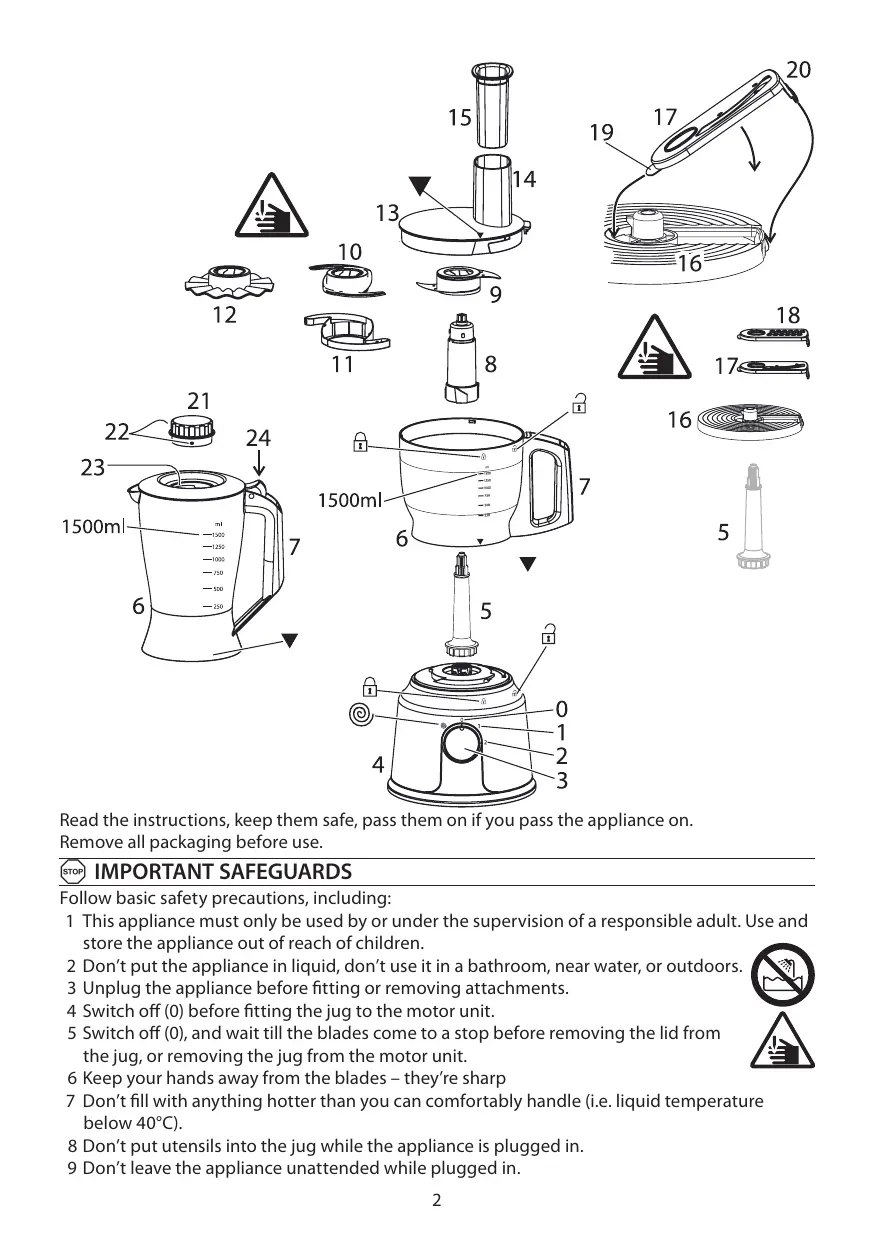
Read the instructions, keep them safe, pass them on if you pass the appliance on.
Remove all packaging before use.

IMPORTANT SAFEGUARDS
Follow basic safety precautions, including:
1 This appliance must only be used by or under the supervision of a responsible adult. Use and store the appliance out of reach of children.
2 Don't put the appliance in liquid, don't use it in a bathroom, near water, or outdoors.
3 Unplug the appliance before fitting or removing attachments.
4 Switch off (0) before fitting the jug to the motor unit.
5 Switch off (0), and wait till the blades come to a stop before removing the lid from the jug, or removing the jug from the motor unit.
6 Keep your hands away from the blades – they're sharp
7 Don't fill with anything hotter than you can comfortably handle (i.e. liquid temperature below 40^ ).
8 Don't put utensils into the jug while the appliance is plugged in.
9 Don't leave the appliance unattended while plugged in.
| diagrams | 7 handle | 16 disc |
| 0 off | 8 support | 17 slicer |
| 1 low | 9 mixer | 18 grater |
| 2 high | 10 chopper | 19 tab |
| 3 speed control | 11 blade guard | 20 latch |
| 4 motor unit | 12 creamer | 21 cap |
| © pulse | 13 lid | 22 hole |
| 5 spindle | 14 tube | 23 pips |
| 6 jug | 15 pusher | 24 press |
10 Don't let the jug overflow. If liquid gets under the motor unit, it may be sucked into the motor, damaging it.
11 Don't use accessories or attachments other than those we supply.
12 Don't use the appliance for any purpose other than those described in these instructions.
13 Don't operate the appliance if it's damaged or malfunctions.
14 If the cable is damaged, it must be replaced by the manufacturer, its service agent, or someone similarly qualified, in order to avoid hazard.
household use only
SWITCH ON
1 Sit the motor unit on a dry, firm, level surface, near a power socket.
2 Check that the speed control is set to 0.
3 Put the plug into the power socket.
SPEED CONTROL
4 Turn the speed control to the speed you want (1 = low, 2 = high).
5 Turn the speed control back to 0 to turn the motor off.
6 Generally, large quantities, thick mixes, and a high ratio of solids to liquids suggest longer timings and slower speeds.
7 Smaller quantities, thinner mixes, and more liquids than solids suggest shorter timings and higher speeds.
8 Don't run the motor for more than 1 minute, or it may overheat. After 1 minute, switch off for at least 2 minutes, to let the motor cool.
PULSE
9 Turning the speed control anti-clockwise to ⑥ will give you a short burst at high speed. In this direction, the knob is spring-loaded. When you let go, it'll return to 0.
USING THE BLENDER
10 Align the on the bottom of the jug with the 21 on the motor unit.
11 Lower the jug on to the motor unit, then turn the jug to align the with the .
12 Press the lever to open the lid.
13 Put the ingredients into the jug.
14 Don't fill past the 1500ml mark. If you do, the contents may force the lid off when you start the motor.
15 Close the lid.
16 Align the pips on the cap with the slots in the hole, fit the cap, and turn it clockwise to lock it.
17 To add ingredients while the blender is working, remove the cap, pour the new ingredients through the hole, then replace the cap.
18 Check that the added ingredients don't push the volume in the jug past the 1500ml mark.

USING THE PROCESSOR
19 Switch the appliance off (0) and unplug it.
20 Fit the spindle to the top of the motor unit.
21 Align the on the bottom of the jug with the 21 on the motor unit.
22 Lower the jug on to the motor unit, then turn the jug to align the with the 1 .
23 Turn the lid to bring the on the lid over the 1 on the jug, and lift the lid off.
24 Choose the attachment you need.

WITH THE SUPPORT
25 Use the chopper for pulverizing ingredients.
26 Use the mixer to mix ingredients together.
27 Use the creamer to thicken cream, to beat eggs, and to cream eggs and sugar together.
28 Fit the attachment over the support, and slide it to the bottom.
29 Lower the support into the centre of the jug, over the spindle.
30 Put the ingredients into the jug.
31 Don't fill past the 1500ml mark. If you do, the contents may force the lid off when you start the motor.
32 Replace the lid, and turn it to bring the on the lid over the 1 on the jug, to lock it in place.
33 To add ingredients while the motor is running:
a) lift the pusher out of the tube
b) add the ingredients via the tube
c) replace the pusher

WITH THE DISC
34 To fit the slicer or grater to the disc:
a) insert the tab into the centre of the disc
b) lower the slicer/grater into the disc
c) secure the latch over the edge of the disc
35 Lower the disc over the top of the spindle.
36 Replace the lid, and turn it to bring the on the lid over the 1 on the jug, to lock it in place.
37 Remove the pusher, and drop the ingredients down the tube.
38 Replace the pusher, and use it to push the ingredients gently down the tube.
39 Don't use fingers or cutlery to push food down the tube - only the pusher.
40 The blade(s) on top of the disc will slice or grate the food into the jug.
41 Don't let the jug get more than about half full - stop and empty it.
42 To remove the slicer or grater from the disc, ease the latch away from the side of the disc, and lift the slicer/grater off.

CARE AND MAINTENANCE
43 Switch the appliance off (0) and unplug it.
44 Wipe the outside of the motor unit with a clean damp cloth.
45 Wash the removable parts in warm soapy water, rinse well, drain, and air dry.
46 Take great care with the blades – don't handle them directly, use a nylon washing-up brush.
47 Don't put any part of the appliance in a dishwasher.

ENVIRONMENTAL PROTECTION
To avoid environmental and health problems due to hazardous substances in electrical and electronic goods, appliances marked with this symbol mustn't be disposed of with unsorted municipal waste, but recovered, reused, or recycled.

recipes
handful
= clove(s)
coriander pesto
2 coriander leaves
2 garlic
60 g pine nuts
125 ml olive oil
60 g Parmesan, grated
Process the coriander, garlic, pine nuts and half the oil till smooth. Transfer to a large bowl.
Stir in the Parmesan. Add oil to adjust the consistency: For a dip: thick. For a topping: medium.
For pasta sauce: thin.
recipes are available on our website:
using the blender:
http://www.russellhobbs.com/ifu/550931
smoothies:
http://www.russellhobbs.com/ifu/550941
using the processor:
http://www.russellhobbs.com/ifu/551078
http://www.russellhobbs.com/ifu/550931
Smoothies:
http://www.russellhobbs.com/ifu/550941
http://www.russellhobbs.com/ifu/551078
http://www.russellhobbs.com/ifu/550931
smoothies:
http://www.russellhobbs.com/ifu/550941
http://www.russellhobbs.com/ifu/551078
http://www.russellhobbs.com/ifu/550931
smoothies:
http://www.russellhobbs.com/ifu/550941
http://www.russellhobbs.com/ifu/551078
http://www.russellhobbs.com/ifu/550931
frappe:
http://www.russellhobbs.com/ifu/550941
uso del robot:
http://www.russellhobbs.com/ifu/551078
http://www.russellhobbs.com/ifu/550931
batidos:
http://www.russellhobbs.com/ifu/550941
uso del robot de cucina:
http://www.russellhobbs.com/ifu/551078
http://www.russellhobbs.com/ifu/550931
smoothies:
http://www.russellhobbs.com/ifu/550941
http://www.russellhobbs.com/ifu/551078
http://www.russellhobbs.com/ifu/550931
smoothies:
http://www.russellhobbs.com/ifu/550941
drug af processoren:
http://www.russellhobbs.com/ifu/551078

ANVANDA MATBEREDAREN
http://www.russellhobbs.com/ifu/550931
smoothies:
http://www.russellhobbs.com/ifu/550941
anvanda matberedaren:
http://www.russellhobbs.com/ifu/551078
BEHANDLING OG VEDLIKEHOLD
http://www.russellhobbs.com/ifu/550931
smoothies:
http://www.russellhobbs.com/ifu/550941
http://www.russellhobbs.com/ifu/551078
http://www.russellhobbs.com/ifu/550931
smoothies-juomia:
http://www.russellhobbs.com/ifu/550941
http://www.russellhobbs.com/ifu/551078
Ipouchte uHCTpyKuHN, coXpaHNTe ux, pni nepeaue cOpBOaHTe uHCTpyKuNei.
IpeepnpiMeHHeHemN3dEInaCHmnte C Hero ynaKOBky.

BAXHbIE MEPbl IPEIOCTOPOXHOCTN
CleyuTe OCHOBHbIM HNCTpyKcIaM No 6e3OpacHOCTn, BkJIouy aJeDuOuIe:
1 DeTAM pa3peSeHo NOIb3OBAbCBy UcTPOiCTBOM TOJIbKO IOI npICMOTpOM B3PocJIbIX. IcNoJIb3yIte IN xpaHInTe pIn6Op B MeCTax HeIOCTynHbIX dIa DeTei.
2 He noprjkaTe npi6op B kaKyio-lno 6KIOKOCTb; He nCNoJIb3yIe erO B BaHHoKOMHaTe, OKOLO BObl IIN BHe NOMEUeHn.
3Прждемустаянвьатин симаьНасадк,OTKлючпгпprиборOTceTN.
4 BbiklouaIte np6op (0),peepTe kak pnpcoeHnHTk kpyKky 6loky dBvraTeJia.
5 PpexJe cHrTb KpbIshky c KpyxKu nn OTOcoeDHNITb KpyxKy OT 6noka DvraTeNa, BbIKNoUHTe np6Op (0) ndoJnteCb, KOrga Hoxn nepeCTaHT BpaataBc.
6 To6bI He npaHnTbc, He npKacaiTecb pyKaM N OCTpbM Je3BnM HOKei
7 He donnyckaetca hanaBb T Kpykky cnilskom tornpouyoo kndkoctb (Bblwe 40 C).
8 He nomeuaiTe npHaJdxEJxHcTn B KByuHn npBkUoyeHHom npu6ope.
9 He ocTablIe BkJIoueHnbl npu6op 6e3 npucmToPa.
10 He donyckaite nepenonHeHnKpykN. POnaBsaan6nok DvraTeJxndkoCTb BnITbBAeTc, noBpejda ero.
11 IcnoIb3yIte ToIbKO npHnAdIeXHOCTN HacAaIKN OT pOnI3BOIDTeNA.
12 Пибор He может pa60taTb OT BHeшero TaMepa Илдпсанционн систмы упраьlenя.
13 He nCnoJIb3yIe npI6Op, ecn OH noBpeJdeH nn pa6OtaeT c nepe6oamn.
14 Ecni Ka6eBn IOBpeXJeH, OH DoJIxHeN 6bITb 3aMeHEn IpoIzBOUInTeJEm, CepBnCHbIM aReHTOM nIN dpyTm KBAJIuΦIuPObAHhBIM IINIOM IJIpEDoTbPaUeHn ONaCHOCTn.
TolbKOДЯбltOBOrNcNoIb3OBAHnA

BKJIIOUOYEHNE
1 UctahOBHTe 6nok DnBraTeTna H cyXoJ, yCTOuHBOu IN POBHOIOBepxHOCTN PdOM C po3eTKoJ 3JIeKtPOnITaHnJ.
2 Y6eɪntεcb,чтpeŋyɪrTOp ckopocTe yctaHOBJIen Ha 0.
3 BCTaBbTe BnIKy Bpo3ETKy.

PERYJARTOPCKOPOCTN
4 YctaHOBITE peRyIaTOp ckOpcStn B Tpe6bEmoe nIoJxKeHne (1 = Hn3Ka, 2 = BbICKa).
5 YTo6bI BvIKJIouHtB DvIraTeJb, yCTaHObITpepyJnTOp cKOpOCTe O6paTHo Ha 0.
6 KaK npaBnIO, 6oIbIe o6bEmbl npOdyKTOB, pIoTHbIe cMeCn I 6OJIee BvICOKoe coDEpXaHne TBepdIX npOdyKTOB OTHOCInTeJbHO JxNkOCTe NpeDnOLaIaOT 6OJIee DInTeJbHoe BpeM nprirotOBLeHnI npi Hn3KOcKOpocTn.
7 He6oIbIe ne O6bEmbl npOyKTOB, MeHne pIoTHbIe cMecn I 60lee BbICOKoe coepXaHne JxIKoCTe oTHocITbHbTOBepbIX npOyKTOB ppeINoIarAO T 60lee KOPOTKoe Bpem npIROTOBJIeHnI np BVcOKoI CKOpOCTn.
8 He 3aynckaIte DnBraTeIb B TeueHne 6OJIee 1 MNHyTbI, INaHe BO3MOxHe NpeperpeB. Yepe3 1 MNHyTy BbIKLIOHTe DnBraTeIb KaK MInHMym Ha 2 MNHyTbI, YTO6bl OH OCTblJN.

IMNyIbC
9Пи поворо teperуларopa ckopocte npOTINb YacOBON CTpeKN K OTMeTKe @ BO3HnKaET KpaTKOBpeMeHHOE BpaUeHne C BblcOKOI CKOpocTbIO. Пи дВижЕн N B 3Ty CTOpOHy npOnxCoДNT HarpykeHne npPyKInbI KHOKN. KaK ToIbKO Bbl OTNcyTNe ee, OHa BepHeTcRa Ha 0.


http://www.russellhobbs.com/ifu/550931
φργκΤΟΒβε KOKτηλι:
http://www.russellhobbs.com/ifu/550941
UCPb3OBaHne KOM6aHa:
http://www.russellhobbs.com/ifu/551078
http://www.russellhobbs.com/ifu/550931
smoothie:
http://www.russellhobbs.com/ifu/550941
http://www.russellhobbs.com/ifu/551078

Precitajte siPokyny a odlozte tak,aby ste ich mohli prilozit pri pripadnom odovzdani vyrobku niekomu inemu.Pred pouzitim odstrante vsetky obaly.

DOLEZITÉ BEZPECNOSTNÉ OPATRENIA
http://www.russellhobbs.com/ifu/550931
ovocné krémy:
http://www.russellhobbs.com/ifu/550941
http://www.russellhobbs.com/ifu/5510781
http://www.russellhobbs.com/ifu/550931
koktajle owocowe:
http://www.russellhobbs.com/ifu/550941
stosowanie robota:
http://www.russellhobbs.com/ifu/551078
Procitajte upute, drzite ih na sigurnom mhestu, prosljedite ih ako dajete uredaj. Uklonite cijelo pakiranje prise uporabe.

VAZNE SIGURNOSNE MJERE
Postujte osnovne sigurnosne mjere, uključujuci slijedeće:
1 Ovaj uredaj je namijenjen uporabi od strane odraslih odgovornih osoba ili pod njihovim nadzorom. Koristite i drzte ovaj uredaj van dosega djece.
2 Nemojte uranjati uredaj u tekucinu; nemojte ga rabiti u kupaonici, blizu vode ili na otvorenom prostoru.
3 Isklučite aparat iz utićnice prije postavljanja ili skidanja dodataka.
4 Prij postavljanja vrca na motornu Jedinicu, isključite uredaj (0).
5 Isklučite urežaj (0) i, prije nego što skinetePoklopac s vrča ili vrčs motorne Jedinice, sačekajte dok se sječiva ne zaustave.
6 Držite prste van domašaja sjeciva, jer su oštri.
7 Nemojte stavljati sastojke cija je temperatura visa od one koju mozete normalno da podnesete (npr. temperatura technosti ispod 40^ ).
8 Ne stavljajte pomagala u vrč dok je uredaj ukopćan u utićnicu.
9 Nemojte ostavljati aparat bez nadzora dok je uključen u uticnicu.
10 Nemojte previše napuniti vrč. Ako se tecnost našć ispod motorne{jedinice, može biti usisana u motor, prouzrokujuci njegovo oštecenje.
11 Nemojte koristiti dijelove ili dodatke drugih proizvodaça.
12 Nemojte koristiti uredaj u bilo koje druge svrhe osim onih opisanih u ovim uputama.
13 Nemojte koristiti uredaj ako je ostecen ilneispravan.
14 Ako je kabel oštećen, radi izbjegavanja opasnosti, mora ga zamijeniti proizvodac, ovlasteni servis ili osoba slične stručnosti.
isključivo za kućnu uporabu

UKLJUCENJE
1 Postavite motornu Jedinicu na suhu, cvrstu, ravnu povrsinu blizini uticnice.
2 Provjerite da je kontrola brzine postavljena na 0.
3 Stavite utikač u uticnicu.

REGULATOR KONTROLE BRZINE
4 Okrenite regulator kontrole brzine naŽeljenu brzinu (1 = niska, 2 = visoka).
5 Okrenite regulator kontrole brzine natrag na 0, kakobiste isključili motor.
6 Općenito, za velike količine, guste smjese i veliki omjer krutina prema tekućini znače dulje vrijeme i manje brzine.
7 Manje koliçine, rije mjesavine i visok omjer krutina prema tekuciñama znači kraće vrijeme i veçé brzine.
8 Nemojte dozvoliti da motor radi bez prekida više od 1 minuta, jer se moze pregrijati. Posljie 1 minuta, isključite ga za njmanje 2 minuta, da bi se motor ohladio.

PULSIRANJE
http://www.russellhobbs.com/ifu/550931
napitci „smoothie"
http://www.russellhobbs.com/ifu/550941
http://www.russellhobbs.com/ifu/551078
Preberite navodila, jih shranite na varnem in jih predajte skupaj z napravo, ce napravo daste komu drugemu. Pred uporabo odstranite vso embalazo.

POMEMBNA VAROVALA
Sledite osnovnim varnostnim ukrepom, vkljucno z:
http://www.russellhobbs.com/ifu/550931
sadni napitki:
http://www.russellhobbs.com/ifu/550941
http://www.russellhobbs.com/ifu/551078
i TIC oNyieC, u TIC OE aOpaIeC, ePoc kai OE nepiTwn Nou dwoTe Tn ouokueu Oe allov xpntn, dwoTE maCi kai Tc odnyieC.
ApaieoTe ola ta ulika ouokuaioiac npiv aio tn xphon.

\SHMANTIKA METPA AΦAΛEIA
TnpieTe ta baoiká μétpa oαφáλεiac, ouπερilαβavouévωv twv napakatw:
1 H ouokuei npéei va xnpoiotoietai anokkietiká anó n uno tvn εniβεyn ueuov evnlikou. Na xnpoiotoie te kai va anohtkeuete tn ouokueu jakpi a ano naiaid.
2 Mny tonotheite tns ouokneun oev yrpó, mny tn xnpoiooieite oto pntavio, kovta ovepó n o eXwepiKOxwpo.
3 AnouuvseTe Tn ouakeun ano to pEuuna npiv ano tyn tonoeTnon n tnv aapaipen Eapntnauv.
4 Anevpyoioiote tnooukeun (0) npotou toothetae ote tnv kavata naww otnv kevtpikn muovada.
5 AnevpyoioTe Tn oukeun (0) Kai nepiEvTe EwC otou va otauatnoouv EvTeAoc oI λenides, npotou apaipoeTe To kanaki ano tyn kavata n va aqaipoeTe Tny kavata ano tyn kevtpikn movada.
6 KpatnoTe ta xepia oac paikia ano tic i c -ivai aixunpoc
7 H θερμοκρασία των συοτατιών στην κανάτα θα πρέπειν αος επιρεπειν αχεριρεότε ἀνετα την κανάτα (δηλαδή, η θερμοκρασία τωνύρων πρέπειν αεῖαι κάτω ἀπό 40°C).
8 Mny too oTeite epyaia kouzivac meoa stnv kavata evn ouokun eivai ouvdeltaevn 0to pUma.
9 Mny apnveTe Tn ouokneun xwiic eipiBxyn evoov eivai ouvodoeyn oTo pua.
10 Mny aqnoe Tnv kavata va unepxieiaei. Eav nnaoioei uypo stnv kevtpikn movada, evdexeta vioe oei meo oto pekai tou npokaloei cnmuia.
11 Mŋ xŋoɪŋoɪeɪte Εεaŋtɪŋa tā δiαροετιká anó autá nou napéxovtai anó tvv εtaipεia μac.
12 M n xρησιομοποιείτη συοκεύν ἀν ΑΝΟΙΟνδήποτε σκόπο πέραν autoú που περίράφεται στις παρούσες σθηγίες.
13 Mn xnpoiouoieTe n ouokeu n evai apuev n napouiae i duoiitoupyie.
14 Eáv to kaλδöio εívai φθαρévo, πρεπει va avtikataστaθεi anó tov kataokεuaσtn, tov avtɪpóωnó tou n kánoio ἐξουοiodotημévo προωnó προς anoφuyn Kivδúvωv.
anoklaotikayia oiklakxpno

ENEPTONOIHsH
http://www.russellhobbs.com/ifu/550931
φρούτοπα:
http://www.russellhobbs.com/ifu/550941
oukeun eEepyaaic tropovv:
http://www.russellhobbs.com/ifu/551078
http://www.russellhobbs.com/ifu/550931
turmix:
http://www.russellhobbs.com/ifu/550941
http://www.russellhobbs.com/ifu/551078
http://www.russellhobbs.com/ifu/550931
smoothie'ler:
http://www.russellhobbs.com/ifu/550941
robotukullanma:
http://www.russellhobbs.com/ifu/551078
http://www.russellhobbs.com/ifu/550931
smoothies:
http://www.russellhobbs.com/ifu/550941
http://www.russellhobbs.com/ifu/551078
IpoueTe TE HNCTpyKcunTe, 3ana3eTe r n n npedabaiTe, aKO npedabaTe upeda.
OtctpaheTecnukOnaKOBKn npden ynoTpe6a.

BAXHNIPEIa3HmMEPKN
ClejBaIte OCHOBHNTe MEPKN 3a 6e3oNacHOCT, BKJIOUHTeJIHO:
1 UpeBb Tpr6Ba da ce n3noJI3Ba cAmO OT uINI NOd HaN3Opa Ha OTROBOPHO TbHNoTeHNo JInCe. 3noJI3BaIte N cbXpaHЯBaIte UpeDa daneue OT doCTbI Na deca.
2 He noctabraye ypea B TeuHocT, He ro n3noJ3BaIte B 6aHa, B 6n3OCT do BOda nn Ha oTKpnto.
3 Izhkiyute ypea ot KOHTaKta, npedn da noCTabTe nIi CBAJIte npicTabKITE.
4 I3kIIOUeTe (O), npei Da noCTaBnTe KaHaTa Bbpyx 3aDbNkBaunia 6JIoK.
5 I3kIIOUeTe (O) nI3UaKaIte, IOKaTO cnpaT OcTpneTaT, npedn da CBaIte KaNaka OT KaHata, INI Da CBaIte KaHaTa OT 3aDbNIXBaunr 6JOk.
6 Pana3eTe cn pBuceTe OT OCTpneTaTa - Te ca octpn
7 He nbJIHHe T c HnIoo NO-ropeo OTOBa, c KOeTo MoKeTe KOMΦOpTHO da pa6OTNe (T.e. TemnepaTypa Ha TeuHocCTTa nOd 40^
8 He noctabraye npnbopn B kaHaTa, KoraTo ypeBt E BKJIouChen B MpeXaTa.
9 He octabraye ypea 6e3 Na6lioudeHne,doKaTo e BklioueH B KOHTaTa.
10 He donyckaite kaHaTa da npelina. Ako TeuHocTt npemHe no3aBnKBaun 6NoK, Ta MoKe da ce npocmye B DnurataJI y da ro nobpei.
11 He n3noJ3BaIte akcecoapn nn npucTAbKn, pa3nnuHn OT Te3n, npedocTaBeHN OT HaC.
12 He n3noJI3BaIte ypeia 3a dpyrIu ceni,OCBeH Te3n,ONICaHN B HactoJIITe INCTpyKcIIN.
13 He n3noI3BaIte ypeDa, aKo e noBpeDeH nn He pa6Otn n3pArdNo.
14 Ako Ka6eIbTe NOBpeH, ToT Tp86Ba Da ce NODMeH OT PPOIN3BOIDTeN, HerOB PpeCTaBNTe 3a cepBn3Ho O6cnyKbaHe IIn DpyrO KBAIIINΦuipaHO 3a Ta3n cen IInCe, 3a da Ce n36eRHe BcRAKaBb PnCK.
peeCNTn mHa HaawaTa ye6 cTpaHnca:
n3POn3BaHe Ha 6IeHepa:
http://www.russellhobbs.com/ifu/550931
cMyTnTa:
http://www.russellhobbs.com/ifu/550941
n3POn3BaHe Ha po6oTa:
http://www.russellhobbs.com/ifu/551078
Jgall 33
1
2
a#dall 1
J
J 34
J 1
J a j 2
a jll aie 1e 2joll 3
. 35
Aaaiia aiaaa aae aee aee aee aee aee 44
a 45
Jgllln Jn Jnne 1000000000000000000000000000000000000000000000000000000000000000
.1J 47
1

j 1
a12i 100e!g y jy jil lcl g iu g h bai jy jll jia jil jj
alilw al gao ai jia aai wail al gao jy gaii gaii gaii gaii gaii gaii gaii gaii gaii 6
a a a a a a a a a a
aiaaii iiaaa aiaaa aiaaa aiaaa aiaaa 7
Aille ic jw o
J 8
.
@
9
A 0 1 2 3 4 5 6 7 8 9 10
bi 1
10
11 11
12
e 13
1500) 1500ml 14
.
e15i 15
aai i 16
Aaiae aIoll
Jusu Jusu Jusu Jusu Jusu Jusu Jusu Jusu Jusu Jusu Jusu Jusu Jusu Jusu Jusu Jusu Jusu Jusu Jusu Jusu Jusu Jusu Jusu Jusu Jusu Jusu Jusu Jusu Jusu
cIi
1500ml 18
Clllal
Aolal jll 19
20
21
1 22
123
Aali jil 124
CllgSall jolal a jolal 25
26
27
Jds 45, g, sinall g g gall 28
29
30
J 1500) 1500ml aae 31
.
AilSo a jaiuui yjyjglge 10g o bll g Jao oJg cIbll Juaal 32
gaii jzjz jy jz jz jz jz jz jz jz jz jz jz jz jz jz jz jz jz jz jz jz jz jz jz jz jz jz jz jz jz jz jz jz jz jz jz jz jz jz jz jz jz jz
Joo
biig jiai jiaiu
1
- IMPORTANT SAFEGUARDS
- household use only
- SWITCH ON
- SPEED CONTROL
- PULSE
- USING THE BLENDER
- USING THE PROCESSOR
- WITH THE SUPPORT
- WITH THE DISC
- CARE AND MAINTENANCE
- ENVIRONMENTAL PROTECTION
- ANVANDA MATBEREDAREN
- BEHANDLING OG VEDLIKEHOLD
- BAXHbIE MEPbl IPEIOCTOPOXHOCTN
- TolbKOДЯбltOBOrNcNoIb3OBAHnA
- BKJIIOUOYEHNE
- PERYJARTOPCKOPOCTN
- IMNyIbC
- DOLEZITÉ BEZPECNOSTNÉ OPATRENIA
- VAZNE SIGURNOSNE MJERE
- isključivo za kućnu uporabu
- UKLJUCENJE
- REGULATOR KONTROLE BRZINE
- PULSIRANJE
- POMEMBNA VAROVALA
- \SHMANTIKA METPA AΦAΛEIA
- anoklaotikayia oiklakxpno
- ENEPTONOIHsH
- BAXHNIPEIa3HmMEPKN
Brand : RUSSELL HOBBS
Model : DESIRE 1900-56
Category : Kettle