
NWA-3550 - Wireless Access Point ZYXEL - Free user manual and instructions
Find the device manual for free NWA-3550 ZYXEL in PDF.
| Product Type | Wireless Access Point |
| Brand | ZYXEL |
| Model | NWA-3550 |
| Wi-Fi Standard | 802.11b+g |
| Frequency Band | 2.4 GHz |
| Maximum Theoretical Throughput | 54 Mbps (802.11g) |
| Connectivity | 1 Ethernet port 10/100 Mbps |
| Power Supply | PoE (Power over Ethernet) via included MS-POE-IJ injector |
| Wireless Security | WPA2-PSK, WPA, WEP (depending on configuration) |
| Management | Web interface (HTTP) – default IP address 192.168.1.2 |
| Number of Antennas | 2 removable external antennas |
| Mounting Type | Wall or pole (mounting kit included) |
| Operating Temperature | 0°C to 40°C |
| Operating Humidity | 10% to 90% (non-condensing) |
| Maintenance | Clean with a soft dry cloth. Do not use abrasive products. |
| Physical Security | Steady green power LED on the injector |
| Package Contents | Access point, PoE injector, mounting kit (wall/pole bracket, bar, screws, anchors), Ethernet cable, quick start guide |
| Initial Setup | Computer with static IP 192.168.1.x, default password 1234 |
| Certifications | FCC, CE (European conformity) |
| Repairability | Not user-serviceable. Contact Zyxel support for any intervention. |
Frequently Asked Questions - NWA-3550 ZYXEL
User questions about NWA-3550 ZYXEL
0 question about this device. Answer the ones you know or ask your own.
Ask a new question about this device
Download the instructions for your Wireless Access Point in PDF format for free! Find your manual NWA-3550 - ZYXEL and take your electronic device back in hand. On this page are published all the documents necessary for the use of your device. NWA-3550 by ZYXEL.
USER MANUAL NWA-3550 ZYXEL
IP Address http://192.168.1.2
Password 1234
Table of Contents
ENGLISH 2
DEUTSCH 16
ESPANOL 32
FRANÇAIS 48
ITALIANO 64
PYCCKN 80
SVENSKA 96
简体中文 110
繁體中文 124
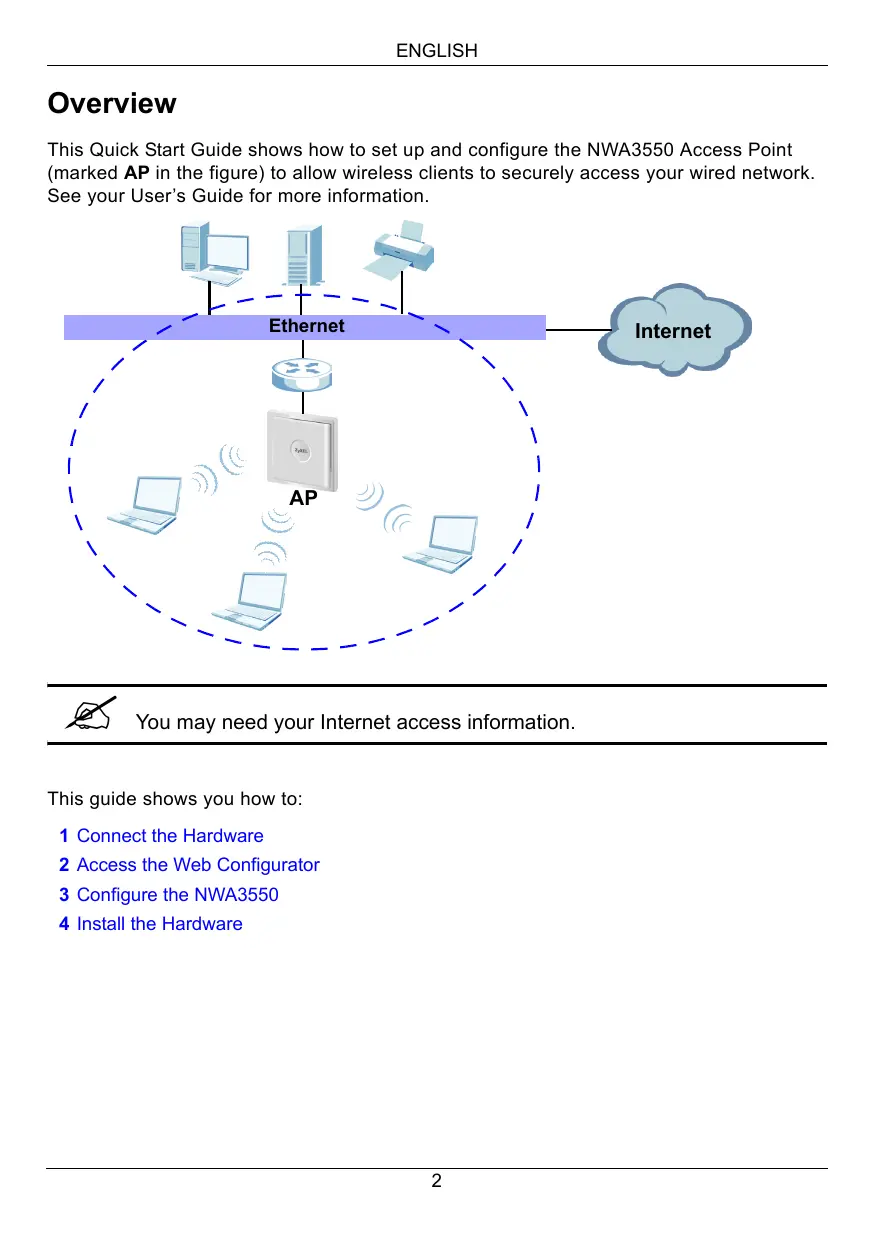
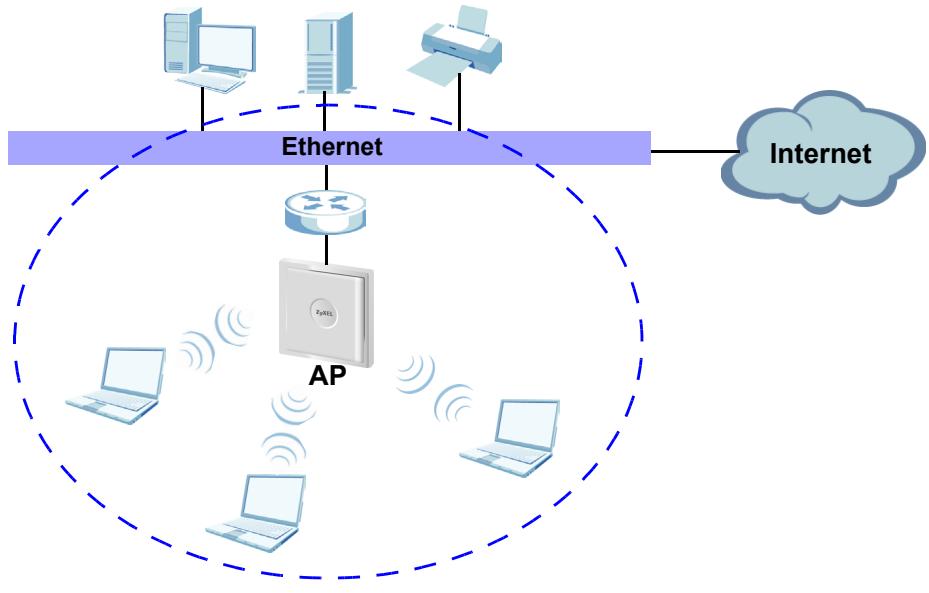
Overview
This Quick Start Guide shows how to set up and configure the NWA3550 Access Point (marked AP in the figure) to allow wireless clients to securely access your wired network. See your User's Guide for more information.

You may need your Internet access information.
This guide shows you how to:
1 Connect the Hardware
2 Access the Web Configurator
3 Configure the NWA3550
4 Install the Hardware
1 Connect the Hardware
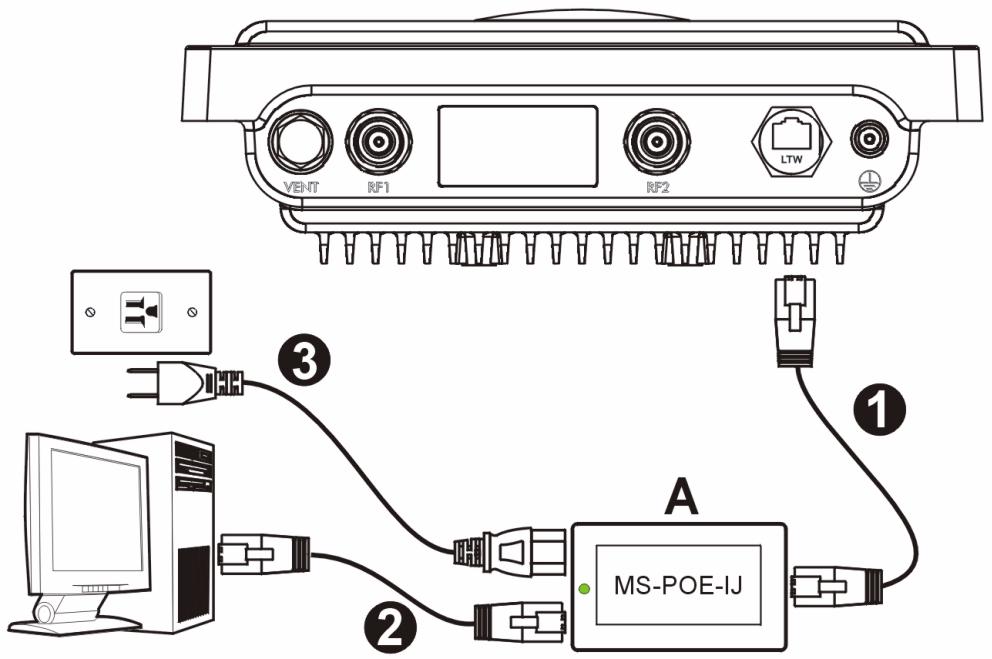
1 Use an Ethernet cable to connect the Ethernet port (opposite the power socket) on the included MS-POE-IJ power injector (A in the figure) to the NWA3550's Ethernet port.
2 Use an Ethernet cable to connect the other Ethernet port (next to the power socket) to a computer for initial configuration.
3 Connect the power injector to a proper power source using the included power cord. The NWA3550 receives it's power from the power injector using PoE (Power over Ethernet).
4 After you have completed the initial configuration, connect the Ethernet port (next to the power socket) of the power injector to an Ethernet jack with network access (for example, a broadband modem or router).
1.1 Power Injector Light
- The LED (light) on the power injector shines green steadily when the power is connected.

If the LED does not turn on, check your connections and inspect the cables for damage. If the LED is still off, contact your vendor.
2 Access the Web Configurator

Use Internet Explorer 6.0 and later or Netscape Navigator 7.0 and later versions with JavaScript enabled and pop-up blocking disabled.
2.1 Set Up Your Computer's IP Address

Note down your computer's current IP settings before you change them.
First, set your computer to use a static IP address in the 192.168.1.3 - 192.168.1.254 range with a subnet mask of 255.255.255.0. This ensures that your computer can communicate with your NWA3550. See your User's Guide for information on setting up your computer's IP address.
2.2 Log Into the Web Configurator

Even though you can connect to the NWA3550 wirelessly, it is recommended that you connect your computer to the Ethernet port for initial configuration.
1 Launch your web browser. Enter 192.168.1.2 (the NWA3550's default IP address) as the address.


If you cannot access the Web configurator, make sure the IP addresses and subnet masks of the NWA3550 and the computer are in the same IP address range (see Section 2.1).
2 Click Login (the default password 1234 is already entered).
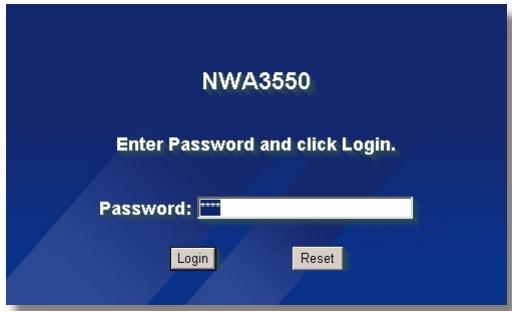
3 Change the login password by entering a new password and clicking Apply. Be sure to record the new password and keep it in a safe place.


If you change the password and then forget it, you will need to reset the NWA3550. Contact your vendor.
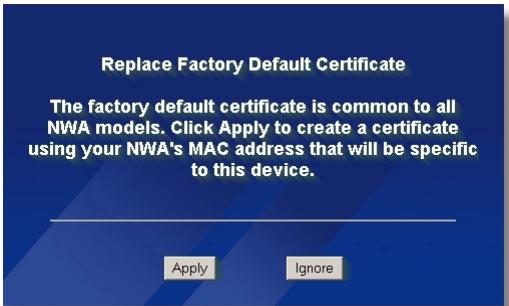
4 Click Apply to replace the factory default certificate for added security; alternatively click Ignore to proceed if you do not want to change the certificate now.
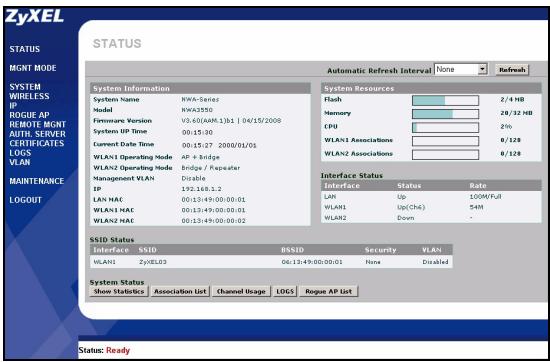
5 The STATUS screen appears.
3 Configure the NWA3550
3.1 Configure System Settings
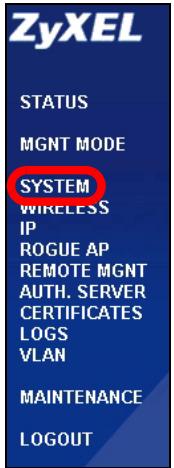
1 Click SYSTEM in the navigation panel.
2 The SYSTEM > General screen appears.
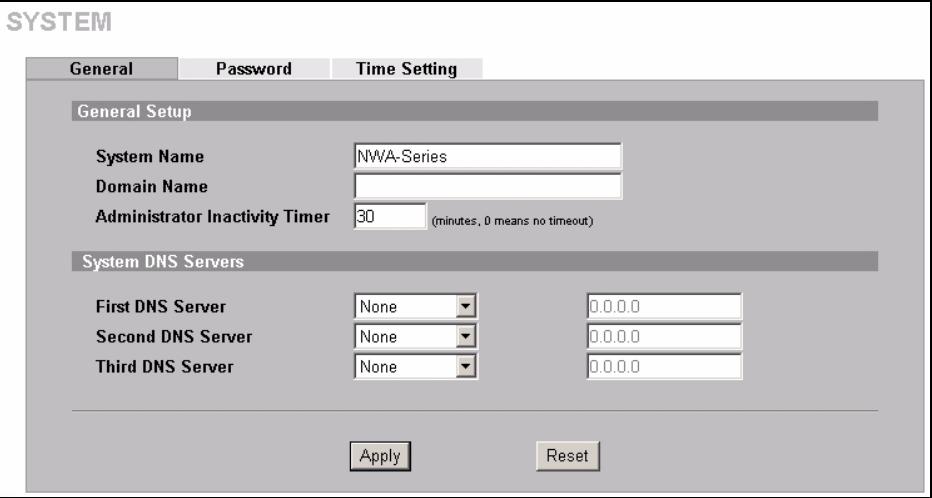
System Name is for identifying the NWA3550 on your network. Choose a distinctive name, or leave this at its default.
Domain Name: Enter a domain name if your ISP requires one for authentication. Otherwise you can leave it blank or set to whatever may have displayed automatically.
DNS Server(s): if your ISP gave you specific DNS (Domain Name System) settings, select User-Defined and enter them here. Otherwise, leave these fields at their defaults.
3 Click Apply.
3.2 Configure Wireless Settings
1 Click WIRELESS in the navigation panel. The following screen appears.
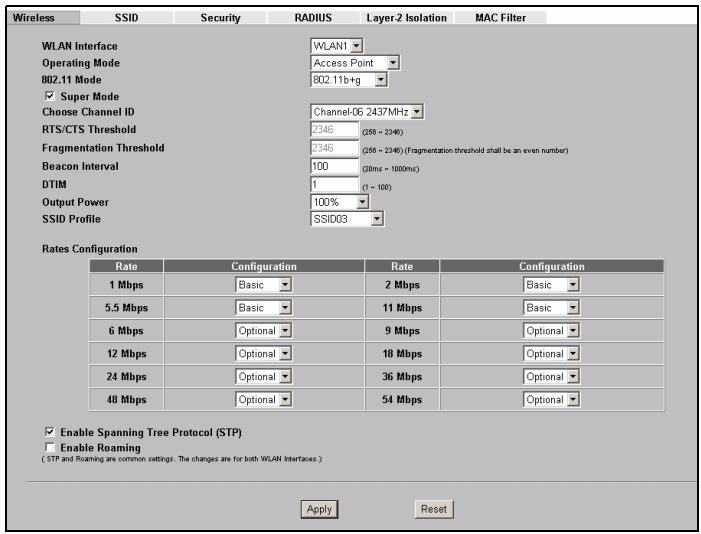

The wireless stations and the NWA3550 must use the same SSID, channel ID and encryption settings for wireless communication.
WLAN Interface: Ensure that WLAN1 is selected.
Operating Mode: Ensure that Access Point mode is selected.
802.11 Mode: Select the wireless standard you want your network to use. If you are not sure which to select, select 802.11b+g.
Choose Channel ID: Select the wireless channel you want your network to use. To have the NWA3550 automatically select a channel, click Scan instead.
SSID Profile: Select the SSID profile you want to configure for network access from the drop-down list box. This example uses the SSID03 profile.
2 Click Apply to save your settings.
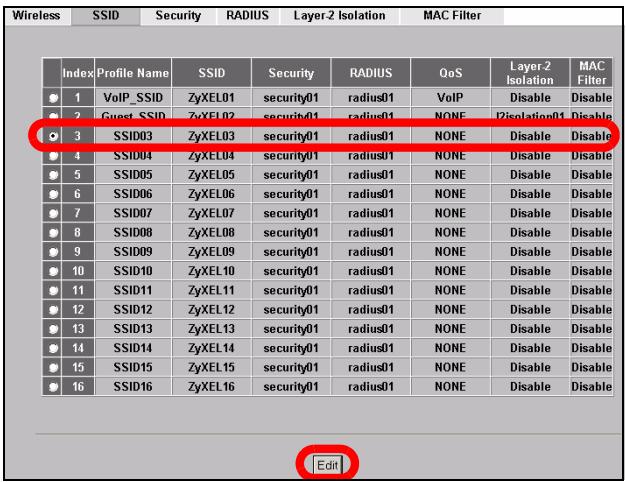
3 Click the SSID tab. The following screen appears. Ensure the settings for SSID03 are at their default values.
The default SSID (the name of the network) is ZyXEL03, its default Security setting is Security01. Layer 2 Isolation and MAC Filter are set to Disable by default.
If you want to change the SSID profile's settings, select SSID03 and click Edit.
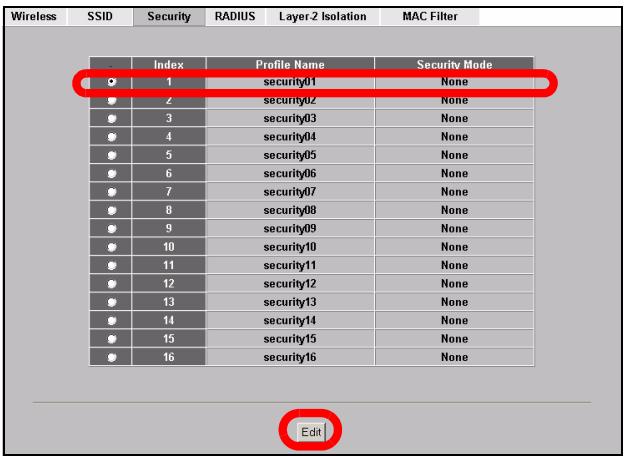
4 Click the Security tab. Ensure that Security01 is selected and click Edit. If you don't configure wireless security, anyone can access your network.
5 This is where you can enter the security settings for your wireless network. The fields you fill in differ according to the type of security you select in the Security Mode field. Select None if you do not wish to use wireless security.
This example uses WPA2-PSK security, in which all wireless clients must use the same pre-shared key to join the network.
Ensure that all your wireless clients support the type of security you set. Click Apply when you have finished.
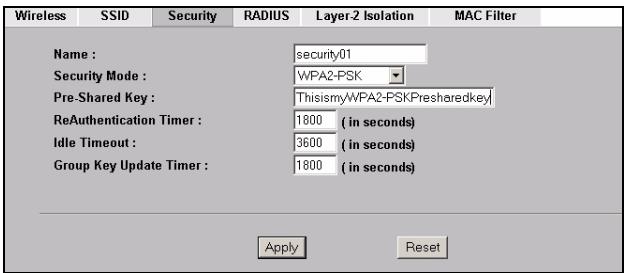

If the wireless clients cannot communicate with the network, ensure that the clients and the NWA3550 are using the same wireless security settings.
3.3 Configure IP Settings
1 You need to set your NWA3550's IP address to be in the same subnet as your network. Click IP in the navigation panel.
Select Get automatically from DHCP if you want to have a DHCP server on your network assign an IP address to the NWA3550.
If you have a specific IP address to use, select Use fixed IP address and enter it along with the subnet mask and gateway IP address.
Click Apply. The NWA3550 now uses the new IP settings; you can no longer connect to the NWA3550 using the default IP address.
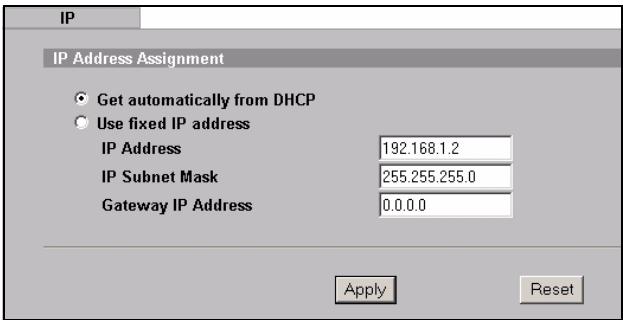

If you change the NWA3550's IP address, you must use the new IP address when you next access the web configurator. If you select Get automatically from DHCP, check your DHCP server to determine the IP address it assigns to the NWA3550. Refer to your DHCP server's documentation for more information.
2 If you changed your computer's IP address in Section 2.1, return it to its previous setting.
3 Change the wireless settings in the wireless stations to match those of the NWA3550. Refer to your wireless adapter's documentation.
The NWA3550 is now ready to connect to your switch or router. You can do this now, or once you have attached the antennas and mounted the NWA3550.

If the NWA3550 cannot communicate with the network, ensure that the NWA3550 is using an IP address on the same subnet as the switch / router.
4 Install the Hardware
Complete the following procedures to install the NWA3550 on a pole or wall.
4.1 Hardware Mounting
In general, the best location for the access point is at the center of your intended wireless coverage area. For better performance, mount the NWA3550 high up in an area that is free of obstructions.
4.1.1 Package List
You need the following:
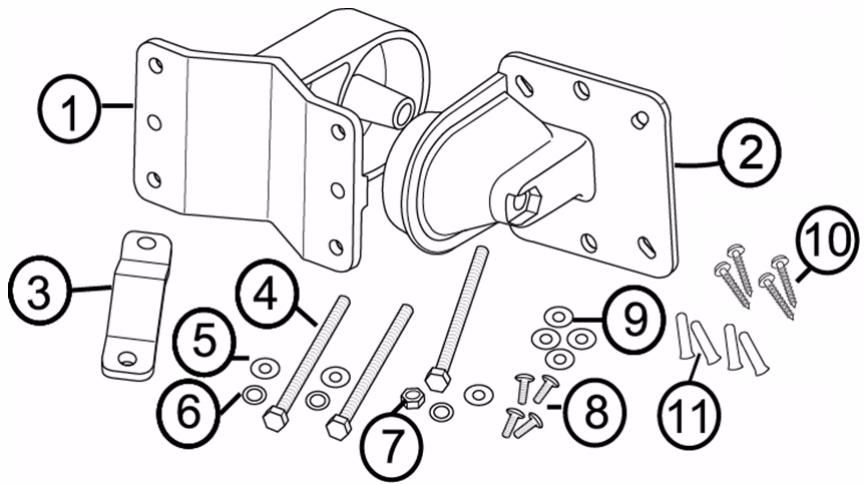
1 One Wall/Pole Bracket
2 One Articulation Bracket
3 One Pole Mounting Bar
4 Three M8*110 Screws
5 Three M8 Washers
6 Three M8 Spring Washers
7 One M8 Nut
8 Four M5*12 Screws
9 Four M5 Washers
10 Four Wall Mounting Screws
11Four Masonry Plugs
4.1.2 Assembling the Mounting Bracket
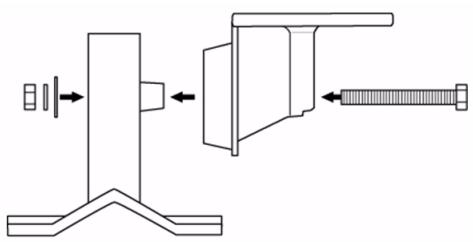
1 Use one M8*110 screw, one M8 washer, one M8 spring washer and one M8 nut to attach the wall/pole bracket to the articulation bracket.

4.1.3 Pole Mounting
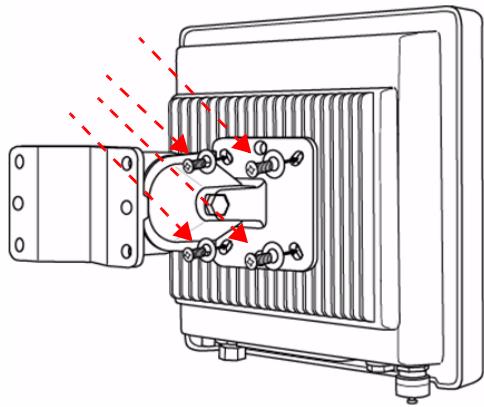
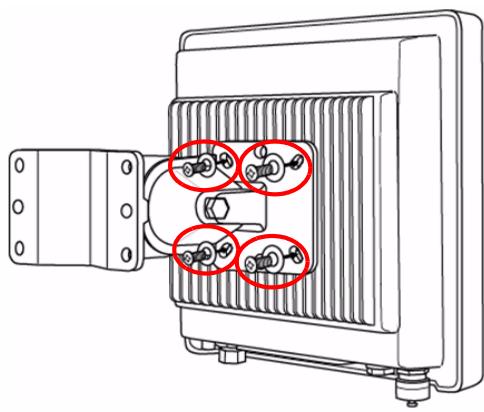
1 Align the mounting bracket with the holes on the rear of the NWA3550. Insert four M5*12 screws into the holes and use a wrench to tighten the screws with the M5 washers.
2 Place the mounting bracket around a pole. Align the pole mounting bar with the holes on the wall/pole bracket. Insert two M8*110 screws into the holes and use a wrench to tighten the screws with the M8 washers and M8 Spring Washers.
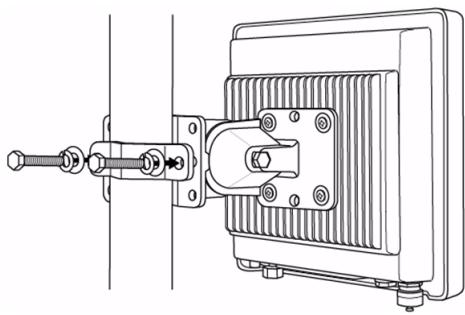
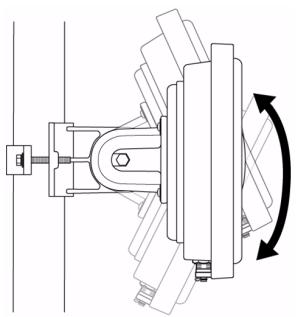
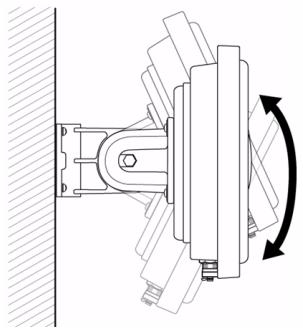
3 Adjust the NWA3550, cables and antennas for correct orientation.
4.1.4 Wall-mounting
1 Select a position free of obstructions on a sturdy wall.
2 Position the wall/pole bracket on the wall to mark how far apart the screws should be placed. Drill four holes for the masonry plugs.

Be careful to avoid damaging pipes or cables located inside the wall when drilling holes for the screws.
3 Insert the masonry plugs into the wall.

The included screws and masonry plugs are intended primarily for use with concrete walls. You may need to use different screws and plugs, depending on your wall's material.
4 Align the mounting bracket with the holes on the rear of the NWA3550. Insert four M5*12 screws into the holes and use a wrench to tighten the screws with the M5 washers.
5 Install four wall mounting screws through the holes on the wall/pole bracket into the plugs to secure the mounting bracket to the wall. Make sure the screws are snugly and securely fastened to the wall.

6 Adjust the NWA3550, cables and antennas for correct orientation.
4.2 Attaching Antennas
Screw the antennas clockwise onto the antenna connectors on the bottom of your NWA3550.
Make sure the antennas are securely screwed onto the antenna connectors.
See your User's Guide for the list of compatible antennas.
Procedure to View a Product's Certification(s)
1 Go to www.zyxel.com.
2 Select your product from the drop-down list box on the ZyXEL home page to go to that product's page.
3 Select the certification you wish to view from this page.
Übersicht
- CBeToIIOuO (INHdNkATOp) Ha ceTeBOM aIaITepe 6yDet NOCToHHO ropeTb 3eJIeHbIM CBETOM npn IOnKJIIOUHeHm nITaHn.

Ecni CBeToNDIO He 3aTropaeTcra, npoBepbTe HndexKHOCTb NODKJIIOueHn I COCTOHNHe UHpya. EcNI INHdNkATOp Bce eUe He rOpNT, o6paTntecb B cnJy6by TeXHHueCKo NODpepXKn ZyXEL.
1 UeKnTe Ha WIRELESS
(BECNPOBOHAR)Ha nahanen Habiracu. IoarNTcCJeDuOuCe OKHO.


Дя успшно coeиненя 6ecnpobodna CTaHци NWA3550 Должны IMetb Odnakobblc SSID, ИдентифигаTOP KaHaJa n HacTpOriKn шнфpoBaHи.
WLAN Interface (Bb6op paIOnHTeppeca):Y6eNTecb,TO Bb6paH WLAN1 (paIOnHTeppeic 1) Bb6op paIOnHTeppeica.
Operating Mode (Pexim pa60bI): Y6eInTeCb, YTO Bb6paH peXIM Access Point (Toka doctyna).
802.11 Mode (Pexim 802.11): BbIbepnte cTaHdapT bEcnpoBODHOcTeN, KOTOpbI Bbl XOTnTE nCNoJIb3OBAtB BAWei cTeN. Ecnn Bbl He yBepeHb I Bbl6ope, yCTaHOBnTE 802.11b+g.
Ecni6ecnpoBODhIe KJIneHTbI He MOryT COeHNITbcra C CeTbIO, y6eHNTecb, YTO OHI NcNoJIb3yIOT ODiHaKOBbIe c NWA3550 HacTpoiKn 6ecnpoBODHOJ 6e3OJaCHOCTN.
3.3 KonfumprupobAHne HacTpoek IP
1 BbI DoJXHbI yCTaHOBnTb Ha BaUeM NWA3550 IP-aDpeC c MaCKo IPOcTe NaBSe CTeN. UeJIKNHTe Ha IP Ha HABINrAciOnHHo nHaHeN.
Bb6epTe Get automatically from DHCP (POnyuaTb abTomatnueckn ot DHCP), ecJIu Bbl XOTnTE, UTo6bl IP- aDpec nJa Bawero NWA3550 npedocTabn DHCP-cebpBawae cetn.
EcIn BbI XOTnTe IcNoJIb3OBAtB onpeIeHnHi IP, Bbl6epnte Use fixed IP address
- Table of Contents
- Overview
- Connect the Hardware
- Power Injector Light
- Access the Web Configurator
- Set Up Your Computer's IP Address
- Log Into the Web Configurator
- Configure the NWA3550
- Configure System Settings
- Configure Wireless Settings
- Configure IP Settings
- Install the Hardware
- Hardware Mounting
- Package List
- Assembling the Mounting Bracket
- Pole Mounting
- Wall-mounting
- Attaching Antennas
- Procedure to View a Product's Certification(s)
- Übersicht
- UeKnTe Ha WIRELESS
- KonfumprupobAHne HacTpoek IP
Brand : ZYXEL
Model : NWA-3550
Category : Wireless Access Point