
SUPER CHRONO HYDROMAG DIGITAL - Wristwatch ELITE - Free user manual and instructions
Find the device manual for free SUPER CHRONO HYDROMAG DIGITAL ELITE in PDF.
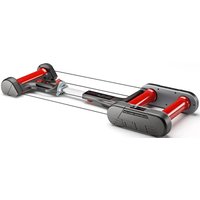
| Product type | Home trainer (training roller for bicycle) |
| Brand | ELITE |
| Model | SUPER CHRONO HYDROMAG DIGITAL |
| Power supply | 2 AA batteries (1.5 V) |
| Resistance type | Hydromagnetic (Hydromag unit) |
| Display functions | Power (W), speed (km/h or mph), slope (%), distance (km), time, lever position, battery charge indicator |
| Available screens | 3 screens: screen 1 (instantaneous values), screen 2 (average values), screen 3 (maximum and total values) |
| User settings | Measurement unit (metric/imperial), cyclist + bike weight, resistance type (value 2) |
| Possibility of resistance adjustment | Yes, via control lever on the handlebar |
| Data memory | Retains data even after shutdown or battery change |
| Standby mode | After 2 minutes of inactivity (stand-by) |
| Data erasure | Press SET for 6 seconds (CLEAR operation) |
| Compatibility | Bicycle with rear wheel, recommended 23 mm tire, pressure 7-8 bar (road bike) or 3.5-4 bar (MTB) |
| Materials | Aluminum unit, support with adhesive feet |
| Maintenance | Clean the tire before use; do not use in a humid environment; remove batteries if not used for a long time |
| Safety | Do not brake during use; do not touch the hot resistance unit; check the stability of the bike |
| Box contents | Hydromag unit, support, axles, control lever, bases, screws, washers, nut, hex key, quick release, console (computer) |
| Warranty | 2 years (except normal wear, misuse) |
| Spare parts and repairability | Parts not user-serviceable; opening voids warranty; quick release replaceable |
Frequently Asked Questions - SUPER CHRONO HYDROMAG DIGITAL ELITE
User questions about SUPER CHRONO HYDROMAG DIGITAL ELITE
0 question about this device. Answer the ones you know or ask your own.
Ask a new question about this device
Download the instructions for your Wristwatch in PDF format for free! Find your manual SUPER CHRONO HYDROMAG DIGITAL - ELITE and take your electronic device back in hand. On this page are published all the documents necessary for the use of your device. SUPER CHRONO HYDROMAG DIGITAL by ELITE.
USER MANUAL SUPER CHRONO HYDROMAG DIGITAL ELITE
CONSOLE AND GEAR SHIFT INSTALLATION 9
USING THE COMPUTER 9
Set up instructions 9
How to use 10
Starting a run 10
SCREENS 10
Information available during the run 10
Finish a run 11
Delete data of a run 11
Batteries 11
Troubleshooting 11
ATTENTION 12
ADVICE 12
WARRANTY 34
F - FRANÇAIS
IMPORTANT 18
INTRODUCTION 18
INSTALLATION ORDINATEUR 19
UTILISATION DE L'ORDINATEUR 19
A Anything's gonna appear in the scritta SET UP.
Thank you for choosing the Super Crono Hydromag Digital.

IMPORTANT
Do not stop the rotation of the bicycle wheel by using caliper or disk brake. This seriously damages the roller and the tire.
INTRODUCTION
Check the presence of all the following components.
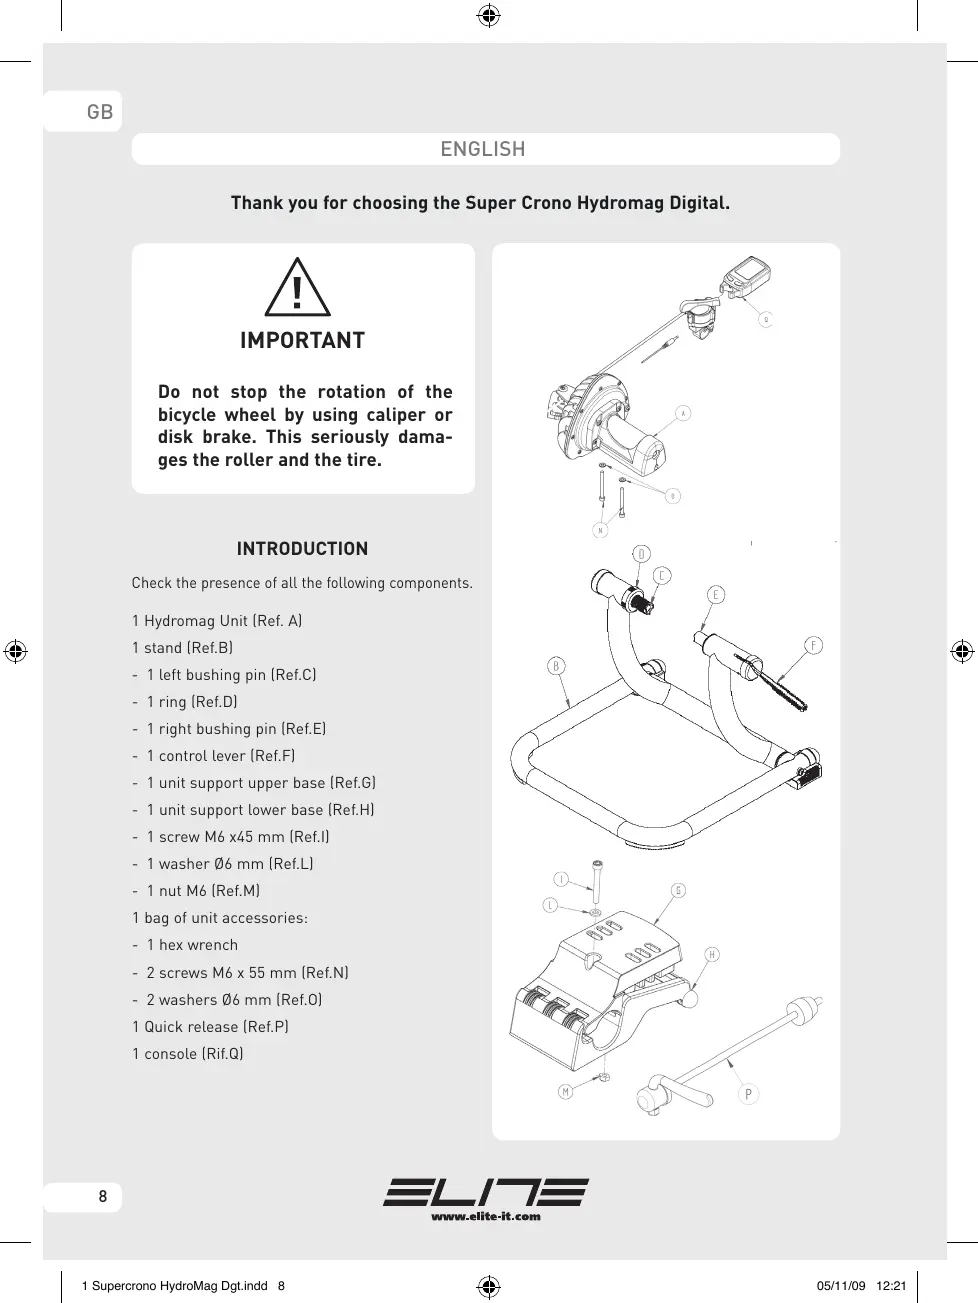
1 Hydromag Unit (Ref. A)
1 stand (Ref.B)
- 1 left bushing pin (Ref.C)
- 1 ring [Ref.D]
- 1 right bushing pin (Ref.E)
- 1 control lever (Ref.F)
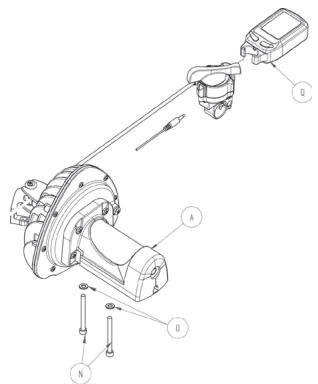
- 1 unit support upper base (Ref.G)
- 1 unit support lower base (Ref.H)
- 1 screw M6 x45 mm (Ref.I)
- 1 washer 6 mm (Ref.L)
- 1 nut M6 (Ref.M)
1 bag of unit accessories:
- 1 hex wrench
- 2 screws M6 x 55 mm (Ref.N)
- 2 washers 6 mm (Ref.0)
1 Quick release [Ref.P]
1 console (Rif.Q)

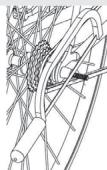
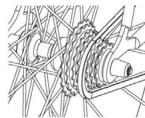
CONSOLE AND GEAR SHIFT INSTALLATION:
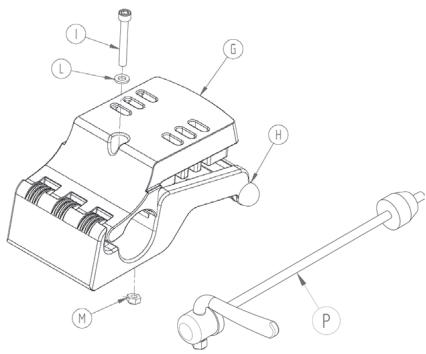
- Install the LCD console to the shifting lever (see the following illustration).

1
- Connect the wire from the back of the LCD console to the shifting lever as shown in the following illustration.
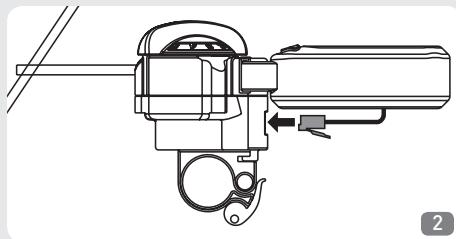
- In case it isn't firmly connected, insert the plug of the speed sensor (the cable that comes from the flywheel housing) in the shifting lever, as shown in the following illustration.

- Make sure the shifter is securely mounted and that the cable does not interfere with you or the bicycle white pedal-ling (pedals, chain, etc).
- It is now possible to start the training session. It is possible to change the resistance level using the remote regulation shifter installed on the handlebar and view all the data of your training session on the LCD display.
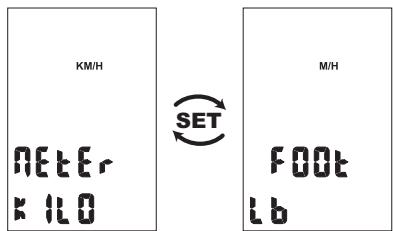
Screen to select the units of measurement.
USING THE COMPUTER Set up instructions
The first operation with Super Crono Hydromag Digital is to set your personal parameters.
This is possible from the SET UP screen that you may have access by keeping pressed the right (MODE) key for at least 3 seconds. SET UP will appear at the bottom of the screen. By stop pressing the key, the
SET UP screen will appear on the LCD display.
Attention: the trainer must not be running to be able to enter the SET UP screen.
060
The next step is to select the units of measurement, which can be metric or Anglo-Saxon.
By pressing the left button (SET), METER, KM/H, KILO and FOOT, M/H
e LB will alternate on the screen. Press the MODE key to select the desired units and to pass to the next screen where you can input your personal weight.
In this screen, a three digit number will appear at the top right corner of the screen which indicates your weight including your bicycle, in the unit of measurement previously selected. Using the trainer for the
first time, the number that appears is the figure preinserted at the factory; from the second time onwards, it's the figure introduced the previous run. To amend the number, press the SET key to modify the first flashing digit and the MODE key to confirm the value selected and pass to the second digit which will start to flash.
Repeat the same operation for all three digits. Press MODE to confirm the weight value and to pass to the next screen.
Type 2
In this screen the model of resistance unit is selected. Select value "2" for Super Crono Hydromag Digital. This value should already be preinserted at the factory; if this is not the case, press the SET key until the number becomes "2". Press the MODE key to exit the SET UP screen.
Attention: Inputting an incorrect value will process incorrect data during your training sessions.
Example: You want to set the following units of measurement: kilometres, metres, kilograms and input your personal weight which is 78kg
To access the SET UP screens keep pressed the MODE key for at least 3 seconds. Press SET until METER, KILO and KM/H appear on the screen. Then press the MODE key. Press the SET key until the flashing digit (first from the right) becomes "8". Then press MODE. Press the SET key until the flashing number [middle] becomes "7". Then press MODE. Press the SET key until the flashing number (first from the left) becomes "0". Then press MODE. Press the SET key until the flashing number becomes "2". Then press MODE. Now you are ready to go!
How to use
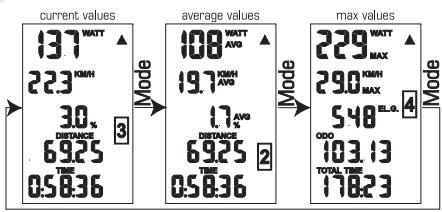
During the run, you can select from four different screens. Each screen is divided in seven parts with different information displayed in each one. During the run, you can toggle through the screens at will with the MODE key.
During the run, you can adjust the resistance level with the remote shifting lever. The console will automatically indicate the gear shift position on the screen and up-date some values [i.e. slope].
Starting a run
To start a run simply press ADJUST or MODE or simply start pedalling.
Information available during the run.
SCREENS
A Current power
B Current speed
C Slope/current incline
D Distance
E Course time
F Resistance level/gear shift position
G Indicator
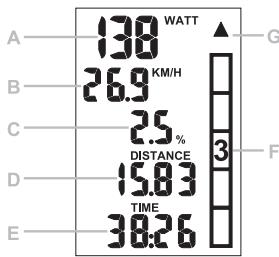
1^st screen:
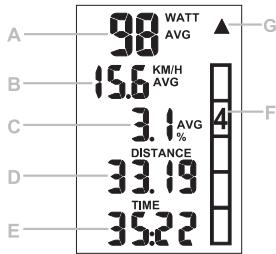
2^nd screen:
A Average power
B Average speed
C Average slope/incline
D Distance
E Course time
F Resistance level/gear shift position
G Indicator
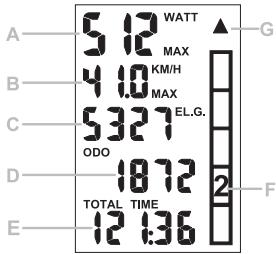
3^rd screen:
A Maximum power
B Maximum speed
C Elevation gain
D Total distance
E Total time
F Resistance level/gear shift position
G Indicator
| SYMBOL | SCREEN | INFO |
| WATT | 1 | Current power. Power developed the moment you read the value on the screen. |
| KM/H-M/H | 1 | Current speed. The speed you are proceeding the moment you read the value on the screen. |
| % | 1 | Slope. The slope value is in function of the cyclist's weight and the resistance level/gear shift position. |
| DST | 1-2 | Distance covered since training commenced. Indicates the distance covered from the starting point. |
| TIME | 1-2 | Race duration. Indicates the time passed since training commenced. |
| ①②③④⑤ | 1-2-3 | Resistance level/Gear shift position. Indicates the gear shift position of the resistance unit. |
| ▲▼ | 1-2-3 | Indicator ▲▼. Indicates if the current speed is higher (▲) or lower (▼) than the average speed. |
| AUG WATT | 2 | Average power. Indicates the average power developed since training commenced. |
| AUG KM/H-M/H | 2 | Average speed. Indicates the average speed since training commenced. |
| % AUG | 2 | Average slope. Average slope of the run. |
| MAX WATT | 3 | Maximum power. Indicates the peak on power during the run. |
| MAX KM/H | 3 | Maximum speed. Indicates the peak on speed during the run. |
| ELG | 3 | Elevation gain. Indicates the elevation gained during the run. |
| ODO | 3 | Total distance covered. Indicates the total distance covered by your Digital Mag. |
| TOTAL TIME | 3 | Total time. Indicates the total time your Digital Mag has been used. |
| + | 3 | Flat battery indicator. |
Finish a run
Once completed the run, it is possible to view the maximum and average values for speed and power, the elevation gain, the distance covered and the duration of the run.
If you restart pedalling, the values of the run (average and maximum values, time and distance) are up-dated.
Delete data of a run
After two minutes of inactivity, which means there is no pedalling motion nor pressing of the console keys, the program goes in "stand-by". Once in "stand-by", all the information of the run just completed are memorized.
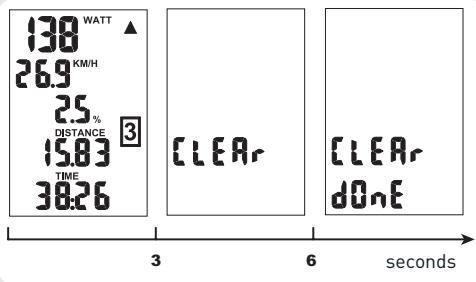
To commence a new run and delete the previous data, just proceed with the CLEAR procedure.
To start the CLEAR procedure, press the left (SET) key for at least six seconds.
Attention: the trainer must not be running to be able to delete data of a run.
For the first three seconds nothing changes.
Maintaining pressed the SET key, after the first three seconds, CLEAR will appear on the screen.
This confirms that you are deleting the data of the run just completed. To stop the delete procedure, simply stop pressing the key.
After six seconds you kept the key pressed, CLEAR and DONE will appear on the screen.
This confirms that you have deleted the data of the run just completed, and you can now stop pressing the key.
Shown below are the screens that appear during this procedure.
Batteries
Two AA batteries are necessary to power Super Crono Hydromag Digital. The life duration depends on the quality of batteries used.
Battery life will last longer if you disconnect the speed sensor plug from the shifting lever when the trainer is not running. In normal conditions, standard alkaline batteries should last for about 300 hours. Rechargeable batteries can be used only if they are 1.5V .
When the batteries are running down a battery symbol will start flashing on the screen. From when the symbol + starts flashing the batteries still have several hours of life.
When the batteries completely run down the screen will turn off, while the program will save
the replacemented will be saved. Information, Superin without powery data.
all the data in it's memory. With the replacement of the batteries all the data stored will be saved. With the possibility of storing information, Super Crono Hydromag Digital can remain without power for long periods without losing any data.
Attention: Throw away run out batteries in appropriate containers.
Troubleshooting
- While pedalling, the values on the LCD screen representing speed, power, time and distance don't up-date as they should [in the current screen, speed and power values are zero while the others don't change].
Probably the information from the sensor placed on the resistance unit doesn't arrive to the console. Check that the speed sensor and the plug are properly fixed.
- All the values on the LCD screen are correct but the resistance level indicator, which indicates the resistance level/gear shift position, remains blocked on the first level even if I change gear.
Probably no information arrives from the sensor of the gear shift. Check the cable from the console to the lever.
3.The slope values are different from yesterday. The slope value is in function of the weight, thus every time you introduce a new weight value, the slope figure for each resistance level will automatically change.
- The slope value is too high.
Check the weight value (see paragraph Set up settings Instructions]. In fact the slope value is inversely proportional to the rider's weight and if the weight value is too low, the slope value is wrong.
- The speed value is too high and the other values are incorrect.
Probably the model of resistance unit selected is not Super Crono Hydromag Digital. Check the SET UP fase that the TYPE value is "2".

ATTENTION
- The resistance unit becomes warm when in use. Wait until it has cooled before touching the aluminium shells.
- Do not brake when using the trainer, as this can permanently damage the roller and the tyre.
- The stand is designed for use by just one cyclist.
- Check the safety and stability of the bicycle before every training session.
- If the quick release is not compatible with the bushings of the stand, replace it with the one supplied (P).
- The computer that is applied on the handlebar is not waterproof. Take care not to sweat over the display, because it could damage the electronic circuit.
- Do not store the Super Crono Hydromag Digital in damp or wet places. This could damage the electronic components.
- If the trainer is not going to be used for a long time, it is advisable to remove the batteries from the computer and the transmitter.
- There are no individually usable components on the inside. The warranty is invalidated if the unit is opened or tampered with.
- Since the feet are made from soft non-slip material, during use they may leave rubber marks on the floor.
- During use of the Super Crono Hydromag Digital with Elastogel roller, slight wear of the roller is to be considered normal. Tests carried out at Elite show that after continuous use for 20,000km , roller wear is around 0.1mm , and as the total thickness is 17.5mm , far greater wear does not prevent correct operation of the trainer.
Claims due to improper or careless use will not be acknowledged. Possible slight wear of the rubber part comes within the norm.
- Use with narrow tyres or with non-optimum tyre pressures can permanently damage the Elastogel roller.
- If slipping of the wheel on the Elastogel roller is noticed, apply a more gradual force on the pedal. Training with the tyre slipping can permanently damage the Elastogel roller.
ADVICE
- For less tyre wear and better grip on the roller, it is advisable to use tyres of 23mm width.
- Recommended rear wheel pressure: 7 -8 atmospheres for racing tyres; 3.5 - 4 atmospheres for MTB tyres. For particular cases, comply with the pressure recommended by the tyre manufacturer.
- For quieter use, better grip of the tyre on the roller and reduced vibration, use slick tyres (also for Mountain bikes).
- Before use, clean the tyre with alcohol or water.
- If the pin of the quick release supplied protrudes more than 3mm from the fixing nut, cut off the protruding part (fig. 4).
NO
OK
4
DEUTSCH
- In accordance with the law no. 24 of 02/02/2002 and CE directive 1999/44, ELITE s.r.l. guarantees its products and the components used for a period of two (2) years from the date of purchase.
2.Warranty is void for defects caused by reasons not chargeable to the manufacturer such as negligence or carelessness whilst using the product, impacts, maintenance done by non-authorised personnel, damage caused by transportation, normal wear. Additionally, warranty is void in case of improper use of the product, wrong observation of instruction, especially the notice concerning installation and use supplied by ELITE s.r.l. for which in any case it is not responsible for eventual direct or indirect damages. - In case of repaired or replaced product done by the Factory or in one of its authorized Service Centers, ELITE s.r.l. is not responsible for any loss or damage during transportation.
4.To take advantage of the warranty service it is necessary to carefully fill in all its parts the "CUSTOMER ASSISTANCE CARD" which needs to accompany, along with the fiscal receipt or other document issued by the Seller which bears the name of the Seller and date selling, the eventual returned product. Warranty is void in case one of these documents are missing. - All the information supplied by the Purchaser on the "CUSTOMER ASSISTANCE CARD" will be handled in accordance with the rules of the law no. 675 of 31/12/1996.
- In case there is, along with the documentation supplied with the product, a technical drawing of the product itself, indicate the defective or malfunctioning part by signing on the correspondent number. The drawing needs to be attached to the "CUSTOMER ASSISTANCE CARD".
7.ELITE s.r.l. reserves the right to apply technical and aesthetic modifications to its products without obligation of notice.
GARANTIE
DEUTSCH
In case of defect contact the distributor in your country.


Brand : ELITE
Model : SUPER CHRONO HYDROMAG DIGITAL
Category : Wristwatch