
Nexture - Washing machine Klarstein - Free user manual and instructions
Find the device manual for free Nexture Klarstein in PDF.


User questions about Nexture Klarstein
0 question about this device. Answer the ones you know or ask your own.
Ask a new question about this device
Download the instructions for your Washing machine in PDF format for free! Find your manual Nexture - Klarstein and take your electronic device back in hand. On this page are published all the documents necessary for the use of your device. Nexture by Klarstein.
USER MANUAL Nexture Klarstein
English 31
Español 55
Français 81
Italiano 107
TECHNISCHE DATEN
Brandschutz
INSTALLATION
Vorbereitung
Congratulations on purchasing this equipment!
Please read this manual carefully and take care of the following hints on installation and use to avoid technical damages. This document is intended for end-users and qualified installers. It provides all information required for safe installation, correct use, cleaning & maintenance, energy-saving, and environmentally responsible disposal of your product.
Always refer to the latest version online at http://use.berlin. This manual may be updated without notice; the online version is authoritative. For any questions or to report issues, contact your local authorized service center or Klarstein Customer Service.

CONTENTS
| Safety Instructions | 32 |
| Appliance overview | 37 |
| Installation | 38 |
| Button Functions | 44 |
| Cleaning and maintenance | 46 |
| Notes on Environmental Protection | 50 |
| Troubleshooting | 51 |
| Disposal Considerations | 54 |
| Manufacturer & Importer (UK) | 54 |
TECHNICAL DATA
| Item number | 10048663 |
| Colour | Black |
| Power supply | 220-240 V ~ 50/60 Hz |
| Light power | 3 W x 2 |
| Motor power | 110 W |
| Total power | 116 W |
| Note: You can purchase an activated carbon filter and an aluminium filter separately for this range hood on our website: www.klarstein.com/shops or contact the Klarstein customer service. | |
SAFETY INSTRUCTIONS
| Symbol | Explanation |
 | WARNING: Indicates a hazardous situation which, if not avoided, could result in serious injury or death. |
 | CAUTION: Indicates a potentially hazardous situation which may result in minor injury or damage to the appliance. |
 | WARNING: Risk of electric shock. |
 | WARNING: Risk of fire. |
 | Note: Offers helpful tips and information for using your range hood. |
General usage and installation safety
- Intended use: This appliance is designed for household use only and should not be used for commercial purposes. Only use the range hood as described in this manual. This appliance is not intended for outdoor use or use in mobile installations (e.g. caravans or boats).
- Installation by qualified professional required: All installation and electrical wiring must be carried out by a competent person or a qualified electrician. The manufacturer is not liable for damage caused by improper installation or use.
- Before first use, ensure that the supply voltage and frequency match the ratings on the range hood's data plate. Installation must comply with all applicable national building, electrical and fire safety regulations.
- Safe operation: Do not operate the range hood if it is damaged or missing parts – contact an authorised service centre in such cases.
- Keep all packaging materials, such as plastic bags and polystyrene, away from children and dispose of them safely, as they pose a suffocation and injury risk. Remove all packaging and protective films from the range hood before first use.

WARNING: Risk of injury
- Keep this appliance and its cord out of the reach of young children.
• Children under eight years of age must not use this appliance. - Children aged 8 years and over, as well as persons with reduced physical, sensory or mental capabilities, may use this device, provided they have received supervision or instruction regarding its safe use and understand the associated risks.
• Children must not play with the appliance.
• Children must not clean or carry out user maintenance without supervision. - Supervision is required to prevent children from climbing on or hanging from the appliance.
Electrical safety
- Power connection: Ensure that the range hood is connected to a properly earthed mains outlet. If a plug is provided, it must remain accessible after installation so that the power can be disconnected; otherwise, a dual-pole isolating switch must be installed by an electrician. This switch must provide contact separation of at least 3 mm for all poles.
- Isolation before service: Always switch off and disconnect the power at the mains before carrying out any installation work, cleaning or maintenance on the range hood (e.g. replacing the bulb). Do not attempt to repair or modify the internal components of the appliance, as there are no user-serviceable parts inside except those described in this manual.
- Cord safety: The power supply cord must not be pinched or crushed during installation. The power cord must not come into contact with hot surfaces or sharp edges.

WARNING: Risk of electric shock.
If the supply cord is damaged, it must be replaced by the manufacturer, its service agent or similarly qualified persons in order to avoid an electrical hazard.
Important notes for extraction mode (air evacuation)

WARNING: Risk of asphyxiation from back-drafting.
Do not operate the range hood in extraction mode simultaneously with any appliance that relies on indoor air for combustion (e.g. gas water heaters or fireplaces), unless adequate ventilation of the room is provided. Running the range hood without sufficient replacement air can create negative pressure in the room. This could result in toxic combustion gases being drawn back down chimneys and flues into the living space.
- Ensure there is always a fresh air inlet into the room when the range hood is extracting air. This can be achieved by opening a window or installing a ventilation grille. This can be achieved by opening a window, installing a dedicated air vent or using a mechanical supply air system.
- For safe operation, the negative pressure in the room should not exceed 4 Pa (0.04 mbar). This requirement is based on EU ventilation safety standards. This limit prevents flue gases from being sucked back indoors. If in doubt, consult a qualified technician, who can evaluate the airflow and, if necessary, install an air intake or interlocked ventilation system.
Important installation guidelines
• Install the range hood at the manufacturer-specified minimum height above the cooking hob. The minimum safe distance between the hob surface and the lowest part of the range hood should be 65–75 cm. For gas cooktops, it must be at least 65 cm (or more if specified by the hob manufacturer).
- Ceiling mounting: Use the appropriate fixings for the ceiling type (e.g. expansion plugs for masonry). The provided fixings are intended for solid masonry walls. If mounting to a drywall ceiling or other materials, use suitable anchors that can support the load. Ensure that the range hood is level and securely attached in accordance with these instructions. Refer to the installation diagram for the mounting hole pattern and dimensions.

- Ducting (extraction mode): If using external venting, connect the exhaust duct to a duct pipe with a sufficient diameter. Avoid sharp bends or kinks in the duct and ensure that any bend has a radius of at least 90° or is gentler to prevent airflow reduction. For best performance, use a rigid or smooth-walled flexible duct and keep the run as short as possible. A suitable wall cap or roof vent must be used to terminate the duct outdoors to prevent backdrafts. Do not connect the exhaust duct to an existing chimney, furnace vent or flue used by other appliances. All duct joints must be properly sealed to prevent air leakage.
- Recirculation (filter mode): If it is not possible to duct outside, install charcoal filters for air recirculation. These filters absorb odours before the air is returned to the kitchen. Ensure that any internal diverter is set to recirculate, if applicable, and that the air outlet vents on the range hood are open. (Refer to the "Filters" section in the "Installation" chapter below for information on fitting filters.) Charcoal filters are not washable and must be replaced periodically according to usage.
Recirculation (filter mode)

Ducting (extraction mode)

Fire safety
- Never flambe dishes or ignite flammable materials (such as alcohol used for deglazing) while the range hood is switched on. Avoid letting flames rise into the range hood. Exercise caution when frying as overheated oils can ignite. Should this occur, switch off the range hood and cover the pan with a lid or fire blanket to smother the flames – do not use water.
- Never leave naked flames under the range hood. Accessible parts of the range hood may become hot when used over cooking appliances, so use caution when adjusting the unit or cleaning in operation.
- Do not place any flammable or smouldering objects on the cooktop under the range hood. Do not install the range hood near a fire. Do not install or operate the range hood near any other uncontrolled heat sources besides normal cooking appliances, and ensure that a suitable fire extinguisher or fire blanket is kept accessible in the kitchen.
- Never operate the range hood without the grease filters in place, and ensure that they are not excessively greasy, as this could lead to a fire hazard.
Safety when cleaning
• Always switch the appliance off before cleaning it.
• For safety reasons, do not clean the appliance with a steam jet or high-pressure cleaner.
- Clean the hob according to the maintenance and cleaning instructions in this manual.
- Do not use harsh abrasive cleaners or sharp metal scrapers to clean the oven door glass, as this can scratch the surface and cause the glass to shatter.
If you encounter any problems with the appliance (e.g. unusual noise, odour, smoke or the fan not running properly), disconnect the power immediately and contact customer services or a qualified technician. Never continue to operate a malfunctioning range hood – this is for your safety and to prevent damage. Never attempt to modify or override safety features. Only use original replacement parts and accessories. If you have any doubts or issues, seek assistance from the manufacturer's service centre.
APPLIANCE OVERVIEW

INSTALLATION
Preparation
Ensure that the installation location meets the following requirements: a stable, vertical wall that can support the range hood"s weight; access to a standard power connection; and, for ducted mode, a clear path for ducting to the outside. Have the following tools ready: a drill with the appropriate bits, a spirit level, a screwdriver, a tape measure, a pencil and a stepladder. It is recommended that two people carry out the installation for safety reasons. Observe all safety instructions during installation.
Installation notes
Installation (Vent outside)
Note: When the range hood and appliance supplied with energy other than electricity are simultaneously in operation, the negative pressure in the room must be not exceed 4 Pa ( 4 × 10⁻⁵ Bar).
Important information for installing exhaust air ducts
- To ensure optimum air extraction, the following rules must be strictly observed. Failure to do so will reduce the range hood's performance and increase its noise level.
- Lay the exhaust pipe as short and straight as possible.
- Do not use a smaller exhaust duct and do not restrict its space.
• If flexible ducts are used, they must always be mounted tightly to minimise pressure loss.
• All installation work must be carried out by a qualified electrician or other qualified person. - Do not connect the range hood"s exhaust duct to an existing ventilation system used by another appliance, such as a chimney.
- The angle of the exhaust pipe bend should be at least 120° . Align the pipe horizontally. Alternatively, the duct should rise from the starting point and exit through an outer wall.
• After installation, ensure that the range hood is level to prevent grease from accumulating on one side.
• Ensure that the selected exhaust duct complies with the relevant standards and is fire-resistant. - The minimum distance is 700 mm from the range hood to a gas hob, and is 650 mm to an electric hob. If the installation instructions for gas hobs specify a greater distance, this must be taken into account.

Note: Two or more persons are required to install or move this appliance. Failure to do so can cause physical injuries
Electrical installation
All electrical wiring must be carried out by a qualified person(s) in accordance with all applicable codes and standards. This range hood must be properly earthed. Turn off the electrical power at the service entrance before starting work. If the supply cord is damaged, it must be replaced by the manufacturer, their service agent, or a similarly qualified person, in order to avoid a hazard.
Installing the range hood
Before you begin: Ensure that the installation location meets the following requirements: a stable, vertical ceiling that can support the range hood's weight; access to a standard power connection; and, for ducted mode, a clear path for ducting to the outside. Have the following tools ready: a drill with the appropriate bits, a spirit level, a screwdriver, a tape measure, a pencil and a stepladder. It is recommended that two people carry out the installation for safety reasons. Observe all safety instructions during installation.
| STEP 1: Turn the adjusting knob of the wire grip counterclockwise to the appropriate position, then push the knob upwards. At this time, the wire grip releases the suspension cables and pulls it out. | STEP 2: Use four M6*10 screws and spring pads to lock the wire grip onto the ceiling mount board. |
 |  |
STEP 3:
First, confirm that the hanging position corresponds to the gourd hole. Then, fix two ST5*45 screws and two plastic dowels into the ceiling, leaving a 5 mm gap between them. Next, hang the ceiling mounting board onto the reserved screw gaps through the gourd hole, rotating it to the appropriate position.
Use two ST5*45 screws and two plastic dowels to fix the ceiling mounting board and secure the two ST5*45 screws originally reserved for this purpose. There should be a wire connector in the middle of the ceiling fixing board to which you can plug in the power cord.
STEP 4: Thread the suspension cables and power cord through the corresponding holes in the decorative ceiling cover. Attach the four ceiling pieces and spring pads, then secure them to the range hood.
Plastic dowel
Ø10x45
plastic dower

Power cord
power cord
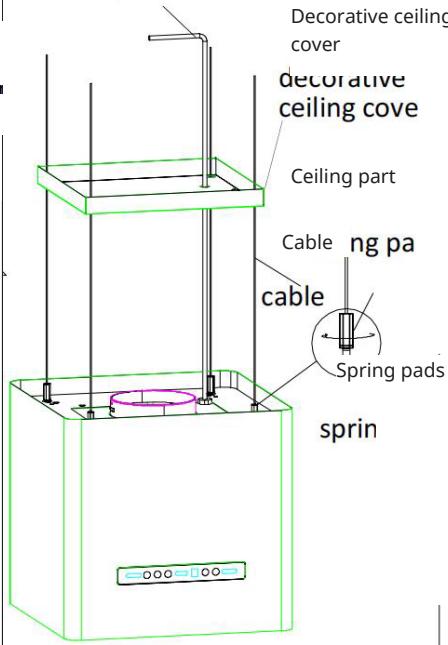
| STEP 5: Thread four cables into the wire grip, adjusting them to the appropriate height. Then, lock the adjusting knob to hang the range hood from the ceiling (note: this step must be carried out by two people). | STEP 6: Loosen the screws on the connector cover and remove the wire connector. Thread the power cord and the main lead wire through the respective wire holes at both ends of the connector box. Use the wire connector to join the power cord and the main lead wire together, as well as the earth wire. Put the wire connector into the box, then reinstall the cover by screwing it back on. Loosen the screws on the wire clamp, thread the power cord through it and secure it in place.Note: This installation step MUST be carried out by a qualified electrician! |
 |  |
STEP 7: Use two M4 x 12 screws to secure the decorative ceiling cover to the ceiling mount board.

Installation (Vent inside)
If you do not have an outlet to the outside, exhaust pipe is not required and the installation is similar to the one show in section "Installation (Vent outside)".
Installing the filters
- To remove the grease filter, press down on the metal latch. This releases the filter from the range hood. Tilt the filter down and take it out.
- To install the grease filter, align the aluminium filter with the slots in the hood. Press in the plastic latch, slide the filter into position and release. Ensure that the filter is securely locked in place after installation.
- Install the carbon filter and lock it in place until you hear a clicking sound.
- Install the grease filter after installing the carbon filter.
Final Checks:
Make sure that all parts are installed correctly and securely. Remove any protective film from stainless steel and glass surfaces. Briefly turn the unit on (after restoring power) to check that the fan and lights operate. If the range hood has a speed regulator slider or electronic control, verify that each speed and light function works. There should be no excessive vibration; if the range hood wobbles or vibrates significantly, recheck that it is mounted tightly. For ducted installations, check for air leaks around the connections by feeling for air escaping, and fix with tape or clamps as needed. Important: If you have installed charcoal filters for recirculation, make sure you remove any temporary tape or covers from the recirculation vents (if the range hood was supplied with them covered).
BUTTON FUNCTIONS
Before using the range hood, ensure that all installation tools and materials have been removed from the cooktop area. Familiarise yourself with the control panel and the functions of your specific model.

| 1 | Reduce fan speed | 5 | Gesture control on/off sensor |
| 2 | Increase fan speed | 6 | On/off button |
| 3 | Ligh on/off | A | Gesture sensor for fan speed |
| 4 | Display | B | Gesture sensor for turning the light on/off |
Touch control
When the appliance is first plugged in, a beep sounds and all the keys and the display light up. After one second, the appliance enters off mode.
Reduce/increase fan speed
Touch the key to increase or reduce the fan speed. The display shows the corresponding speed level: 1/2/3/P. (Please note that speed P works for five minutes only, after which it automatically switches to speed 3.)
Light on/off
Briefly press the LIGHT key to switch the light on, and press it again to switch it off. (The light key can be controlled independently.)
Display
On/off
In off mode, touch the key and the key backlight will turn on. The display will show "1" and the appliance will work at low speed. When the fan is running, touching the button will stop the appliance and it will enter off mode.
Setting the switch-off delay
When the fan is running, press and hold the reduce fan speed button for three seconds to set the fan to turn off after 15 minutes. The display will show the current speed. After the time has elapsed, all the keys will dim and the appliance will switch to off mode. To cancel the delay, press either the reduce fan speed or increase fan speed button during the countdown.
Gesture control on/off sensor
Touch the key to activate the gesture control sensor, which then illuminates. Touch again to turn off gesture control.
You can continue to use the touch sensors after gesture control is active.
Hand movements should not be fast; typically, a single gesture should take about one second.
Please see the steps below for gestures and their functions:
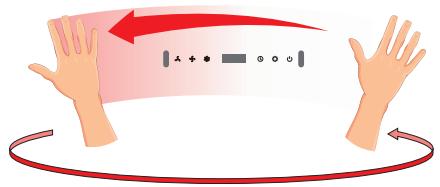
Hold your hand 5–10 cm from the control panel surface and wave your palm from the A area to the B area to set the motor speed cycles to increment from 1 to 2 to 3 to 1 to 2, with the display showing 1, 2, 3, 1, 2.
Wave your palm above the switch from the B area to the A area to turn the fan off with a 15-minute delay. Wave again to turn the appliance off.
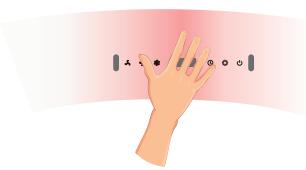
Place your hand near the centre of the panel (under the B-labelled sensor) for two seconds to light up the light key and the hood lamp.

CLEANING AND MAINTENANCE

WARNING: Risk of injury.
Always disconnect the power supply before performing any cleaning or maintenance (unplug the unit or switch off the circuit breaker)

Note: Wear gloves to protect your hands from sharp edges and use caution with electrical components.
Grease filters (metal mesh): dishwasher safe
These filters trap oil and grease particles from cooking vapours. To prevent the build-up of grease, which can attract pests, cause odours, reduce airflow and pose a fire risk, they must be cleaned periodically. As a general rule, clean the metal grease filter every 2-4 weeks (or more frequently if the range hood is used intensively).
Removal: To remove the grease filter, first ensure that the range hood is switched off and has cooled down. Locate the filter latch or handle, which is usually a small metal or plastic tab on the edge of the filter. Press or slide the latch to release the filter. The filter will then tilt downwards, so support it with your hand before pulling it out. Some models have multiple filter panels, which should be removed one by one in a similar manner. Be careful of dripping grease if the filter is saturated.
Cleaning: Metal filters (often aluminium or stainless steel mesh) can be cleaned by hand or in a dishwasher. For hand washing, use hot water and a degreasing detergent. Soak the filters in hot, soapy water for 10–15 minutes to loosen the grease, then scrub them gently with a soft brush. Rinse thoroughly and leave to dry completely. If using a dishwasher, wash the filters on a gentle cycle (place them vertically, if possible, and separate from dishes in case grease drains off). Please note that cleaning the filters in a dishwasher may cause them to discolour slightly (this is cosmetic and does not affect functionality). Ensure the filters are fully dry before reinstallation.
Reinstallation: Align the filter with the slot at the back of the range hood, then push it up and back into place. Secure it by pressing the latch so that it locks into place. The filter should sit snugly without wobbling. Warning: Never operate the range hood without the grease filters in place, as grease can accumulate inside the range hood and on the motor otherwise.
Charcoal filters (for recirculation) - not dishwasher safe.
If you use your range hood in recirculating mode, it will use these filters to remove odours from the air before returning it to the kitchen. These filters are usually not washable and must be replaced periodically. Over time, the activated carbon becomes saturated and ineffective at absorbing odours.
Lifetime: Depending on your cooking habits, you should replace the charcoal filter approximately every 3 to 6 months. If you notice that cooking smells are no longer being reduced effectively, it's probably time to change the filter.
Replacement: First remove the metal grease filters to access the charcoal filter mount. The charcoal filter is usually attached directly to the fan intake. It may twist to lock (common for round types) or clip in place (common for panel types). Remove the old filter by twisting it anticlockwise or releasing the clips, as applicable. Dispose of it in accordance with local waste regulations (charcoal filters are largely non-toxic but not recyclable). Install the new filter by fitting it into place and twisting it clockwise or snapping it in until it is secure. It should hold firm and not rattle. Finally, reinstall the clean grease filters.

Note: Mark your calendar or set a phone reminder for the next replacement based on your usage. Running the range hood with a spent charcoal filter is inefficient as it blocks the airflow without removing odours.
Surface cleaning (range hood body)
- Keep the exterior and interior surfaces of the range hood clean and free from grease splatters and dust. After each cooking session, once the hood has cooled, wipe down the underside and visible surfaces with a soft, damp cloth to prevent grease from hardening.
- Use a mild detergent or washing-up liquid solution to clean; apply with a sponge or cloth, then wipe with a clean, damp cloth and finally dry with a soft towel. This will prevent streaks, particularly on stainless steel or glass surfaces.
- Do not use abrasive cleaners (such as scouring powders or steel wool) on the hood as these can scratch the finish or remove paint. They can scratch the finish or remove paint. For stainless steel surfaces, wipe along the grain using a microfibre cloth. To achieve a polished look, you can use a specialised stainless steel cleaner (apply it to the cloth, not directly to the hood).
- Do not use corrosive or flammable cleaners or solvents such as bleach, alcohol or acetone. These can damage surfaces and create fumes or fire hazards.
- Periodically clean the accessible areas around the fan inside the range hood to remove any accumulated grease. Do this with the power off, using a damp cloth, and avoid disturbing any wiring. If there is a heavy build-up of grease inside, it is best to have it serviced by a professional.

WARNING: Risk of injury and damage to the device.
Never use a steam cleaner on the cooker hood. The steam can reach electrical components and cause short circuits or electric shock. Excess moisture can also damage the motor.
Light bulb replacement
The range hood"s lights ensure visibility while cooking. These may be LED modules or traditional bulbs (halogen or incandescent, depending on model). Check the Technical Data for the lamp type. Over time, bulbs can burn out.
Dispose of old bulbs responsibly. Halogen and incandescent bulbs go in general waste (not recycling). LED bulbs should be taken to electronic recycling collection if available (per WEEE regulations).

Note: Before replacing a bulb, always switch off the hood and allow the lights to cool.
Steps for replacing the LED-lamp
- Open the lamp panel.
- Loosen the screws on the lamp panel and find the wire terminal. Disconnect the light wire from the connector terminal. Then remove the lamp panel from the hood body.
- Loosen the screws on the back of the lamp panel and remove the backboard.
- Finally, loosen the screws holding the LED light in place and disconnect the light wire from the terminal connector.
- Replace the old LED light with the new one, aligning the screw holes, and then tighten the screws to fix the new light in place. Extend the light wire from the wire hole, then reconnect the new lamp wire to the connector terminal.
- Cover the backboard and tighten the screws on the back of the lamp panel.
- Reinstall the lamp panel to the hood body using the screws, and connect the light wire to the terminal of the light wire connector.
- Close the lamp panel. The lamp replacement is complete.
Periodical maintenance checks
- Fasteners: Check that the screws and mounting brackets holding the bonnet are tight every so often. Vibration can loosen hardware over time. Gently tighten any loose screws (support the bonnet while doing so).
- Flexible duct: If you are using a flexible hose for extraction, inspect it annually for cracks or tears, as these could cause air leakage. Replace it if it is damaged. Also, make sure that the exterior vent flap (if applicable) moves freely and is not obstructed by debris or pests.
- Electrical cord: Inspect the power cord for damage or wear. If the insulation is damaged or the wires are exposed, do not use the hood until the cord has been replaced by a qualified person.
- Controls: Keep buttons and switches clean and dry. If they become sticky or greasy, carefully wipe them with a damp cloth (do not use excessive water) and a mild cleaner. Do not allow liquid to seep into the control panel openings.
- By maintaining your range hood properly you can ensure that it continues to operate safely and efficiently. Not only does a clean appliance work better, it also reduces the risk of accidental fires (grease is flammable). Set a regular cleaning schedule according to how often you cook. If you frequently deep-fry or stir-fry, clean the filters more often. It is worth the effort for a cleaner kitchen environment and a longer-lasting appliance.
Energy saving tips
To use your range hood efficiently and minimise energy consumption, follow this guidance:
• Use the appropriate fan speed: select a speed that is suitable for the cooking activity.
Generally, use the lowest effective speed that keeps the air clear. Higher speeds consume more power, so only use boost or intensive mode when you need rapid extraction, such as during high-heat frying or when smoke is visible. Running the range hood on maximum power unnecessarily wastes energy without improving air quality. Start with a lower setting and only increase it if cooking fumes or odours persist.
- Kitchen ventilation: Maintain good general kitchen ventilation. If possible, keep a window partially open or an air vent available while the range hood is in use. This improves the range hood's efficiency by providing a fresh air source and reducing the effort needed to draw out fumes. A well-ventilated kitchen also helps to prevent the range hood from creating negative pressure, which can impair extraction and cause the range hood to work harder.
- Cook efficiently: Wherever possible, use lids on pots and pans to reduce the release of excessive steam and vapour. This speeds up cooking and means the range hood can run at a lower setting. Similarly, use the back burners when possible, as the range hood captures steam more effectively from burners closer to the wall, and centre your cookware under the range hood to optimise the capture of fumes.
- Timely usage: Turn on the range hood a few minutes before you start cooking. This allows time for airflow to establish and prevents smoke buildup from the outset. Likewise, turn it off shortly after you have finished cooking – do not leave it running any longer than necessary. Many modern range hoods have a 5-minute auto-off timer; if yours does, use this to shut off automatically once the remaining moisture/odour has cleared. Leaving the range hood running when the stove is off only wastes electricity.
- Regular maintenance: Keep the grease filters clean. A clogged grease filter reduces airflow and makes the fan work harder, using more energy for less effect. Cleaning the filter roughly every month (or as soon as it looks saturated) will help to maintain the range hood's efficiency. Likewise, replace the charcoal filters as recommended (typically every three to six months of regular use). A saturated charcoal filter will no longer absorb odours and will also dramatically restrict airflow, leading you to run the range hood at higher speeds or for longer periods. Installing a fresh carbon filter on schedule ensures the range hood removes odours quickly and can run for a shorter time.
- Lighting efficiency: If your range hood uses halogen bulbs, consider upgrading to LED lamps (check compatibility). LEDs consume far less electricity to produce the same light output. Always turn off the cooker lights when they are not needed – for example, use natural lighting during the day or turn off the range hood lights after checking your food instead of leaving them on for the whole cooking time.
- Cook smart: Use the back burners or centralise your cookware to allow the range hood to capture heat and steam more effectively. Avoid excessive open boiling, as this releases a lot of steam. Simmer with lids on to contain the steam (the range hood will then have less to extract). Cooking multiple dishes in succession (i.e. batch cooking while the oven or stove is hot) means you can use one period of range hood operation to cover several tasks rather than repeatedly turning it on and off.
- When not cooking: If your range hood has an automatic sensor or humidity sensor mode (some advanced models do), take advantage of it. The range hood can adjust the speed or turn
itself off when no more steam is detected, thus optimising energy use. Keep the sensor areas clean to ensure proper function.
By following these user guidelines, you can reduce your environmental impact by lowering your energy consumption and greenhouse gas emissions, while also keeping your kitchen comfortable with minimal noise and draughts. Efficient use can reduce electricity bills and extend the life of your appliance. Remember that a well-maintained and wisely used cooker range hood can contribute to a more sustainable kitchen without compromising performance.
NOTES ON ENVIRONMENTAL PROTECTION
- During cooking, make sure that there is sufficient air supply so that the range hood can operate efficiently and with low operating noise.
- Adjust the fan speed to the amount of steam produced during cooking. Use the intensive mode only when necessary. The lower the fan speed, the less energy is consumed.
- If large amounts of steam are produced during cooking, select a higher fan speed in good time. If the cooking steam has already dispersed in the kitchen, the range hood must be operated longer.
- Switch off the range hood when you no longer need it.
- Switch off the lighting when you no longer need it.
- Clean the filter at regular intervals and replace it if necessary to increase the effectiveness of the ventilation system and prevent fire hazards.
• Always put the lid on when cooking to reduce cooking steam and condensation.
TROUBLESHOOTING
If you experience any problems with the range hood, please refer to the table below for a list of common issues and their recommended solutions. Always disconnect the appliance from the power supply before investigating any internal issues. If you need to carry out any electrical repairs or if the problem persists, contact a qualified technician or the manufacturer's service centre – do not attempt to repair electrical components yourself.
| Problem | Possible cause | Solution |
| The range hood does not turn on (fan and lights are off). | There is no power to the unit. This may be because the plug is loose or the circuit breaker/fuse has tripped. | Ensure that the power plug for the range hood is firmly inserted into the outlet (or that the hardwired connection is live). Check your home“s electrical panel – if a fuse is blown or a circuit breaker has tripped, reset or replace it. If it trips again immediately, do not repeatedly reset it; there may be a fault – call an electrician. Also, make sure that any wall switch controlling the outlet (if applicable) is turned on. |
| The lights are operational, but the fan is not (the motor is not running). | Fan speed is set to 0/off; there is a problem with the fan motor or control switch; the motor“s thermal protector has tripped due to overheating. | Ensure that a fan speed has been selected (some range hoods require you to press a speed level after switching on). If the controls are electronic, try resetting them by turning the range hood off and on again. Clean the grease filter, as a severely clogged filter can cause the motor to overheat and switch off as a safety measure. Allow the motor to cool and try again later. If the fan still won“t start but the lights do, the motor or its capacitor may be faulty – seek servicing. |
| The fan functions, but the lights do not come on. | Loose light socket or a wiring issue in the lighting circuit. | Replace the lamp with a new one of the correct type (see section “Changing the LED light” above). It is possible that the driver has failed, which would require professional repair. Ensure that the light switch is working properly (you should hear a click or see an indicator light when you press it). |
| Insufficient airflow or poor performance. | Grease filter saturated/cloggedCharcoal filter (if used) exhaustedObstructions in the ductExcessive bends or long duct run causing pressure dropRange hood installed too high above hobLow fan speed setting | First, clean or replace the filters, as this often restores proper airflow. Next, if the range hood is ducted, inspect the duct and ensure that the duct damper (flap) is opening freely and that there are no blockages (e.g. bird nests or debris) at the exterior vent. If possible, reduce the number of sharp bends in the duct and use smooth ducting of the correct diameter. If the range hood is mounted significantly above the recommended height, performance will drop – lower it if feasible. Finally, use a higher fan speed for heavy cooking fumes. |
| Excessive vibration or noise (rattling sounds). | The range hood might be loosely secured to the wall, or there might be loose parts (such as a filter that isn”t seated properly, or a screw that has fallen into the fan). The fan might be unbalanced due to grease build-up or damage, or a foreign object might be contacting the fan blade (such as a piece of packaging or a bug). | Turn off the range hood. Check that all screws and mounting points are tight and tighten any loose ones on the range hood body or chimney. Remove the grease filter and ensure that there is nothing inside the fan area. Sometimes a filter that is not clipped in properly will vibrate, so make sure that the filters are fitted securely. Clean the fan blades if they are dirty, as uneven grease deposits can cause imbalance. When you power it back on, listen carefully to pinpoint the source of any noise: a continuous rattling could indicate a defective motor bearing (which requires servicing), whereas a buzzing noise could indicate a loose panel. If the duct pipe is rattling against something inside the wall, secure or cushion it. Also, check that the backdraft damper (if present) is not flapping loudly – you can use a little tape or a weighted attachment to dampen its movement. |
| The airflow is reversed or coming back into the kitchen (for ducted installations). | A backdraft from outside (wind pushing air in), or the duct check valve is missing or not installed, allowing outside air in. | Install a backdraft damper (if not already present) – this is a one-way flap that prevents outside air from coming in through the range hood. If a damper is already installed, check that it is not stuck open. In heavy winds, some backward airflow is possible, so you might want to consider an outdoor cap with a wind protector. Also, ensure that windows and doors on the leeward side of the house are open to balance the pressure if the wind is forcing air down the chimney. |
| If the electronic controls are not responding or displaying error codes. | A glitch in the control board or a power surge. If there is an error code (flashing lights), consult the manual (some range hoods have codes for issues such as the temperature being too high or sensor faults). | Try resetting the electronics by unplugging the range hood or switching off the circuit breaker for one minute, then restoring power. This can clear minor glitches. If the problem persists, the control unit may need replacing – contact the manufacturer"s service centre. If an error code is displayed, provide this information to the service centre. |
| Unusual odours persist or smoke is not being cleared (especially in recirculation mode) | Charcoal filters are saturated. Filters are installed incorrectly. The unit is overwhelmed by extremely heavy smoke. | Replace the charcoal filters if they are old or have not been replaced recently, as they may be unable to absorb any more odours. Check that both the grease and charcoal filters are properly fitted with no gaps for smoke to bypass them. Cook with lids on pans to reduce smoke. If the range hood"s airflow capacity is too low for your cooking style (e.g. strong wok cooking), you may need a more powerful model or switch to an external duct, which is generally more effective than recirculation. |
DISPOSAL CONSIDERATIONS
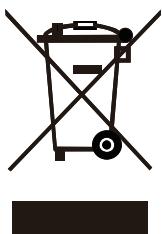
If there is a legal regulation for the disposal of electrical and electronic devices in your country, this symbol on the product or on the packaging indicates that this product must not be disposed of with household waste. Instead, it must be taken to a collection point for the recycling of electrical and electronic equipment. By disposing of it in accordance with the rules, you are protecting the environment and the health of your fellow human beings from negative consequences. For information about the recycling and disposal of this product, please contact your local authority or your household waste disposal service.
MANUFACTURER & IMPORTER (UK)
Chal-Tec GmbH, Mühlenstraße 25, 10243 Berlin, Germany. Contact: info@klarstein.com
EU Ecodesign Information
In compliance with EU Regulation 2023/826, this range hood power consumption is approximately 0.36 W in off-mode (after 5 min).
Energy performance data measured and calculated according to Commission Regulation (EU) No 66/2014 (see measurement methods reference in technical documentation).
In accordance with EU Regulation (EU) No 65/2014 and UK Regulations, this range hood is supplied with an official Energy Efficiency Label. This label provides a quick visual reference of the product's performance and efficiency class.
For full label details and verification, visit the official EU database at: https://eprel.ec.europa.eu/ or scan the QR code included on the energy label affixed to your appliance.
Estimado cliente:
INSTALACIÓN
Preparación
LIMPIEZA Y MANTENIMIENTO

SOMMAIRE
Sécurité incendie
INSTALLATION
Préparation

AVVERTENZE DI SICUREZZA
INSTALLAZIONE
Preparazione


- BRANDSCHUTZ
- INSTALLATION
- VORBEREITUNG
- CONTENTS
- SAFETY INSTRUCTIONS
- GENERAL USAGE AND INSTALLATION SAFETY
- WARNING: RISK OF INJURY
- ELECTRICAL SAFETY
- WARNING: RISK OF ELECTRIC SHOCK
- IMPORTANT NOTES FOR EXTRACTION MODE (AIR EVACUATION)
- WARNING: RISK OF ASPHYXIATION FROM BACK-DRAFTING
- IMPORTANT INSTALLATION GUIDELINES
- FIRE SAFETY
- SAFETY WHEN CLEANING
- APPLIANCE OVERVIEW
- PREPARATION
- INSTALLATION NOTES
- INSTALLATION (VENT OUTSIDE)
- IMPORTANT INFORMATION FOR INSTALLING EXHAUST AIR DUCTS
- ELECTRICAL INSTALLATION
- INSTALLING THE RANGE HOOD
- STEP 3
- INSTALLATION (VENT INSIDE)
- INSTALLING THE FILTERS
- FINAL CHECKS
- BUTTON FUNCTIONS
- TOUCH CONTROL
- REDUCE/INCREASE FAN SPEED
- LIGHT ON/OFF
- DISPLAY
- ON/OFF
- SETTING THE SWITCH-OFF DELAY
- GESTURE CONTROL ON/OFF SENSOR
- CLEANING AND MAINTENANCE
- GREASE FILTERS (METAL MESH): DISHWASHER SAFE
- CHARCOAL FILTERS (FOR RECIRCULATION) - NOT DISHWASHER SAFE
- SURFACE CLEANING (RANGE HOOD BODY)
- WARNING: RISK OF INJURY AND DAMAGE TO THE DEVICE
- LIGHT BULB REPLACEMENT
- STEPS FOR REPLACING THE LED-LAMP
- PERIODICAL MAINTENANCE CHECKS
- ENERGY SAVING TIPS
- NOTES ON ENVIRONMENTAL PROTECTION
- TROUBLESHOOTING
- DISPOSAL CONSIDERATIONS
- MANUFACTURER & IMPORTER (UK)
- EU ECODESIGN INFORMATION
- ESTIMADO CLIENTE
- INSTALACIÓN
- PREPARACIÓN
- LIMPIEZA Y MANTENIMIENTO
- SOMMAIRE
- SÉCURITÉ INCENDIE
- PRÉPARATION
- AVVERTENZE DI SICUREZZA
- INSTALLAZIONE
- PREPARAZIONE
Brand : Klarstein
Model : Nexture
Category : Washing machine