
ML 591 - Dot Matrix Printer OKI - Free user manual and instructions
Find the device manual for free ML 591 OKI in PDF.
| Product type | Dot matrix printer (impact) |
| Brand | OKI |
| Model | ML 591 |
| Print technology | 24-pin dot matrix |
| Print head | 24 pins, 0.20 mm diameter, automatic paper thickness adjustment |
| Print speed (max) | 450 cps at 15 cpi (Utility mode) |
| Max graphics resolution | 360 × 360 dpi |
| Interfaces | Centronics parallel (standard), RS-232C serial (optional) |
| Emulations | Epson LQ, IBM Proprinter, IBM AGM |
| Buffer memory | 64 KB |
| Supported paper formats | Single sheets, continuous paper (front/rear/bottom), envelopes, labels |
| Maximum paper width | 16 inches (406 mm) |
| Maximum paper thickness | 0.017 inch (0.44 mm) with bottom feed |
| Power supply | 120 V AC, 50/60 Hz (also available in 230/240 V) |
| Dimensions (W x D x H) | 585 × 380 × 166 mm (23 × 15 × 6.5 inches) |
| Weight | 9 kg (19 lb 13 oz) |
| Included ribbon | Black ribbon cartridge (ref. 52106001) |
| Black ribbon life | 4 million characters (average, 10 cpi) |
| Optional accessories | Sheet feeder, push/pull tractor, serial interface, roll paper support |
| Maintenance | Cleaning every 6 months or 300 hours of operation |
| Safety instructions | Unplug before cleaning, avoid moisture, do not block openings |
Frequently Asked Questions - ML 591 OKI
User questions about ML 591 OKI
0 question about this device. Answer the ones you know or ask your own.
Ask a new question about this device
Download the instructions for your Dot Matrix Printer in PDF format for free! Find your manual ML 591 - OKI and take your electronic device back in hand. On this page are published all the documents necessary for the use of your device. ML 591 by OKI.
USER MANUAL ML 591 OKI
Every effort has been made to ensure that the information in this document is complete, accurate and up-to-date. OKIDATA assumes no responsibility for the results of errors beyond its control. Okidata also cannot guarantee that changes in software and equipment made by other manufacturers, and referred to in this handbook, will not affect the applicability of the information in this manual. Mention of software products manufactured by other companies does not necessarily constitute endorsement by Okidata.
© 1994, 1995, 1996, 1998, 2001 by Okidata.
Revised edition, September 2001.
Written and produced by the Okidata Training & Publications Department. Please address any comments on this publication to:
Training & Publications Department
Okidata, Division of Oki America, Inc.
2000 Bishops Gate Blvd.
Mount Laurel, NJ 08054-3405
OKIDATA and MICROLINE are registered trademarks/marques déposées/marcas eeggistradas, Oki Electric Industry Company, Ltd. OKISMART TYPER is a trademark of Oki Electric Industry Company, Inc.
ENERGY STAR is a registered trademark of the United States Environmental Protection Agency.
IBM and PC are registered trademarks of International Business Machines Corporation.
Epson is a registered trademark of Epson America, Inc.
Year 2000 Compliance
All products currently sold by Okidata are Year 2000 Compliant. Each product contains information technology that accurately processes date and time data between the years 1999 and 2000. These products, when used in combination with products purchased from other manufacturers, whose products properly exchange date and time information, will accurately process the date and time. All future products are committed to meeting the same Year 2000 compliance.

ENERGY STAR®
As an ENERGY STAR partner, Okidata has determined that this product meets the ENERGY STAR guidelines for energy efficiency.
Important Safety Instructions
Your OKIDATA printer has been carefully designed to give you years of safe, reliable performance. As with all electrical equipment, however, there are a few basic precautions you should take to avoid hurting yourself or damaging the unit:
- Read the setup and operating instructions in this handbook carefully. Be sure to save it for future reference.
- Read and follow all warning and instruction labels on the printer itself.
- Unplug the printer before you clean it. Use only a damp cloth; do not use liquid or aerosol cleaners.
- Place your printer on a firm, solid surface. If you put it on something unsteady, it might fall and be damaged; if you place it on a soft surface, such as a rug, sofa, or bed, the vents may be blocked, causing it to overheat.
- To protect your printer from overheating, make sure no openings on the printer are blocked. Don't put the printer on or near a heat source, such as a radiator or heat register. If you put the printer in any kind of enclosure, make sure it is well ventilated.
- The printhead can get quite hot when it's been printing for a length of time. Don't touch the printhead until it's had a chance to cool.
- Do not use your printer near water, or spill liquid of any kind into it.
- Be certain that your power source matches the rating listed on the back of the printer. If you're not sure, check with your dealer or with your local power company.
- Your printer has a grounded, 3-prong plug as a safety feature, and it will only fit into a grounded outlet. If you can't plug it in, chances are you have a non-grounded outlet; contact an electrician to have it replaced with a grounded outlet. Do not use an adapter to defeat the grounding.
- The printer must be installed near a power outlet which remains easily accessible.
- To avoid damaging the power cord, don't put anything on it or place it where it will be walked on. If the cord becomes damaged or frayed, replace it immediately.
- If you're using an extension cord or power strip with the printer, make sure that the total of the amperes required by all the equipment on the extension is less than the extension's rating. Generally, the total ratings of all equipment plugged into any one power line should not exceed 15 amperes. Don't exceed this unless you know that the power line your equipment is plugged into has a rating above 15 amperes.
- Aside from the routine maintenance described in this handbook, don't try to service the printer yourself; opening the cover may expose you to shocks or other hazards. Don't make any adjustments other than those outlined in the handbook — you might cause damage requiring extensive repair work.
- If anything happens that indicates that your printer is not working properly or has been damaged, unplug it immediately and have your printer serviced. These are some of the things to look for:
The power cord or plug is frayed or damaged.
Liquid has been spilled into the housing, or the printer has been exposed to water.
The printer has been dropped or its cabinet has been damaged.
The printer doesn't function normally when you're following the operating instructions.
1: Setting Up Your Printer 1
Unpacking 2
Check The Contents 2
Remove the Protective Film 3
Remove the Shipping Retainers 3
Install the Ribbon Cartridge 4
Connect to Your Computer and to the Power Line 5
Turn on the Printer 6
2: Loading Paper 7
Single-Sheet Paper 8
Preliminaries 9
Loading Single-Sheet Paper 10
Setting the Top of Form for Single-Sheet Paper 12
Temporarily Changing the Top of Form Setting for Single-Sheet Paper 13
Rear-Feed Paper 14
Preliminaries. 15
Loading Rear-Feed Paper 16
Temporarily Changing the Top of Form Setting for Rear-Feed Paper 19
Paper Handling Features 20
Tear Feature 20
Form Tear-Off Feature 21
Paper Park Feature 24
Switching from Continuous-Form Paper to Single-Sheet Paper 25
Switching from Single-Sheet Paper to Continuous-Form Paper 26
3: Testing Your Printer 27
The Font Test (Self Test) 28
The Rolling ASCII Test 28
4: Setting Up Your Printer with Software 29
Basic Terminology 30
Emulations 30
Changing Emulations 30
Selecting a Printer Driver 31
5: Using the Control Panel 32
Print Mode 36
Indicator Lights 36
Menu Mode 38
Entering the Menu Mode 39
Exiting the Menu Mode 39
The Printer Menu 40
Active Buttons in Menu Mode. 41
6: Problem Solving & Maintenance 42
Problem Solving 43
Clearing Rear-Feed Paper Jams 48
Solving the Problem of Continuing Rear-Feed Jamming. 49
Clearing Single-Sheet Feed Jams 51
Cleaning the Housing. 52
7: Accessories & Replacement Parts. 53
Accessories 54
Replacement Parts 54
Reference Section 1: English 55
Reference Section 2: French 64
Reference Section 3: Spanish 75
Reference Section 4: Portuguese 84
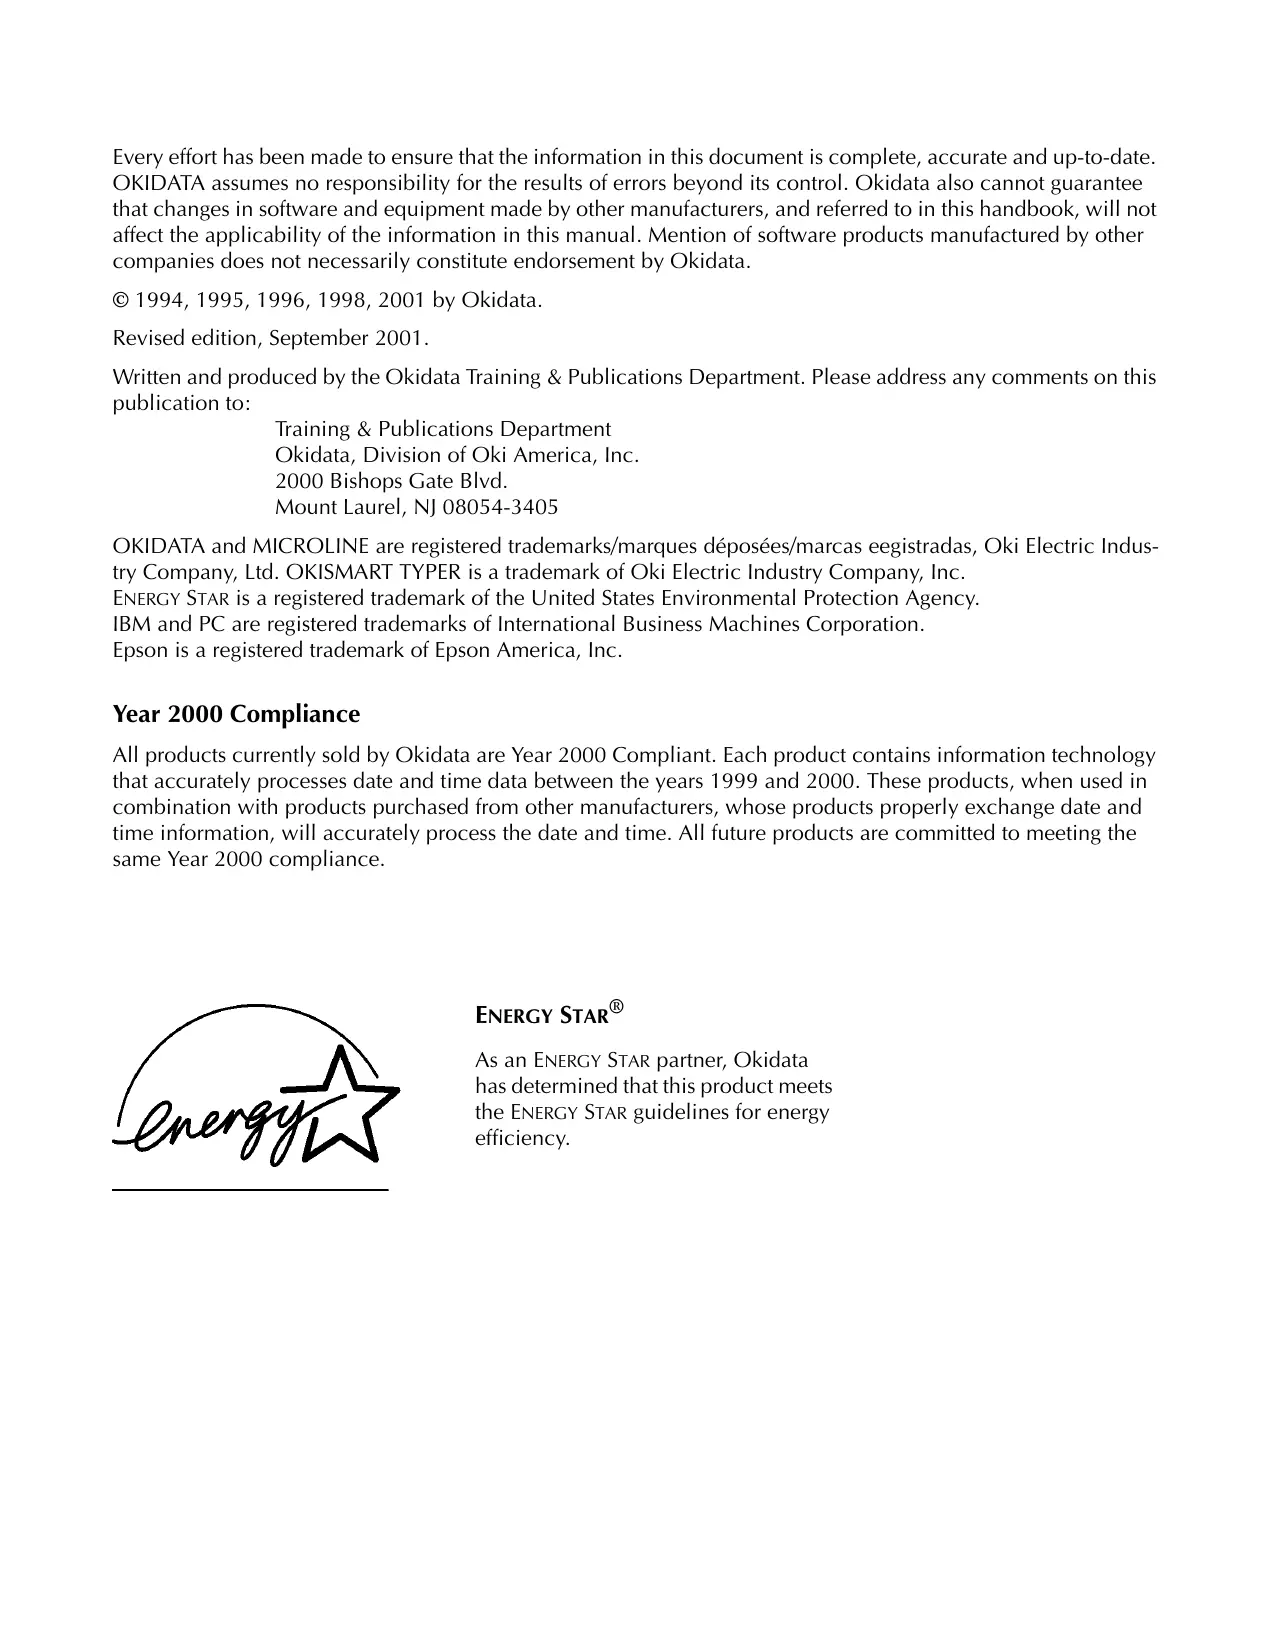
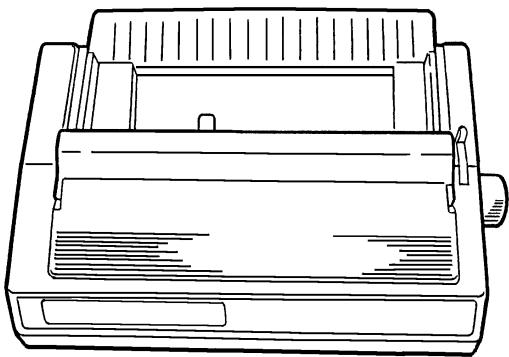
Unpack your printer and check to be sure you have the following items:
- printer
- diskette
- power cord
- ribbon cartridge
If you are missing any of these items, contact your dealer immediately
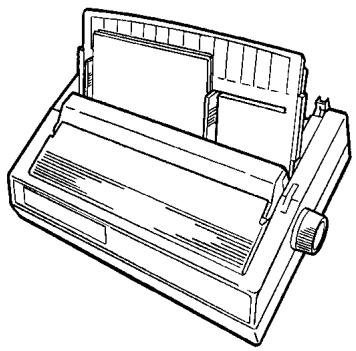
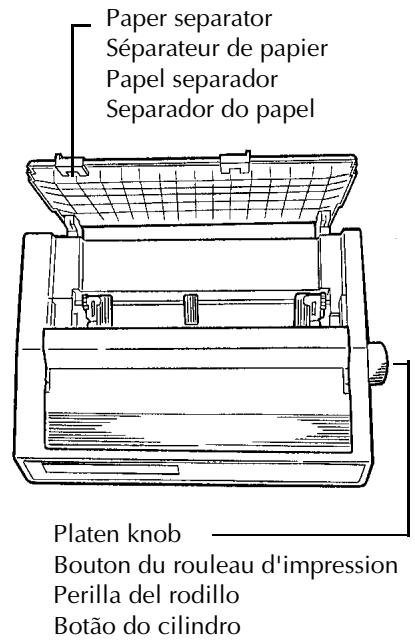
Printer
Imprimante
Impresora
Impressora

Diskette Disquette
Disquete
Disquete
Power cord
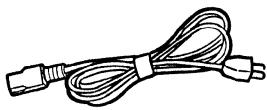
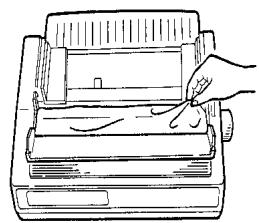
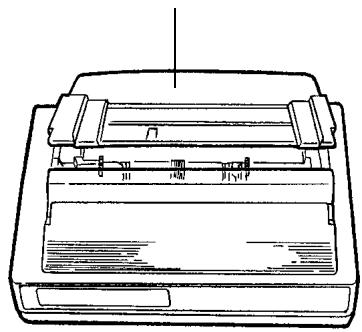
Remove the Protective Film
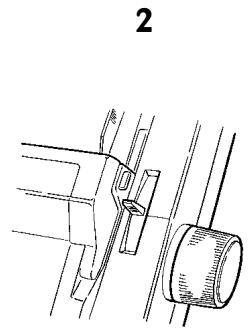
Peel the plastic film from the carriage cover (1). Pull up on the carriage cover and peel the plastic film from the access cover (2), then swing carriage cover back into place.
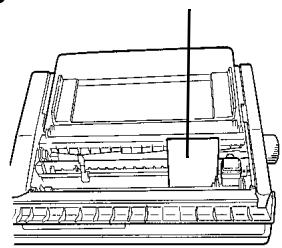
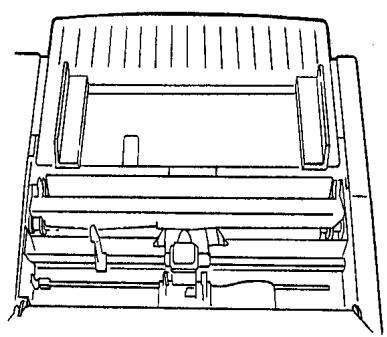
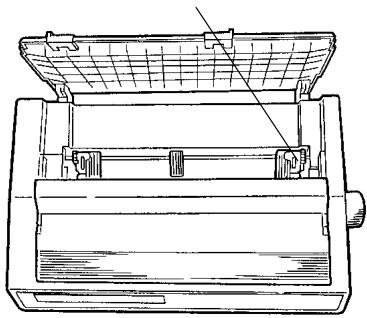
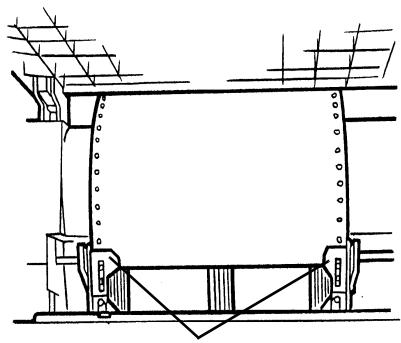
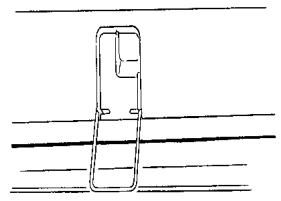
Remove the Shipping Retainers
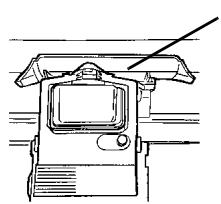
Open the access cover and remove the shipping retainer for the printhead (1). Lift the paper separator and remove the second shipping retainer (2).
1
2
3
Retainer
Cale
Retenedo
Protetor
4
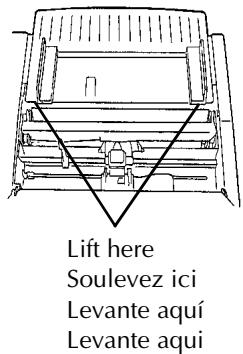
Lift here
Soulevez ici
Levanteaquí
Levante aqui
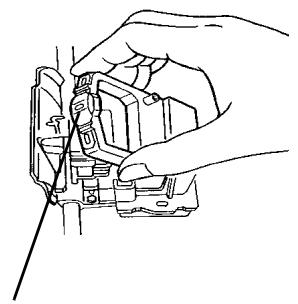
Install the Ribbon Cartridge
Note: Leave the ribbon shield on the cartridge!
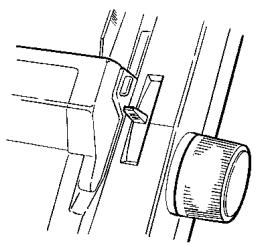
Make sure the printer is turned off. Slide the printhead to the center of the platen (1). Holding the ribbon cartridge as shown (2), fit the grooves in the flat end of the cartridge over the posts on the ribbon plate (3). Lower the front of the cartridge over the printhead until it snaps into place (4). Turn the knob in the direction of the arrow on the cartridge to take up the ribbon slack (5).
1
2
Ribbon shield Protection du ruban Protector de la cinta Proteçao da fita
3
4
5
Knob
Bouton de manoeuvre
Perilla
Pino deavanço da fita
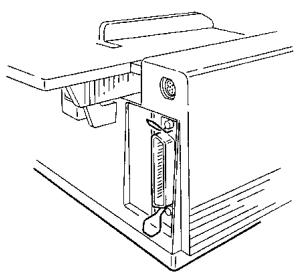
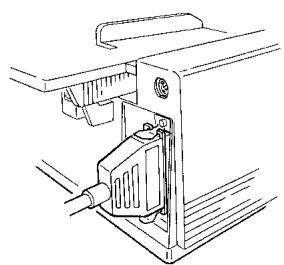
Connect to Your Computer and to the Power Line
Turn both the computer and the printer off. Plug the parallel interface cable (you must supply the cable) into the parallel interface port on the back of the printer (1) and secure it in place with the wire loops (2).
Note: FCC regulations require the use of a shielded cable no longer than 6 ft. (1.8 m).
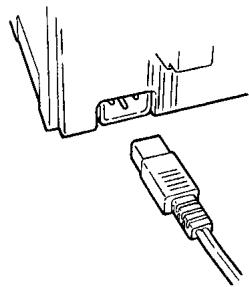
Plug the power cord into the power socket on the back of the printer (3), then plug the other end into a grounded outlet.
1
2
3
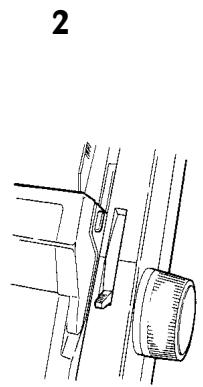
Turn on the printer (the power switch is on the right side of the housing).
The printhead crosses back and forth along the platen and the pins gently fire to determine the printhead gap setting. The POWER light (1) comes on. The ALARM light (2) also comes on, indicating that there is no paper loaded.
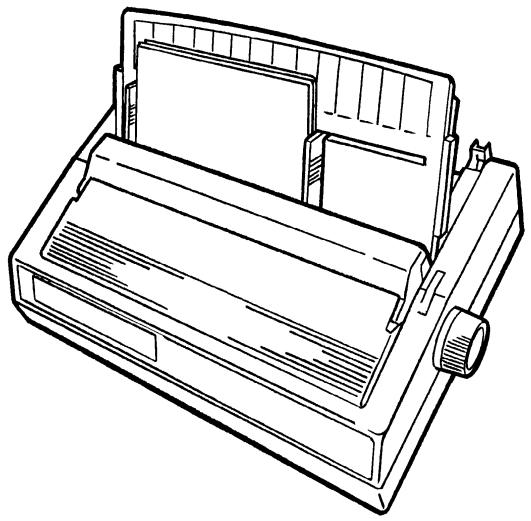
Use single-sheet paper for letterhead stationery, memos, and envelopes. It is also recommended for printing graphs and charts because it provides the most accurate control of the paper, producing solid black graphics and vibrant color charts.
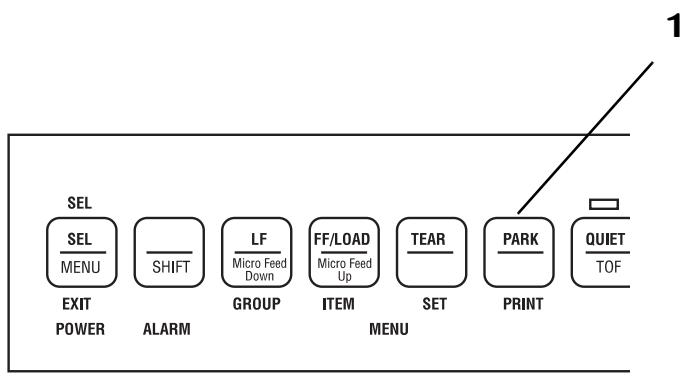
Note: If you have continuous-form paper in the paper path, press the PARK button on the front panel to remove it from the path before loading single-sheet paper!
Make sure the printer is turned on and that the ALARM light (1) is on, indicating that there is no paper in the paper path.
Note: If the ALARM light is off, continuous-form paper is loaded in the paper path. Press the PARK button (2) to remove it from the path before attempting to load single-sheet paper.
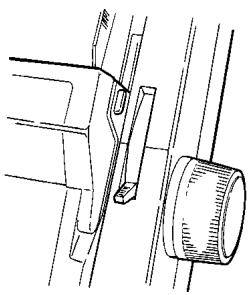
Préliminaires
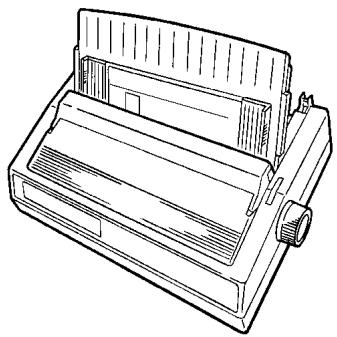
Move the paper lever to the position marked TOP (1). Unsnap the paper separator from the housing, then swing it upright to the position illustrated (2): make sure the wire feed guide is against the separator. Adjust the paper feed guides to fit the width of the paper and place a sheet of paper in the paper separator (3). The paper automatically feeds into the printer. The printhead travels back and forth, gently firing its pins to sense the paper thickness and set the printhead gap.
Important! If you are printing envelopes, you need to enter the printer Menu, go to the "Top Feed" group and change the setting for "Gap Control" to 6 to ensure optimum printing performance (see pages 39-41).
1
2
3
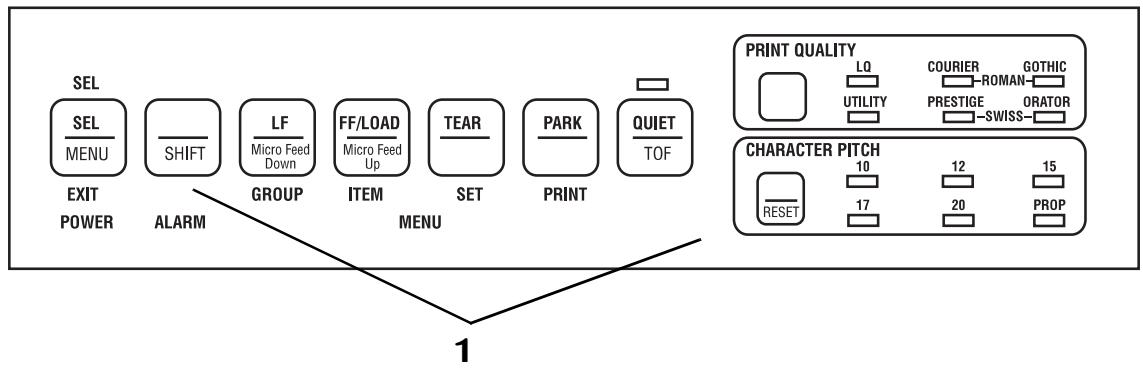
Note: If the sheet of paper doesn't feed in properly, the "15" light on the front panel flashes. To correct this, press the SHIFT and RESET buttons simultaneously (1), then reload the paper.
Setting the Top of Form for Single-Sheet Paper
Make sure the printer is deselected (SEL light off—press the SEL button to deselect). To set the Top of Form (the position where the first line of printing begins) for single-sheet paper, use the front panel buttons indicated below (1). When you are done press the SEL button. The location of the printing is indicated by the red line on the paper shield.
Note: To reset the Top of Form to the factory default, turn off the printer, then hold the PARK and QUIET buttons while turning the printer back on.
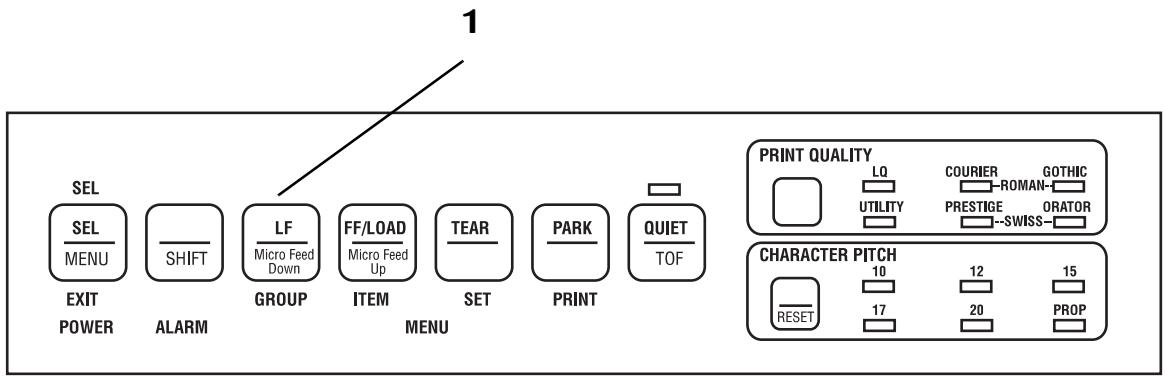
To set Top of Form higher, press and hold SHIFT button while pressing LF button.
To set Top of Form lower, press and hold SHIFT button while pressing LF/LOAD button.
Temporarily Changing the Top of Form Setting for Single-Sheet Paper
To temporarily change the Top of Form setting for a page, deselect the printer (press SEL button) and press the LF button (1) until you reach the Top of Form position you want to use. The printer retains this setting until the next sheet feeds in.
Load continuous-form paper on the rear-feed paper path for printing spreadsheets, long reports, etc. For graphics or charts, use the single-sheet paper path to obtain the best results.
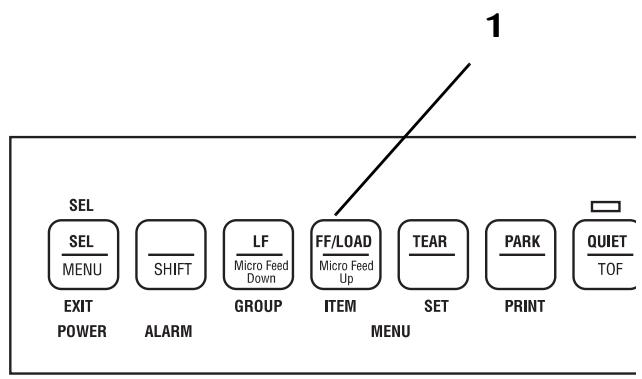
Note: If you have single-sheet paper in the paper path, press the FF/LOAD button to remove it from the path before loading rear-feed paper. The ALARM light comes on.
Make sure the printer is turned on and that the ALARM light (1) is on, indicating that there is no paper in the paper path.
Note: If the ALARM light is off, paper is loaded in the paper path. Press the FF/LOAD button (2) to remove single-sheet paper or the PARK button (3) to remove continuous-form paper from the path before proceeding.
Préliminaires
Loading Rear-Feed Paper
Move the paper lever to the position marked REAR (1). Lift the front edge of the paper separator and swing it up (2). Pull up on the lock levers to release the rear-feed tractors and swing open the tractor covers, then move the right-hand tractor to fit the width of the paper you're installing (3).

1
2
3
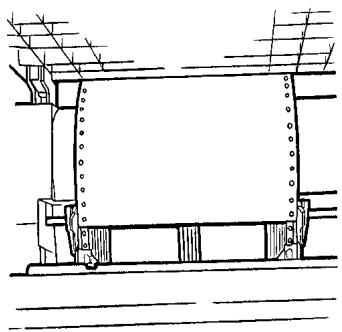
Pull the paper through the opening between the printer and the rear cover, and place the first two holes on each side of paper over tractor pins (1). Close the tractor covers and move the left tractor to align the edge of the paper with the reference mark for that paper size (2). Lock the left tractor by pushing back on its lock lever: move the right tractor so that the paper holes are centered on the pins, then lock the right tractor by pushing back on its lock lever (3).
1
Tractor covers closed
Close the paper separator and swing the wire feed guide forward so that it rests on the pull-up roller assembly (1).
Note: The wire feed guide keeps the continuous-form paper from curling back into the printer.
Push the FF/LOAD button (2). The paper automatically feeds into the printer and the ALARM light goes out. The printhead travels back and forth, gently firing the pins to sense the thickness of the paper and to set the printhead gap. Press the SEL button to select the printer, then set the Top of Form using the procedure described for single-sheet paper on page 12.
1
Temporarily Changing the Top of Form Setting for Rear-Feed Paper
To change the Top of Form setting for a single page, deselect the printer (press SEL button) and press the LF button until you reach the Top of Form position you want to use. The printer retains this setting for one page only.
To change the Top of From setting for multiple pages of continuous-form paper, deselect the printer (press SEL button) and press the LF button to move to the new Top of Form position, then press and hold the SHIFT button while pressing the QUIET/TOF button. The printer retains this setting until you park the continuous-form paper or until you change the Top of Form again.
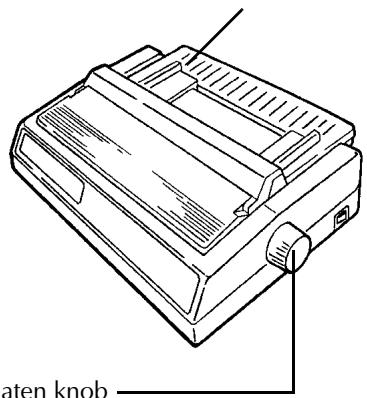
Caution! Do not use the platen knob to advance the paper to the tear position!
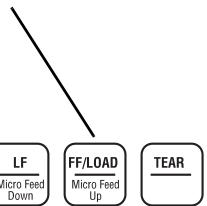
Press the TEAR button (1) to advance continuous forms up to the tear position so you can easily tear off a printed sheet without wasting paper or readjusting the printer.
To return the paper to the print position, press the TEAR button again.
Note: The Tear feature can not be used when the optional pull tractor is installed.
Form Tear-Off Feature
This feature automatically moves continuous-form paper up to the tear position after the selected amount of time. The paper will return to the initial printing position when the printer receives data.
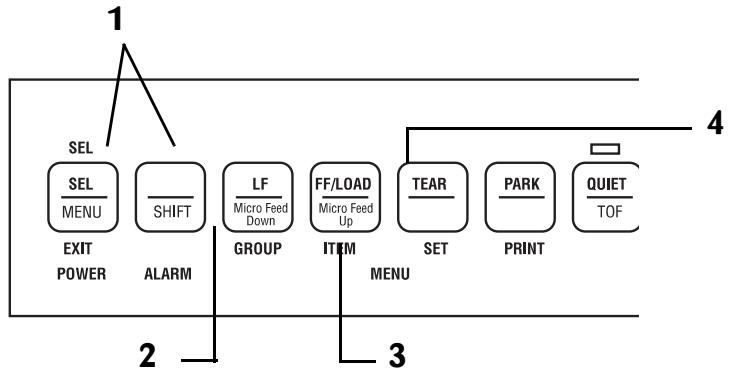
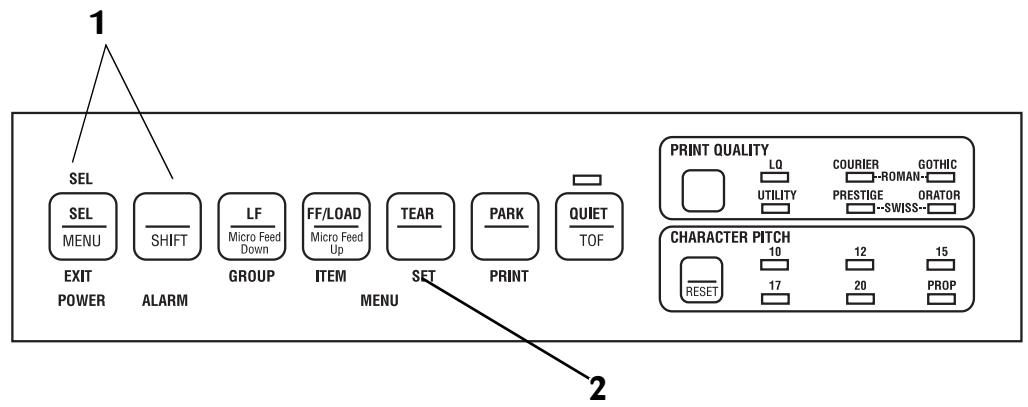
This feature is normally turned off. To activate it, hold the SHIFT button and press the SEL button to enter the Menu Mode (1). Press the LF button until the Rear Feed group appears (2), press the FF/LOAD button until Form Tear-Off appears (3), press the TEAR button (4) until the setting you want appears — 500 ms, 1 sec, or 2 sec — then hold the SHIFT button while pressing the SEL button to exit the Menu Mode (1).
Caution! Do not engage Form Tear-Off when printing on labels.
Form Tear-Off Feature (continued)
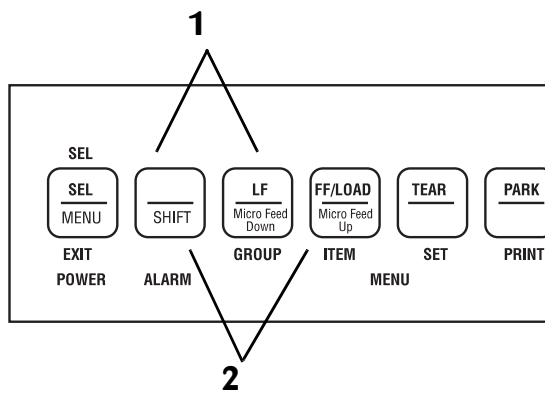
To adjust the tear position with the Forms Tear-Off feature engaged, press and hold the SHIFT button while using the LF button (1) to feed the paper down in small increments or the FF button (2) to feed the paper up in small increments.
To set the Top of Form with the FormTear-Off feature engaged, push and hold the SHIFT and TEAR buttons (3) to see the current Top of Form setting. Then continue to hold the SHIFT button, release the TEAR button and press the LF button (4) to move the paper down or the FF button (5) to move the paper up to set the Top of Form.
Form Tear-Off Feature (continued)
Note: Some programs, such as high resolution graphics packages, pause occasionally while sending data to the printer. If the pause lasts more than two seconds, the paper advances to the tear-off position until more data is received. No data is lost, but this extra paper movement can cause uneven print registration in graphics. If you have this problem, enter the printer Menu, go to the Rear Feed group and change the setting for Form Tear-off to Off.
If you have problems setting the Top of Form high enough on the page when using Forms Tear-Off, see "Problem Solving" in Chapter 6.
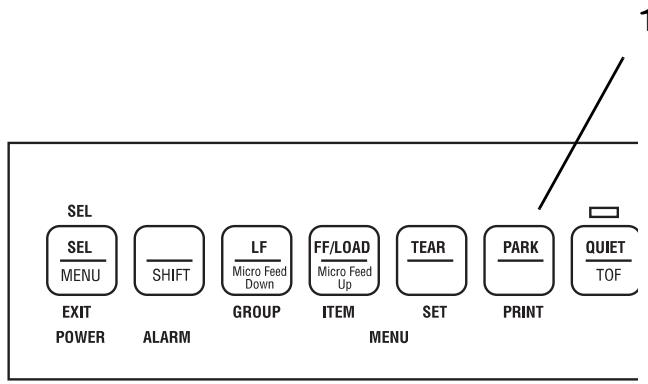
Press the PARK button (1) to move continuous-form paper out of the paper path. To move the parked continuous-form paper back to the print position, press the FF/LOAD button.
Switching from Continuous-Form Paper to Single-Sheet Paper
Tear off printed pages, then press the PARK button (1) to remove the continuous-form paper from the paper path. Lift the paper separator to the upright position and move the paper lever to the position marked TOP (2). Load single-sheet paper into the paper separator. The printer automatically feeds the sheet of paper into the print position.
Switching from Single-Sheet Paper to Continuous-Form Paper
To switch from single-sheet paper to continuous-form paper which has been parked:
Press the FF/LOAD button (1) to remove the single-sheet paper from the paper path. Lower the paper separator to the continuous-forms position. Move the paper lever to the position marked REAR (2). Press the FF/LOAD button (1) to advance the continuous-forms paper into the print position.
The Font Test (Self Test)
The Font Test provides a printout containing samples of each available typeface.
To run the Font Test, load paper and turn off the printer, then press and hold the LF button (1) for several seconds while turning the printer on.
The Rolling ASCII Test
The Rolling ASCII Test provides a continuous printout of all 96 ASCII characters.
To start the Rolling ASCII Test, load paper and turn off the printer, then press and hold the QUIET button (2) for several seconds while turning the printer on

Test de fontes (auto test)
Your printer emulates the following printers: Epson LQ (the factory default), IBM Proprinter, IBM AGM.
Changing Emulations
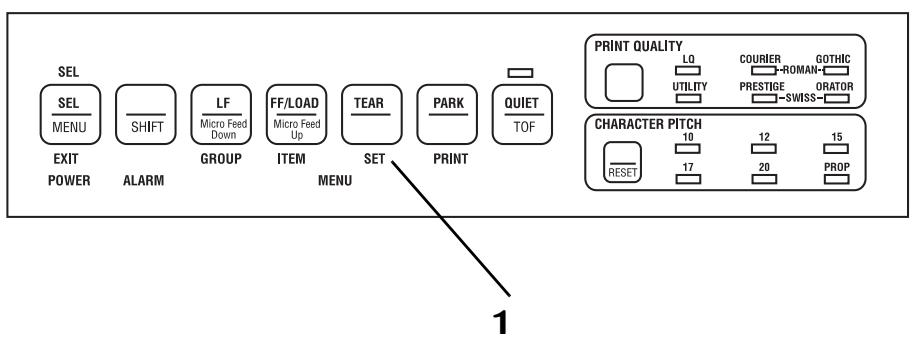
Your printer is set at the factory for the Epson LQ emulation. If you wish to change to one of the other emulations, hold the SHIFT button and press the SEL button to enter the Menu Mode (1). Press the TEAR button until the emulation you wish to engage prints (2). Exit the Menu Mode and save your settings by holding the SHIFT button while you press the SEL button (1).
Terminologie de base
Emulations
Selecting a Printer Driver
The table summarizes the various printer drivers which will work with your printer. The drivers are listed in order by decreasing compatibility as you go down the list: use one as close to the top of the list as possible. If your software does not have a printer driver from near the top of the list, call the software manufacturer to see if they have added any drivers to those supplied when you purchased your software.
Important! Check your software documentation for instructions on how to install a printer driver
Emulation/Emulation/Emulación/Emulación
| Epson LQ | IBM Proprinter | IBM X24e AGM/XL24e AGM |
| Okidata ML 590/1 Epson Epson LQ 870/1170 Epson LQ 800/1000 Epson LQ 2550, for color Epson LQ 2500 Epson LQ 1500 Epson FX Epson JX Epson LX Epson RX Epson MX | Okidata ML 590/1 IBM IBM Proprinter X24e/XL24e IBM Proprinter X24/XL24 IBM Proprinter IBM Graphics Printer | Use this emulation only when you've selected an IBM Proprinter X24e/XL24e driver and you need to usepson LQ high density graphics. N'utilisez esta émulation qu'une fois que vous avez sélectionné un gestionnaire IBM Proprinter X24e/XL24e et que vous avez besoin d'utiliser des graphiques haute densité Epson LQ. Utilice esta emulación solamente quando haya selecciónado un controlador de impressora IBM Proprinter X24e/XL24e y deba utiliser grafícos de alta densidad Epson LQ. IBM Graphics PrinterUse esta émulation somente se tiver seleçãoado um driver IBM Proprinter X24e/XL24e e precisar usarpson LQ para grafi-cos de alta densidade. |
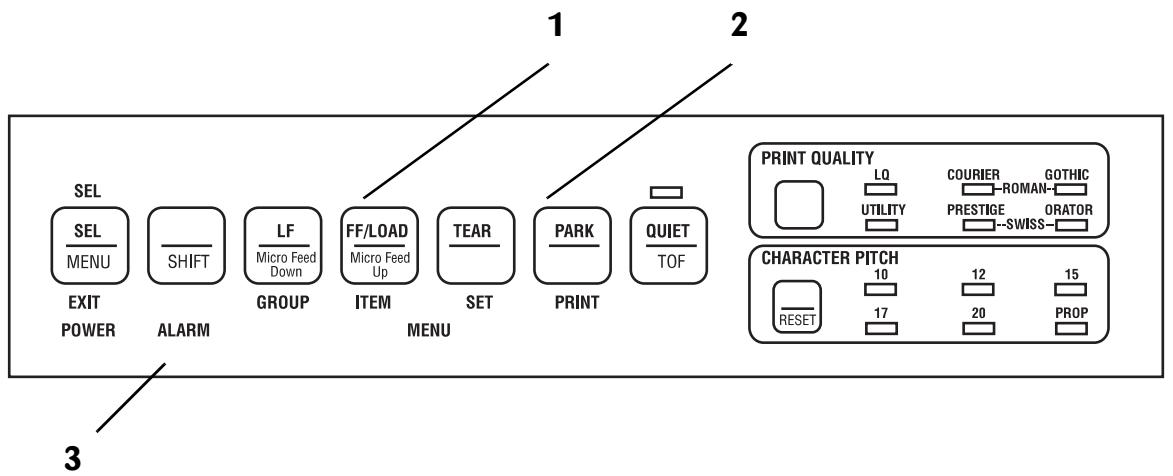
Press to select/ deselect printer. Press while holding SHIFT button to enter Menu Mode.
Menu Mode:
Press while holding SHIFT button to exit Menu Mode.
Print Mode:
Press to feed paper down line by line.
Press while holding SHIFT button to move Top of Form up on page.
Menu Mode:
Press to advance to next Group.
Print Mode:
Press to move continuous-form paper up for tear off or back down for printing.
Menu Mode:
Press to advance to next Setting for the item.
Print Mode:
Press to select Print Quality.
Print Mode:
Press to engage/ disengage Quiet mode.
Press while holding SHIFT button to set temporary Top of Form on continuous-form paper.
Print Mode:
Lights indicate whether printer is in Letter Quality (LQ) or Utility mode.
Print Mode:
Lights indicate font selected: Roman or Swiss are selected when both lights to their right and left are lit.
SEL
SEL
MENU
EXIT
POWER
SHIFT
ALARM
LF
Micro Feed Down
GROUP
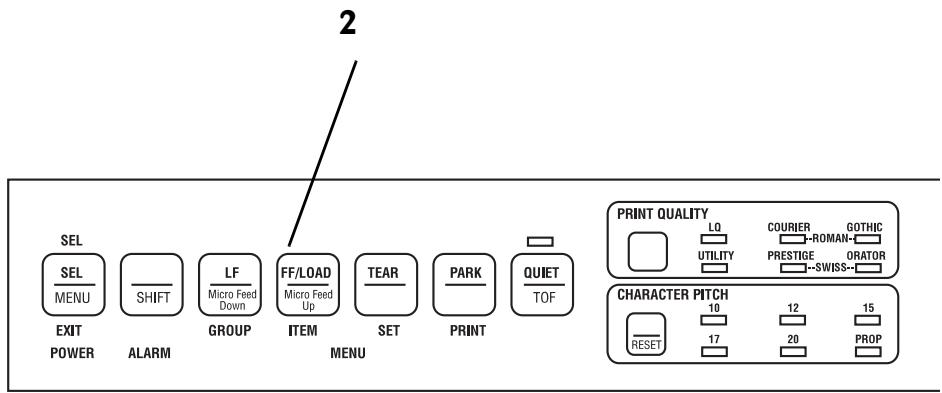
FF/LOAD
Micro Feed Up
ITEM
TEAR
SET
PARK
QUIET
TOF
PRINT QUALITY


COURIER
#
PRESTIGE
#
GOTHIC
ROMAN-
CHARACTER PITCH


Print Mode:
Press and hold while pressing LF button or FF/ LOAD button to change Top of Form setting.
Press and hold while pressing RESET button to reset printer.
Press and hold while pressing SEL button to enter Menu Mode.
Menu Mode:
Press and hold while pressing SEL button to exit Menu Mode.
Print Mode:
Press to feed in or eject sheet of paper, or to advance continuous-form paper to print position.
Press while holding SHIFT button to move Top of Form down on page.
Menu Mode:
Press to advance to next Item.
Print Mode:
Press to move continuous-form paper out of the paper path to "parked" position.
Menu Mode:
Press to print out current menu settings.
Print Mode:
Press to select Character Pitch. Press while holding SHIFT button to reset printer.
Print Mode:
Lights indicate which Character Pitch is selected.
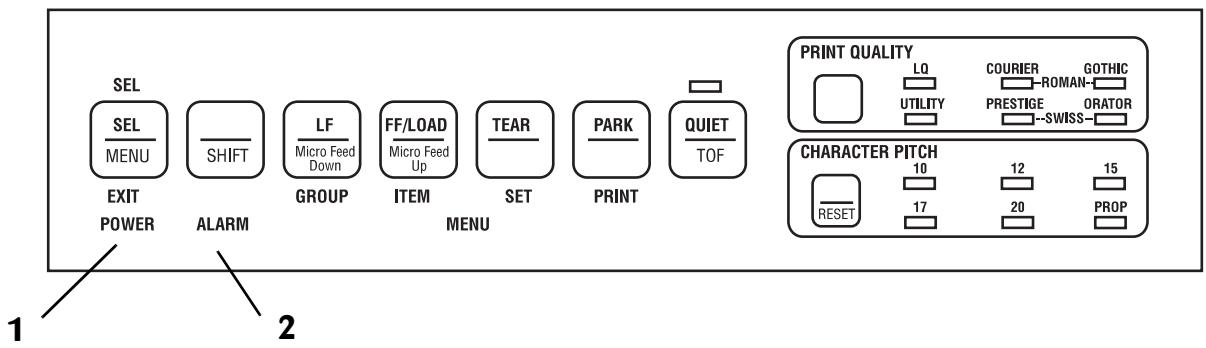
Print Mode :
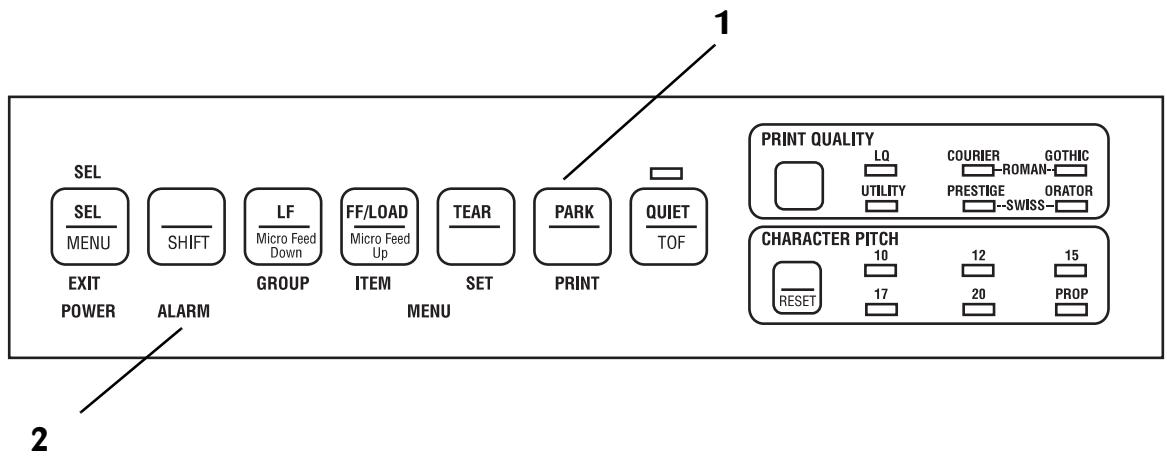
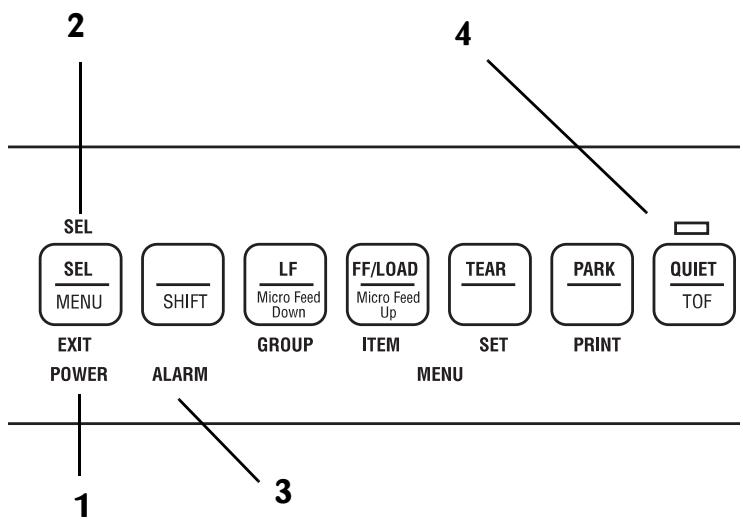
1 POWER Light: Lights whenever the printer is on.
2 SEL Light: Lights when the printer is selected and ready to receive data. If this light is not lit, the printer can not receive data. This light flashes when the printer is in the Print Suppress mode.
3 ALARM Light: Lights when an error condition exists, such as when the printer is out of paper, if there is a paper jam, or if the paper lever is set to the wrong paper path for the paper loaded. If this light flashes, and continues to flash after you turn the printer off then on again, contact your service representative.
4 QUIET Light: Lights when the printer has been placed in the QUIET state.
Mode Impression
Voyants lumineux
Important! Any commands your software sends will override the front panel settings.
Note: Your printer has eight bar codes, EAN8, EAN13, UPC-A, UPC-E, CODE39, Interleaved 2 of 5, and Code 128 sets A, B and C. For more details, use the Okidata Taxable Facts (call 1-800-OKIDATA and follow the recorded instructions).
To reset the character pitch to the factory default (10 cpi), deselect the printer, then hold the SHIFT button while pressing the CHARACTER PITCH button.
When your printer is in the Menu Mode, you can use the front panel buttons to change the defaults for the printer parameters. The changes you make in the Menu Mode are automatically saved in your printer's memory when you exit the Menu Mode and are retained even if you turn the printer of.
To reset your printer to the factory defaults for the menu, turn the printer off, then press and hold the SEL and LF buttons while turning the printer back on again.
Caution! If you have the printer in the Menu Mode and turn the printer off without first exiting, any changes you have made in the menu will be lost.
Press simultaneously to reset printer to defaults
To place your printer in the Menu Mode, hold the SHIFT button while pressing the SEL button. The MENU light comes on and the SEL light goes out.
Exiting the Menu Mode
When you are done making changes in the Menu Mode, exit the mode (saving the changes you have made) by holding the SHIFT button while pressing the SEL button. The MENU light goes out and the SEL light comes on.
Press simultaneously to enter or exit Menu Mode.
MENU light glows when printer is in Menu Mode.
The printer menu is made up of groups. Within each group is a list of items, each of which has various settings.
The illustration at the right shows a printout of the factory settings for the menu. To generate a printout of the menu, hold the SHIFT button and press the SEL button to enter the Menu Mode, then press the PARK button.
For a table showing the settings for each item within each group, see the Reference Section at the back of this manual.
| Printer Control | Emulation Mode | EPSON LQ |
| Font | Print Mode | LQ Courier |
| Font | Pitch | 10 CPI |
| Font | Proportional Spacing | No |
| Font | Style | Normal |
| Font | Size | Single |
| Symbol Sets | Character Set | Set I |
| Symbol Sets | Language Set | American |
| Symbol Sets | Zero Character | Slashed |
| Symbol Sets | Code Page | USA |
| Rear Feed | Line Spacing | 6 LPI |
| Rear Feed | Form Tear-Off | Off |
| Rear Feed | Skip Over Perforation | No |
| Rear Feed | Page Length | 11 " |
| Rear Feed | Gap Control | Auto Gap |
| Bottom Feed | Line Spacing | 6 LPI |
| Bottom Feed | Form Tear-Off | Off |
| Bottom Feed | Skip Over Perforation | No |
| Bottom Feed | Page Length | 11 " |
| Bottom Feed | Gap Control | Auto Gap |
| Top Feed | Line Spacing | 6 LPI |
| Top Feed | Bottom Margin | Valid |
| Top Feed | Page Length | 11 " |
| Top Feed | Gap Control | Auto Gap |
| Top Feed | Wait Time | 1 sec |
| Set-Up | Graphics | Uni-directional |
| Set-Up | Receive Buffer Size | 64K |
| Set-Up | Paper Out Override | No |
| Set-Up | Print Registration | 0 |
| FWD (FWD) (REV) | ||
| Set-Up | Operator Panel Function | Full Operation |
| Set-Up | Reset Inhibit | No |
| Set-Up | Print Suppress Effective | Yes |
| Set-Up | Auto LF | No |
| Set-Up | Time Out Print | Valid |
| Set-Up | Auto Select | No |
| Set-Up | Smoothing | Valid |
| Set-Up | Ribbon Selection | Black Ribbon |
| Set-Up | Printhead Gap Adjust | 0 |
| Set-Up | Graphics Speed | High |
| I-Prime | Buffer Print | |
| Parallel I/F | Pin 10 | +5v |
| Parallel I/F | Auto Feed XT | Invalid |
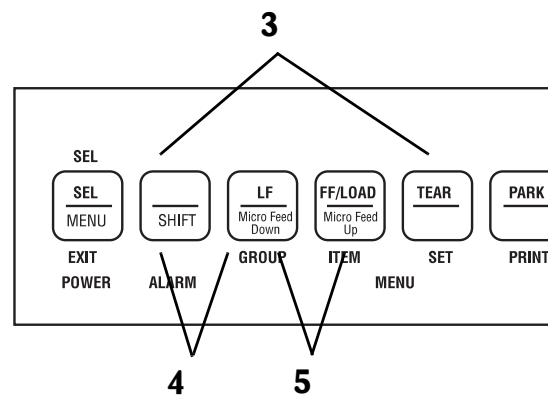
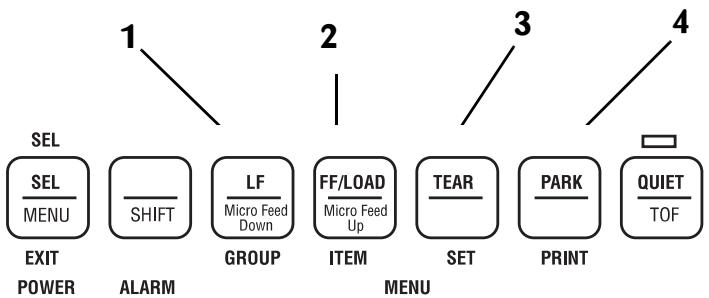
Active Buttons in Menu Mode
1 GROUP Button: Each time you press this button, the menu line that prints shows the next group.
2 ITEM Button: Each time you press this button, the menu line that prints shows the next item within that group.
3 SET Button: Each time you press this button, the menu line that prints shows the next setting for that item.
4 PRINT Button: Press this button to print out a listing of the current settings for each item.
Problem: Nothing happens when I turn on the printer.
Solution: The printer may not be plugged in. Check the power cord connection to the outlet and to your printer. If you're using a power strip, make sure it's turned on. Check to be sure that the circuit breaker hasn't tripped.
Problem: The printer doesn't print when the computer sends data.
Solutions: (1) The printer may be deselected. If the SEL light is out, press the SEL button to select the printer.
(2) The printer cable may be loose: check to be sure that it is securely connected to both the printer and your PC.
Problem: I've installed a brand new ribbon and the printing is smeared and streaked.
Solution: The shield on the ribbon may be either loose or missing. Move the printhead to the center of the platen (CAREFUL! the printhead may be HOT!) and lift off the ribbon cartridge. If the ribbon shield is loose, secure it in place properly. If it's missing, locate it and reinstall it.
Problem: The printing is too light or too dark.
Solution: The head gap setting needs adjustment. Enter the Menu Mode and change the setting for "Printhead Gap Adjust" under the Group "Setup." The default setting is 0. If the printing is lighter, change the setting to -1; if it's darker, change it to +1.
Problem: The ALARM light is on and the Character Pitch 15 light is flashing.
Solution: This indicates a paper loading error. Press the SHIFT and RESET buttons simultaneously. Before trying to load paper again, check to be sure that you have the paper lever in the correct position for the paper path you're using. If the paper lever is in the correct position and you're using continuous-form paper, check to see if the paper is properly on the tractors and has not jammed up.
Problem: The first line is printing too far down on the page and I can't get it any higher using the SHIFT-LF/ Micro Feed Down keys.
Solution: The setting for the Top of Form will be restricted if you have the Form Tear-Off feature engaged when you set the Top of Form. To correct for this, enter the Menu Mode and change the setting for Form Tear-Off in the Rear-Feed group ( or in the Bottom Feed group if you have the optional bottom-feed tractor installed) to Off. Then exit the Menu and set the Top of Form. When the Top of Form is set, enter the Menu Mode again and change the Form Tear-Off setting back to your original setting. (See Chapter 5 for information on the Menu Mode.)
Problem: I need to load paper, but the Alarm light is not on.
Solution: Press and release the SEL button, then hold the SHIFT button and press the RESET (Character Pitch) button. The ALARM light will come on and you will be able to load the paper.
Problem: My word processor files don't print the way I have the menu and front panel set.
Solutions: Before sending a file to the printer, many word processors send either an "initialization string" or an I-Prime signal to the printer.
The initialization string contains commands that change the printer to a default set of features. These commands override front panel or Menu settings. To set your printer to ignore the reset command, enter the printer Menu and change the Reset Inhibit item in the Set-Up group to Yes. Please note that while this stops the reset command from resetting your printer, other commands in the initialization string may still override the printer Menu and/or front panel settings.
The I-Prime signal is sent over the parallel interface (pin 31) and automatically overrides any settings you have made using the front panel. To eliminate this problem, enter the printer Menu and change the I-Prime item in the Parallel I/F group to Invalid.
Problem: The Print Quality and Character Pitch buttons on the front panel won't work.
Solution: The Operator Panel Function item on the printer menu can be used to disable these buttons. If the printer is a part of a customized system or if it is used by a number of people, the system manager may have used this option to make sure the printer is always set properly.
Problem: Static electricity causes my continuous-form paper to stick.
Solution: Sometimes static charges can build up on continuous-form paper, making it cling to the paper separator. If you have this problem during high-volume printing jobs, try moving the paper guides together so that the paper rests on the guides rather than on the separator itself.
Clearing Rear-Feed Paper Jams
Caution! Always turn the printer off before you turn the platen knob!
Turn the printer off and open the paper separator 1). Use the platen knob to back the continuous-form paper out of the printer, removing any ripped pieces of paper. Re-load paper (2): open tractor covers, mount first two holes in paper on pins, close tractor covers. Turn the printer on and press the FF/LOAD button (3).
1
Paper separator
Déparateur de papier
Separador de papel
Separador do papel
2
3

EXIT POWER
SHIFT

ALARM
GROUP
ITEM
MENU
3
ALARM
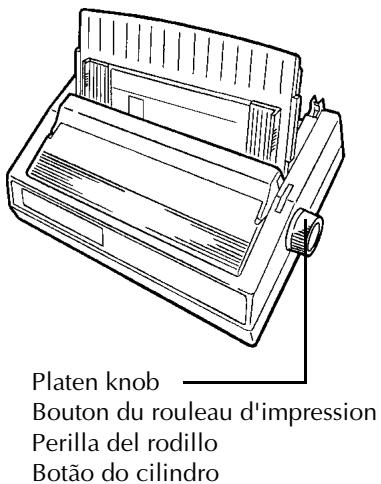
Platen knob
Bouton de manoeuvre du rouleau d'impression
Perilla del rodillo
Botao do cilindro
Solving the Problem of Continuing Rear-Feed Jamming
If the rear-feed paper keeps jamming, you probably have bits of paper stuck in the paper path.
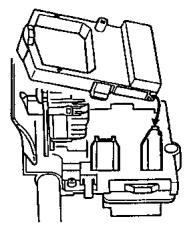
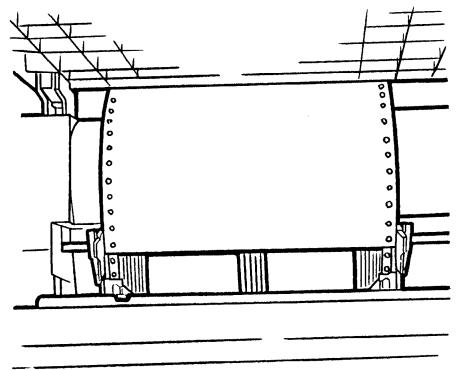
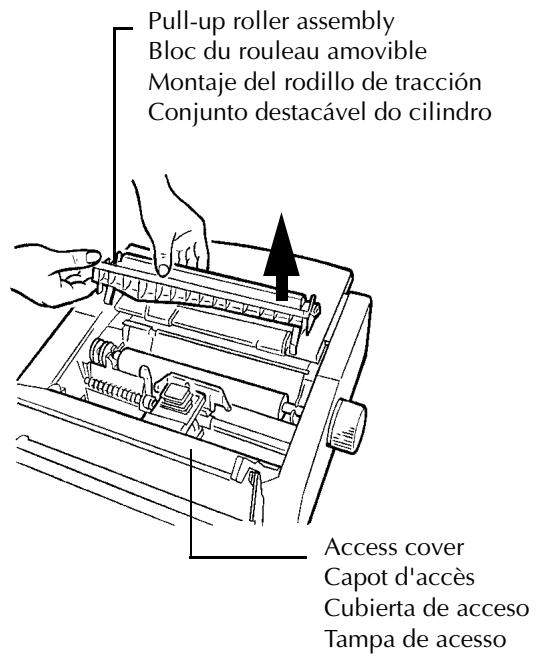
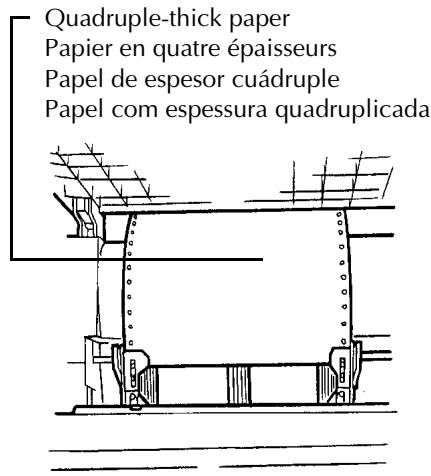
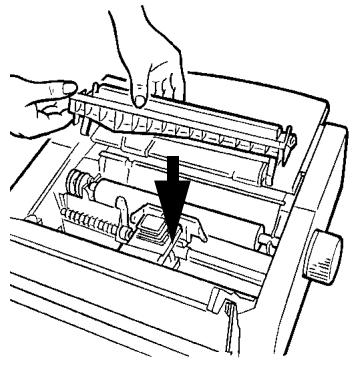
Turn the printer off. Open the access cover, lift off the pull-up roller assembly (1) and remove any bits of paper from around the carriage. Open the paper separator and use the platen knob to back the paper out of the printer (2). Fold some single-sheet, continuous-form paper over three times to produce a page four sheets thick and load it onto the tractor pins (3).
1
2
3
Solving the Problem of Continuing Rear-Feed Jamming (continued)
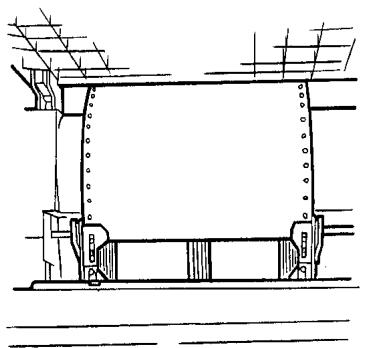
Turn the platen knob to bring the quadruple-thick paper up around the platen. This will bring jammed pieces of paper up and out.
Back the quadruple-thick paper out of the printer using the platen knob. Replace the pull-up roller assembly (1), re-load your regular continuous-form paper (2), and close the paper separator and the access cover (3). Turn the printer back on and press the FF/LOAD button (4).
1
2
3

4
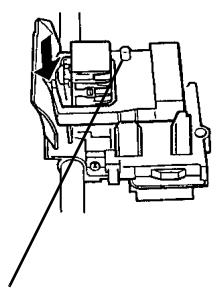
Turn the printer off. Rotate the platen knob to back the paper out of the carriage (1). If necessary, open the access cover and lift the pull-up roller assembly to provide access to remove any ripped pieces from around the carriage (2), then re-install the pull-up roller assembly and close the access cover. Turn the printer back on and place a new sheet of paper in the paper separator (3).
1
2
Pull-up roller assembly
Cleaning the Housing
Caution! Never use solvents or strong detergents on the housing — they could damage it!
You should clean the printer every six months (or after about 300 hours of operation).
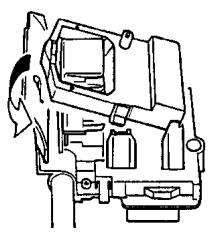
Turn the printer off and move the paper out of the paper path. Open the access cover and remove the pull-up roller assembly (1). Remove any loose pieces of paper from the carriage area, then use a clean, dry cloth to dust around the carriage and platen (2). Re-install the pull-up roller assembly and close the access cover (3). Turb the printer back on.
1
How to Get Information on Programming Codes 58
How to Order Parts 58
Specifications 59
FCC Radio Frequency Interference Information 61
Material Safety Data Sheet 62
Menu Table
The table below lists the Menu entries for your printer. The factory defaults are shown in bold italic.
Note: The table includes all possible Menu settings available with your printer. Some of the entries, as noted, appear only when a specific emulation is selected or when the appropriate option is installed.
| Group | Item | Settings |
| Printer Control | Emulation Mode | Epson LQ, IBM PPR, IBM AGM |
| Font | Print Mode | LQ Courier, LQ Roman, LQ Swiss, LQ Swiss Bold, LQ Orator, LQ Gothic, LQ Prestige, Utility |
| Pitch | 10 cpi, 12 cpi, 15 cpi, 17.1 cpi, 20 cpi, | |
| Proportional Spacing | No, Yes | |
| Style | Normal, Italics | |
| Size | Single, Double | |
| Symbol Sets | Character Set | Set I, Set II |
| Language Set | American, French, German, British, Danish I, Swedish, Italian, Spanish I, Japanese, Norwegian, Danish II, Spanish II, Latin American, French Canadian, Dutch, Publisher | |
| Zero Character | Slashed, Unslashed | |
| Code Page | USA, Canada French, Multilingual, Portugal, Norway | |
| Rear Feed | Line Spacing | 6 LPI, 8 LPI |
| Form Tear-Off | Off, 500ms, 1 sec, 2 sec | |
| Skip Over Perforation | No, Yes | |
| Page Width (Model 591 only) | 13.6", 8" | |
| Page Length | 11", 11-2/3", 12", 14", 17", 3", 3.5", 4", 5.5", 6", 7", 8", 8.5" | |
| Gap Control | Auto Gap, Semi Auto Gap, 1, 2, 3, 4, 5, 6, 7, 8, 9 | |
| Bottom Feed | Line Spacing | 6 LPI, 8 LPI |
| Form Tear-Off | Off, 500ms, 1 sec, 2 sec | |
| Skip Over Perforation | No, Yes | |
| Page Width (Model 591 only) | 13.6", 8" | |
| Page Length | 11", 11-2/3", 12", 14 ", 17", 3", 3.5", 4", 5.5", 6", 7", 8", 8.5" | |
| Gap Control | Auto Gap, Semi Auto Gap, 1, 2, 3, 4, 5, 6, 7, 8, 9 | |
| Top Feed | Line Spacing | 6 LPI, 8 LPI |
| Form Tear-Off (with optional Roll Paper Stand installed) | Off, 500ms, 1 sec, 2 sec | |
| Bottom Margin | Valid, Invalid | |
| Page Width (Model 591 only) | 13.6", 8" | |
| Page Length | 11", 11-2/3", 12", 14", 17", 3", 3.5", 4", 5.5", 6", 7", 8", 8.5" | |
| Gap Control | Auto Gap, Semi Auto Gap, 1 , 2 , 3 , 4 , 5 , 6 , 7 , 8 , 9 | |
| Wait Time | 1sec, 2 sec, 500ms | |
| Page Length Control | By MENU Setting, by Actual Page Length | |
| Set-Up | Graphics | Uni-directional, bidirectional |
| Receive Buffer Size | 64K, 1 Line, 32K | |
| Paper Out Override | No, Yes | |
| Set-Up (continued) | Operator Panel Function | Full Operation, Limited Operation |
| Print Registration | 0, 0.05 mm Left, 0.10 mm Left, 0.15 mm Left, 0.20 mm Left, 0.25 mm Left, 0.25 mm Right, 0.20 mm Right, 0.15 mm Right, 0.10 mm Right, 0.05 mm Right | |
| Reset Inhibit | No, Yes | |
| Print Suppress Effective | Yes, No | |
| Auto LF | No, Yes | |
| Auto CR (appears only when IBM Proprinter emulation is selected) | No, Yes | |
| SI Select Pitch, 10 cpi (appears only when IBM Proprinter emulation is selected) | 17.1 CPI, 15 CPI | |
| SI Select Pitch, 12 cpi (appears only when IBM Proprinter emulation is selected) | 20 CPI, 12 CPI | |
| Time Out Print | Valid, Invalid | |
| Auto Select | No, Yes | |
| Ribbon Selection (Optional color ribbon must be installed in order to print in colors other than black) | Black Ribbon, Black, Yellow, Magenta, Cyan, Violet, Orange, Green | |
| Printhead Gap Adjust | 0, -1, +1 | |
| Graphics Speed | High, Low | |
| Parallel I/F | I-Prime | Buffer Print, Buffer Clear, Invalid |
| Pin 18 | +5v, Open | |
| Auto Feed XT (appears only when Epson LQ emulation is selected) | Invalid, Valid | |
| Serial I/F (appears only when optional Serial Interface is installed) | Parity | None, Odd, Even |
| Serial Data 7/8 Bits | 8 Bits, 7 Bits | |
| Protocol | Ready/Busy, X-On/X-Off | |
| Diagnostic Test | No, Yes | |
| Baud Rate | 19200 bps, 9600 bps, 4800 bps, 2400 bps, 1200 bps, 600 bps, 300 bps | |
| Busy Line | SSD-, SSD+, DTR, RTS | |
| DSR Signal | Valid, Invalid | |
| DTR Signal | Ready on Power Up, Ready on Select | |
| Busy Time | 200 ms, 1 sec | |
| CSF Bin 1 (appears only with optional Cut Sheet Feeder installed) | Line Spacing | 6 LPI, 8 LPI |
| Bottom Margin | Valid, Invalid | |
| Page Width (Model 591 only) | 13.6", 8.5" | |
| Page Length | 11", 11-2/3", 12", 14", 17", 3", 3.5", 4", 5.5", 6", 7", 8", 8.5" | |
| Gap Control | Auto Gap, Semi Auto Gap, 1, 2, 3, 4, 5, 6, 7, 8, 9 | |
| CSF Bin 2 (appears only with optional Cut Sheet Feeder installed) | Line Spacing | 6 LPI, 8 LPI |
| Bottom Margin | Valid, Invalid | |
| Page Length | 11", 11-2/3", 12", 14", 17", 3", 3.5", 4", 5.5", 6", 7", 8", 8.5" | |
| Gap Control | Auto Gap, Semi Auto Gap, 1, 2, 3, 4, 5, 6, 7, 8, 9 |
How to Get Information on Programming Codes
The Microline Reference Manual provides complete lists of all the commands, along with information on their use. You may view this document by accessing it on the CD provided with your printer.
How to Order Parts
Note: See page 54 for a listing of parts and accessories for your ML590/591 printer.
Before you order, make sure you know your printer model number (on the front of the unit) and have the correct part number and description of the item. For information on parts not listed, please call our toll-free number 1-800-OKIDATA or consult the dealer where you purchased your printer.
- Consult the dealer where you purchased your printer.
- Locate an Authorized Okidata Reseller by visiting our web site, www.okidata.com.
-
In the United States, purchase directly from Okidata:
-
Via the Internet at www.okidata.com
- Order toll-free by phone at 1-800-OKI-DATA (1-800-654-3282) using VISA, MasterCard, or America Express.
- In Canada, call 1-888-309-4570.
Specifications
Print Method:
Impact dot matrix
Printhead:
24 pins, 0.20mm diameter, automatically adjusting to paper thickness, with thermal protection
Print Speed:
| Mode | Characters Per Inch (cpi) | Characters Per Second (cps) |
| Utility | 10 | 300 |
| 12 | 360 | |
| 15 | 450 | |
| 17.1 | 257 | |
| 20 | 300 | |
| Letter Quality (LQ) | 10 | 100 |
| 12 | 120 | |
| 15 | 150 | |
| 17.1 | 171 | |
| 20 | 200 |
Characters Per Line (cpl):
| Setting | ML 590 | ML 591 |
| 10 cpi | 80 cpl | 136 cpl |
| 12 cpi | 96 cpl | 163 cpl |
| 15 cpi | 120 cpl | 204 cpl |
| 17.1 cpi | 137 cpl | 233 cpl |
| 20 cpi | 160 cpl | 272 cpl |
Emulations:
Epson LQ and IBM ProPrinter, co-resident
Interface:
Standard: Centronics parallel Optional: RS-232C serial
Graphics Resolution:
360 × 360 dots per inch maximum
Resident Fonts
Letter Quality:
Courier (10 cpi/12 cpi/proportional, with superscript/subscript)
Letter Gothic (10 cpi/12 cpi/proportional, with superscript/subscript)
Orator (10 cpi/12 cpi)
Prestige (10 cpi/12 cpi)
Roman (10 cpi/12 cpi; 18 point: 96 ASCII and foreign language characters)
Swiss, Swiss Bold (10 cpi/12 cpi, with superscript/subscript; 18 point: 96 ASCII and foreign language characters)
Utility:
Gothic (10 cpi/12 cpi, with superscript/subscript; proportional)
Bar Code:
Code 39, UPC A, UPC E, EAN 8, EAN 13, Interleaved 2 of 5,
Code 128, Postnet
Buffer Size:
64K
Reliability
Mean Time Between
Failures (MTBF):
6000 hours at 25% duty cycle and 35% page density
Mean Time to Repair (MTTR):
15 minutes
Printhead life:
200 million characters average in 10 cpi utility mode at 25% duty and
35% page density
Ribbon Life
(on average, 10 cpi utility):
black ribbon: 4 million characters
color ribbon: black = 1.5 million characters
cyan = 1.5 million characters
magenta = 1.5 million characters
yellow = 0.8 million characters
| Paper type | Feed | Weight | Width range |
| Cut sheets | Top only | 14 to 24 lb. | ML 590: 7.2" to 8.5" ML 591: 7.2" to 14.3" |
| Single-part continuous forms | Rear, Bottom | 12 to 24 lb. | ML 590: 3" to 10" ML 591: 3" to 16" |
| Carbonless, multi-part continuous form (original + 4 copies) | Rear, Bottom | 9 to 11 lb. | ML 590: 3" to 10" ML 591: 3" to 16" |
| Interleaf, multi-part continuous forms (original + 4 copies) | Rear, Bottom | 10- to 12- lb. paper, 9- lb. carbon | ML 590: 3" to 10" ML 591: 3" to 16" |
| Labels | Bottom only | N.A. | ML 590: 3" to 10" ML 591: 3" to 16" |
| Envelopes, single feed | Top | 24 lb. max. | 6.5" to 9.5" |
| Envelopes, continuous feed, non-overlap type | Rear, Bottom | 24 lb. max. | 6.5" to 9.5" |
| Card stock | Bottom only | 120 lb. max. | ML 590: size 5" x 8" ML 591: size 5" x 14" |
| Transparencies | Top only | 8.5" x 11" |
Paper Specifications
Width, Minimum: 3"
Width, Maximum: Model 590: 10"
Model 591: 16"
Weight: 12 to 24 lb.
Thickness, Rear feed: 0.014" (0.36 mm)
Thickness, Bottom feed: 0.017" (0.44:mm)
Dimensions (W x D x H)
Model 590: 17 × 15 × 6.5 inches (431 x 380 x 166 mm)
Model 591: 23 × 15 × 6.5 inches (585 x 380 x 166 mm)
Weight
Model 590: 16.5 lb. (7.5 kg)
Model 591: 19 lb., 13 oz. (9 kg)
Environmental Requirements
Operating Temperature: 41 to 104^ (5 to 40^ )
Storage Temperature: 14 to 122^ (-10 to +50^ )
Operating Humidity: 20 to 80% RH
Storage Humidity: 5 to 95% RH
Electrical requirements
120 volts ac (+5.5%) -15% 50 or 60Hz (± 2%)
Also available for 230/240 volts ac (+10%) -14% ,50 or 60Hz (± 2%)
Federal Communications Commission
Radio Frequency Interference Statement for 120-Volt Models
WARNING: This equipment has been tested and found to comply with the limits for a Class B digital device, pursuant to Part 15 of the FCC rules. These limits are designed to provide reasonable protection against harmful interference in a residential installation. This equipment generates, uses and can radiate radio frequency energy and, if not installed and used in accordance with the instructions, may cause harmful interference to radio communications. However, there is no guarantee that interference will not occur in a particular installation. If this equipment does cause harmful interference to radio or television reception, which can be determined by turning the equipment off and on, the user is encouraged to try to correct the interference by one or more of the following measures:
- Reorient or relocate the receiving antenna.
- Increase the separation between the equipment and the receiver.
- Plug the unit into an outlet on a circuit different from that to which the receiver is connected.
- Consult the dealer or an experienced radio/television technician for help.
Note It is the responsibility of the user to obtain the required shielded cable in order to ensure compliance of this equipment with FCC regulations.
Changes or modifications not expressly approved by OKIDATA may void your authority to operate this device.
Federal Communications Commission
Radio Frequency Interference Statement for 230/240-Volt Models
WARNING: This equipment has been tested and found to comply with the limits for a Class A digital device, pursuant to Part 15 of the FCC Rules. These limits are designed to provide reasonable protection against harmful interference when the equipment is operated in a commercial environment. This equipment generates, uses and can radiate radio frequency energy and, if not installed and used in accordance with the instructions, may cause harmful interference to radio communications. Operation of this equipment in a residential area is likely to cause harmful interference in which case the user will be required to correct the interference at his own expense.
Note It is the responsibility of the user to obtain the required shielded cable in order to ensure compliance of this equipment with FCC regulations.
Changes or modifications not expressly approved by OKIDATA may void your authority to operate this device.
Canadian Department of Communications
Radio Interference Statement for 120-Volt Models
This OKIDATA apparatus complies with the Class B limits for radio interference as specified in the Canadian Department of Communications Radio Interference Regulations.
Canadian Department of Communications
Radio Interference Statement for 230/240-Volt Models
This OKIDATA apparatus complies with the Class A limits for radio interference as specified in the Canadian Department of Communications Radio Interference Regulations.
European Union Council of the European Communities
Statement of Electromagnetic Conformance for 230/240-Volt Models
This product complies with the requirements of the Council Directive 89/336/EEC on the approximation of the laws of the member states relating to electromagnetic compatibility.
MATERIAL SAFETY DATA SHEET
58087501
For ML 590/591 Black Ribbon (P/N 52106001)
For more information, contact Okidata at
2000 Bishops Gate Blvd.
Mount Laurel, NJ 08054-4620
For Emergency Information,
call 1-800-OKIDATA
Emergency First Aid Procedures
| Emergency | Procedure |
| Contact occurs with eyes | Flush eyeswith large quantities of water for 15 minutes, keeping eyelids open with fingers. Seek medical attention. |
| Contact occurs with skin | Wash thoroughly with soap and water. |
Hazardous Ingredients
Carbon Black
(Group 2B "Possible Carcinogen"; IARC)
CAS# 1333-86-4
OSHA PEL 3.5mg / m^3
ACGIH TLV N/A
Coloring Material
CAS# Not applicable
OSHA TWA Not applicable
ACGIH TLV Not applicable
Oil
CAS# Not applicable
OSHA TWA Not applicable
ACGIH TLV Not applicable
Additives
CAS# Not applicable
OSHA TWA Not applicable
ACGIH TLV Not applicable
Nylon 6-6 Fabric
CAS# Not applicable
OSHA TWA Not applicable
ACGIH TLV Not applicable
Physical Data
Melting Point: N/A
Boiling Point: N/A
Vapor Pressure: N/A
Vapor Density (Air = 1) : N/A
Evaporation Rate (Butyl Acetate=1): Not applicable
Specific Gravity (H_2O = 1) : No data available
Solubility in Water: No data available
Appearance and Odor: Nylon 6-6 fabric impregnated with liquid black ink
Fire and Explosion Hazard Data
Flash Point (Method Used): N/A
Flammable Limits:
Lower Explosive Limit: N/A
Upper Explosive Limit: N/A
Extinguishing Media: Water, CO_2 , Dry Chemical or Foam
Special Fire and Explosion Procedures: N/A
Unusual Fire and Explosion Hazards: None
Health Hazard Data
Routes of Entry: Ingestion, Eyes, Skin
Health Hazards: None
Reactivity Data
Stability: Stable
Polymerization: Will not occur.
Hazardous Decomposition or Byproducts: None
Conditions to Avoid: N/A
Incompatibility (Materials to Avoid): None
Spill Cleanup and Disposal
Spill Cleanup: If ribbon is inadvertently released, it should be rewound on the reel.
Waste Disposal: Follow appropriate federal, state and local regulations.
Safe Handling and Use
Respiratory Protection: Not applicable
Protective Gloves and/or Eye Protection: Not normally required. Protective gloves desirable in some cases.
Ventilation: Not applicable
Other Protective Equipment and/or Hygienic Practices: Not applicable
Special Precautions
Precautions for Handling or Storage: Store in a dark, cold place. Do not pull ribbon out of cassette except for mounting on printer.
Other Precautions: Not applicable
The information contained in this Material Safety Data Sheet (MSDS) is based on data considered accurate; however, no warranty is expressed or implied regarding the accuracy of these data or the results to be obtained from the use thereof. Vendor assumes no responsibility for injury to vendee or third person party proximately caused by the product if reasonable safety procedures are not adhered to as stipulated in the MSDS. Furthermore, vendor assumes no responsibility for injury to vendee or third person party proximately caused by use of the product even if reasonable safety procedures are followed. Additionally, vendee assumes the risk of his use of the product.
Table des matieres
Tableau du menu 65
2000 Bishops Gate Blvd. Mount Laurel, NJ 08054-4620
Ventilation: Non applicable
2000 Bishops Gate Blvd. Mount Laurel, NJ 08054-4620
OSHA TWA No applicable
ACGIH TLV No aplicable
Aceite
CAS# No aplicable
OSHA TWA No aplicable
ACGIH TLV No applicable
Aditivos
CAS# No aplicable
OSHA TWA No applicable
ACGIH TLV No aplicable
Tela de Nilón 6-6
CAS# No aplicable
OSHA TWÄ No applicable
ACGIH TLV No aplicable
Dates físicos
2000 Bishops Gate Blvd. Mount Laurel, NJ 08054-4620
Cable requirements 5
Card stock 60
CHARACTER PITCH button 32
Characters per line 59
Color ribbon kit 54
Computer connection 5
Continuous-form paper, removing 24
Control Panel 32, 36 disable function 57
Cut sheet feeder 54
D
Dimensions 60
Drivers 31
E
Electrical requirements 60
Emulations 30-31,56,59 changing 30
Envelopes 8,10,60
Environmental requirements 60
F
Factory defaults 56-58
resetting 38
FCC statements 61
FF/LOAD button 32
Font Test 28
Fonts, resident 59
Form Tear-Off 21-23
G
Graphics resolution 59
GROUP button 22
H
Humidity requirements 60
1
Indicator Lights 36
Interface 59
parallel 5
serial 54
I-Prime signal 46
ITEM button 41
L
Labels 60
Letterhead stationery, loading 8-11
LF button 32
M
Material safety data sheet 62
Menu mode 38-41
Menu settings 56-58
0
Ordering parts 58
P
Paper
loading 7-19
park feature 24
path,switching 25-26
single-sheet 8
specifications 60
tear 20
tear-off feature 21-23
Paper jam,clearing rear-feed 48-50 single sheet 51
Parts ordering 58 replacement, listing 54
POWER light 6,36
Print mode 36-37
Print speed 59
PRINT button 32
PRINT QUALITY button 32
Printhead specifications 59 life 60
Printer drivers 30-31
Printer housing, cleaning 52
Problem solving 43-47
Programming codes 58
Protective Film 3
Pull tractor 54
Push tractor 54
Q
QUIET button 32
QUIET light 36
R
Rear-Feed clearing jams 48-50 paper, loading 14-18
Reliability 60
Replacement Parts 54
Resident fonts 59
Ribbon installation 4 replacement 54 shield 4,43
Roll paper stand 54
Rolling ASCII Test 28
s
SEL light 36
SEL/MENU button 32,38-39
Serial Interface 54
SET button 41
Setting Up 1-6
SHIFT button 32
Shipping Retainers 3
Single-sheet paper loading 8-13
Specifications 59-60
Switching paper paths 25-26
T
TEAR button 32
Tear feature 20
Temperature specifications 60
Testing the printer 28
TOF button 32
Top of Form, setting 45
rear-feed paper 12, 19
reset to factory default 12
single-sheet paper 12-13
Tractors 54
Transparencies 60
U
Unpacking 2
W
Weight 60
A
Accessoires 54
Alimentation arriere
papier, chargement 14-18
suppression des bourages
papier 48-50
B
Emulations 30-31,65,69
changement 30
Enveloppes 8,10,70
Specifications 69-71
Vidautildocabecone 89