
MB460MFP - Multifunction Printer OKI - Free user manual and instructions
Find the device manual for free MB460MFP OKI in PDF.
| Product type | Multifunction printer (MFP) |
| Main functions | Print, scan, copy |
| Automatic document feeder (ADF) capacity | Up to 50 pages |
| Standard toner cartridge | 3,500 pages A4 @ ISO/IEC 19752 |
| High-capacity toner cartridge | 7,000 pages A4 @ ISO/IEC 19752 |
| Image drum | 25,000 pages A4 |
| Connectivity | USB, network (TCP/IP), parallel port LPT |
| Supported operating systems | Windows 2000, XP, Vista, Mac OS X, Linux (PS3) |
| Print type | Digital (LED), monochrome |
| Scan file formats | PDF, JPEG, TIFF |
| Security functions | PIN code access control, administrator password |
| Included software | MFP configuration tool, Address book manager, Phone directory manager, Profile manager, PIN manager, Actkey (USB), PaperPort, OmniPage SE |
| Maintenance | Replacement of toner cartridges and image drum |
| Scan to email | Yes (via SMTP) |
Frequently Asked Questions - MB460MFP OKI
User questions about MB460MFP OKI
0 question about this device. Answer the ones you know or ask your own.
Ask a new question about this device
Download the instructions for your Multifunction Printer in PDF format for free! Find your manual MB460MFP - OKI and take your electronic device back in hand. On this page are published all the documents necessary for the use of your device. MB460MFP by OKI.
USER MANUAL MB460MFP OKI
Installing MFP Drivers and Utilities. 5
Printer Driver 5
Network Software 5
Optional Utilities 5
Internet Downloads 5
User Guides 5
MFP Setup Utility (Windows only) 6
MFP Settings 6
Address Book Manager 6
Phone Book Manager 6
Profile Manager 6
PIN Manager 6
Actkey Utility (Windows only, USB only) 6
ScanSoft Utilities 6
PaperPort 6
OmniPage SE. 7
Configuring the MFP 7
Default Passwords/PIN 7
Fax Receiving (MB470 & MB480 only) 7
Setting Fax Parameters. 7
Setting the Ring Response 7
Setting Access Control 8
Enable/Disable Access Control 8
Entering PIN ID 8
Logout operation 8
Operation Time-out 8
Minimum Configuration Requirements 9
Internet Communication Features 9
Pre-Installation Information. 9
Scan to E-mail 9
Setting up an SMTP Server 9
Operating the MFP. 9
Scanning and Copying Documents 9
Printing Documents 9
Clearing Media Jams 10
ADF Document Jam 10
Printer Jams 10
Maintenance 12
Replacing Toner Cartridges & the Image Drum . 12
Where to Purchase 12
Service and Support 40
Installing MFP Drivers and Utilities
Note: You must be logged on as an administrator or a member of the Administrators group in order to complete this procedure. If your computer is connected to a network, network policy settings may also prevent you from completing this procedure.
Printer Driver
Note: Install the printer driver before connecting the cable to the printer.
- Turn the printer OFF.
- Insert CD1 in the CD-ROM drive. The CD will autorun.
- Select your language.
- Accept the license agreement.
- Under Driver Setup, click Install Driver.
- Select local or network printer.
- If you selected "local": Select the port you want your printer to use: USB (Universal Serial Bus), LPT (a local port), or FILE (a local port).
If you selected "network":
You are prompted to select how your printer is connected to the network:
- Directly using TCP/IP (select this option if your printer is connected directly to the network)
-
Indirectly via another PC (if the printer is shared on another PC, type its name in the box; if you don't know the name, click Next to search for shared printers)
-
Enter the IP address of the printer.
-
Select the printer model.
-
When prompted, select one or more printer emulations:
PCL
- PS (Postscript) (MB470 & MB480 only)
- FAX: (MB470 & MB480 only) The fax printer driver allows you to send faxes directly from your computer without printing the document first.
With Oki's fax driver you are sending the fax data from your computer to the MFP, and then the MFP automatically sends the document.
- Follow the on-screen instructions.
- When prompted, connect the appropriate cable and turn the printer on.
Network Software
Installation of the Network Software utilities is optional. They can be found on CD1. Utilities include: Network Card Setup Utility, Direct Network Printing Utility (LPR), and Network Extension.
Optional Utilities
Installation of the Optional utilities can be found on CD1. Utilities include: Change the Printer Display Language, and Install PS Gamma Adjuster.
Internet Downloads
Installation of the Internet Downloads is optional. They can be found on CD1.
When installed, launch your web browser for access to the Oki website. On the Oki website you will find downloads for the selected printer model.
User Guides
Installation of the User Guide is optional. It can be found on CD1.
MFP Setup Utility (Windows only)
Installation of the MFP setup utility is optional and can be found on CD2 of the MFP Software under the MFP Utilities folder. Select the Install Configuration Tool option.
The MFP setup tool can discover MB4x0 MFP devices over USB or network connections.
The setup program does not automatically place an icon on your desktop. If you wish, you can drag and drop the icon on to your desktop for ease of future use.
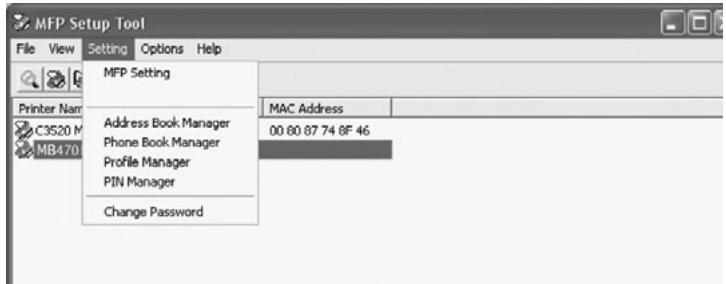
There are 5 main functions included in this software:
MFP Settings
- Address Book Manager
- Phone Book Manager
Profile Manager
PIN Manager
MFP Settings
Allows you to change most of the same settings as you'd see on the MFP's operator panel, on a locally connected PC.
The settings include an Admin. menu. This is password protected and hidden by default. To enable the Admin menu, select: Setting>MFP Setting>Display >Administrator menu and enter the MFP's password.
Address Book Manager
Adds names, e-mail addresses, assign them to IDs (for scan to e-mail feature of MFP).
- Arrange people into groups.
- Import and export settings to CSV files.
- Import settings from other Oki MFP devices.
Phone Book Manager
For managing people and fax numbers (for "scan to fax" feature of MFP). Add names, fax numbers, assign them to speed dial numbers.
- Arrange people into groups.
- Import and export settings to CSV files.
- Import settings from other Oki MFP devices.
Profile Manager
A profile is a set of saved settings for scanning to a networked PC. A profile consists of the following:
- Details for connecting to the networked PC (protocol, port, user name, password etc)
- Paper size
- File format to scan to (PDF, TIFF, JPEG) and format settings such as resolution, compression
- Import and export settings to CSV files
- Import settings from other Oki MFP devices
PIN Manager
The MFP can have access control switched on the front panel. If this is the case, a PIN (Personal Identification Number) is required to use the MFP. The PIN Manager creates PIN numbers and assigns them rights such as whether they can copy, print, scan to email, scan to network PC or fax.
- Import and export settings to CSV files.
- Import settings from other Oki MFP devices.
Actkey Utility (Windows only, USB only)
Installation of the Actkey utility is optional and can be found on CD2 of the MFP Software under the MFP Utilities folder.
The Actkey utility is a tool for performing common scan actions. It enables the unit to receive one-key touch commands from a locally connected computer.
ScanSoft Utilities
Installation of the ScanSoft utilities is optional and can be found on CD2 of the MFP Software under the MFP Utilities folder.
PaperPort
PaperPort is a paper management application to organize, access, share, and manage documents and image files on your personal computer. Key features include:
- Scan documents and photos directly to the desktop in popular file formats, such as PDF, JPEG, and TIFF.
- Use the Explorer-like folder system to organize all your documents and photos on your computer or on the network. You can color-code your folders and add any existing folder to PaperPort without moving it within your file system.
View large, clear thumbnail images of your scanned image files.
OmniPage SE
ScanSoft OmniPage SE converts paper and Adobe PDF files into editable digital documents. Using OCR (optical character recognition) and page layout preservation capabilities, OmniPage eliminates re-typing of static documents and unlocks content in PDF files. Key features include:
- Set up custom workflows, such as a template to automatically recognize a 20 page PDF file, convert it into a Word document, e-mail it, and save a copy to your local hard drive.
- OmniPage Pro 14 Office lets you automate the conversion of paper and PDF documents into industry-standard XML documents.
Configuring the MFP
Note: In the United States, as required by FCC regulations, a heading must be included on all FAX messages. The heading must include the date and time it is sent and an identification of the business or other entity, or other individual sending the message, and the telephone number of the sending machine or such business, other entity, or individual.
Default Passwords/PIN
Before using this MFP, a few basic settings have to be carried out.
Ensure that you have the relevant permission/PIN numbers before starting.
The Factory set default passwords/PIN are:
Administrator
aaaaa
PIN
000000
Network (web page)
aaaaa
Fax Receiving (MB470 & MB480 only)
This MFP's fax will automatically answer the telephone after the Ring Response delay. For information on setting this, see "Setting the Ring Response" on page 7.
Setting Fax Parameters
Follow these instructions to set the Date and Time (clock adjustment), Country Code, Local Phone No., and Sender ID.
- Using the Down arrow key, scroll to Menu and press Enter.
-
Using the Down arrow key, scroll to Admin Setup and press Enter.
-
Using the arrow keys and on-screen keypad, enter the Administrator password. Highlight Done and press Enter.
- Using the Down arrow key, scroll to Fax Setup and press Enter.
- Press Enter to select the Clock Adjustment menu.
- Using the arrow keys and keypad, enter the time and date.
- Press Enter to confirm.
- Using the Down arrow key, scroll to Basic Setup and press Enter.
- Using the Down arrow key, scroll to Country Code and press Enter.
- Using the arrow keys, scroll to the country in which the MFP is situated and press Enter to confirm.
- Using the Down arrow key, scroll to Local Phone No. and press Enter
- Using the keypad or arrow keys, type in the local phone number press Enter to confirm.
- Using the Down arrow key, scroll to Sender ID and press Enter.
- Using the keypad or arrow keys and the on-screen keypad, type in the sender ID.
- Highlight Done and press Enter.
Setting the Ring Response
The fax facility of this MFP will automatically answer the incoming ringtone after the delay period set by the ring response.
The factory default for ring response is 1 ring. This can be set up to 20 seconds in the Admin Menu as follows (you need to have administrator rights to alter this setting):
- In the top level screen, scroll down to Menu and select using the Enter key.
- In the drop down menu, scroll down to the Admin Menu and select using the Enter key. Enter the password.
- In the drop down menu, scroll down to Fax Setup and select using the Enter key.
- In the drop down menu, scroll down to Basic Setup and select using the Enter key.
- In the drop down menu, scroll down to the Ring Response and select using the Enter key.
- In the drop down menu, scroll down to the response time required and select using the Enter key.
- Using the Left arrow key, return to the top level menu.
Setting Access Control
The operation and functionality of this machine can be limited only to authorized personnel by the simple introduction of a 4-9 digit PIN (Personal Identification Number). This is known as Access Control. The greater the number of digits in the PIN, the more secure it is.
Enable/Disable Access Control
To enable Access Control, use the menu to go to: Menu >Admin Setup>System Setup>Access Control and select Enable.
- With Access Control set to Enable, the display reverts to the System Setup screen immediately following the setting change. If one of the functions such as Print, Fax Send or PC Scan is running however, the display will only revert to the System Setup screen when the task has been completed.
Entering PIN ID
- With Access Control Enabled, entering a PIN ID is required to enable setting up various utilities.
- Enter the PIN ID via the Ten Key pad.
- A valid PIN ID consists of 4 to 9 digits.
- The numbers entered are not displayed on the Enter PIN ID screen, being replaced by '*'.
- The MFP supports the following 2 kinds of PIN ID:
Administrator PIN ID — This is the PIN ID for the system administrator(s). If a PIN ID is registered as an administrator, the Admin password entry screen is displayed, and, when an Admin password is entered, it will be authenticated as an administrator.
User PIN ID — This is PIN ID for general users. If a PIN ID is registered as a general user, the function selection screen is displayed, also after PIN ID entry the function selection screen is displayed.
- Invalid PIN ID: If the PIN number entered is invalid, Incorrect Password is displayed for 3 seconds and the display reverts to the Enter PIN ID screen.
Logout operation
IfLogout is selected or an Operation Time-out occurs, the display reverts to the Enter PIN ID screen.
Logout by user
With Access Control enabled,Logout options are displayed in the Menu on the Mode Selection screen.
When the cursor is moved toLogout and the Enter key is pressed, the display reverts to the ConfirmLogout screen.
If Yes is selected with the Enter key on the Confirm Logging screen, the display reverts to the Enter PIN ID screen.
Operation Timeout
- When the MFP operation panel is left inactive for a prescribed length of time (Operation Time-out), the display automatically reverts to the Idle screen if Access Control is disabled.
- If an error state occurs, Operation Time-out is disabled.
- After Operation Time-out, the display automatically reverts to the Enter PIN ID screen if Access Control is enabled.
- The length of the Operation Time-out depends on the setting in Menu Mode>Admin Setup >System Setup > Return to Stand-by Time.
Minimum Configuration Requirements
To make the best of this MFP, the following configuration is required:
To send Faxes (MB470 & MB480 only):
- A PSTN telephone line connection.
To send e-mail:
- TCP/IP network.
- A SMTP and an optional POP3 server.
- Default "From" Address (this MFP's Address).
To file document(s) via intranet:
- FTP, or CIFS Protocol environment.
- Windows 2000, Windows XP, Windows Vista, Mac OS X, Linux (PS3 only), or FTP server.
Internet Communication Features
Pre-Installation Information
The MFP has to be set up properly on your network to perform scan to e-mail and other functions. In order for other network devices to find the MFP on the network, the following network parameters have to be set:
- IP Address Set:
- IP Address: . . .
- Subnet mask: . .
- Gateway IP: .
- DNS server: . .
- SMTP server:
- SMTP port: 25
- POP3 server:
- POP3 Port: 110
For an Explanation of these settings, see the online User's Guide on the CD.
Scan to E-mail
The MFP allows you to deliver your scanned document to e-mail addresses on the network. The document is first scanned and converted to a standard PDF, JPEG, or TIFF file format and then transmitted to remote recipients simultaneously as an e-mail attachment.
When you send an e-mail to someone using this MFP it uses Simple Mail Transfer Protocol (SMTP) to transfer your outgoing e-mails to your SMTP mail server, and then send these e-mails to your recipients via the internet.
Setting up an SMTP Server
This section explains setting up an SMTP server.
- Using the Down arrow keys, scroll to the Menu function and press Enter.
- Using the Down arrow key, scroll to Admin Setup and press Enter.
- Using the arrow keys and on-screen keypad, enter the Administrator password. Highlight Done and press Enter.
- Using the Down arrow key, scroll to Network Setup and press Enter.
- Using the Down arrow key, scroll to Mail Server Setup and press Enter.
- Press Enter to select SMTP server and then press Enter again.
- Enter your IP address. Numbers are entered using the Ten Key pad. When a number is entered from the Ten Key pad, the number currently displayed is cleared and the number just entered is displayed as the first digit. When another number is entered, the number in the first digit moves to the next, and so on.
- To confirm, press the Enter key. To cancel the IP address, move the cursor to the first field and then press the Left arrow key.
Operating the MFP
Scanning and Copying Documents
The MFP can scan/copy/send document(s) using either the ADF (Automatic Document Feeder) or manually on the glass.
If you want to scan/copy/send multiple pages, use the ADF. The ADF can hold up to 50 pages at one time.
If you want to scan/copy/send pages from books, newspaper clippings, or paper with wrinkles or curls, use the glass.
To make an instant copy, press the START button.
Printing Documents
Your MFP will handle a variety of print media including a range of paper weights and sizes.
See the User's Guide on CD1 for general advice on choice of media, and an explanation of how to use each type.
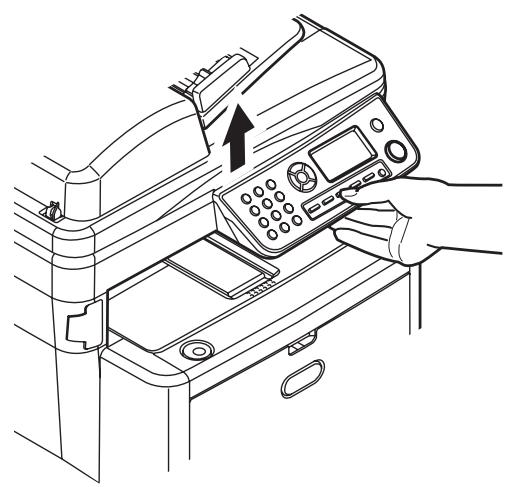
Clearing Media Jams
ADF Document Jam
1.
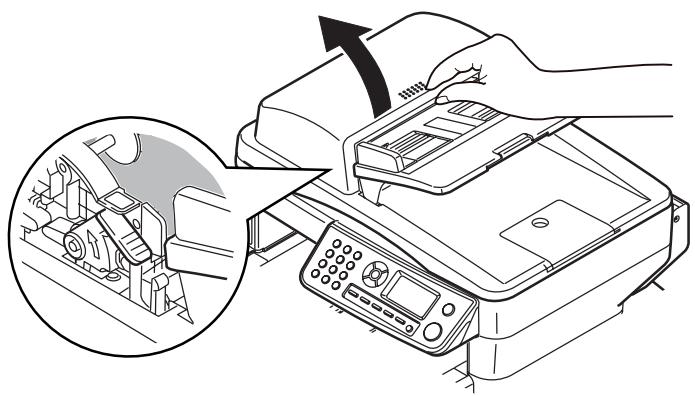
2.
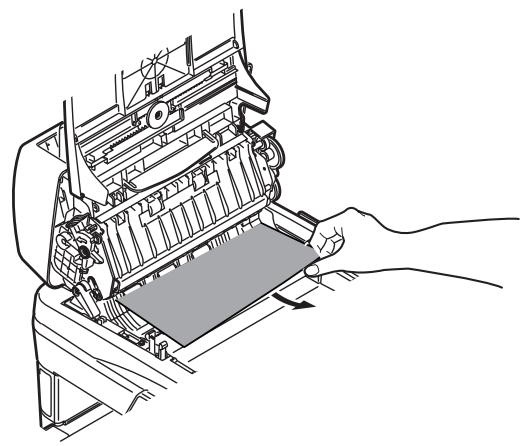
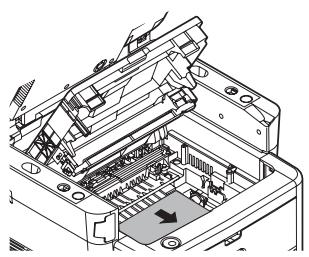
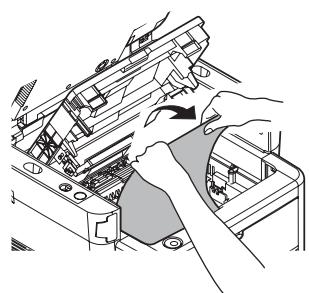
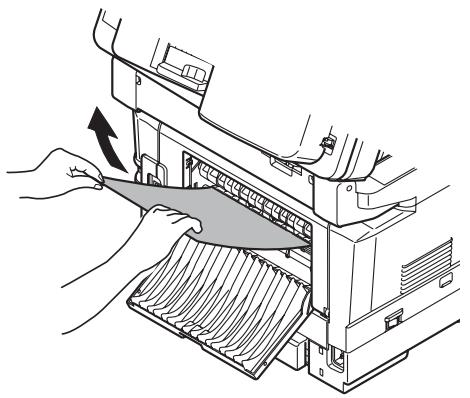
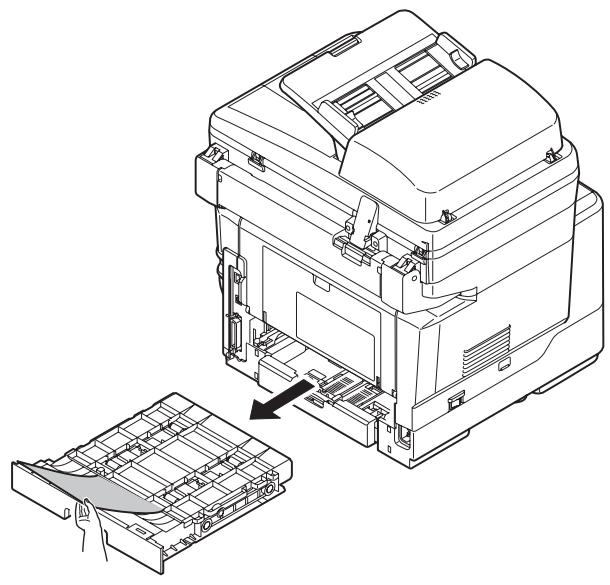
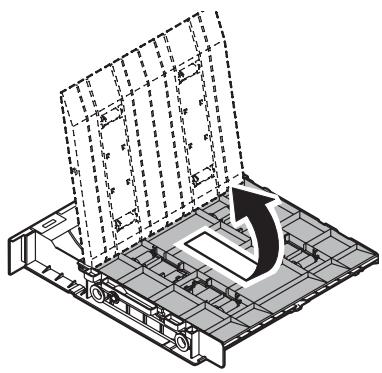
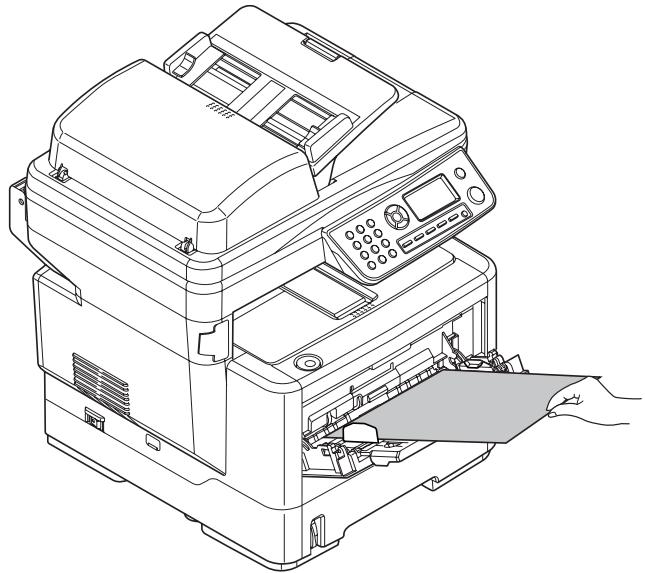
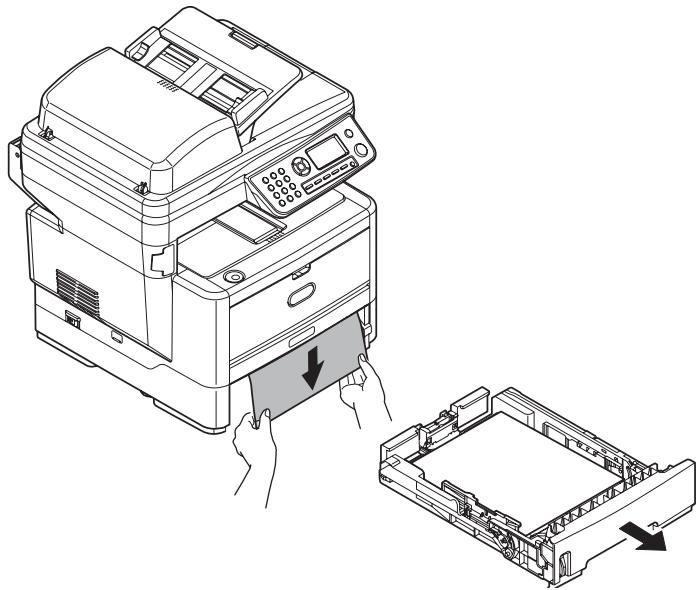
Printer Jams
1.
2.
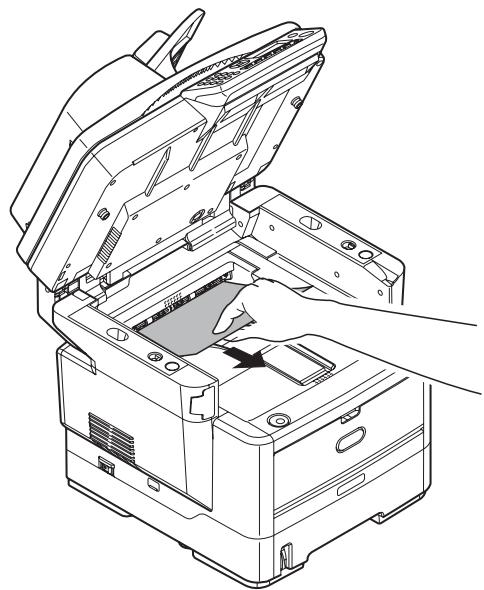
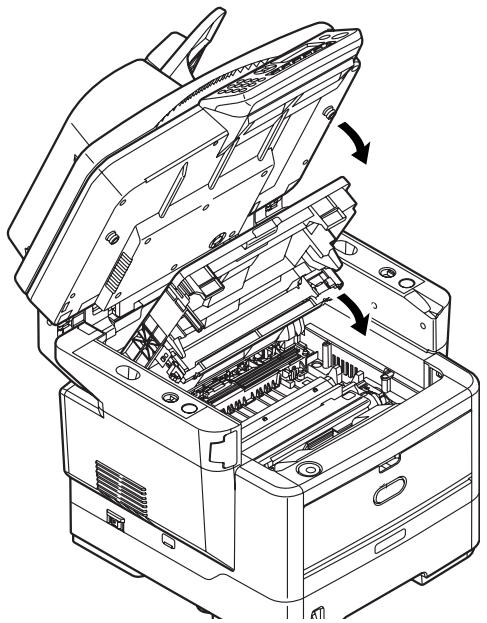
3.
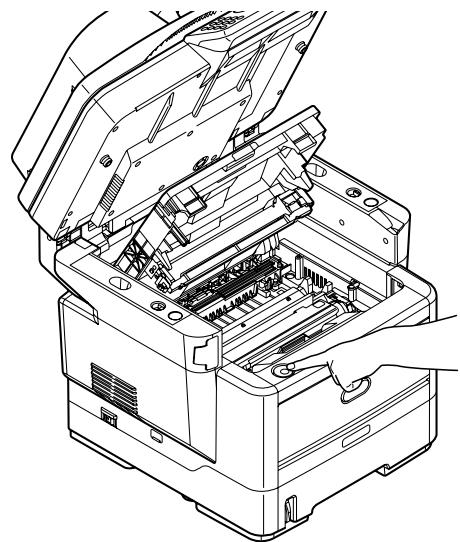
CAUTION! The fuser may be hot! It is clearly labelled. Do not touch.
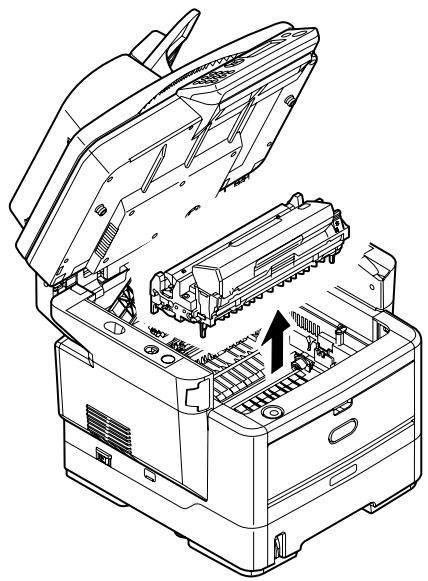
4.
CAUTION! Do not touch the green image drum surface or expose it to light for more than 5 minutes.
5.
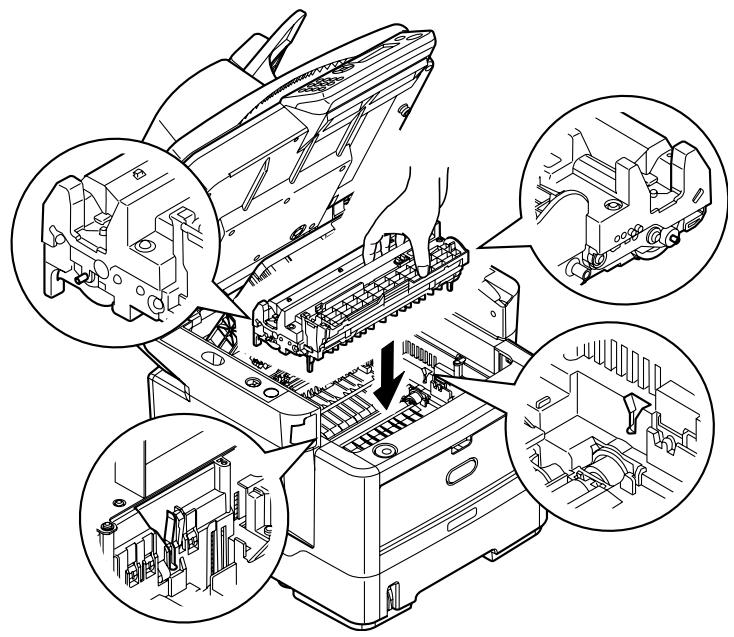
6.
7.
8.
9.
10.
11.
Maintenance
Replacing Toner Cartridges & the Image Drum
| Item | Life | Order No. |
| Toner standard MB460 MFP, MB470 MFP, MB480 MFP | 3,500 A4@ ISO/IEC19752 | 43979101 |
| Toner high capacity MB460 MFP, MB470 MFP, MB480 MFP | 7,000 A4@ ISO/IEC19752 | 43979201 |
| Toner high capacity MB480 only | 12,000 A4@ ISO/IEC19752 | 43979215 |
| Image Drum | 25,000 A4 pages | 43979001 |
Only use genuine original consumables to ensure the best quality and performance from your hardware. Non original products may adversely affect your printer's performance and invalidate your warranty.
Where to Purchase
- Consult the dealer where you purchased your system.
- Consult an Oki Data Authorized Sales or Service Dealer. For the nearest dealer, call 1-800-654-3282.
- U.S., Puerto Rico, Guam, U.S. Virgin Islands: Order on the Internet www.okiprintingsolutions.com.
U.S. only: Order toll-free at 1-800-654-3282, using VISA®, MasterCard®, AMEX®.
Available 24 hours a day, 7 days a week
- Visit our multilingual web site: www.okiPRINTINGSOLUTIONS.COM
- Visit MY.OKIDATA.COM
- Call 1-800-654-3282
Service et soutien
OKI, OkiLAN ® Oki Electric Industry Company, Ltd.
Microsoft, Windows, Internet Explorer ®/™ Microsoft Corporation
Novell, NetWare® Novell Corporation
dobe, Acrobat, Acrobat Reader, PostScript®/™ Adobe Systems, Inc..
Ethernet® Digital Equipment Corporation.
EtherTalk, LaserWriter, Mac, Macintosh © Apple Computer, Inc.
- Installing MFP Drivers and Utilities. 5
- Configuring the MFP 7
- Operating the MFP. 9
- Clearing Media Jams 10
- Maintenance 12
- Installing MFP Drivers and Utilities
- Printer Driver
- Network Software
- Optional Utilities
- Internet Downloads
- User Guides
- MFP Setup Utility (Windows only)
- There are 5 main functions included in this software:
- MFP Settings
- Address Book Manager
- Phone Book Manager
- Profile Manager
- PIN Manager
- Actkey Utility (Windows only, USB only)
- ScanSoft Utilities
- PaperPort
- OmniPage SE
- Configuring the MFP
- Default Passwords/PIN
- Fax Receiving (MB470 & MB480 only)
- Setting Fax Parameters
- Setting the Ring Response
- Setting Access Control
- Enable/Disable Access Control
- Entering PIN ID
- Logout operation
- Logout by user
- Operation Timeout
- Minimum Configuration Requirements
- To send Faxes (MB470 & MB480 only):
- To send e-mail:
- To file document(s) via intranet:
- Internet Communication Features
- Pre-Installation Information
- Scan to E-mail
- Setting up an SMTP Server
- Operating the MFP
- Scanning and Copying Documents
- Printing Documents
- Clearing Media Jams
- ADF Document Jam
- Printer Jams
- Maintenance
- Replacing Toner Cartridges & the Image Drum
- Where to Purchase
- Service et soutien
Brand : OKI
Model : MB460MFP
Category : Multifunction Printer