
CX2731MFP - Multifunction Printer OKI - Free user manual and instructions
Find the device manual for free CX2731MFP OKI in PDF.
| Product type | Monochrome LED multifunction printer |
| Brand | OKI |
| Model | CX2731MFP |
| Weight | 24 kg (53 lb) |
| Power supply | 110-127 V or 220-240 V, 50/60 Hz, 1100 W max |
| Main functions | Print, copy, scan, fax, scan to email and network PC |
| Paper capacity (tray 1) | 250 sheets (75 g/m²) |
| Paper capacity (MP tray) | 100 sheets (75 g/m²) or 10 envelopes |
| Paper capacity (optional tray 2) | 530 sheets (75 g/m²) |
| Supported paper sizes | A4, A5, A6, B5, Legal, Letter, Executive, custom (width 64-216 mm, length 127-1321 mm) |
| Supported paper weight | 64 to 220 g/m² (17 to 58 lb) |
| Network connectivity | Ethernet 10/100 Base-TX (category 5 cable) |
| USB connectivity | USB 2.0 High Speed |
| Compatible operating systems | Windows 2000, XP, Vista, 7 (32/64-bit), Server 2003, 2008, Mac OS X 10.3.9 to 10.6 |
| Security | Authentication by PIN or username/password, access control, administrator password |
| Spare parts | Toner cartridge (black), imaging drum, fuser unit, roller sets |
| Maintenance and cleaning | Keep the packaging for transport, clean the document glass and automatic feeder with a soft cloth |
| General information | Manual available in PDF (212 pages) at notice-facile.com |
Frequently Asked Questions - CX2731MFP OKI
User questions about CX2731MFP OKI
0 question about this device. Answer the ones you know or ask your own.
Ask a new question about this device
Download the instructions for your Multifunction Printer in PDF format for free! Find your manual CX2731MFP - OKI and take your electronic device back in hand. On this page are published all the documents necessary for the use of your device. CX2731MFP by OKI.
USER MANUAL CX2731MFP OKI
Hardware Installation. 7
Package Contents. 7
Prepare a Location 7
Unpack the Machine 8
Turning the Machine On 11
Turning The Machine Off 11
Power Save Mode and Sleep Mode 12
The Control Panel. 12
Load Print Media 12
Printing the Configuration Report. 16
Configuring the Tray Settings 16
Print Exits 17
Loading Documents for Scanning 18
Network Installation:
Making Connections and Installing
Printer Drivers 20
Compatible Operating Systems 20
Make the Network Connection 20
Locate the Setup Form 22
Set the Administrative Password 22
Set Up the Network for Windows Systems 22
Set up the Network for Macintosh Systems 26
Configuring the Machine for Network
Operation 31
Enter the Machine's IP Address on the Setup Form 31
Set Up Scan To Email and Internet Fax. . 31
Set Up Scan To Network PC. 33
Profiles for Scan To Network PC. 38
Setting Up User Authentication and
Access Control 40
General Information 40
Before You Start. 40
Windows Systems. 40
Mac Systems 41
Authentication by PIN 41
Authentication by User Name and Password 44
Configuring the Machine for Faxing. 46
Basic Settings for Faxing 46
USB Installation 48
USB Connection 48
USB: Installing a Printer Driver for Windows 50
USB: Installing a Printer Driver for Mac . . . 51
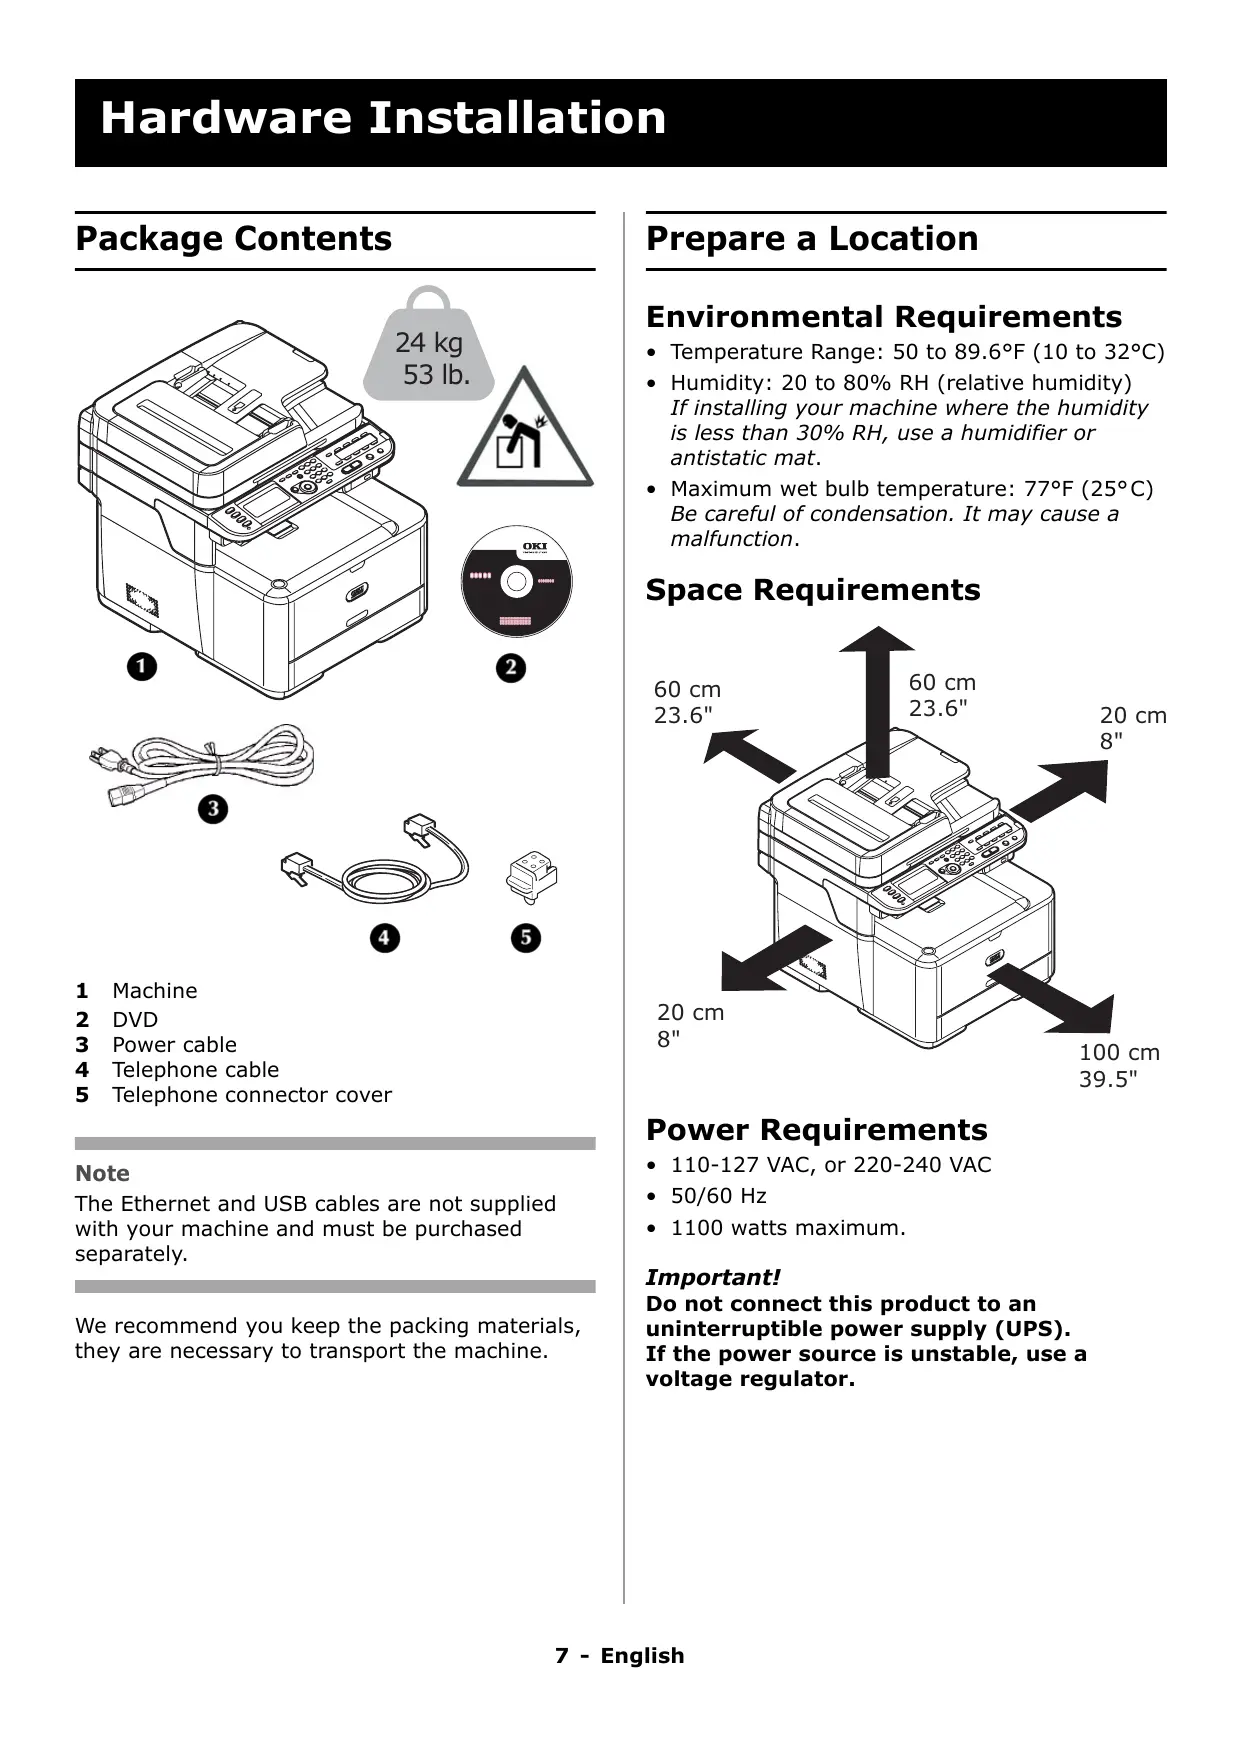
1 Machine
2 DVD
3 Power cable
4 Telephone cable
5 Telephone connector cover
Note
The Ethernet and USB cables are not supplied with your machine and must be purchased separately.
We recommend you keep the packing materials, they are necessary to transport the machine.
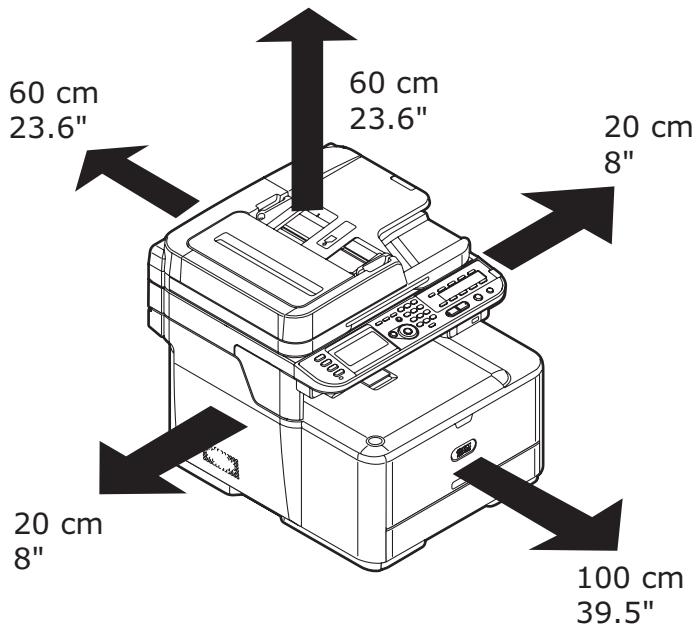
Prepare a Location
Environmental Requirements
- Temperature Range: 50 to 89.6^ F (10 to 32^ C )
- Humidity: 20 to 80% RH (relative humidity) If installing your machine where the humidity is less than 30% RH, use a humidifier or antistatic mat.
- Maximum wet bulb temperature: 77^ F ( 25^ C ) Be careful of condensation. It may cause a malfunction.
Space Requirements
Power Requirements
110-127 VAC, or 220-240 VAC
- 50/60 Hz
1100 watts maximum.
Important!
Do not connect this product to an uninterrupted power supply (UPS). If the power source is unstable, use a voltage regulator.
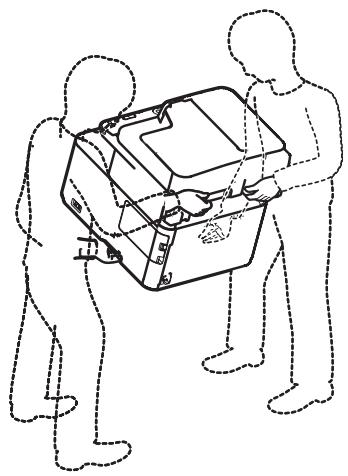
Unpack the Machine
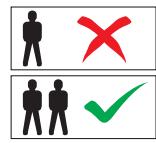
Important!
At least two people are needed to lift the machine safely.

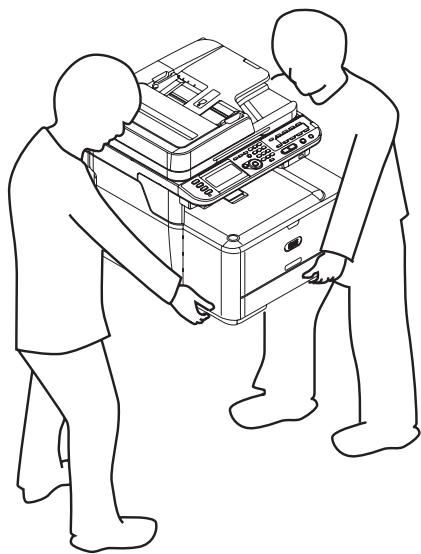
24 kg 53 lb.
Note
The illustrations below are representative. The actual tape/packing materials may differ somewhat from those illustrated.
Keep the packing materials, they are necessary to transport the machine.
1 Remove your machine from the box and place it where it is to be installed.

2 Remove the outer packing materials.
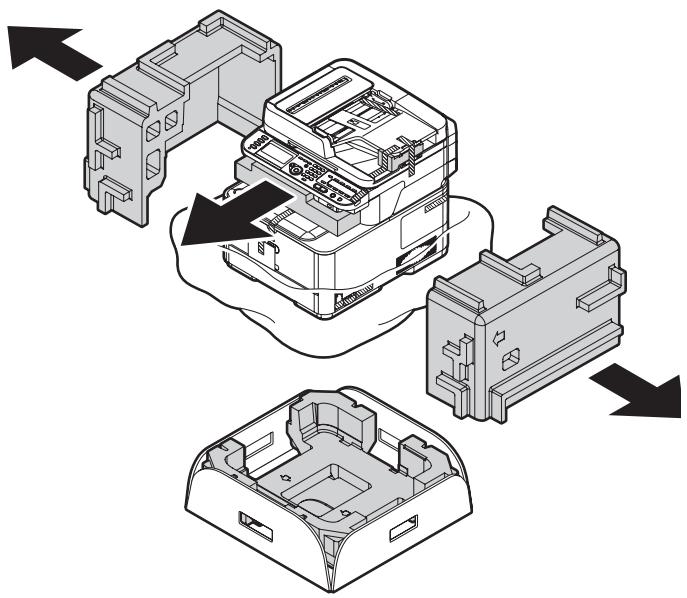
3 Remove the external packing tape.
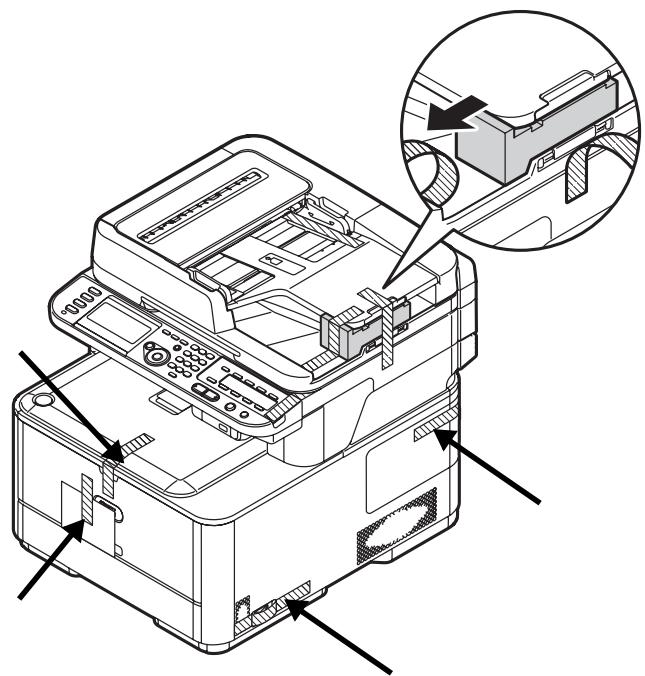
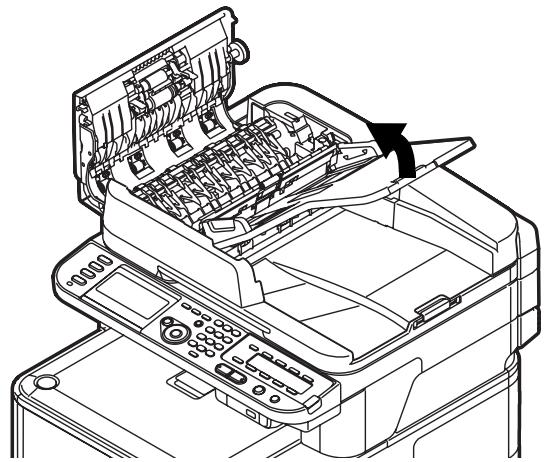
4 Open the ADF cover and remove any packing materials.
5 Lift the document tray and remove any packing materials.
6 Lower the document tray and close the ADF cover.
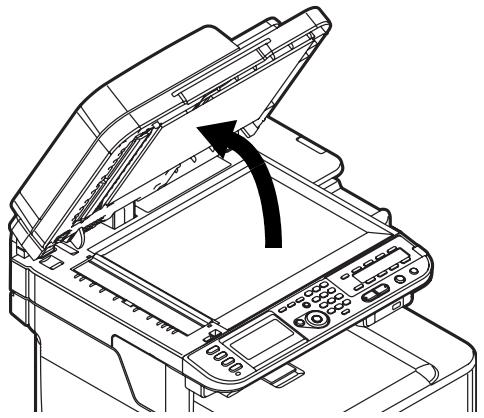
7 Open the document glass cover (1) and remove the packing materials and protective sheet.
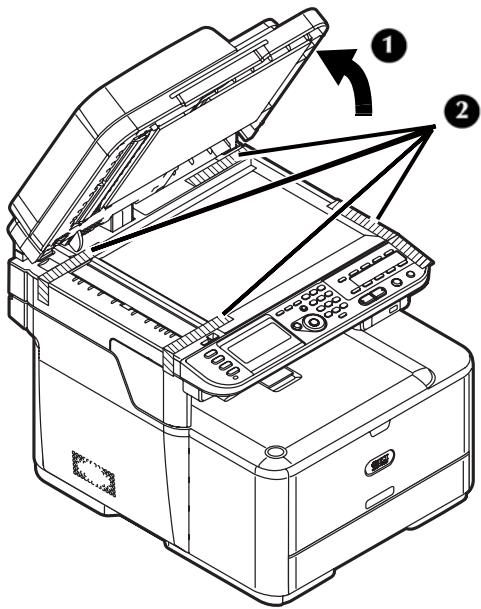
8 Close the document cover.
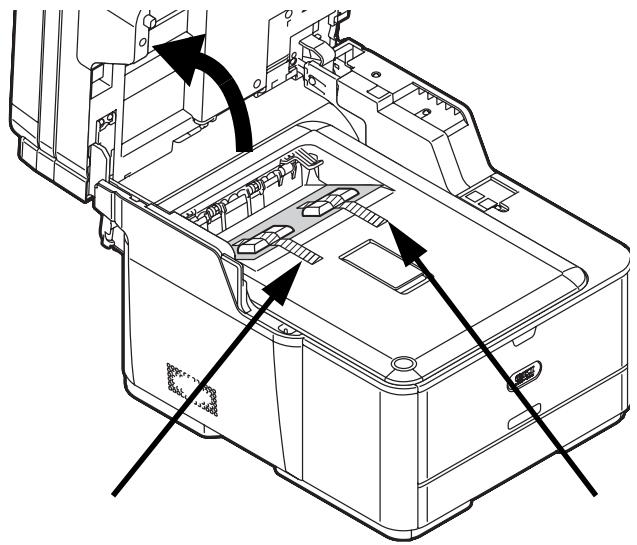
9 Open the scanner unit and remove any packing materials.
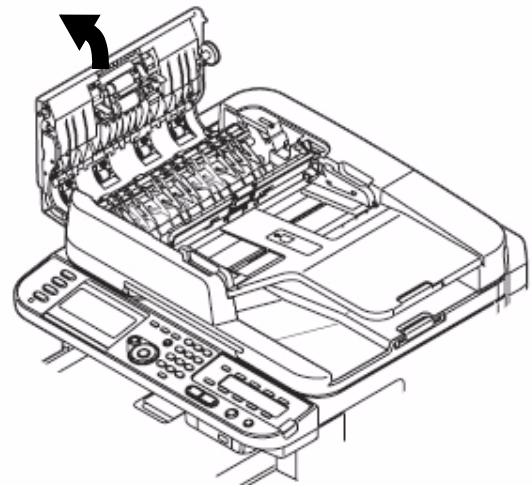
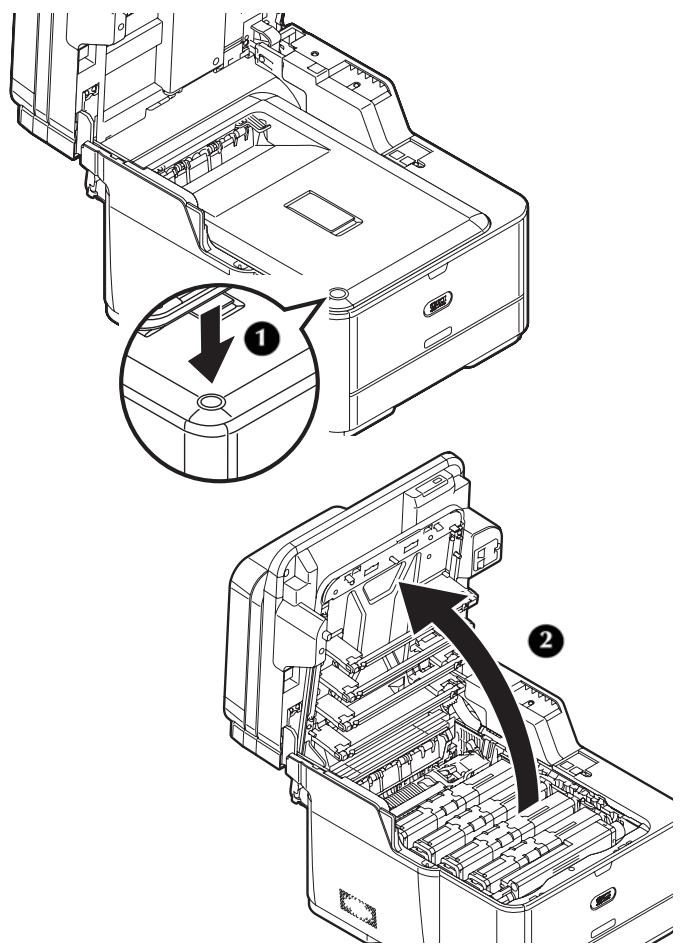
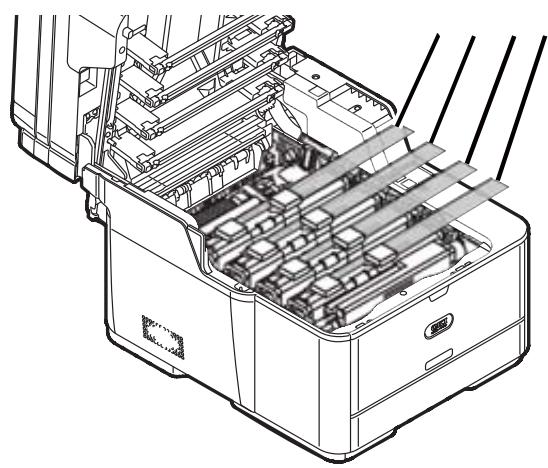
10 Press the cover release button (1) and open the top cover (2).
Caution!
- The green tube on the image drum is very delicate. Handle it carefully.
- Do not expose the image drum unit to direct sunlight or very bright interior light (approximately more than 1500 lux). Even under the normal interior light, do not leave the image drum exposed for more than 5 minutes.
11 Remove the tape and packing materials from the toner cartridges.
12 Press the blue lever (1) of the fuser unit in the direction of the arrow and remove and store the orange stopper (2).
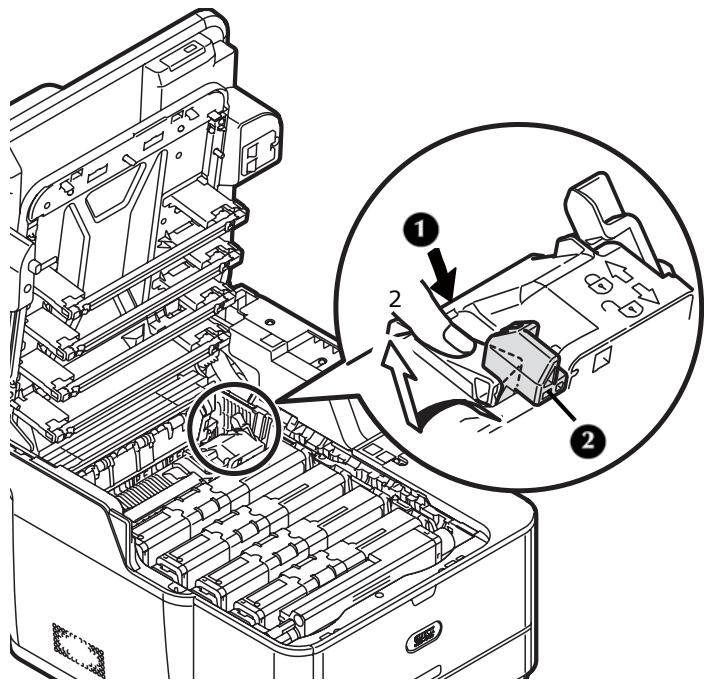
Important!
Keep the orange stopper, it is necessary if you ever need to transport the machine.
13 Slide the blue locking sleeve on each toner cartridge to the left until it stops.

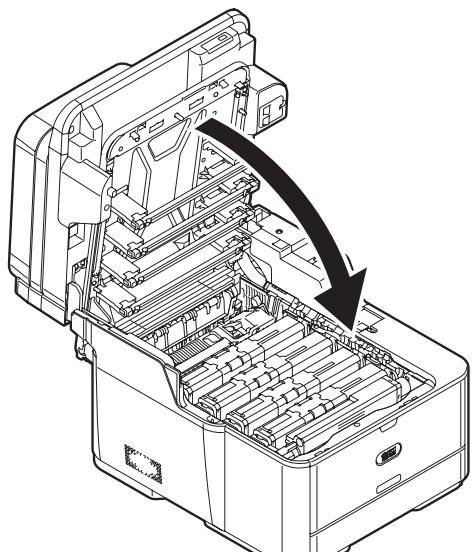
14 Gently close the top cover and scanner unit.
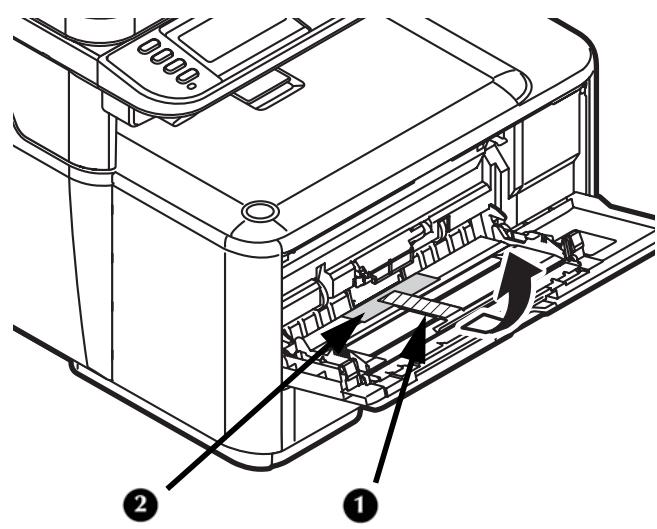
15 Remove the tape on the MP Tray, then open the tray.
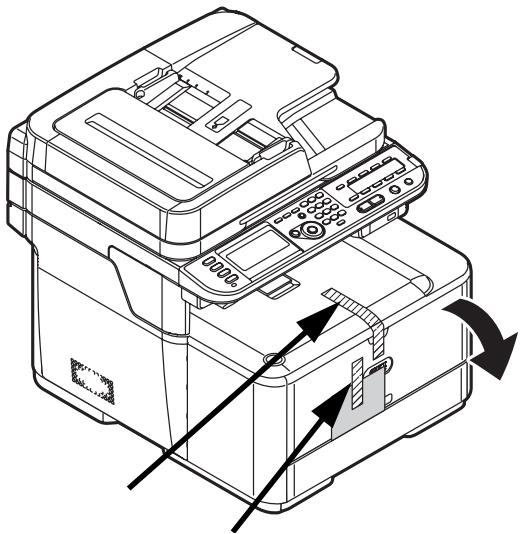
16 Remove the interior tape (1) and protective sheet (2), then close the MP Tray.
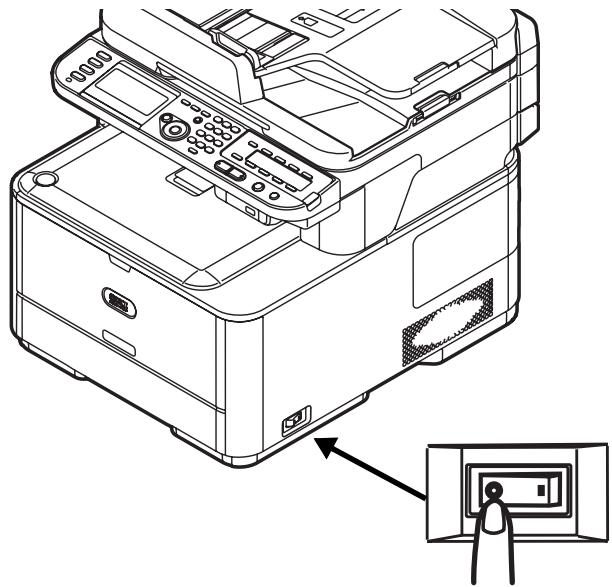
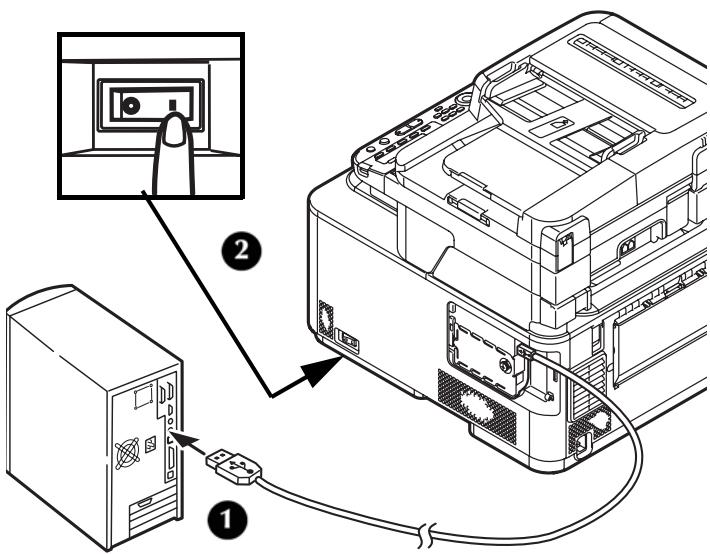
Turning the Machine On
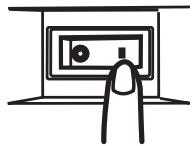
1 Make sure the power switch (on the right side of the machine) is off < 0> .
2 Plug the power cable into the power socket on the back of your machine.
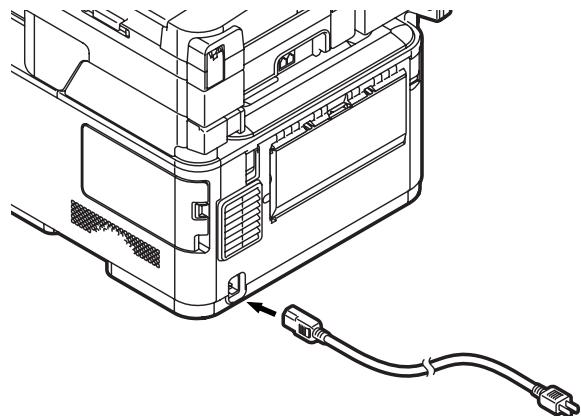
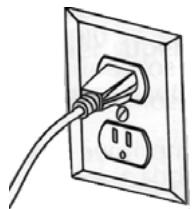
3 Plug the power cable into a suitable grounded outlet.
4 Make sure no documents are on the document glass or ADF, and that the ADF cover is closed.
5 Turn the printer on.
Turning The Machine Off
Caution!
Do not turn off the power switch suddenly: this can damage your machine. Always follow the correct procedure to ensure that no data is lost.
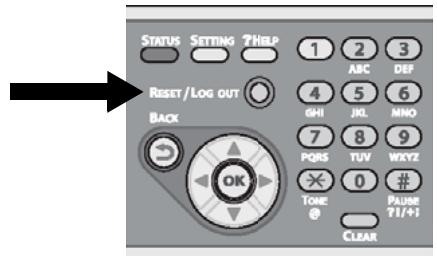
1 Press

2 Press the down arrow key repetitively to select [Shutdown], then press
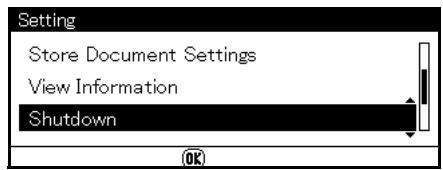
3 When the confirmation message appears, press the right arrow key to select [Yes], then press
4 When the screen prompting you to turn off the power switch appears, turn the machine off.
Power Save Mode and Sleep Mode
Note
See the on-line Basic User Guide on the DVD supplied with your machine for more information.
Power Save Key
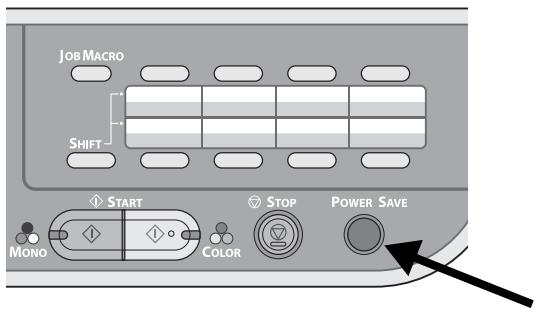
When your machine is not used for 30 minutes (the factory default), it automatically enters a power save mode to reduce the power consumption.
You can enter (or exit) the power save mode manually by pressing
The Control Panel
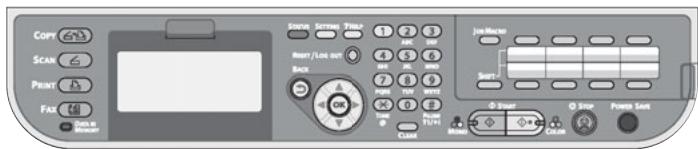
For information on
the control panel
- entering/deleting text/data
see the on-line Basic User's Guide on the DVD supplied with your machine.
Load Print Media
For more information on print media, see the on-line Basic User's Guide on the DVD supplied with your machine.
Available Trays
1 Tray 1
2 MP Tray
3 Tray 2 (optional)
Selectable Weight Ranges
| Designation | Weight Range, | |
| US Bond | Metric | |
| Light | 17 to 18 lb. | 64 to 74 g/m2 |
| Medium Light | 20 to 21 lb. | 75 to 82 g/m2 |
| Medium | 22 to 28 lb. | 83 to 104 g/m2 |
| Heavy | 28 to 32 lb. | 105 to 120 g/m2 |
| Ultra Heavy1 | 32 to 47 lb. | 121 to 176 g/m2 |
| Ultra Heavy2 | 47 to 58 lb. | 177 to 220 g/m2 |
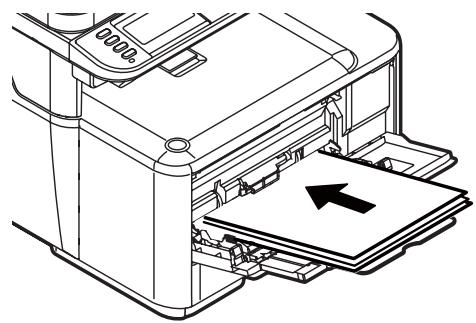
Loading Paper: Tray 1 and Optional Tray 2
Tray 1
- Takes up to 250 sheets of 20-lb. US Bond (75 g/m²) paper
- Usable Sizes: Letter, Legal 13/13.5/14, Executive, A4, A5, A6, B5, 16K, Custom
- Paper Weight range: 17 to 47 lb. US Bond (64 to 176g / m^2 )
Tray 2 (optional)
- Takes up to 530 sheets of 20-lb. US Bond (75 g/m²) paper
- Usable Sizes: Same as Tray 1, but no A6
- Paper Weight range: same as Tray1
Important!
Before printing on custom size paper, you must first define the size in the printer driver. See page 16.
The following procedure shows loading paper in Tray 1. The procedure for Tray 2 is the same.
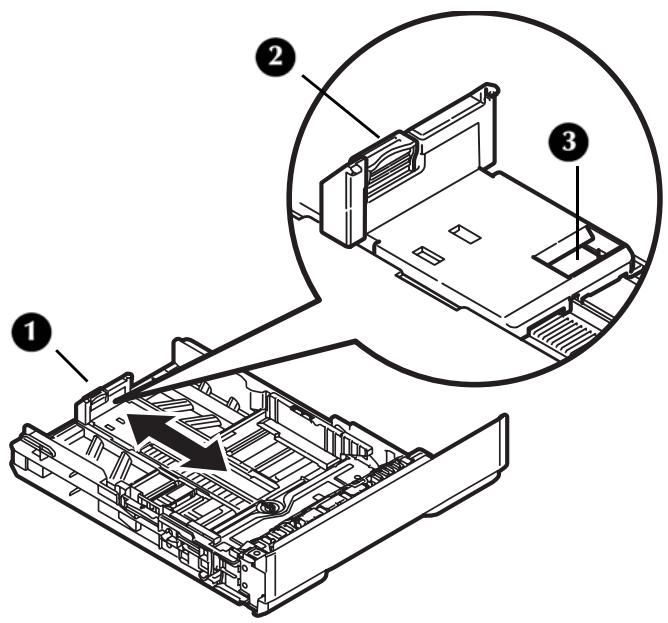
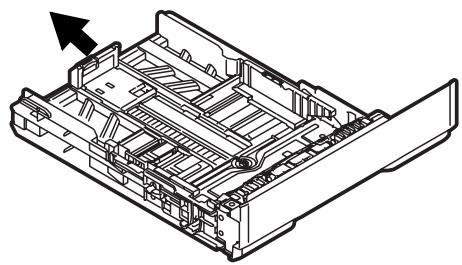
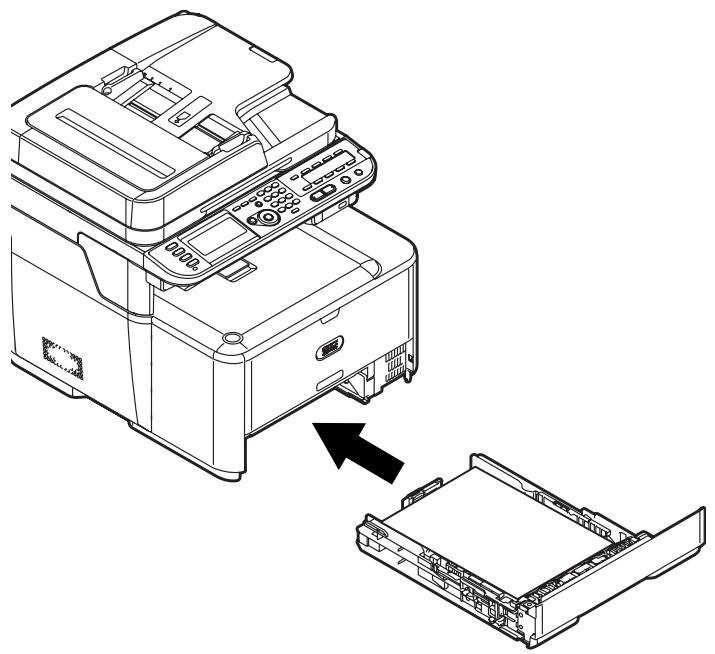
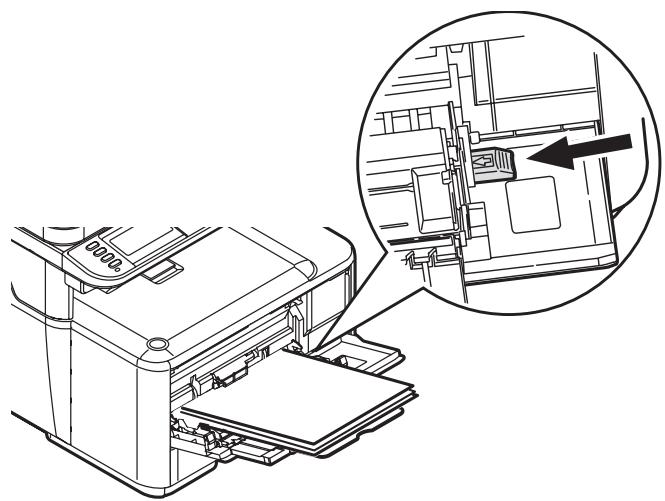
1 Pull out the paper tray.
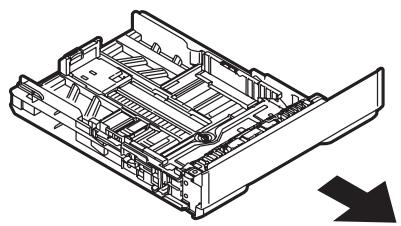
2 Slide the paper width guides to the width of paper to be loaded.
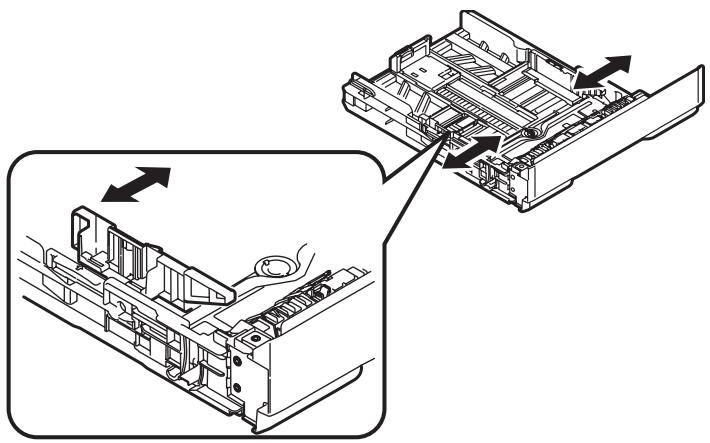
3 Adjust the paper stopper (1) for the paper length: press down lightly on the blue release lever (2), then slide the paper stopper to the length of paper to be loaded. The length selected will show in the view window (3).
Note
If you are loading legal paper, you must slide the paper stopper out beyond the end of the tray. For Legal 14 paper, slide it as far out as it will go (about 2.5 inches, 64mm ). Settings for Legal 13, Legal 13.5 and Legal 14 will appear in the stopper window when it is properly positioned.
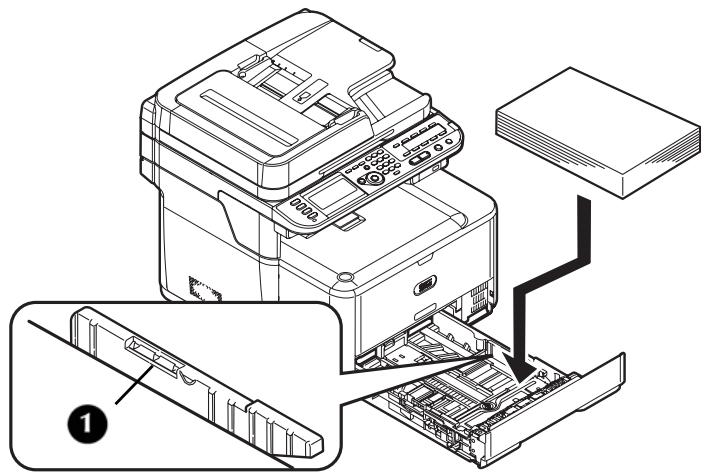
4 Flex the paper back and forth, and then fan it. Straighten the edges of the paper stack on a level surface.

5 Load the paper with the print side face down. Keep the stack below the fill line (1).
6 Fine tune the paper width guides and the paper stopper to be snug, but not tight, against the paper.
7 Push the paper tray into the printer until it stops.
8 Configure the tray settings in your machine's menu. See "Configuring the Tray Settings" on page 16.
Loading Paper in the MP Tray
- Takes up to 100 sheets of 20-lb. US Bond (75 g/m ^2 ), up to 10 envelopes.
- Usable sizes: Letter; Legal 13/13.5/14"; Executive; A4, A5, A6, B5; C5, DL, Com-9, Com-10 and Monarch envelopes, 3'' × 5'' index cards, photo paper sizes 4'' × 6'' or 5'' × 7'' : banners up to 52'' (1320 mm) long, custom
- Paper weight range: 17 to 58 lb. US Bond (64 to 220g / m^2 )
Important!
Before printing on custom size paper, you must first define the size in the printer driver. See page 16.
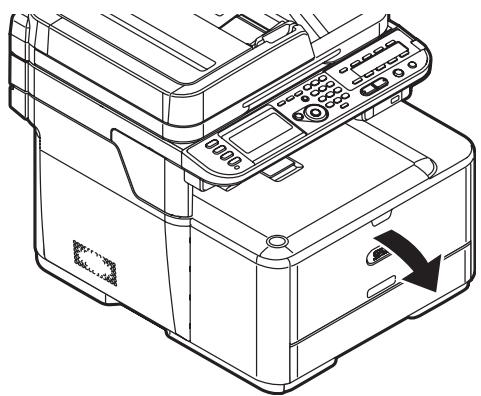
1 Lower the MP tray.
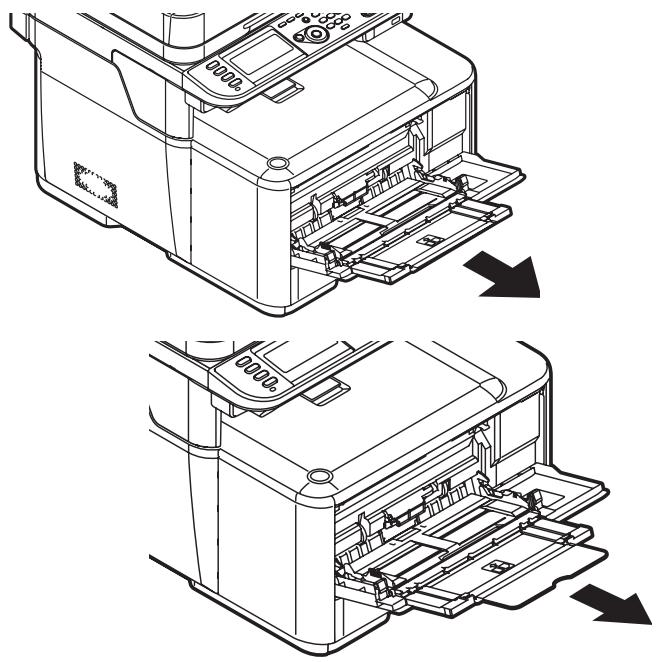
2 Pull out the paper support and the sub support.
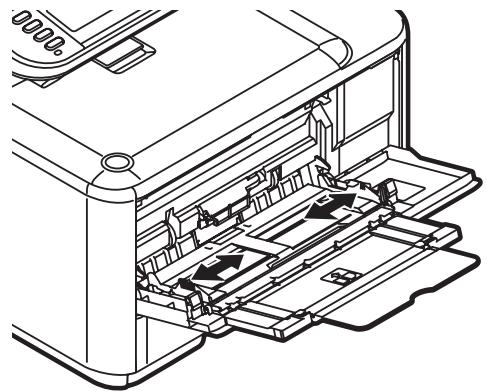
3 Adjust the paper feed guides to the width of paper to be loaded.
4 Insert the paper with the print side face up until its edge touches the paper feed entrance, then fine tune the position of the feed guides.
Note
Load envelopes with the short edge into the machine, flap down and to the right.
5 Press the tray latch button.
6 Register the loaded paper on your machine. See "Configuring the Tray Settings" on p. 16.
Note
- Do not load paper above the fill line.
- Do not load paper of different sizes, types or weights at the same time.
- When adding paper, remove the paper on the MP tray and straighten the edges of both stacks of paper, and then load them again.
- Do not put anything other than paper for printing. Do not apply too much pressure on the MP tray.
Printing the Configuration Report
You can check the detailed information of your machine, such as the settings and status, by printing the configuration report.
1 Press
2 Use the down arrow key to select [Reports], then press
3 Use the down arrow key to select [Configuration], then press <OK> .
4 When the confirmation message appears, press the left or right arrow key to select [Yes], then press <OK> .
Configuring the Tray Settings
Standard Size Print Media
Note
To scroll through the various selections on the display, press the down arrow key repetitively.
1 Press
2 Use the down arrow key to select [Paper Setup], then press
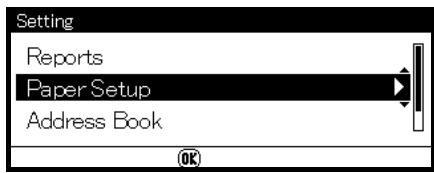
3 Use the down arrow key to select the applicable paper tray, then press <OK> .
4 Use the down arrow key to select [Paper Size], then press
5 Use the down arrow key to select the size of the loaded paper, then press <OK> .
6 Use the down arrow key to select [Media Type], then press
7 Use the down arrow key to select the type of media loaded, then press <OK> .
8 Use the down arrow key to select [Media Weight], then press
9 Use the down arrow key to select the weight of the loaded paper, then press
Custom Size Print Media
To load custom size paper, you need to register the width and length of the paper before printing.
| Tray | Available size range |
| Tray 1 | Width: 4.1 to 8.5" (105 to 216 mm) Length: 5.8 to 14.0" (148 to 356 mm) |
| Tray 2 (optional) | Width: same as Tray 1 Length: 8.3 to 14.0" (148 to 356 mm) |
| MP tray | Width: 2.5 to 8.5" (64 to 216 mm) Length: 5.0 to 52.0" (127 to 1321 mm) |
Note
For tray 1 and tray 2, you can configure the [Custom] setting only when [Paper Size] is set to [Custom].
1 Follow steps 1 through 3 at the left.
2 Use the down arrow key to select [Custom], then press OK>.
3 Enter the desired value in the Width box using the keypad.
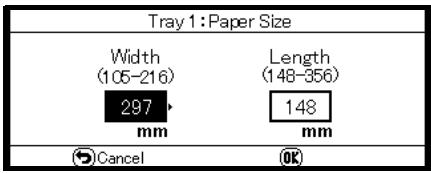
4 Press the right arrow key to move to the Length box, then enter the value using the keypad.
5 Press
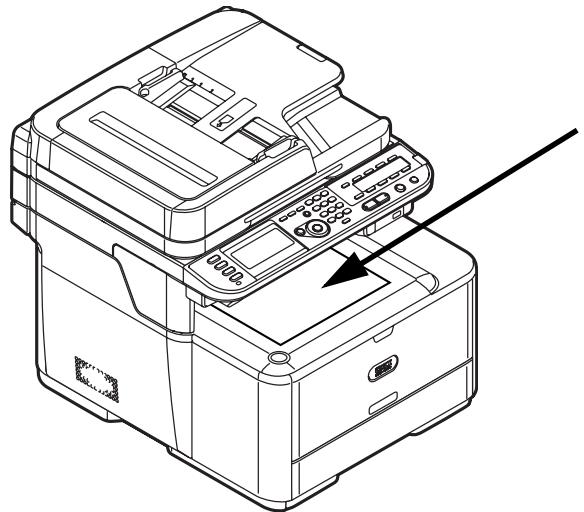
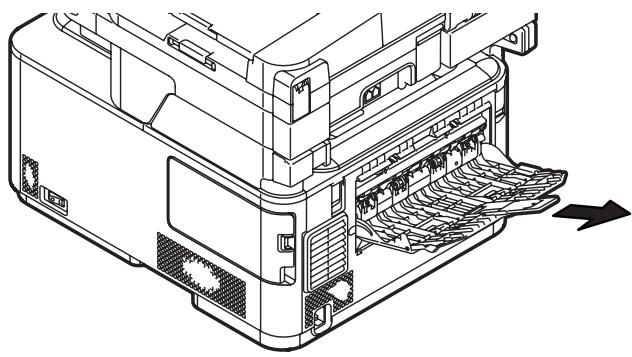
Print Exits
Important!
Do not open or close the rear exit (face up stacker) while the machine is printing as it can cause a paper jam.
Using the Top Exit (Face Down Stacker)
The top exit (facedown stacker) is the default. It is enabled when the rear exit is closed.
- Delivers documents with the print side face down.
- Takes up to 150 sheets of 20-lb. US Bond (75 g/m ^2 ) paper.
Using the Rear Exit (Face Up Stacker)
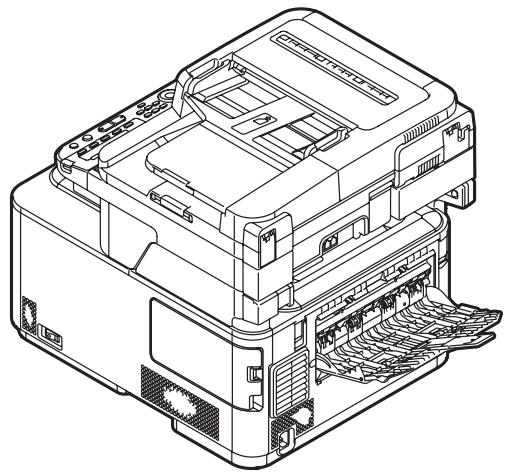
The rear exit is enabled when it is opened.
- Delivers documents with the print side face up.
-
Provides straight-through path required for heavy paper, transparencies, envelopes, and labels.
-
Takes 100 sheets of 20-lb. US Bond (75 g/m²) paper
- Takes 10 envelopes
1 Pull the rear exit on the back of the machine and open it toward you.

2 Unfold the stacker.
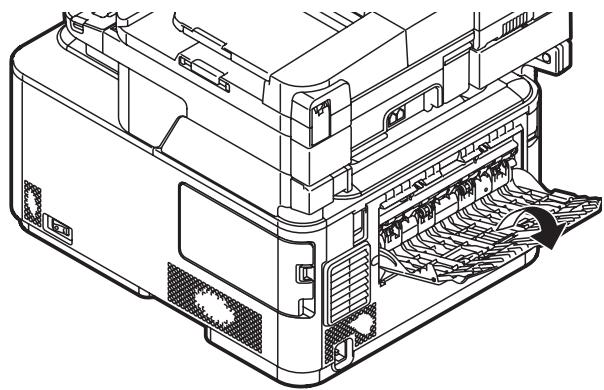
3 Open the paper support.
Loading Documents for Scanning
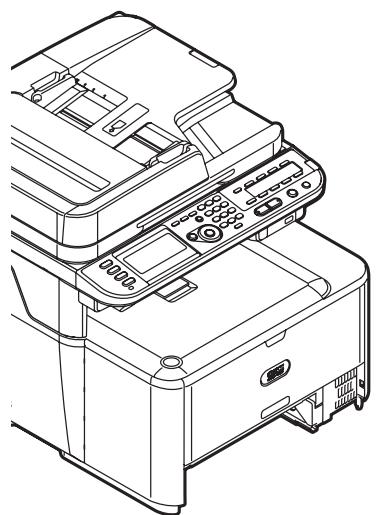
You can use the auto document feeder (1) or the document glass (2) to load documents for copying, scanning or faxing.

Document Requirements
For information on document requirements, see the on-line Basic User's Guide on the DVD supplied with your machine.
Loading Documents on the Auto Document Feeder (ADF)
- Takes Letter, Legal 13/13.5/14, Executive, A4, A5, A6, B5.
- Holds 50 sheets of 20-lb. US Bond (75g / m^2)
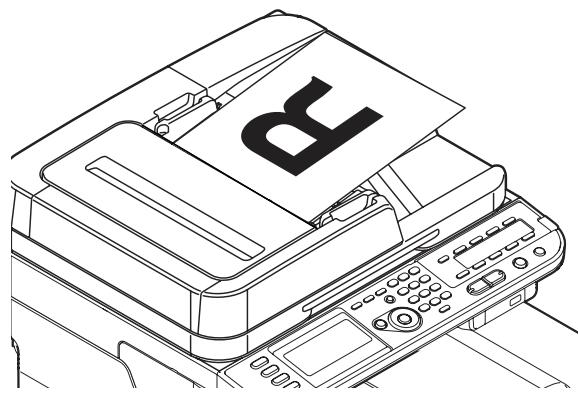
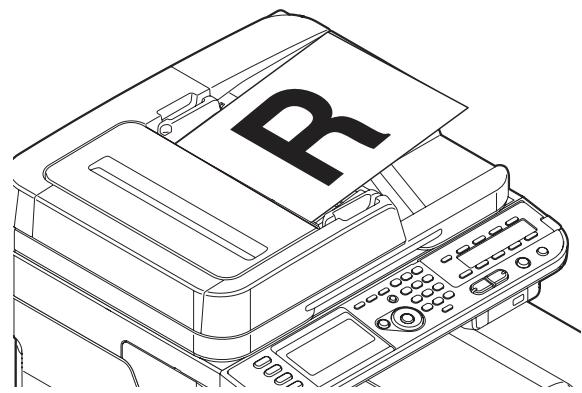
- Load documents face up.
Important!
Make sure that any glue, ink, or correction fluid on documents is completely dry before loading them.
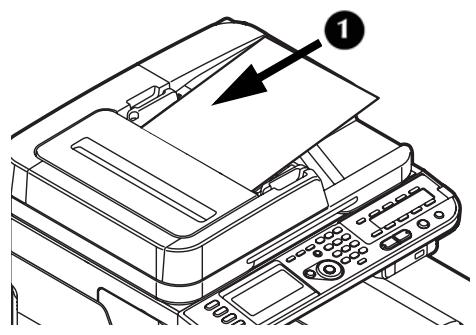
1 Load the document(s) on the ADF.
a) Load portrait documents with the top edge in first.
b) Load landscape documents with the left edge in first.
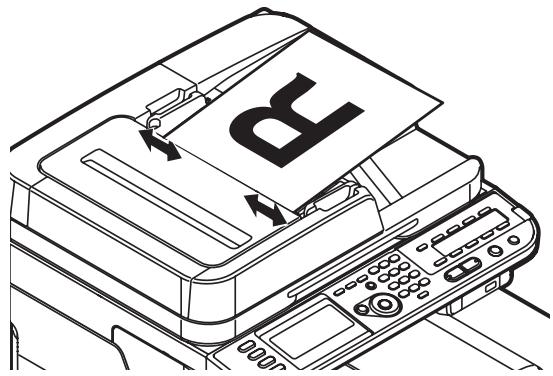
2 Adjust the document guides to the width of the pages.
Loading Documents on the Document Glass
- Takes Letter, Executive, A4, A5, A6, B5
- Usable for documents up to 0.78-inch (20 mm) thick
Important!
Make sure that any glue, ink, or correction fluid on documents is completely dry before loading them.
1 Lift and open the document glass cover.
2 Place a document face down on the document glass.
a) If your document is portrait, align its top edge to the upper-left corner of the glass.
b) If your document is landscape, align its right edge to the upper-left corner of the glass.
3 Close the document glass cover gently.
Note
If you want to use [N-in-1], [Sort] or [DuplexCopy] functions, change the [Document Direction] setting according to the direction of your document to get the output you want. The default setting is [Portrait].
Network Installation:
Making Connections and Installing
Printer Drivers
Compatible Operating Systems
Your machine supports the following operating systems:
Windows
- Windows 7,
- Windows 7 64-bit Edition
- Windows Server 2008 R2 64-bit Edition
- Windows Server 2008
- Windows Server 2008 64-bit Edition
- Windows Vista
- Windows Vista 64-bit Edition
- Windows Server 2003
- Windows Server 2003 x64 Edition
- Windows XP
- Windows XP x64 Edition
- Windows 2000
Macintosh
Mac OS X 10.3.9 to 10.6.
Important!
For Mac OS X 10.6 IntelPC users, install
Rosetta before installing the printer driver.
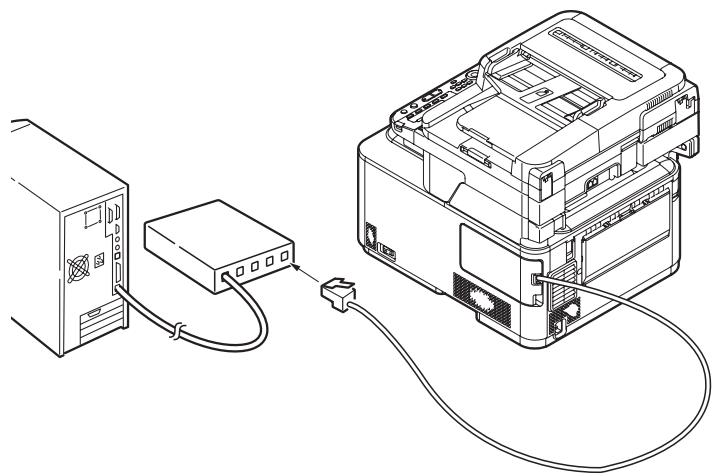
Make the Network Connection
Important!
You must connect your machine to a network with a suitable Ethernet cable before installing the printer driver.
Note
The Ethernet cable and hub are not included with your machine. The Ethernet cable must be category 5, twisted pair, straight.
1 Turn off your machine:
a) Press
b) Use the down arrow key to select [Shutdown], then press <OK> .
c) When the confirmation message appears, press the right arrow key to select [Yes], then press < 0K> .
d) When prompted to, turn the machine off.
2 Turn off the computer.
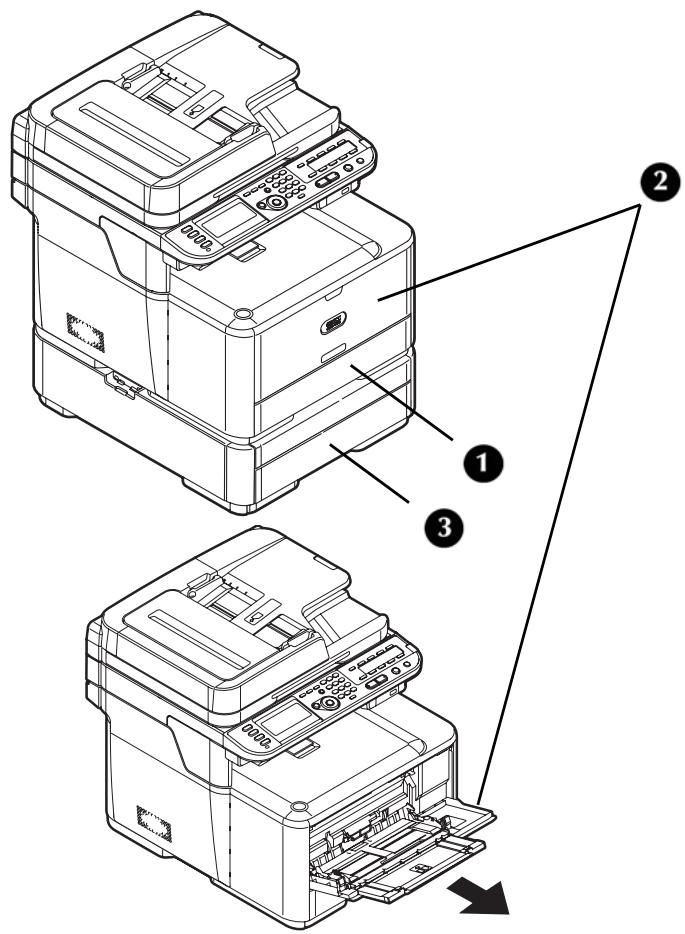
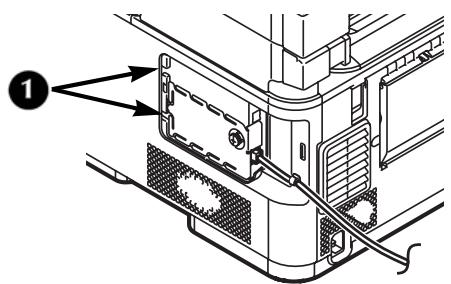
3 Depress the latch (1) on the right side of the machine and remove the access cover (2).
1
2
4 Plug one end of the Ethernet cable into the LAN connection on the machine.
5 Secure the Ethernet cable under the hook (1) on the machine.
6 Fit the tabs on the side cover into the slots (1) on the machine housing and snap the cover back into place.
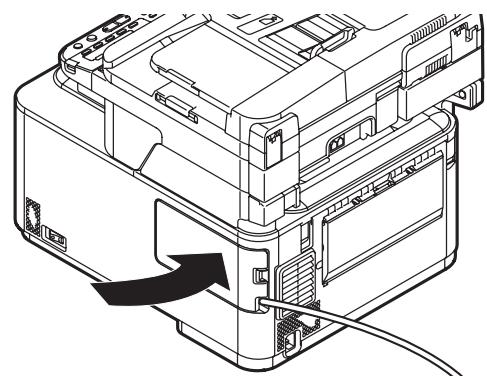
7 Connect the hub to a computer, then plug the other end of the Ethernet cable into the hub.
Locate the Setup Form
| No. | Item | Example | Your Value |
| At: Basic Setup Information | |||
| A-1 | Administrator password for your machine | aaaaa (the default) | |
| A-2 | IP address of your machine | 192.168.0.2 | |
| B: Scan To Email and to Internet Fax | |||
| B-1 | Email address for your machine (up to 80 characters) | mc561@test.com | |
| B-2 | SMTP server address | smtp.test.com | |
| B-3 | POP3 server address | pop3.test.com | |
| B-4 | Authentication method | SMTP | |
| B-5 | SMTP user ID | OKIMC561 | |
| B-6 | SMTP password | okimc561 | |
| B-7 | POP user ID | user | |
| B-8 | POP password | okimc561 | |
| B-9 | Name of the email destination | User | |
| B-10 | Email address of the email destination | user@test.com | |
| C: Scan To Network PC | |||
| C-1 | Name of the destination computer | PC1 | |
| C-2 | User name to log into the destination computer (up to 32 characters) | mc561 | |
| C-3 | Password to log into the destination computer (up to 32 characters) | mc561 | |
| C-4 | Profile name to register the settings (up to 16 characters) | Sales | |
| C-5 | Shared folder name on the destination computer (up to 64 characters) | SalesDev | |
| C-6 | File name of the scanned data (up to 64 characters) | ScanData | |
You will find a Setup Form on page 54. You can use this form to record needed information about your network settings, then refer to it when setting up the machine for network operation.
Set the Administrative Password
Note
When using the arrow keys to make your selections, press the key repetitively to go to the selection.
1 Press

2 Use the down arrow key to select [Admin Setup], then press <OK> .
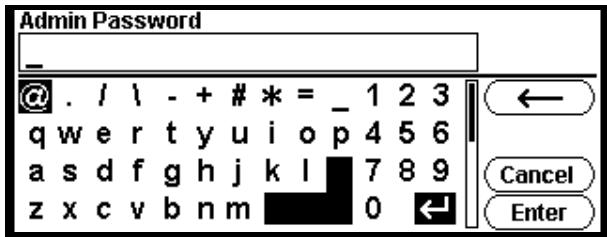
3 Use the down arrow key to select [a], then press
4 Use the arrow keys to select [Enter] on the display, then press <OK> .
5 Use the up arrow key to select [Management], then press <OK> .
6 Use the up arrow key to select [Admin Password], then press
7 Use the arrow keys to select the digits of your password, pressing <OK> after each digit.
8 When done entering your new password, use the arrow keys to select Enter on the display, then press OK>.
Note
The Admin Password must have at least six digits and is case sensitive.
9 When you have entered all the digits, use the arrow keys to select [Enter] on the display, then press
10 Use the left arrow key to back out to the main screen.
11 Enter the Admin Password on line A-1 of the Setup Form.
Set Up the Network for Windows Systems
To complete the network connection with a Windows computer, first set IP addresses for the computer and the machine, and then install printer driver(s) on the computer.
Set Up the IP Address, if Necessary
If your network meets either of the following conditions, an IP address is assigned to the computer and to the machine automatically.
- If a DHCP or BOOTP server is on the network
- Universal Plug-and-Play
If all the computers connected to the network are
- Windows 7
- Windows Vista
- Windows XP
- Windows 2000
- Windows Server 2008 R2
- Windows Server 2008
- Windows Server 2003,
- or your router supports Universal Plug-and-Play,
an IP address is automatically assigned to the computer and to the machine even if a DHCP/BOOTP server is not on the network.
If the network does not meet the conditions above, or your network administrator or internet service provider specifies a unique IP address for the computer and your machine, set the IP addresses manually.
General Information
- You must enter the administrator password to complete this procedure.
- When setting an IP address manually, ask the network administrator or your internet service provider which IP address to use. If the IP address is not set correctly, the network might go down or Internet access could be disabled.
Note
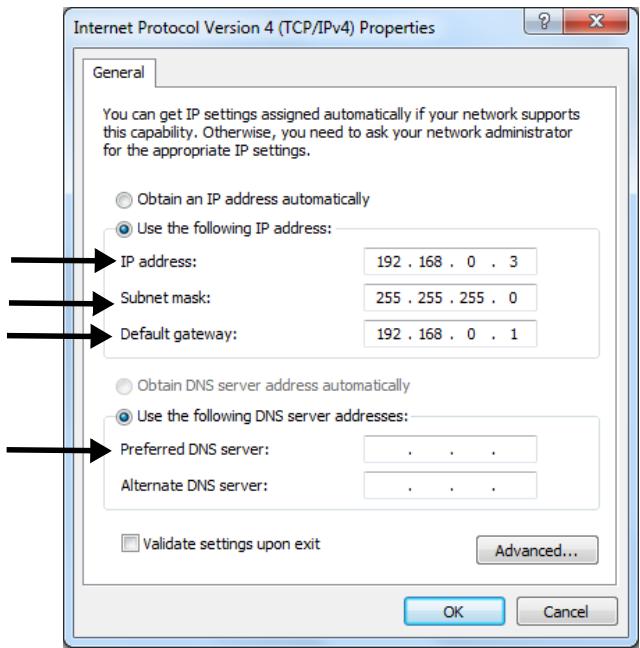
If you are configuring a small network consisting of only your machine and a computer, set the IP addresses as shown below (according to RFC1918):
For the computer
IP address: 192.168.0.1 to 254
Subnet mask: 255.255.255.0
Default gateway: not used
DNS server: not used
For the machine
IP address Set: Manual
IP address: 192.168.0.1 to 254 (select a different value from the computer)
Subnet Mask: 255.255.255.0
Default Gateway: 0.0.0.0
To set [Network Scale]:
- Press
on the control panel. - Select [Admin Setup] > [Network Menu] > [Network Setup] > [Network Scale].
Set Up Your Computer's IP Address
Important!
If the IP Address for your computer is already known, skip to the next section "Set Up Your Machine's IP Address."
The procedure below uses Windows 7 as an example. The screen images may differ depending on the operating system.
1 Turn on the computer.
2 Click [Start] > [Control Panel] > [View network status and tasks].
- For Windows Server 2003, click [Start] > [Control Panel] > [Network Connections] > [Local Area Connection].
- For Windows XP, click [Start] > [Control Panel] > [Network and Internet Connections] > [Network Connections].
- For Windows 2000, click [Start] > [Settings] > [Network and Dial-up Connections].
3 Select [Change adapter settings].
- For Windows Server 2008 and Windows Vista, select [Manage network connections].
- For Windows Server 2003, Windows XP, and Windows 2000, skip this step.
4 Double-click [Local Area Connection].
- For Windows Server 2003, skip this step.
5 Click [Properties].
If the [User Account Control] dialog box appears, click [Yes]. (For Windows Vista, click [Continue]).
6 Select [Internet Protocol Version 4 (TCP/IPv4)] and then click [Properties].
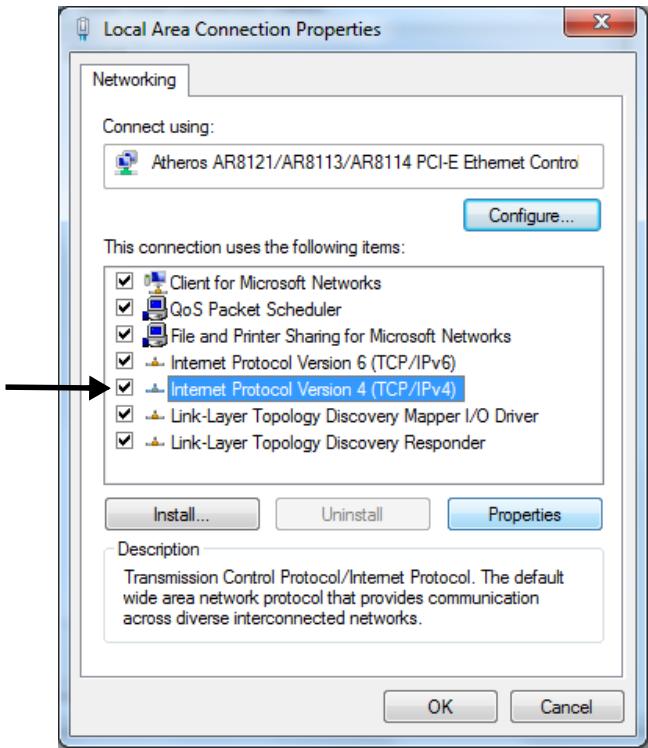
- For Windows Server 2003, Windows XP, and Windows 2000, select [Internet Protocol (TCP/IP)] and then click [Properties].
7 If setting an IP address manually, enter the IP address, subnet mask, default gateway and DNS server, and then click [OK].
- If obtaining an IP address from the DHCP server automatically, select [Obtain an IP address automatically] and then click [OK].
Important!
Do not enter a default gateway or DNS server if unnecessary.
8 Close the open windows.
Set Up Your Machine's IP Address
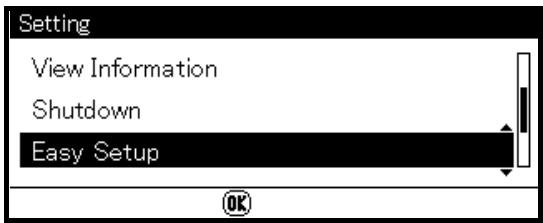
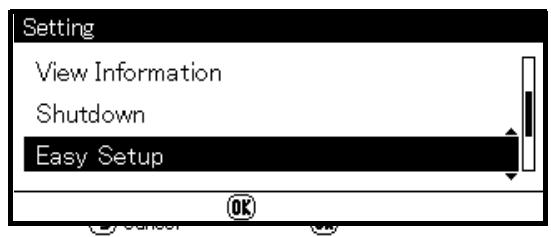
1 Turn on your machine.
2 Press
3 Use the down arrow key to select [Easy Setup], then press <OK> .
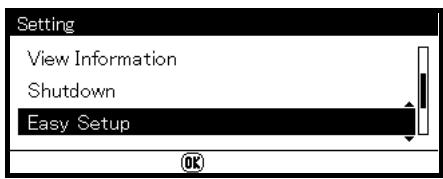
4 Enter the administrator password. See line A-1 on your Setup Form
5 Use the arrow keys to select [Enter], then press OK>.
6 Use the down arrow key to select [Network Setting], then press the right arrow key.
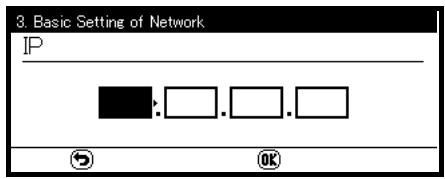
7 If setting an IP address manually, use the down arrow key to select [Manual], then press < OK> .
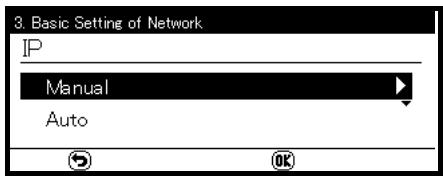
If obtaining an IP address automatically, select [Auto], and skip down to "Install the Printer Driver for Windows."
8 Use the right arrow key to move from box to box, entering the applicable information in each box using the keypad, then press <OK> .
9 Enter the DNS server and WIN server if necessary.
If they are unnecessary for your network connection, press <OK> until the popup message appears.
10 Press
Install the Printer Driver(s) for Windows
You can install multiple drivers at the same time. Selectable drivers for each model:
PCL
PS
FAX
When you install the drivers, the program also automatically installs the TWAIN driver required for scanning, as well as the Network Extension and Color Swatch utilities.
Note
The procedure below uses Windows 7 as an example. The actual procedure may differ somewhat depending on the operating system.
1 Make sure your computer is turned on and connected to the machine via the network.
2 Place the DVD supplied with your machine in the CD/DVD drive.

The DVD auto runs. If it does not, double click the OKI setup file in the DVD directory.
3 Select your language from the drop-down list then click [Next].
4 Read the License Agreement, then click [I Agree].
5 Under Driver Setup, click [Install Drivers].
Note
If the [User Account Control] dialog box appears, click [Yes]. (For Windows Vista, click [Continue]).
6 Read and observe the instructions, then click [Next].
7 Click [Easy Installation (Network)].
Note
The Easy Installation selection is an easy setup method. If you want to select a driver to install manually, install a shared printer, or use the Oki LPR Utility as a print method, select [Custom Installation] and then follow the instruction displayed on the screen.
8 Click [Next].
The device search starts.
9 Select the printer driver(s) you want to install: PCL, PS, FAX.
10 If your machine is automatically detected and displayed, select it, then click [Next]. If your machine is not displayed, click [Restart search] to restart the device search.
Note
To specify the IP address manually, select [IP address] and enter the IP address assigned to your machine, then click [Next].
Installation of the driver(s) and utilities starts.
Notes
- If the [Windows Security] dialog box appears, click [Install this driver software anyway].
- For Windows Server 2003 and Windows XP, if the [Hardware Installation] dialog box appears, click [Continue Anyway].
- For Windows 2000, if the [Digital Signature Not Found] dialog box appears, click [Yes].
11 Click [Finish] to complete the installation.
Notes
- To set a default printer, select the check box of the driver you want. You can also configure the printer settings of the selected driver by clicking [Open property dialog].
- If the dialog box prompting to restart the computer appears, click [Yes]. The computer automatically restarts.
12 Windows 7: click [Start] > [Devices and Printers].
Windows Server 2008 and Windows Vista: click [Start] > [Control Panel] > [Printer].
Windows Server 2003 and Windows XP: click [Start] > [Printers and Faxes].
Windows 2000: click [Start] > [Settings] > [Printers].
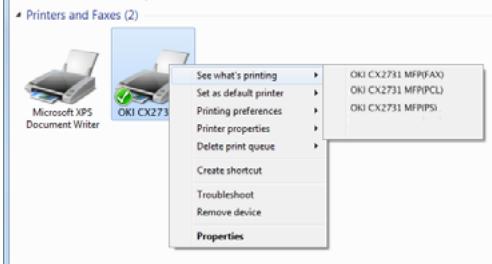
13 Check that the OKI CX2731 MFP icon is displayed.
- For Windows 7, if you have installed multiple drivers, right-click the OKI CX2731 MFP icon and select one of the menu items, and then check that all the printer drivers installed are displayed in the submenu.
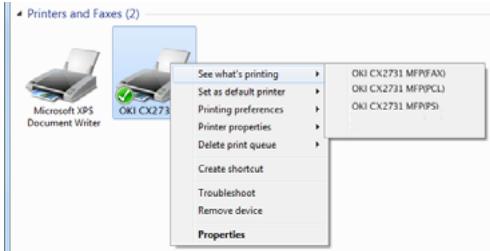
- For other Windows operating systems, check that the icon representing each driver is displayed.
14 Remove the DVD from the computer.
The installation is complete.
Set up the Network for Macintosh Systems
To complete the network connection with a Mac operating system, install a printer driver on the computer and set your machine as a network printer.
Install the Printer Driver for Mac
Only the PS driver is available for Mac systems. Select the protocol for your network connection from the following:
-
Ethertalk
-
for Mac 10.3.9 to 10.4.11, see below
-
for Mac 10.5, see page 28.
-
Bonjour (Rendezvous)
-
for Mac 10.3.9 to 10.4.11, see page 28.
- for Mac 10.5 and 10.6, see page 30.
Important!
Disable the anti-virus software before starting this procedure.
Using Ethertalk,
Mac OS X 10.3.9 to 10.4.11
Note
The procedure below uses Mac OS X 10.4.11 as an example. The actual procedure may differ somewhat depending on the operating system.
1 Make sure your machine and Mac are turned on and connected.
2 From the Apple menu, select [System Preferences].
3 Select [Network].
4 Select [Network Port Configurations] from [Show], then check that [Built-in Ethernet] is selected.
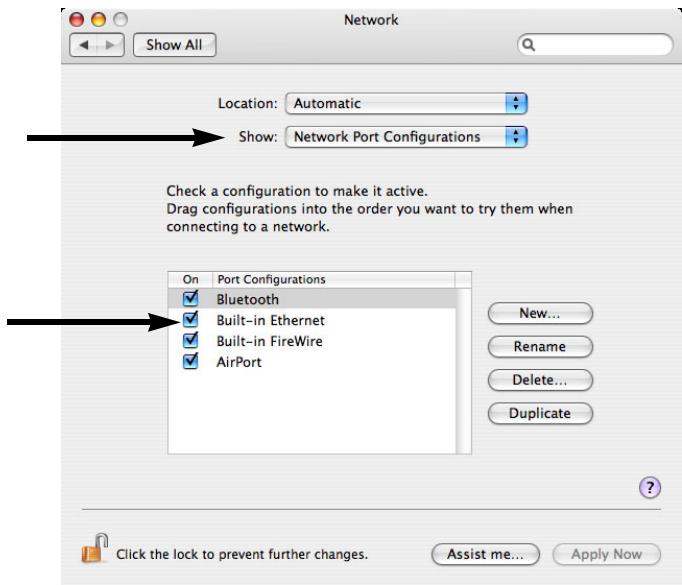
5 Select the [AppleTalk] tab, then check that [Make AppleTalk Active] is selected.
6 Close [Network].
7 Insert the DVD supplied with your machine into the computer.

8 Double-click the icon that appears on the desktop.
9 Double-click the [Driver] folder, then the [Printer] folder.
10 Double-click [Installer for Mac OSX].
11 Enter the administrator's name and password, and then click [OK].
12 Follow the instructions displayed on the screen to complete the installation.
13 Remove the DVD from the computer.
14 From the [Go] menu, select [Utilities] and then double-click [Printer Setup Utility].
Note
If [Printer Setup Utility] is already running, close it and open it again.
15 Click [Add].
Note
If the [You have no printers available] dialog box appears, click [Add].
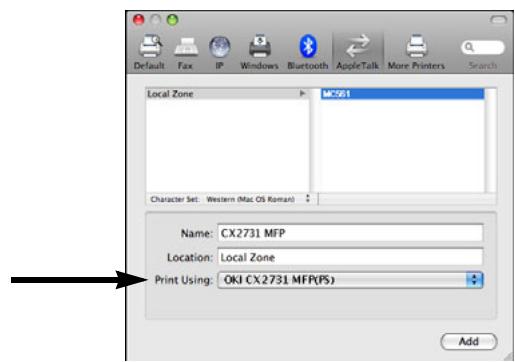
16 For Mac OS X 10.3.9, select [AppleTalk].
17 Select the name of your machine whose [Connection] is [AppleTalk], and then check that the name of your machine is displayed under [Print Using].
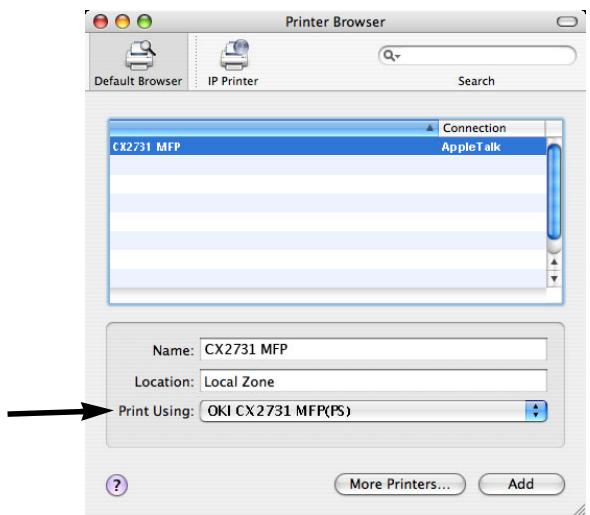
18 For Mac OS X 10.3.9, select the name of your machine and select [OKI] from [Print Model], and then select [OKI CX2731 MFP(PS)] from the list. Click [Add].
19 If the [Installable Options] window appears, click [Continue] unless you have already installed options. If you have installed options, configure each option before clicking [Continue].
20 Check that the name of your machine is displayed in [Printer List], and then close the window.
21 From the [Go] menu, select [Applications] and then double-click [TextEdit].
22 Select [File] > [Page Setup].
23 Select the name of your machine from [Format for].
24 Check that the name of your machine is displayed correctly under [Format for].
25 Click [OK].
The installation is complete.
Using Ethertalk Mac 10.5 (Leopard)
1 Make sure that your machine and the Mac are turned on and connected.
2 Insert the DVD supplied with your machine into the computer.

3 Double-click the icon that appears on the desktop.
4 Double-click the [Driver] folder, then the [Printer] folder.
5 Double-click [Installer for MacOSX].
6 Enter the administrator's name and password, and then click [OK].
7 Follow the instructions displayed on the screen to complete the installation.
8 Remove the DVD from the computer.
9 From the Apple menu, select [System Preferences].
10 Click [Print & Fax].
11 Click [+ ]
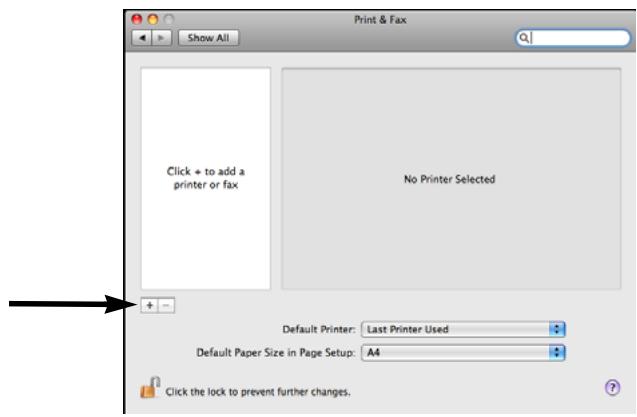
12 Click [AppleTalk].
13 Select the name of your machine and then check that the name of your machine is displayed in [Print Using].
14 Click [Add].
15 If the [Installable Options] window appears, click [Continue] unless you have already installed options. If you have installed options, configure each option before clicking [Continue].
16 Check that your machine is displayed under [Printers].
17 Check that the name of your machine is displayed in [Kind] and then close [Print & Fax].
The installation is complete.
Note
The name of your machine may not be displayed if the printer driver does not read the PPD file correctly.
In this case, click [-] to remove your machine from [Print & Fax] and then redo the procedure from step 10.
Using Bonjour (Rendezvous) Mac 10.3.9 to 10.4.11
Note
The procedure below uses Mac OS X 10.4.11 as an example. The actual procedure may differ somewhat depending on the operating system.
1 Make sure that your machine and the Mac are turned on and connected.
2 From the Apple menu, select [System Preferences].
3 Select [Network].
4 Select [Network Port Configurations] from [Show], and then check that [Built-in Ethernet] is selected.
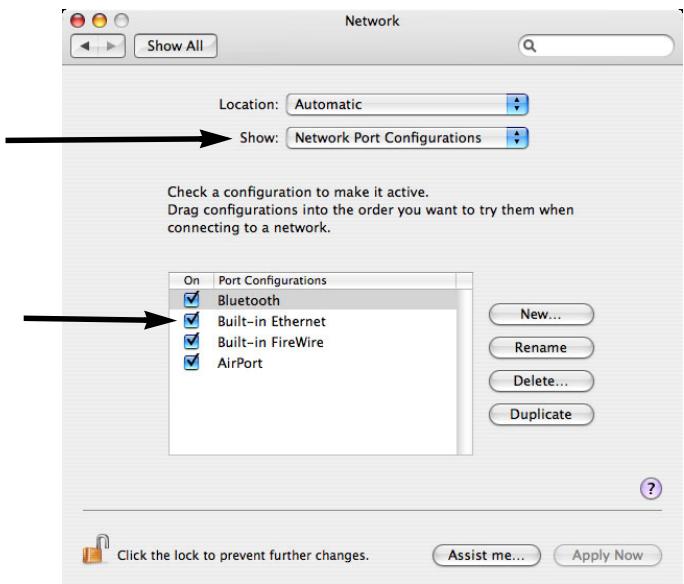
5 Close [Network].
6 Insert the DVD supplied with your machine into the computer.
7 Double-click the icon that appears on the desktop.
8 Double-click the [Driver] folder, then the [Printer] folder.
9 Double-click [Installer for Mac OSX].
10 Enter the administrator's name and password, and then click [OK].
11 Follow the instructions displayed on the screen to complete the installation.
12 Remove the DVD from the computer.
13 From the [Go] menu, select [Utilities] and then double-click [Printer Setup Utility].
Important!
If [Printer Setup Utility] is already running, close it and open it again.
14 Click [Add].
Note
If the [You have no printers available] dialog box appears, click [Add].
15 For Mac OS 10.3.9, select [Rendezvous].
16 Select the name of your machine whose [Connection] is [Bonjour], and then check that the name of your machine is displayed in [Print Using].
Your machine is displayed with the last six digits of the MAC address in the printer list.
17 For Mac OS X 10.3.9, select the name of your machine and select [OKI] from [Print Model], and then select [OKI CX2731 MFP(PS)] from the list.
18 Click [Add].
19 If the [Installable Options] window appears, click [Continue] unless you have already installed options. If you have installed options, configure each option before clicking [Continue].
20 Check that the name of your machine is displayed in [Printer List], and then close the window.
21 From the [Go] menu, select [Applications] > [TextEdit].
22 Select the [File] menu > [Page setup].
23 Select the name of your machine from [Format for].
24 Check that the name of your machine is displayed correctly under [Format for].
25 Click [OK].
The installation is complete.
Using Bonjour Mac 10.5 and 10.6 (Leopard and Snow Leopard)
Note
The procedure below uses Mac OS X 10.6 as an example. The actual procedure may differ somewhat depending on the operating system.
1 Make sure your machine and Mac are turned on and connected.
2 Insert the DVD supplied with your machine in the computer.
3 Double-click the icon that appears on the desktop.
4 Double-click the [Driver] folder, then the [Printer] folder.
5 Double-click [Installer for MacOSX].
6 Enter the administrator's name and password, and then click [OK].
7 Follow the instructions displayed on the screen to complete the installation.
8 Remove the DVD from the computer.
9 From the Apple menu, select [System Preferences].
10 Click [Print & Fax].
11 Click ([+]
12 Click [Default].
13 Select the name of your machine whose [Kind] is [Bonjour], then check that the name of your machine is displayed in [Print Using].
The name of your machine is displayed with the last six digits of the MAC address in the printer list.
14 Click [Add].
15 If the [Installable Options] window appears, click [Continue] unless you have already installed options. If you have installed options, configure each option before clicking [Continue].
16 Check that your machine appears under [Printers].
17 Check that the name of your machine is displayed in [Kind] and then close [Print & Fax].
The installation is complete.
Note
The name of your machine may not be displayed if the printer driver does not read the PPD file correctly.
If this happens, click [-] to remove your machine from [Print & Fax] and then add it again (go back to step 9).
Configuring the Machine for Network Operation
Functions such as
- Scan To Email
- Scan To Network PC
- Internet Fax
enable you to send scanned data to a computer via the network connection. To use them, you need to set up your machine and the computers to which you want to send scanned data.
Enter the Machine's IP Address on the Setup Form
Note
When using the arrow keys, press the key repetitively to go to the selection.
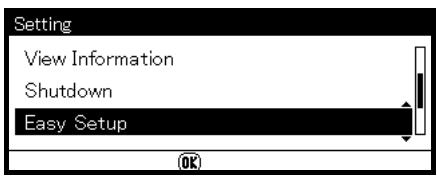
1 Press
2 Use the down arrow key to select [View Information], then press <OK> .
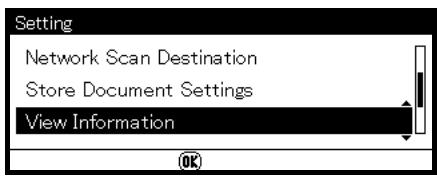
3 Use the down arrow key to select [Network], then press <OK> .
4 Enter the IP address under [IPv4 address] on line A-2 of the Setup Form.
Set Up Scan To Email and Internet Fax
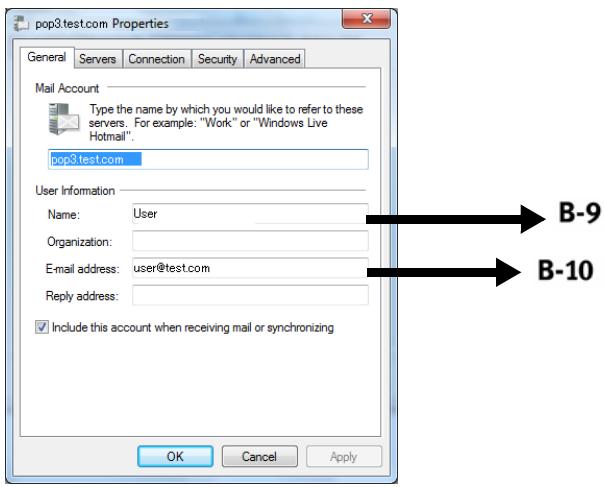
Check the Email Settings of the Computer
- If a network administrator specifies the values such as a mail server account, password and email address for your machine, note them on the Setup Form.
Note
The procedure below uses Windows Live Mail on Windows 7. If you are using a different email software, refer to the manual for that email software.
1 Click [Start] > [Windows Live Mail].
2 Select the [Tools] menu > [Accounts]. If the menu bar is not displayed, click the [Menu] icon and then select [Show menu bar].
3 Select the default mail account and then click [Properties].
4 On the [General] tab, enter the content of [Name] and [E-mail address] on lines B-9 and B-10 of the Setup Form.
5 Click the [Server] tab, and then enter each setting in the corresponding lines of the Setup Form.
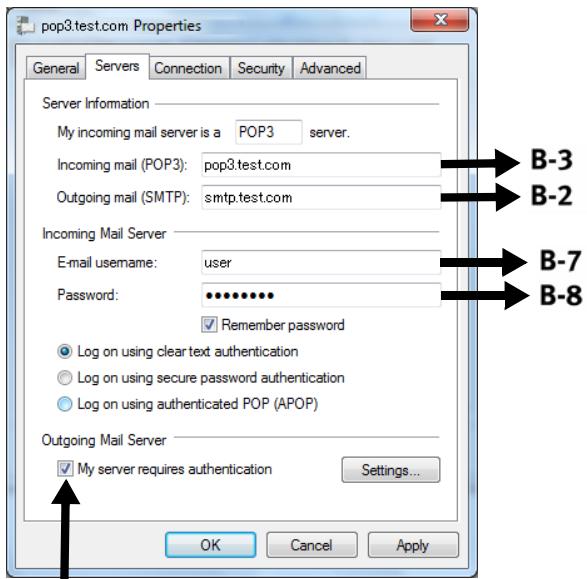
- If the [My server requires authentication] check box is selected, enter "SMTP" on line B-4 of the Setup Form.
- If it is not selected, enter "POP" on line B-4.
6 Select the [My server requires authentication] check box and click [Settings].
7 In the [Outgoing Mail Server] dialog box:
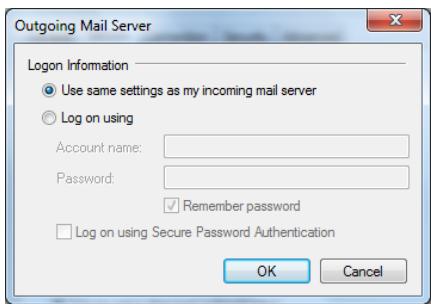
- If [Use the same settings as my incoming mail server] is selected, enter - the value from line B-7 on line B-5 and - the value from line B-8 on line B-6 of the Setup Form.
- If [Log on using] is selected, enter - the [Account name] on line B5 and - The [Password] on line B-6 of the Setup Form.
Set the Email Address for Your Machine
Enter an email address to be used by your machine on line B-1 of the Setup Form.
- If the email address for your machine is specified by the network administrator, enter the email address on line B-1.
- If you are using an internet service provider, obtain an email address for your machine from the provider and then enter the email address on line B-1.
-
If the email address for your machine is neither specified nor obtained, determine the email address according to the value you entered on line B-4 (authentication method):
-
If B-4 is "SMTP", determine an email address and enter it on line B-1.
-
If B-4 is "POP", enter the same email address as B-12 on line B-1.
-
If you want your machine to receive email, you must obtain an email address for your machine from a network administrator or your internet service provider.
Configure The Machine for Scan To Email and to Internet Fax
Set up the machine for Scan To Email and Internet Fax using the information in the Setup Form.
Note
When using the arrow keys, press the key repetitively to go to the selection.
Press the
8 Use the down arrow key to select [Easy Setup] and press <OK> .
9 Enter the administrator password, then use the arrow keys to select [Enter] and press
10 Use the down arrow key to select [Email Setting] and press the right arrow key.
11 Referring to the Setup Form:
a) Server Address: Press the right arrow key, then enter the information from line B-2.
b) Use the arrow keys to select [Enter], then press
c) Your machine's email address: Press the right arrow key, then enter the information from line B-1.
d) Select [Enter], press
e) Authentication Method: Press the right arrow key, then use the down arrow kwy to select the method from line B-4.
f) Continue to follow the on-screen instructions to enter the requested information from section B of the Setup Form.
g) When all the information has been entered, "Email Setting was completed" appears on the display, and the screen returns to the Setup Menu.
12 When the setup menu screen appears, press
The setup for Scan To Email and Internet Fax is complete.
For details on how to use Scan To Email and Internet Fax, see the Basic User Guide on the DVD supplied with your machine.
Set Up Scan To Network PC
The Scan To Network PC function enables you to send and save scanned images to the "shared folder" of a computer on the network. To use this function, register your machine on the computer as a user and create a shared folder, and then create a profile on your machine to register the settings for the computer.
- Before starting the setup, get permission from the network administrator to create a shared
folder on the computer by following the procedure below.
- The CIFS protocol is used in this procedure.
Check the Name of the Computer
Check the name of the computer following the procedure below, and fill it in on line C-1 of the Setup Form.
Windows 7, Windows Server 2008 R2, Windows Server 2008 Windows Vista
Note
The procedure below uses Windows 7 as an example. The display may differ depending on the operating system.
1 Click [Start] > [Control Panel].
2 Select [System and Security]. For Windows Server 2008 and Windows Vista, select [System and Maintenance].
3 Select [See the name of this computer] under [System].
4 Note the name in [Computer name] on line C-1 of the Setup Form.
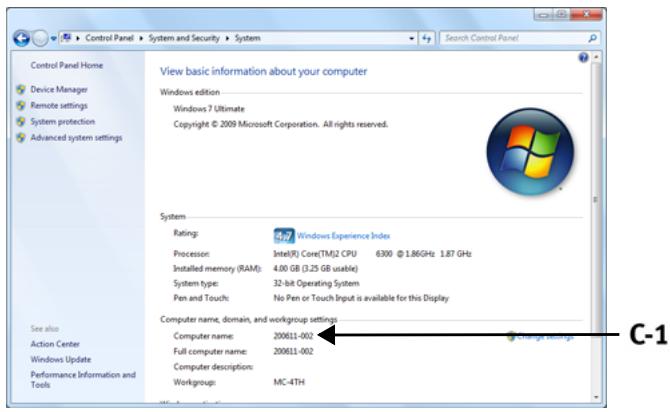
5 Close the window.
Windows Server 2003 Windows XP
1 For Windows Server 2003, click [Start] > [Control Panel] > [System]. For Windows XP, click [start] > [Control Panel] > [Performance and Maintenance] > [System].
2 Select the [Computer Name] tab and then click [Change].
3 Note the name in [Computer name] on line C-1 of the Setup Form.
4 Click [Cancel] to close the window.
Windows 2000
1 Click [Start] > [Settings] > [Control Panel].
2 Double-click [System].
3 Select the [Network Identification] tab and then click [Properties].
4 Note the name in [Computer name] on line C-1 of the Setup Form.
5 Click [Cancel] to close the window.
Determine the Names of the Items Required for Scan To Network PC
Determine the names of the following items and fill them in on lines C-2 to C-6 on the Setup Form.
- User name to log into the destination computer (C-2)
- Password to log into the destination computer (C-3)
- Profile name to register the settings on your machine (C-4)
- Shared folder name on the destination computer (C-5)
- File name of the scanned data (C-6)
Configure the Computer for Scan To Network PC
Register your machine on the computer as a user and then set up a shared folder to which scanned images are sent and saved.
- Windows 7, see below
- Windows Server 2008 R2, see below
- Windows 2008, see below
- Windows Vista, see below
- Windows Server 2003, see page 35
- Windows XP, see page 36
- Windows 2000, see page 37
Important!
If the computer is in a domain, the procedure of adding a user account may be different from the procedure below. Refer to the Microsoft Windows manual.
Windows 7, Windows Server 2008 R2, Windows 2008, Windows Vista
Note
The procedure below uses Windows 7 as an example. The display may differ depending on the operating system.
1 Click [Start] > [Control Panel].
2 Select [Add or remove user accounts].
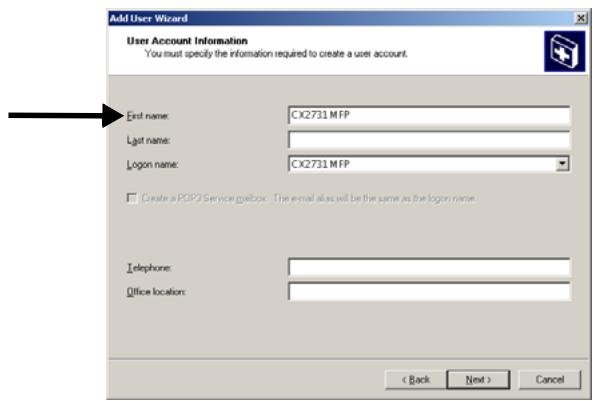
3 Select [Create a new account].
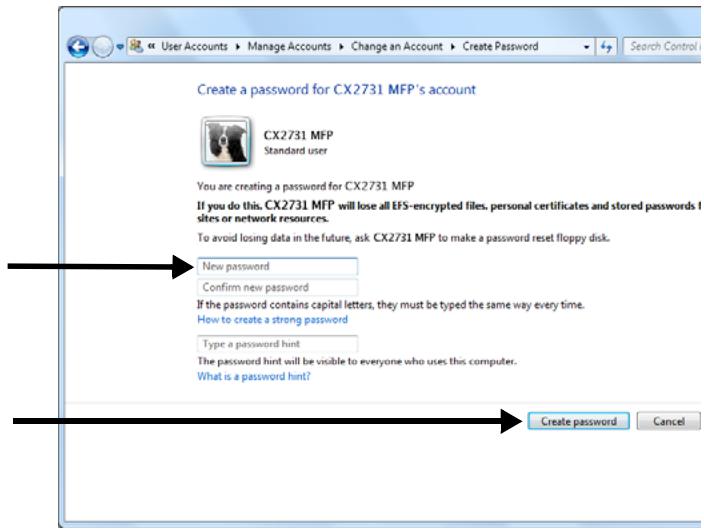
4 Enter the information from line C-2 of the Setup Form in the text box.
5 Ensure that [Standard user] is selected, and then click [Create Account].
6 Click the icon of the user account created in the previous step.
7 Select [Create a password].
8 Enter the information from line C-3 in [New password] and [Confirm for new password], then click [Create password].
9 Close the control panel.
10 Create a new folder on the computer with the name entered on line C-5.
Note
It is recommended to create a folder in the local drive, not on the desktop or [My Documents].
11 Right-click the folder created in step above and select [Properties].
12 Select the [Sharing] tab and then click [Share].
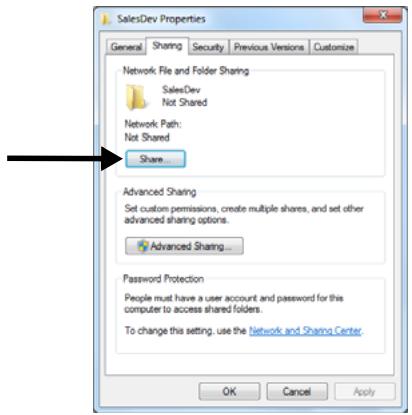
13 Select the user account created in step 5 from the drop down box, and then click [Add].
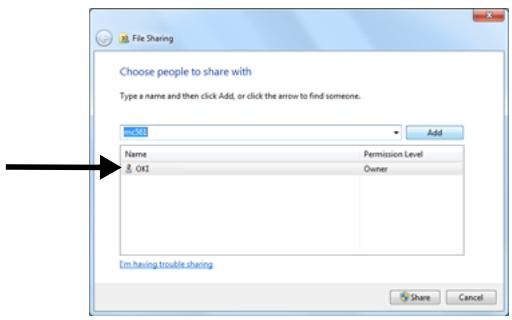
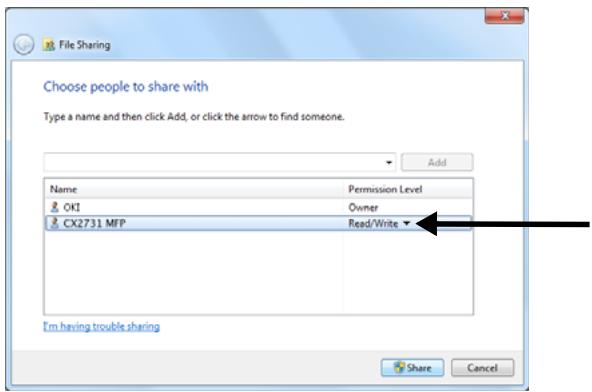
14 Select the user added in the previous step and select the permission level, then click [Share].
15 Click [Done].
16 Click [Advanced Sharing] on the [Sharing] tab.
17 Click [Permissions].
18 Select the user added in step 13 and select the [Allow] check box for [Full Control], then click [OK].
19 Close the folder's property dialog box.
20 Create a profile to complete the setup for Scan To Network PC. See "Profiles for Scan To Network PC" on page 38.
For Windows Server 2003
1 Click [Start] > [Administrative Tools] > [Server Management].
2 Click [Users].
3 Select [Add a user].
4 Enter the value of C-2 in the [First name] text box and then click [Next].
5 Enter the value of C-3 in [Password] and [Confirm password].
6 Select the [Cannot change password] and then click [Next].
7 Click [Finish].
8 Click [Close].
9 Create a new folder on the computer with the name entered on line C-5.
Note
It is recommended to create a folder in the local drive, not on the desktop or [My Documents].
10 Right-click the folder created in the step above, and then select [Sharing and Security].
11 On the [Sharing] tab, select [Share this folder] and then click [Permissions].
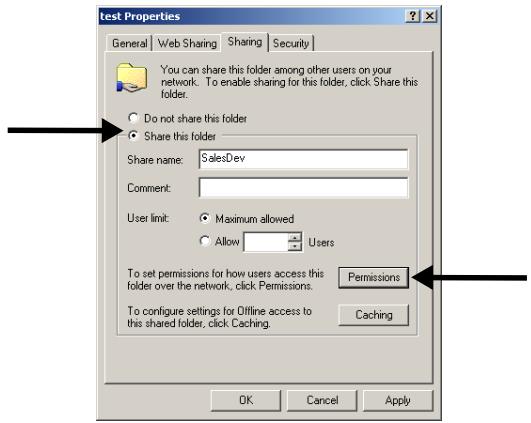
12 Click [Add].
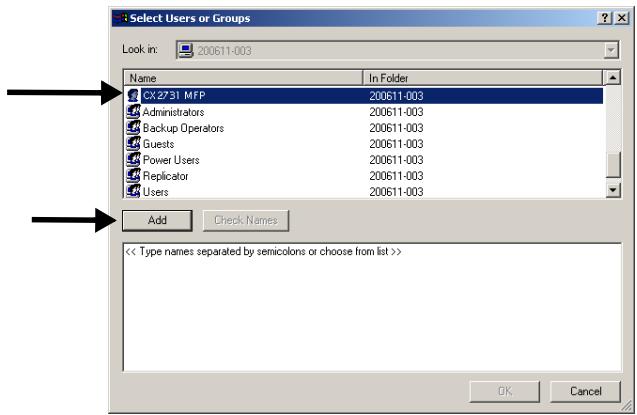
13 Enter the value of C-2 and then click [Check Names].
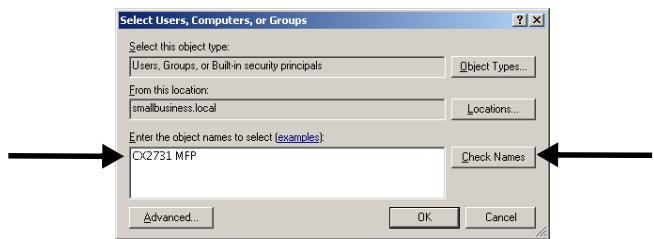
14 Check that the value of C-2 is displayed, and then click [OK].
15 Select the [Allow] check box for [Full Control], and then click [OK].
16 Close the folder's property dialog box.
17 Create a profile to complete the setup for Scan To Network PC. See page 38.
For Windows XP
1 Click [start] > [Control Panel].
2 Double-click [User Accounts].
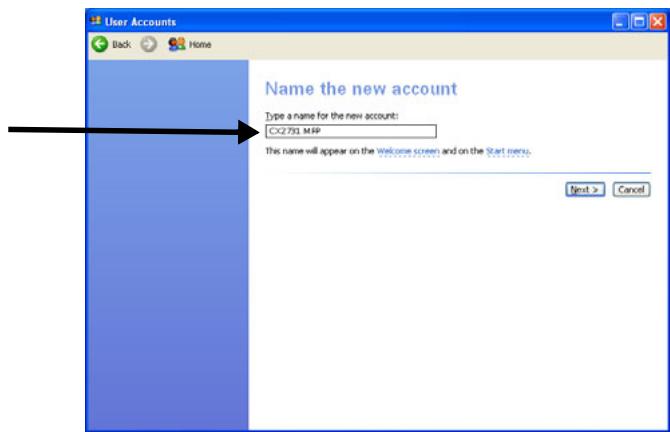
3 Select [Create a new account].
4 Enter the value of C-2 in the text box and click [Next].
5 Select [Limited] and click [Create Account].
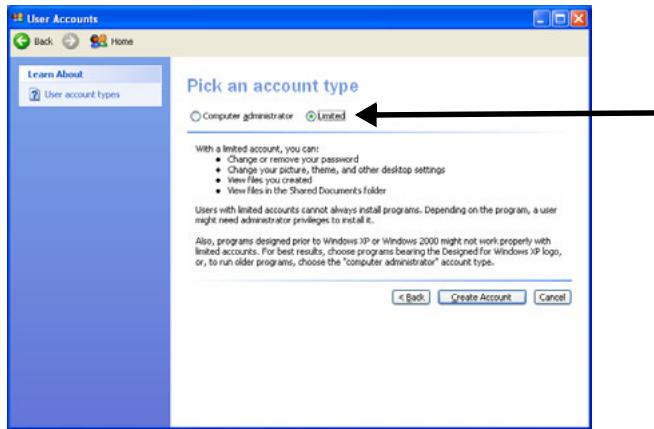
6 Click the icon of the user account created in the step above.
7 Select [Create a password].
8 Enter the value of C-3 in [Type a new password] and [Type the new password again to confirm], and then click [Create Password].
9 Close the control panel.
10 Create a new folder on the computer with the name entered on line C-5.
Note
It is recommended to create a folder in the local drive, not on the desktop or [My Documents].
11 Right-click the folder created in the step above, and then select [Sharing and Security].
12 Click [If you understand the security risks but want to share files without running the wizard, click here].
13 Select [Share this folder] in Windows Firewall, and then click [OK].
14 Select the [Share this folder on the network] and [Allow network users to change my files] check box, and then click [OK].
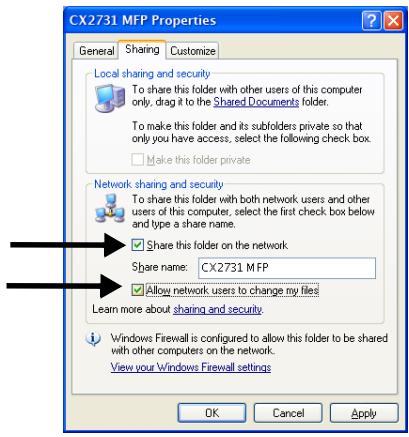
15 Select the [Allow] check box for [Full Control], and then click [OK].
16 Create a profile to complete the setup for Scan To Network PC. See page 38.
For Windows 2000
1 Right-click [My Computer] on the desktop and then select [Manage].
2 In the right window, double-click [System Tools] > [Local Users and Groups]. Right-click [Users] and select [New User].
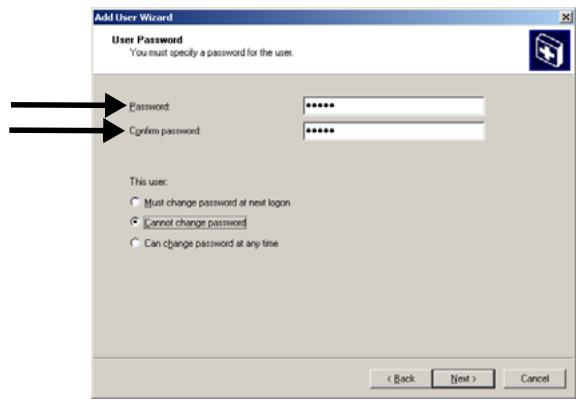
3 Enter the value of C-2 in [User name] and the value of C-3 in [Password] and [Confirm Password].

4 Select [User can not change password] and [Password never expires], and then click [Create].
5 Click [Close] to close the [New User] dialog.
Note
If [User must change password at next logon] is selected, clear it so that you can select [User can not change password] and [Password never expires].
6 Double-click [User] and check that the user created in step 4 is displayed. Close the [Computer Management] window.
7 Create a new folder on the computer with the name entered on line C-5.
Note
It is recommended to create the folder in the local drive, not on the desktop or [My Documents].
8 Right-click the folder created in step 6 and then select [Sharing].
9 Select [Share this folder] and then click [Permissions].

10 Click [Add].
11 Select the user account created in step 4 and then click [Add].
12 Check that the user account is displayed, and then click [OK].
13 Select the [Allow] check box for [Full Control], and then click [OK].
14 Ensure that the icon of the shared folder changes into the icon with a hand, and then close the window.
15 Create a profile to complete the setup for Scan To Network PC. See "Profiles for Scan To Network PC" on page 38.
Profiles for Scan To Network PC
Register the information you configured on the computer as a profile. This is necessary when you perform Scan To Network PC with the computer.
Creating a Profile
Note
When using the arrow keys, press the key repetitively to go to the selection.
1 Press the
2 Use the down arrow key to select [Profile], then press
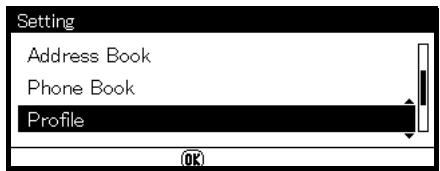
3 Use the down arrow key to select the profile number you want to register, then press <0K> .
4 Use the down arrow key to select [Edit], then press OK>.
5 Use the down arrow key to select the profile number you want to register, then press
6 Use the down arrow key to select [Profile Name], then press
7 Enter the information from line C-4 of the Setup Form.
8 Use the arrow keys to select [Enter], then press
9 Use the down arrow key to select [Target URL], then press <OK> .
10 Enter the value from lines C-1 and C-5 of the Setup Form as "\C-1\C-5"; e.g., \PC1\SalesDev.
11 Use the arrow keys to select [Enter], then press
12 Use the down arrow key to select [UserID], then press <0K> .
13 Enter the information from line C-2 of the Setup Form. If domain management is done, enter "C-2@domain name".
14 Use the arrow keys to select [Enter], then press
15 Use the down arrow key to select [Password], then press
16 Enter the information from line C-3 of the Setup Form.
17 Use the arrow keys to select [Enter], then press
18 Use the down arrow key to select [File Name] and then press <OK> .
19 Enter the information on line C-6 on the Setup Form. You can enter up to 64 characters. By adding "#n" to the end of the file name, a serial number is automatically assigned to the end of the name of sent files.
By adding "#d" to the end of the file name, a date is automatically assigned to the end of the name of sent files.
20 Use the arrow keys to select [Enter], then press
21 Configure other items if necessary.
22 Press <OK> to register the settings.
The setup for Scan To Network PC is complete.
For details how to use Scan To Network PC, see the online Basic User Guide on the DVD supplied with your machine.
Modifying a Profile
Note
When using the arrow keys, press the key repetitively to go to the selection.
1 Press the
2 Use the down arrow key to select [Profile] and then press
3 Use the down arrow key to select [Edit] and then press
4 Use the down arrow key to select the profile you want to modify, then press < OK> .
5 Use the down arrow key to select the item you want to modify, then press < OK> .
6 Modify the item.
7 Use the arrow keys to select [Enter], then press
8 If you want to modify more than one item, repeat steps 5-7.
9 Press <0K> to register the settings.
Deleting a Profile
Note
When using the arrow keys, press the key repetitively to go to the selection.
1 Press the
2 Use the down arrow key to select [Profile], then press <OK> .
3 Use the down arrow key to select [Delete], then press <0K> .
4 Use the down arrow key to select the profile you want to delete, then press < OK> .
5 Use the left arrow key to select [Yes] on the confirmation message.
6 If you want to delete more than one profile, repeat steps 4 and 5.
7 Press
Setting Up User Authentication and Access Control
General Information
These functions are used to limit access to the machine. This can help you save toner, paper and wear and tear on the machine.
User Authentication and Access Control are password protected and must be set up by the System Administrator.
The following conditions are required to enable these functions:
- The machine must be connected to a network.
- For networks with only Windows systems, the Configuration Tool utility must be installed on a computer on the network.
- For Macintosh systems, the Job Accounting Client utility must be installed
User Authentication
User Authentication allows the System Administrator to limit use of the machine to people who have been assigned either
- a PIN (personal identification number) or
- a user name and password.
This limitation applies to both walk-up use and using the machine from a computer.
You can assign up to 100 PINs with or without User Name and Password.
Access Control
Access Control takes it a step further by allowing the System Administrator to limit the type of functions each person authorized to use the machine can perform.
Access control can be applied to the following functions:
- Copying (Color/Mono)
- Printing (Color/Mono)
- Printing from USB Memory
- Scanning to e-mail
- Scanning to network PC
- Scanning to USB memory
- Faxing
- Faxing via PC
- Internet Faxing
Before You Start
There are several ways to set up access control for your machine:
using software
Using the web page
through the control panel
This guide includes instructions for configuring the machine using software.
For more information on using the web page or the control panel, see the Advanced User's Guide at www.my.okidata.com.
Windows Systems
Loading the Configuration Tool
In order to set up User Authentication and Access Control for Windows, you need to load the Configuration Utility on your computer.
1 Make sure your computer is turned on and connected to the machine, then place the DVD supplied with your machine in the CD/DVD drive.
The DVD auto runs. If it does not, double click the OKI setup file on the DVD.
2 Select your language from the drop-down list then click [Next].
3 Read the License Agreement, then click [I Agree].
4 Click [MFP Software].
5 Click [Install Configuration Tool].
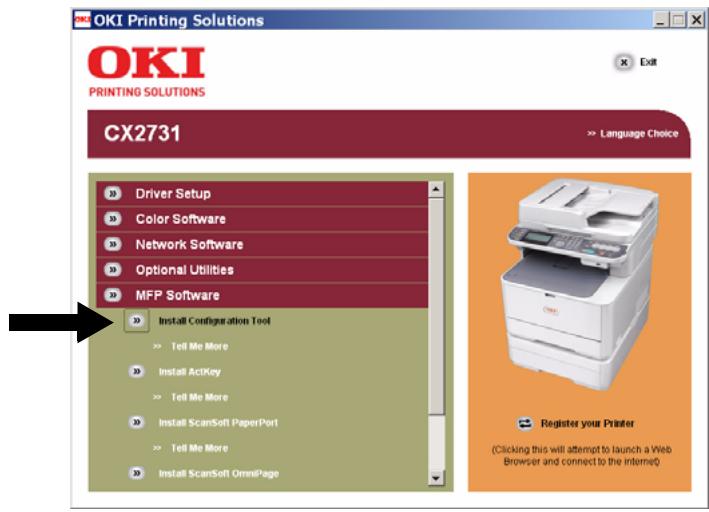
6 Click [Install] and wait for the software to install.
7 Select your machine model, then click [Next].
8 Click [Close].
Using the Configuration Tool to Set Up User Authentication/ Access Control
1 Make sure the computer and the machine are connected through the network and that both are turned on.
2 Click [Start] > [Programs] > [Okidata] > [Configuration Tool] > [Configuration Too].
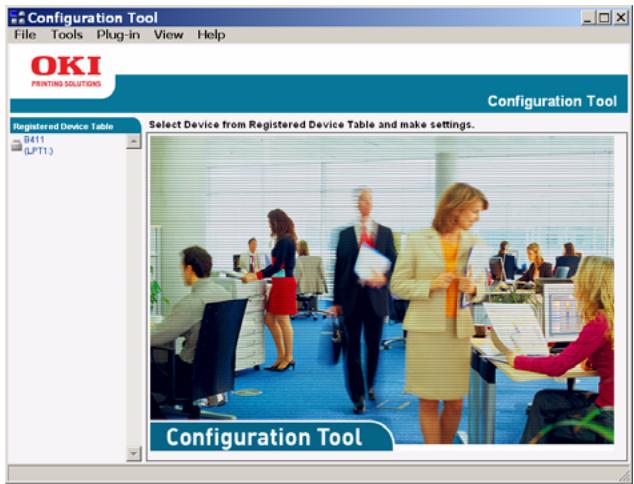
3 Click [Register Device] in the Tools drop-down list.
4 Double click your machine model name. The name appears in the [Registered Device Table] on the left side of the screen.
5 Double click your machine in the list, then select the [User Setting] tab.
6 Click [PIN Manager], then enter the administrator password and click
7 To enter a new PIN number and set it up with the desired access control, click the PIN icon. To enter a new user with User ID, Password and PIN number, click the New(User) icon.
8 Repeat the above step for each user on the network.
9 When done, click the [Save to Device] icon. The records you have entered are saved to the machine.
Mac Systems
In order to set up User Authentication and Access Control for Mac systems, see the Advanced User Guide at www.my.okidata.com.
Authentication by PIN
Enabling PIN Access Control
Once you have finished setting up PINs and/or User IDs/Passwords, you must enter the machine menu and enable Access Control.
Access Control is password protected: you must know the Admin Password to proceed.
Note
To scroll through the various selections on the display, press the down (or up) arrow key repetitively.
1 Press
2 Use the up arrow key to select [Admin Setup], then press
3 Enter your administrator password: use the arrow keys to select the digits of the password, pressing <OK> between digits.
4 When done entering your password, use the arrow keys to select [Enter] on the display, then press OK>.
5 Use the up arrow key to select [Management], then press <OK> .
6 Use the down arrow key to select [System Setup], then press
7 Make sure that [Access Control] is selected, then press
8 Use the up arrow key to select PIN as the method of Access Control, then press
9 Use the left arrow key to back out to the main screen
Access Control is enabled.
Walk Up Operation
Logging In
General Users
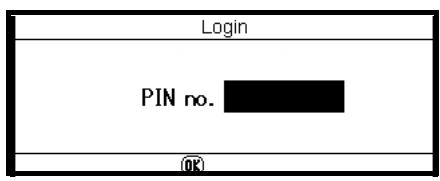
1 Enter your assigned PIN using the ten-key pad on the control panel.
2 Press <OK> .
The main screen appears.
Administrator
1 Enter "000000" using the ten-key pad on the control panel, then press
- The PIN of the administrator is "000000". You cannot change this value.
2 When the Admin Password screen appears, enter the administrator password: use the arrow keys to select the digits of the password, pressing <OK> after highlighting each digit.
3 Use the arrow keys to select [Enter] on the display, then press <OK> . The main screen appears.
Logging Out
When you have finished using the machine, be sure to log out.
1 Press the left arrow key until the main screen appears.
2 Press
The screen returns to the PIN entry prompt.
Note
After a certain period of time, the machine automatically logs out users.
Setting Up Operation From a Computer with Authentication by PIN
First, make sure the appropriate machine driver(s) have been installed on the computer using the DVD.
Second, install Job Accounting (client) software on the computer. To do this, place the DVD supplied with the machine in the computer drive and follow the screen prompts to download the Job Accounting software from the internet.
Note
The authentication type specified on the computer overrides the one specified on the machine.
Setting Up Windows Computers for Printing
Note
This procedure use Windows 7 as an example. The procedures and menus may differ depending on the operating system you use.
1 Click [Start] > [All Programs] > [Okidata] > [Print Job Accounting Client] > [Change Job Accounting Mode].
2 On the [User Account Control] window, click [Yes].
3 Select the printer driver you want in [Driver].
4 Select the [Tab] check box and then click [Change].
5 Click [OK].
6 From the [File] menu, select [Close].
7 Click [Start] and select [Devices and Printers].
- For Windows Server 2008, click [Start] and select [Control Panel] > [Printers].
- For Windows Vista, click [Start] and select [Control Panel] > [Printer].
- For Windows Server 2003, click [Start] > [Printers and Faxes].
- For Windows XP, click [start] > [Printers and Faxes].
- For Windows 2000, click [Start] > [Settings] > [Printers].
8 For each driver installed on the computer:
$$ ^ {*} X X X = P C L, P S, o r F A X $$
a) Right-click the OKI CX2731 MFP icon and select [Printer properties] > [OKI CX2731 MFP (XXX*)].
b) Select the [Job Accounting] tab.
c) Enter the user name in [UserID] and the PIN in [Job Account ID].
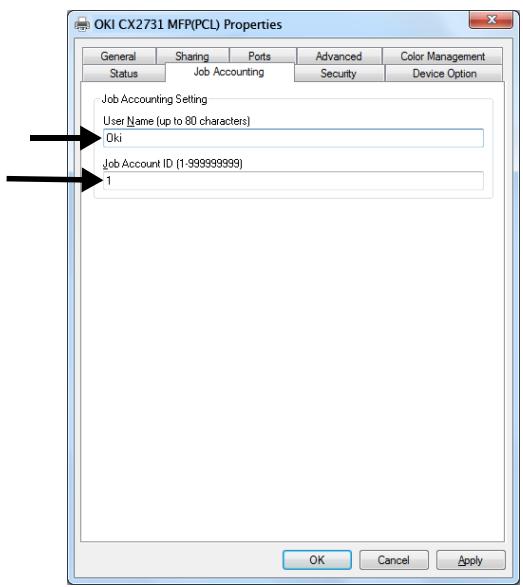
d) Click [OK].
Printing from Windows
1 Open the file you wish to print.
2 Select [Print] from the [File] menu.
3 Select the printer driver, then click [Print].
Setting Up Mac Computers for Printing
Note
This procedure uses Mac OS X 10.6 (Snow Leopard) as an example. The procedures and menus may differ depending on the operating system you use.
1 Insert the DVD supplied with your machine.

2 Double-click the OKI icon on the desktop.
3 Double-click [Utility] > [JA Client] > [Print JobAccounting].
4 Click [New].
5 Enter the user name beside [UserName] and the PIN beside [JobAccountingID].
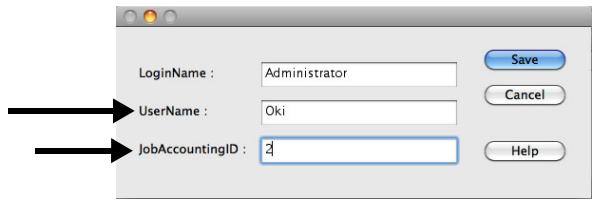
6 Click [Save].
7 Click [save].
8 If prompted, enter the user password and then click [OK].
Printing from a Mac
1 Open the file you want to print.
2 From the [File] menu, select [Print].
3 Select your machine and then click [Print].
Setting Up Windows Computers for Faxing
Note
This procedure uses Windows 7 as an example. The procedures and menus may differ depending on the operating system you use.
1 Click [Start] > [All Programs] > [Okidata] > [Print Job Accounting Client] > [Change Job Accounting Mode]
2 On the [User Account Control] window, click [Yes].
3 Select the fax driver in [Driver].
4 Select the [Tab] check box and then click [Change].
5 Click [OK].
6 From the [File] menu, select [Close].
7 Click [Start] and select [Devices and Printers].
- For Windows Server 2008, click [Start] and select [Control Panel] > [Printers].
- For Windows Vista, click [Start] and select [Control Panel] > [Printer].
- For Windows Server 2003, click [Start] and select [Printers and Faxes].
- For Windows XP, click [start] and select [Printers and Faxes].
- For Windows 2000, click [Start] and select [Settings] > [Printers].
8 Right-click the OKI CX2731 MFP icon and select [Printer properties] > [OKI CX2731 MFP (FAX)].
9 Select the [Job Accounting] tab.
10 Enter the user name in [UserID] and the PIN in [Job Account ID].
11 Click [OK].
Faxing from Windows
1 Open the file you want to fax.
2 From the [File] menu, select [Print].
3 Select the fax driver, then click [Print].
Authentication by User Name and Password
Enabling User Name/Password Access Control
Access Control is password protected: you must know the Admin Password to proceed.
Note
To scroll through the various selections on the display, press the down (or up) arrow key repetitively.
1 Press
2 Use the up arrow key to select [Admin Setup], then press
3 Enter your administrator password: use the arrow keys to select the digits of the password, pressing
4 When done entering your password, use the arrow keys to select [Enter] on the display, then press OK>.
5 Use the up arrow key to select [Management], then press <OK> .
6 Use the down arrow key to select [System Setup], then press <OK> .
7 Make sure that [Access Control] is selected, then press <OK> .
8 Use the up arrow key to select User/Password as the method of Access Control, then press
9 Use the left arrow key to back out to the main screen
Access Control is enabled.
Operation from a Computer
Note
The authentication type specified on the computer overrides the one specified on the machine.
Printing from Windows
Note
This procedure uses Windows 7 and NotePad as an example. The procedures and menus may differ depending on the operating system you use.
1 Open the file you want to print.
2 From the [File] menu, select [Print].
3 Select the printer driver you want in [Select Printer] and click [Preferences].
4 Select the [Job Options] tab.
5 Click [User Auth].
6 Select the [Use User Authentication] check box.
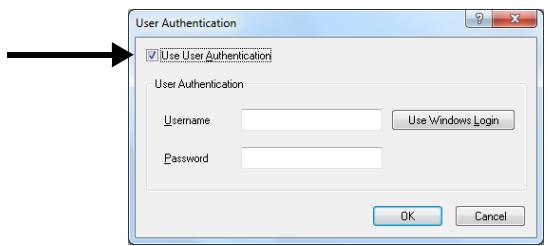
7 Enter the user name in [Username] and the password in [Password]. Clicking [Use Windows Login] automatically enters your login name on Windows.
8 Click [OK].
9 Click [OK] and then click [Print].
Printing from a Mac
Note
This procedure uses Mac OS X 10.6 as an example. The procedures and menus may differ depending on the operating system you use.
1 Open the file you want to print.
2 From the [File] menu, select [Print].
3 Select your machine's printer driver.
4 Select [UserAuth] from the panel menu under the [Printer] and [Presets] menus.
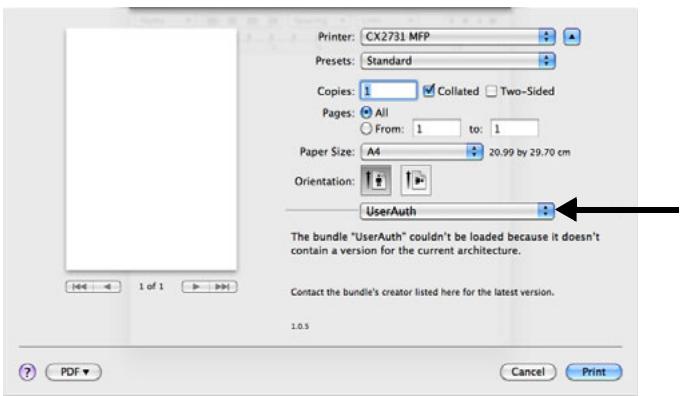
5 Select the [Use User Auth] check box on the [UserAuth] panel.
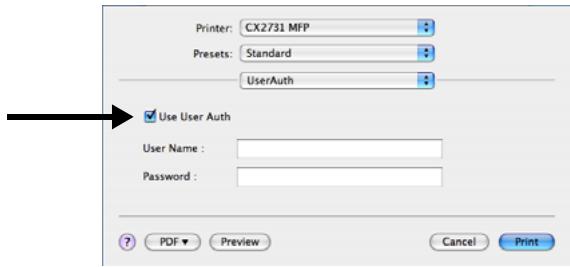
6 Enter the user name in [UserID] and the password in [Password].
7 Click [Print].
Faxing From Windows
Note
This procedure uses Windows 7 and NotePad as an example. The procedures and menus may differ depending on the operating system you use.
1 Open the file you want to fax.
2 From the [File] menu, select [Print].
3 Select your machine (fax driver) in [Select Printer] and click [Preferences].
4 On the [Setup] tab, click [User Auth].
5 Select the [Use User Authentication] check box.
6 Enter the user name in [Username] and the password in [Password].
Note
Clicking [Use Windows Login] automatically enters your login name on Windows.
7 Click [OK].
8 Click [OK] and then click [Print].
Configuring the Machine for Faxing
Basic Settings for Faxing
You must configure the following settings before you transmit faxes.
Connecting a Telephone Line
Important!
Use only the telephone cable supplied with your machine. Using a different cable may cause a malfunction.
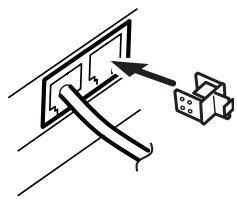
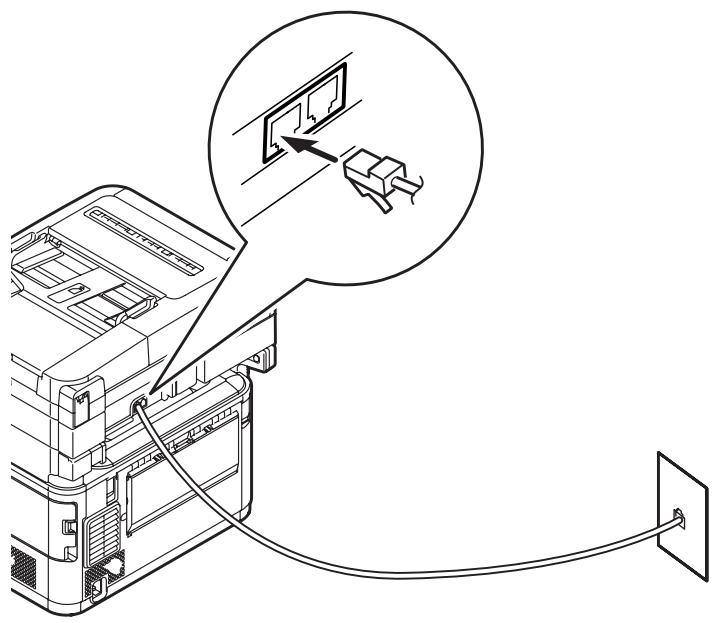
Connecting for Fax Only
1 Plug one end of the supplied telephone cable into the LINE connection on the back of your machine and the other end into an active telephone jack.
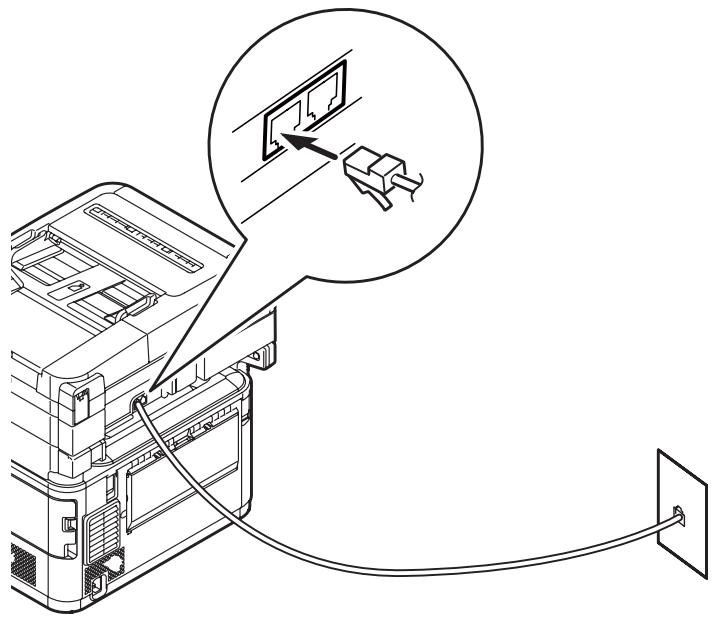
2 Attach the supplied connector cover to the TEL connection on the back of your machine.
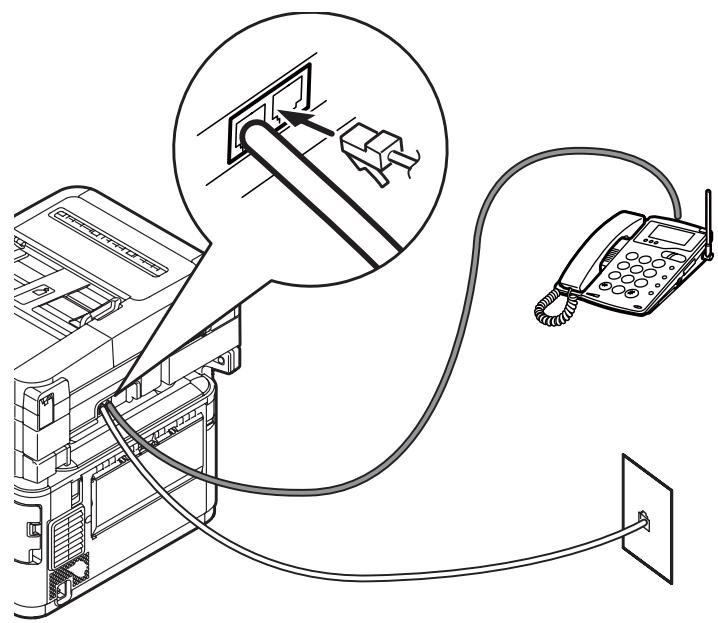
Connecting for Fax and Telephone
1 Plug one end of the supplied telephone cable into the LINE connection on the back of your machine and the other end into an active telephone jack.
2 Plug the telephone's cable into the TEL connection on the back of your machine.
Specifying Current Time and Sender Information
Note
You can set up the date and time automatically using the Webpage. For details, refer to the Advanced User's Guide at www.my.okidata.com.
Note
When using the arrow keys, press the key repetitively to go to the selection.
1 Press
2 Use the down arrow key to select [Easy Setup], then press <0K> .
3 If prompted, entire the Admin Password, then use the arrow keys to highlight [Enter] and press
4 With [Date/Time Setting] highlighted, press the right arrow key.
5 Use the down arrow key to select the appropriate time zone and then press the right arrow key.
You can select the time zone between [-12:00] and [+13:00] in 15 minute increments.
6 Use the down arrow key to select [Not Summer Time] or [Now Summer Time] for daylight saving, then press the right arrow key.
7 Use the down arrow key to select [Manual], then press the right arrow key.
8 Use the up and down arrow keys to set the Year, Month and Day, pressing the right arrow key to move to each successive block. When done press <OK> .
9 Use the up and down arrow keys to set the current time (Hour, Minute, Seconds), pressing the right arrow key to move to each successive block. When done press <OK> . "Date/Time Setting was completed" appears on the display, then the Setup Menu screen appears.
**Specifying Sender Information**
Specify the fax number and sender name for your machine. The sender ID is printed on the top edge of the fax when it is printed by the recipient.
10 Press the down arrow key to select [Fax Setting], then press the right arrow key.
11 Press < 0K> to select [FAX number].
12 Use the keypad to enter the fax number of your machine.
13 With [Enter] highlighted, press OK>.
14 Press the right arrow to select [Sender ID].
15 Use the screen keypad to enter your ID, up to 22 digits. When the ID is entered, use the arrow keys to highlight [Enter], then press
"Fax Setting was completed" appears on the display, then the Setup Menu screen appears.
16 Press <OK> to complete the setup, then use the left arrow key to back out to the main screen.
USB Installation
USB Connection
1 Prepare a USB cable.
A USB cable is not supplied with your machine.
Use a USB 2.0 Hi-Speed cable for a USB 2.0 Hi-Speed connection.
2 Turn off your machine:
a) Press
b) Press the down arrow key repetitively to scroll to [Shutdown], then press <OK> .
c) When the confirmation message appears, press the right arrow key to select [Yes], then press OK>.
d) When the screen prompts you to turn off the power switch, turn the machine off.
3 Turn off the computer.
4 Depress the lock button (1) on the right side of the machine and remove the access cover (2).
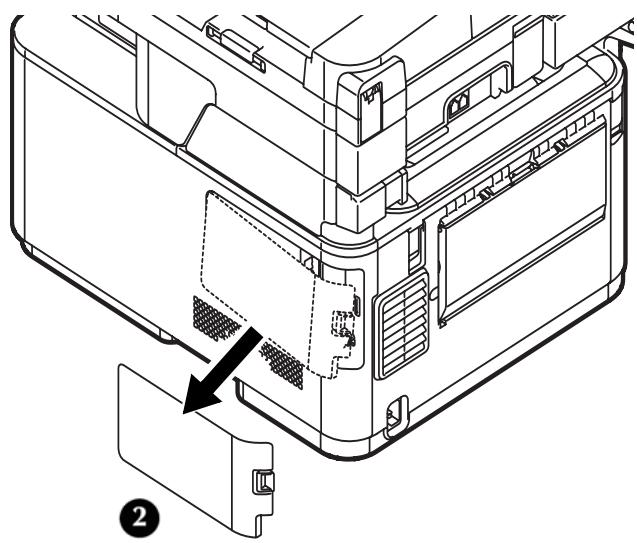
CAUTION!
Do not plug the USB cable into the network connection. Doing so may cause a malfunction.
5 Plug one end of the USB cable into the USB connection on the machine.

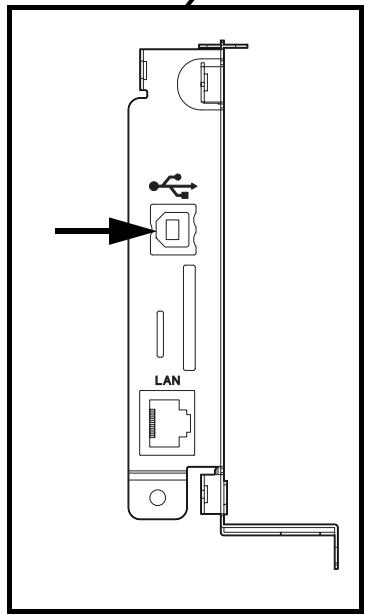
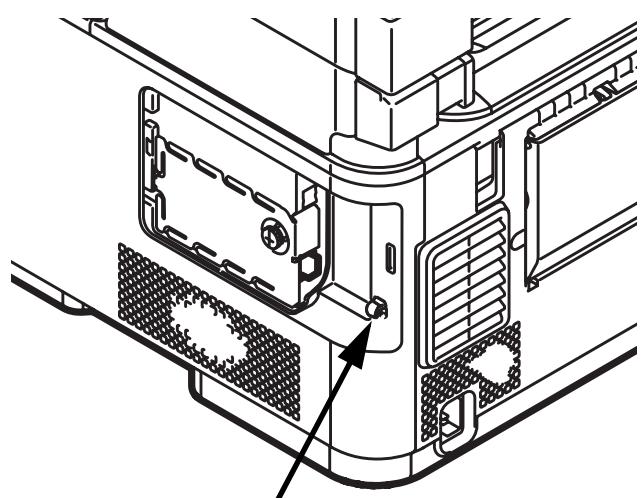
6 Secure the USB cable under the hook (1) on the machine.
1
7 Fit the tabs on the side cover into the slots (1) on the machine housing and snap it back into place.

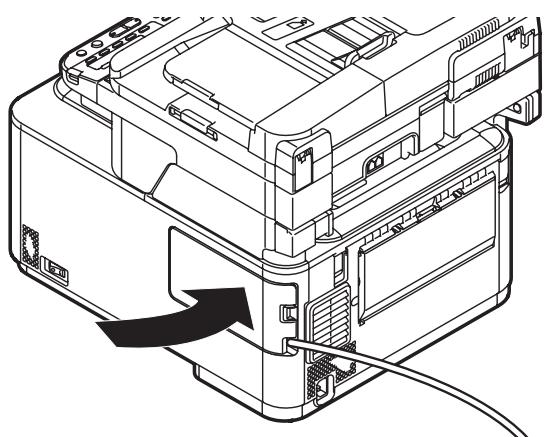
For Windows installation, go to page 50.
For Macintosh installation, go to page 51.
USB: Installing a Printer Driver for Windows
- You must be logged in as an administrator to complete this procedure.
Note
The procedure below uses Windows 7 as an example. The display may differ depending on the operating system.
1 Turn off your machine:
a) Press <SETTING> on the control panel.
b) Press the down arrow key repetitively to select [Shutdown], then press
c) When the confirmation message appears, press the right arrow key to select [Yes], then press OK>.
d) When the screen prompts you to turn off the power switch, turn the machine off.
2 Place the DVD supplied with your machine in the CD/DVD drive.
The DVD auto runs. If it does not, double click the OKI setup file in the DVD directory.
3 Select your language from the drop-down list then click [Next].
4 Read the License Agreement, then click [I Agree].
5 Under Driver Setup, click [Install Drivers (CX2731 MFP)].
Note
If the [User Account Control] dialog box appears, click [Yes]. (For Windows Vista, click [Continue]).
6 Read and observe the instructions, then click [Next].
Installation starts.
-
If the [Windows Security] dialog box appears, click [Install this driver software anyway].
-
For Windows Server 2003 and Windows XP, if the [Install Hardware] dialog box appears, click [Continue].
- For Windows 2000, if the [Digital Signature Not Found] dialog box appears, click [Yes].
7 When the instruction prompting you to do so appears, plug the USB cable into the computer and turn on your machine.
8 Click [Next].
9 Follow the on-screen instructions to complete the installation.
10 When the [Complete] screen appears, click [Finish].
Check the Installation
1 Click [Start] > [Devices and Printers]. For Windows Server 2008 and Windows Vista, click [Start] > [Control Panel] > [Printer].
For Windows Server 2003 and Windows XP, click [Start] > [Printers and Faxes].
For Windows 2000, click [Start] > [Settings] > [Printers].
2 Check that the OKI CX2731 MFP icon is displayed.
For Windows 7, if you have installed multiple drivers, right-click the OKI CX2731 MFP icon and select one of the menu item, and then
check that all the printer drivers installed are displayed in the submenu.
For other Windows operating systems, check that the icon representing each driver is displayed.
3 Remove the DVD from the computer.
The installation is complete.
Note
[Easy Installation (Local)] is an easy setup method. If you want to select a driver to install manually, select [Install printer driver completely] and then follow the instruction displayed on the screen.
USB: Installing a Printer Driver for Mac
Important!
- Only the PS printer driver is available for the Mac.
- Disable the anti-virus software before starting this procedure.
For Mac OS X 10.3.9 to 10.4.11
Note
The procedure below uses Mac OS X 10.4.11 as an example.
1 Turn off your machine:
a) Press
b) Press the down arrow key repetitively to scroll to [Shutdown], then press <OK> .
c) When the confirmation message appears, press the right arrow key to select [Yes], then press OK>.
d) When the screen prompts you to turn off the power switch, turn the machine off.
2 Turn off the computer.
3 Plug the other end of the USB cable into the computer's USB interface connector.

4 Turn the Mac on.
5 Insert the DVD supplied with your machine into the computer.
6 Double-click the [OKI] icon > [Driver] folder > [Printer] folder.
7 Double-click [Installer for Mac OS X].
8 Enter the administrator's name and password, and then click [OK].
9 Follow the on-screen instructions to complete the installation.
10 Remove the Driver/Manual DVD from the computer.
11 From the [Go] menu, select [Applications] > [Utilities], and then double-click [Printer Setup Utility].
Important!
If [Printer Setup Utility] is already running, close it and open it again.
12 Click [Add].
If the [You have no printers available] dialog box appears, click [Add].
Note
If the name of your machine is already displayed, select it and click [Delete], and then click [Add].
13 Select the name of your machine designated USB, then check that the name of your machine is displayed in [Print Using].
14 Click [Add].
15 If the [Installable Options] window is displayed, click [Continue]. If you have installed options before the driver installation, configure each item and then click [Continue].
16 Check that the name of your machine is displayed in [Printer List], and then close the window.
The installation is complete.
For Mac OS X 10.5 and 10.6
Note
The procedure below uses Mac OS X 10.6 (Snow Leopard) as an example.
1 Make sure that your machine and the computer are turned on and connected.
2 Plug the other end of the USB cable into the computer's USB interface connector.
3 Insert the DVD supplied with the machine into the computer.

4 Double-click the [OKI] icon > [Driver] folder > [Printer] folder.
5 Double-click [Installer for MacOSX].
6 Enter the administrator's name and password, and then click [OK]. Follow the on-screen instructions to complete the installation.
7 Remove the Driver/Manual DVD from the computer.
8 From the Apple menu, select [System Preferences].
9 Click [Print & Fax].
10 Click ([+]
11 Select the name of your machine designated USB, and then check that the name of your machine is displayed in [Print Using].
12 Click [Add].
13 If the [Installable Options] window is displayed, click [Continue]. If you have installed options before the driver installation, configure each item and then click [Continue].
14 Check that the name of your machine is displayed in the printer list, and then close [Print & Fax].
The installation is complete.
Setup Form
| No. | Item | Example | Your Value |
| A: Basic Setup Information | |||
| A-1 | Administrator password for your machine | aaaaa (the default) | |
| A-2 | IP address of your machine | 192.168.0.2 | |
| B: Scan To Email and to Internet Fax | |||
| B-1 | Email address for your machine (up to 80 characters) | CX2731MFP@test.com | |
| B-2 | SMTP server address | smtp.test.com | |
| B-3 | POP3 server address | pop3.test.com | |
| B-4 | Authentication method | SMTP | |
| B-5 | SMTP user ID | OKICX2731MFP | |
| B-6 | SMTP password | okicx2731mfp | |
| B-7 | POP user ID | user | |
| B-8 | POP password | okicx2731mfp | |
| B-9 | Name of the email destination | User | |
| B-10 | Email address of the email destination | user@test.com | |
| C: Scan To Network PC | |||
| C-1 | Name of the destination computer | PC1 | |
| C-2 | User name to log into the destination computer (up to 32 characters) | cx2731mfp | |
| C-3 | Password to log into the destination computer (up to 32 characters) | cx2731mfp | |
| C-4 | Profile name to register the settings (up to 16 characters) | Sales | |
| C-5 | Shared folder name on the destination computer (up to 64 characters) | SalesDev | |
| C-6 | File name of the scanned data (up to 64 characters) | ScanData | |
Format de support standard
Remarque
El",[2] El,[3] El,[4] El,[5] El,[6] El,[7] El,[8] El,[9] El,[10] El,[11] El,[12] El,[13] El,[14] El,[15] El,[16] El,[17] El,[18] El,[19] El,[20] El,[21] El,[22] El,[23] El,[24] El,[25] El,[26] El,[27] El,[28] El,[29] El,[30] El,[31] El,[32] El,[33] El,[34] El,[35] El,[36] El,[37] El,[38] El,[39] El,[40] El,[41] El,[42] El,[43] El,[44] El,[45] El,[46] El,[47] El,[48] El,[49] El,[50] El,[51] El,[52] El,[53] El,[54] El,[55] El,[56] El,[57] El,[58] El,[59] El,[60]
Network Scale (Escalade red):
Pequeña
Para建立起 [Network Scale] (Escalade red):
$$ * X X X = P C L, P S \circ F A X $$
- Hardware Installation. 7
- Network Installation:
- Making Connections and Installing
- Printer Drivers 20
- Configuring the Machine for Network
- Operation 31
- Setting Up User Authentication and
- Access Control 40
- Configuring the Machine for Faxing. 46
- USB Installation 48
- Note
- Prepare a Location
- Environmental Requirements
- Space Requirements
- Power Requirements
- Important!
- Unpack the Machine
- Caution!
- Turning the Machine On
- Turning The Machine Off
- Power Save Mode and Sleep Mode
- Power Save Key
- The Control Panel
- Load Print Media
- Available Trays
- Loading Paper: Tray 1 and Optional Tray 2
- Tray 1
- Tray 2 (optional)
- Loading Paper in the MP Tray
- Printing the Configuration Report
- Configuring the Tray Settings
- Standard Size Print Media
- Custom Size Print Media
- Print Exits
- Using the Top Exit (Face Down Stacker)
- Using the Rear Exit (Face Up Stacker)
- Loading Documents for Scanning
- Document Requirements
- Loading Documents on the Auto Document Feeder (ADF)
- Loading Documents on the Document Glass
- Printer Drivers
- Compatible Operating Systems
- Windows
- Macintosh
- Make the Network Connection
- Locate the Setup Form
- Set the Administrative Password
- Set Up the Network for Windows Systems
- Set Up the IP Address, if Necessary
- General Information
- For the computer
- For the machine
- Set Up Your Computer's IP Address
- Set Up Your Machine's IP Address
- Install the Printer Driver(s) for Windows
- Notes
- Set up the Network for Macintosh Systems
- Install the Printer Driver for Mac
- Using Ethertalk,
- Using Ethertalk Mac 10.5 (Leopard)
- Using Bonjour (Rendezvous) Mac 10.3.9 to 10.4.11
- Using Bonjour Mac 10.5 and 10.6 (Leopard and Snow Leopard)
- Configuring the Machine for Network Operation
- Enter the Machine's IP Address on the Setup Form
- Set Up Scan To Email and Internet Fax
- Check the Email Settings of the Computer
- Set the Email Address for Your Machine
- Configure The Machine for Scan To Email and to Internet Fax
- Set Up Scan To Network PC
- Check the Name of the Computer
- Windows Server 2003 Windows XP
- Windows 2000
- Determine the Names of the Items Required for Scan To Network PC
- Configure the Computer for Scan To Network PC
- Windows 7, Windows Server 2008 R2, Windows 2008, Windows Vista
- For Windows Server 2003
- For Windows XP
- For Windows 2000
- Profiles for Scan To Network PC
- Creating a Profile
- Modifying a Profile
- Deleting a Profile
- Setting Up User Authentication and Access Control
- User Authentication
- Access Control
- Before You Start
- Windows Systems
- Loading the Configuration Tool
- Using the Configuration Tool to Set Up User Authentication/ Access Control
- Mac Systems
- Authentication by PIN
- Enabling PIN Access Control
- Walk Up Operation
- Logging In
- General Users
- Administrator
- Logging Out
- Setting Up Operation From a Computer with Authentication by PIN
- Setting Up Windows Computers for Printing
- Printing from Windows
- Setting Up Mac Computers for Printing
- Printing from a Mac
- Setting Up Windows Computers for Faxing
- Faxing from Windows
- Authentication by User Name and Password
- Enabling User Name/Password Access Control
- Operation from a Computer
- Configuring the Machine for Faxing
- Basic Settings for Faxing
- Connecting a Telephone Line
- Connecting for Fax Only
- Connecting for Fax and Telephone
- Specifying Current Time and Sender Information
- **Specifying Sender Information**
- USB Installation
- USB Connection
- USB: Installing a Printer Driver for Windows
- Check the Installation
- USB: Installing a Printer Driver for Mac
- For Mac OS X 10.3.9 to 10.4.11
- For Mac OS X 10.5 and 10.6
- Format de support standard
- Remarque
Brand : OKI
Model : CX2731MFP
Category : Multifunction Printer