419002 GLACES CREATIV' - Ice Cream LAGRANGE - Free user manual and instructions
Find the device manual for free 419002 GLACES CREATIV' LAGRANGE in PDF.
User questions about 419002 GLACES CREATIV' LAGRANGE
0 question about this device. Answer the ones you know or ask your own.
Ask a new question about this device
Download the instructions for your Ice Cream in PDF format for free! Find your manual 419002 GLACES CREATIV' - LAGRANGE and take your electronic device back in hand. On this page are published all the documents necessary for the use of your device. 419002 GLACES CREATIV' by LAGRANGE.
USER MANUAL 419002 GLACES CREATIV' LAGRANGE
Glaces Creativ®
Ref: 419 002
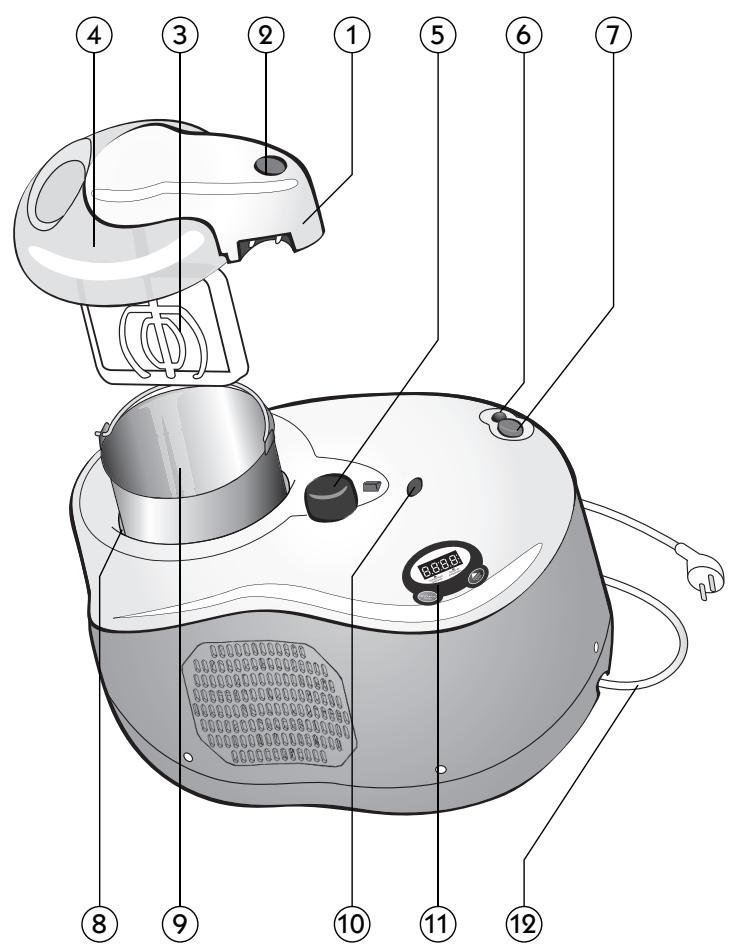
- DESCRIPTION DE L'APPAREIL -
Consommation immediate :
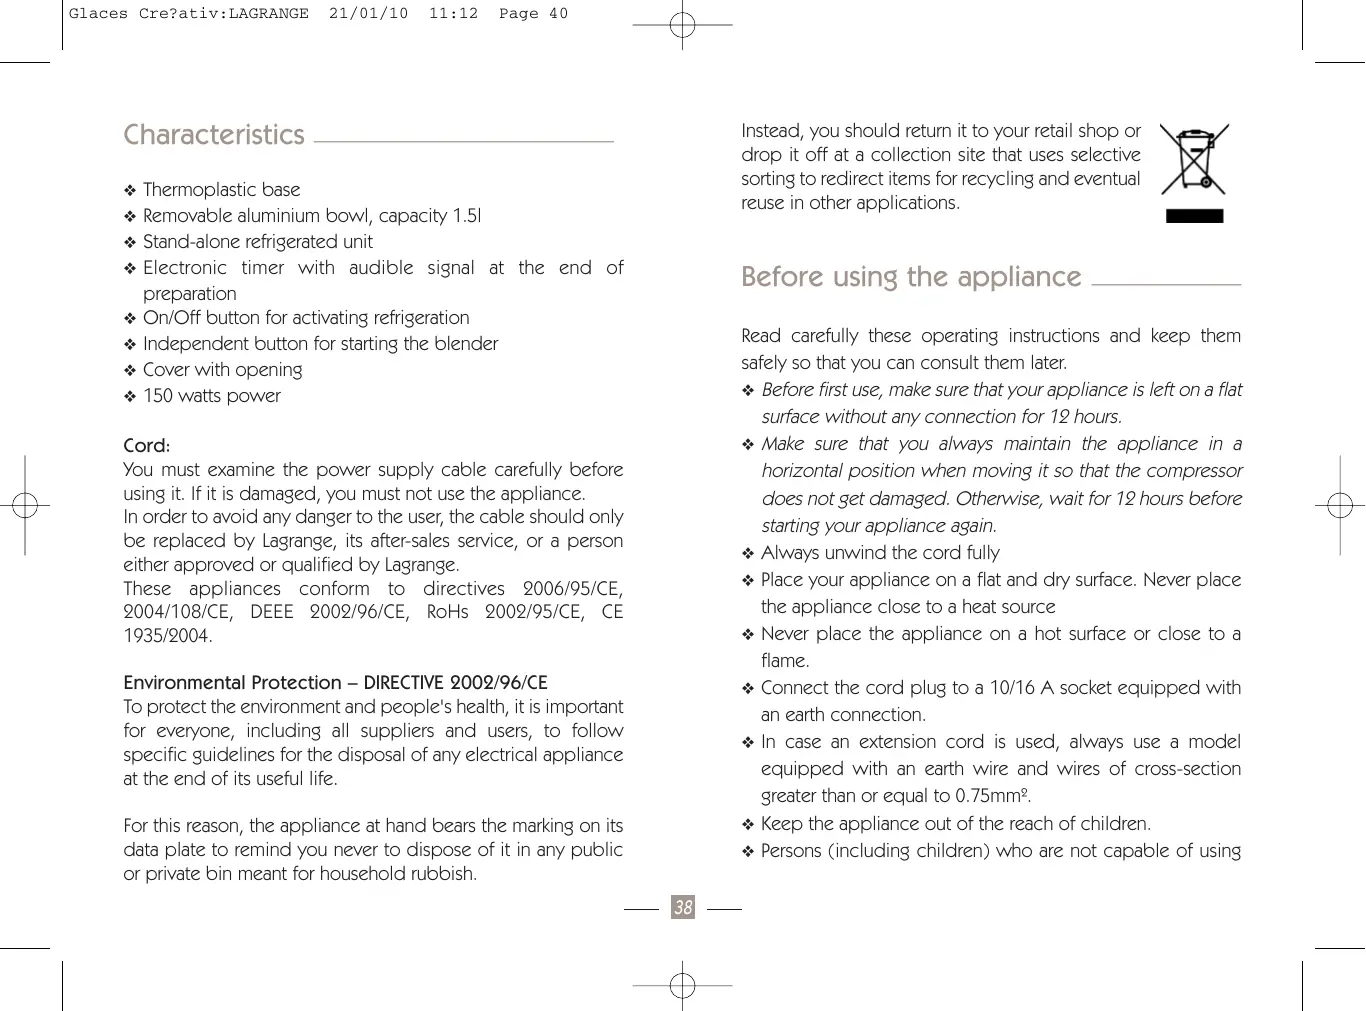
Thermoplastic base
Removable aluminium bowl, capacity 1.5l
Stand-alone refrigerated unit
Electronic timer with audible signal at the end of preparation
On/Off button for activating refrigeration
Independent button for starting the blender
Cover with opening
150 watts power
Cord:
You must examine the power supply cable carefully before using it. If it is damaged, you must not use the appliance.
In order to avoid any danger to the user, the cable should only be replaced by Lagrange, its after-sales service, or a person either approved or qualified by Lagrange.
These appliances conform to directives 2006/95/CE, 2004/108/CE, DEE 2002/96/CE, RoHs 2002/95/CE, CE 1935/2004.
Environmental Protection - DIRECTIVE 2002/96/CE
To protect the environment and people's health, it is important for everyone, including all suppliers and users, to follow specific guidelines for the disposal of any electrical appliance at the end of its useful life.
For this reason, the appliance at hand bears the marking on its data plate to remind you never to dispose of it in any public or private bin meant for household rubbish.
Instead, you should return it to your retail shop or drop it off at a collection site that uses selective sorting to redirect items for recycling and eventual reuse in other applications.

Before using the appliance
Read carefully these operating instructions and keep them safely so that you can consult them later.
Before first use, make sure that your appliance is left on a flat surface without any connection for 12 hours.
Make sure that you always maintain the appliance in a horizontal position when moving it so that the compressor does not get damaged. Otherwise, wait for 12 hours before starting your appliance again.
Always unwind the cord fully
Place your appliance on a flat and dry surface. Never place the appliance close to a heat source
Never place the appliance on a hot surface or close to a flame.
Connect the cord plug to a 10/16 A socket equipped with an earth connection.
In case an extension cord is used, always use a model equipped with an earth wire and wires of cross-section greater than or equal to 0.75 ~mm^2 .
Keep the appliance out of the reach of children.
Persons (including children) who are not capable of using
the appliance safely, either because of their physical, sensory or mental abilities, or because of their lack of experience or knowledge, may under no circumstances use the appliance without supervision or instructions from a responsible person
It is recommended that the appliance be connected to an installation with a differential residual current system having a breaking current of not more than 30 ~mA .
Never immerse the appliance with its cord in water.
For your safety, it is recommended that the appliance must never be left in an area exposed to bad weather and humidity.
Do not drop the appliance as this can damage it
Do not use any accessory not supplied with your appliance when operating it
These appliances are not designed to be activated using an external timer or a separate remote control system.
Disconnect the appliance from the power supply when it is not used or left unsupervised and before installing, dismantling or cleaning.
CAUTION:
Never put utensils in the bowl when the appliance is operating.
Never use sharp accessories in the removable bowl as you risk damaging it.
Starting and use
FIRSTUSE
CAUTION:
Make sure that the appliance is always unplugged before any operation.
ASSEMBLY:
1


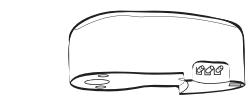
Assemble the plastic cover with the blender motor. Lock the system properly.
3
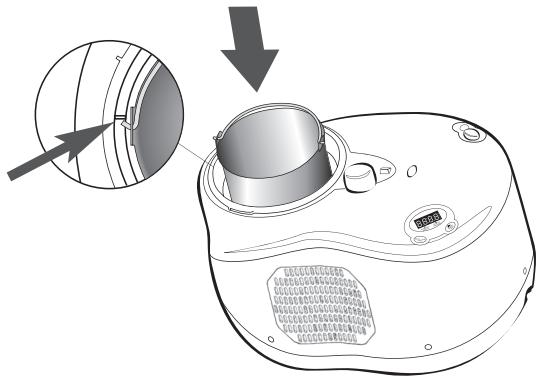
Place the removable bowl in the body of the appliance so that its position is fixed.

2
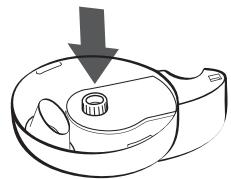
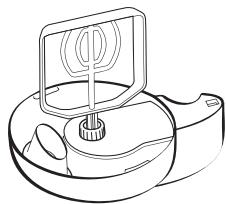
Place the blender on the blender motor. Make sure that it is properly placed in the notches. otherwise there is risk of the blender operating incorrectly.
4
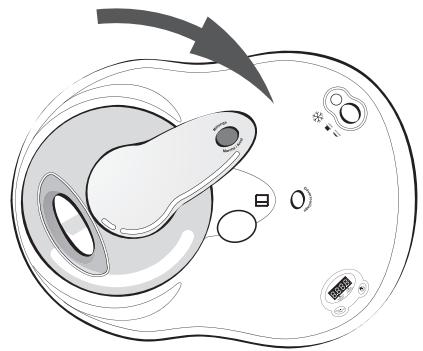
Place the blender motor by sliding it until it is connected in the socket.
CAUTION :
Never use the removable bowl in a microwave, oven or any other heating appliance.
The removable bowl is fragile, take care not to scratch it while cleaning.
Do not put very hot liquid inside the bowl and never put it under very hot water when it is very cold.
- Never operate the appliance without the cover in order to prevent any loss of refrigeration.
Using the timer
The electronic timer allows you to programme the preparation time.
Important: When the timer goes off the mixing process stops but the refrigeration process continues. Once the ice cream is ready, the appliance must be put in the "off" position to turn off the appliance. (the indicator lamp goes off)
To set the timer, press the "time setting" button several times until the desired time display
Press the "start time" button to start the timer.
When the time stops flashing, this shows that the preparation has begun.
If you wish to modify the time, press the "stop time" button and repeat the above operation.
The end of the preparation time will be indicated by an audible signal 30 seconds before the end of preparation.
CAUTION: The signal indicates that the programmed time has elapsed but does not indicate that the ice cream is ready. If, however, after the end of the time set the ice cream is not of proper consistency, press the "start time" button to restart the process for 5 minutes.
Starting
Before use, prepare your ice cream mixture (see recipes). If you are using a hot preparation, let it cool in the refrigerator until the mixture is at the refrigerator's temperature (about 10^ ).
Place the appliance on a flat surface and make sure that the ventilation grilles are not obstructed.
Connect the assembled appliance to the mains
Press the cooling On button (located on the motor unit); the indicator light comes on to indicate that the process has begun.
Wait for 5 minutes then start the blender function by pressing the button located on the blender motor.
Pour out the preparation from the opening of the transparent cover. IMPORTANT: Never put hot food in the bowl.
IMPORTANT: never fill the bowl more than half because the volume increases as the ice cream is made.
During preparation, you may add chocolate chips, raisins or any other ingredients from the opening in the cover. Alcohol must be added to the ice cream a few minutes before the end of cycle as there is a risk of delaying the preparation time to a large extent.
The preparation time may range from 20 to 40 minutes depending on the recipe selected (approximately 20 to 30 minutes for sorbet and 40 minutes for ice cream). This time gives creamy ice cream. For harder ice cream, add about 10 minutes.
Towards the end of the preparation time, you may verify the consistency of the ice cream through the transparent cover.
IMPORTANT: Avoid turning off the cooling process during the preparation as the appliance then goes off automatically for 5 minutes and can thus hamper the ice cream making process.
- When the ice cream attains good consistency, the rotation of the blender is reversed. This indicates that the preparation is ready. This reversal does not damage the motor but it is however recommended to stop the rotation of the blender.
If you require harder ice cream, let the cooling process operate for an additional 5 to 10 minutes.
Once the ice cream is ready, turn off the appliance and unplug it.
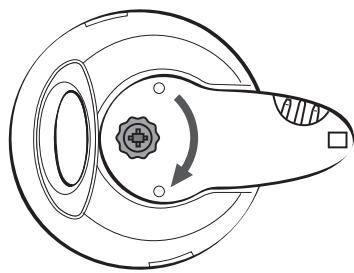
Keep the blender motor unlocking button pressed and rotate the motor anticlockwise to remove it from the appliance.
CAUTION: stop the cooling process when the ice cream is ready otherwise it will freeze in the bowl.
Remove the blender to take the ice cream out more easily from the bowl.
Remove the ice cream from the bowl using plastic or wooden accessories so that the bowl does not get damaged.
Preserving the ice cream
Immediate consumption:
You may leave the ice cream for 10 to 20 minutes in the turned off appliance. Before serving, restart the appliance for a few minutes until the desired consistency and temperature are attained once again.
Storing in the freezer:
You can preserve the ice cream in the freezer but it is recommended to do this for a short period as after 2 weeks the freshness and taste will deteriorate.
Put the ice cream in a container (plastic, aluminium) closed properly and place it in the freezer.
Take the ice cream out of the freezer 10 to 15 minutes before serving.
Recommended preservation time:
Ice cream made from fresh products: 1 week in the freezer
Sorbet: 1 to 2 weeks
Ice creams based on semi-cooked product: 2 weeks
CAUTION: Never refreeze ice cream that has already thawed or thawed partially.
Maintenance
Before cleaning your product, make sure that it is properly unplugged.
Always wait till the fixed bowl and removable bowl have returned to ambient temperature before cleaning them in order not to damage them.
Dismantle the removable elements such as the cover, blender, and bowl. These elements can be washed with hot water and dishwashing liquid.
The fixed bowl can be cleaned with a wrung sponge or a damp cloth. Dry well after cleaning.
CAUTION:
Never put any element in the dishwasher.
Never immerse the complete product or the blender motor in water.
Preparation advice
When preparing a recipe requiring food to be cooked, prepare the mixture the previous day then put it in the refrigerator so that it attains the proper temperature (approximately 10^ C ) and its final volume (the final mixture must never fill more than half the bowl as the ice cream volume increases during the process).
Preparations containing a high proportion of sugar, butterfat or alcohol require more time to solidify (depending on the proportion, they may never even become firm).
If you wish to add sugar in course of the preparation, never add it directly from the opening as
it will not dissolve. It must be dissolved in water or milk beforehand.
General Warranty Conditions
Your appliance is subject to a 2-year warranty.
In order to benefit from an additional year of warranty coverage free of charge, register on the LAGRANGE Web site (www.lagrange.fr)
The warranty covers parts and labour and also covers manufacturing defects.
The warranty excludes deterioration due to misuse or failure to follow the user instructions, or due to dropping the product and breaking the enamel.
THIS WARRANTY APPLIES TO DOMESTIC USE; UNDER NO CIRCUMSTANCES DOES IT COVER PROFESSIONAL USE
The vendor's legal warranty obligations in no way exclude the Manufacturer's legal warranty obligations relating to faults or manufacturing defects in accordance with Article 1641 and subsequent articles of the French Civil Code.
In the event of a breakdown or malfunction, contact your retailer.
In the event of a technical fault occurring within 8 days of purchase, the appliance may be exchanged. After this period, it is repaired by LAGRANGE's after-sales service.
Recipe Ideas
Vanilla ice cream (for 11)
375 ml of milk – 375 ml of liquid cream – 2 vanilla pods split into 2 along the length with their grains scraped off – 145 g of powdered sugar – 8 large egg yolks
Heat the milk, cream, vanilla pods and their grains with sugar in a saucepan over moderate heat and stir till the sugar dissolves. The milk almost reaches boiling point. Let it brew for 15 minutes off the fire. Remove the vanilla pods and reheat lightly. Whisk the egg yolks in a large salad bowl. Add 60ml of hot milk and smoothen the mixture. Blend the remaining milk. Decant the cream in a clean saucepan, by constantly shaking over a light to moderate fire, whisk for 8 to 10 minutes, until it thickens and coats the back of the spoon. Do not let it boil. When the cream has cooled down a little, cover it and refrigerate it until it chills.
Pour it out into your ice-cream maker (cooking time 30 to 40 minutes)
Rum raisins ice cream
60 g of chopped raisins - 2 sugar spoonfuls of amber rum. 750 ml of liquid cream - 250 ml of milk - 170 g of sugar
Let the raisins swell in rum overnight, covered.
Mix the liquid cream, milk and sugar in a salad bowl.
Pour out the preparation in the ice cream maker and add the raisins at half the given time. (cooking time 30 to 40 minutes)
Strawberry sorbet
345 g of powdered sugar - 750 ml of fresh strawberries - strawberries and whipped cream to serve (optional)
Dissolve the sugar with 250~ml of water in a saucepan by shaking over a slow fire. Let the syrup cool down.
Blend the strawberry purée with the cooled syrup then pour out the mixture into a metal mould and chill in the freezer.
Pour the mixture out into your ice-cream maker (cooking time 20 to 30 minutes)
Serve with strawberries and whipped cream if you wish.
Pear apple sorbet
4 large green apples peeled and seeded, cut into cubes
4 peeled and seeded pears, cut into cubes, 1 strip of lemon zest – 1 cinnamon stick – 60 ml of lemon juice – 80 g of sugar
2 sugar spoonfuls of calvados or Williams pear liqueur.
In a large saucepan, lightly poach the apples and the pears with the lemon zest, the cinnamon stick and sufficient water to cover them, for about 6 to 8 minutes until the fruits are tender. Remove the lemon zest and the cinnamon stick. Crush the fruits into a smooth purée with lemon juice using your blender.
In a saucepan, boil the sugar with 80 ml water and let it simmer for 1 minute. Blend into it the purée of fruits and the liqueur. Let it cool down.
Pour out the preparation into your ice-cream maker (cooking time 30 minutes)