PMR FX-100 TWIN - Talkie Walkie BRONDI - Free user manual and instructions
Find the device manual for free PMR FX-100 TWIN BRONDI in PDF.
User questions about PMR FX-100 TWIN BRONDI
0 question about this device. Answer the ones you know or ask your own.
Ask a new question about this device
Download the instructions for your Talkie Walkie in PDF format for free! Find your manual PMR FX-100 TWIN - BRONDI and take your electronic device back in hand. On this page are published all the documents necessary for the use of your device. PMR FX-100 TWIN by BRONDI.
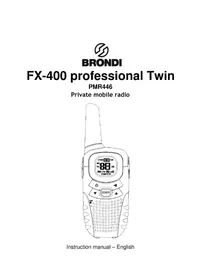
USER MANUAL PMR FX-100 TWIN BRONDI
Brondi would like to congratulate you on your purchase of the brand new FX-100 private 2-way radio.
We recommend that you carefully read the User manual for correct use of the handset.
p. 3-26
Brondi se congratula con Uds. para la compra del innovador transmisor-receptor particular mod.FX-100.
5.1 Fitting the batteries 13
5.2 Using the accessories 15
- USING THE HANDSET 16
6.1 Switching the handset on and off 16
6.2 Communicating 16
6.3 Communicating: receiving and transmitting 18
6.4 Call function (CALL) 19
6.5 Personalising the call tune 19
6.6 Monitoring the channel (deactivating the automatic squelch) 19
6.7 Locking the chosen channel 20
6.8 SCAN function: channel scanning 20
6.9 Low battery consumption mode 21
6.10 VOX function: voice activation 21
6.11 Transmission over tone ("ROGER BEEP") 22
6.12 Button tones 22
6.13 Monitoring 2 channels at once 23
6.14 Using the stopwatch 24
- WARRANTY 25
- CE CONFORMITY DECLARATION 26

1. INFORMATION, PRECAUTIONS CARE AND MAINTENANCE
USING THE HANDSET
On the basis of the current "Code of Electronic Communications" (Legislative decree 259/03) all PMR 446 handsets are subject to a declaration of use and an annual contribution: contact the Area Inspector of reference (Ministry of Communications) to request the forms and information on how to gain general authorisation to use the PMR 446 handsets. The handsets may be used after the necessary forms have been sent off, taking care to keep a copy.
The use of PMR 446 2-way radios is allowed in Italy and in the following European countries: France, Spain, Austria, Germany, Denmark, Holland, Ireland, Great Britain, Sweden, Portugal, Finland, Belgium, Czech Republic, Norway, Switzerland, Luxemburg, and Greece. For use in the above-mentioned countries, seek information on the regulations in the various States.
RANGE
Your FX-100 has a range of up to 5 Km in wide open spaces. The atmospheric and environmental conditions may limit the range. The range may also be reduced if the batteries are not fully charged. Other factors which might restrict range are: buildings, thick vegetation (trees, etc.), hills or mountains. The greatest range is obtained in wide open spaces which are flat and free from obstructions. Lastly, the range also depends on the battery charge and receiving and transmitting features of the handsets used by those with whom you are communicating.
PRECAUTIONS AND SAFETY STANDARDS
Do not soak in water or other liquids, do not leave in constant contact with water.
Aerial damage
Do not use radios with a damaged aerial. If a damaged aerial comes into contact with skin, slight burning may be possible.
Batteries
- Do not replace or charge batteries in environments where there is a risk of explosion.
- Only use 3 rechargeable AA batteries or 3 alkaline AA batteries.
- Ensure that the batteries are properly fitted, observing the polarity indicated inside the compartment.
Vehicles with airbag
Do not rest the radio in the area above the airbag or on the area it occupies when open. When the airbag opens it inflates immediately. If the radio is in the area concerned it may be projected forwards, risking injury to the occupants of the vehicle.
Environments at risk of explosion
In environments with a risk of explosion it is best to switch off the radio. The presence of sparks in these areas can cause fires or explosions.
Electric detonators and explosive areas
To avoid possible interference with operations in which explosive material is used, switch off the radio near electric detonators, in "partially explosive areas" or where there is a signal indicating the need to switch off radios. Observe all instructions and indications.
NOTE: Potentially explosive environments are often, but not always, indicated clearly. These include: refuelling areas (e.g. on-board boats) or transfer and storage areas of combustible or chemical substances; environments containing chemical products of suspended particles, such as metallic dust or residue.
Electromagnetic compatibility/interference
Switch off the unit in any building where there are signs forbidding its use. Hospitals or clinics may use equipment which is sensitive to the electromagnetic emissions of the handset. Switch off the
unit on aircraft when its use is expressly forbidden. Any use of the unit must respect the regulations of the airline or the instructions given by the crew.
CARE AND MAINTENANCE
- If the handset is dirty, clean using a soft cloth and water. Never use detergents or solvents, which could ruin the outer casing and penetrate inside the handset, causing damage.
- Protect the handset from water or other liquids.


2. PERFORMANCE, TECHNICAL DATA, SUGGESTIONS FOR USE
SPECIAL PERFORMANCE
Professional handset, sporty look.
Built-in stopwatch.
- Illuminated display.
- VOX function: detects the voice and activates transmission.
Monitoring 2 channels at once.
RANGE & COMMUNICATION
- Up to 5 Km range in a wide open space1.
- 8 channels + 38 coded per channel.
- Communication guaranteed in any place2: also works where mobile phones don't.
- Communicates with all PMR 446 radios.
- Unlimited number of contacts.
- No time tariff3.
- Suitable for use in 18 European countries.
- Channel monitoring: listen to all communications (even when very weak).
- SCAN function, automatic scanning of all channels.
OTHER FEATURES
- Also operates with 3 alkaline AA batteries.
- Channel lock.
-
Tone activation and deactivation.
-
Selected channel lock: to avoid accidentally changing channel.
- Channel monitoring: to listen to all the communications on the channel (even when very weak).
Large backlit display. - Call function: button to call all handsets synchronised on the same channel.
Volume control.
TECHNICAL DATA
Standard:
Operating range:
Operating channels:
Channel pitch:
Type of modulation:
CTCSS codes:
Delivery power:
Range of action:
Autonomy:
Batteries:
Weight (with batteries):
PMR 446
446,00625 - 446,09375 MHz
8
12. kHz
FM
38 for channel
500 mW erp
up to 5 Km in a wide open space
20 hours (5% transmitting;
5% receiving; 90% in standby)
3 rechargeable AA batteries or
3 alkaline AA batteries
156 g
SUGGESTIONS FOR USE
Sport:
- bicycle
- skiing
- running
- trekking
- sailing
-
fishing
-
golf
-
Walking/trips outdoors:
-
mountains
-
lake
city -
Outdoor team games
-
Holidays with the family or friends:
-
camping
- holiday resort
- on the beach
- on a boat
-
in theme parks
-
Travelling with friends:
-
between cars
- in mobile home
Work:
- in warehouses
- in shopping centres
- on sites
- in discos
- at trade fairs
- sporting events
9
3. PACK CONTENTS
HANDSETS
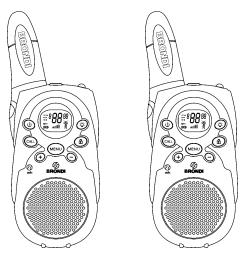
two two-way radios
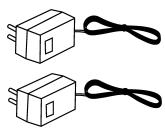
ACCESSIONS

2 battery chargers
3+3 batteries

2 earpieces
CARRYING ACCESSORIES

2 neck straps

2 belt clips
DOCUMENTATION
Instruction manual.
Warranty.
List of service centres.
10

4. HANDSET DESCRIPTION
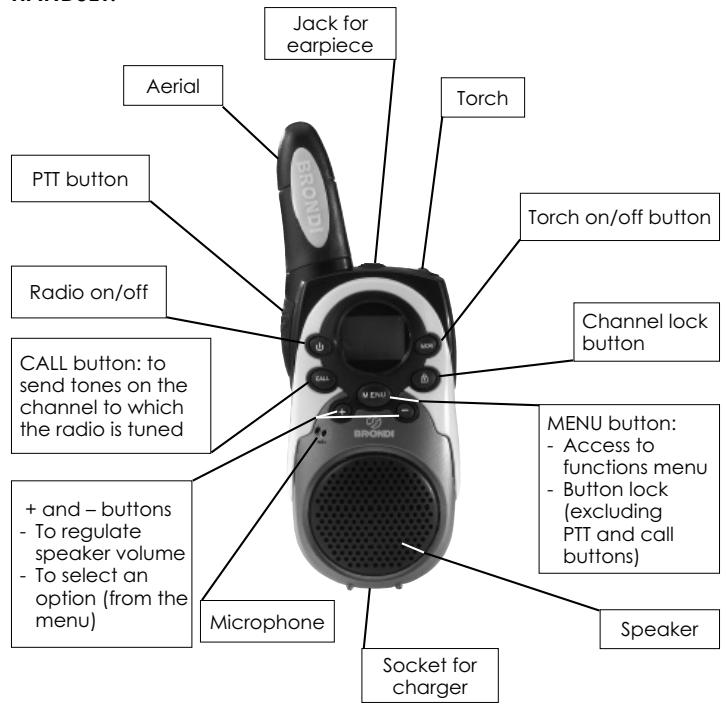
HANDSET:
11

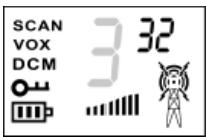
DISPLAY:
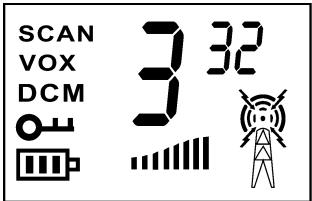
3 Channel (from 1 to 8)
32 Code (from 0 to 38)
Battery charge level
Transmission activated Receiving activated
DCM Dual channel monitoring activated
VOX VOX function activated
SC SCAN function activated
- Buttons locked
Speaker volume level
12

INSTALLATION
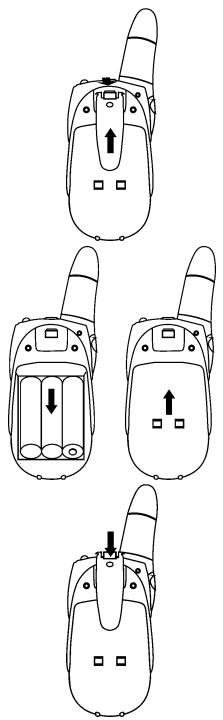
5.1 FITTING THE BATTERIES
To use the handsets it is necessary to fit 3 rechargeable AA batteries (like those supplied) or 3 Alkaline batteries in each handset.
Ensure that the batteries are properly fitted, observing the polarity indicated inside the compartment.
HOW TO FIT THE BATTERIES
- Position the radio with the display facing downwards.
- Remove the belt clip, lifting the hook on the back of the clip and sliding it upwards.
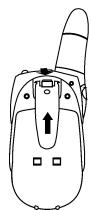
- Slide down the battery compartment cover and position the 3 batteries according to the polarity marking inside the compartment.
- Replace the cover and hook the clip on again.
NOTE 1: It takes about 10 hours to charge up new rechargeable batteries before using the handset (see the paragraph "Recharging the batteries").
BATTERY METER
When the handset is on, the meter is located in the left corner of the display. It shows the battery charge level using bars (III).
When the battery power is insufficient, the battery meter flashes. Recharge the batteries immediately, otherwise you will be unable to use the radio.
NOTE: If the handset is left idle for a long time, remove the batteries to avoid leaking and damage to the inside of the handset.
RECHARGING THE BATTERIES
ATTENTION:
Before recharging the batteries, check that the 3 batteries in the handset are rechargeable.
Every handset can be recharged separately, thanks to the two battery chargers contained in the pack. Only recharge the batteries using the battery charger supplied.
- Switch off the handset, pressing the button and holding it down until the handset issues a beep and the display shows the time only.
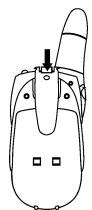
- After raising the rubber guard, plug the battery charger jack into the socket on the bottom of the handset.
- Plug the battery charger adaptor into the main power socket.
- The handset takes about 10 hours to recharge.
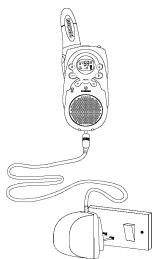
NOTES:- The handset can be recharged when switched on or off. - Discharge the batteries completely at least once a month, then recharge them, so as to maintain the charge for as long as possible and extend the life.

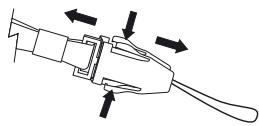
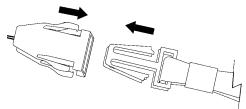
5.2 USING THE ACCESSORIES
BELTCLIP
To hook on the clip
To unhook the clip
NECK STRAP
- Press the two flaps on the neck strap and release the two ends of the accessory.
- Slot the finer strap into the hole on the belt clip (on the upper part) and make a knot.
- Hook the two ends of the accessory back together as shown in the figure.
EARPIECE
The handset can be used with the earpiece, microphone and PTT button supplied.
- Lift the protective rubber guard from the socket in the upper part of the handset
- Slot the earpiece jack into the socket indicated by the symbol
At this point the microphone and the speaker on the handset will be deactivated at you will be able to listen from the earpiece and transmit by pressing the PTT transmission button on the microphone of the accessory speaking close to the microphone on the accessory.

6. USING THE HANDSET
6.1 SWITCHING THE HANDSET ON AND OFF
When the radio is switched off, the display is switched off. In this condition no operation can be performed.
IMPORTANT: we recommend that you switch off the handset when the radio is not in use to prevent the batteries from being completely discharged.
To switch the handset on, press the button and hold it down until the handset issues a beep. At this point the display will show the information related to operation as a 2-way radio. To switch the handset off, press the button again and hold it down until the handset issues a beep.
6.2 COMMUNICATING
With your BRONDI FX-100 you can communicate with another BRONDI FX-100 handset or with any other 2-way radio that uses the PMR 446 standard. You may communicate with an unlimited number of PMR 446 handsets in conference.
ATTENTION: All the handsets must be tuned to the same channel and the same CTCSS code to intercommunicate.
When using the handset, take care when communicating confidential information, as another PMR 446 handset near your FX-100 which is tuned into the same channel may listen to your conversation. Communication takes place alternately: if another handset is transmitting, you must wait for the transmission to end before speaking (pressing the PTT communication button on the left side of the handset and holding it down) and vice versa.
Selecting the channel and the CTCSS (Continuous Tone Coded Squelch System) code.
Your handset can communicate on one of the 8 channels available. For every channel it is possible to set even just one of the 38 CTCSS codes: you will hear only the conversations of the PMR 446 handsets tuned to the same channel and CTCSS code. All other conversations will be filtered, if you choose 0 as your CTCSS code, the CTCSS filter will be deactivated and you will only hear the communications of the channel chosen.
NOTE: If another user on the same channel uses a PMR 446 without CTCSS codes or with the code deactivated, he may listen to your transmissions, even though you cannot listen to his.
- Press the MENU button, the number of the channel on the display will start flashing.
- Press the + and - buttons to choose the channel (from 1 to 8).
- Press the MENU button again, the number of the CTCSS code will start flashing.
- Press the + and - buttons to choose the code (from 0 to 38).
- To return to stand-by, press and immediately release the PTT communication button; the parameters set up to now will be saved.
17

NOTE: If no button is pressed for 6 seconds during programming, the handset will automatically return to stand-by and the changes will be confirmed.
6.3 COMMUNICATE: RECEIVING AND TRANSMITTING
To transmit or receive, all the handsets must be tuned into the same channel and the same CTCSS code.
RECEIVING
When your handset is on and in stand-by, it is always ready to receive communications which you will hear through the speaker. At the end of every reception you will hear a "roger beep" meaning that your contact is ready to receive your communication. When receiving, the display will show the receiving symbol
ATTENTION: You cannot receive communications when the PT communication or CALL buttons are pressed, even if you are not speaking.
CONTROLLING THE SPEAKER AND TUNE VOLUME
It is possible to set the speaker volume by pressing the + and - buttons:
- press the + button to increase the volume;
- press the - button to decrease the volume.
Every time you select a volume level, the handset will issue a beep and the display will show the level with a series of bars. The level set will always be visible on the display.
TRANSMITTING
Transmission can only take place while the PTT communication button is pressed, unless the VOX function is active.
- Before starting communication check that channel is free, i.e.: there is no receiving signal on the display.
- Press the PTT communication button and hold it down and the transmission symbol will appear on the display.
-
Speak into the microphone from a distance of 15 centimetres.
-
At the end of the transmission, release the PTT communication button the handset will issue a "roger beep".
6.4 CALL FUNCTION
The CALL button allows you to call all the handsets synchronised on your channel and CTCSS code and they will ring for two seconds; others can call your handset in the same way.
6.5 PERSONALISING THE CALL TUNE
Your handset also allows you to personalise the tune with which the other handsets will ring, using a simple program described below. In this way, those called will know that you are calling them.
- Press the MENU button 4 times. The handset will enter the tune programming mode and "CA" will appear on the display, indicating the current setting which flashes (OF, 1, 2, 3, 4 or 5).
- Press the + and - buttons to choose one of the 5 tunes; every time you choose one, the display will show the corresponding number and the handset will let you listen to them.
- To exit this programming procedure, press and immediately release the PTT communication button; the parameters set up to now will be saved.
NOTE:
- If, during programming, you choose "OF", you will set the "silencer" function on your handset only. When you call the other handsets, they will ring with the standard tune.
- The previous programming does not alter the tune.
6.6 CHANNEL MONITORING
(deactivating the Automatic Squelch)
With this function you can listen to all the signals (even when very weak) of the channel to which you are tunes, regardless of the CTCSS code set, if any.
You can use this function to listen to communications at the limit of the range of action.
Press the - and MENU buttons at the same time to activate the monitoring function; to deactivate it, press and immediately release the MENU button. When the monitoring function is active, the display remains illuminated for 5 seconds and the receiving symbol appears.
NOTE: The monitoring function is automatically deactivated if the PTT transmission button is pressed.
6.7 LOCKING THE CHOSEN CHANNEL
This function is useful to avoid accidentally changing the channel and CTCSS code set.
LOCKING THE CHANNEL:
Press the button and hold it down for about 3 seconds, until you hear a confirming beep. The oT symbol will appear on the display.
UNLOCKING THE CHANNEL:
Press the button and hold it down for about 3 seconds, until you hear a confirming beep. The symbol will disappear from the display.
6.8 SCAN FUNCTION: CHANNEL SCANNING
This function is particularly useful if the channel has been accidentally changed by you or your contacts. This function allows you to check the communications on all 8 channels to identify the channel used by yours.
If your contacts have set a particular CTCSS code, the scan will detect the voice and the channel used, but will not detect the CTCSS code.
-
With the handset in stand-by, press and immediately release the MENU and + buttons at the same time. The word SCAN will appear on the display and the channel number will change quickly (from 0 to 8).
-
When the handset detects any kind of signal (vocal or call) on one of the 8 channels, the scan pauses and the signal detected can be heard in the speaker.
- The scan will automatically restart a few seconds after the end of the receipt of the signal.
- To complete the scan, briefly press the MENU button.
WARNING:
Once a signal has been detected you can listen to your contact, but you can only transmit a communication if the CTCSS code set on his handset is the same as that set on yours.
6.9 LOW BATTERY CONSUMPTION MODE
The handset will automatically switch to low battery consumption mode after 4 seconds of inactivity. Despite being in this mode, the handset will be able to receive communications.
IMPORTANT: when you are not using the handset as a 2-way radio, we advise you to switch it off (pressing the button and holding it down) to optimise the maintenance of the battery charge.
6.10 VOX FUNCTION: VOICE ACTIVATION
This function enables activation with both hands free; with the function active, your handset will detect your voice and automatically activate transmission. You can set 3 levels of sensitivity.
Procedure:
- From stand-by mode, press the MENU button 3 times. The word _OX will appear on the display and the current setting of the _OX function will flash.
- Repeatedly pressing the + or - buttons, you can choose on of the following settings:

Function deactivated

1 Function activated with low sensitivity
Function activated with medium sensitivity
3 Function activated with high sensitivity
- To return to stand-by mode, press and immediately release the PTT communication button. The parameters set up to now will be saved. If the VOX function is activated, the word "VOX" will appear on the display.
6.11 TRANSMISSION OVER TONE ("ROGER BEEP") ACTIVATION/DEACTIVATION
The "Roger Beep" is a tone issued by your handset every time you release the PTT communication button after transmission. To activate or deactivate this tone, follow the simple programming procedure described below:
- Press the MENU button 5 times. The handset will enter the "Roger Beep" programming procedure and the letters "RQ" will appear in small print on the display, accompanied by "ON" in big print, flashing.
- Press the + or - buttons to deactivate ("DF" on the display) or activate ("ON" on the display) the tone.
- To exit this programming procedure, press and immediately release the PTT communication button; the parameters set up to now will be saved.
6.12 BUTTON TONES: ACTIVATION/DEACTIVATION
Every time you press a button, your handset issues a tone. You can activate or deactivate this signal by following the simple programming procedure described below:
-
Press the MENU button 6 times. The handset will enter the button tone programming procedure and the letters "TO" will appear in small print on the display, accompanied by "ON" in big print, flashing.
-
Press the + or - buttons to deactivate ("DF" on the display) or activate ("DM" on the display) the tone.
- To exit this programming procedure, press and immediately release the PTT communication button; the parameters set up to now will be saved.
6.13 MONITORING 2 CHANNELS AT ONCE
This function allows you to monitor two channels at the same time: during this operation the handset constantly controls the primary and secondary channels.
As soon as the handset receives a signal on one of the two stations, it remains tuned to that station for the 5 seconds following the termination of communication, after which it returns to monitoring the two channels.
If you press the PTT communication button when receiving, the handset will transmit on the same channel. If you press the PTT communication button when no signal is detected, the handset will transmit on the primary channel. When the function is active, the letters DCN will appear on the display.
NOTE: The primary channel is that currently set with the standard choice of channels (see paragraph 6.2), the secondary channel is that which is set using the activation procedure of the function described below.
Activating the function:
To activate the function it is necessary to set the secondary channel and the CTCSS code:
- Press the MENU button 7 times. The “DF” symbol will flash on the display and the letters BCN will appear in small print.
- Choose the channel required using the + or - buttons.
- Then press the MENU button to change the CTCSS code and the number “0” in small print on the display will flash.
- Choose the CTCSS code required using the + or - buttons.
- Press the MENU button to confirm and exit the mode.
Deactivating the function:
When the function is active,
- Press the MENU button 7 times. The second channel and the CTCSS code will flash on the display.
- Press the + or - buttons until "OF" appears on the display.
- Press the MENU button to confirm and exit the mode.
ATTENTION:
The secondary channel must be different from the primary. Therefore, when attempting to set a secondary channel which is the same as the primary, the DCM function will be deactivated (OF).
6.14 USING THE STOPWATCH
You can use the stopwatch to a hundredth of a second in the following way:
- Press the MENU button and hold it down for 3 seconds to enter the stopwatch mode.
- Press the + button once to start the stopwatch.
- Press the + button once more to stop the stopwatch.
- Press the - button to reset the stopwatch.
- To exit the stopwatch mode, press the MENU button and hold it down for 3 seconds.
ARRANTY
Like all Brondi products, FX-100 TWIN has a 12-month warranty. The packing of the FX-100 TWIN contains a special warranty card which, to be valid, must be:
- completely filled in;
- accompanied by proof of purchase (receipt or invoice, etc.).
To correctly fill in the warranty card print the name of the product purchased (FX-100 TWIN) and the serial number (SN) printed under the base (if this is not already printed on the warranty card).

It is necessary to collect electric and electronic devices separately
Brondi reserves the right to change the product specifications and performance without prior notice.

8. CE CONFORMITY DECLARATION
Brondi Telefonia S.p.A., with registered office in Str. Caffadio 14 - 10036 Settimo Torinese (TO) and operating premises in Via Guido Rossa 3 - 10024 Moncalieri (TO), declares that the FX-100 TWIN handset conforms to the following standards:
EN300296-2 v.1.1.1 (2001-03), EN301489-5 v1.3.1 (2002-08), EN60065 :2002.
It satisfies the requirements of European Directive 1999/5/CE regarding radio and telecommunications terminal equipment. The conformity to said requirements is expressed with the

Product conforming to Directive 89/336/CEE regarding electromagnetic compatibility and also conforming to Directive 73/23/CEE (low voltage) regarding safety standards.

26

ESPAGNOL
INDICE
- INFORMACION, PRECAUCIONES CUIDADO Y MANTENIMIENTO..28
- PRESTACIONES, DATOS TECNICOS, SUGERENCIAS DE EMPLEO ..31
- CONTENIDO DEL EMBALAJE 34
- DESCRIPTICN DEL APARATO 35
- INSTALLACION 37
20 hours (5% de transmission)
BRONDI TELEFONIA SPA Factory with certified quality system
Per information on products (performance, digital instruction manuals, etc.), to consult the updated list of service centres and find out about initiatives and news, visit our site: