Bravo Cordless 2 - Phone BRONDI - Free user manual and instructions
Find the device manual for free Bravo Cordless 2 BRONDI in PDF.
User questions about Bravo Cordless 2 BRONDI
0 question about this device. Answer the ones you know or ask your own.
Ask a new question about this device
Download the instructions for your Phone in PDF format for free! Find your manual Bravo Cordless 2 - BRONDI and take your electronic device back in hand. On this page are published all the documents necessary for the use of your device. Bravo Cordless 2 by BRONDI.
USER MANUAL Bravo Cordless 2 BRONDI
BRONDI
BRAVO CORDLESS 2

text_image
BRONDI 08:10:07 24:00 00:10:02 24:00 1 2 3 4 5 6 7 8 9 *#/o 0#/#o BRONDIINSTRUCTION MANUAL MANUAL DE INSTRUCCIONES MANUEL D'INSTRUCTION BEDIENUNGSANLEITUNG
BRONDI
ENGLISH 3
ESPAÑOL 19
FRANÇAIS 37
DEUTSCH 55
BRAVO CORDLESS 2
CORDLESS DECT GAP
Congratulations for choosing BRAVO CORDLESS 2, Brondi's DECT GAP cordless. This telephone which features big keys and big numbers on a light display will make it easier for you to make telephone calls.
BRAVO CORDLESS 2 is provided with speakerphone and allows you to adjust the earpiece volume. For further details on this product, please check this instruction manual.
HSITION
INDEX
-
UNPACKING YOUR CORDLESS 5
-
FEATURES 6
-
WHERE TO FIND IT 7
-
SAFETY 9
-
INSTALLATION 10
5.1 Power supply....10
5.2 Connect the base unit to the telephone line 10
5.3 Fitting Batteries....10
5.4 Recharging your cordless 10
5.5 Replacing batteries....10
- OPERATIONAL FUNCTION ..... 11
6.1 To answer a call....11
6.2 Making a call (manual selection)....11
6.3 Speakerphone 11
6.4 Pre-selection 11
6.5 Las number redial....12
6.6 Call's duration 12
6.7 Adjusting the volume 12
6.8 Ringer volume 12
6.9 Ringer melody....12
6.10 To mute the mouthpiece....12
6.11 To page the handset 13
6.12 To lock the keypad....13
6.13 Using your cordless on a PABX 13
6.14 Redial 13
6.15 Turning ringer temporarily off 13
- MEMORY AND CALLER DISPLAY 14
7.1 10 Memories....14
7.2 Caller Details Service and Caller Display....14
-
GUARANTEE 16
-
DECLARATION OF CONFORMITY CE....17
1. UNPACKING YOUR CORDLESS
EQUIPMENT AND DEVICES:
- 1 cordless handset
- 1 base unit
- 1220V adapter
• 1 telephone line cable with Italian plug
• 1 rechargeable battery pack
natural_image
Line drawing of a vintage mobile phone with keypad and base (no text or symbols)1 Cordless handset - 1 Base Unit

1 220V Adapter

1 Telephone line cable with Italian plug

2 Rechargeable AAA Batteries
5
©
2. FEATURES
SPECIAL FEATURES
- Easier handset use:
- very big keys
– big digits on a light display
- speakerphone
– high volume ring
- Speakerphone conversation
- Incoming call light and tone alert located in the base unit
- Compatible with devices for hearing impaired
LOCK FUCTIONS
- Keypad lock
CALL FEATURES/MEMORY
• Autonomy: 11 calling hours, 100 standby mode hours
- 10 memories
- Caller details
- Caller Display: up to 20 records (1)
• Redial list: 3 last dialled numbers
DISPLAY, TUNES
- Light display
- Handset with 9 melodies
- Base unit with 1 melody
- Adjustable handset ringing volume
- Adjustable earpiece volume
STANDARD FEATURES
- Handset locator button (with light led)
- Microphone Mute button
- Pause button: for easier offi ce use
[1] (when service has been activated)
ENCLOSED DOCUMENTS
- WARRANTY
• INSTRUCTION MANUAL (ENGLISH)
• TECHNICAL ASSISTANCE CENTRES DIRECTORY
GIFT BOX CONTENTS
- 1 cordless
• 1 Italian line plug
• 1 220V adapter - 2 batteries
TECHNICAL DETAILS
Type:
Digital
Cordless
Standard: DECT GAP
Frequency Range: 1880 MHz - 1900 MHz
Operating Range: up to 300m (outdoors), 50m (indoors)
Batteries: 2 AAA NiMH 1,2V batteries
Handset dimensions: 65 x 162 x 33 mm
Base Unit dimensions: 116 x 47 x 121 mm
Handset weight (batt. incl.): 146 g
6

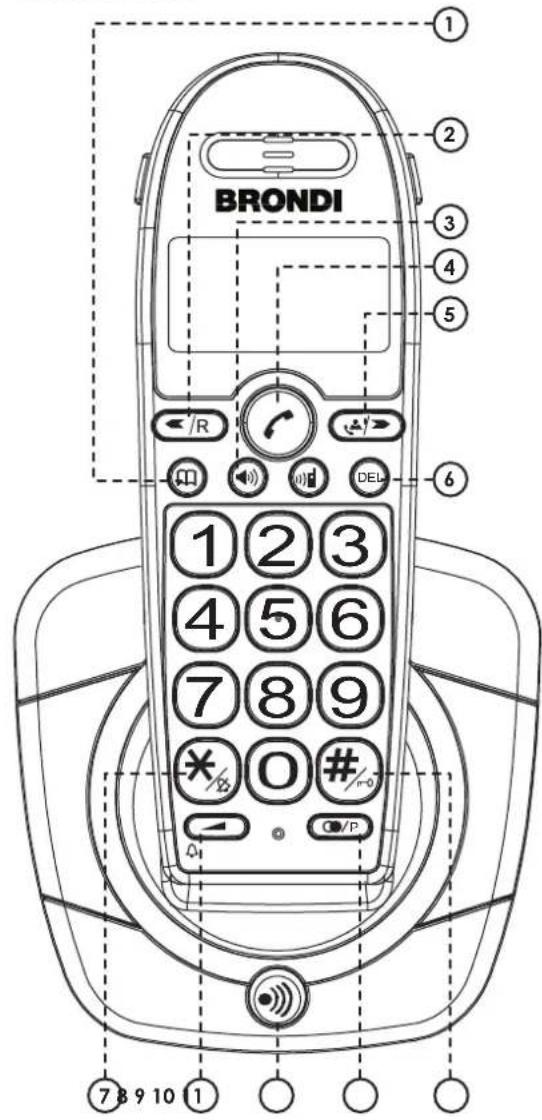
3. WHERE TO FIND IT
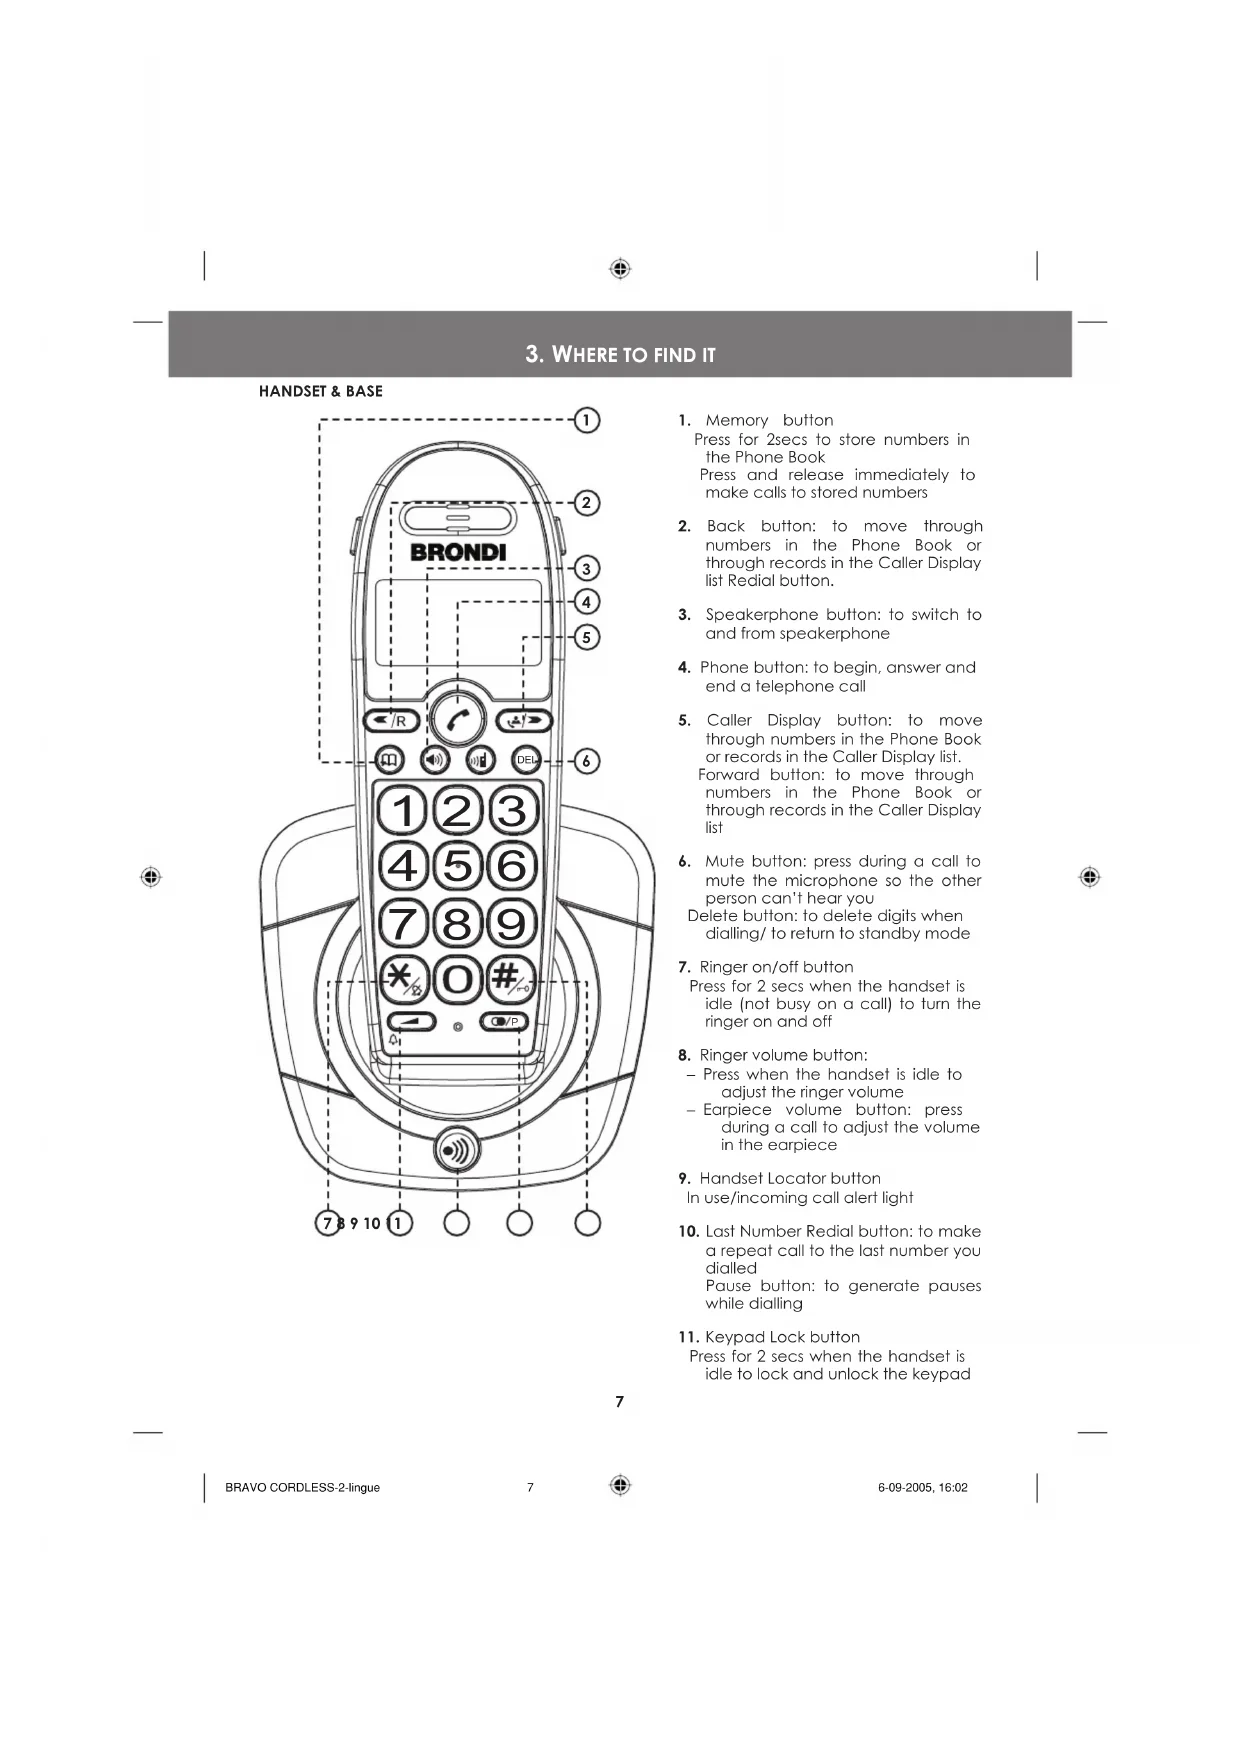
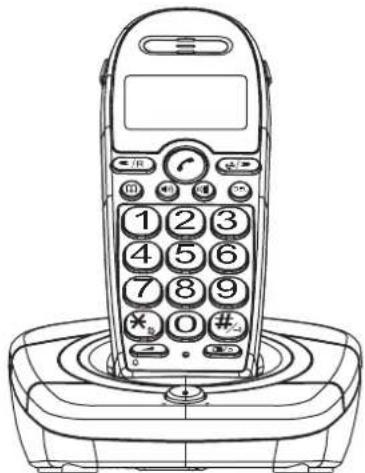
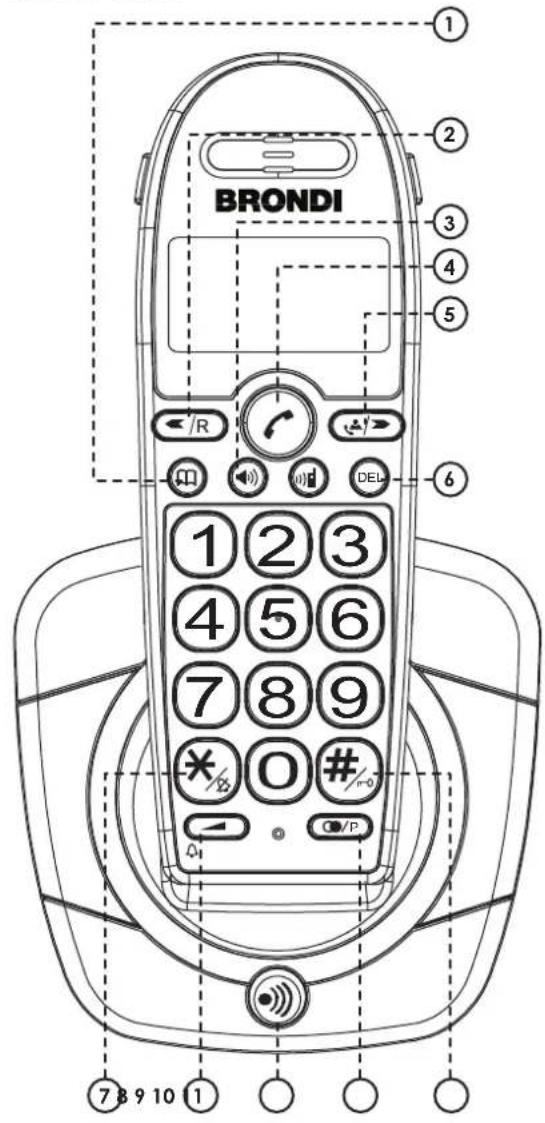
HANDSET & BASE
text_image
BRONDI 1 2 3 4 5 6 7 8 9 10 1- Memory button
Press for 2secs to store numbers in the Phone Book
Press and release immediately to make calls to stored numbers
-
Back button: to move through numbers in the Phone Book or through records in the Caller Display list Redial button.
-
Speakerphone button: to switch to and from speakerphone
-
Phone button: to begin, answer and end a telephone call
-
Caller Display button: to move through numbers in the Phone Book or records in the Caller Display list. Forward button: to move through numbers in the Phone Book or through records in the Caller Display list
-
Mute button: press during a call to mute the microphone so the other person can't hear you
Delete button: to delete digits when dialling/ to return to standby mode
- Ringer on/off button
Press for 2 secs when the handset is idle (not busy on a call) to turn the ringer on and off
- Ringer volume button:
- Press when the handset is idle to adjust the ringer volume
- Earpiece volume button: press during a call to adjust the volume in the earpiece
- Handset Locator button
In use/incoming call alert light
- Last Number Redial button: to make a repeat call to the last number you dialled
Pause button: to generate pauses while dialling
- Keypad Lock button
Press for 2 secs when the handset is idle to lock and unlock the keypad
7
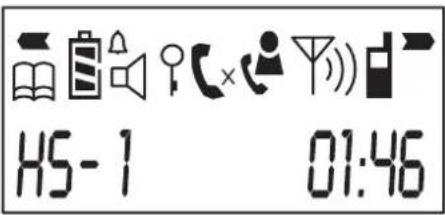
INFORMATION ON THE DISPLAY
text_image
H5-1 01:46| Memory/ Store (to store a number in memory or to make a call to a stored number) | |
| Battery Level | |
| Battery Level (Battery Low) | |
| Headset Ringer on | |
| Headset Ringer off | |
| Speakerphone on | |
| Keypad locked | |
| On steadily: telephone line is busyFlashing: incoming call | |
| The X appears when the microphone is muted | |
| On steadily: all new Caller Display records have been listend to but not yet deletedFlashing: new Caller Display records present | |
| On steadily: handset within range of the base unitFlashing: handset out of range | |
| Intercom operating: during calls to another handset | |
| More digits to view to the right or to the left of the display |


4. SAFETY
- If necessary clean the equipment with a damp cloth. DO NOT CLEAN ANY PART WITH SOLVENT CHEMICALS.
- Your cordless must be associated to an approved telephone.
- Do not use your phone in exceedingly humid, cold or hot places and always keep it from direct exposure to the sun or other hot sources.
- Do not place anything (objects or furniture) on the phone cables.
- DON'T LET THE BASE UNIT OR CHARGER POD GET WET.
- Avoid using your phone or placing its base unit nearby large metal objects - like a refrigerator, a mirror or a fling cabinet - as this may cause radio interference.
- Keep your phone at least 50cm away from other electronic devices to avoid radio interference.
- The base unit should be placed on a level surface.
- If you install your phone in a multi-level place, make sure to place the base unit at the intermediate level.
- When too far from its base unit your handset won't work properly. USE THE HANDSET WITHIN THE OPERATING RANGE OF 50m INDOORS AND 300m OUTDOORS.
- For the best performance and long duration of your batteries, make sure to discharge them fully once a month, and then recharge them. IMPORTANT! USE AAA RECHARGEABLE BATTERIES ONLY
- The phone base unit must be only used with the mains adapter supplied with it; using any other adapter may cause serious damage.

9

5. INSTALLATION
5.1 POWER SUPPLY
IMPORTANT!
The mains power lead must be installed near the equipment and must be easily accessible.
- Plug the mains adapter pin end into the base unit power plug.
- Plug the mains adapter into the wall mains socket.
5.2 CONNECT THE BASE UNIT TO THE TELEPHONE LINE
- Insert the telephone line plug into the base unit socket.
- Insert the telephone line threefold plug into the wall telephone socket.
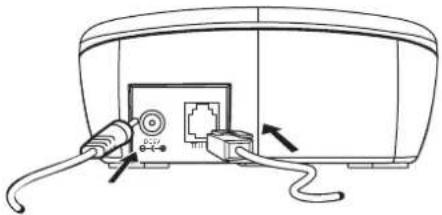
natural_image
Line drawing of a device with cables and connectors, no text or symbols presentTELEPHONE LINE CORDMAINS POWER LEAD
5.3 FITTING BATTERIES
- Place your handset with the keypad facing downwards.
- Remove the battery compartment cover by pushing and pulling it in your direction
- Insert the two batteries (AAA) into the battery compartment, paying attention to the polarity orientation.
- Slide the battery compartment cover back into place, pressing firmly to make sure it is secure.

flowchart
graph LR
    A["Step 1: Left Side"] --> B["Step 2: Right Side"]
    B --> C["Step 3: Left Side with Arrow"]
    C --> D["Step 4: Right Side with Arrow"]
IMPORTANT!
TO CHARGE THE BATTERIES FULLY BEFORE YOU USE THE CORDLESS HANDSET FOR THE FIRST TIME LEAVE THE HANDSET ON THE CHARGER POD FOR 15 HOURS.
5.4 RECHARGING YOUR CORDLESS
When your handset is discharged the Low Battery symbol ☐ appears on the display. To recharge it, just replace the handset on the charger pod with the keypad in your direction.
To recharge the batteries fully leave the handset on the charger pod for 15 hours.
5.5 REPLACING BATTERIES
IMPORTANT: Only use the rechargeable batteries provided for this model.
When the handset autonomy starts reducing, even when batteries are correctly recharged, it is time to replace the batteries: follow the instructions in Paragraph "5.3 Fitting Batteries".
6. OPERATIONAL FUNCTION
Introduction
When your cordless is in standby mode, i.e. no calls or operations are being made, the heading "H5-1" appears on the display (the number identifying the cordless).
6.1 TO ANSWER A CALL
- When you receive a call, both handset and base start ringing, the symbol appears on the display, and both the red led on the handset locator button and the big white led on the phone base start flashing.
If your cordless is directly connected to the telephone line (not via PABX) and the Caller Details Service has been activated by your server, the caller's telephone number (if available) appears on the display. - Press the button to answer the call, the symbol will come up steadily on the display and the base red led will flash.
- To end a call, press again the button, or alternatively replace the handset back in the base. The display symbol and the base red led disappear.
6.2 MAKING CALLS (MANUAL SELECTION)
- Press button.
- The symbol 📊 appears steadily on the display and the base red led starts flashing.
- Check that the dial tone is present then key in the number.
- The dialled number appears on the display.
- To end the call, press again the button or alternatively replace the handset back in the base.
6.3 SPEAKERPHONE
To activate the speakerphone, press the button when the handset is idle or after having pressed the button.
The speakerphone is active if you can hear the caller voice coming from the speaker and can see the ▶ and ▶ symbols on the display ▶ (hold repeatedly the Volume button to adjust the speaker volume). To switch back to standard from a speakerphone call, just press briefly the ▶ button.
6.4 PRE-SELECTION
- When handset is idle key in up to 25 digits.
- You can check the digit on the display before starting your call.
- If you make a mistake, press shortly the DEL button to clear digits one by one from the display; to clear all digits, press and hold the DEL button.
- When number is checked, press the button to start the call.
- At this point digits are selected and dialled.
- To end the call, press the 📋 button again, or replace the handset back in the base.
Note: If you have a PABX connection you need to pause for a few seconds between dialing the system code and the actual phone number.
To pause, press the buffer and a dash "-" will appear on the display.
6.5 LAS NUMBER REDIAL
You can call back the last 3 numbers you have dialled as your cordless stores them in memory.
Last number redial
- Press the phone button ⬆ to dial the number.
- Then press the Ⓐ/P button to have the number shown on the display.
Note: If you have a PABX connection you need to pause for a few seconds between dialing the system code and the actual phone number.
To pause, press the 📄/P button and a dash "-" will appear on the display.
Redialing any other number than the last one
If necessary, press the Last Number Redial button again until the number C/P you want is shown on the display, then press the phone button to dial the number.
6.6 CALL'S DURATION
When you make or answer a call the display shows the call's duration in minutes and seconds both during and a few seconds after the call has ended.
6.7 ADJUSTING THE VOLUME
During a call, to adjust the volume in the hanset's earpiece or speakerphone press the volume button repeatedly ▶.
The display shows the current volume level: the more "0", the highest the volume ("0" to "00000").
6.8 RINGER VOLUME
- While the handset is idle (not busy on a call) press the volume button.
- Press the < /a change the volume.
The display shows the current volume level: the more "☐"; the highest the volume ("0" to "00000"); the symbol shows on the display the ringer is turned off. - Press the button again to confirm, otherwise wait a few seconds for the new setting to be automatically confirmed and the display to get back to standby mode.
6.9 RINGER MELODY
You have a choice of 9 ringing melodies.
- While the handset is idle (not busy on a call) press the button and hold it for about 3 seconds, the display shows "d" followed by the current ringer melody.
- Press the ◀/R or 🚙/▶ button briefly to hear the different ringing melodies.
- When you reach the melody you prefer press the button again to confirm, otherwise wait a few seconds for the new setting to be automatically confirmed and the display to get back to standby mode.
6.10 TO MUTE THE MOUTHPIECE
To put the call on hold, so that the person on the other end cannot hear you, press the DEL. Button briefly. While the mouthpiece is muted (x) is shown on the display. To get back the call press the DEL button again.
6.11 TO PAGE THE HANDSET
This function is useful if you can't find your handset.
- On the base unit press and release the button. The handset rings with a special tone.
- To stop the handset ringing, on the handset press any button or numbered key.
6.12 TO LOCK THE KEYPAD
To lock the handste's keypad so that no buttons can be pressed.
- To block the handset keypad, while handset is idle press #/r0 and hold it for a few seconds; until you hear a confirmation beep and ♀ appears on the display.
- To unlock the keypad, press #again and hold it until disappears from the display.
6.13 USING YOUR CORDLESS ON A PABX
PAUSE FUNCTION
If you have a PABX connection you need to pause for a few seconds between dialing the system code and the actual phone number. To pause, press the Ⓐ/P button and a dash "-" will appear on the display.
6.14 REDIAL
◀/R This is the flash key, press it during the line is engaged to send the flash signal.
6.15 TURNING RINGER TEMPORARILY OFF
- To turn the ringer temporarily off, when the handset is idle press and hold for a few seconds the X button, the symbol will appear on the display.
- To turn the ringer back on, press and hold again the button ×_fs the symbol will disappear from the display.
IMPORTANT: with this function active only the base rings when receiving a call, while the handset only shows a symbol on the display.
7. MEMORY AND CALLER DISPLAY
7.1 10 MEMORIES
You can store up to 10 numbers in memory. Each number can have up to 25 digits.
TO STORE A NUMBER
Make sure the handset is idle (not connected).
-
Press the 📄 button and hold it untill the symbol 📋 flashes on the display.
-
Key in the number you want to store (max 25 digits). If you have a PABX connection, always remember to press the ⬆/P button between the system access code and the actual telephone number. Use the ◀/R and 🔊/▶ buttons to move the cursor from a digit to another, and the DEL button to delete a wrong digit to the left of the cursor.
-
Briefly press the button, again, the thephone number moves to the right on the display and the cursor flashes on the left.
-
Key in a memory location number (0 to 9).
-
The display goes back to standby mode.
To store another number, start again form step 1.
You can delete a record by simply storing a new number in the same location.
TO DELETE A NUMBER FROM MEMORY
- Press the 📄 button and hold it until the symbol 📄 flashes on the display.
- Briefly press the button, again, a dash "-" will appear on the display.
- Key in the memory location number (0 to 9).
- You hear a confirmation tone and the display goes back to standby mode.
TO SELECT A MEMORY
- When the handset is idle press briefly the 📄 button to enter the Phone Book.
- Key in the memory location number, if the wrong number appears on the display, key in another memory location number (0 to 9) to view the other stored records.
- Press the button or the button to call the desired number.
7.2 CALLER DETAILS SERVICE AND CALLER DISPLAY
If you subscribe to this feature from your service provider, you can see the phone numbers (if available) of people calling you, before you answer.
The phone will store the numbers of the last 20 calls (both answered and missed). The record number date and time of the call are recorded only if the telephone has a standard analog telephone line (PSTN), but not for ISDN connections.
Whit idle handset, when there have been calls you haven't answered, the symbol flashes on the display.
Missed calls whose record has already been checked are indicated on the display with the symbol ⚙ coming up steadily.
Check the paragraph below to learn how to access the list.
NOTE:
- If your cordless has a PABX connection, the Caller Details Service is only active where the main system can support this Service.
• The first 25 digits of incoming calls are recorded.
TO CHECK CALLER DISPLAY RECORDS
With handset idle, press the Caller 📁/→ Display button, you'll see the most recent record on the display.
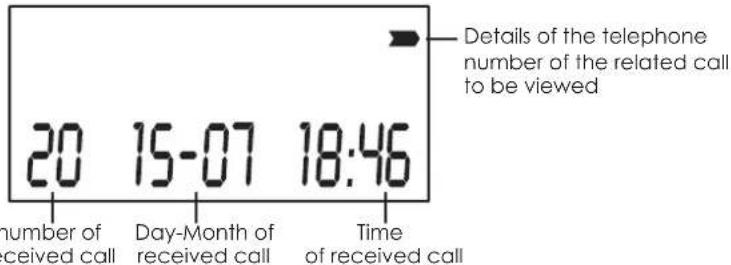
text_image
Details of the telephone number of the related call to be viewed 20 15-07 18:46 number of received call Day-Month of received call Time of received callWait a few seconds for the display to automatically show you the telephone number related to the call, otherwise press the 📁/▶ button again to check the caller's number.
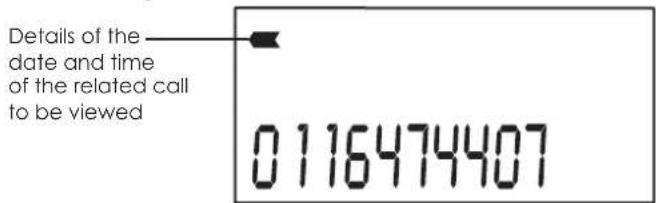
text_image
Details of the date and time of the related call to be viewed 0116474407Now, just press the ◀/R button to go back and view the date and time of the last call. Press the Caller Display button again ◀/R repeatedly to view the next records (less recent ones).
Press repeatedly the 🎨/→ button to view the phone number of the related call first, and then the date and time of the following calls (more recent ones).
Once you've reached the beginning or the end of the list, scroll it again backwards.
TO RETURN A CALL
- With handset idle, press the Phone ↩/→ button to enter the list.
- Use the
- To call back a number when the call details (date and time or telephone number) are displayed, just press thee for the button.
TO DELETE A CALLER DISPLAY RECORD
A simple operation allows you to delete a record from the list:
- When the handset is idle, press the 📁/→ button to enter the list.
- Use the
- When the record is shown on the display, press and hold the DEL, button until the display moves to the next Caller Display records.
If there are no more Caller Display records, the display shows "NO CL IP".
TO STORE A CALLER DISPLAY RECORD (10 MEMORIES AVAILABLE)
- When the handset is idle, press the button to enter the list.
- Use the
- When the number is shown on the display, press and hold for about 2 seconds the button until the symbol flashes on the display.
• Key in a memory location number (0 to 9).
- Press the Memory button 📄 briefly again, you'll hear a beep to confirm.
8. GUARANTEE
All Brondi products come with a 12-month Guarantee.
Inside the package of BRAVO CORDLESS 2 you can find the guarantee form.
The Guarantee is only valid when:
- the form is fully filled in;
– the sales ticket, invoice etc. is attached to the form; - the package has not been damaged.
The Guarantee form must be filled in with: name of the product (BRAVO CORDLESS 2), the series number (SN) shown underneath the telephone base unit (but sometimes already printed on the form).

Electric and electronic appliances need to be differentiated for waste collection.
Brondi reserves the right to amend with no previous notice the characteristics and features of its products.
16

9. DECLARATION OF CONFORMITY CE
Brondi Telefonia S.p.A., with registered offices in Str. Caffadio 14 – 10036 Settimo Torinese (TO) and headquarters in Via Guido Rossa 3 – 10024 Moncalieri (TO), holds that the appliance BRAVO
CORDLESS 2 complies with the EC R&TTE Directive 1999/5/EC and conforms to the following standards:
Radio: TBR 6
EMC: EN 301489
Safety: EN60950, EN 41003
Other: I-CTR 37
Conformity to these requirements is indicated through the marking:

BRAVO CORDLESS 2 has been designed and produced to be used in connection with the Italian analog telephone network PSTN.
Bravo Cordless 2 complies with the EC EMC Directive 89/336/EEC and with the EC Low Voltage Directive 73/23/EEC.
17


text_image
SISTEMA QUALITA CERTIFICATO UNI EN ISO 9001/2000 SINCERT DNVBRONDI TELEFONIA SPA
Company with
Quality Certification System
For product details (features, on-line instruction manuals, etc.), updated directories of customer service centres and all our latest promotions and products please visit our website:
www.brondi.it
18
BRAVO CORDLESS 2
CORDLESS DECT GAP
natural_image
Line drawing of a vintage mobile phone with keypad and base (no text or symbols)1 1 Portátil - 1 Base
1 Adaptador 220V
natural_image
Line drawing of a server rack with attached cables and ports (no text or symbols)natural_image
Line drawing of a vintage mobile phone with keypad and base (no text or symbols)11 Combiné - 1 Base

1 Adaptateur 220 V
Poids combiné (piles. incluses.): 146 g
40

3. DESCRIPTION DE L'APPAREIL
COMBINÉ ET BASE
text_image
BRONDI 1 2 3 4 5 6 7 8 9 10 1natural_image
Diagram of a device showing cable routing and connector connections (no text or symbols)CABLE D'ALIMENTATION CABLE TELEPHONIQUE
5.3 INSTALLATION DES BATTERIES
flowchart
graph LR
    A["Device with circular ports"] --> B["Arrow to next state"]
    B --> C["Device with circular ports"]
    C --> D["Arrow left"]
ATTENTION!
AVANT D'UTILISER L'APPAREIL NOUS VOUS CONSEILLONS DE LAISSER LE COMBINÉ EN CHARGE PENDANT AU MOINS 15 HEURES, POSE SUR LA BASE, AFIN DE PERMETTRE AUX BATTERIES DE SE CHARGER COMPLETEMENT.
5.4 COMMENT RECHARGER LE COMBINÉ
text_image
Line drawing of a vintage mobile phone with keypad and control buttonsDISPLAY, KLINGELTÖNE
natural_image
Line drawing of a device with attached cables and ports (no text or symbols)TELEFONKABESTROMKABEL
5.3 BATTERIEN EINLEGEN
flowchart
graph LR
    A["Step 1: Left Side"] --> B["Step 2: Right Side"]
    B --> C["Step 3: Left Side with Arrow"]
    C --> D["Step 4: Right Side with Arrow"]
ACHTUNG!
VOR DER ERSTEN BENUTZUNG EMPFEHLEN WIR IHNEN DAS MOBILTEIL MINDESTENS 15 STUNDEN IM BASISGERÄT ZUM AUFLADEN ZU LASSEN, DAMIT SICH DIE BATTERIEN KOMPLETT AUFLADEN KÖNNEN.