DVT-229 - TV LENCO - Free user manual and instructions
Find the device manual for free DVT-229 LENCO in PDF.


| Product Type | LCD TV with built-in DVD player |
| Brand | LENCO |
| Model | DVT-229 |
| Screen Size | 22 inches (diagonal) |
| Maximum Resolution (PC) | 1360 x 768 (WXGA) or 1440 x 900 depending on model |
| Supported HDMI/VGA Resolutions | 480p, 576p, 720p, 1080i (HDMI); VGA, SVGA, XGA, WXGA (VGA) |
| Tuner | ATV (analog) and DTV (digital) built-in |
| Video Inputs | HDMI, VGA, SCART, composite video (AV), YPbPr (component) |
| Audio Inputs | PC Audio (3.5 mm jack), audio L/R (RCA) |
| Other Connectors | USB (for software update), CI (optional), headphone (3.5 mm jack) |
| Power Supply | 100-240 V, 50/60 Hz (AC) |
| Main Functions | Analogue/digital TV, DVD player, USB Media (JPEG, MP3, MPEG-4), teletext, EPG, parental control, timer |
| Compatible Disc Formats | DVD, VCD, Audio CD, CD-R/RW, JPEG, MP3, MPEG-4, Kodak Picture CD, CD+G |
| Operating Temperature | 0 °C to 40 °C |
| Energy Efficiency Class | Not specified (older model) |
| Maintenance and Cleaning | Clean with a soft dry cloth; do not use solvents |
| Safety | Do not open the housing (risk of electric shock); do not expose to moisture; ventilation required |
| Dimensions (approx.) | Approximately 50 cm wide, 35 cm high, 15 cm deep (estimate for 22 inches) |
| Weight (approx.) | Approximately 4 kg (estimate) |
Frequently Asked Questions - DVT-229 LENCO
User questions about DVT-229 LENCO
0 question about this device. Answer the ones you know or ask your own.
Ask a new question about this device
Download the instructions for your TV in PDF format for free! Find your manual DVT-229 - LENCO and take your electronic device back in hand. On this page are published all the documents necessary for the use of your device. DVT-229 by LENCO.
USER MANUAL DVT-229 LENCO
Introduction
- Warning
- Caution
- Main Unit Description
- Remote Control
- OSD basic adjustment
- DTV Features
USB Features
DVD manual
- Specifications
- Trouble Shooting
Introduction
Thank you very much for your purchase of our product of LCD TV. It serves as a normal colour TV and PC monitor. To enjoy your TV to the full from the very beginning, read this manual carefully and keep it handy for ready reference.
INSTALLATION
① Locate the TV in a room where direct light does not strike the screen. Total darkness or a reflection on the picture screen can cause eyestrain. Soft and indirect lighting is recommended for comfortable viewing.
② Allow enough space between the receiver and the wall to permit ventilation.
③ Avoid excessively warm locations to prevent possible damage to the cabinet or premature component failure.
④ This TV can be connected to AC100-240V 50/60HZ.
⑤ Do not install the TV in a location near heat sources such as radiator, air ducts, direct sunlight, or in a place somewhere like close compartment and close area. Do not cover the ventilation openings when using the TV.
(6) The indicator light will last about 30 seconds to go out after cutting off the electricity, during this period, you cannot repower it on until the indicator light goes out, thanks a lot for your attention!
Warning

CAUTION RISK OF ELECTRIC SHOCK DO NOT OPEN

CAUTION: TO AVOID THE RISK OF ELECTRIC SHOCK.
DO NOT REMOVE COVER (OR BACK).
NO USER- SERVICEABLE PARTS INSIDE.
REFER SERVICING TO QUALIFIED SERVICE PERSONNEL.

This symbol is intended to alert the user to avoid the risk of electric shock, do not disassemble this equipment by anyone except a qualified service personnel.

This symbol is intended to alert the user to the presence of important operation and maintenance instructions in the literature accompanying the equipment.
Caution
Caution
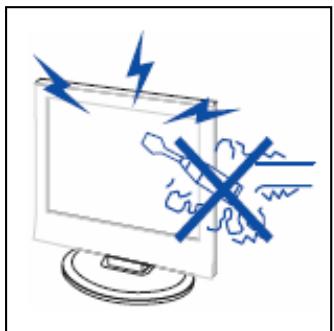
High voltages are used in the operation of this product. Do not open the product's casing. Refer servicing to qualified service personnel.
Caution
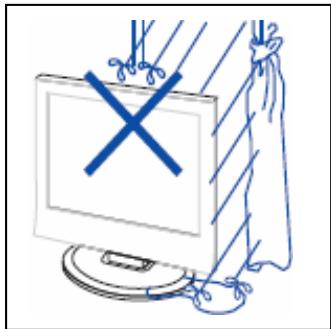
To prevent fire or electrical shock hazard, Do not expose the main unit to moisture.
Caution
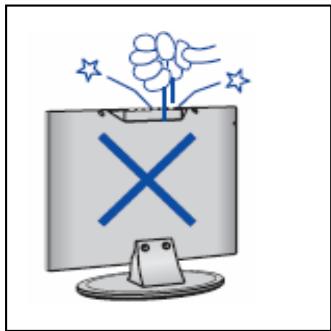
Do not drop or push objects into the television cabinet slots or openings. Never spill any kind of liquid on the television receiver.
Caution
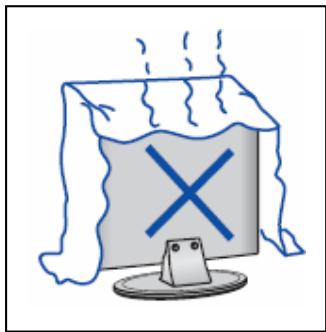
Avoid exposing the main unit to direct sunlight and other sources of heat. Do not stand the television receiver directly on other products which give off heat. E. g. video cassette players, Audio amplifiers. Do not block the ventilation holes in the back cover. Ventilation is essential to prevent failure of electrical component. Do not squash power supply cord under the main unit or other heavy objects.
Caution
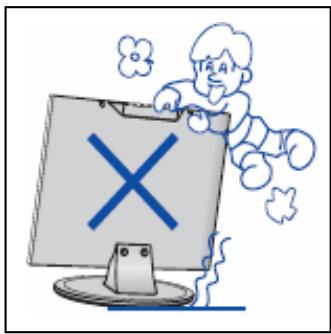

Never stand on, lean on, push suddenly the product or its stand. You should Pay special attention to children.
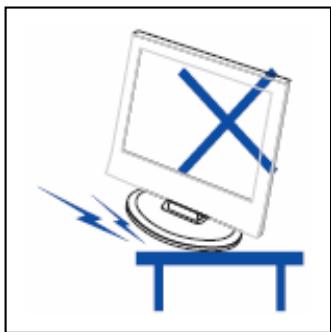

Do not place the main unit on an unstable cart stand, shelf or table. Serious injury to an individual, and damage to the television, may result if it should fall.
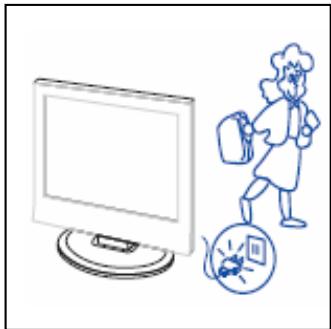

When the product is not used for an extended period of time, it is advisable to disconnect the AC power cord from the AC outlet.
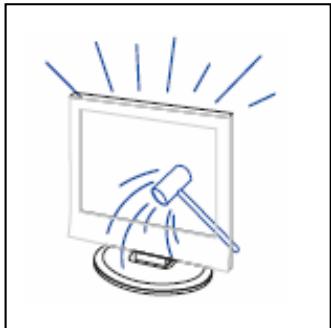

The LCD panel used in this product is made of glass. Therefore, it can break when the product is dropped or applied with impact. Be careful not to be injured by broken glass pieces in case the LCD panel breaks.
Main unit description
Control Panel Button Function
VOL+ : Volume up.
VOL- : Volume down.
CH+ : TV channel up.
CH- : TV channel down.
MENU:Press to select the main menu.
TV/AV: Select the input signal.
POWER: Switch on when in standby mode or enter the standby mode.
TV Terminal Connections
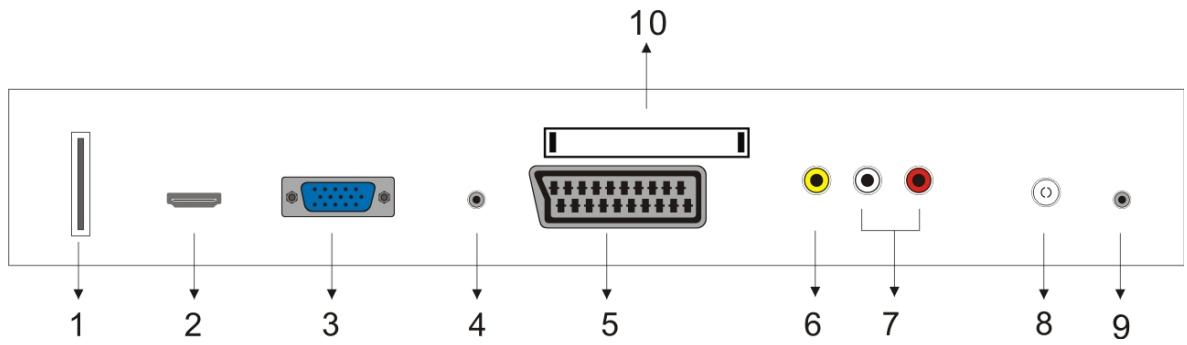
- USB input terminal (Only used for upgrading software).
- HDMI input terminal.
- VGA input terminal.
- PC AUDIO input terminal.
- SCART input terminal.
- Video input terminal.
- AUDIO input terminal.
- ATV antenna/close circuit TV network port or DTV antenna port.
- HEADPHONE output terminal.
- CI input terminal. (optional)
Power Input Configuration
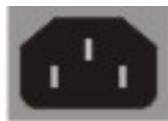
AC
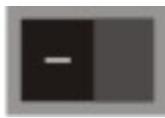
POWER
Remote control
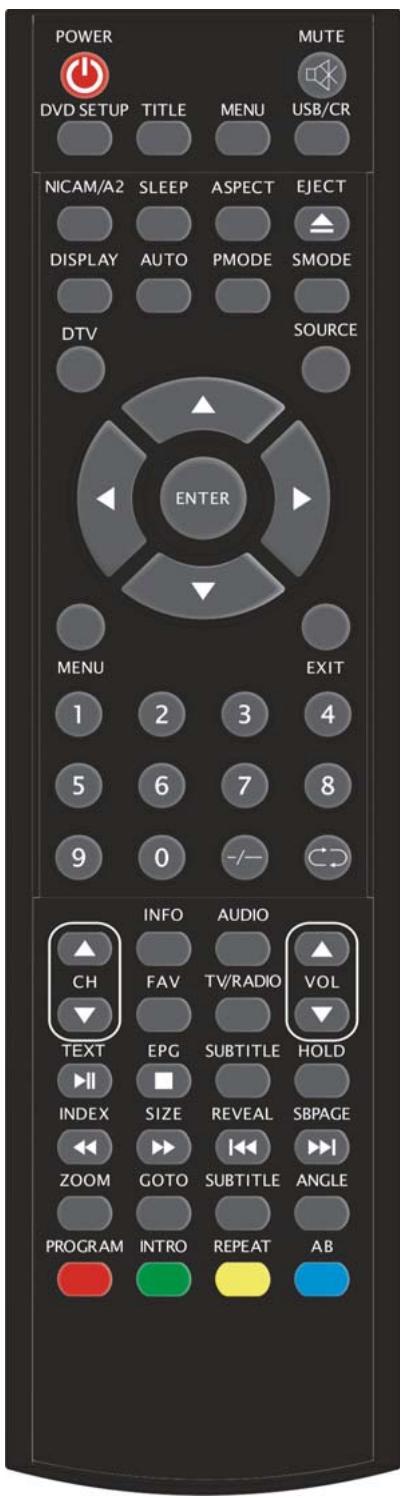
POWER: Press this button to switch on the TV when at standby mode or enter standby mode.
MUTE: Press this button to mute or restore sound.
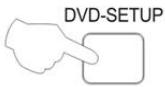
DVD SETUP: Press this button to enter the DVD main menu and press again to exit the main menu.
(Used for models with DVD function only)
TITLE: Press this button to return the title menu.
(Used for models with DVD function only)
MENU(BLUE): Press this button to return the root menu or exit the DVD main menu.
(Used for models with DVD function only)
USB/CR: This button is not available.
NICAM/A2: In the TV condition, press this button to select the sound effects.
SLEEP: Set the sleep timer.
ASPECT: Press to select the different picture size.
EJECT : press to eject the DVD-disc in DVD mode.
(Used for models with DVD function only)
DISPLAY: Display TV information.
AUTO: Press to adjust the picture automatically in PC mode.
PMODE: Select picture mode.
SMODE: Select sound mode.
DTV: Press to enter the DTV channel.
(Used for models with DTV function only)
SOURCE: Press to change signal source.
ENTER: Enter the selected option or perform the selected operation.
MENU: Press this button to enter the main menu for various optional adjustable setting.
EXIT: Exit the OSD (On-screen display).
0-9: Select and switch to a channel using 0 - 9.
-/-:Channel list.
: Switch back and front between the current and previous channels.
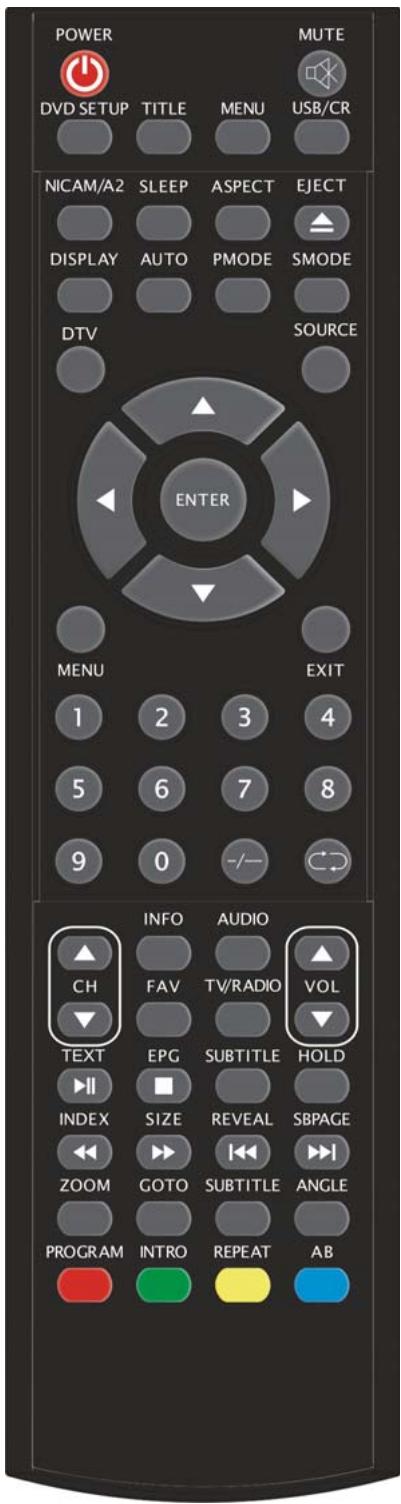
CH + / CH - : Change the channel up and down.
VOL + / VOL - : Adjust the volume.
INFO: Display some information of current program in DTV mode.
(Used for models with DTV function only)
AUDIO: Press to select the DTV audio or DVD audio.
(Used for models with DTV or DVD function only)
FAV: Switch between custom set "Favourite List".
(Used for models with DTV function only)
TV/RADIO: Switch between DTV program and radio program (only audio but not image).
(Used for models with DTV function only)
EPG: Enter electronic program guide.
(Used for models with DTV function only)
□: Stop playing the disc.
(Used for models with DVD function only)
SUBTITLE(GREEN): Open or close subtitle.
(Used for models with DTV function only)
TEXT: Press to enter the Teletext mode.
(Used for European region only)
Press to start playing the disc to pause playing.
(Used for models with DVD function only)
HOLD: Freeze a multi-page passage on screen in Teletext mode. (Used for European region only).
INDEX: Press this button to go to the index page in Teletext.
(Used for European region only)
Press to play backward.
(Used for models with DVD function only)
SIZE: Display the top, bottom or all of page to read easily in Teletext mode.
(Used for European region only)
Press to play forward.
(Used for models with DVD function only)

REVEAL: Press this button to reveal the hidden information in Teletext page. Press again to hide the information.
(Used for European region only)
: Skip to previous chapter
(Used for models with DVD function only)
SUBPAGE: Carry out the function of SUBCODE in the text while enter the text display mode.
(Used for European region only)
:Skip to next chapter
(Used for models with DVD function only)
ZOOM: Select the zoom picture.
(Used for models with DVD function only)
GOTO: Jump to the appointed chapter or title.
(Used for models with DVD function only)
SUBTITLE(BLUE): Select the disc caption.
(Used for models with DVD function only)
ANGLE: Select the angle.
(Used for models with DVD function only)
PROGRAM: Select the disc program.
(Used for models with DVD function only)
INTRO: Press the button to display the time of chapter remain or elapsed.
(Used for models with DVD function only)
REPEAT: Select the repeat mode.
(Used for models with DVD function only)
AB: Select the segment to repeat.
(Used for models with DVD function only)
RED, GREEN, YELLOW, BLUE: Correspond to the different colored subjects.
(Used for european region function only)
OSD basic adjustment
Installation Guide
If this is the first time you are turning on the TV and there are no programs in the TV memory, the "Installation Guide" menu will appear on the screen.
- Press the “ / ” button to select the local language.
- Press “ / ” button to select “Auto Scan” and press the “▶” button or “ENTER” button to “MENU” button to skip, or press the “EXIT” button to exit if necessary.

Note: Searching for platform will take a long time, please be patient!
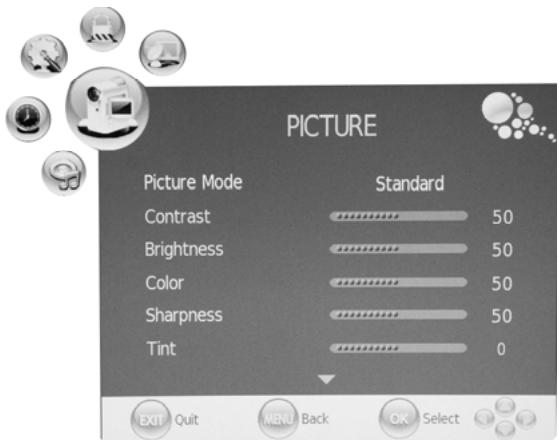
PICTURE
You can select the type of picture, which best corresponds to your viewing.
- Press the “MENU” button to enter the OSD menu. Then press “ ” button to select the “PICTURE” menu. Enter the “PICTURE” menu by pressing “ ” button or “ENTER” button.
- Press “▲/▼” button to select “Picture Mode” and press the “▲/▼” button to select the picture mode.
- Press “▲/▼” button to select “Contrast” and press the “▲/▼” button to enter contrast adjustment menu to adjust contrast.
- Press “▲/▼” button to select “Brightness” and press the “▲/▼” button to enter brightness adjustment menu to adjust brightness.
- Press “▲/▼” button to select “Color” and press the “▲/▼” button to enter color adjustment menu to adjust color.
- Press “▲/▼” button to select “Sharpness” and press the “▲/▼” button to enter sharpness adjustment menu to adjust sharpness.
- Press “▲/▼” button to select “Tint” and press the “</▶” button to enter hue adjustment menu to adjust tint.
Note: The 'Tint' item is used in NTSC mode only
- Press “▲/▼” button to select “Color Temperature” and press the “▲/▼” button to select the color temp.
- Press “▲/▼” button to select “Red” and press the “▲/▼” button to adjust.
- Press “▲/▼” button to select “Green” and press the “▲/▼” button to adjust.
- Press “▲/▼” button to select “Blue” and press the “▲/▼” button to adjust.
- Press “ / ” button to select “Aspect Ratio” and press the “ / ” button to select the size which you desire.
Note: When the current source is “PC”, the “Aspect Ratio” item only has two options for “16:9” and “4:3”.
- Press “ / ” button to select “Noise Reduction” and press the “ / ” button to select open or close the noise reduction function.
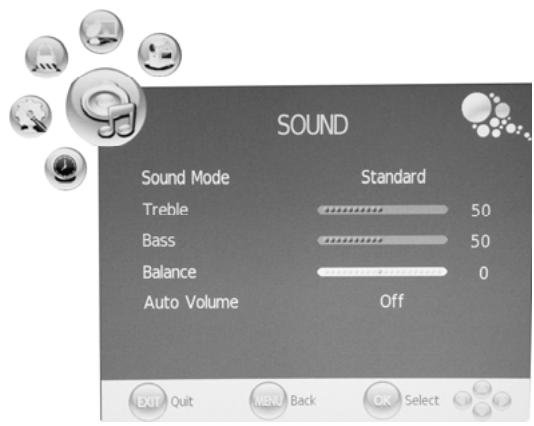
SOUND
You can select the type of sound, which best corresponds to your listening.
- Press the "MENU" button to enter the OSD menu. Then press / button to select the "SOUND" menu. Enter the "SOUND" menu by pressing "▼" button or "ENTER" button.
- Press “ / ” button to select “Sound Mode” and press the “ / ” button to select the sound mode.
- Press “ / ” button to select “Treble” and press the “ / ” button to adjust.
- Press “ / ” button to select “Bass” and press the “ / ” button to adjust.
- Press “ / ” button to select “Balance” and press the “ / ” button to adjust.
- Press “ / ” button to select “Auto Volume” and press the “ / ” button to select “On” or “Off”. This reduces the effect of sudden changes in volume of the source.
TIME
- Press the “MENU” button to enter the OSD menu. Then press “ ” button to select the “TIME” menu. Enter the “TIME” menu by pressing “ ” button or “ENTER” button.
- Press “ / ” button to select “Clock” and press the “▶” button or “ENTER” button to enter to setup the local time.
- Press “ / ” button to select “Off Time” and press the “▶” button or “ENTER” button to set the time at which you want the TV to turn off.
- Press “ ” button to select “On Time” and
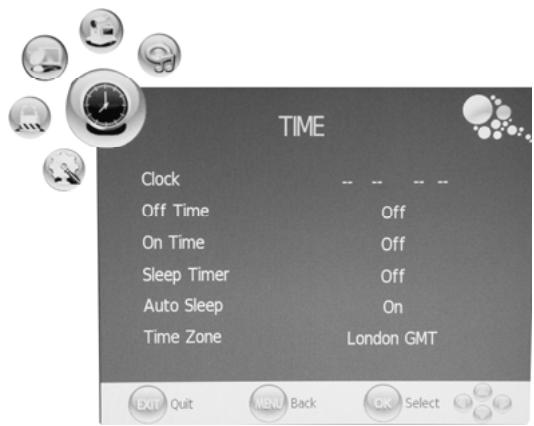
press the “▶” button or “ENTER” button to set the time at which you want the TV to turn on (from standby mode).
-
Press “ / ” button to select “Sleep Time” and press the “ / ” button to select sleep time.
-
Press “ / ” button to select “Auto Sleep” and press the “ / ” button to select the function “On” or “Off”.
- Press “ / ” button to select “Time Zone” and press the “ / ” button to select the local time zone.
OPTION
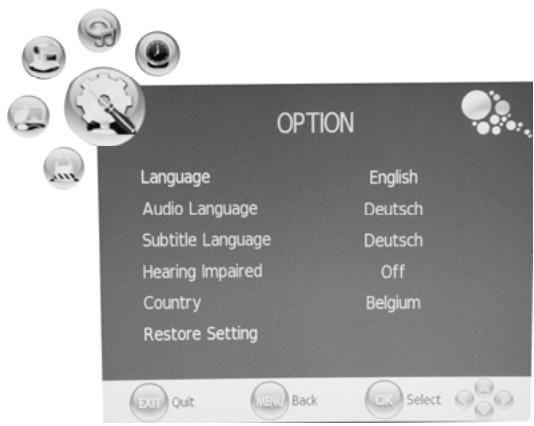
- Press the "MENU" button to enter the OSD menu. Then press / button to select the "OPTION" menu. Enter the "OPTION" menu by pressing button or "ENTER" button.
- Press “▲/▼” button to select “Language” and press the “▲/▼” button to select the OSD language which you desire.
- Press “▲/▼” button to select “Audio Language” and press the “▶” button or “ENTER” button to set the “Audio Language”. This function is only used for DTV source.
- Press “▲/▼” button to select “Subtitle Language” and press the “▶” button or “ENTER” button to set the “Subtitle Language”. This function is only used for DTV source.
- Press “ / ” button to select “Hearing Impaired” and press the “ / ” button to select “On” or “Off”. This function is only used for DTV source.
- Press “ / ” button to select “Country”. The Country is set to default state., setting is can not be changed.
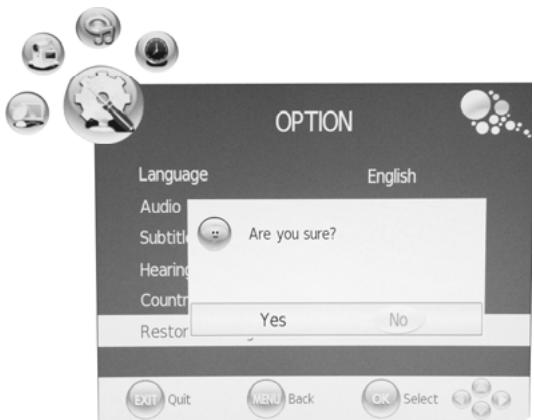
- Press “▲/▼” button to select “Restore Setting” menu and press the “▶” button or “ENTER” button to enter. Press the “▲/▶” button to select “YES” or “NO”, press “ENTER” button to reset when select “YES”, press “ENTER” button to return back to the previous menu when select “NO”.
LOCK
- Press the "MENU" button to enter the OSD menu. Then press / button to select the "LOCK" menu. Enter the "LOCK" menu by pressing "▼" button. The default password is "0000". The administrator password is "8899".
- Press “ / ” button to select “Lock Channel” and press the “ / ” button to select “On” or
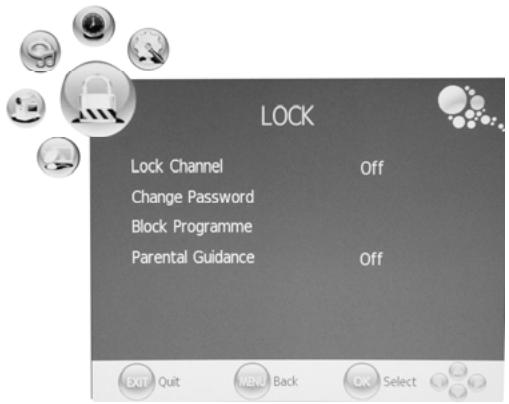
"Off". Setting to On enables Program Blocking.
- Press “ / ” button to select “Change Password” and press the “▶” button or “ENTER” button to enter to change password.
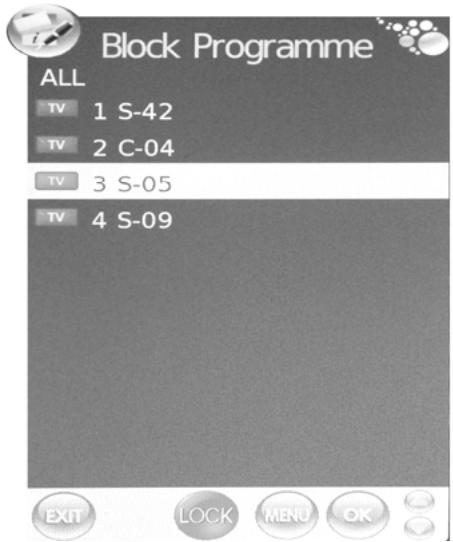
- Press “▲/▼” button to select “Block Programme” and press the “▶” button or “ENTER” button to enter. Press “▲/▼” button to select the item which you want to lock. Press “GREEN” button to lock the item and press “GREEN” button again to unlock. Press “MENU” button to return the previous menu. Press “EXIT” button to exit the menu.
- Press “ ” button to select “Parental Guidance” and press the “ ” button to select “Parental Guidance”.
ATV CHANNEL
- Press the "MENU" button to enter the OSD menu. Then press / button to select the "CHANNEL" menu. Enter the "CHANNEL" menu by pressing "▼" button or "ENTER" button.
- Press “▲/▼” button to select “Auto Scan” and press the “▶” button or “ENTER” button to do auto search. Press “MENU” button to return the previous menu. Press “EXIT” button to exit. Note: Searching for platform will take a long time, please be patient!
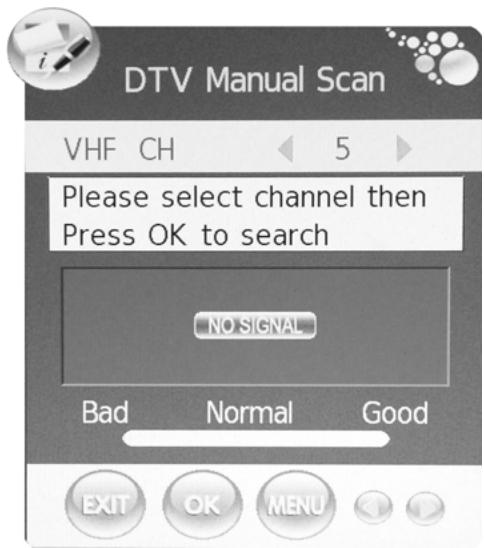
- Press “▲/▼” button to select “DTV Manual Scan” and press the “▶” button or “ENTER” button to do DTV manual search. Press “MENU” button to return the previous menu. Press “EXIT” button to exit the menu
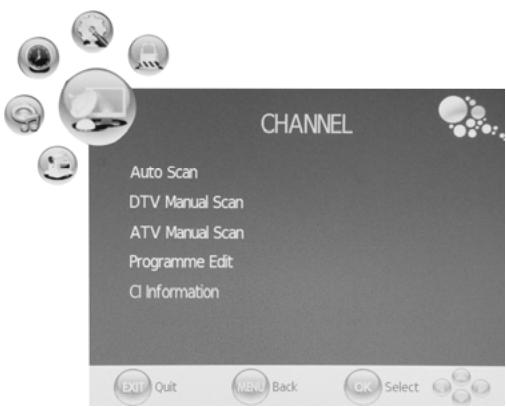
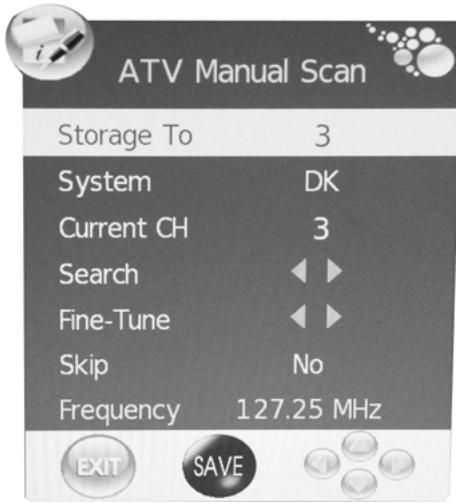
- Press “▲/▼” button to select “ATV Manual Scan” and press the “▶” button or “ENTER” button to do DTV manual search. Press “MENU” button to return the previous menu. Press “EXIT” button to exit the menu. Press “RED” button to save the program.
- Press “▲/▼” button to select “Programme Edit” and press the “▶” button or “ENTER” button to enter.
a. DELETE
Press “ / ” button to select the program and press “RED” button twice to delete the program.
b. RENAME
Press “ / ” button to select the program and press “GREEN” button to rename the program.
Press“/”button to select the item which you want to change and press the“/” button to select the different item. Press“MENU” button to confirm.
c. SWAP
Press “ / ” button to select the channel and press the “YELLOW” button to swap. Then press the “ / ” button to select the channel with which you want to swap. Press “YELLOW” button again to confirm.
d. SKIP
Press “ / ” button to select the channel which you want to skip and press the “BLUE” button to skip. Press “BLUE” button again to cancel the setting.
e. FAV
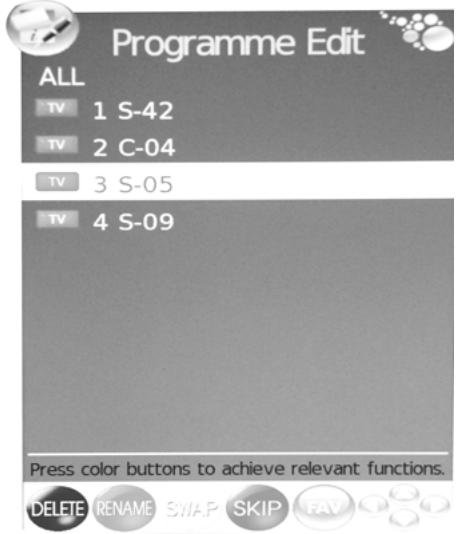
Press “ / ” button to select the channel and press the “FAV” button to label the channel for favourite.
PC (When signal source is PC)
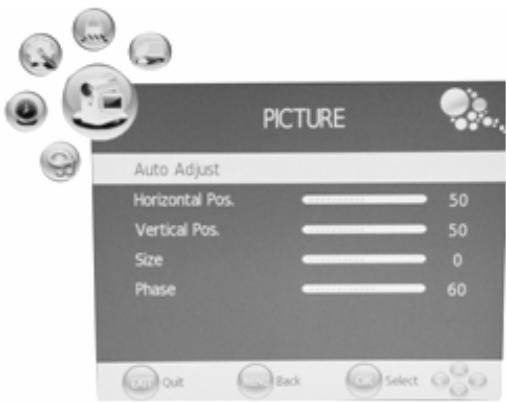
- Press the "MENU" button to enter the OSD menu. Then press / button to select the "PICTURE" menu. Press / button to select "PC Setup". Enter the "PC Setup" menu by pressing or "ENTER" button.
- Press “▲/▼” button to select “Auto Adjust” menu and press the “▶” button or “ENTER” button to do auto adjustment.
- Press “ ” button to select “Horizontal Pos.” and press the “ ” button to adjust.
- Press “ / ” button to select “Vertical Pos.” and press the “ / ” button to adjust.
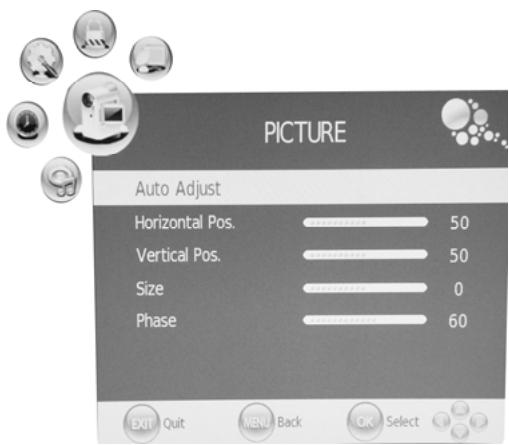
- Press “▲/▼” button to select “Size” and press the “▲/▼” button to adjust.
- Press “ / ” button to select “Phase” and press the “ / ” button to adjust.
DTV CHANNEL
- Press the "MENU" button to enter the OSD menu. Then press / button to select the "CHANNEL" menu. Enter the "CHANNEL" menu by pressing button or "ENTER" button.
- Press “▲/▼” button to select “Auto Scan” and press the “▶” button or “ENTER” button to do auto search. Press “MENU” button to return the previous menu. Press “EXIT” button to exit. Note: Searching for platform will take a long time, please be patient!
- Press “▲/▼” button to select “DTV Manual Scan” and press the “▶” button or “ENTER” button to do DTV manual search. Press “MENU” button to return the previous menu. Press “EXIT” button to exit the menu.
- Press “▲/▼” button to select “ATV Manual Scan” and press the “▶” button or “ENTER” button to do DTV manual search. Press “MENU” button to return the previous menu. Press “EXIT” button to exit the menu. Press “RED” button to save the program
- Press “▲/▼” button to select “Programme Edit” and press the “▶” button or “ENTER” button to enter.
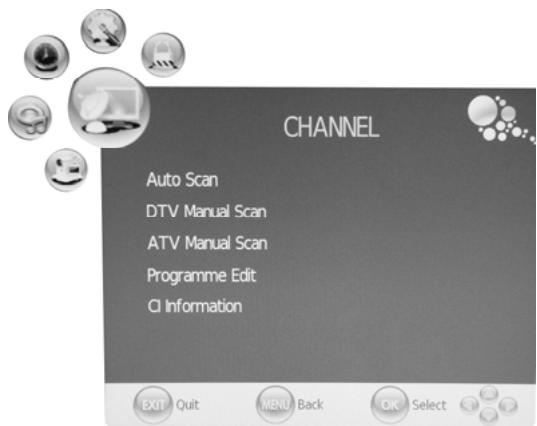
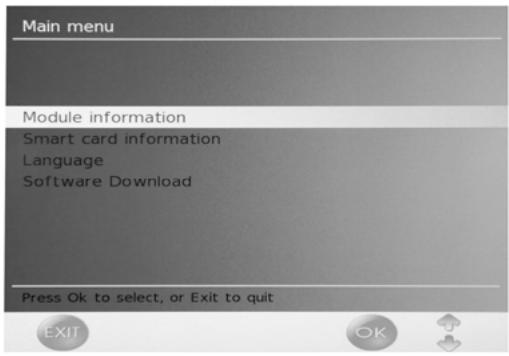
- Press “▲/▼” button to select “CI Information” and press the “▶” button or “ENTER” button to enter.
Note: The pic is provided for reference only since the info displayed will be different according to different CI card.
DTV Features
Favourite List
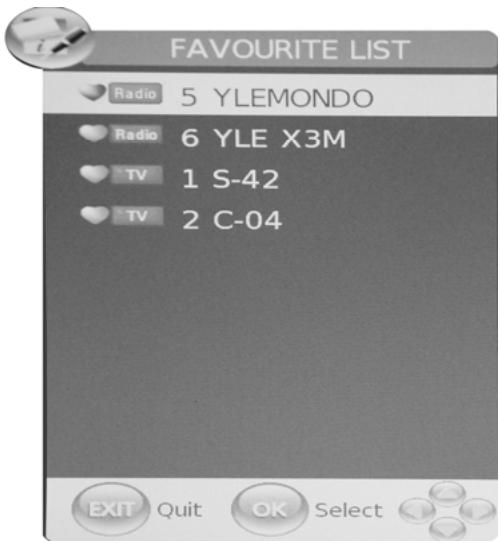
When the source is selected as DTV, users can enter FAVOURITE LIST by pressing "FAV" button.
The "Favourite LIST" window is illustrated as follows:
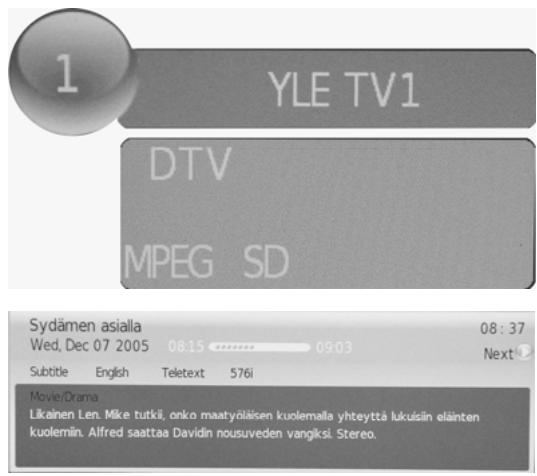
Program Information
When the source is selected as DTV, you can press "INFO" button to display the channel's information. The PROGRAM INFORMATION window is illustrated as follows:
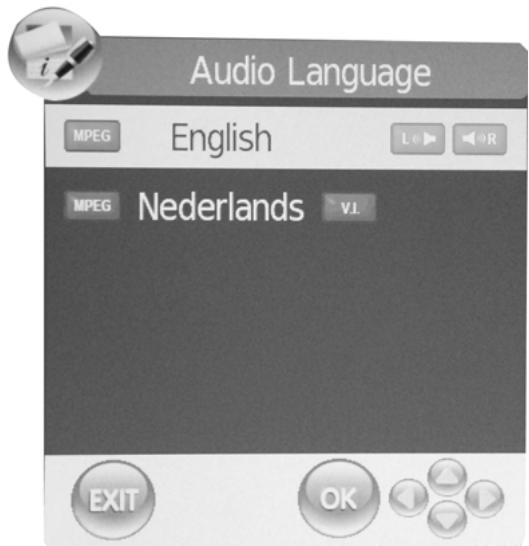
Audio
When the source is selected as DTV, users can enter "Audio channel" by pressing "AUDIO" button. The "channel audio" window is illustrated as follows:
Press“/”button to select the“Sound Mode” such as“L&R”,“R&R”,“L&L”.
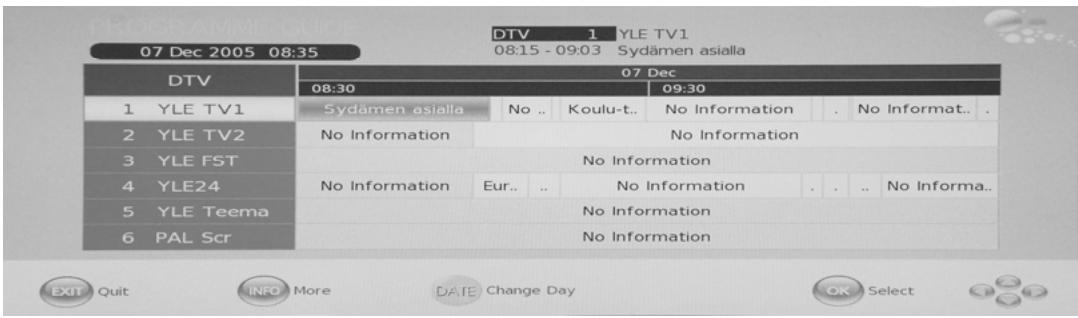
Electronic Program Guide (EPG)
Electronic Program Guide provides program information which will be broadcasted now or in the future. The system will display EPG window by pressing "EPG" button. DATE and TIME information is displayed on the right of the window. The left side shows all channels. The right side shows the programs in the channel. The selected program is also displayed on the top of the screen. When you have selected a program, you can press "INFO" button to display the program's detail. Press "YELLOW" button to select the data and press the / button to change the day.
DTV / Radio Switch
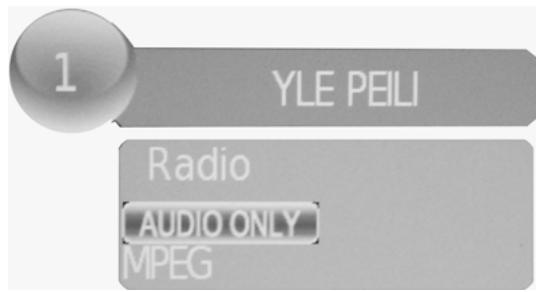
"TV / RADIO" button is used to switch between DTV programs and Digital Radio broadcasts.
Subtitle
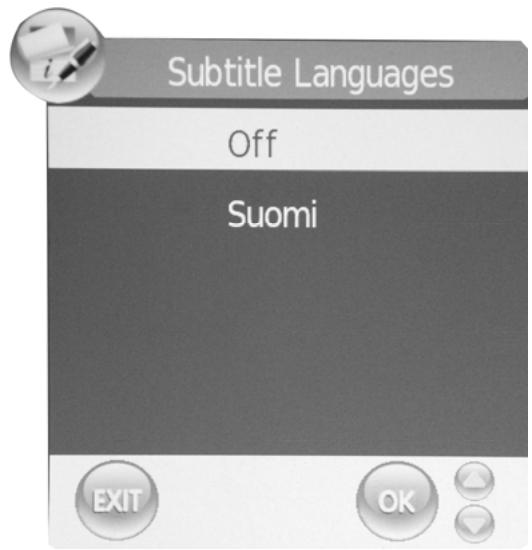
When the source is selected as DTV, users can view subtitles (broadcast dependent) by pressing "SUBTITLE" button.
DVD manual
BASIC PLAY BACK
Preparations
Press the TV/AV button on the front panel or SOURCE button to select the DVD source.
Basic playback
- press EJECT to open the disc tray,
Place a disc on the disc tray.(If there is no disc placed on the disc tray in DVD mode, OPEN will display on the screen all the times)
There is only one disc size. Place the disc in the correct guide on the disc tray. If the disc is out of the guide, it may damage the disc and cause the DVD player to malfunction Do not place a disc Which is unplayable in this DVD player.
2. Press EJECT to close the disc tray. The playback will automatically start.
Some disc may not playback automatically, you can press PLAY/PAUSE or ENTER button to start playback.
Some disc may start playback with a menu .use the cursor button on the remote control to select menu options and press PLAY/PAUSE or ENTER to start, or press digits to select a menu options directly.
Pause playback
Press PLAY/PAUSE or ENTER to pause playback (still mode). The sound will be muted during still mode.
Press PLAY/PAUSE or ENTER to resume normal playback.
Stop playback
- Press STOP button to go to stop mode, the TV screen will show the start-up logo, For some disc the player can recall the location where stopped, such as DVDs and audio CDs.. Press PLAY/PAUSE or ENTER to resume playback from the location where playback is stopped,
- Press STOP twice to stop completely
Previous and Next
During play back, press PREV key can go back to the beginning of this chapter, then each press of this key will skip a chapter till the start of the disc. (note; Disc function may vary depending on disc format)
Each press of NEXT key during playback will skip the current chapter and play the next one.
Fast forward and Fast reverse
Press F.FWD to fast forward through the disc. Each time the F.FWD button is pressed, the fast forward motion speed changes. it would cycle through 2x,4x,8x,16x,32x , and normal.
press PLAY/ENTER to resume normal playback,
press F.REV to fast reverse through the disc. Each time the F.REV button is pressed, the fast reverse motion speed changes, it would cycle through 2X, 4X, 8X, 16X, 32X and normal.
press PLAY/ENTER to resume normal playback.
ZOOM
Press this button can zoom enlarge or lessen the picture. Each time pressed the picture times will be change, in zoom mode press navigation buttons to move the picture displayed on the screen
IMPORTANT NOTE;
ALL DESCRIBING FUNCTION IS FOR DVD DISCS. IF YOU PLAY OTHER FORMAT DISC, THE OPERATION AND DISPLAY ON SCREEN MAY DIFFERENT.
SUBTITLE
Press “SUBTITLE”, the screen will display “SUBTI-TLE 01/XX XXXX”, “01” indicates the ordinal number of this language; “XX” indicates total number of language; “XXXX” indicates the language of country, (the number of language depends on disc). This function can select up to 32 languages displayed on screen.
REPEAT
Press REPEAT button multiple times to reach desired play mode;
DVD
Chapter repeat, title repeat, all repeat CD
Track repeat, all repeat MP3
Single, Repeat one, Repeat folder, Folder, Shuffle, random
REPEAT A-B
Press A-B to mark the start-point, press again to set an end point to complete setting, The selected section A-B will be repeated immediately.
Press the repeat A-B again to cancel this function.
ANGLE
When enjoying sports, concert or theatre, press this key to watch same actions in different angles. (Valid for discs possessing this function, Using a disc recorded in multi-angle you can view the scene from different angles, for example, front, side, whole view and exterior scene,)
MEUN
Press this key to display foot menu, select item according to your preference. (This function will work with a DVD having a multi-layer menu.).
PROGRAM
When playing discs, press "PROGRAM" to enter program mode. Press the digit buttons to select the program number that you want, when finished, move the cursor to select "START". This will start the program playback. if you want to cancel this function, press "STOP", then press PLAY/PAUSE or ENTER NOTE; This function is invalid for MP3
AUDIO
Press this key can change the audio mode.
Such as; Audio 1/2; AC 3 2 CH English
Audio 2/2; AC 3 5.1CH English
If you play CD disc, press this button can cycle among mono left, Mono Right, Mix-Mono and Stereo.
Note; When press this button continuously, you must above 3 seconds interval.
TITLE/PBC
With some DVD discs pressing this key will display the title menu, You can then use the digit buttons to select the item you prefer.
You can view Kodak picture CD and JPEG picture CD on this TV.
Playback
Insert a Kodak picture CD or JPEG picture CD into the tray and the disc will be loaded
Automatically. If the disc type can be identified, the player will start showing the pictures one by one (slide show mode).if a navigation menu will be displayed use the navigation buttons to select a file, then press the ENTER button.
Each picture in the CD will be displayed consecutively in a slide-show fashion and will be scaled to fit in the whole TV screen. Some slide show transition modes are provided use “PROGRAM” key to select. Customer can set transition effects for each picture.
TO display an image indefinitely, press the "PAUSE" key. To view the next or previous picture press "NEXT" or "PREV" key. To resume the slide show press the "ENTER" key.
Press the STOP button to preview the photos in a folder, press navigation buttons to rotate a picture.
ZOOM
We provide zoom in/out function for the pictures, press the ZOOM key to execute zoom function and select the zoom enlarging scale by pressing and buttons.
SCREEN SAVER FUNCTION
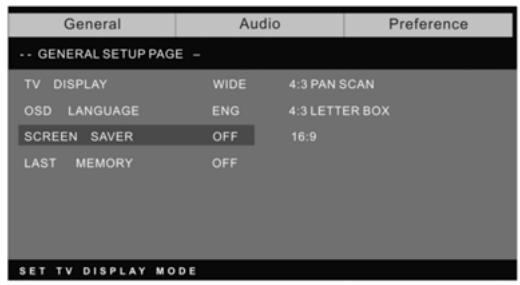
If this unit is not working by 3 minutes, it will go to sleep mode with screen saver on. In this mode, you can press any key on remote control or on front panel to activate the unit.
You can set SCREEN SAVER function to OFF in GENERAL SETUP PAGE of DVD SYSTEM SETUP.
MP3 PLAYBACK
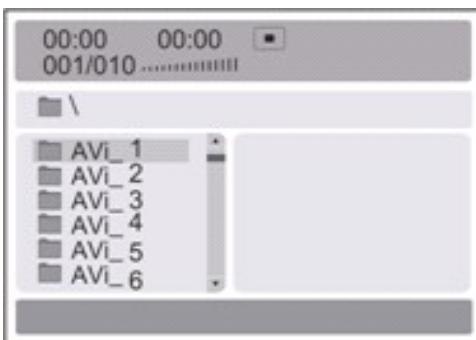
When playing an MP3 disc, a navigation menu will be displayed automatically. In the menu, Use up or DOMN navigation buttons to choose the folder. Then PLAY/PAUSE or ENTER to enter the folder. Use UP or DOMN navigation buttons to choose the file and press PLAY/PAUSE or. ENTER Pressing the left navigation button will take you to the previous screen menu.
MPEG4 DISC FUNCTION INTRODUCTION
MPEG-4 is the forth video and audio encoding standard released by MPEG (The abbreviation of "moving pictures Experts Group").VCD is based on MPEG-1 technology and DVD is based on MPEG-2 MPEG-4 takes advantage of narrow bandwidth, purser the best picture quality by
compress and transmit the data in frame reconstruct technology. The audio data is compressed by WMA or MP3 standard.MPEG-4 is the most advanced compression technology standard In AV field. It has the highest compression rate. By MPEG-4 Technology, we can encode and compress a DVD film into one Or two CD-R disc with pretty good picture quality, or can burn Several films that has same quality as VCD into one CD-R disc, Or can burn several films that has similar quality to DVD into DVD-ROM disc.
Note:
- The MPEG-4 discs in market now have many different formats, such as XVID, AVI, RM etc. But some discs with "MPEG4" logo in market are not encoded by MPEG technology. It is normal that some of the discs can't be played well in this player because of the incorrect encoding standard.
DVD SYSTEM SETUP
General Setup Process
press the DVD-SETUP button, the general setup page, preference page will be displayed in turn,
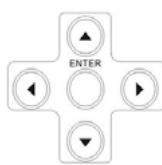
press or to select, the item, then press
to enter the submenu.
press or to select, then press PLAY/PAUSE or ENTER to confirm.
press DVD SETUP repeatedly to exit the set-up menus.
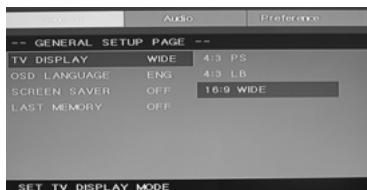
General setup page
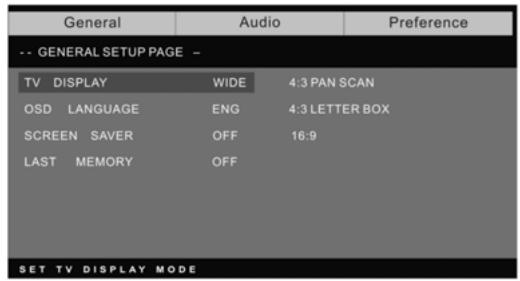
ASPECT RATIO DESCRIPTION
When using the DVD with the internal TV, select 4:3/LB.
The following information applies only when the DVD output is connected to an
external TV.
4:3/PS (PS=Pan and Scan)
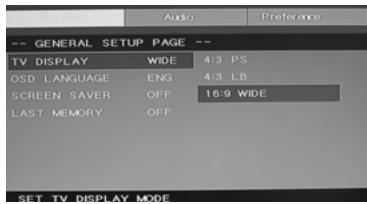
You may select if you have a normal aspect ratio (4:3) TV, although the NORMAL/LB (letter box) is a more common (letter box) choice. In PS mode, widescreen material will fill the screen, but at the expense of chopping off extreme left and right edges of the original film picture. For this feature to work, the disc must be specially coded. Such discs are uncommon.
4:3/LB (LB=Letter Box)
You may select this if you have a normal aspect ratio (4:3) TV. Widescreen material will be shown in pure unaltered form, allowing the entire picture area of the original film to be viewed without any side cropping. Black bars will appear above and below the picture,
16:9
You may select this if you have a widescreen (16:9)TV, back bars may still appear above and below the picture even if using a widescreen TV, this is because some film directors prefer to use ultra widenscreen aspect ratios e.. g.
2.35:1. This will normally be indicated on the DVD packaging.
DVD SYSTEM SETUP(CONTINUED)
General Setup Page
TV Display: user can select different display wide model such as 4:3 PS, 4:3 LB, 16:9 WIDE.
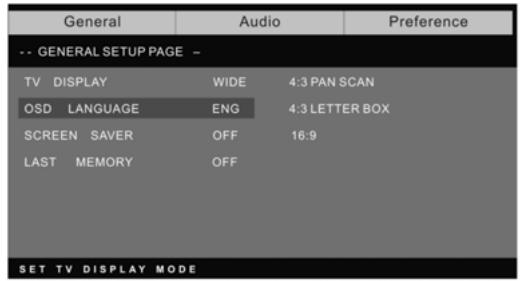
On Screen Display (OSD) Language:
Users can select on-screen display
Language.
Screen Saver: if the screen saver is on, then there will be an animated picture of DVD on the screen whenever the DVD player is idle for more than 3 minutes.
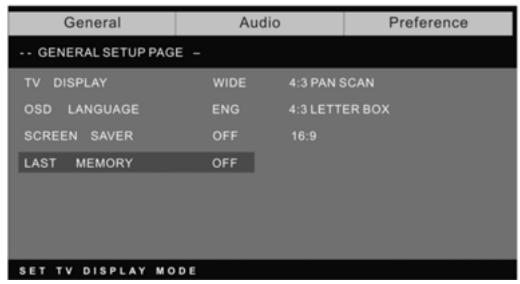
Last memory: memorize the chapter you have just watched. When last memory is on, if you turn on the DVD again after off it will display from the chapter you watched when you turn off the DVD.
Preference page
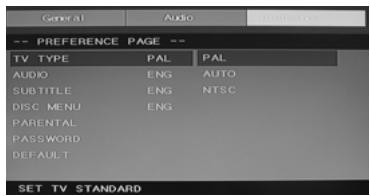
The preference page is only available when there is no disc in the player. These settings are applied consistently to
all discs which are inserted and played.
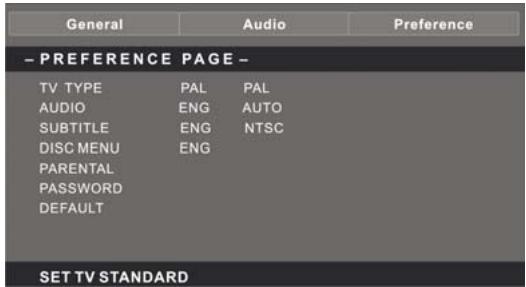
TV Type: this player
Supports different TV output, including Auto, NTSC, and PAL systems.
Usually please set to Auto
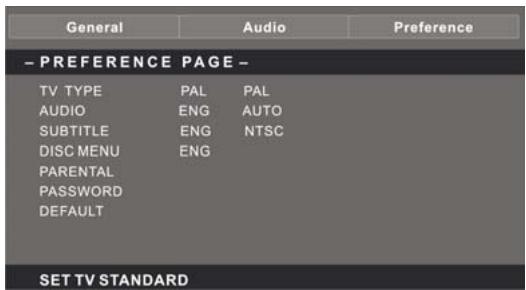
Parental:the parental control
function works in conjunction with the different censorship classes assigned to DVDs.
These classes help to control the types of DVDs that the family watches, there are up to 8 censorship classes for DVDs.
Note;
To change this setting you must enter your password. (initial password is 8888)
Password change;
You can change your password. by entering 4 digits. Your must confirm the 4 digits before the new password can be accepted
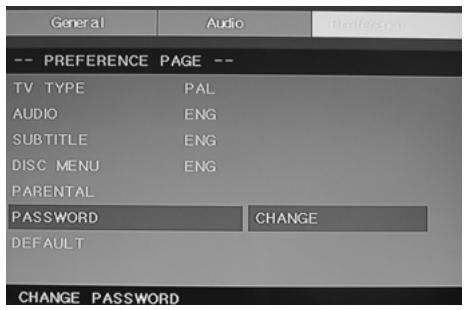
NOTE: If you forget your password or a password is accidentally set enter 8888 as the password, this will enable you to regain control.

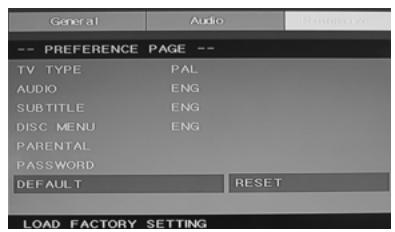
Default: resets all settings (except password and parental lock status) for this DVD player back to the manufacturers original settings, press ENTER to perform the reset,
Note;
Some functions may not be available depending no the type of disc.
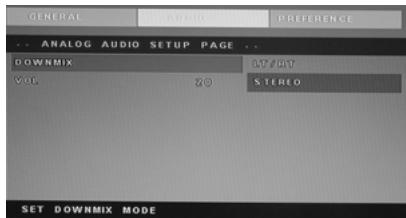
ANALOG AUDIO SETUP PAGE
- Press the DVD-SETUP button, the Analog
Audio Setup Page, Preference
Page will be displayed in turn.
2.press or to select, the item, then press to enter the submenu.
3. Press or to select then press PLAY/PAUSE or ENTER to confirm.
4. Press DVDSETUP repeatedly to exit the set-up menus.
Note1: If the DVD have the USB and CARD terminal, you can use the function with these operation as below. When the current source is DVD, press “USB/CR” button to display the threshold. Press “▲/▼” button to select “USB” or “CARD” and press “ENTER” button to confirm. Press “▲/▼” button to select the item which you want to play and press the “ENTER” button to play. Press “▲” button to return back the previous catalogue when you have enter one subdirectories at least. Press “▷” button to start playing or pause playing. Press “□” button to stop. Press “←” to play backward. Press “▷” button to play forward. Press “⟨⟩” button to skip the previous chapter. Press “▷” button to skip the next chapter.
Note2:The DVD's work temperature is 0^ to 40^ .
PLAYABLE DISCS
The following discs can be played;
| DISCS | LABEL | CONTENTS | DIMENSION |
| DVD VIDEO | DVD VIDEO TM | Audio + video (moving picture) | 12cm |
| AUDIO CD | COMPACT DISC DIGITAL AUDIO | Audio | 12cm |
| JPEG | JPEG | Video(picture) | 12cm |
| KODAK CD | Kodak PICTURE CD COMPATIBLE | Video(picture) | 12cm |
| CD-R | CD·R | Audio or video (moving picture) | 12cm |
| CD-RW | CD-RW | Audio or video (moving picture) | 12cm |
| CD+G | CD+G | Video(picture) | 12cm |
| MPEG4 | Audio or video (moving picture) | 12cm |
Support discs DVD, VCD, CD-R, CD-RW, SVCD, DVCD, HDCD, JPEG, CD+G, MPEG-4, Kodak CD, W MA.
- You cannot play discs other than those listed above,
- You cannot play non-standardized discs, even if they may be labeled as above,
The performance of CD-R or CD-RW disc is depend on the way of disc-burning. In a few Cases, their performance may not be very well or even not playable.
ON HANDLING DISCS
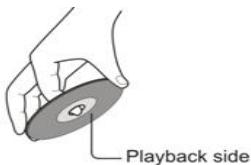
Do not touch the playback side of the disc.
Do not attach paper or tape to disc.



ON CLEANING DISCS
Fingerprints and dust on the disc cause picture and sound deterioration. Wipe the disc from the centre outwards with a soft cloth. Always keep the disc clean.




If you can not wipe off the dust with a soft cloth, wipe the disc lightly with a slightly moistened soft cloth and finish with a dry cloth.
Do not use any type of solvent such as thinner, benzene, commercially available cleaners or anti-static spray for vinyl Lps. It may damage the disc.
ON STORING DISCS
Do not store discs in a place subject to direct sunlight or near heat source,
Do not store discs in place subject to moisture and dust such as a bathroom or near a humidifier.
Store discs vertically in a case. Stacking or placing object on discs outside of their case may cause warping.
STRUCTURE OF DISC CONTENTS
Normally, DVD discs are divided into titles, and the titles are sub-divided into chapters. Audio CD are divided into tracks.
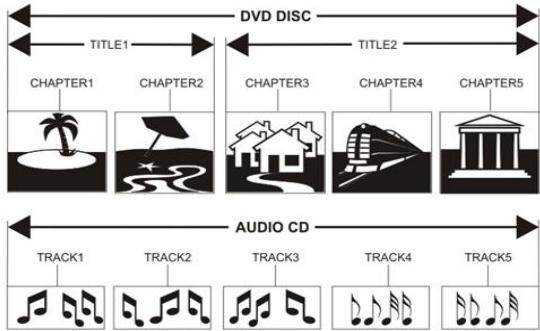
Each title, chapter, or track is assigned a number, which is called title number, chapter number or track number respectively.
There may be discs that do not have these number
Compare DVD disc with other discs;
| DVD | LG | SVCD | VCD | CD | ||||
| Encode method | Digital/MPEG || | Analog | Digital | Digital/MPEG 1 | Digital | |||
| Capacity | Single-side | Double-side | Single-Side | Double-Side | 650MB | 650MB | 650MB | |
| Single-layer | Single-layer | Double-Layer | Double-Layer | |||||
| 4.7G | 8.5G | 9.4G | 17G | |||||
| Playing Time | 133 minutes | 242 minutes | 266 minutes | 484 minutes | Single-side60 minutesDouble-side120 minutes | 45 minutes | 74 minutes | 74 minutes |
| Disc diameter | 12cm | 30cm/20cm | 12cm | 12cm | 12cm | |||
| Horizontal resolution | More than 500 line | No more than430 line | No more than350 line | No more than250 line | ||||
| Picture proportion | Multiple kinds | One kind | One kind | One kind | ||||
| Subtitle | 32 kinds | 16 kinds | 4 kinds | |||||
| Sound quality | 48khz, 96khz/6, 20 ,24bit | 44.1khz/16bit | 44.1khz/16bit | 44.1khz/16bit | 44.1khz/16bit | |||
SPECIFICATIONS
RGB INPUT
| Mode | Resolution | Horizontal Frequency (KHz) | Vertical Frequency (HZ) |
| DOS | 720x400 | 31.5 | 70 |
| VGA | 640x480 | 31.5 | 60 |
| SVGA | 800x600 | 37.9 | 60 |
| XGA | 1024x768 | 48.4 | 60 |
| WXGA | 1360x768 | 47.7 | 60 |
| WXGA+ | 1440x900 | 55.9 | 60 |
1360x768 is only used for 22” and 23” LCD TV.
1440x900 is only used for 19” LCD TV.
HDMI INPUT
| Mode | Resolution | Horizontal Frequency (KHz) | Vertical Frequency (HZ) |
| VGA | 640 x 480 | 31.47 | 59.94 |
| 480i | 720 x480i | 15.73 | 59.94/60 |
| 576i | 720 x 576i | 15.63 | 50 |
| 480p | 720 x480p | 31.47 | 59.94/60 |
| 576p | 720 x 576p | 31.26 | 50 |
| 720p | 1280 x 720p | 37.50 | 50 |
| 44.96 | 59.94/60 | ||
| 1080i | 1920 x 1080i | 28.13 | 50 |
| 33.75 | 59.94/60 |
COMPONENTVIDEO (YPbPr) INPUT
| Mode | Resolution | Horizontal Frequency (KHz) | Vertical Frequency (HZ) |
| 480i | 720 x480i | 15.73 | 59.94/60 |
| 576i | 720 x 576i | 15.63 | 50 |
| 480p | 720 x480p | 31.47 | 59.94/60 |
| 576p | 720 x 576p | 31.26 | 50 |
| 720p | 1280 x 720p | 37.50 | 50 |
| 44.96 | 59.94/60 | ||
| 1080i | 1920 x 1080i | 28.13 | 50 |
| 33.75 | 59.94/60 |
Trouble Shooting
Before consulting service personnel, check the following chart for possible solutions.
| PROBLEM | SOLUTION |
| TV will not turn on | ●Make sure the power cord is plugged in. ●The batteries in the remote control may be Exhausted; replace the batteries. |
| No picture, no sound | ●Check the cable between TV and antenna/external AV device. ●Press the power button on the remote. ●Press the SOURCE button the remote, then press the “▲/▼” button repeatedly to select the TV source. |
| Poor picture, sound OK | ●Check the cable between TV and antenna/external AV device. ●Try another channel, the station may have broadcast difficulties. ●Adjust the brightness/contrast in the Video menu. Check that the unit is set to PAL |
| Audio noise | ●Move any infrared equipment away from the TV. |
The TFT LCD panel uses a panel consisting of sub pixels which requires sophisticated technology to produce. However, there may be a small number of bright or dark pixels on the screen. These pixels will have no impact on the performance of the product.

If at any time in the future you should need to dispose of this product please note that: Waste electrical products should not be disposed of with household waste. Please recycle where facilities exist. Check with your Local Authority or retailer for recycling advice. (Waste Electrical and Electronic Equipment Directive)
Benutzerhandbuch
22" LCD-TV
Inhaltsverzeichnis
EXIT: Beenden des OSDs (On-screen display).
4:3/LB (LB=Letter Box)
4:3/LB (LB=Letter Box)
EXIT: quitte le mode OSD (On-screen display).
4:3/LB (LB=Letter Box)
Frequency 127.25 MHz

SAVE

Programme Edit
ALL
1 S-42
W 2 C-04
TV 3 S-05
4 S-09