USER MANUAL DPA-155 LENCO
DIGITAL PHOTO VIEWER
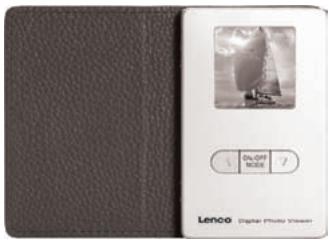
Table of Contents
Table of Contents 1
ENGLISH 2-11
DEUTsCH. 12-21
Espanol 22-31
NEDERLANDS 32-41
FRANCAIS. 42-51
DIGITAL PHOTO VIEWER
Read First
Quick Installation Guide
SYSTEM REQUIREMENTS:
Windows 98 / 2000/ ME / XP/Vista
INSTALLATIONPROCEDURE:
** Important: Install application software before connect deviceto PC. **
1. Disconnect device USBcable from PC ifit is connected.
2. Insert CD andfollow the on-screen instructionto install "Photo Viewer".
3. After theapplication software has beensuccessfully installed, you could connect device to PC with theprovided USB cable.
4. Windows OS will set up hardware driver automatically.
5. Launch "Photo Viewer" and enjoy.
NOTE: The software cannot initialize when the device is plugged in and running slide show.
Introduction
This Digital Photo Viewer is a stand-alone device that is designed to transfer and store images from a PC and then display the images. Using the application software supplied with this device, you can organize, edit, enhance and download the image in your PC to this device using USB.
Important Safety Instructions
WARNING:
This device will be fullycharged after two hours.
- Do not leave the deviceconnected to the USB forlonger than 12 consecutive hours otherwise damage andoverheating of the device may occur.
- Do not expose this device to water or moisture.
- Do not remove cover. No user serviceable partsinside. Refer servicing to qualified personnel.
- The device should be away from sources of high heat such as radiators or stoves.
- The device should be connected to a power supply only of the type described in the operating instructions or as marked on the unit.
- Care should be taken so that objects are not placed on, nor liquids spilled on or inside the device.
- The user should not attempt to service the device beyond those means described in these operating instructions. All other servicing should be referred to qualified service personnel.
Installing the Software/ Hardware
IMPORTANT: You must install the software to your computer before connecting the device to your computer for the first time.
- Insert the CD-ROM and run the file SETUP_UT1.02.EXE; Follow the onscreen instructions.
- The application Photo Viewer will be installed on your computer and a shortcut to the application will appear on your desktop. DO NOT LAUNCH THE SOFTWARE YET.
- After the software is installed, connect the device to the computer with the USB cable supplied. The hardware drivers will be installed automatically. Follow the on-screen instructions and accept the installation screens that appear.
- After hardware installation is complete, launch the PhotoViewer application from the shortcut on your PC desktop.
NOTE: If you are unable to launch the software or connect to your Photo Viewer, go to the Troubleshooting of this manual for more information.
Charging the Battery
The internal battery of the device may be charged using the USB cable when connected to a powered USB port(such as USBport on your computer) or hub.It will be fully charged after two hours. At full charge, the device can provide up to 3 hours of run time.
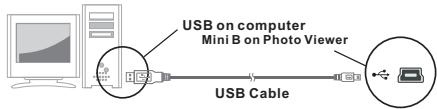
1. Connect to PC
Usethe USBcable provided. Connect the large end to the computer and thasmall endto the device.
2. Launch the Photo Viewer Software
Double-click the Photo Viewer shortcut on your desktop.
3. View Photos Stored in the Photo Viewer

4. Browse Images onYour PC
Use the File Manager A to browse photos onyour PC.
NOTE: The device readsJPG/BMP/TIF/GIF/PNG images.
5. Select Images and Transfer to CollectionPanel
The Image Preview area will display a thumbnail preview of all of the JPG/BMP/TIF/GIF/PNG images that are located in the directory you have selected.
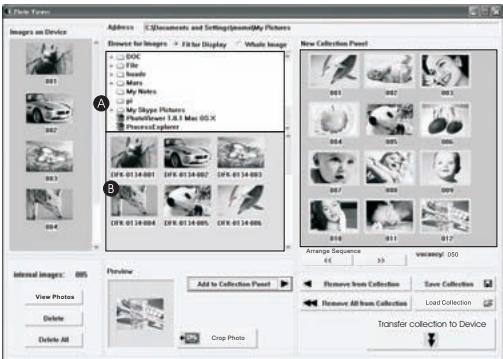
- Select the thumbnail image and click Crop Photo to edit the image before transferring (seeEditing Images).
- Select the thumbnail image and click " Add to Collection Panel" to transfer the image as-is.
6. Organize Collection Panel
To delete a photo: select the photo and click" Remove From Collection
To delete all photos: click Remove All from Collection
To change the order of the photo, select the photo then click "to move to the back and click" to move to the front.
7. Save and Restore Collection Panel
To save the photos on the Collection Panel to your PC, click Save Collection
To retrieve the the saved Collection Panel, click " Load Collection".
8. Download Collection Panel to Digital Photo Viewer
Click " Transfer collection to Device" to download all images on the collection panel to Digital Photo Viewer.
Important !! Do not disconnect the device until the download process is complete and you have exited successfully from the Photo Viewer program.
1. Select an image to Edit
Select a photo you wish to edit in the image preview area. Click on Crop Photo "button to edit selected image in the pop up window.
2. Edit Image
In the Edit Image Window you can do the following:
- Crop: click and drag the smaller boxes (at the corners of the large box) to increase or decrease the area to be cropped.
- Reposition: click and drag in the center of the large box to change the position of the crop.
- Brightness / Contrast: click and drag the slider bars.
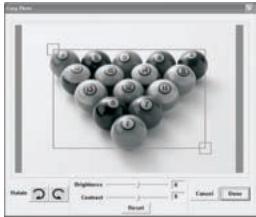
NOTE: Images that are brighter and more contrast will look better on the smaller monitor of the device.
Rotate: Use to rotate the image clockwise or counterclockwise.
3. Click DONE
The edited image will be added to the collection panel.
Using the Function Keys
- Monitor
- Power/Play & Pause
- Previous Image / Delete images
- Next Image/Delete all Images.
- Mini USB Connection
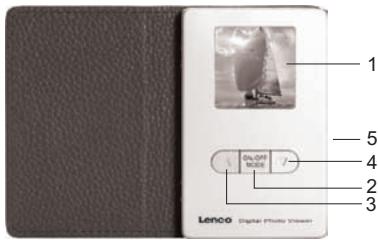
Digital Photo Viewer
- This device complies with Part 15 of the FCC Rules and CE. Operation is subject to the following connotations:
(1) This device may not cause harmful interference.
(2) This device must accept any interference received, including interference that may cause undesired operation.
THIS CLASS B DIGITAL APPARATUS COMPLAINS WITH CANADIAN ICES-003. / CET APPAREL NUMERIQUE DE LA CLASSE BE STÉ CONFORMÉ À LA NORME NMB - 003 DU CANADA.
Using the PhotoViewer
To turn on power, press and hold MODE/ION/OFFuntil the screen turns on. To turn off power, you must turn off the slide show first, then press and hold MODE until the screen turns off.
Manual viewing of photos
Upon powering up, the device is in browse mode, or manual viewing mode, press to view the next photo, and press to view the previous photo. NOTE: In browse viewing mode, the screen turns off automatically when there is no key pressed intwo minutes.
Slide show
Press MODE to change to slide show from browse mode, the screen displays "Auto Play On". To turn off slideshow, press MODE again and the screen displays "Auto Play Off".
Deleting single photo
Turn off the slide show, select the photo you wantto delete, press and hold UP until " DELETE" appears on the screen, and press MODE to delete.
Deleting all photos
Turn off the slide show, press and holdDOWN until "DELETE ALL" appears on the screen, press MODE to delete.
Troubleshooting for Installation
If the device displayserror message "Device not connected" during installation, follow these steps to resolve:
A. For Software issues (PhotoViewer software cannot launch)
- Re-insert and launchthe installation CD and choose "Remove" or "Uninstall" from the InstallerMenu.
- Disconnect the USBcable and device fromthe computer and restart.
- After computerhas restarted, launch theinstaller again and reinstall the software.
Note: DO NOT connect the USB cable until after the software is installed.
B. For Hardware installation issues (Device not recognized)
- With the Viewer connected to the computer via USB goto the Start Menu / Control Panels/ Add Hardware.
- When the Dialogbox comes up, click the option that says "Yes, I have already connected the software".
- In the listof Devices-Find "Photo Viewer" click NEXT and this will give the status of the device. If a warning icon appears next to the Photo Viewer then double click the icon and select the option to "Reinstall the software".
DIGITALES FOTOALBUM
MIT WECKFUNKTION
Bitte lesen!
If at any time in the future you should need to dispose of this product please note that: Waste electrical products should not be disposed with household waste. Please recycle where facilities exist. Check with your Local Authority or retailer for recycling advice. (Waste Electrical and Electronic Equipment Directive)





