USER MANUAL WRT54G LINKSYS
natural_image
Blue and black wireless router device with two antennas and control buttons (no visible text or symbols on the device body)
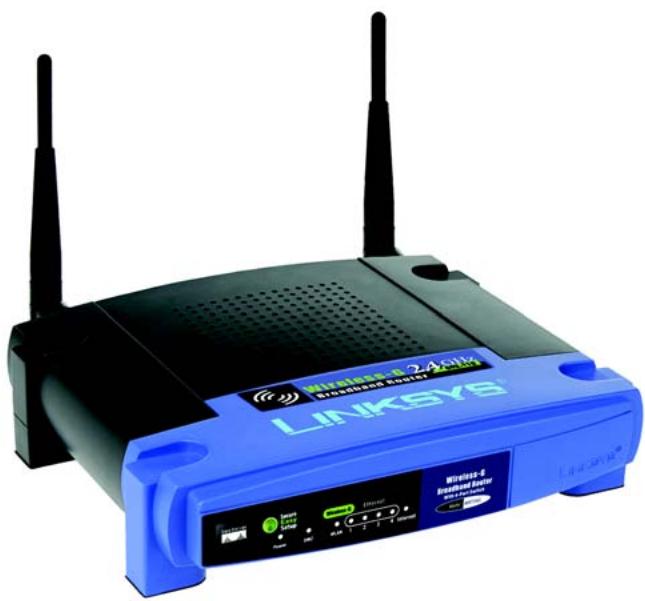
Package Contents
• Wireless-G Broadband Router
- Setup CD-ROM with User Guide
- Power Adapter
- Ethernet Network Cable
- Quick Installation (some models may only have the Quick Installation on the Setup CD)
2,4 GHz 802.11g
Wireless
Wireless-G
Broadband Router
Quick Installation Guide
There are two ways to configure the Router. Choose one of the following:
- Run the Setup CD-ROM - Insert the Setup CD-ROM into the CD-ROM drive, and follow the on-screen instructions.
- Use this Quick Installation guide - If you wish, you can use the Router's Web-based Utility. Proceed to Step 1 of this Quick Installation.
1 Connect the Router
A Power down your network devices.
B Locate an optimum location for the Router. The best place for the Router is usually at the center of your wireless network, with line of sight to all of your mobile stations.
C Fix the direction of the antennas. Normally, the higher you place the antennas, the better the performance will be.
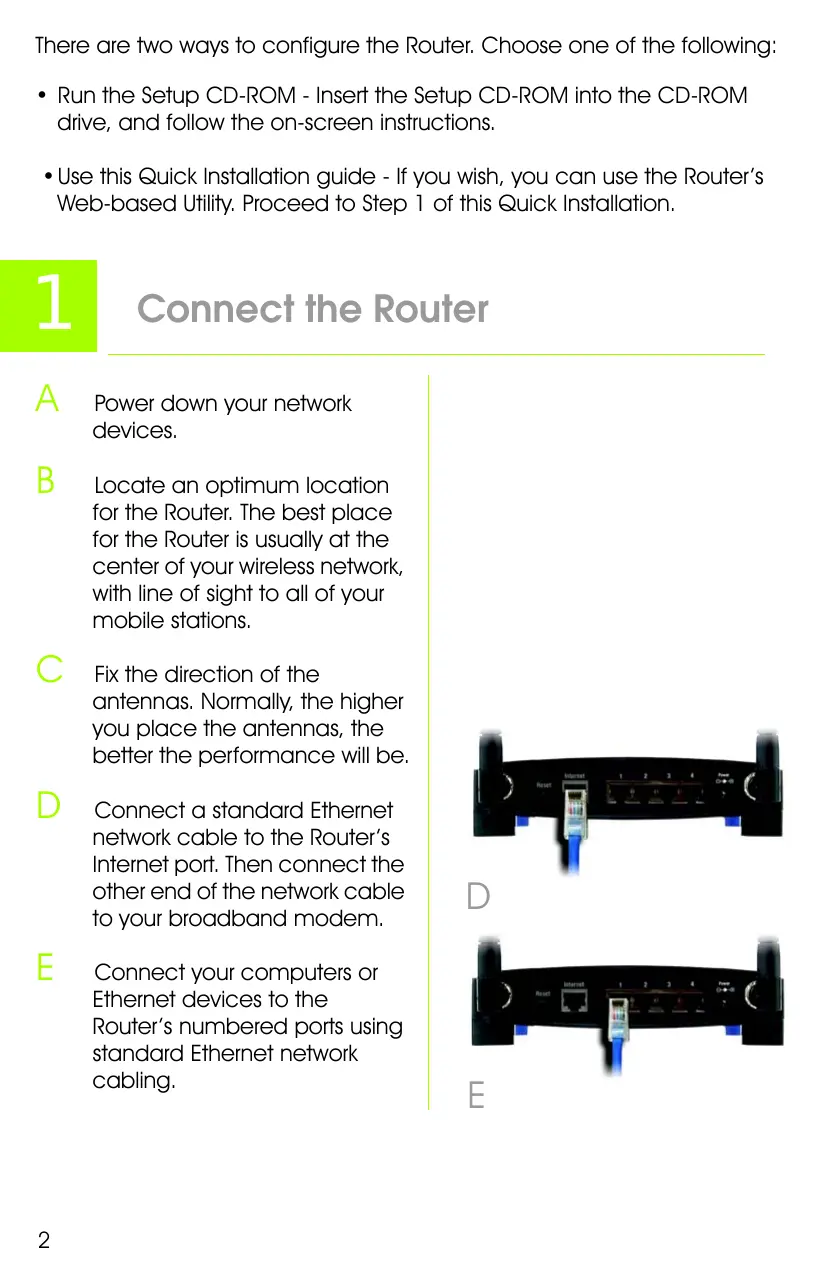
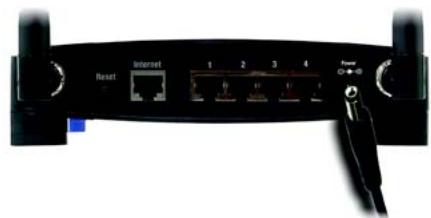
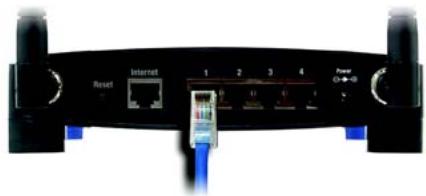
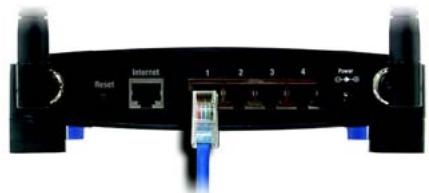
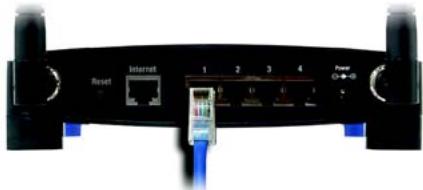
D Connect a standard Ethernet network cable to the Router's Internet port. Then connect the other end of the network cable to your broadband modem.
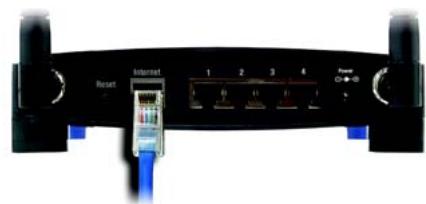
E Connect your computers or Ethernet devices to the Router's numbered ports using standard Ethernet network cabling.
natural_image
Front view of a network device with ports labeled 'Reset' and 'Internet', showing connected cables and ports (no readable text beyond labels)
D
natural_image
Front view of a network device with ports, cables, and an Ethernet switch (no visible text or symbols)
E
F Power on the broadband modem.
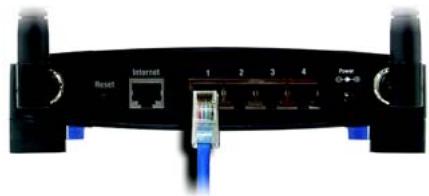
G Connect the AC power adapter to the Router's Power port and the other end into an electrical outlet.
H Power on the PC you wish to use to configure the Router.
Proceed to Step 2.
natural_image
Front view of a network router with ports and control buttons (no visible text or symbols)

IMPORTANT: Make sure you use the power adapter that is supplied with the Router. Use of a different power adapter could damage the Router.
2
NOTE: Make sure your PC's Ethernet adapter is set to obtain an IP address automatically. For more information, refer to Windows Help.
A
Open your web browser. Enter http://192.168.1.1 in its Address field. Press the Enter key.
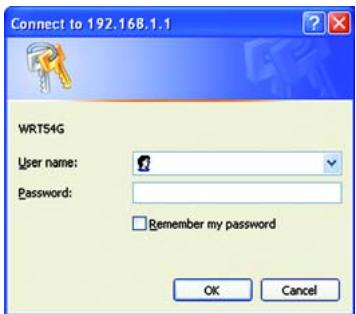
B
A password request screen will appear. Leave the User name field blank, and enter the default password, admin, in the Password field. (For added security, you should later set a new password, using the Administration tab's Management screen of the Web-based Utility). Then click the OK button.
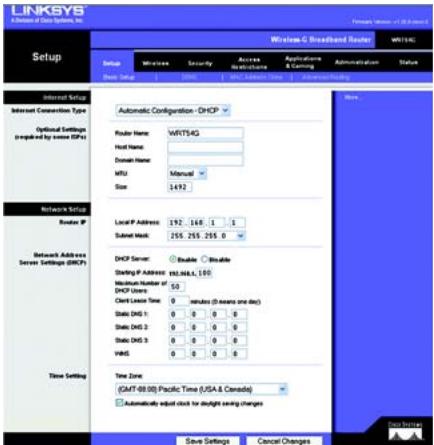
C
The Web-based Utility will appear with the Setup tab selected. If requested by your Internet Service Provider (ISP), complete the Host Name and Domain Name fields. (These are usually requested by cable ISPs.) Otherwise, leave them blank.
B
C

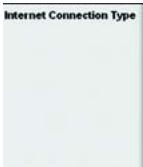
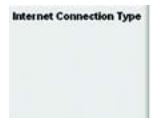
For the Internet Connection Type setting, six connection types are offered through the drop-down menu, five of which are covered here. Each Setup screen and available features will differ depending on which connection type you select.
Internet Configuration Type
Automatic Configuration - DHCP:
If you are connecting through DHCP or a dynamic IP address from your ISP, keep this default setting.
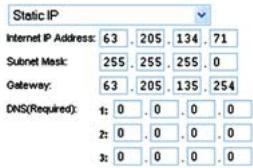
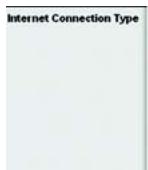
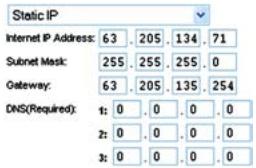
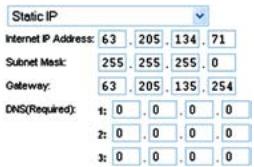
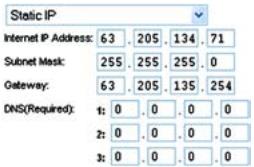
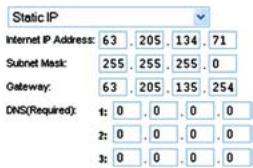
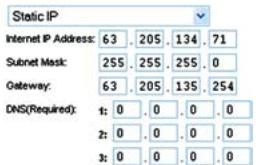
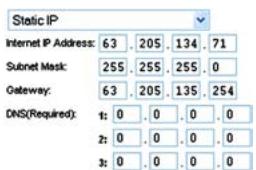
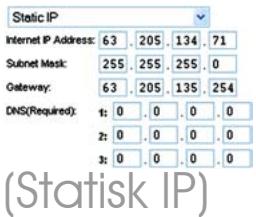
Static IP: If your ISP assigns you a static IP address, select Static IP from the drop-down menu.
Complete the Internet IP Address, Subnet Mask, Gateway, and DNS fields. You need to enter at least one DNS address.
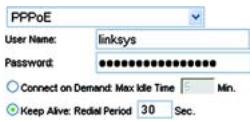
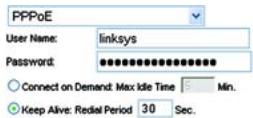
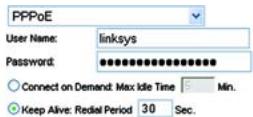
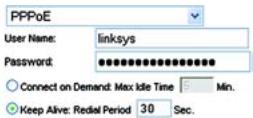
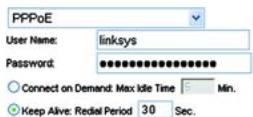
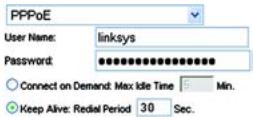
PPPoE: If you are connecting through PPPoE, select PPPoE from the drop-down menu. Complete the User Name and Password fields.
Select Keep Alive if you always want to be connected to your ISP, or select Connect on Demand if you are charged for the time that you are connected to your ISP.


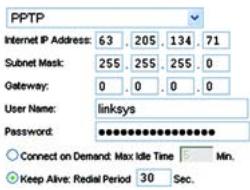
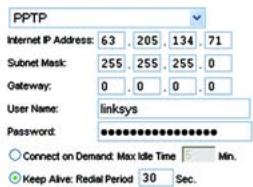
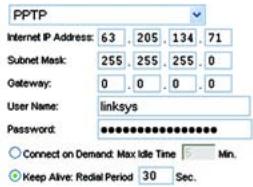
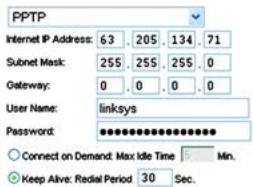
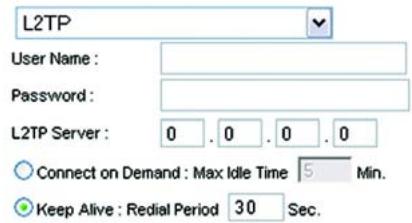
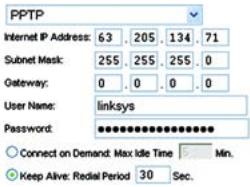
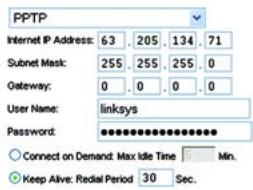
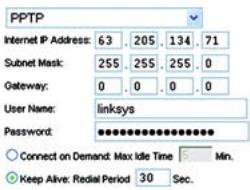
PPTP: PPTP is a service used in Europe only.
Complete the Internet IP Address, Subnet Mask, and Gateway fields.
Complete the User Name and Password fields.
Select Keep Alive if you always want to be connected to your ISP, or select Connect on Demand if you are charged for the time that you are connected to your ISP.
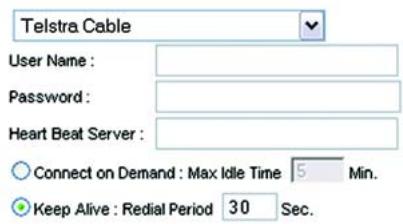
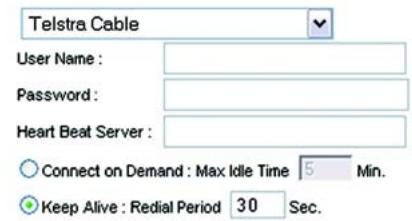
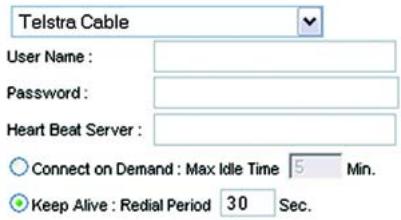
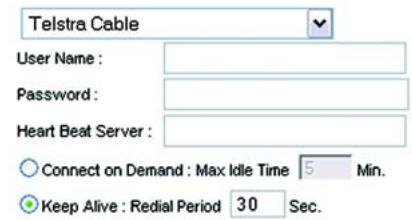
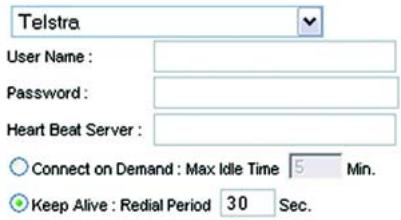
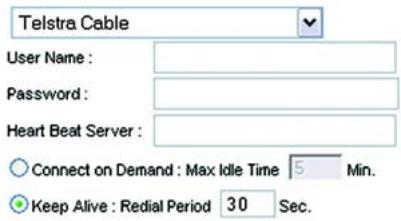
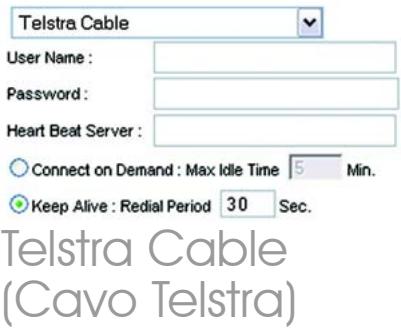
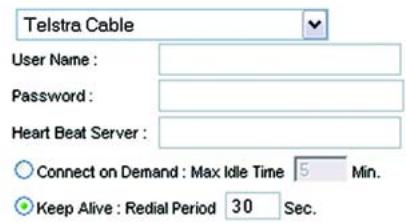
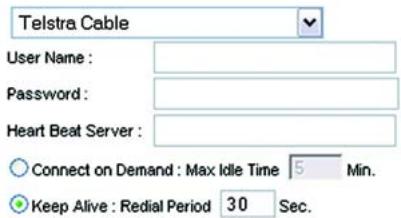
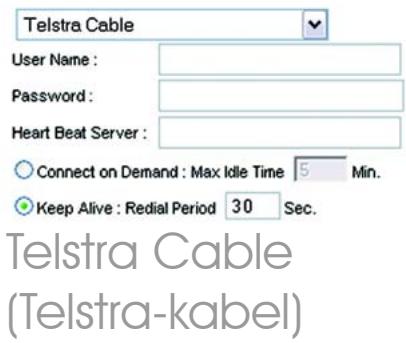
Telstra Cable: Telstra is a service used in Australia and New Zealand only. If you are using an HBS connection, check with your ISP for setup information.
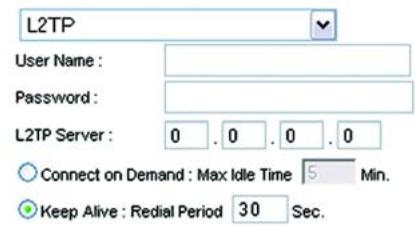
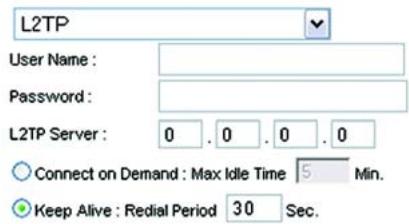
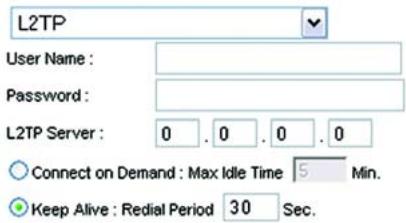
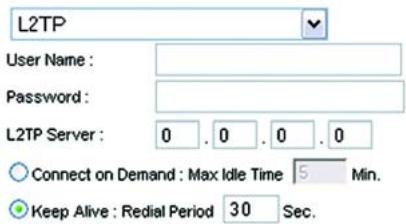
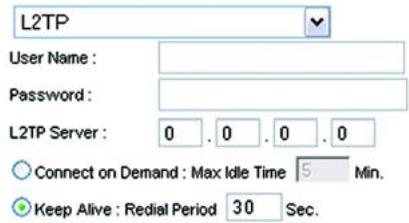
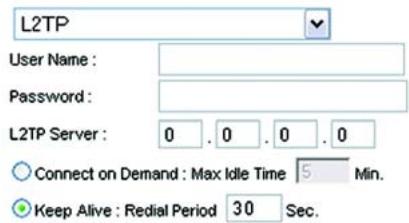
L2TP: L2TP is a service used in Israel only. If you are using an L2TP connection, check with your ISP for setup information.
E
When you have finished entering your Internet connection settings, click the Save Settings button to save your changes.
F
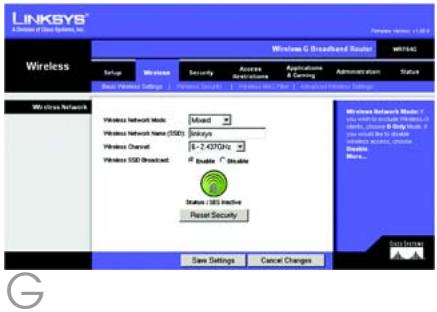
To configure the Router for your wireless network, select the Wireless Tab's Basic Wireless Settings screen.
PPTP
Telstra Cable
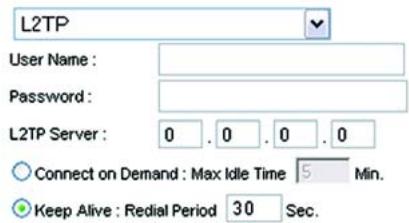
L2TP

Select the Wireless Network Mode:
Mixed: If your network has Wireless-G and Wireless-B devices, then keep the default setting, Mixed.
G-Only: If your network only has Wireless-G devices, select G-Only.
B-Only: If your network only has Wireless-B devices, select B-Only.
Disable: If you want to disable wireless networking, select Disable.

Wireless Network Name (SSID). The SSID is the network name shared among all devices in a wireless network. The SSID must be identical for all devices in the wireless network. It is case-sensitive and must not have more than 32 characters (use any keyboard character). For added security, you should change the default SSID (linksys) to a unique name.

Wireless Channel. Select the appropriate channel from the list provided to correspond with your network settings. All devices in your wireless network must broadcast on the same channel in order to function correctly.
J
Wireless SSID Broadcast. When wireless clients survey the local area for wireless networks to associate with, they will detect the SSID broadcast by the Router. To broadcast the Router's SSID, keep the default setting, Enable. If you do not want to broadcast the Router's SSID, then select Disable.
K
Change these settings as described here and click the Save Settings button to apply your changes.
L
Power your broadband modem off and back on again.
M
Restart or power on your PCs so they can obtain the Router's new settings.
N
To test the Router's settings, open your web browser from any computer. In the browser's Address field, enter www.linksys.com/registration and press the Enter key.
Congratulations! The installation of the Wireless-G Broadband Router is complete.
IMPORTANT: Once the Router is configured, wireless security, either WEP or WPA, should be configured to prevent security breaches in your network.
NOTE: If your wireless adapters support Secure Easy Setup (SES), you can use the SES button on the Router to set them up.
To do this: Press the orange Cisco logo on the Router's front panel for at least two seconds. Wait about 10 seconds. When the logo turns white and begins to flash, press the adapter's SecureEasySetup button. The Router's Cisco logo will stop flashing when the device has been added to the network. Repeat this procedure for any additional SecureEasySetup device.
Refer to the User Guide for further instructions.
Open the Router's Web Utility as shown in Step 2, and click the Wireless tab.
Click the Wireless Security tab.
Select the security method you want to use: WPA/WPA2 Personal, WEP, WPA/WPA2 Enterprise, or RADIUS.
For WPA/WPA2 Personal and WEP, proceed to the appropriate instructions.
For WPA/WPA2 Enterprise or RADIUS, refer to the User Guide (English only) on the CD-ROM.
WPA/WPA2 Personal
Select the option you want, WPA or WPA2 Personal. Then configure the following:
WPA Algorithm - Select the method you want to use, TKIP or AES.
WPA Shared Key - Enter a Shared Key of 8-63 characters.
Group Key Renewal - Enter a Group Key Renewal period, which instructs the Router how often it should change the encryption keys. In most cases, you can keep the default, 3600 seconds.
NOTE: If your wireless adapters support Secure Easy Setup (SES), you can use the SES button on the Router to set up wireless security.
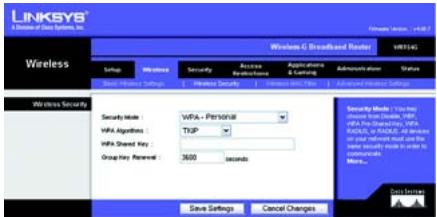
WPA-Personal Security Settings
WEP
Configure the Default Transmit Key and WEP Encryption settings. Then enter a passphrase or WEP key(s).
Default Transmit Key - Select a Default Transmit Key to use. In most cases, you should keep the default, 1.
WEP Encryption - Select the level of encryption you want to use, 64 bits 10 hex digits or 128 bits 26 hex digits.
Passphrase - To automatically generate WEP keys, enter a Passphrase and then click Generate.
Key 1-4 - To manually enter WEP keys, complete these fields. For 64-bit encryption, a WEP key should have exactly 10 hexadecimal characters. For 128-bit encryption, a WEP key should have exactly 26 hexadecimal characters. Valid hexadecimal characters are "0" to "9" and "A" to "F".

Click the Save Settings button.
Congratulations! Wireless Security is now configured on the Router.
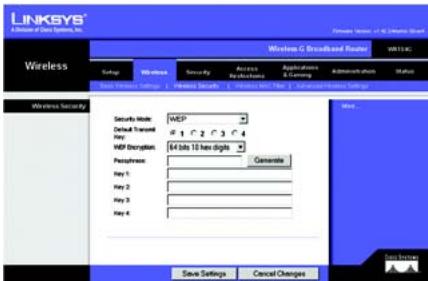
WEP Security Settings
LINKSYS®
A Division of Cisco Systems, Inc.
For additional information or troubleshooting help, refer to the User Guide on the CD-ROM or the Technical Support Insert. You can also e-mail for further support.
Website
http://www.linksys.com/international
Product Registration
http://www.linksys.com/registration
Linksys is a registered trademark or trademark of Cisco Systems, Inc. and/or its affiliates in the U.S. and certain other countries. Copyright © 2006 Cisco Systems, Inc. All rights reserved.
natural_image
Blue and black wireless router device with two antennas and control buttons (no readable text or symbols beyond branding)
Pakkens indhold
natural_image
Front view of a network router with ports and connectors (no visible text or symbols)
E

Internet Connection Type
DHCP
Automatic Configuration - DHCP
Static IP (Statisk IP)
PPPoE
PPTP
Telstra Cable
(Telstra-kabel)
L2TP

G
J Wireless SSID Broadcast
(Trådløs SSID-broadcast).
Sikkerhedsindstillinger
for WPA-Personal
WEP
A Division of Cisco Systems, Inc.
natural_image
Blue and black wireless router device with two antennas and control buttons (no visible text or symbols on body)
Lieferumfang
natural_image
Front view of a network device with ports, cables, and a central connector (no visible text or symbols)
E

natural_image
Front view of a network device with ports and indicator lights (no readable text or symbols)

C

Static IP
PPTP
Telstra Cable (Telstra-Kabel)

L2TP

Wireless Network Name (SSID)
Wireless Channel (Wireless-Kanal):
G
WPA/WPA2 Personal (WPA-/WPA2-Personal)
WEP Encryption (WEP-
Schlüssel genau 10 hexadezimale
Schlüssel genau 26 hexadezimale
A Division of Cisco Systems, Inc.
natural_image
Blue and black wireless router device with two antennas and control buttons (no visible text or symbols on body)
natural_image
Front view of a network device with ports, cables, and an Ethernet port (no visible text or symbols)
D
natural_image
Front view of a wireless router with ports and cables (no visible text or symbols)
E
natural_image
Front view of a black wireless router with ports and cables (no visible text or symbols)


PPTP
Telstra Cable
L2TP

Wireless Network Name (SSID)
G
J
A Division of Cisco Systems, Inc.
natural_image
Blue and black wireless router device with two antennas and control buttons (no visible text or symbols on the device body)
Pakkauksen sisältö
natural_image
Front view of a network device with ports labeled 'Reset' and 'Internet', showing connected cables and ports (no readable text beyond labels)
D

natural_image
Front view of a network device with ports and cables (no readable text or symbols)
E
F
natural_image
Front view of a network router with ports and indicator lights (no visible text or symbols)

C

Internet Connection Type
DHCP
Automatic Configuration - DHCP
Static IP
(Kiinteä IP)

PPPoE
PPTP
Telstra
L2TP

Valitse Wireless Network Mode (Langattoman verkon tila):
Wireless SSID Broadcast
Basic Wireless Settings (Langattomat perusasetukset)
A Division of Cisco Systems, Inc.
natural_image
Blue and black wireless router device with two antennas and control buttons (no visible text or symbols on body)
natural_image
Front view of a network device with ports, cables, and a central connector (no visible text or symbols)
E
F
natural_image
Front view of a network router with ports and indicator lights (no visible text or symbols)

C

Internet Connection Type
Automatic Configuration - DHCP
DHCP
Adresse IP statique
PPPoE
PPTP

Telstra Cable
(Câble Telstra)
L2TP

Wireless Network Name (SSID)
J
Wireless SSID Broadcast
WPA/WPA2 Personal (WPA/WPA2 personnel)
A Division of Cisco Systems, Inc.
natural_image
Blue and black wireless router device with two antennas and control buttons (no visible text or symbols on the device body)
natural_image
Front view of a network device with ports, cables, and a central connector (no visible text or symbols)
E

natural_image
Front view of a network device with ports and indicator lights (no readable text or symbols)

C


PPTP
L2TP

Wireless Network Name (SSID)
Wireless SSID Broadcast
A Division of Cisco Systems, Inc.
natural_image
Blue and black wireless router device with two antennas and control buttons (no visible text or symbols on body)
natural_image
Front view of a network device with labeled ports and cables (no readable text or symbols)
D
natural_image
Front view of a network router with ports and connectors (no visible text or symbols)
E
natural_image
Front view of a network router with ports and connectors (no visible text or symbols)
C


Static IP
(Vast IP-adres)
PPPoE
PPTP

Telstra Cable
(Telstra-kabel)
L2TP

Selecteer de Wireless Network Mode (WLAN-netwerkmodus):
Wireless Network Name (SSID)
G
J
Wireless SSID Broadcast
Instellingen
WPA-Personal-
beveiliging
WEP
WEP-beveiligingsin-
stellingen
LINKSYS®
A Division of Cisco Systems, Inc.
natural_image
Blue and black wireless router device with two antennas and control buttons (no visible text or symbols on body)
natural_image
Front view of a network device with ports, cables, and a central connector (no visible text or symbols)
E
F
Ligue o modem de banda larga.
G
natural_image
Front view of a network router with ports and indicator lights (no readable text or symbols)

C


PPPoE
PPTP
Telstra Cable
L2TP

Seleccione o Wireless Network Mode (Modo de rede sem fios):
Wireless Network Name (SSID)
G
J
A Division of Cisco Systems, Inc.
natural_image
Blue and black wireless router device with two antennas and control buttons (no visible text or symbols on body)
natural_image
Front view of a network device with labeled ports and cables (no readable text or symbols)
D
natural_image
Front view of a network device with ports, cables, and a switch (no visible text or symbols)
E
natural_image
Front view of a network device with ports and cables (no visible text or symbols)
G


PPPoE
PPTP


L2TP

J
Wireless SSID Broadcast
WPA/WPA2 Personal (WPA/WPA2 - privat)
A Division of Cisco Systems, Inc.