USER MANUAL BEFW11S4 LINKSYS
Wireless Access Point Router with 4-Port Switch
natural_image
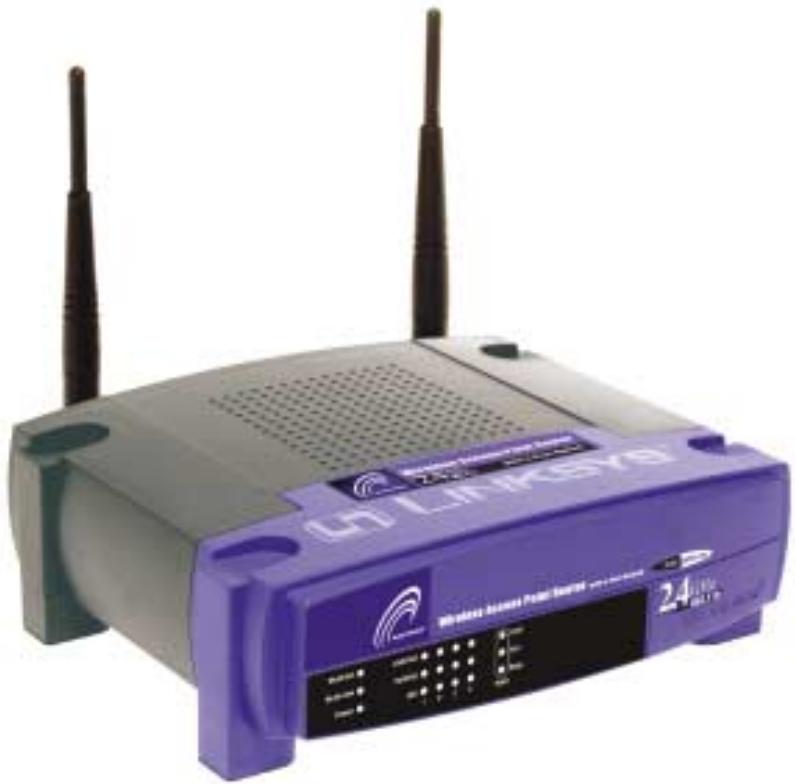
Purple LINKSYS wireless router with two antennas and control panel (no visible text or symbols on device body)
Use this Guide to install:
BEFW11S4 ver. 3
Fast Start
Guide
Linksys Group declares that the Instant Wireless™ Series products included in the Instant Wireless™ Series conform to the specifications listed below, following the provisions of the EMC Directive 89/336/EEC and Low Voltage Directive 73/23/EEC:
• ETS 300-826, 301 489-1 General EMC requirements for Radio equipment.
• EN 609 50 Safety
• ETS 300-328-2 Technical requirements for Radio equipment.
Note: This equipment is intended to be used in all EU and EFTA countries. Outdoor use may be restricted to certain frequencies and/or may require a license for operation. For more details, contact Linksys Corporate Compliance.
Note: Combinations of power levels and antennas resulting in a radiated power level of above 100 mW are considered as not compliant with the above mentioned directive and are not allowed for use within the European community and countries that have adopted the European R&TTE directive 1999/5/EC and/or the CEPT recommendation Rec 70.03. For more details on legal combinations of power levels and antennas, contact Linksys Corporate Compliance.
natural_image
Front view of a black wireless router with two antennas and ports, connected by a blue cable (no visible text or symbols)
natural_image
Close-up of a white electronic device with a black socket connected to a blue medical catheter, labeled 'C1' in the corner (no readable text or symbols on the device itself)
natural_image
Front view of a black wireless router with two antennas and a blue cable inserted (no visible text or symbols)
natural_image
Illustration of a network device with Internet connection icon, showing router, wireless router, and desktop computer (no text or symbols on devices)
Si vous utilisez:
Windows 2000
Si vous utilisez:
Windows XP
natural_image
Illustration of a network device connected via wireless links, including a router, Wi-Fi, and desktop computer (no text or symbols visible)
natural_image
Illustration of a globe, router, and computer with a question mark symbol (no text or labels)
Figure C-1
Figure C-2
Figure C-6
natural_image
Close-up of a black wireless router with two antennas and a blue cable inserted (no visible text or symbols)
natural_image
Close-up of a white electronic device with a connector and a blue medical device inserted, labeled C1 (no readable text or symbols)
natural_image
Front view of a black wireless router with two antennas and a blue cable inserted (no visible text or symbols)
natural_image
Illustration of a network device with Internet connection icon, showing router, wireless router, and desktop computer (no text or symbols on devices)

natural_image
Illustration of a network device connected via wireless links to a globe icon, a router, and a computer monitor (no text or symbols)

natural_image
Illustration of a globe, network device, and computer with a question mark (no text or symbols)
Figuur C-1
Figuur C-3
Figuur C-4
Figuur C-5
Figuur C-6
Figuur C-7
Figuur C-8
Figuur C-9
Deactiveer de opties Network Authentication (Shared mode) en The key is provided for me automatically.
Figuur C-10
natural_image
Front view of a black wireless router with two antennas and a blue cable inserted (no visible text or symbols)
10/100 Workgroup Hubs
natural_image
Close-up of a white electronic device with a USB cable inserted into the port, labeled 'C1' in the corner (no readable text or symbols on the device itself)
natural_image
Front view of a black wireless router with two antennas and a blue cable inserted (no visible text or symbols)
Betriebssystem:
Windows 2000

natural_image
Illustration of a network device connected via wireless links to a laptop and a router (no text or symbols visible)
Adresse
http://www.linksys.com/registration/
natural_image
Illustration of a globe, router, and computer with a question mark symbol (no text or labels)
Abbildung C-1
Abbildung C-2
10/100 Workgroup Hubs
Copyright © 2002 Linksys, All Rights Reserved. Instant Wireless is a trademark of Linksys. Microsoft, Windows, and the Windows logo are registered trademarks of Microsoft Corporation. All other trademarks and brand names are the property of their respective proprietors.
FCC STATEMENT
The Instant Wireless™ Wireless Access Point Router with 4-Port Switch has been tested and complies with the specifications for a Class B digital device, pursuant to Part 15 of the FCC Rules. These rules are designed to provide reasonable protection against harmful interference in a residential installation. This equipment generates, uses, and can radiate radio frequency energy and, if not installed and used according to the instructions, may cause harmful interference to radio communications. However, there is no guarantee that interference will not occur in a particular installation. If this equipment does cause harmful interference to radio or television reception, which is found by turning the equipment off and on, the user is encouraged to try to correct the interference by one or more of the following measures:
- Reorient or relocate the receiving antenna
- Increase the separation between the equipment or devices
- Connect the equipment to an outlet other than the receiver's
- Consult a dealer or an experienced radio/TV technician for assistance
Table of Contents
Introduction 92
Step 1: Connect the Router 94
Step 2: Configure the PCs 96
Step 3: Configure the Router 100
Help 105
Configuring Wireless Security 110
Configuring Wireless
Security in Windows XP 113
For product support and product registration, contact us at the addresses below:
E-mail europe-support@linksys.com
latam-soporte@linksys.com
Web http://www.linksys.com/international
FSG-BEFW11S4 ver. 3-21008 TE
Introduction
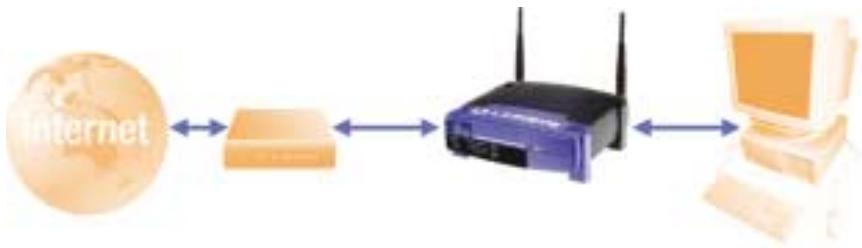
Thank you for choosing the Instant Wireless™ Wireless Access Point Router. This Router will allow you to set up a network with your PCs and even share your Internet connection.
How does the Router do all of this? By connecting your ADSL modem directly to the Router and using the Router's Ethernet ports to connect your PCs, it's almost as if each PC is connected directly to the Internet. In this way, you can have several PCs utilizing one Internet connection simultaneously. Plus, because it's also an Access Point, the Router can bridge your Ethernet network with your wireless PCs.
But what does all of this mean?
Networks are useful tools for sharing computer resources. You can access one printer from different computers and access data located on another computer's hard drive. Networks are even used for playing multiplayer video games. So, networks are not only useful in homes and offices, they can also be fun.
The PCs you connect to the Router's four LAN ports, when properly configured, create a LAN, or Local Area Network. They are connected with an Ethernet cable plugged into your computer's Ethernet adapter at one end and into one of the Router's LAN ports (numbered from one to four) at the other end. The term "Ethernet" is used to refer to your network accessories, such as cables and adapters, because Ethernet refers to the type of network you are setting up. In your Router's documentation, Ethernet refers to accessories that transfer computer data from 10Mbps to 100Mbps. (10Mbps and 100Mbps refer to the speeds used by network devices. When transferring data at 10Mbps, you are moving the equivalent of over seven floppy disks every second! Network accessories that function at 100Mbps move data ten times faster!)
PCs can also interact with the Router wirelessly. By configuring your wireless PCs with the same wireless settings as the Router, you can bridge these wireless PCs while integrating them into your existing Ethernet network.
Perhaps the most remarkable thing the Router does is to allow you to share your ADSL connection. This is done by connecting your ADSL modem to the Router's WAN port with an Ethernet cable. (WAN refers to a Wide Area Network.) The Internet is a network that, being global, covers the widest area of all! The PCs connected to the Router share this connection.
Use the instructions in this Fast Start to help you connect the Router, configure your PCs, and configure the Router in your network. These instructions should be all you need to get you up and running with a basic network, sharing your Internet access. The Router also comes equipped with more advanced functions, but these functions should not be utilized without a further understanding of routers and networks.
This is What You Will Be Setting Up

The Router's setup is similar to that shown in the figure above for any Windows PC. The Router lets you share your ADSL connection among several computers in your home or business. This is called a Local Area Network or LAN.
This Fast Start guide gives you the “big picture” of what you need to set up a basic home or business network. The next three sections explain how you will set up and configure your equipment to enable shared high-speed access to the Internet.
Step 1: Connect the Router
This walks you through the process of connecting the Router to your ADSL modem. Then, it shows you how your PCs are connected to the Router.
This describes how your PCs are configured to communicate with the Router.
This step walks you through some basic Router settings, making it work with your ADSL modem and your ISP's settings.

Note: This Fast Start Guide will direct you how to set up the Router with Ethernet cables. While the Router can be set up through a wireless connection, details about setting up the Router wirelessly will not be addressed in this Fast Start Guide. Those who wish to set up the Router through their wireless connection should refer to the Linksys website at www.linksys.com.
Step 1: Connect the Router
In Step 1, you will connect the Router to your ADSL modem and to your home or business computers.
First, make sure that all devices you'll be working with are powered down, including your PCs, modem, and the Router.
A. If you haven't already done so, connect your ADSL modem to the phone jack. (Follow the instructions from your ADSL modem's installation guide.)
B. Using an Ethernet cable, connect the LAN or Ethernet port of the ADSL modem to the Router's WAN port.
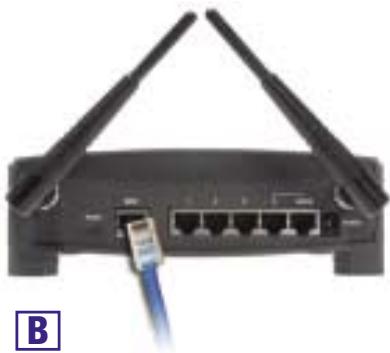
natural_image
Front view of a black wireless router with two antennas and a blue cable inserted (no visible text or symbols)
C. Connect an Ethernet cable to your PC's Ethernet adapter. Connect the other end of the cable to one of the Router's LAN ports. Repeat this process for every PC you wish to connect to the Router.
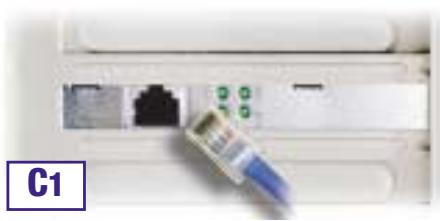
natural_image
Close-up of a white electronic device with an attached blue medical or laboratory probe inserted into the port, showing network ports and green indicator lights (no readable text or symbols)
Note: If your PC's Ethernet adapter is not set up, please refer to the Ethernet adapter's documentation for more information.
For ease of installation, start with LAN Port 1 on the Router, then Port 2, Port 3, and finally Port 4.
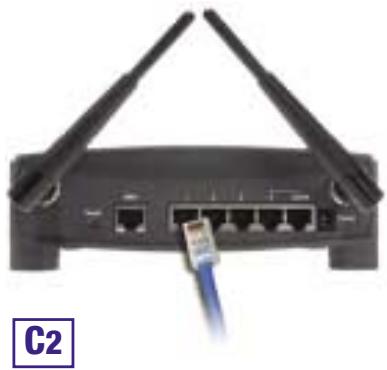
natural_image
Front view of a wireless router with two antennas and a blue cable inserted (no visible text or symbols)
D. Connect the power adapter to the Router's Power port. Then, connect the power adapter to an electrical outlet. Turn on the ADSL modem. Then turn on the first PC you wish to use when configuring the Router.
Proceed to Step 2: Configure the PCs on the next page.

natural_image
Illustration of a network device with Internet connection icon, showing router, wireless router, and desktop computer (no text or symbols on devices)
In Step 2, you will configure each of your computers to communicate with the Router.
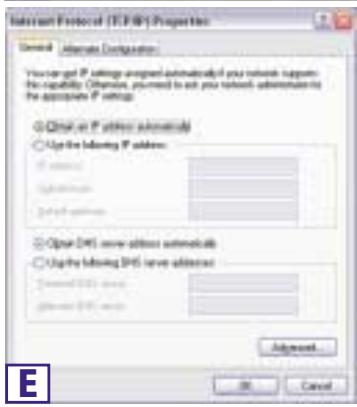
To do this, you will need to configure your PC's network settings to obtain an IP (or TCP/IP) address automatically. Computers use IP addresses to communicate with each other across a network or the Internet.
Find out which operating system your computer is running, such as Windows 98 SE, Millennium, 2000, or XP. You will need to know which operating system your computer is running. You can find out by clicking the Start button and then selecting the Settings option. (If your Start menu doesn't have a Settings option, you're running Windows XP. You can select the Control Panel directly from the Start Menu.) Then, click Control Panel and double-click the System icon. Click the Cancel button when done.
Once you know which Windows operating system you are running, follow the directions in this step for your computer's operating system. You may need to do this for each computer you are connecting to the Router.
The next few pages tell you, step by step, how to configure your TCP/IP settings based on the type of Windows operating system you are using. Once you've configured your computers, continue to Step 3: Configure the Router.
If you are running:
Windows 98 SE, Windows Me
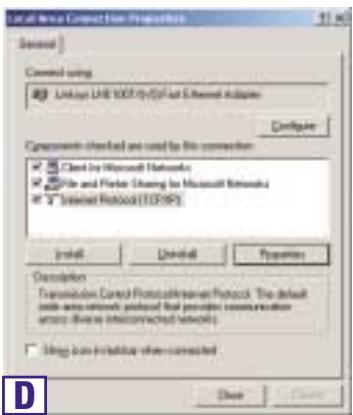
A. Click the Start button, click Settings and open the Control Panel. From there, double-click the Network icon to open the Network screen.
B. Select the Configuration tab and highlight the TCP/IP line for the applicable Ethernet adapter*. If the word TCP/IP appears by itself, select that line**. Then, click the Properties button.
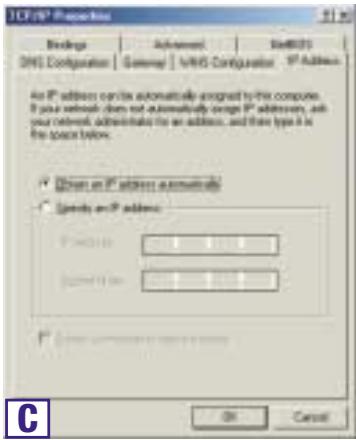
C. Click the IP Address tab and select Obtain an IP address automatically.
D. Click the Gateway tab and verify that the Installed Gateway field is blank. Click the OK button.
E. Click the OK button again. Windows may ask you for the original Windows installation disk or additional files. Supply them by pointing to the correct file location, e.g., D:\win98,D:\win9x,c:\windows\options\ cabs, etc. (This assumes that "D" is the letter of your CD-ROM drive).
F. If Windows asks you to restart your PC, click the Yes button. If Windows does not ask you to restart, restart your computer anyway.
Note: When I use Internet Explorer, a box pops up prompting me to dial up a connection. How can I disable that?
A. Go to your desktop and double-click My Computer, and then double-click Control Panel
B. When the Control Panel window pops up, double-click the Internet Options icon
C. When the Internet Options window appears, click the Connections tab.
D. Check Never Dial Up a Connection.
E. Click the Apply button.
F. Click the OK button
*Note: Do not choose a TCP/IP entry whose name mentions DUN, PPPoE, VPN, or AOL.
**Note: If there is no TCP/IP line listed, refer to your Ethernet adapter's documentation to install TCP/IP now.
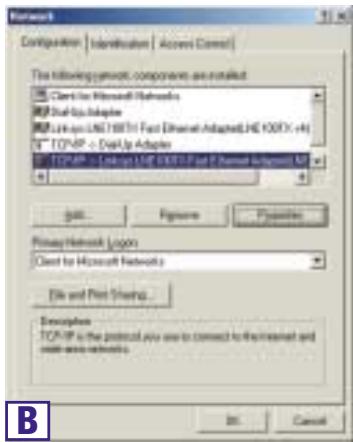
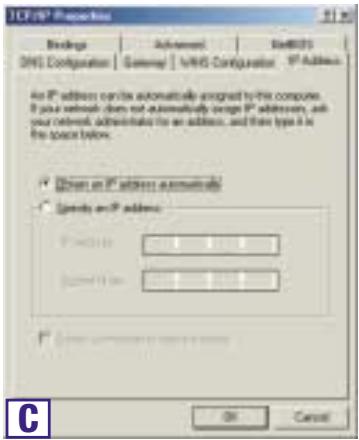
If you are running:
Windows 2000
A. Click the Start button, click Settings and open the Control Panel. From there, double-click the Network and Dial-up Connections icon. This will display the Network screen.
B. Select the Local Area Connection icon for the applicable Ethernet adapter* (usually it is the first Local Area Connection listed). Double-click Local Area Connection.
C. When the Local Area Connection Status screen appears, click the Properties button.
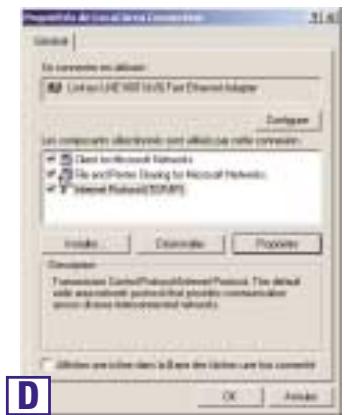
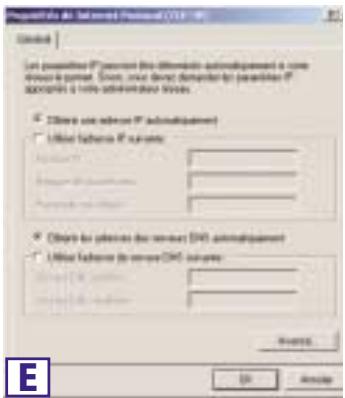
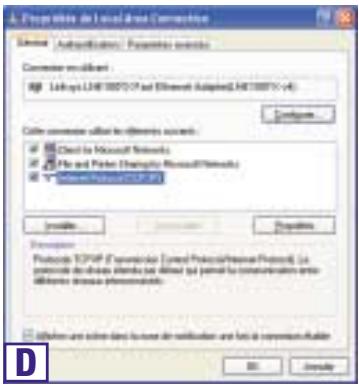
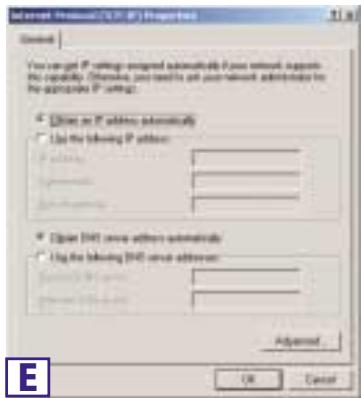
D. Select Internet Protocol (TCP/IP) and click the Properties button.
E. Select Obtain an IP address automatically and click the OK button on the subsequent screens to complete the PC's configuration.
F. Restart your computer.
Note: When I use Internet Explorer, a box pops up prompting me to dial up a connection. How can I disable that?
A. Go to your desktop and double-click My Computer, and then double-click Control Panel
B. When the Control Panel window pops up, double-click the Internet Options icon
C. When the Internet Options window appears, click the Connections tab.
D. Check Never Dial Up a Connection.
E. Click the Apply button.
F. Click the OK button.
*Note: Do not choose a TCP/IP entry whose name mentions DUN, PPPoE, VPN, or AOL.


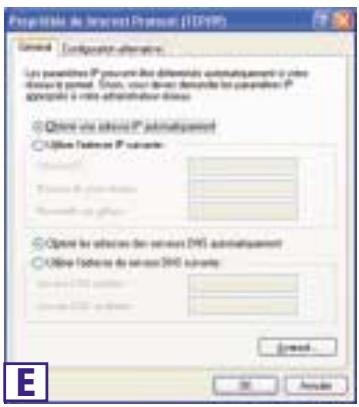
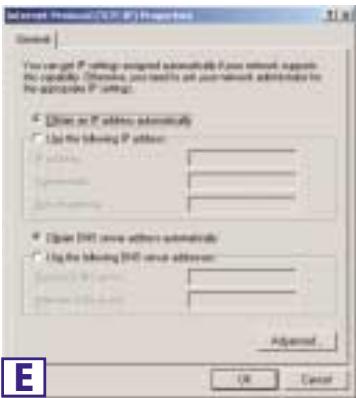
If you are running:
Windows XP
The following instructions assume you are running Windows XP's default interface. If you are using the Classic interface (where the icons and menus look like previous Windows versions), please follow the instructions for Windows 2000.
A. Click the Start button, open the Control Panel. and click the Network and Internet Connections icon. Then, click the Network Connections icon to display the Network screen.
B. Select the Local Area Connection icon for the applicable Ethernet adapter (usually it is the first Local Area Connection listed). Double-click Local Area Connection.
C. When the Local Area Connection Status screen appears, click the Properties button.
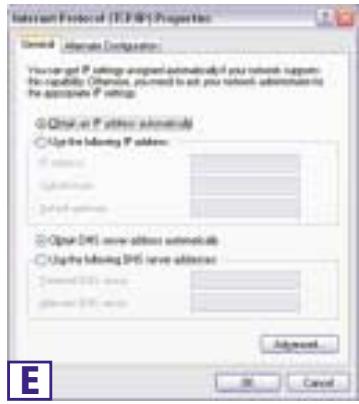
D. Select Internet Protocol (TCP/IP) and click the Properties button.
E. Select Obtain an IP address automatically and click the OK button on the subsequent screens to complete the PC's configuration.
F. Restart your computer.
Note: When I use Internet Explorer, a box pops up prompting me to dial up a connection. How can I disable that?
A. XP users using the default interface, click Start, and then select Control Panel.
B. using the default interface, click Network and Internet Connections, and then click Internet Options.
C. When the Internet Options window appears, click the Connections tab.
D. Check Never Dial Up a Connection.
E. Click the Apply button.
F. Click the OK button.


natural_image
Illustration of a network device connected via wireless links to a computer (no text or symbols visible)
In Step 3, you will configure the Router to function in your network and gain access to the Internet through your Internet Service Provider (ISP). Further, you will set the WAN Configuration Type on the Router's Setup tab from the information given by your ISP. You will need this setup information from your ISP. If you do not have this information, please contact your ISP before proceeding. To find out what questions you should ask your ISP, refer to question #1 in the Help section.
The instructions from your ISP tell you how to set up your PC for Internet access. Since you are now using the Router to share Internet access among several computers, you will use this setup information for Router configuration.
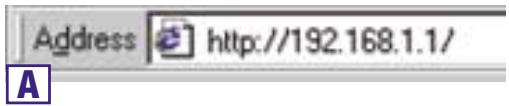
A. Open your web browser. (It's all right if you get an error message at this point. Continue following these instructions) Enter 192.168.1.1 into the web browser's Address field and press the Enter key.
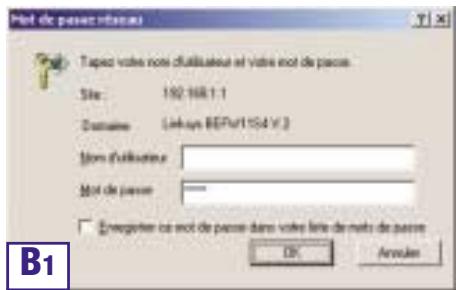
B. An Enter Network Password window, shown in Figure B1, will appear. (Windows XP users will see a Connect to 192.168.1.1 window, shown in Figure B2.) Leave the User Name field empty, and enter admin (the default password) in lowercase letters in the Password field. Then, click the OK button.
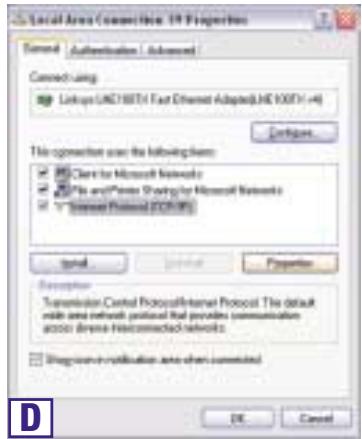
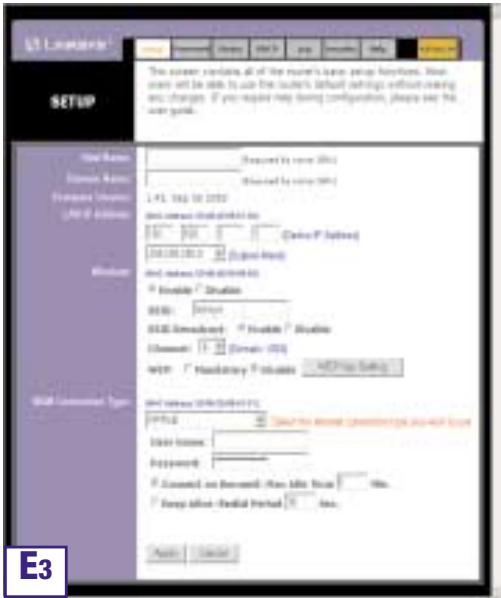
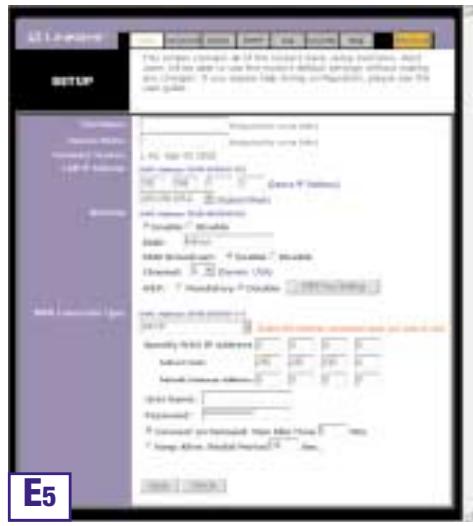
C. To configure the Router for your wireless network, verify that the Setup tab's Wireless fields (shown in Figure D) are completed as follows:
Enable/Disable: Selecting the Enable radio button will enable the Router's wireless feature. Wireless functions will not be available unless enabled.
SSID: The SSID (or ESSID) is a unique name for your wireless network. It is case sensitive and must not exceed 32 characters. The default SSID is "linksys" but you should change this to a personal wireless network name. All wireless points in your network must use the same SSID.
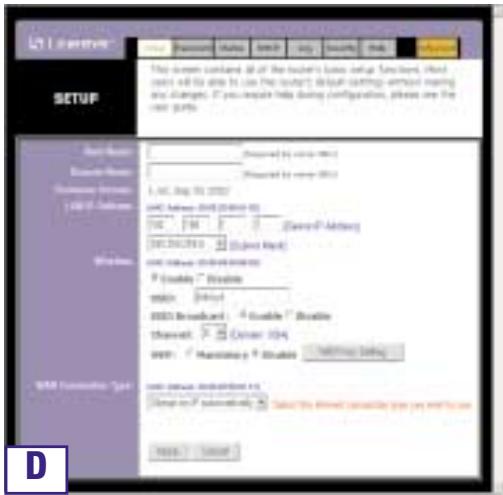
Channel: Select the appropriate channel for your network from the list provided. All wireless points in your network must use the same channel in order to function properly.

Note: If you are interested in changing the Router's WEP settings, turn to the section for Configuring Wireless Security.
D. The Router supports five connection types: DHCP (obtain an IP automatically), PPPoE, Static IP Address, RAS, and PPTP. These types are selected from the pull-down menu beside WAN Connection Type. If you possess a standard ADSL, subscription, choose PPPoE.
PPPoE
Make sure you complete the following steps.
a. Select PPPoE as the WAN Connection Type.
b. Enter the User Name and the Password you received from your ISP.
c. Click the Apply button follow by the Continue button to save the settings.
d. Click the Status tab, followed by the Connect button, to start the connection.
E. If you haven't already done so, click the Apply button to save the settings.
F. Reset the power on your DSL modem and restart your computers. They will now obtain the Router's new settings.
Note: You only need to configure the Router from one computer. If you need advanced setting information, please refer to the Linksys support website at support.linksys.com
Congratulations! You've successfully configured the Router. You can test the setup by opening your web browser from any computer and entering www.linksys.com/registration.
If you are unable to reach our website, you may want to review what you did in this section or refer to the Help section in this Fast Start guide.
Address

http://www.linksys.com/registration/
Securing your wireless network
Using radio waves, a wireless network introduces some security risks which are not present in a wired network; an unauthorized third party can intercept transmitted data, gain access to your wireless network, ... In order to make your wireless network as secure as a wired network you should apply, at least, the following guidelines:
1. Change the SSID
Your wireless network is identified on the basis of an SSID (Service Set Identifier). This parameter, which can be considered as the networkname, is broadcasted periodically through a beacon. Also the SSID is, in most cases, set default to a welknown value. To improve the security you can :
- disable the SSID broadcast. Users who want to connect to your wireless network must know this value to become connected. Also, your wireless network becomes invisible to a third party.
- change the default value of the SSID. The SSID can contain maximal 32 characters and it's best to choose a value which is not too obvious.
2 Activate WEP
To guarantee that your data is transmitted in a private manner, you should activate WEP (Wired Equivalent Privacy). Use of this protocol will result in your data being encrypted while travelling through the air. Choose the largest encryption key possible (in most cases this is 128 bits) and make sure that each PC on your wireless network uses the same key as the access point. You can even improve the security by changing the WEP-key on a regular base.
3 Activate MAC-address control list
By means of the MAC-address list, also known as the Association Control List, you can determine which client adapters can access your wireless network. This is done by introducing the MAC-address of the client adapter in the concerned list of the access point. A MAC address consists of 12 characters (0-9,A-F) and can be found on the back of the client adapter. A client adapter whose MAC address is not included in the list will not be granted access to your wireless network.
4 Change / activate passwords
Configuration of the access point is done through a web browser. Secure this access, and any other access which may exist, by a carefully chosen password. If a default password, set by the manufacturer, is used, you should replace this by your own password.
Help

natural_image
Illustration of a globe, router, and computer with a question mark symbol (no text or labels)
The Help section contains the most frequently asked Internet connection questions. If you have additional setup needs or you wish to get information on the Advanced Features, please visit kb.linksys.com
What type of connection do I have: dynamic IP address, static IP address, or PPPoE?
• If I am using a dynamic IP address, I should ask:
- What is my Host Name (if needed)?
- What is my Domain Name (if needed)?
• If I am using a static IP address, I should ask:
- What is my IP Address?
- What is my Gateway?
- What is my DNS?
• If I am using PPPoE (typically used by ADSL ISPs), I should ask:
- What is my User Name?
- What is my Password?
After you obtain the information, follow the instructions in the Fast Start - Step 3: Configure the Router, and use this information to enter on the Setup tab. In the WAN Connection Type section, refer to the chart on the next page:
| If you have this type of connection: | Perform these steps: |
| Dynamic IP Address (DHCP) | 1. Select Obtain an IP automatically as the WAN Connection Type.2. Click theApplybutton to save the setting. |
| Static IP Address | 1. Select Static IP as the WAN Connection Type.2. Enter the IP Address.3. Enter the Subnet Mask.4. Enter the Gateway Address.5. Enter theDNSin the 1, 2, and/or 3 fields.You need to enter at least one DNS address.6. Click theApplybutton to save the settings. |
| PPPoE | 1. Select PPPoEas the WAN Connection Type.2. Enter the User Name.3. Enter thePassword.4. Click theApplybutton to save the settings.5. Click on the Status tab then on the Connect button to launch the connection. |
| RAS or PPTP | If you are using RAS (Singapore SingTel) or PPTP (service in Europe), check with your ISP for the necessary setup information. |
- I'm having problems connecting to the Internet, what LEDs should be lit on the front of the Router?
- Each Router's LED will light up for any proper connection made on the back of the Router—whether it is an Ethernet cable or power cord.
For example, the following are typical LEDs that light up once a computer and DSL modem are connected:
- When the Router is turned on (the power adapter is plugged into the Router), the Power LED lights up.
- When an Ethernet cable is properly connected between a PC and Port 4 of the Router, the Link/Act, Ful/Col, and 100 LEDs in Column 4 light up.
- ADSL modem connection causes the WAN Link LED to light up.
• My WAN Link LED isn't lit. What should I check?
- Check that the cable you are using between your ADSL modem and the Router is the same cable that came with your modem. Depending on the type of connection your modem uses, you may need either a "straight-through" or "crossover" Ethernet cable (the "straight-through" type is more common).
- Some of the lights on the front of the Router don't light up when I plug in a PC.
- Only the Link/Act LED is required for a connection to work correctly.
- I cannot get onto the Internet, nor can I access the Router's Setup page. What should I check?
A. First check that the ADSL modem and computers are properly connected to the Router. See Question #2 for how to verify that the connections are good.
B. Then, check that you have properly configured your PCs to communicate with the Router. Below you will find instructions for the various versions of Windows.
- Windows 98 SE, or ME
- Click the Start menu, and then click Run. After the Run window appears, enter winipcfg in the Open field, and then click the OK button.
- When the IP Configuration window appears, click the gray box with a black arrow pointing down.
- A list of adapters will appear. Select the adapter that you use to connect to the Internet. These items should not contain "PPP", "VPN", "AOL", or "Dial-Up adapter" as part of the entry.
- The IP Address field should show an IP address of 192.168.1.100 or 192.168.1.xxx, with "xxx" being any number greater than 100. If your IP address is not in that range, hold the reset button on the front of the Router for more than 30 seconds. This will cause your Router to be set to factory default, so you will need to re-configure the Router's Setup page. After re-configuring the Setup page, restart the computer.
- Windows NT, 2000, and XP
- Click the Start menu, and then click Run. After the Run window appears, enter cmd in the Open field, and then click the OK button.
- This will open a command prompt. Enter ipconfig /all and then press the Enter key.
- The IP Address field should show an IP address of 192.168.1.100 or 192.168.1.xxx, with "xxx" being any number greater than 100. If your IP address is not in that range, hold the reset button on the front of the Router for more than 30 seconds. This will cause your Router to be set to factory default, so you will need to re-configure the Router's Setup page. After re-configuring the Setup page, restart the computer.
C. Now you will configure some settings in Windows.
- Go to your desktop and double-click My Computer, and then double-click Control Panel (Windows XP users using the default interface, click Start, and then select Control Panel).
- When the Control Panel window pops up, double-click the Internet Options icon (Windows XP users using the default interface, click Network and Internet Connections, and then click Internet Options).
- When the Internet Options window appears, click the Connections tab.
- Check Never Dial Up a Connection. (If this choice is grayed out, that is fine.)
- Click the LAN Settings ... button in the lower right-hand corner.
- When the Local Area Network (LAN) Settings window appears, uncheck all boxes.
- Click the OK button and the Apply button (the Apply button will be grayed out if you did not have to make any changes). Then click the OK button again.
-
Exit the Control Panel, and restart your computer.
-
When I click on the icon to access the Internet, and enter the user name and password that my ISP gave me, I cannot connect to the Internet. What is wrong?
This means that you're using the software given to you by your ISP. Please use Internet Explorer or Netscape Navigator, which is located on your desktop (located on the Start Menu in Windows XP).
- When I use Internet Explorer, a box pops up prompting me to dial up a connection. How can I disable that?
A. Go to your desktop and double-click My Computer, and then double-click Control Panel (Windows XP users using the default interface, click Start, and then select Control Panel).
B. When the Control Panel window pops up, double-click the Internet Options icon (Windows XP users using the default interface, click Network and Internet Connections, and then click Internet Options).
C. When the Internet Options window appears, click the Connections tab.
D. Check Never Dial Up a Connection.
E. Click the Apply button.
F. Click the OK button.
6. I get no signal strength or link quality or signal strength, what can I do?
A. Verify that the Router's WLAN LED is illuminated.
B. Verify that all of your wireless PCs are using "Infrastructure" mode.
7. How can I improve the Router's range?
A. Verify that the Router is as high off of the ground as possible.
B. Verify that there are no large sources of electrical interference nearby. (For example: speakers breaker boxes, florescent lights, microwaves, etc.)
C. Change the wireless channel being used. To do this:
- Open your web browser and type http://192.168.1.1 into the "Address" field.
- In the "Enter Network Password" box, leave the "User Name" field blank and type admin as the password. Then, click OK.
- From the Setup tab, change the channel to 1.
- Click the Apply button to save the settings.
- Continue doing this until you find the channel that provides the best range.
Configuring Wireless Security

Note: WEP encryption is an additional data security measure and not essential for router operation.
An acronym for Wired Equivalent Privacy, WEP is an encryption method used to protect your wireless data communications. WEP uses a combination of 64-bit or 128-bit keys to provide access control to your network and encryption security for every data transmission. To decode a data transmission, each point in a network must use an identical 64-bit or 128-bit key. Higher encryption levels mean higher levels of security, but due to the complexity of the encryption, they may mean decreased network performance.
You may also have heard the term “40-bit” used in conjunction with WEP encryption. This is simply another term for 64-bit WEP encryption. This level of WEP encryption has been called 40-bit because it uses a 40-bit secret key along with a 24-bit Initialization Vector (40 + 24 = 64) . Wireless vendors may use either name. Linksys uses the term “64-bit” when referring to this level of encryption.
Make sure your wireless network is functioning before attempting to configure WEP encryption.
A 128-bit WEP encrypted wireless network will NOT communicate with a 64-bit WEP encrypted wireless network. Therefore, make sure that all of your wireless devices are using the same encryption level. All wireless devices complying with the 802.11b standard will support 64-bit WEP.
In addition to enabling WEP, Linksys also recommends the following security implementations:
- Changing the SSID from the default “linksys”
- Changing the WEP key regularly

Note: In order for WEP Encryption to be enabled, wireless functions must first be enabled. Select Enable on the Router's Wireless tab before proceeding.
The following steps will show you how to utilize WEP encryption
- From the Web-based Utility's Setup tab, select Mandatory under the WEP section.
- Press the WEP Key Setting button to set the WEP Encryption type and level.
- The screen displayed in Figure C-1 may appear, verifying that you are enabling WEP Encryption. Press the OK button to continue.
- This will display the screen shown in Figure C-2. From this screen, you will choose your WEP Encryption settings.

Figure C-1
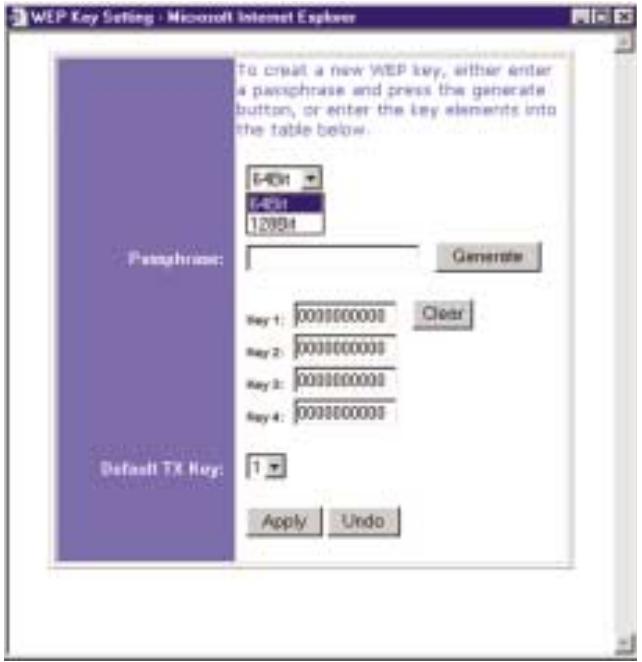
Figure C-2
- WEP (64Bit or 128B) Select the level of encryption from the drop-down box. 128-bit WEP encryption is unique to Linksys and may conflict with other vendors' WEP encryption.

Note: In order to utilize WEP encryption, all points in your wireless network must have WEP enabled and be set to the same Key Setting.
The WEP Encryption key is generated in one of two ways:
- You may create an encryption key by using a Passphrase.
a. Enter a Passphrase, a user-defined password, into the Passphrase field. The Passphrase can be a maximum of 31 letters, symbols, and numbers. No spaces can be used.
b. Click the Generate button to create a key. The key will be 10 digits if you chose 64-bit encryption, or 26 digits if you chose 128-bit encryption. This key will be used to encrypt and decrypt the data being sent between the Router and your network's wireless PCs.
The Key field may not display all digits. Using the mouse, click anywhere within the Key field. Move the cursor to the right to view the rest of the Key. Make sure your write down the entire Key EXACTLY the way it is displayed.
- You may enter the encryption key manually.
Make a note of the Passphrase or Manual Key. You will need it for the other wireless devices on the network, as the same WEP encryption key must be entered in all wireless devices on the network.
Once you have chosen your key encryption method and entered either the Passphrase or manual key, click the Apply button, and the encryption portion of the setup is complete.

Note: In Windows XP, a 128-bit Key generated by the Router will be called a "104 bits (26 digits)" key, and a 64-bit Key generated by the Router will be called a "40 bits (10 digits)" key.
Configuring Wireless Security in Windows XP
As Windows XP does not allow for the use of the Linksys Passphrase feature with the wireless PC adapters, you will need to manually enter the key generated in the previous section.
The following steps will help you enable WEP and enter the encryption key manually for your wireless PC cards, in order to enable your Windows XP system to communicate with the Router wirelessly.
These steps assume that your CD-ROM drive is letter D and that you are running Windows XP in the default mode.
Be sure you have the WEP Key generated by the Router.
- As shown in Figure C-3, click the Start button and go to the Control Panel.
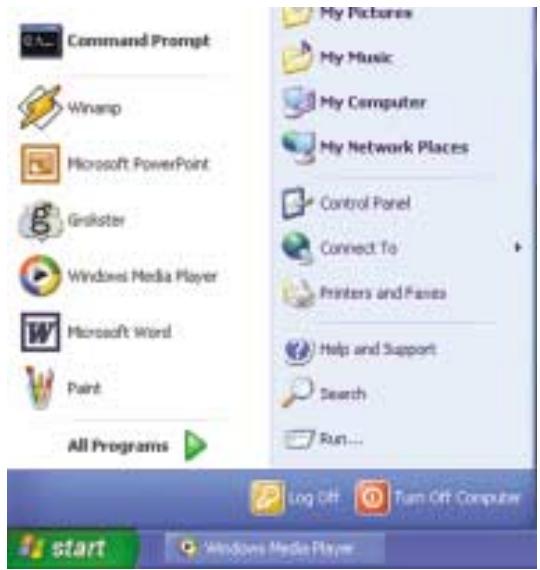
Figure C-3
- In the “Control Panel” window, click the Network and Internet Connections icon, shown in Figure C-4.

Figure C-4
- Click the Network Connections icon, shown in Figure C-5.
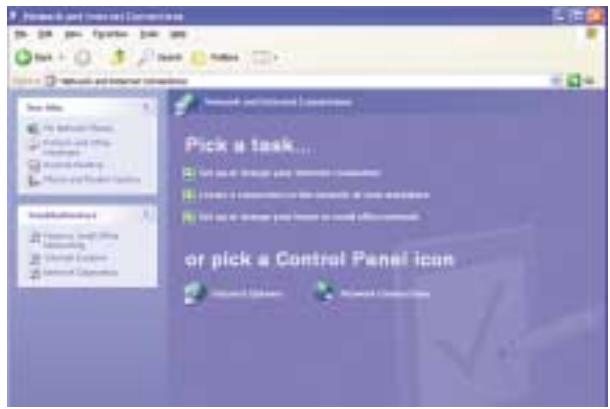
Figure C-5
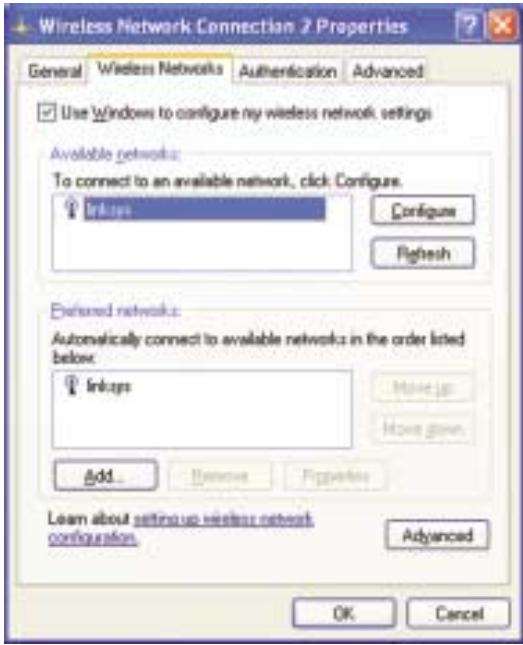
- The “Network Connections” window will appear, as shown in Figure C-6. Under LAN or High-Speed Internet you will see all Network cards that are installed and operating in your computer. Double-click the Wireless Network Connection icon associated with your wireless adapter.
If the “Wireless Network Connection Status” window appears, continue to the next step
If a “Connect to Wireless Network” window appears, in the Available Networks section, click the desired wireless network, specified by the Router’s SSID. Then, double-click the Wireless Network Connection icon.
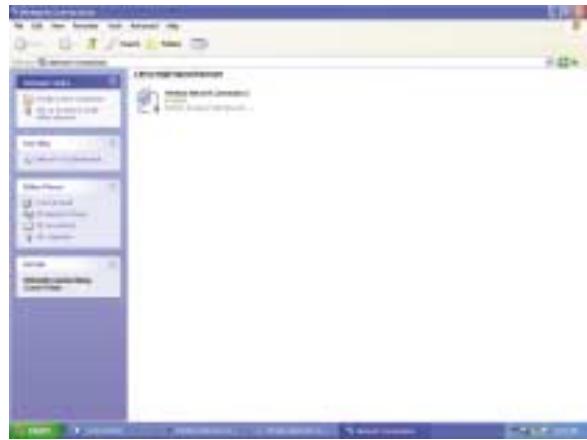
Figure C-6
- When the “Wireless Network Connection Status” window appears, as in Figure C-7, click the Properties button.
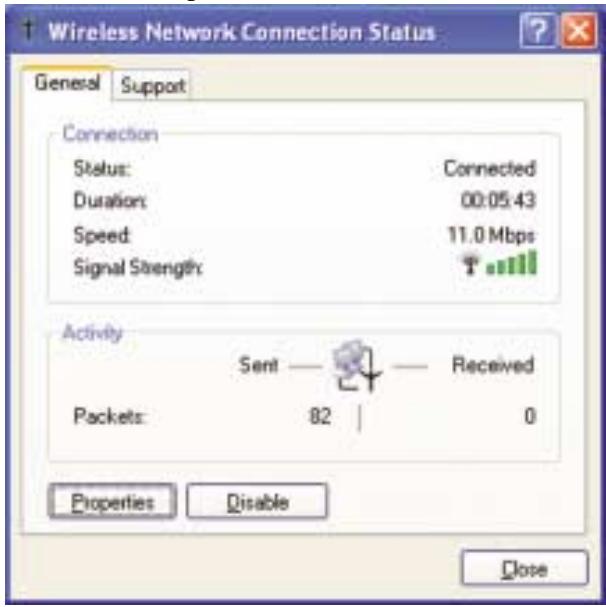
Figure C-7
-
When the “Wireless Network Connection Properties” window appears, as in Figure C-8, click the Wireless Networks Tab.
-
If the appropriate wireless network, specified by the Router's SSID, is displayed in the "Preferred networks" section, as shown in Figure C-9, double-click it and continue to the next step.
Otherwise, click on the appropriate wireless network, specified by the Router's SSID, in the "Available networks" section. Then, click the Configure button
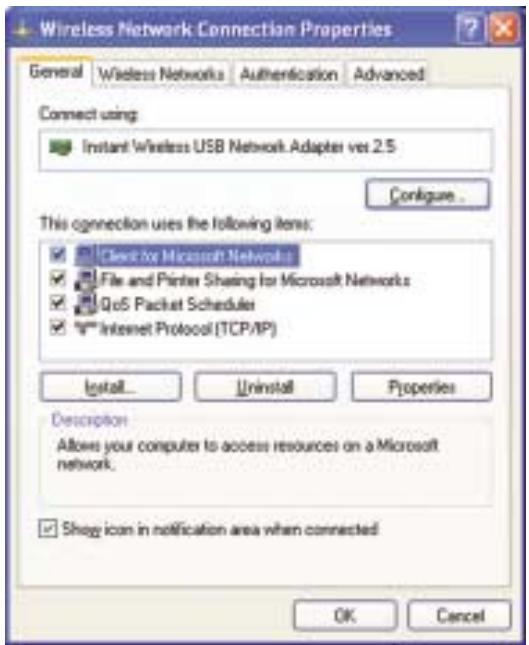
Figure C-8

Figure C-9
- The “Wireless Network Properties” window (shown in Figure C-10) will appear.
Click the check box for the Data encryption (WEP enabled) option.
Remove the check from the Network Authentication (Shared mode) and The key is provided for me automatically fields.
In the "Network key" field, enter the exact Key (all 10 or 26 digits, depending on the level of encryption) generated by the Router.
Verify that the “Key format” field displays “Hexadecimal digits” and that the “Key length” field displays either “40 bits (10 digits)” or “104 bits (26 digits)”. If this is not displayed, you have entered the key incorrectly.
![Wireless Network Properties Network name (SSID): WEP Wireless network key (WEP) This network requires a key for the following: ✓ Data encryption [WEP enabled] □ Network Authentication (Shared mode) Network key: ************ Key format: Hexadecimal digits Key length: 104 bits (26 digits) Key index (advanced): 0 □ The key is provided for me automatically This is a computer to compute (ad hoc) network, wireless connect points are not used OK Cancel](/content/2019/11/161460/images/77508ab01b316984eb031fbff21543c4be0e85286ea73a4f2c8ebaa1cda38b6f.jpg)
Figure C-10
Click the OK button to save the settings. Click on OK buttons until you get back to the “Wireless Network Connection Status” window. Close any open windows to get back to the Windows XP desktop.
Close any applications and reboot your PC. After reboot, WEP configuration is complete and you should be able to connect wirelessly to the Router.

