Conga 4000 Carpetspot Clean Xl Advance - Vacuum Cleaner CECOTEC - Free user manual and instructions
Find the device manual for free Conga 4000 Carpetspot Clean Xl Advance CECOTEC in PDF.


User questions about Conga 4000 Carpetspot Clean Xl Advance CECOTEC
0 question about this device. Answer the ones you know or ask your own.
Ask a new question about this device
Download the instructions for your Vacuum Cleaner in PDF format for free! Find your manual Conga 4000 Carpetspot Clean Xl Advance - CECOTEC and take your electronic device back in hand. On this page are published all the documents necessary for the use of your device. Conga 4000 Carpetspot Clean Xl Advance by CECOTEC.
USER MANUAL Conga 4000 Carpetspot Clean Xl Advance CECOTEC
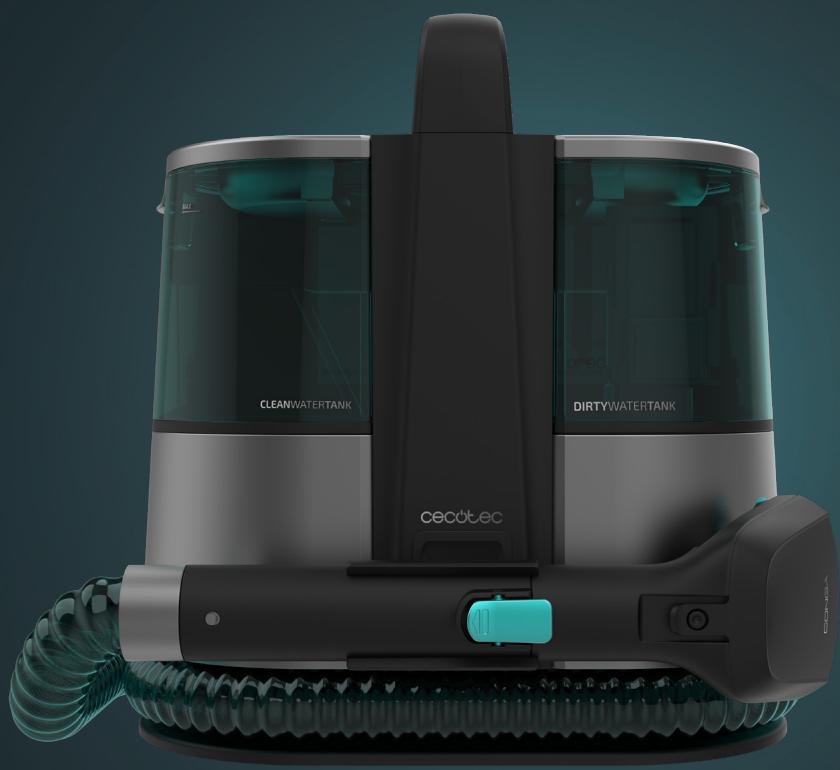
CONGA 4000 CARPET&SPOT CLEAN XL ADVANCE
Limpiatapicerías / Upholstery cleaner
Safety instructions 8
-
Parts and components 51
-
Before use 51
-
Assembly 52
-
Operation 52
-
Cleaning and maintenance 53
-
Troubleshooting 54
-
Technical specifications 56
-
Disposal of old electrical and electronic appliances 56
-
Technical support and warranty 56
-
Copyright 57
SOMMAIRE
Please, keep this instruction manual in a safe place for future reference or new users.
- Read these instructions carefully before assembling or using your carpet cleaner. These instructions contain important information that will help you get the best out of your equipment. It is your responsibility to make sure every user is informed about the warnings and precautions stated in this instruction manual.
- This appliance can be used by children aged 8 years and above and people with reduced physical, sensory, or mental capabilities or lack of experience and knowledge if they have been given supervision or instruction concerning the use of the appliance in a safe way and understand the hazards involved. Children must not play with the appliance. Cleaning and user maintenance should not be carried out by unsupervised children.
- This appliance is designed for domestic use only and is not intended for bars, restaurants, farmhouses, hotels, motels, and offices.
- WARNING: check that the upholstery cleaner and package are not damaged. Never use the appliance if damaged. Contact the official Cecotec Technical Support Service immediately.
- Packaging material may be dangerous to children. Remove it and place it out of their reach.
- The upholstery cleaner plug must be connected to a grounded socket. If you do not have an earthed socket, an earthed installation must be carried out by a licensed electrician. In case of ungrounded use, Cecotec shall not be liable for any malfunction or damage that this may cause.
- Make sure that the mains voltage matches the voltage
stated on the appliance marking and that the wall outlet is earthed.
- Always use the plug provided with the appliance. Do not modify the plug provided with the appliance if it does not match the power socket.
- Check the power cord regularly for visible damage. If the cable is damaged, it must be replaced by the official Cecotec Technical Support Service in order to avoid any type of danger.
- Do not operate the appliance if its cord, plug, or structure show visible damage, do not operate properly, or produce unusual sounds or odours.
- In case of malfunctioning, repairs must be carried out by Cecotec's Technical Support Service; otherwise, the warranty will be void.
- To unplug the appliance, pull from the socket, never from the cord.
- Do not immerse the cable, plug, or any other part of the appliance in water or any other liquid or expose electrical connections to water. Make sure your hands are dry before handling the plug or switching on the appliance.
- Disconnect the appliance from the electric circuit when it is not used.
- Disconnect the appliance from the power socket before carrying out any maintenance, cleaning, or transport.
- Do not use the appliance with pesticides, dyes, lubricants, or other liquids.
- Do not use the appliance to vacuum lit matches, cigarette ends, petrol gas, sources of heat, or hot ash.
- Do not use the appliance without installing the waste-water tank.
- The appliance is designed to clean carpets and upholstery, do not use it for any other purpose.
- This appliance is designed for personal use only and is not suitable for commercial use.
- Do not place the appliance near sources of heat, flammable substances, etc.
- If any strange object blocks any of the parts or you vacuum any strange object, stop using the appliance, empty it, and clean it to be able to use it again.
- This product is used to remove dirt through rinsing. Use tap water or alkaline ionised water at a temperature below 40 °C.
- This product cannot be used to clean arts and crafts, non-waterproof fibres (nets, acetic acid, rayon, etc.), non-waterproof products (furs, leather products, white wooden furniture, tea sets, etc.) and vulnerable surfaces (floors, tables).
- When the waste-water tank exceeds the maximum water level, stop operating the device immediately and empty the waste-water tank before using the product again.
- When using detergent, dilute a low-foaming detergent with water and spray it over the object to be cleaned.
- When using detergent, make sure it will not leave any stains before using it.
- If you use the appliance over a shag carpet, this will block the water outlet and the machine may stop working.
- If there is too much foam or wastewater in the lower part of the machine during operation, stop using it immediately and clean the tank before using it again.
- Do not use a detergent that foams.
- Do not try to vacuum the following objects:
a. Large quantities of dust (extinguishing agent, etc.)
b. Large quantities of sand and pebbles
c. Large quantities of waste
d. Metals like needles and pins, glass, etc.
e. Large and medium plastic bags
Protective device
- If the appliance stops working correctly, the protective device will start running to prevent the motor overheating, and the appliance will not work for a short period of time, even if you turn it on.
-
If the protective device is activated:
-
Press the power button and disconnect the appliance plug.
- Store the appliance in a dry and cool place.
- After 1 hour, the protective device will deactivate automatically, and you will be able to use the appliance again.
INSTRUCTIONS DE SÉCURITÉ
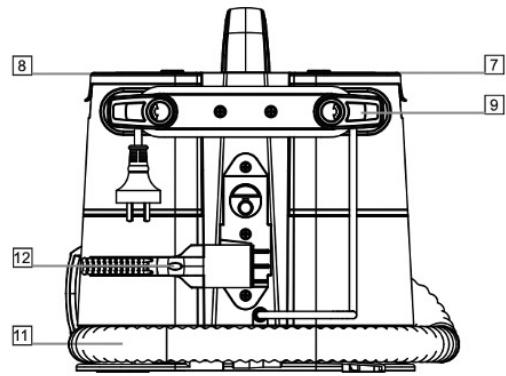
- Main body handle
- Power button
- Clean-water tank
- Waste-water tank
- Right-angle suction nozzle
- Suction nozzle release tab
- Clean-water tank release tab
- Waste-water tank release tab
- Power cable hook
- Hose bracket
- Hose
- Accessories bracket
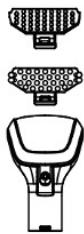
- Normal bristle nozzle
- 2 in 1 narrow nozzle
- XXL bristle nozzle
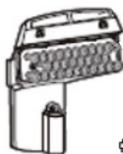
- Accessory for windows
For storage, you can wind the hose around the appliance and tie and hang the power cord in its hook, as shown in Figure 1.
NOTE:
The graphics in this manual are schematic representations and may not exactly match the device.
2. BEFORE USE
- This appliance includes a safety package to protect it during transport. Unpack the appliance and keep the original packaging and materials in a safe place. It will help prevent any damage if the appliance needs to be transported in the future. In case the original packaging is disposed of, make sure all packaging materials are recycled accordingly.
- Make sure all parts and components are included and in good conditions. If any sign of visible damage is observed, immediately contact Cecotec's official Technical Support Service.
- Box content:
- Upholstery cleaner
- Normal bristle nozzle
ENGLISH
- 2 in 1 narrow nozzle
- XXL bristle nozzle
- Clean-water tank
- Waste-water tank
- Hose hook
- Accessory for windows
- Instruction manual
3. ASSEMBLY
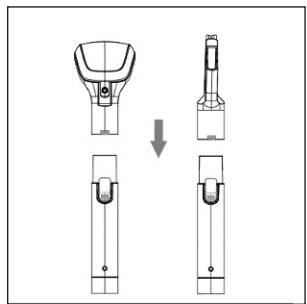
- Insert the suction nozzle in the appliance.
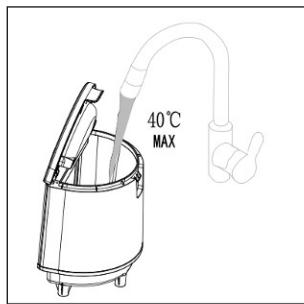
- Remove the clean-water tank from the main body of the appliance by pressing the release tab on the clean-water tank and pulling out the tank. Fill the tank with clean water up to the "MAX" mark and install the clean-water tank back into the main body of the appliance. Fig. 2
Note
- You can add low-foam detergent to the clean-water tank, combined with water in a 5:10 proportion.
- After using the appliance, you must empty the remaining water in the clean-water tank to avoid leakage and mould formation.
- Do not shake the clean-water tank during installation, as it could cause water leakage.
4. OPERATION
- Connect the product to the mains socket.
- Press the power button to switch on the appliance.
- Press and hold the water release button to spray clean water. Spray clean water on the dirt to bring it to the surface.
- Press the suction inlet on the dirt to bring water and dirt to the surface and vacuum them. Fig. 3
- Stop spraying clean water and vacuum the wastewater.
- Switch off the appliance by pressing the power button.
- Unplug it from the power supply.
- Empty the clean and wastewater from the tanks and clean the waste-water tank.
Note
- It is normal for the surface to be wet after spraying.
-
Do not spray water continuously over the same spot.
-
Switch off the appliance before unplugging it.
- After using the device, hang and wind the power cord in the power cord hook.
Cleaning embedded dirt
Warning:
- You can add low-foam detergent in the clean-water tank or apply it directly on the stain.
- Make sure the detergent will not damage the soiled surface before using it.
- Do not use thinners, aniline, chloroform, or flammable detergents.
Recommended liquids
- Alkaline ionised water.
- Low-foam detergent to the clean water tank combined with water in a 5:10 proportion.
- Citric acid
- Water with hydrochloric acid.
Non-recommended liquids
- Neutral kitchen detergent.
- Alkaline detergent.
-
Acid detergent.
-
Apply detergent over the soiled surface, spray clean water, and scrub the dirt with a brush to bring it to the surface.
- Vacuum the dirt and do not let any detergent remain.
Warning:
- To know the detergent quantity and use, carefully read the manufacturer instructions.
- Stop using the appliance when the water or foam in the waste-water tank reaches the maximum water level and clean the waste-water tank. Otherwise, water may enter the appliance.
Using the right-angle suction nozzle
Press the suction nozzle against the soiled surface and move it from top to bottom.
5. CLEANING AND MAINTENANCE
Note
- Stop the appliance and unplug it from the mains before cleaning it.
- Do not wet the appliance to avoid the risk of electric shock.
- Do not use detergents, thinners, benzene, or other chemical agents to clean the appliance.
- After every use, you must remove and clean the waste-water tank, the clean-water tank, and the suction nozzle to prevent humidity and dirt remains from emitting bad odours.
ENGLISH
5.1 Cleaning the main body
- The most common dirt can be cleaned with a slightly damp cloth.
- The most stubborn dirt can be cleaned with a cloth slightly soaked in detergent and then a cloth slightly soaked in water.
5.2 Waste-water tank cleaning. Fig. 4
- When the wastewater reaches the maximum level, stop using the appliance and unplug it from the mains.
- Remove the waste-water tank. To do so, slide the waste-water tank release tab and remove the waste-water tank.
- Remove the upper cover of the waste-water tank and empty the wastewater.
- Clean the tank, the upper cover, and the sealing strip.
- Place the waste-water tank in the main body of the appliance.
Note
- Do not lean or shake the waste-water tank when transporting or assembling it; otherwise, wastewater will easily leak.
- We recommend you empty the wastewater before it exceeds the maximum level on the tank; if you continue using the tank after the wastewater has exceeded the maximum water level, the float buoy will activate the device for automatic water suction stop and stop suction.
5.3 Cleaning the suction nozzle. Fig. 5
- Press the suction nozzle release button and separate it from the hose bracket
- Rinse the suction nozzle.
- Install the suction nozzle cover again. Make sure the pins are correctly placed in the holes and press these parts until they click.
When cleaning the suction nozzle, empty the water outlet if clogged.
Check the hose is not damaged and has no leaks.
5.4 Cleaning the hose. Fig. 6
- Press the suction nozzle release button and separate it from the hose bracket.
- Connect the device to the mains and connect the suction nozzle to the main body and press the trigger to clean the hose.
6. TROUBLESHOOTING
If you observe any problem, carefully read this manual and try any possible solutions before contacting Cecotec Technical Support Service.
| Problem | Possible causes | Possible solutions |
| The appliance does not work, and the switch is on | The plug is not correctly connected and loose, so it does not make contact. | Turn off the appliance and connect it again to the mains. |
| The internal line or power cord are broken. | Contact the official Cecotec Technical Support Service. | |
| The appliance overheats and the protective device is activated. | Read the instructions on the protective device. | |
| When pressing the water release button, there is no water or little water released | The nozzle is clogged. | Remove the suction nozzle and clean it with clean water. |
| The bracket or pump are damaged. | Contact the official Cecotec Technical Support Service. | |
| It does not vacuum, or it is too weak | The power button is in the Off position. | Turn on the power button. |
| The waste-water tank is full, which activates the float valve. | Empty the waste-water tank and use it again. | |
| The hose does not work properly. | Check the hose is not cracked, broken, or clogged. | |
| The waste-water tank is not correctly installed. | Install the waste-water tank correctly. | |
| The air inlet sponge is blocked. | Clean or replace the sponge. |
If after these tasks the problem still occurs, contact the provider or Cecotec's Technical Support Service.
Warning
Do not try to disassemble, repair, or modify the appliance by yourself.
ENGLISH
7. TECHNICAL SPECIFICATIONS
Product: Conga 4000 Carpet&Spot Clean XL Advance
Product reference: A01_EU01_100006
Voltage: 220-240 V, 50/60 Hz
Power: 600 W
IPX4
Actual waste-water tank capacity: around 0.85 litres
Actual clean-water tank capacity: around 1.5 litres.
Hose length: 30 mm x 1.2 m
Dimensions: 290 mm × 180 mm × 270 mm
Technical specifications may change without prior notification to improve product quality.
Made in China | Designed in Spain
8. DISPOSAL OF OLD ELECTRICAL AND ELECTRONIC APPLIANCES

This symbol indicates that, according to the applicable regulations, the product and/or batteries must be disposed of separately from household waste. When this product reaches the end of its shelf life, you should dispose of the cells/batteries/accumulators and take them to a collection point designated by the local authorities.
Consumers must contact their local authorities or retailer for information concerning the correct disposal of
old appliances and/or their batteries.
Compliance with the above guidelines will help protecting the environment.
9. TECHNICAL SUPPORT AND WARRANTY
Cecotec shall be liable to the end user or consumer for any lack of conformity that exists at the time of delivery of the product under the terms, conditions, and deadlines established by the applicable regulations.
It is recommended that repairs be carried out by qualified personnel.
If at any moment you detect any problem with your product or have any doubt, do not hesitate to contact the official Cecotec Technical Support Service at +34 96 321 07 28.
10. COPYRIGHT
The intellectual property rights over the texts in this manual belong to CECOTEC INNOVACIONES, S.L. All rights reserved. The contents of this publication may not, in whole or in part, be reproduced, stored in a retrieval system, transmitted, or distributed by any means (electronic, mechanical, photocopying, recording or similar) without the prior authorization of CECOTEC INNOVACIONES, S.L.
FRANÇAIS
1. PIÈCES ET COMPOSANTS
Img. 1
6. PROBLEEMOPLOSSING
Product: Conga 4000 Carpet&Spot Clean XL Advance
Referentie: A01_EU01_100006
Spanning: 220-240 V, 50/60Hz
Vermogen: 600 W
IPX4
13

14
15

16
Fig./Img./Abb./Afb./Rys.1
1
2

3
Fig./Img./Abb./Afb./Rys. 2

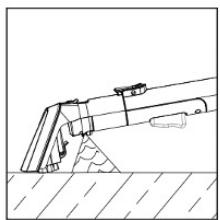
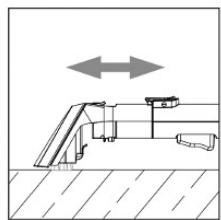


Fig./Img./Abb./Afb./Rys. 3
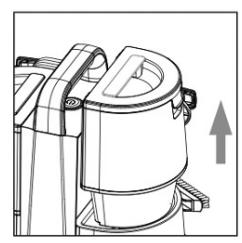


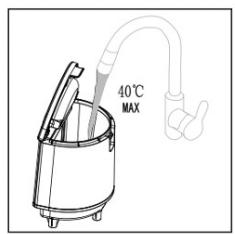


Fig./Img./Abb./Afb./Rys. 4


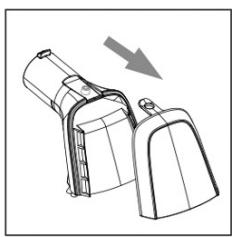


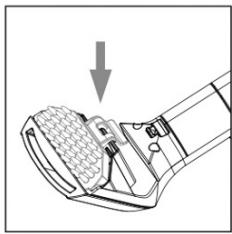
Fig./Img./Abb./Afb./Rys. 5

Fig./Img./Abb./Afb./Rys. 6
www.cecotec.es
- SOMMAIRE
- PROTECTIVE DEVICE
- INSTRUCTIONS DE SÉCURITÉ
- NOTE
- BEFORE USE
- ENGLISH
- ASSEMBLY
- OPERATION
- CLEANING EMBEDDED DIRT
- WARNING
- RECOMMENDED LIQUIDS
- NON-RECOMMENDED LIQUIDS
- USING THE RIGHT-ANGLE SUCTION NOZZLE
- CLEANING AND MAINTENANCE
- 5.1 CLEANING THE MAIN BODY
- 5.2 WASTE-WATER TANK CLEANING. FIG. 4
- 5.3 CLEANING THE SUCTION NOZZLE. FIG. 5
- 5.4 CLEANING THE HOSE. FIG. 6
- TROUBLESHOOTING
- TECHNICAL SPECIFICATIONS
- DISPOSAL OF OLD ELECTRICAL AND ELECTRONIC APPLIANCES
- TECHNICAL SUPPORT AND WARRANTY
- COPYRIGHT
- FRANÇAIS
- PIÈCES ET COMPOSANTS
- IMG. 1
- PROBLEEMOPLOSSING
Brand : CECOTEC
Model : Conga 4000 Carpetspot Clean Xl Advance
Category : Vacuum Cleaner