
IMAGEVIEW 118326 - Digital binoculars BUSHNELL - Free user manual and instructions
Find the device manual for free IMAGEVIEW 118326 BUSHNELL in PDF.

| Product Type | Digital Binoculars |
| Brand | Bushnell |
| Model | IMAGEVIEW 118326 |
| Power Supply | 2 AAA batteries (not included) |
| Screen | Flip-up LCD |
| Internal Storage | Internal memory + SD card (up to 2 GB) |
| File Formats | Photo: JPG, Video: AVI (or proprietary format) |
| Photo Resolution | Adjustable (high, standard) |
| Video Mode | Continuous (8, 15, 30 or 60 seconds) or standard |
| Photo Functions | Self-timer (10 s), Burst (3 photos) |
| Focus | Central + dual diopter on eyepieces |
| Interpupillary Adjustment | Yes, by pivoting the barrels |
| Eyepieces | Fold-down eyecups for eyeglass wearers |
| PC Connection | USB (mass storage) |
| Compatibility | Windows, Mac |
| Warranty | 2-year limited |
| Included Accessories | USB cable, remote shutter release, wrist strap (depending on version) |
Frequently Asked Questions - IMAGEVIEW 118326 BUSHNELL
User questions about IMAGEVIEW 118326 BUSHNELL
0 question about this device. Answer the ones you know or ask your own.
Ask a new question about this device
Download the instructions for your Digital binoculars in PDF format for free! Find your manual IMAGEVIEW 118326 - BUSHNELL and take your electronic device back in hand. On this page are published all the documents necessary for the use of your device. IMAGEVIEW 118326 by BUSHNELL.
USER MANUAL IMAGEVIEW 118326 BUSHNELL
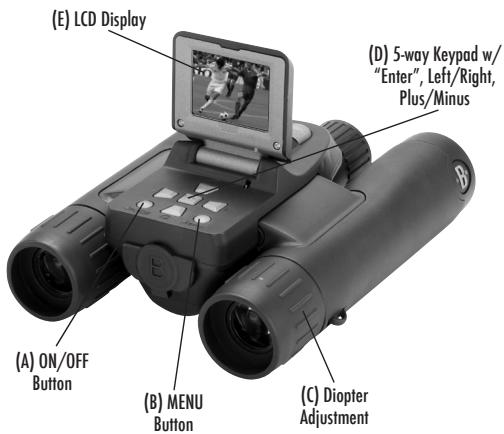
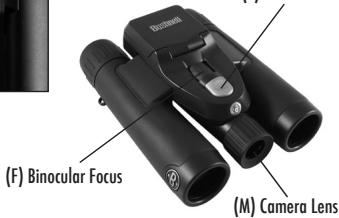
Camera and Binocular Parts Guide
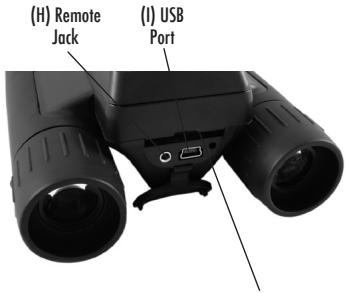
(K) Card Slot
(G) Battery Compartment
(L) SNAP Button
ENGLISH
QUICK START GUIDE: BUSHNELL SYNCFOCUS™ INSTANT REPLAY
1) The SyncFocus is powered by two AAA batteries (not included). Insert batteries into the compartment (G), using the polarity marks inside for reference. A power meter in the lower left corner of the display indicates battery condition.
2) Insert an SD card into slot (K) if greater storage is desired. The card will click into place. You may use SD cards (not MMC cards) up to 2 GB capacity. Note: If the card you insert was previously used in other devices, format it before taking photos. Press the Enter button (D) to enter Play mode, then press the MENU button (B). Press the Minus key (D) once to select "Format", then press Enter. Note the warning that this will erase all files - make sure you have backed up any files you wanted to keep. Press the Plus key (D) to select "OK", then press Enter to format the card.
3) Raise the LCD display (E), and press the ON/OFF button (A) briefly. The camera will automatically turn itself off after two minutes of inactivity (this can be changed using the "Auto Off" option in the Setup menu).
4) The Date/Time imprint feature is turned on by default. To set the date, press the MENU button. Find "Clock Set" using the Minus key and press Enter. Now set the Year, Month, Date, Hour and Minute (in order from left to right), using the Plus/Minus keys to make changes, and the Right key to move to the next item. Once date & time are set, press the Enter button. Use "Date Stamp" to set your preference (month first, year first or off). Press Enter then Exit menu to return to the preview display. Reset the date/time if you replace batteries.
5) Hold the camera steady with both hands and press the SNAP button (L) to take a still photo. When using a tripod, you can help avoid the effects of camera shake by plugging the supplied remote shutter release cable into the jack next to the SD card slot rather than SNAP to take photos.
6) To shoot a video, press the Right key (D) three times until the red movie camera icon appears at the top right corner of the display (see "LCD Preview Display Icons"-10). You can then start shooting the video at any time by pressing the SNAP button. To stop recording the video, press the SNAP button again. By default, videos are recorded as a 15 second loop ("instant replay"). To change this, press Menu-the first item is Resolution". Press Enter, then select Video Size". Use the Plus/Minus buttons to select a different video resolution and frame rate combination (which determines loop length-8, 15, 30 or 60 seconds). You also have the option to select a "Norm" video setting if you prefer to shoot standard video clips, instead of loops that re-record (refresh) automatically.
For more details regarding using the still and video resolution options and other menu settings, please read the full instruction manual, available online at: http://www.bushnell.com/customer_service/manuals.cfm
7) To review or playback a still photo or video, press the Enter button. You will see the most recent still photo or video. To review previous photos or videos one at a time, press the Left key. To playback a video, press the SNAP button (press again to stop playback). To delete photos/videos, press MENU. Select Delete One (only the currently displayed photo/video) by pressing Enter, then the Plus button to select "OK", and press Enter to delete the file. If you wish to delete all photos/videos, use the Format menu option as described earlier.
8) To download photos/videos to your PC or Mac, connect the USB cable from the SyncFocus to your computer. The SyncFocus will be recognized as a standard "USB Mass Storage" device and will appear as a "Removable Disk" under the "My Computer" list (on Macs, an icon will appear on your desktop). The photo files are located in the "DCIM" folder on this "Removable Disk". Copy the files to your hard drive (drag or use the "copy files" option), then disconnect the camera. (On Mac computers, drag the "disk" that appeared on your desktop when the camera was connected into yourtrash to "eject" it before disconnecting.) The jpg standard files from the SyncFocus may be edited with any photo software you choose to use.
NOTE: If you are not using an SD card in the SyncFocus, be sure to download all files from its internal memory before changing batteries and before storing the camera for a long period. If you use an SD card, photos may also be downloaded by removing the card and using any USB card reader with an SD slot.
Your SyncFocus camera is already set for high resolution and quality right out of the box, and it is not necessary to change any of the settings to get good results. However, many features and options are provided to enhance your enjoyment of the camera. For more information about them, please refer to the complete instruction manual, available online at: http://www.bushnell.com/customer_service/manuals.cfm
Adjusting the Binocular IPD
The distance between the eyes, called "interpupillary distance," varies from person to person. To set the hinge for your personal IPD:
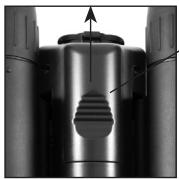
Hold the binocular in the normal viewing position, with a firm grip on each side. Move the barrels closer together or further apart (Fig. 1) until you see a single circular field. Always re-set your binocular to this position before using.
Eyecups
The SyncFocus binocular is fitted with rubber roll-down eyecups designed for your comfort and to exclude extraneous light. If you wear glasses, roll down the eyecups. This will bring your eyes closer to the binocular lens so you can view the entire image without any cutoff.
Setting the Eyepiece Dual Diopter Adjustments
First, look only through the left side of the binocular - you will see a black ring (reticle) in the center. Rotate the left eyecup (diopter adjustment) until this reticle appears as sharp as possible. Next, look through the left side only at an object in the distance, and adjust the center focusing knob until it appears as sharp as possible to your left eye. Then, look at the
same object through only the right side of the binocular, and rotate the right eyecup (diopter adjustment) until it appears sharp for your right eye (do not touch the center focus knob while doing this). Once set, note the number on the left and right binocular tubes that the index mark on each eyecup is lined up with. With the eyepieces set to these positions, you should be able to get sharp photos/videos of a subject at any distance while you look through the binoculars and adjust the center focus knob (do not re-adjust the eyepiece diopter settings), without the need to pull up or view the LCD display. Just focus normally and snap the photo or shoot the video.
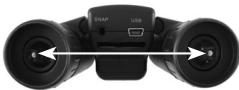
Fig.1
Full Instruction Manual available at: http://www.bushnell.com/customer_service/manuals.cfm
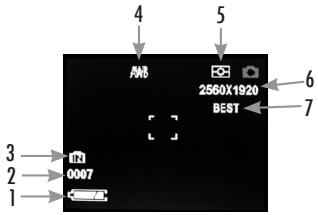
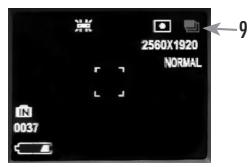
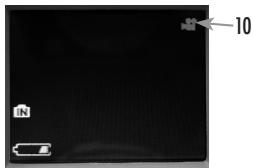
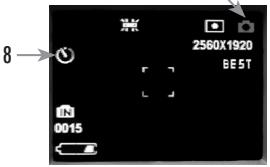
LCD Preview Display Icons
| # | Icon |
| 1 | Battery Indicator (full battery shown) |
| 2 | # of Photos Remaining (based on unused internal or card memory) |
| 3 | Internal or Card Memory |
| 4 | White Balance Setting (Auto White Balance shown) |
| 5 | Exposure Meter Pattern setting |
| 6 | Photo Resolution setting (Pixels) |
| 7 | Photo Quality setting (File Compression) |
| 8 | Self Timer (10 sec delay) |
| 9 | Rapid Sequence (3 shot burst) |
| 10 | Video Mode (Elapsed time counter also appears while recording) |
Additional Feature Icons
Press the Right key (1, 2, or 3 times) to select the self timer, rapid sequence, or video mode features. Press again after selecting video mode to return to normal still photo operation (camera icon returns at top right of LCD).
TWO-YEAR LIMITED WARRANTY
Your Bushnell® product is warranted to be free of defects in materials and workmanship for two years after the date of purchase. In the event of a defect under this warranty, we will, at our option, repair or replace the product, provided that you return the product postage prepaid. This warranty does not cover damages caused by misuse, improper handling, installation, or maintenance provided by someone other than a Bushnell Authorized Service Department.
Any return made under this warranty must be accompanied by the items listed below:
1) A check/money order in the amount of $10.00 to cover the cost of postage and handling
2) Name and address for product return
3) An explanation of the defect
4) Proof of Date Purchased
5) Product should be well packed in a sturdy outside shipping carton, to prevent damage in transit, with return postage prepaid to the address listed below.
IN U.S.A. Send To:
Bushnell Outdoor Products
Attn.: Repairs
8500 Marshall Drive
Lenexa, Kansas 66214
IN CANADA Send To:
Bushnell Outdoor Products
Attn.: Repairs
25A East Pearce Street, Unit 1
Richmond Hill, Ontario L4B 2M9
For products purchased outside the United States or Canada please contact your local dealer for applicable warranty information. In Europe you may also contact Bushnell at:
Bushnell Germany GmbH
European Service Centre
Mathias-Brugger-Stt.80
D-50827 Köln
GERMANY
This warranty gives you specific legal rights.
You may have other rights which vary from country to country.
©2009 Bushnell Outdoor Products
FCC COMPLIANCE STATEMENT:
This equipment has been tested and found to comply with the limits for a Class B digital device, pursuant to part 15 of the FCC Rules. These limits are designed to provide reasonable protection against harmful interference in a residential installation.
Operation is subject to the following two conditions: (1) This device may not cause harmful interference, and (2) this device must accept any interference received, including interference that may cause undesired operation.
This equipment generates, uses and can radiate radio frequency energy and, if not installed and used in accordance with the instructions, may cause harmful interference to radio communications. However, there is no guarantee that interference will not occur in a particular installation. If this equipment does cause harmful interference to radio or television reception, which can be determined by turning the equipment off and on, the user is encouraged to try to correct the interference by one or more of the following measures:
Reorient or relocate the receiving antenna.
- Increase the separation between the equipment and receiver.
- Connect the equipment into an outlet on a circuit different from that to which the receiver is connected.
- Consult the dealer or an experienced radio/TV technician for help.
The device does not contain any user-serviceable parts. Repairs should only be made by an Authorized Bushnell repair center. Unauthorized repairs or modifications could result in permanent damage to the equipment, and will void your warranty and your authority to operate this device under Part 15 regulations.
The shielded interface cable which is provided must be used with the equipment in order to comply with the limits for a digital device pursuant to Subpart B of Part 15 of FCC Rules.
Specifications and designs are subject to change without any notice or obligation on the part of the manufacturer.
Bushnell Outdoor Products
Attn.: Repairs
8500 Marshall Drive
Lenexa, Kansas 66214
Bushnell Outdoor Products
Attn.: Repairs
25A East Pearce Street, Unit 1
Richmond Hill, Ontario L4B 2M9
European Service Centre
Mathias-Bruggen-Str.80
D-50827 Köln
GERMANY
©2009 Bushnell Outdoor Products
REMARQUE RELATIVE À LA FCC (COMMISSION FÉDERALE DES TÉLECOMMUNICATIONS):
Bushnell Outdoor Products
Attn.: Repairs
8500 Marshall Drive
Lenexa, Kansas 66214
En CANADÁ enviar a:
Bushnell Outdoor Products
Attn.: Repairs
25A East Pearce Street, Unit 1
Richmond Hill, Ontario L4B 2M9
European Service Centre
Mathias-Bruggen-Str. 80
D-50827 Köln
GERMANY
Tel:+49221995568-0
Fox: +49 221 995568-20
©2009 Bushnell Outdoor Products
Bushnell Outdoor Products
Bushnell Outdoor Products
Attn.: Repairs
Attn.: Repairs
8500 Marshall Drive
25A East Pearce Street, Unit 1
Lenexa, Kansas 66214
Richmond Hill, Ontario L4B 2M9
European Service Centre
Mathias-Bruggen-Str. 80
D-50827 Köln
GERMANY
©2009, Bushnell, Outdoor Products
Bushnell Outdoor Products
Attn.: Repairs
8500 Marshall Drive
Lenexa, Kansas 66214
Recapito in Canada:
Bushnell Outdoor Products
Attn.: Repairs
25A East Pearce Street, Unit 1
Richmond Hill, Ontario L4B 2M9
European Service Centre
Mathias-Bruggen-Str. 80
D-50827 Köln
GERMANY
Tel:+492219955680
Fax: +49 221 995568-20
Questagaranzia daskespecificidinitilegali.
©2009 Bushnell Outdoor Products
Bushnell Outdoor Products
Attn.: Repairs
8500 Marshall Drive
Lenexa, Kansas 66214
NO CANADÁ REMETER PARA:
Bushnell Outdoor Products
Attn.: Repairs
25A East Pearce Street, Unit 1
Richmond Hill, Ontario L4B 2M9
Para produits adquirifs para los Estados Unidos ou da Canada favor contrator se revendedor local quando a informacoes aplicables referenca a sui garantio. A Bushnell本次活动 o serrotado na Euro pego delphoto:
Bushnell Germany GmbH
European Service Centre
Mathias-Bruggen-Str. 80
D-50827 Köln
GERMANY
©2009 Bushnell Outdoor Products
NOTA DA FCC:
INNOVATION THAT THRIVES OUTSIDE
For further questions or additional information please contact:
Bushnell Outdoor Products
9200 Cody, Overland Park, Kansas 66214
(800) 423-3537 www.bushnell.com