PLAYMATEVOCALIST - CD Player ALESIS - Free user manual and instructions
Find the device manual for free PLAYMATEVOCALIST ALESIS in PDF.

User questions about PLAYMATEVOCALIST ALESIS
0 question about this device. Answer the ones you know or ask your own.
Ask a new question about this device
Download the instructions for your CD Player in PDF format for free! Find your manual PLAYMATEVOCALIST - ALESIS and take your electronic device back in hand. On this page are published all the documents necessary for the use of your device. PLAYMATEVOCALIST by ALESIS.
USER MANUAL PLAYMATEVOCALIST ALESIS
ALESIS PlayVocalist Mate
Quick Start Owner's Manual
Box Contents:
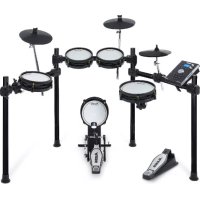
Playmate Vocalist CD Player
Quick Start Owner's Manual
Power Cord
This page intentionally left blank.
Quick Setup
- Make sure all items listed on the front of this guide are in the Playmate Vocalist's box.
- Read the Important Safety Instructions.
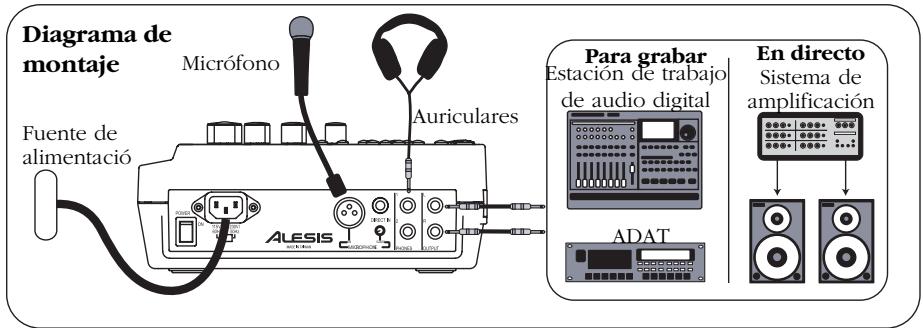
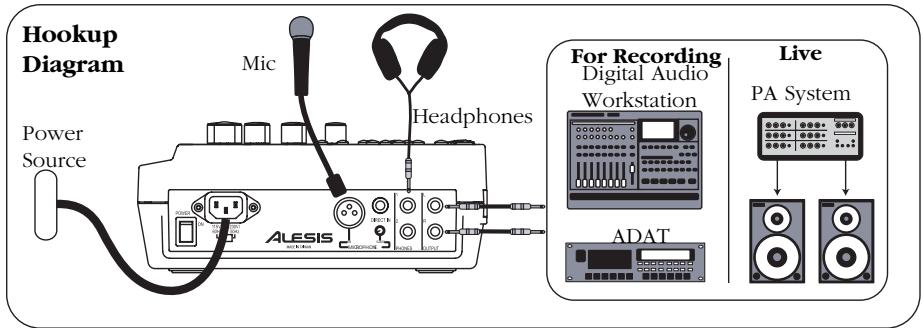
- Study the Hookup Diagram above. Refer to the next section for details on which cables to use.
- Make sure all devices and instruments are turned off and all gain knobs set to zero.
- Connect your microphone to either the XLR input or the 1/4 direct input located on the rear of the Playmate Vocalist.
Note: The Playmate Vocalist does not provide phantom power. Do not attempt to use microphones that require external phantom power.
- Connect your headphones to one of the PHONES jacks. You may connect two sets of headphones.
- To output the signal to a PA amplifier, mixer or other equipment, connect the Playmate Vocalist's Left and Right OUTPUT jacks to the inputs of the device using 1/4 TRS plugs. To connect to your stereo, you will need to buy 1/4 -to-RCA plug converters.
- Turn on the Playmate Vocalist first, followed by the other equipment. Be sure to turn on any amplifiers last to avoid any sudden "pops" that could damage speakers.
- When finished, turn off any external amplifiers first before turning off or disconnecting the Playmate Vocalist—to prevent damage to external speakers.
- Go to http://www.alesis.com to register the Playmate Vocalist.
Rear-Panel Features and Connection Details
- POWER - Turns the unit on and off. Always use this button to turn off the unit before removing the power cord.
- IEC Power Plug Connector - Plug in the power cord that came with the unit here.
- Voltage Switch - Adjusts the voltage from 115V / 60Hz (American) to 230V / 50Hz (European). It's important that this is set to the correct voltage; otherwise, you could damage the Playmate Vocalist.
- MICROPHONE Input - an XLR input that accepts any microphone with an XLR plug.
- DIRECT IN Input - a 1/4" instrument input. This input bypasses the Playmate Vocalist's effects section and works well for adding your synthesizer or other instrument into the mix.
- Gain Knob - controls the gain of the MICROPHONE input. Turn this knob up until you achieve a loud, clear sound. Turn it down if you experience distortion, feedback, clipping or excessive hiss.
NOTE: The Gain knob only works with the MICROPHONE input; it does not affect the DIRECT IN input.
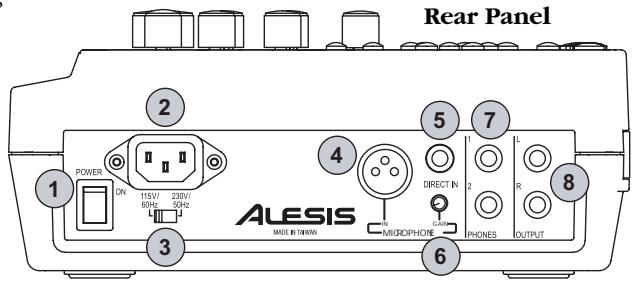
- PHONES - stereo 1/4 unbalanced jacks for connecting two sets of headphones.
- Land R OUTPUTS - 1/4" TRS stereo output for routing the left and right signals to a device such as a mixer or amplifier.
Features of the Playmate Vocalist
- Display - Shows the current track and effect program, CD time and various other settings. Refer to the "Features of the Display" section for details.
- Play/Pause Button - Plays the CD. If you press this button while a CD is playing, it will be paused until you press Play/Pause again.
- Stop Button - Stops a playing CD.
- Skip Previous Button - Skips to the beginning of the current track, or skips to the previous track on the CD.
- Skip Next Button - Skips to the beginning of the next song on the CD.
- Scan Forward Button - Scans forward through the current song. Hold down this button to continue scanning.
- Scan Back Button - Scans backward through the current song. Hold down this button to continue scanning.
- PITCH Knob - Controls the tuning of the CD audio. When you turn this knob, both the pitch and the speed of the audio are affected. You may adjust the pitch by as much as plus or minus 8% .
- SPEED Knob - Adjusts the speed, or tempo, of the CD audio without affecting its pitch. You may decrease the tempo by as much as 50% and increase it as much as 150% .
- TRANSPOSE Knob - Changes the key of the CD audio in half-step intervals, a maximum of seven half-steps up or down, without affecting the speed of the audio.
The TRANSPOSE knob does not affect the audio's tuning either. For example, let's say you tune the audio to 5% sharp using the PITCH knob. If you then transpose the audio up four half-steps, it will then be four half-steps plus 5% sharp.
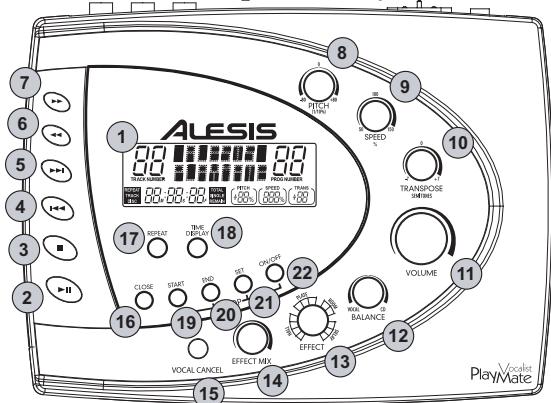
Top of the Playmate Vocalist
TIP: We recommend that you transpose a song to the appropriate key first, and then adjust the speed, followed by the pitch. That way you can tune the music to your voice or instrument first, adjust the tempo without affecting that tuning, and then make minor pitch adjustments if necessary.
- VOLUME Knob - Controls the master output volume of the Vocalist Playmate.
- BALANCE Knob - Controls the ratio of the volume of the inputted vocal (along with the selected effect) versus the volume of the CD audio. Turn this knob all the way to the right and the main outputs will contain 100% CD audio. Turn it all the way to the left and the outputs will contain 100% vocal. When the knob is in the center position, the vocals and CD audio will be mixed evenly at 50% each.
- EFFECT Knob - Turn this 16-position knob to select an effect program from the Playmate Vocalist's digital vocal processor.
When you turn on the unit, you automatically have access to the 16 effects in Bank A. To access Bank B, press and hold the SET button and hit the ON/OFF button. The sixteen positions of the EFFECT knob will then be mapped to Programs 17 - 32.
Bank A contains traditional effects such as reverss and delays. Bank B offers some inventive reversbs, echoes, pitch shifters, distortions
and special effects. See the Effect Quick Reference for descriptions of all the effects.
- EFFECT MIX Knob - Controls the wet/dry mix of the selected effect from 0% to 100% . Turn the EFFECT MIX knob to the right to increase the amount of effect in the signal. Turn the knob to the left to decrease the amount.
The Display will show the percentage of the wet/dry mix as you turn the EFFECT MIX knob.
- VOCAL CANCEL Button - eliminates the lead vocal track from the CD. As you press this button, you'll rotate through Type 1, Type 2, Type 3 and Off vocal cancellation types. Depending on the specific CD, you may find any one of the three types to be most effective.
- OPEN/CLOSE Button - Opens and closes the CD tray.
-
REPEAT Button - Press this button repeatedly to cycle through the four Repeat options:
-
Track - Plays a track and then stops.
- Track Repeat - Plays a track and then plays it again, over and over.
- Disc - Plays the disc and then stops.
-
Disc Repeat - Plays the disc and then plays it again, over and over.
-
TIME DISPLAY Button - Press this button repeatedly to cycle through the four Time Display options.
-
In Total mode, the Display shows the time elapsed on the CD.
- In Total Remain mode, the Display shows the time remaining until the end of the CD.
- In Single mode, the Display shows the time elapsed in the current track.
- In Single Remain mode, the Display shows the time remaining in the current track.
Looping Features
Topics 19 - 22 cover the Playmate Vocalist's looping features. These work together to allow you to define a section of CD audio that you would like to repeat indefinitely. The Playmate Vocalist makes looping easy: simply tell it the locations on the CD at which you want the loop to begin and end, enable the loop, and then sing or play along.
See "Creating a Loop" for more information.
- START Button - This button has two functions: setting the Loop Start and jumping to the Loop Start. To set the Loop Start, hold down the SET button and press START. To jump to the Loop Start, simply press START.
When you first insert a CD, the Loop Start is automatically set to the beginning of the disc (0:00:00).
- END Button - This button also serves two functions: setting the Loop End point and jumping to the Loop End point. To set the Loop End, hold down the SET button and press END. To jump to the Loop Start, just press END.
When you first insert a CD, the Loop Start is automatically set to the end of the disc.
- SET Button - Used in conjunction with the START and END buttons to set the Loop Start and Loop End.
You can also use the SET button in conjunction with the ON/OFF button to access Bank B of the effects processor (press ON/OFF while holding down SET).
- ON/OFF Button - Enables and disables the loop. If the loop is playing when you hit ON/OFF, the CD will continue playing through the end of the loop instead of returning to the Loop Start.
Display
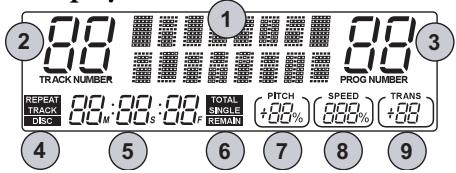
Features of the Display
-
Screen - When you turn the unit on, the screen reads "Alesis Playmate" for a few seconds. It also does the following:
-
During normal playing mode, the screen displays the currently selected effect program.
- When you turn the EFFECT MIX knob, the screen shows the current effect level. This level remains on the screen for a few seconds after you stop turning the knob.
-
When you press the VOCAL CANCEL button, the screen briefly indicates whether Vocal Cancel mode is on or off.
-
TRACK NUMBER Indicator - Shows the number of the currently selected track.
- PROG NUMBER Indicator - Shows the number of the currently selected effect program.
-
REPEAT Indicator - Displays the current Repeat mode:
-
Track - Plays a track and then stops.
- Track Repeat - Plays a track and then plays it again, over and over.
- Disc - Plays the disc and then stops.
-
Disc Repeat - Plays the disc and then plays it again, over and over.
-
Time Display - Shows the current playing time.
- Time Display Indicator- Indicates which of the four Time Display modes is current: Total, Total Remain, Single or Single Remain.
- PITCH Indicator - Shows the current setting of the PITCH knob.
- SPEED Indicator - Shows the current setting of the SPEED knob.
- TRANS Indicator - Shows the current setting of the TRANSPOSE knob.
Creating a Loop
- Insert a CD and press Play.
- Use the Skip button to move to the track where you would like to create the loop.
- Listen to the track and make note of the point at which you would like the loop to begin.
- Use the Scan button to reach a point a few moments before the place you want the loop to start. You may allow the CD to continue playing, or you may pause it to give yourself preparation time.
- Press and hold down the SET Button.
- If you paused the CD, hit PLAY/PAUSE to continue playing. As soon as the CD reaches the point at which you want the loop to begin, hit the START button while holding the SET button. The Loop Start is now set. You may now return to the Loop Start at any time by pressing START.
- Allow the CD to continue to play, or use the Scan button to move to a point a few moments before the point at which you want the loop to end.
- Press and hold down the SET button.
- When the CD reaches the point at which you want the loop to end, hit the END button while holding down the SET button. The Loop End is now set. You may return to the Loop End at any time by pressing END.
- Enable the loop by pressing the ON/OFF button. The Playmate Vocalist will jump to the Loop Start while continuing to play. Every time it reaches the Loop End, it will jump back to the Loop Start.
To disable the loop, press the ON/OFF button again. it will jump back to the Loop Start.
If you skip to another track, the loop will be disabled. The loop start and end points will automatically change to coincide with the start and end points of the new track.
Effect Quick Reference
(To switch between banks, press ON/OFF while holding down SET)
Effect Type
Number and Name
Description
Bank A: Conventional Effects
| Hall Reverb | 1. Small Hall | Simulates the sound of a small concert hall. |
| 2. Medium Hall | Simulates a medium concert hall. | |
| 3. Large Hall | Simulates a large concert hall. | |
| 4. Concert Hall | A warmer and even larger hall reverb. | |
| 5. Reverse Reverb | A reverb that plays in reverse and comes before instead of after the original sound. | |
| Plate Reverb | 6. Classic Plate | A recreation of the classic "plate reverb" produced by vibrating metal plates. |
| 7. Modern Plate | Brighter and thinner than Classic Plate. | |
| 8. Future Plate | Similar to Classic Plate, but larger sounding. | |
| 9. Golden Plate | Similar to Modern Plate, but larger sounding. | |
| Room Reverb | 10. Small Room | Simulates the acoustics of a small room. |
| 11. Medium Room | Simulates the acoustics of a medium-sized room. | |
| 12. Large Room | The full-sounding reverb of a large room. | |
| Delay | 13. Echo 1 | Adds an echo to your vocals. |
| 14. Echo 2 | An echo that has a longer delay time than Echo 1. | |
| 15. Echo 3 | An echo that has a shorter delay time than Echo 1. | |
| 16. Tape Echo | Imitates the classic tape delay created by recording audio to tape and replaying it as an echo. |
Bank B: Radical Effects
| Reverbs | 17. Triggered Reverb | A reverb that doesn't kick in until a certain volume threshold is reached. |
| 18. Ducking Reverb | A “ducking” reverb. The reverb level decreases when the input is loud and increases when the input is quieter. | |
| Echoes | 19. Ducking Echo 1 | A ducking version of Echo 1. The echo level decreases when the input is loud and increases when the input is quieter. |
| 20. Ducking Echo 2 | A ducking version of Echo 2. | |
| Pitch | 21. Multi Chorus | Adds fullness to your vocals by emulating the sound of several voices at once. |
| 22. Schizo Chorus | A frenzied chorus effect. | |
| 23. Easy Flange | Shifts the pitch of the original signal up and down, creating a swirling effect. | |
| 24. Resonant Flange | A flange with wider and quicker shifts in pitch. | |
| 25. Stereo Rotary | The classic sound of an organ's rotary speaker. | |
| Distortion | 26. Walkie Talkie | Distorts your voice so that you sound as if you're singing through a walkie talkie. |
| 27. Distort & Phaser | A distortion effect combined with a phaser, which creates a duplicate signal and delays it slightly. | |
| 28. Distort & Flange | Distortion combined with a flange effect. | |
| Special Effects | 29. Robot Vocal | The name says it all; this one gives your voice an electronic, robot-like tone. |
| 30. Robovox & Reverb | The Robot Vocal effect with reverb added. | |
| 31. Telephone Receiver | Cuts off highs and lows so you sound like you're talking on the telephone. | |
| 32. Decim8ed Filter | A super low-fi, harsh and resonant effect. |
This page intentionally left blank.