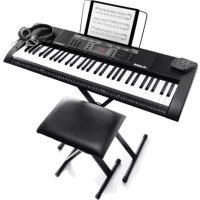
Harmony 61 MK3 - Keyboard ALESIS - Free user manual and instructions
Find the device manual for free Harmony 61 MK3 ALESIS in PDF.



| Product type | Digital keyboard |
| Number of keys | 61 |
| Key size | Standard size |
| Polyphony | 32 voices (estimated) |
| Tones | 100 (estimated) |
| Accompaniment rhythms | 100 (estimated) |
| Power supply | Mains (adapter included) or 6 AA batteries |
| Headphone output | Yes, 6.35mm jack |
| Sustain pedal input | Yes, 6.35mm jack |
| Sustain pedal included | Yes |
| Built-in speakers | Yes |
| Main functions | Transposition, demo, one-key, recording, rhythm programming, metronome, automatic accompaniment (single/fingered chord), dual, split, vibrato, sustain, percussion, fill-in, intro/outro |
| Automatic standby | After 5 minutes of inactivity |
| Display | 3-digit LED |
| Maintenance and cleaning | Use a soft dry cloth; avoid touching the connectors while the computer is connected |
| Safety | Follow the safety instructions provided in the guide |
Frequently Asked Questions - Harmony 61 MK3 ALESIS
User questions about Harmony 61 MK3 ALESIS
0 question about this device. Answer the ones you know or ask your own.
Ask a new question about this device
Download the instructions for your Keyboard in PDF format for free! Find your manual Harmony 61 MK3 - ALESIS and take your electronic device back in hand. On this page are published all the documents necessary for the use of your device. Harmony 61 MK3 by ALESIS.
USER MANUAL Harmony 61 MK3 ALESIS
User Guide (English)
Introduction
Box Contents
Harmony 61 MK3
Headphones
Music Rest
Keyboard Stand
Bench
Sustain Pedal
Power Adapter
User Guide
Safety & Warranty Manual
Support
For the latest information about this product (system requirements, compatibility information, etc.) and product registration, visit alesis.com.
For additional product support, visit alesis.com/support.
Setup
Bench


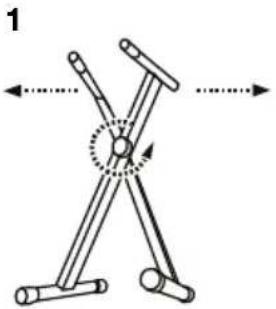
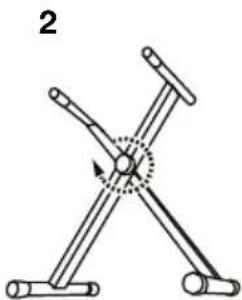
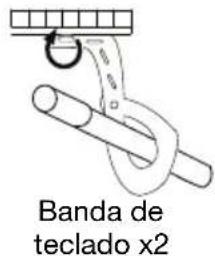
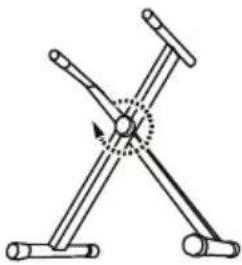
Stand


Connection Diagram
Items not listed in Introduction > Box Contents are sold separately.
Note: Make sure to unplug/remove headphones before moving away from the keyboard.
![graph TD A["Sustain Pedal"] --> B["Rear Panel"] B --> C["Headphones"] B --> D["Power"] B --> E["SUSTAIN"] B --> F["PH"] B --> G["ES"]](/content/2026/04/623090/images/52f24766e1d25d48db6c2963b38e449158ea994cabd9fa0bf6d55b723dd7ab18.jpg)
Features
Top Panel

- Power On/Off: Press this button to turn the keyboard on or off.
- Transpose: Press the Transpose + or Transpose - button to increase or decrease the pitch of the keyboard by a half-step. Press the Transpose + and Transpose - buttons simultaneously to reset to the default value.
- Rhythm Volume: Press the Rhythm Vol + or Rhythm Vol - button to increase or decrease accompaniment rhythm volume. Press the Rhythm Vol + and Rhythm Vol - simultaneously to reset to the default value.
- Chord Volume: Press the Chord Vol + or Chord Vol - button to increase or decrease accompaniment chord volume. Press the Chord Vol + and Chord Vol - buttons simultaneously to reset to the default value.
- Main Volume: Press the Main Vol + or Main Vol - button to increase or decrease the overall volume for the sounds and rhythms. Press the Main Vol + and Main Vol - buttons simultaneously to reset to the default value.
- Tempo: Press the Tempo + or Tempo - button to increase or decrease the speed of the rhythm and chord accompaniment, demo song and/or metronome. Press the Tempo + and Tempo - buttons simultaneously to reset to the default value.
- Demo: Press this button to begin playback of the demonstration songs. Use the number buttons or + or - buttons to select another demonstration song. Press this button again to stop the playback.
- One-Key: Press this button to start the one-key function. This function lets you play along with the demo songs by pressing any key to the rhythm of the song. Use the number buttons or the + or - buttons to select another demonstration song.
- LED Display: Shows the various keyboard functions and numerical values.
- Program: Press this button to program a custom accompaniment rhythm.
- Play: Press this button to playback a custom accompaniment rhythm or recorded song.
- Record: Press this button to record a custom song.
- Tone: Press this button and then use the number buttons or the + or - buttons to select a tone.
- Rhythm: Press this button and then use the number buttons or the + or - buttons to select an accompaniment rhythm.
- Numbers: Use these buttons to select an instrument, rhythm, song, or tempo.
-
Sync: Press the Sync button, and then play the second lowest F# key or lower on the keyboard (corresponding to the chords/notes). The play-along feature starts immediately when playing a key, instead of having to press the Start/Stop button to start it.
-
Start/Stop: Press to start or stop an accompaniment rhythm.
-
Fill In: Press this button to have a temporary rhythm play during the accompaniment rhythm.
-
Single Chord: Press this button to enable the Single automatic chord feature. This feature will generate chords for the accompaniment rhythms based on the keys you play that are the second lowest F# key or lower on the keyboard. The available chords for this function are described in Operation > Accompaniment Rhythm. Press this button again or press the Chord Clear button to disable the chord function.
-
Fingered Chord: Press this button to enable the Fingered automatic chord feature. This feature will generate chords for the accompaniment rhythms based on the keys you play (the second lowest F# key or lower on the keyboard). The available chords for this function are described in Operation > Accompaniment Rhythm. Press this button again or press the Chord Clear button to disable the chord function.
-
Chord Clear: Press this button to turn the Single Chord/Fingered Chord feature off.
-
Sustain: Press this button to activate a sustain effect which simulates a sustain pedal when playing the keyboard. Press this button again to disable the sustain effect.
-
Vibrato: Press this button to activate a pulsating change to the pitch when playing the keyboard. Press this button again to disable to vibrato effect.
-
Dual: Press this button to layer two sounds together. The sound that you were using before pressing the Dual button will be used for one part of the layer. To select the other sound for the layer, enter a number for the sound or use the + and - buttons. Press the Dual button again to disable the dual-tone function.
-
Split: Press this button to split the keyboard into two zones. The sound that you were using before pressing the Split button will be applied to the left-hand side of the keyboard. To select a sound for the right-hand side, enter a number for the sound or use the + and - buttons. Press the Split button again to disable the keyboard split.
-
Percussion: Press this button to play the built-in drum kit and percussion sounds using the keys. Press this button again to disable this function.
-
Intro/Ending: Press this button to play an intro and then start playback of an accompaniment rhythm. Press this button while the accompaniment rhythm is playing to play an outro and then stop playback of an accompaniment rhythm.
-
Beat: Press this button to start the metronome. Press this button again to change the time signature of this button or turn off the metronome.
-
Drum Kit Buttons: Press these buttons to play percussion sounds. See the images on the buttons to note which button plays which type of sound. The Drum Kit Buttons are particularly useful for the Rhythm Programming feature.
Rear Panel
- Sustain: Connect a standard 1/4" (6.35 mm) sustain pedal here.
- Phones: Connect the included headphones here to hear the keyboard and mute the internal speakers.
Note: Make sure to unplug/remove headphones before moving away from the keyboard.
- Power Input: Connect the included power adapter here.

Bottom Panel
- Battery Compartment: Install 6 "AA" batteries here to power the keyboard if you are not using the power adapter.

Operation
Selecting a Tone
To select a tone, press Tone then use the number buttons or the + and - buttons.
To layer two sounds together, press the Dual button. The sound that you were using before pressing the Dual button will be used for one part of the layer. To select the other sound for the layer, enter a number for the sound or use the + and - buttons. Press the Dual button again to disable the dual-tone function.
To split the keyboard into two zones, press the Split button. The sound that you were using before pressing the Split button will be applied to the left-hand side of the keyboard. To select a sound for the right-hand side, enter a number for the sound or use the + and - buttons. Press the Split button again to disable the keyboard split.
Accompaniment Rhythm
To select an accompaniment rhythm, press Rhythm then use the number buttons or the + and - buttons.
To start or stop an accompaniment rhythm, press the Start/Stop button.
To have the accompaniment rhythm play a fill, press the Fill In button.
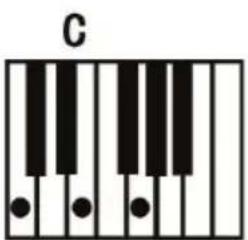
Press the Single Chord or Fingered Chord button to enable the automatic chord features. These features will generate chords for the accompaniment rhythms based on the keys you play that are the second lowest F# key or lower on the keyboard. Press this button again or press the Chord Clear button to disable the chord function.
Single Chord:
When using the Single Chord feature you can use the abbreviated chord shapes shown below starting on any note to play major, minor, seventh, or minor seventh chords.

Fingered Chord:
When using the Fingered Chord feature you can use the full chord shapes shown below starting on any note to play major, minor, seventh, or minor seventh chords.

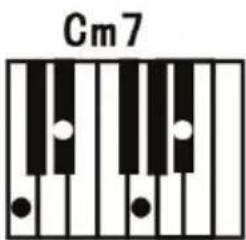

Recording Function
- To record your playing, press the Record button to start recording a song.
- During the recording process, press Play to stop recording and Play again to play the recorded song.
- Press Play again to stop playback.
Note: The recorded song will be erased when recording is started again or when the keyboard is turned off. When the memory is full, the screen will display "FUL", and recording will automatically stop.
Rhythm Programming
To create custom accompaniment rhythms using the keyboard keys:
- Press the Program button and start programming the rhythm by playing each note in the pattern, one at a time.
- Press Play to stop programming and hear the programmed rhythm.
- Press the Program button again to disable the programming function and erase the programming rhythm.
Note: The programmed rhythm will be erased when programming is performed again or if the keyboard is turned off.
Auto-power Off
After 5 minutes of inactivity, Harmony 61 will power off. If you press any button or key, it will turn back on.

Avoid touching the USB port, the headphone output, or the area around these connections while using this keyboard with a computer. This may cause the keyboard to temporarily stop working or act abnormally.
2

3

Soporte

3

4
Funcionamiento
Assistance technique
2


2

3

4

2

3

Supporto
1

2
3

4
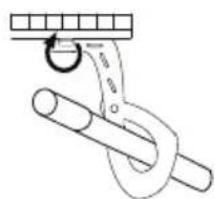
2


Ständer
1

2

3
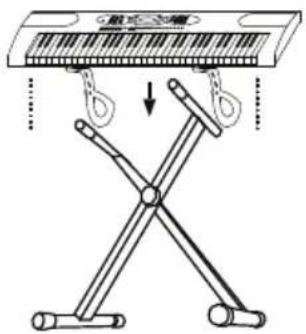
4

Anschlussdiagramm
| 001–039 Piano | 191–206 Reed |
| 040–062 Mallet | 207–221 Pipe |
| 063–083 Organ | 222–245 Lead |
| 084–100 Guitar | 246–258 Pad |
| 101–128 Bass | 259–266 Effects |
| 129–147 Strings | 267–279 Ethnic |
| 148–170 String Ensemble | 280–289 Percussive |
| 171–190 Brass | 290–300 SFX |
Rhythms
| 001–015 Beat | 101–115 Ballad | 201–215 Trap |
| 016–038 Rock&Dance | 116–138 Punk&EDM | 216–238 Metal&House |
| 039–058 Soul&Funk | 139–158 Fusion | 239–258 Swing&Jazz |
| 059–090 Country | 159–190 Folk&Golden | 259–290 Classical |
| 091–100 Pop | 191–200 Modern | 291–300 New Age |
Technical Specifications
| Power | 6 “AA” batteries or included power adapter (9 V DC, 500 mA) |
| Dimensions | 12.4” x 37.4” x 4.1” / 315 x 948 x 105 mm |
| Weight | 11.0 lbs. / 5.0 kg |
Specifications are subject to change without notice.
Trademarks & Licenses
Alesis is a trademark of inMusic Brands, Inc., registered in the U.S. and other countries.
All other product or company names are trademarks or registered trademarks of their respective owners.
alesis.com



- USER GUIDE (ENGLISH)
- INTRODUCTION
- BOX CONTENTS
- SUPPORT
- SETUP
- BENCH
- STAND
- CONNECTION DIAGRAM
- FEATURES
- TOP PANEL
- REAR PANEL
- BOTTOM PANEL
- OPERATION
- SELECTING A TONE
- ACCOMPANIMENT RHYTHM
- SINGLE CHORD
- FINGERED CHORD
- RECORDING FUNCTION
- RHYTHM PROGRAMMING
- AUTO-POWER OFF
- SOPORTE
- FUNCIONAMIENTO
- ASSISTANCE TECHNIQUE
- SUPPORTO
- STÄNDER
- ANSCHLUSSDIAGRAMM
- TRADEMARKS & LICENSES
Brand : ALESIS
Model : Harmony 61 MK3
Category : Keyboard