Airforce 4000 Bazooka Turbo - Blower CECOTEC - Free user manual and instructions
Find the device manual for free Airforce 4000 Bazooka Turbo CECOTEC in PDF.


User questions about Airforce 4000 Bazooka Turbo CECOTEC
0 question about this device. Answer the ones you know or ask your own.
Ask a new question about this device
Download the instructions for your Blower in PDF format for free! Find your manual Airforce 4000 Bazooka Turbo - CECOTEC and take your electronic device back in hand. On this page are published all the documents necessary for the use of your device. Airforce 4000 Bazooka Turbo by CECOTEC.
USER MANUAL Airforce 4000 Bazooka Turbo CECOTEC
Safety instructions 13
-
Parts and components 112
-
Before use 112
-
Assembly 113
-
Operation 114
-
Cleaning and maintenance 115
-
Troubleshooting 115
-
Technical specifications 117
-
Disposal of old electrical and electronic appliances 118
-
Technical support and warranty 119
-
Copyright 119
-
Declaration of conformity 119
SOMMAIRE
EN • The coding in this manual is generic and applies to all code variants of the appliance.
Read these instructions thoroughly before using the appliance. Keep this instruction manual for future reference or new users.
- This appliance is designed for domestic use only and is not intended for bars, restaurants, farmhouses, hotels, motels, and offices.
- If the power cord is damaged, it must be replaced by the official Cecotec Technical Support Service.
- WARNING: To recharge the battery, use only the power supply unit provided with the tool.
-
WARNING:
-
Switch off and disconnect the tool from the mains before cleaning or maintenance.
- Read the instruction manual.
- Do not expose to rain.
- Wear eye protection
-
Keep bystanders away.
-
WARNING: Never allow children, people with physical, sensory or mental limitations or a lack of experience and knowledge and/or people unfamiliar with these instructions to use the tool.
- WARNING: Never operate the tool while people, especially children, or pets are nearby.
- The leaf blower is a tool designed to clean outdoor surfaces, such as gardens and patios, using a powerful air flow to blow leaves and light debris. It is not intended for blowing heavy or wet materials, nor for indoor use.
- Do not overreach and always maintain your balance at all times. Always be sure of your footing on slopes. Walk, never run.
-
WARNING: Do not touch dangerous moving parts before switching off the tool or until they have come to a complete stop.
-
Always wear sturdy footwear and long trousers while operating the tool.
-
Switch off the tool and ensure that it is disconnected from the power supply in the following circumstances:
-
Whenever you stop using the tool.
- Before clearing/unblocking an obstruction.
- Before checking, cleaning or working on the tool.
- Before checking the tool for damage.
-
If the tool starts to vibrate abnormally, stop using it and check immediately for damage.
-
WARNING: Never operate the tool with defective guards or covers, without safety devices, or if the power cord is damaged or worn.
- Do not connect a damaged cord to the power supply or touch a damaged cord before it is disconnected from the power supply, as damaged cords can lead to contact with energised parts at low voltage.
- Keep extension cords away from moving hazardous parts to avoid damage and contact with energised parts.
- Connect the tool only to a power supply circuit protected by a residual current device (RCD) with a tripping current not exceeding 30 mA.
- Avoid using the tool in adverse weather conditions, especially when there is a risk of lightning.
- Do not use the tool on paved, gravel or other loose material surfaces, as the air flow may lift and project objects, causing injury or property damage.
- Stop the tool, remove the battery and allow both to cool down before storing or transporting them.
- Always wear a suitable filter mask in conditions where there is a lot of dust or airborne particles. This will reduce the risk of respiratory problems and protect your health while using the leaf blower.
- Never point the blower nozzle at people, pets or fragile surfaces. The air flow may project particles or objects, causing injury or damage.
IMPORTANT
READ CAREFULLY BEFORE USE.
KEEP IT FOR FUTURE REFERENCE.
- Training
a) Read these instructions carefully. Familiarise yourself with the correct use and operation of the tool.
b) Never allow children or people unfamiliar with these instructions to use the tool. Local regulations may restrict the age of the operator.
c) Please note that the operator or user is responsible for accidents or hazards that may occur to other people or their property.
- Preparation
a) Wear ear protection and safety goggles. Wear them at all times while operating the machine.
b) Always wear suitable footwear and long trousers when using the appliance. Do not use the appliance if you are barefoot or if you are wearing sandals. Avoid wearing loose-fitting clothes or clothes with laces or ties that hang down.
c) Do not wear loose clothing or jewellery that could get into the air intake. Keep long hair away from air intakes.
d) Use the appliance in the recommended position and only on a firm and level surface.
e) Do not operate the appliance on a paved or gravel surface, as ejected material could cause injury.
f) Before using the appliance, always visually check that the bolts and other fixing elements are securely fastened, that the housing is not damaged, and that guards and grids are in place. Replace worn or damaged components in sets to preserve balance of the appliance. Replace damaged or illegible labels.
g) Before using the appliance, check that the power cable and extension lead are not damaged, broken or worn out. If the cable is damaged during use, disconnect it immediately from the power supply. DO NOT TOUCH THE CABLE BEFORE DISCONNECTING THE POWER. Do not use the appliance if the cable is damaged or worn.
h) Never use the appliance in there are people, especially children, or domestic animals nearby.
- Operation
a) Before starting the appliance, make sure that there is no foreign object inside the machine.
b) Keep face and body away from the power inlet opening.
c) Do not insert your hands or any other part of your body or clothing inside the appliance.
d) Keep your feet firmly on the ground and always maintain your balance. Do not lean forward when using the appliance. Keep your body balanced. Never stand higher than the base of the appliance.
e) Always keep away from the material to be blown when using this appliance.
f) When blowing materials, be very careful not to blow pieces of metal, stones, bottles, cans or other foreign objects.
g) If the cutting mechanism hits any foreign object or if the tool starts to make any unusual noise or vibration,
switch off the power supply immediately and allow the machine to stop. Disconnect the machine from the power supply and follow the steps below before restarting and operating the machine:
I. inspect for damage;
II. replace or repair damaged parts;
III. check for loose parts and tighten them.
h) Do not allow processed material to accumulate in the discharge area: this may prevent proper discharge and may cause material to back up through the inlet opening.
i) If the appliance jams, turn off the power supply and disconnect the machine from the power supply before clearing debris.
j) Never use the tool with defective guards or covers, or without safety devices.
k) Keep the power supply clean of debris and other accumulations to prevent damage to the power supply or possible fire.
l) Do not transport this appliance if connected to the power supply.
m) Stop the appliance and unplug it from the socket. Ensure that all moving parts have come to a complete stop
- whenever you stop using the appliance;
- before unblocking or unclogging the tube;
- before checking, cleaning or working on the tool.
n) Do not tilt this appliance when connected to the power supply.
- Maintenance and storage
a) When stopping the machine for maintenance, inspection or storage, or to change an accessory, switch off the appliance, disconnect it from the power supply and
ensure that all moving parts have come to a complete stop. Allow the appliance to cool down before carrying out any inspections, adjustments, etc. Take care of the appliance and keep it clean.
b) Store the appliance in a dry place, out of the reach of children and pets.
c) Always allow the appliance to cool down before storing it.
d) When carrying out maintenance on the tool, please note that even if the power supply is switched off due to the interlocking function of the protection, the machine can still be operated.
e) Replace worn or damaged parts for safety reasons. Only use original spare parts and accessories.
f) Never attempt to override the protection lock.
The symbols used by this tool are shown below. Make sure you understand their meaning before using the tool.
| Symbol | Meaning |
 | Read all instructions carefully before operating the appliance.Follow all warnings and safety instructions. |
 | Do not expose to rain or damp places. |
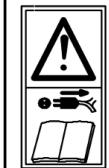
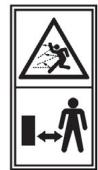




Warning: Before cleaning or servicing the appliance, disconnect it from the mains.
Danger: Beware of thrown objects. Keep bystanders away.
Always wear eye protection.
Use hearing protection.
Wear safety footwear.
INSTRUCTIONS DE SÉCURITÉ
- Concentrator and diffuser accessory
- Blower tube
- Power icon
- Turbo function icon
- Battery
- Battery release button
- Base
- Blower tube release button
NOTE:
The graphics in this manual are schematic representations and may not exactly match the product.
2. BEFORE USE
- This appliance is packaged in a way as to protect it during transport. Take the appliance out of its box and remove all packaging materials. You can keep the original box and other packaging elements in a safe place to prevent damage to the appliance if you need to transport it in the future. In case the original packaging is disposed of, make sure all packaging materials are recycled accordingly.
- Make sure all parts and components are included and in good conditions. If there is any piece missing or in bad conditions, contact the official Cecotec Technical Support Service immediately.
- Do not remove the serial number of the appliance in order to keep a correct traceability of it in case of assistance.
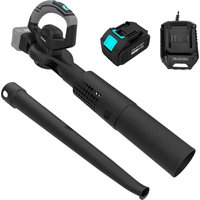
Box content
- Leaf blower
- Battery
- Charger
- Blower tube
- Concentrator accessory
- Diffuser accessory
- Instruction manual
3. ASSEMBLY
Installing the blower tube
Warning: Before carrying out any maintenance or repair work on the tool, make sure that it is switched off and that the battery has been removed.
- To install the blower tube, insert it into the front opening of the leaf blower until the tabs snap into the corresponding slots and the tube locks into place. Fig. 2
- To remove it, press and hold the corresponding release button and then pull the blower tube out. Fig. 3
- If you wish to increase the air flow or focus the air to larger areas, install the concentrator or diffuser accessory. Fig. 4
- To do this, align the tabs on the accessory with the slots in the front opening of the blower, then rotate it until it locks into place. Fig. 5
Installing and removing the battery
Warning: The battery comes discharged from the factory. Before using the blower for the first time fully charge the battery.
To avoid injury and reduce the risk of fire or electric shock, follow the recommendations below:
- Replace the battery or charger immediately if the battery casing or charger cable is damaged.
- Before carrying out any maintenance or repair work on the tool, make sure that the battery has been removed.
- Installing the battery
To install the battery, align the guides with those on the tool and fit it into the bottom of the handle. Then slide it all the way forward until it locks into place. Fig. 6
- Removing the battery
- Press and hold the battery release button. Fig. 7
- Hold the blower firmly and remove the battery from the handle by pulling it out. Fig. 8
NOTE:
- If the battery cracks or breaks, whether or not it leaks, do not recharge or use it. Dispose of it and replace it with a new battery. DO NOT ATTEMPT TO REPAIR IT.
- Do not attempt to disassemble or destroy any of the battery components.
- Do not attempt to open the battery.
- If the battery leaks, the electrolytes released are corrosive and toxic. Do not allow the solution to come into contact with your eyes or skin or ingest it.
4. OPERATION
WARNING: Read and fully understand all instructions and safety warnings before using this blower. Failure to do so may result in serious injury or death. Do not allow anyone who has not read this manual to use the blower. A blower can be dangerous if improperly assembled or used. Do not use this blower if you have any doubts or questions about its safe operation.
Switching on/off the blower
- Install the battery.
- Press the power icon to switch on the tool.
- To adjust the air flow rate, press the blowing power selection icon.
- When the blower is not in use and you wish to switch it off, press the power icon again.
Blower use
You can use the blower for a wide variety of tasks:
- Blowing debris, such as leaves and grass clippings, from driveways, pavements, patios, yards, gardens, car parks, etc.
- Sweep and accumulate fallen leaves and grass clippings in piles.
- Clean residues from surfaces such as corners, joints and bricks.
Charging the battery in the charger
- First, remove the battery from the blower by pressing and holding the button in figure 9.
- Slide the battery out as shown in figure 10 to remove it from the charging device.
- Next, place the battery in the charger by aligning it as shown in figure 11. Slide the battery down into the charger making sure that the terminals match and the battery fits correctly.
- Start charging by connecting the charger to the mains socket.
- Check that the indicator light on the charger illuminates, which will confirm that the battery is correctly connected and starting to charge.
- Once the battery is fully charged, disconnect the charger from the power supply.
- Remove the battery from the charger.
Note: For charging, try to keep the temperature within the 5-40 °C range.
Charging status indicator light
- Charge available: the indicator light will turn on green and remain steady.
- Charging: the indicator light will turn on red and remain steady.
- Charging completed: the indicator light will turn on green and remain steady.
- Charger damaged: the indicator light does not light up.
- Battery damaged or low charge level: the indicator light will flash green and red alternately.
5. CLEANING AND MAINTENANCE
Warning: To avoid personal injury and reduce the risk of fire and electric shock, remove the battery before cleaning or servicing.
- Remove the battery.
- Use compressed air or a vacuum cleaner to remove dust and dirt from the air outlet. Make sure that there are no obstructions, such as sawdust or wood chips, in the air outlet.
- Do not spray the tool with water or immerse it in any other liquid.
- Clean the blower housing and accessories with a soft, damp cloth.
- Do not use solvents or abrasive cleaning products to clean the housing or accessories, as they may damage the tool and cause electric shock.
Battery
- Charge the battery fully before storing.
- If you do not use the blower frequently, remove the battery and make sure to charge it every six months. This will extend the lifespan of the battery.
- When the green indicator light lights up, remove the battery from the charger and disconnect the latter from the mains.
- Before storage, remove the battery from the tool. Store the battery in a cool, dry place.
- Keep the tool out of the reach of children.
Charger
- Keep the charger clean. Do not allow dirt to come into contact with the load terminals. Clean it with a dry cloth. Do not use solvents or water.
- Unplug the charger when not charging the battery.
- Store the charger at room temperature. Do not store in places where the temperature is too high. Store in a cool, dry place away from direct sunlight and moisture.
- Charge the battery at a room temperature between 5 °C and 40 °C. If the battery has overheated, allow it to cool down before recharging.
- During charging, keep the charger out of the reach of children and pets to avoid the risk of electric shock or fire.
- Do not use the charger near flammable gases or liquids.
- Make sure that the rated mains voltage corresponds to the voltage indicated on the charger's rating plate.
6. TROUBLESHOOTING
In case the tool does not work properly, please refer to the following troubleshooting table. If you cannot solve the problem, contact the official Cecotec Technical Support Service.
Note: It is recommended to fully charge the battery before each use to ensure optimal performance.
| Problem | Cause | Solution | |
| The tool does not work. | The indicator light flashes twice. | Battery voltage is too low. | Replace or charge the battery. |
| The indicator light flashes three times. | Battery voltage is too high. | Replace the battery. | |
| The indicator light flashes four times. | Motor stalled. | Disassemble the motor and check that it is not jammed. | |
| The indicator light flashes five times. | The temperature of the control board is too high. | Switch off the tool and let it cool down for ten minutes before using it again. | |
| When pressing the power icon, the indicator light does not turn on. | Open circuit on control board or internal wiring. | Replace the control board or check the internal wiring. | |
| The battery does not charge.Check whether the indicator light turns green when the charger is connected to the mains. Protection against overheating. | Battery voltage is too low. | Check the battery charging indicator light:1. A bar indicates that the charge level is low.2. Two bars indicate 50% charge.3. Three bars indicate full charge. |
| 1. If it turns on normally, place the battery in the charger and make sure the indicator light changes to red.2. Once the battery is fully charged, the indicator light on the charger will turn on green and remain steady. | ||
| Wait half an hour after the battery is fully discharged before recharging it. Once the battery is fully charged (the indicator light will change from red to green), wait another half hour before using it. |
7. TECHNICAL SPECIFICATIONS
Product reference: EU01_102510
Product: AirForce 4000 Bazooka Turbo Leaf blower
Maximum idle speed: 168 km/h
Vibration level: 2.25 m/s 4
Uncertainty: 1.5 m/s 4
Air speed;
Low speed: 136 km/h
High speed: 200 km/h
Air volume;
Low speed: 601 m³/h
High speed: 742 m³/h
A-weighted sound pressure level at operator position: 88.13 dB(A)
Uncertainty: 3 dB
A-weighted sound power level: 100.85 dB(A)
Uncertainty: 3 dB
Weight (without battery): 1.88 kg
Weight (with battery): 2.465 kg
Charger model: EA036-2150-1200WG
Charger input: 100-240 V\~, 50/60 Hz, 0.8 A
Charger output: 21.5 V DC, 1.2 A
Battery: 21 V, 4000 mAh, 84 WH
Only use with the supplied Cecotec battery.
Technical specifications may change without prior notification to improve product quality.
Made in China | Designed in Spain
8. DISPOSAL OF OLD ELECTRICAL AND ELECTRONIC APPLIANCES

This symbol indicates that, according to the applicable regulations, the appliance and/or batteries must be disposed of separately from household waste. When this product reaches the end of its shelf life, you should dispose of the cells/batteries/accumulators and take them to a collection point designated by the local authorities.

For detailed information on the most appropriate way to dispose of electrical and electronic equipment and/or batteries, consumers should contact their local
authorities.
Compliance with the above guidelines will help protecting the environment.
9. TECHNICAL SUPPORT AND WARRANTY
Cecotec shall be liable to the end user or consumer for any lack of conformity that exists at the time of delivery of the product under the terms, conditions and deadlines established by the applicable regulations.
Repairs should be carried out by qualified personnel.
If at any moment you detect any problem with your product or have any doubt, do not hesitate to contact the official Cecotec Technical Support Service at +34 96 321 07 28.
10. COPYRIGHT
The intellectual property rights over the texts in this manual belong to CECOTEC INNOVACIONES, S.L. All rights reserved. The contents of this publication may not, in whole or in part, be reproduced, stored in a retrieval system, transmitted, or distributed by any means (electronic, mechanical, photocopying, recording or similar) without the prior authorization of CECOTEC INNOVACIONES, S.L.
11. DECLARATION OF CONFORMITY
MANUFACTURER: CECOTEC INNOVACIONES S.L
ADDRESS: Av. Reyes Católicos, N°60, 46910, Alfafar, Valencia (Spain)
DESCRIPTION: Leaf blower
PRODUCT IDENTIFICATION: AirForce 4000 Bazooka Turbo
FUNCTION: Battery-powered leaf blower
MODEL: EU01_102510
It certifies the appliance described has been designed, manufactured and tested and complies with all applicable provisions.
EU DIRECTIVES IMPLEMENTED:
- Directive 2006/42/CE on machinery.
- Directive 2014/30/EU on the harmonisation of the laws of the Member States relating to electromagnetic compatibility.
- Directive 2011/65/EU and delegated directive (EU) 2015/863 on the restriction of the use of certain hazardous substances in electrical and electronic equipment.
APPLICABLE HARMONISED NORMS:
- EN 60335-1:2012 +A11:2014 +A13:2017 +A14:2019 +A1:2019 +A2:2019 +A15:2021
- EN 50636-2-100:2014
- EN ISO 12100:2010
- EN 62233:2008
- EN IEC 55014-1:2021
- EN IEC 55014-2:2021
- IEC 62321-1:2013; EN IEC 62321-2:2021; IEC 62321-3-1:2013; IEC 62321-4:2013+A1:2017; IEC 62321-5:2013; IEC 62321-6:2015; IEC 62321-7-1:2015; IEC 62321-7-2:2017; IEC 62321-8:2017.
1. PIÈCES ET COMPOSANTS
Image 1
- IEC 62321-1:2013; EN IEC 62321-2:2021; IEC 62321-3-1:2013; IEC 62321-4:2013+A1:2017; IEC 62321-5:2013; IEC 62321-6:2015; IEC 62321-7-1:2015; IEC 62321-7-2:2017; IEC 62321-8:2017.
1. ONDERDELEN EN COMPONENTEN
Figuur 1
6. PROBLEEMOPLOSSING
- IEC 62321-1:2013; EN IEC 62321-2:2021; IEC 62321-3-1:2013; IEC 62321-4:2013+A1:2017; IEC 62321-5:2013; IEC 62321-6:2015; IEC 62321-7-1:2015; IEC 62321-7-2:2017; IEC 62321-8:2017.
1. CZĘŚCI I KOMPONENTY
Rysunek 1
Akumulator: 21 V, 4,000 mAh, 84 WH
- IEC 62321-1:2013; EN IEC 62321-2:2021; IEC 62321-3-1:2013; IEC 62321-4:2013+A1:2017; IEC 62321-5:2013; IEC 62321-6:2015; IEC 62321-7-1:2015; IEC 62321-7-2:2017; IEC 62321-8:2017.
Fig./Img./Abb./Afb./Rys.1
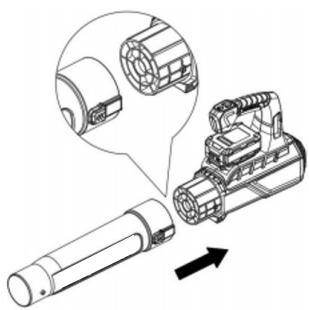
Fig./Img./Abb./Afb./Rys.2

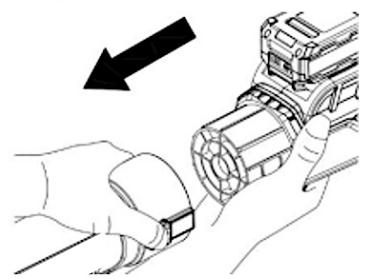
Fig./Img./Abb./Afb./Rys. 3
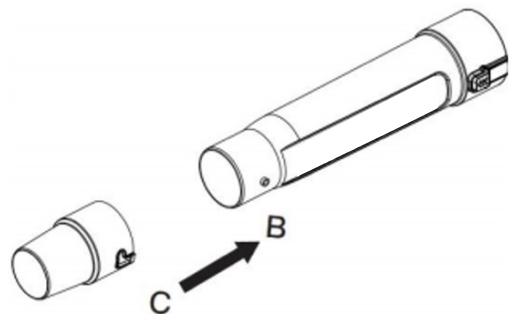
Fig./Img./Abb./Afb./ Rys. 4
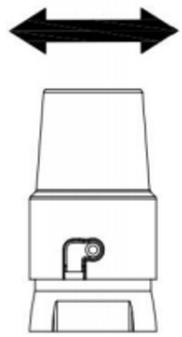
Fig./Img./Abb./Afb./Rys.5


Fig./Img./Abb./Afb./Rys. 6

Fig./Img./Abb./Afb./ Rys. 7
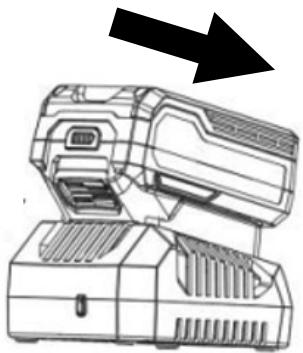
Fig./Img./Abb./Afb./ Rys. 10

Fig./Img./Abb./Afb./Rys. 8

Fig./Img./Abb./Afb./ Rys. 11

Fig./Img./Abb./Afb./ Rys. 9
www.cecotec.es


- SOMMAIRE
- IMPORTANT
- READ CAREFULLY BEFORE USE
- KEEP IT FOR FUTURE REFERENCE
- INSTRUCTIONS DE SÉCURITÉ
- BEFORE USE
- BOX CONTENT
- ASSEMBLY
- INSTALLING THE BLOWER TUBE
- INSTALLING AND REMOVING THE BATTERY
- INSTALLING THE BATTERY
- REMOVING THE BATTERY
- NOTE
- OPERATION
- SWITCHING ON/OFF THE BLOWER
- BLOWER USE
- CHARGING THE BATTERY IN THE CHARGER
- CHARGING STATUS INDICATOR LIGHT
- CLEANING AND MAINTENANCE
- BATTERY
- CHARGER
- TROUBLESHOOTING
- TECHNICAL SPECIFICATIONS
- DISPOSAL OF OLD ELECTRICAL AND ELECTRONIC APPLIANCES
- TECHNICAL SUPPORT AND WARRANTY
- COPYRIGHT
- DECLARATION OF CONFORMITY
- EU DIRECTIVES IMPLEMENTED
- APPLICABLE HARMONISED NORMS
- PIÈCES ET COMPOSANTS
- IMAGE 1
- ONDERDELEN EN COMPONENTEN
- FIGUUR 1
- PROBLEEMOPLOSSING
- CZĘŚCI I KOMPONENTY
- RYSUNEK 1
Brand : CECOTEC
Model : Airforce 4000 Bazooka Turbo
Category : Blower